Shizuoka Seiki VAL6 MPX User manual
English
• ThisOwner’sManualprovidesimportantinformationonproperhandling,operation,andmaintenance.FAILURETOFOLLOW
THEINSTRUCTIONS,PRECAUTIONS,ORSAFETYTIPSINTHISMANUALAUTOMATICALLYVOIDSALLWARRAN-
TIES,EXPRESSORIMPLIED.
• FAILURETOCOMPLYWITHTHE INSTRUCTIONS,PRECAUTIONS,ANDSAFETYTIPS INTHISMANUALCANRE-
SULTINDEATH,SERIOUSBODILYINJURYANDPROPERTYLOSSORDAMAGEFROMHAZARDSOFFIRE,EXPLO-
SION,BURN,ASPHYXIATION,CARBONMONOXIDEPOISONING,AND/ORELECTRICALSHOCK.
• ReadandthoroughlyunderstandthisOwner’sManualbeforeusingtheheaterinanyway,includingunpacking,assembling,fuel-
ing,inspecting,lighting,operating,adjusting,turningoff,coolingdown,moving,orstoringtheheater.
• PleasekeepthisManualfortheuser’sneedandreference.
•DonotallowanyonewhohasnotreadandunderstoodthisOwner’sManualtoassemble,inspect,light,operate,adjust,turnoff,
cooldown,refuel,move,orstoretheheater.
• Therequirementsoflocalauthoritieshavingjurisdictionshallbefollowed.
•Theinstallationoftheunitshallbeinaccordancewiththeregulationsoftheauthoritieshavingjurisdiction.
IMPORTANT
1. Special precautions ........................................... 2
2. Names of components ...................................... 6
3. How to use .......................................................... 7
3-1. Preparation for operation ......................... 7
3-2. Operating procedures ............................... 9
3-3. How to connect the Control Device ....... 10
3-4. Use of the Heat Shielding Mat ................. 11
3-5. Operation with Portable Generator ........ 11
4. Inspection ......................................................... 11
4-1. Daily inspection ........................................ 12
4-2. Periodic inspection .................................. 13
5. How to replace the Nozzle & Fuse ................. 13
6. How to store the heater ................................... 14
7. Troubleshooting ............................................... 15
8. Specications .................................................. 16
9. Safety labels ..................................................... 17
WARRANTY POLICY ............................................ 18
Contents
Owner’s Manual
VAL6_MPX_En.indd 1 2016/09/16 18:54

2
1Special precautions
Thank you for having bought our Infrared Oil Heater “VAL6”.
■Following signs, used throughout this Manual, are dened as follows:
Important Notice
◆ThisManualexplainsnecessaryprecautionsthatmustbestrictlyfollowedforproperandsafeop-
eration.Precautionsaredividedinto3categories Danger, Warning,and Caution.Pleaseread
andunderstandwellthedetailsandmeaningsofeachcategory.
*Dependinguponthecircumstances,eventhecategoryof“CAUTION”canleadtogravedamagetopersonsand/or
property.Cautionandrecommendationlistedineachcategoryareequallyimportantforsafeoperation,sobesureto
followtheprecautionsinall3categories.
WARNING
● Whenoperatingorservicingthisheater,pleasefollowallinstructionsdescribedinthisManual.
● Whenreplacingparts,useonlythegenuinepartsmadeorapprovedbythemanufactureroftheheater.Pleasenotethatweshallnotbeheld
responsibleorliableforanydamageoraccidentthatresultsfromusinganyunapprovedornon-genuineparts.
● Weshallnotbeheldliableorresponsibleforanydamageoraccidentthatresultsfromdisobeyingornotproperlycarryingoutanyinstruc-
tionsinthisManual,orfromtheimpropermodicationoroperationoftheheater.
● TheStateofCaliforniarequiresthefollowingwarning:
WARNING:COMBUSTIONBY-PRODUCTSPRODUCEDWHENUSINGTHISPRODUCTCONTAINCARBONMONOXIDE,ACHEMI-
CALKNOWNTOTHESTATEOFCALIFORNIATOCAUSECANCERANDBIRTHDEFECTS(OROTHERREPRODUCTIVEHARM).
1.
Aswecannotpredicteverypossiblesituationofdangerwhileoperatingthisheater,thecontentsdescribedinthisManualcouldnotfully
foreseeawholerangeofpossibledangers.So,whenoperatingordoingdailyinspection(tothisheater),pleasepayfullattentionnotonlyto
thecontentsofthisManualandtheLabelsontheheateritself,andalsobeconstantlyalertforfactorsthatmightaffectthesafeoperationof
theheater.DonothesitatetostopoperationandcontactyourdealerifyouhaveanyquestionsaboutanymatternotdiscussedinthisManual.
2.Ifyouhaveanyquestionorwanttoknowmoredetailedinformationabouttheheater,pleasecontactyourdealer.
3.Ifanyirregularormissingpage(s)isfoundinthisManual,pleasecontactyourdealerandwewillexchangeitwithanewone.
4.PleasekeepthesetofStandardPartssuppliedwiththeheater.
5.Theoperatoroftheheaterisresponsibleforwarninganyonewhoworksaroundtheheaterorcomesneartheheaterofthedangersofthe
heaterandthesafetyprecautionsthatmusttherebybetakenpursuanttothisManual.
“DANGER” means that failure to follow the given precaution (s) may lead
to death, serious injury and/or major re.
“WARNING” means that failure to follow the given precaution (s) may
likely result in death, serious injury, re and/or possible explosion.
“CAUTION” means that failure to follow the given precaution (s) may re-
sult in serious injury and/or property damage.
DANGER
WARNING
CAUTION
Prohibited
(This indicates “actions that are strictly forbidden”.)
Mandatory
(This indicates “actions or instructions” that must be carried out.)
Caution
(This indicates “actions” that require careful attention)
Purpose of this Owner’s Manual
ThisManualaimstosupplytheuserwithdetailedinformationonhowtoproperlyuse,operateandservicethisVAL6Heater.
VAL6_MPX_En.indd 2 14/04/03 9:39
3
English
* It is important that the safety precautions listed below are understood and followed prior to rst
operation of the heater. These precautions must also be followed thereafter.
To Help Ensure Safe Operation, Comply with the Following Precautions
DANGER
1Use of gasoline
prohibited
Never use gasoline, for any purpose, for example, for cleaning or as fuel, in
connectionwith,oraround,operationorstorageoftheheater,asareand/or
explosionmayresult.
2Use of amma-
bles prohibited
Never use or store the heater where thinner, gasoline, liquid propane gas, or
otherhighlyammablevapors,etc.,arepresent,becausethesemayleadtoex-
plosionorre.
3Ventilation
required
Neverusetheheaterinpoorlyventilatedareas.Poorventilationallowsabuild-
upofcarbonmonoxideproducedbytheheater,especiallyifthereisalsoinad-
equatecombustion.CARBONMONOXIDEisacolorlessandodorlesspoison-
ousgasthatmayleadto death orotherinjury.Alwaysprovideafresh supply
ofoutsideorcirculatingairwhenevertheheaterisused.Somepeoplearemore
affectedby carbonmonoxide than others,including pregnant women,persons
withheartdisease,lungdisease,anemia,and/orundertheinuenceofalcohol.
Highaltitudealsocreatesahigherdangerofsusceptibilitytocarbonmonoxide.
Dangersignsthatapersonmaybesufferingfromcarbonmonoxidepoisoning
include,headache,dizziness,burningeyesandnose,nausea,anddrymouthor
sore throat. If any of these symptoms occur, immediately seek medical atten-
tion, ventilate the area, and turn the heater off.This heater requires approxi-
matelyatleast2,800cm2(3.06ft2)openingperunitwhenitisusedindoor.
1
2
3
5
6
WARNING
Keep aerosol contain-
ers away from the
heater
Neverplacesealed,pressurizedcontainers(suchasaerosolcans)neartheheat-
erasexposuretoheatfromtheheatermaybuilduppressureinthecontainer
andcauseittoexplodewithdeadlyforce.
Never use the heater
where ammable
dusts are present
Neveroperatetheheaterwherehighlyammabledusts(ofwood,paper,tex-
tile, etc.) are present. Dusts, after sucked and heated by the heater, will be
blownout“sparked”andcauseare.
Be careful of hot sur-
faces on and around
the heater
Portionsoftheheater(bothwhiletheheaterisinoperationandfor30minutes
ormoreaftertheheateristurnedoff),arehottothetouchandmayburnthe
skin and/or ignite clothing and other combustible materials.Avoid touching
theburnerandnearbyareaswhiletheheaterisinoperationandforatleast30
minutesafteritisturnedoff.Alsodonotmoveorservicetheheaterwhileitis
operatingorhot.
Modication of the
heater prohibited
Never modify the heater by any means.Any modication may increase the
chanceofburns,res,explosions,orotherproblemsbefore,during,andafter
operationoftheheater.
Be careful of electri-
cal shock
To avoidelectrical shock, never use the heater whereexposed to rain, snow
orhighhumidity. Iftheheaterorany part of itbecomesimmersedinwater,
immediatelycontact a qualied service agencyto inspect the heater andde-
termineifanythingneedstobereplacedpriortofurtheroperation.Makesure
thepowerplugisdisconnectedfromtheelectricaloutlet,beforestartingdaily
inspectionandmaintenance.
4Do not service the
heater while burning
Donotserviceorhandletheheaterwhileburning,inoperation,hotor
plugged-intoavoidanyinjuryand/ortrouble.
7
Never use the heater
for any residential
application
Thisheaterisforindustrialuseonly.Neverusetheheaterforanyresidential
applicationatalltime.Wronguseofthisheatercanresultinpotentialdeath,
seriousinjury,reand/orpossibleexplosion.
VAL6_MPX_En.indd 3 14/04/03 9:39

4
To Help Ensure Safe Operation, Comply with the Following Precautions
CAUTION
2
3
Do not block the
heater
To avoid a re, never place any object within one (1) meter (3.28 feet) from (the
front of) the radiation disk.
Do not try to ignite
the heater more than
3 times in a row
If the heater does not ignite the rst time, do not try to ignite more than two more times
in a row thereafter because a re may result. If the heater does not ignite after the third
attempt, stop trying and consult your dealer prior to further operation of the heater.
1
Keep flammable ma-
terials away from the
heater
To avoid a re, please keep all ammables more than 2.5m (8.2ft.) away from
the front of the radiation disk, and more than 2m (6.56ft.) away from all sides
(left/right and top/rear) of the heater.
5
Placing the heater on
combustible matter or
ooring is prohibited
The heater is for use on non combustible matter or ooring only unless the
shielding mat, part #503002-05001 is used.
Materials of shielding mat : glass cloth and aluminum lm
Dimension of shielding mat : 1200 x 1200 x (3.5) mm (L x W x H)
6
7
8
9
10
Operation of the heater
when either the heater or the
operator is wet is prohibited
Do not use the heater where it is exposed to water, e.g, rain or snow, and do
not operate the heater with wet hands or if it becomes wet. Water contact may
cause an electric shock or other danger or malfunction.
Do not use the heater
in high altitudes
When the heater is used in an altitude higher than 1000m (3000 ft) above sea
level, some adjustments will be required. Please contact your dealer about the
adjustments. The heater, if not duly adjusted, may cause a re.
Stop using the heater
when anything ir-
regular is found
If a burning smell or smoke occurs during operation of the heater, immediately
turn off the heater and consult your dealer. Further operation may result in a
re or other hazard.
Do not move the heater
while in operation
Moving the heater while it is on or otherwise in operation is prohibited. Move-
ment may result in a re, especially if the heater is overturned or unbalanced.
Turn the heater off by
operation switch
Be sure to shut off the heater by switching off. Do not stop the heater by un-
plugging. Doing so may cause trouble in the heater.
11 Turn off while refuel-
ing
Never rell the fuel tank when the heater is on or it is still hot. Refueling while the
heater is still operating or hot may cause a “ash back” of ames to the fuel container
or other hazard, causing serious injury and/or property damage. For the same reason,
refueling should only be done outdoors and away from any open ame. In addition,
spilling fuel on a carpet while refueling or otherwise creates an additional re hazard.
4Do not leave the heater unattended while it is in operation or cooling down so
that unexpected problems, such as re, can be dealt with immediately.
12
13
14
15
Use only the correct
voltage
Only electrical voltage and frequency specied on the model plate must be
used, to avoid a re, electrical shock and/or damage.
Ground the heater
before operation
Do not pull out the
power plug by pulling
on the power cord
Do not damage the
power cord
When disconnecting the power cord, always pull out the plug, never the cord,
to unplug the cord. To pull out the cord may damage the cord itself and result
in re through electrical shock or short circuit.
Do not place excessive force on the cord by bending, pulling, twisting, pinch-
ing or remodeling. Also, do not place any heavy objects on the heater, etc. that
may damage it, to avoid a re and electric shock.
Prior to operation, conrm that the heater is properly connected to a grounded
power cord and outlet. Attempting to use or operating the heater without prop-
er grounding may result in dangerous electrical shock.
Do not operate the
heater unattended
VAL6_MPX_En.indd 4 2016/09/08 10:57
5
English
CAUTION
20
21
Do not operate in ex-
treme temperatures
Make sure that the heater operates at temperatures between –20o and 40oC (–4o
and 104oF). If the heater operates at more than 40oC (104oF), the heater will
overheat and result in re.
Provide the Owner’s
Manual to the new
owner
If the heater is sold or given to a new owner, make sure that this Owner’s
Manual is transferred to the new owner along with the heater.
22 Do not use fuel of low
quality Do not use fuel of low quality such as discarded oil or fuel mixed with water.
23
Be careful when
moving or storing the
heater
When the heater is moved or stored, it must be in a level position to avoid a
leakage of fuel.
16 Use gloves When cleaning the heater, use gloves, to avoid any injury to hand or ngers.
Use of gloves while operating and moving the heater is also recommended.
17
18
19
Make sure the flame
is extinguished and
the power off before
leaving the heater un-
attended
After shutting off the heater, make sure that the ame is extinguished and the
power disconnected before leaving the heater unattended. It is also not safe
to leave the heater unattended while it is cooling off or to leave it in any area
where children are present or may come upon it.
Do not dispose of the
heater illegally
When you dispose of the heater, please do not dispose of it illegally and con-
sult your local authorities or specialists on how to properly dispose of it.
Do not use the heater
in the following places
or conditions
To prevent accident or injury, do not use the heater in the following places or
under the following conditions:
• On vibrating, trembling, or unstable ooring
• On ladders, scaffolds, or sawhorses
• On any oor that is slanted, sloped, or not level
• On stairs or anywhere where it might block access to emergency exits
• Near unstable or stacked materials
•
In windy, humid, or dusty areas, and areas where metal particles are present
• In areas where the ow of people or vehicles is impeded or obstructed
Always use caution in determining where to place the heater for use or storage
and take into account both present and potential future dangers.
24 Keep away from chil-
dren
The heater should not be used, cooled, or stored where children could have ac-
cess to it. The heater must not be ignited, operated, maintained, attended to, or
otherwise used in any way by children.
25
Children or the hand-
icapped are not to
operate this heater
This heater is not to be operated by children or physically handicapped or
person without proper knowledge and experience unless they have been given
proper supervision or instruction.
26
27
Never look directly
straight into the ra-
diation disk
Do not use the heater
in an environment subject
to corrosive gas.
While the heater is in operation, avoid looking straight into the radiation disk.
It may cause eye injury.
Do not use the heater in an environment subject to corrosive gas.
(Ex. ammonia arising from livestock barn)
Parts can become corroded and cause unit to operate improperly.
To Help Ensure Safe Operation, Comply with the Following Precautions
VAL6_MPX_En.indd 5 2016/09/08 10:57
6
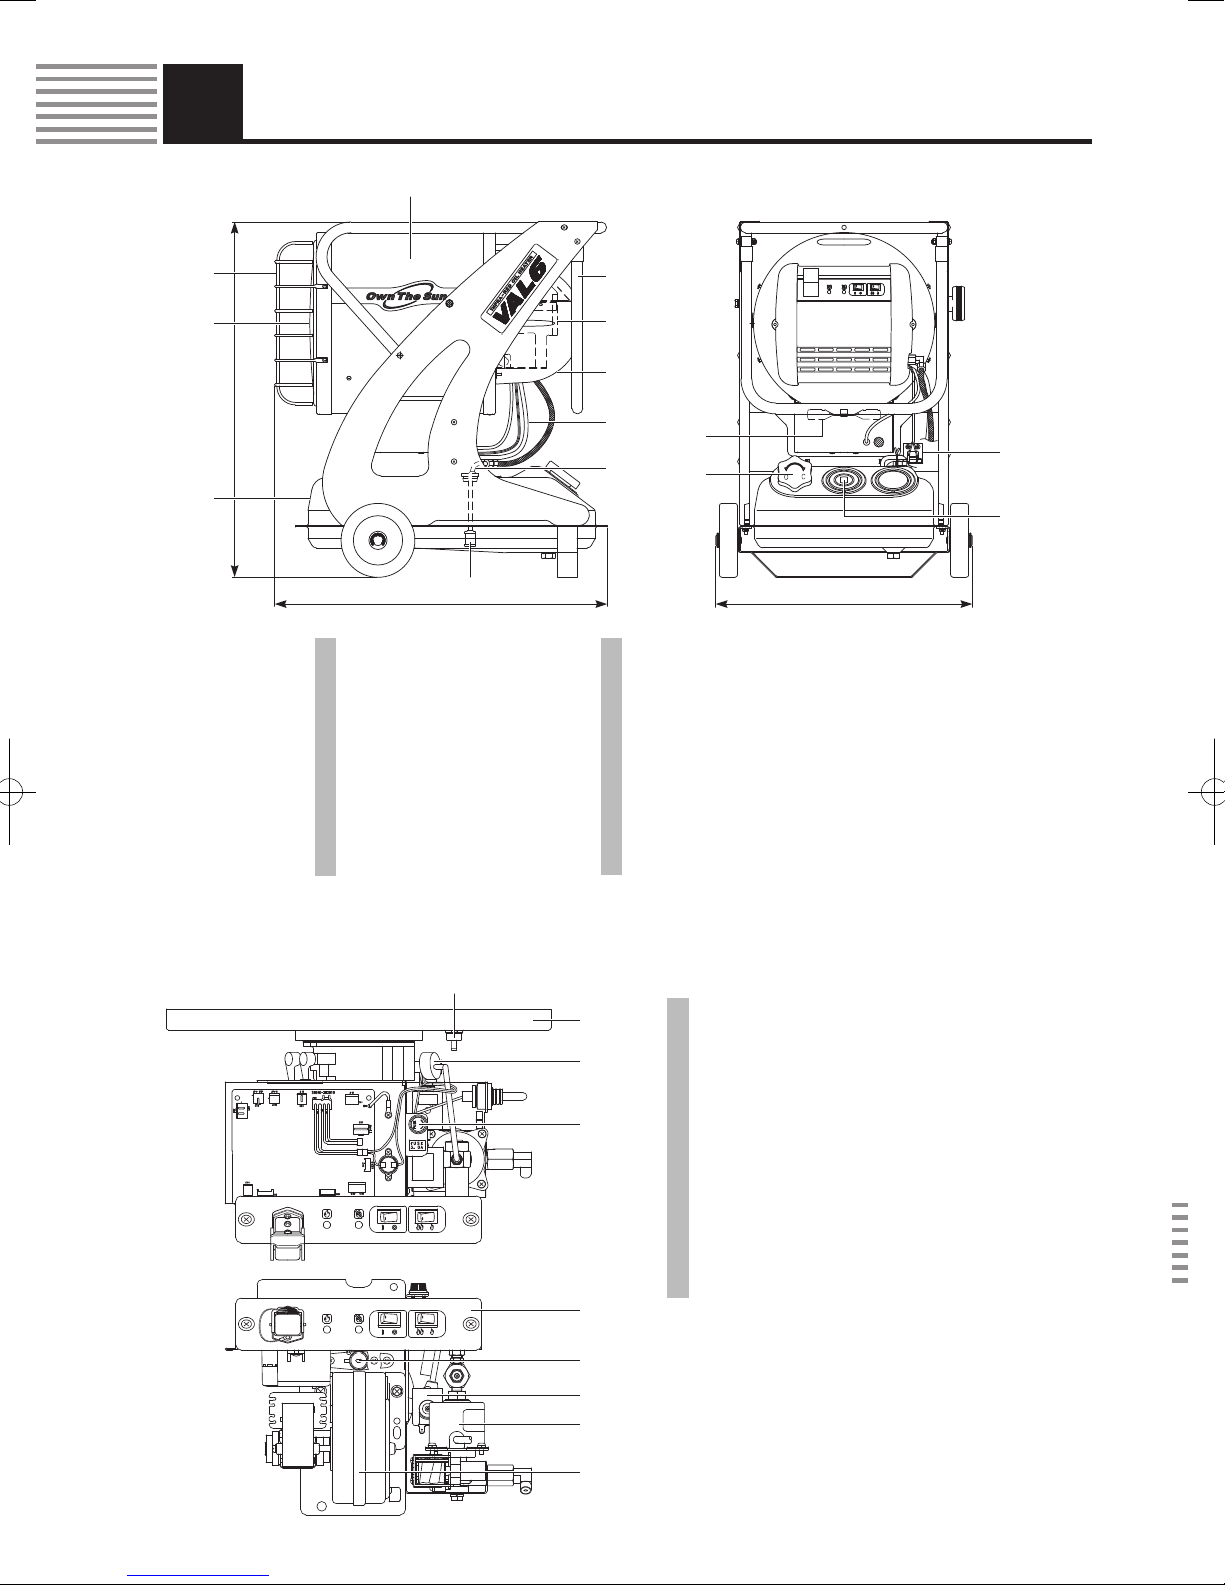
2Names of components
721.6
677.6 521.8
r
w
q
y
o
!3
t
!1
!4
i
!0
e
u
!2
!5 Insulating Board
!6 Overheat Prevention System
!7 Fuse
!8 Flame Monitor
!9 Fan Motor
@0 Switch Section
@1 Fuel Pump
@2 Fuel Preheater
@3 Solenoid Valve
◆Burner Section
iFuel Gauge
oFuel Tank Cap
!0 Suction Pipe
!1 Return Line
!2 Filter Element
!3 Burner Section
!4 Tip-over Switch
qRadiation disk
wCasing
eHandle
rGuard
tBurner Cover
yBlower
uFuel Tank
!5
!6
!7
!9
@2
@1
@3
@0
!8
VAL6_MPX_En.indd 6 14/04/03 9:39

7
English
◆Switch Section
•
Neverusehighlyammablefuellikegasoline,toavoidre.
•
Nevercontaminateormixfuels.Forexample,nevercontaminatekerosenewithgasolineby
usingagasolinecontainertocarrykerosene.Evenasmallamountofgasoline,orothervol-
atilefuels,inkeroseneishazardous.Storekeroseneonlyincontainersspecicallylabeled
andapprovedforkeroseneanddonotusethecontainerforanyotherfuelsorchemicals.
DANGER
3How to use
3-1. Preparation for operation
@3
@5@7 @6
@4 @3 Operating Switch
Thisignitesorextinguishestheame.(Refer to pages 9.)
@4 Change-over Switch
Thischagesovercombustionintwostep.
@5 Operating Lamp
Thisislitwhile(theheateris)operatingandcooling
down.
@6MisreLamp
Thisislitwhentheameisextinguishedirregularly.
@7 External Thermostat Connector
Whentheameisextinguished,turn“OFF”theoperatingswitch.Thenturn“ON”theoperatingswitchagainafterthecause
ofmisreissolved.
Description of Safety Devices
!4 Tip-over Switch
Automatically extinguishes the ame when motion or an impact is detected during operation.
Operating condition : The misfire lamp lights and if the heater is operating, the fan will cool
down the heater for about 3 minutes (hereafter referred to as post purge).
!6 Overheat Preven-
tion System
Automatically extinguishes the ame should the heater overheat.
Operating condition : The misfire lamp lights and if the heater is operating, the fan will cool
down the heater for about 3 minutes (hereafter referred to as post purge).
!7 Electrical System
Protection (Fuse)
Cuts off power to the heater should an electrical surge pass through the circuit caused by
damage to the heater, etc.
Operating condition : The whole operation stops.
!8 Flame Monitor
This automatically extinguishes the ame when ignition fails or ame goes out during the
operation. This monitor, when it detects any irregularity before ignition, automatically extin-
guishes the ame.
Operating condition : The misfire lamp lights and if the heater is operating, the fan will cool
down the heater for about 3 minutes (hereafter referred to as post purge).
@2 Fuel Preheater This fuel preheater warms the fuel up to prevent its viscosity from rising. This starts to oper-
ate at the time of plugged-in if the ambient temperature is below 5℃ (41℉).
Anomaly detection
system for fan motor
This automatically extinguishes the ame when some errors are detected in fan motor such
as cable disconnection.
VAL6_MPX_En.indd 7 14/04/03 9:39

8
■Refueling
Observations
• Pleaseuse“kerosene”or“Fuel-OilnoheavierthanNo.2(Diesel)”anddonotusepoorqualityorfoulfuel,tohelpavoid
ignition,operating,andotherproblems.
1 Remove the fuel cap and insert a handy
suction pump into the fuel tank.
2 Watch the fuel gauge while refueling.
When the gauge reaches the maximum
level, stop refueling.
3 Wipe off any fuel that has spilled onto the
fuel tank or elsewhere.
Replace the fuel cap and tighten it securely.
Do not operate theheater with a loose fuel
cap or without a fuel cap.
■ Connecting the power supply
• Do not use an adapter to change the power plug or power outlet from grounded (3
prongs or inlets) to ungrounded (2 prongs or inlets) as this improperly overrides the
safetyfunctioningroundingtheheaterbytheprovidedpowerplug.Alsoifthepower
cordorplugneedtobereplaced,pleasebesuretoreplaceitonlywithgenuineorman-
ufacturer-approvedreplacementparts.
CAUTION
• Pleaserefuelonlywhiletheheateristurnedoffandcompletelyextinguished.
• Useonlytheelectricpower(voltageandfrequency)speciedonthemodelplateofthe
heater to operate the heater. Using electrical power different from the specications
mayresultinre,electricalshock,and/ordamage.
• Pleaseconrmtheground/earthcableisproperlyconnected,topreventelectricalshock.
• Whendisconnectingtheelectricpowercord,besuretoalwayspulltheplugoutbyit-
self.Donotpullouttheplugbypullingonthepowercord.Also,donotalloworcause
excessiveforcetobeexertedonthecordatanytimetoavoiddamagingitandcausing
areorshockhazard.Theheatershouldnotbeoperatedwiththepowercordinataut
ortightenedpositiontofurtheravoiddamagetothecord,accidentalunpluggingofthe
electricity,andreand/orshock.
CAUTION
■ Adjust the angle of the main unit
• Donotadjusttheangleofthemainunitwhiletheheaterispluggedin,operating,orhot
toavoidsevereburnsandelectricshock.
CAUTION
Prior to operation, loosen the knob bolt to
move and set the main heater unit at the
desired angle, and tighten the knob bolt
rmly.
The vertical angle of the radiation disk is
adjustable up to 45 degrees.
Tighten 45 degrees
Loosen
VAL6_MPX_En.indd 8 14/04/03 9:39

9
English
3-2. Operating procedures
• Ifyoudetectsmokeoraburningsmellcomingfromtheheater,turntheheateroffim-
mediately to help prevent a re, contact your dealer and the heater inspected before
furtheroperation.
• Morethanthreeconsecutiveattemptstoignitetheheatermaycauseare.Iftheheater
doesnotigniteafterthreeconsecutiveattempts,stoptryingandcontactyourdealerfor
aninspectionoftheheater.
• Whenusingtheheater,becarefulsothattheoorsurface(infrontofit)maynotget
overheated.
• Donotoperatetheheater,whilefueltankisdirtyandfoul,topreventpoorignitionor
improperburning.
CAUTION
1 Make sure that the operating switch is
“OFF”, then plug the heater’s power
plug into approved, grounded, three-wire
extension cord.
2 Plug extension cord into standard 120 volt/
60 Hz, 3-prong grounded outlet.
AC Outlet
Grounded Power Pin
Connect
Extension Cord
Extension Cord Size Requirement
• 6 to 10 feet (1.8 to 3 meters) long, use 18
AWG (0.75 mm2) rated cord
• 11 to 100 feet (3.3 to 30.5 meters) long,
use 16 AWG (1.0 mm2) rated cord
■ Ignition Procedures
Observations
• Whenswitchingontheheater,pleasemakesurethattheheaterisignitedproperlyanditscombustionisstable.
1 Use the fuel gauge to check if the fuel is
sufciently lled up in the tank.
2 Turn “ON” the operating switch, and the
heater will ignite in about 5 seconds.
If ignition fails, try again as follows
Stop the operation completely. Wait for the
operating lamp to turn off. After the operat-
ing lamp has turned off, try step 2 above
again. DO NOT TRY TO IGNITE THE
HEATER MORE THAN THREE TIMES IN A
ROW AS FIRE MAY RESULT.
■
Changing combustion speed
The heater has two-step combustion and it
can be changed by change-over switch.
Operating Switch “ON”
Operating Switch “OFF”
Change-over Switch
VAL6_MPX_En.indd 9 14/04/03 9:39

10
• Whentheheateriscontrolledbyanotherdevice(suchasathermostatoratimer),the
heatercouldturnitselfonatanytime.
• Whentheheateriscontrolledbyanotherdevice,extracaremustbetakentoensurethat
theheaterisnotaccidentallyturnedonwithoutsomeonenearbywhocanimmediately
attendtoanyproblemswhentheheaterisignited,operating,andcoolingoff.
CAUTION
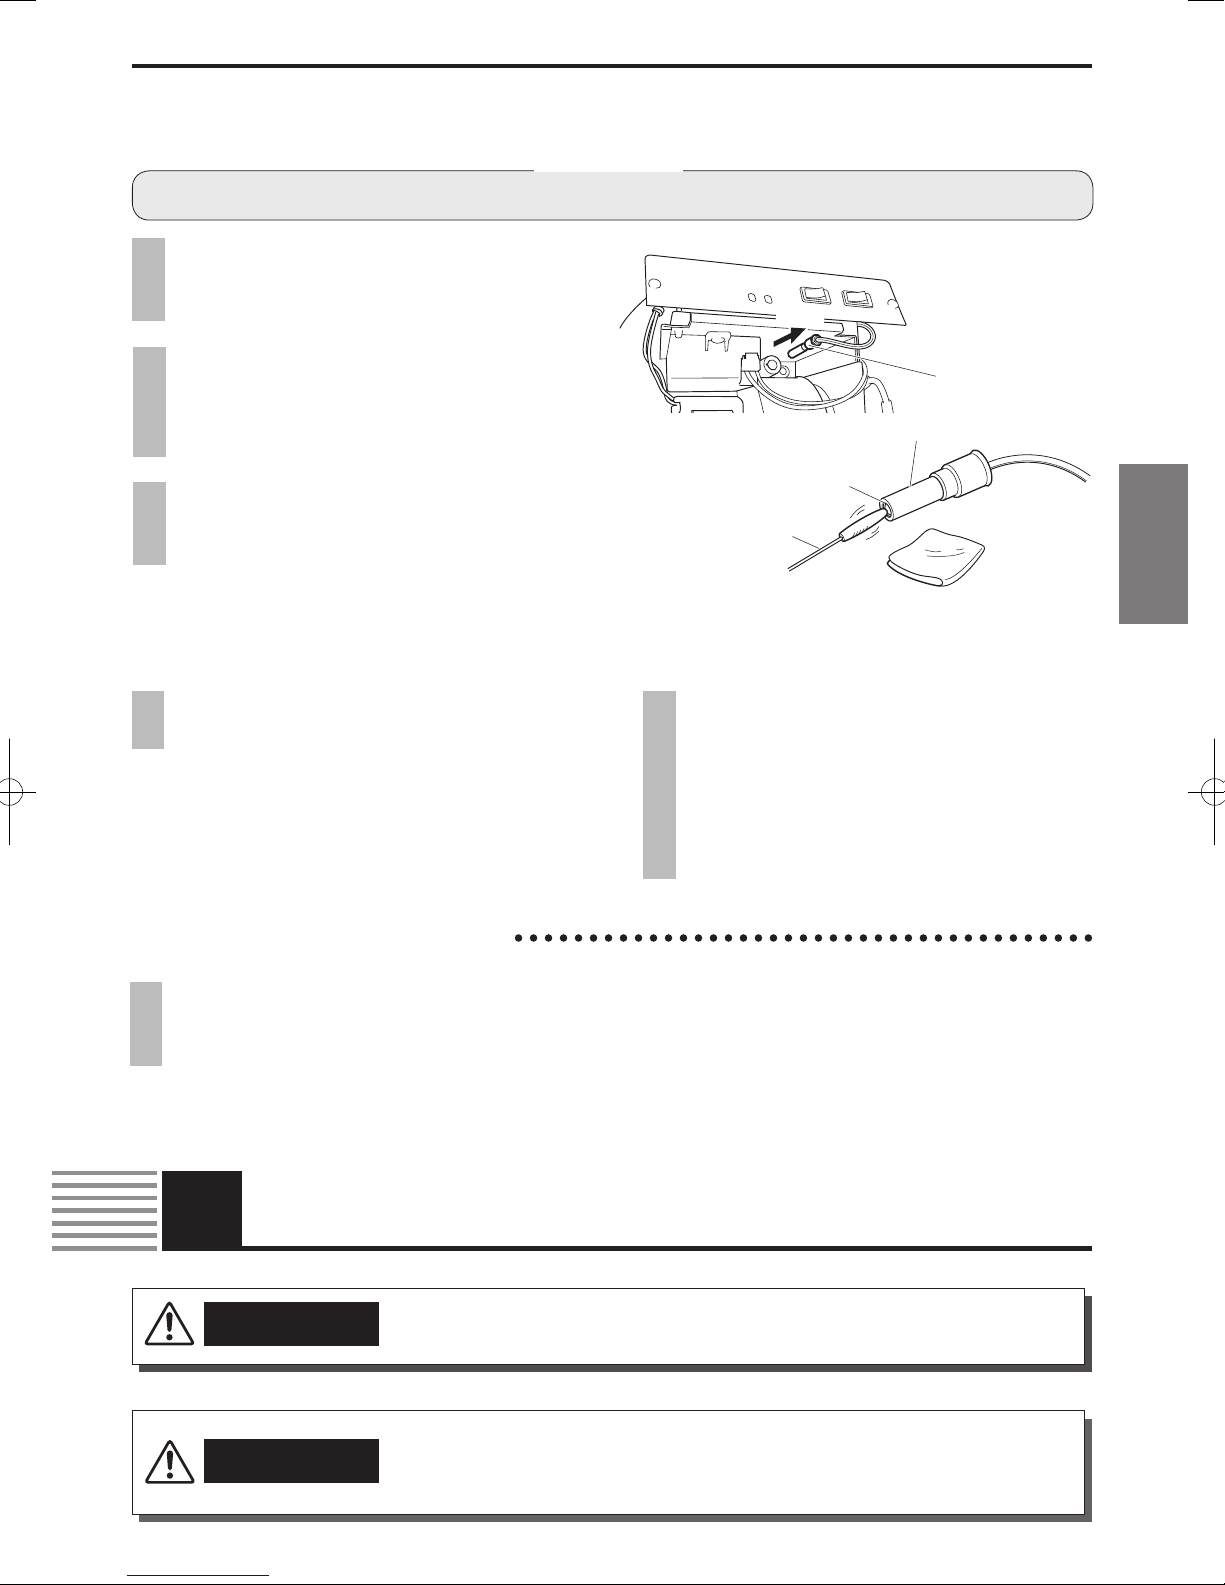
3-3. How to connect the Control Device
■ Shut-Down Operation
CAUTION • Aftertheoperationisshutdown,pleasemakesurethattheameiscompletelyextin-
guishedbeforeleavingtheheaterunattendedormovingorstoringit.
Turn “OFF” the operating switch, and the
heater ame will be extinguished, then the
cooling operation will also automatically
stop after about three (3) minutes.
● If the heater is used for only a short period of time
after refueling, air inside of the fuel pipe may cause
the ame to icker when the heater shutting down.
This is not abnormal.
Observations
• BeforeyoudisconnectthepowerplugfromtheACoutlet,pleasemakesurethatthefanmotorisstopped.
• Neverdisconnectthepowerplugwhiletheheaterisoperating(coolingoperation),itwillcausenozzletobeclogged.
Operating Switch “OFF”
To connect the thermostat
Take the cap off and hook up thermostat
plug (No need to rewire)
Cap
Thermostat
Direct-coupling pin
Don’t forget to put the cap back unless the thermostat is connected to heater. Without the cap, heater won’t
operate at all with all circuit cut off. Therefore, there is the direct-coupling pin inside the cap and it must
be used.
VAL6_MPX_En.indd 10 14/04/03 9:39
11
English
3-5. Operation with Portable Generator
• Beforeoperatingtheheaterfromaportablegenerator,pleaseconrmthatthegenera-
torhasbeenproperlyconnectedtothegroundearth.Tooperatethegeneratorwithout
proper grounding may result in electrical shock. Please refer to the owner’s manual
suppliedbythegenerator’smanufacturer.
WARNING
4Inspection
• Beforestartinganyinspectionorservice,toavoidelectricshock,pleasemakesurethe
heaterisshutdownandthatthepowercordisdisconnected.
• Whencleaningtheheater,pleasewearglovestopreventpossibleinjury.
CAUTION
Observations
• Priortoeachoperationchecktheheaterforsignsofdamage.Donotoperateadamagedheater.Haveitinspectedand
repairedbyaqualiedserviceagency.
• Priortoeachoperationchecktheheaterforsignsoffuelleakage.Donotoperateaheaterwithfuelleakage.Haveitin-
spectedandrepairedbyaqualiedserviceagency.
The heater operates within the voltage
range of 108 Volts to 132 Volts. Before plug-
ging the heater into the generator, the out-
put voltage of generator should be veried.
If the voltage does not measure in this
range, the heater should not be plugged
into the generator.
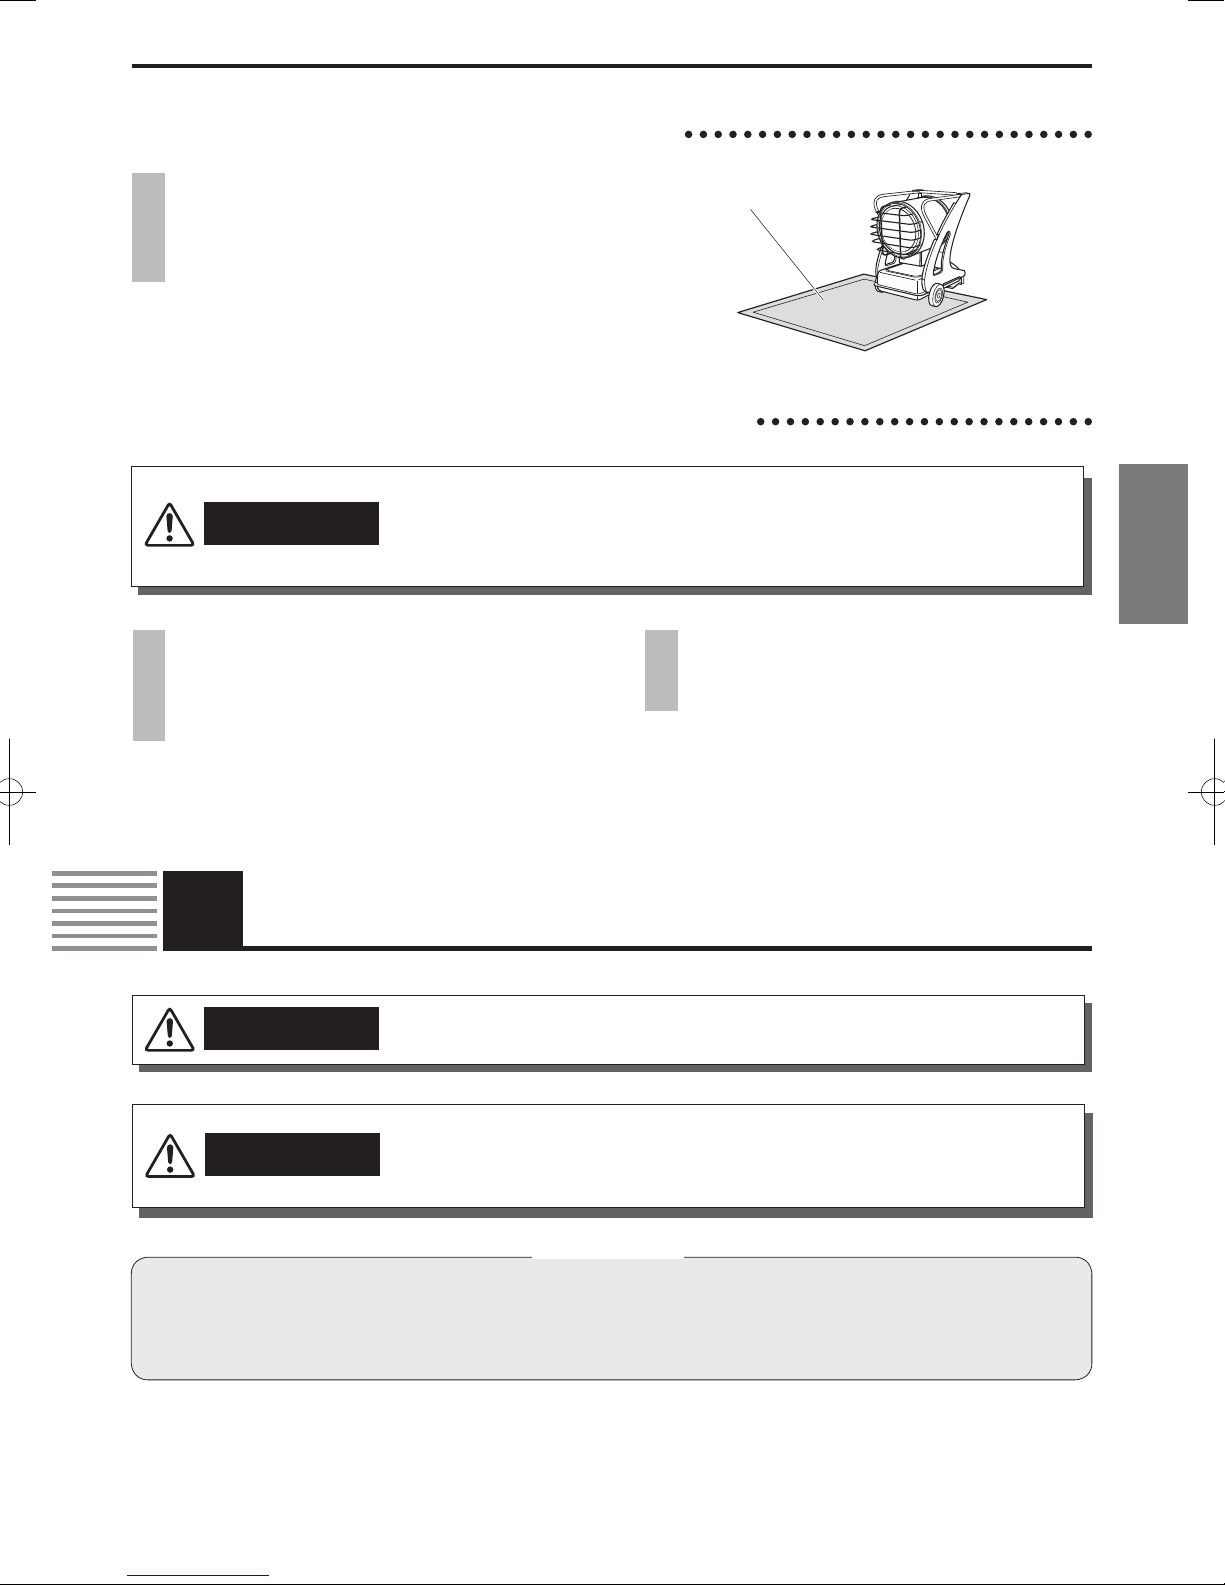
3-4. Use of the Heat Shielding Mat
To avoid unexpected re or trouble, NEVER
use the heater on combustible ooring un-
less the heat shielding mat, which is avail-
able as an option, is used.
Heat shielding mat
WARNING • Neverinspectorservicetheheaterwhileitisburning,inoperation,hotorplugged-in
toavoidanyinjuryand/ortrouble.
VAL6_MPX_En.indd 11 14/04/03 9:39

12
4-1. Daily inspection
Drainage of water from the fuel tank
■ Inspecting the tip-over switch
1 While the heater is operating, grasp the
handle and shake the heater up and down,
and from side to side.
2 Check if the tip-over switch has automati-
cally extinguished the ame.
3 If the tip-over switch did not activate, shut
down the heater and contact the dealer
from whom you purchased the heater.
■ Inspectionofthelteranddrainageofwaterfromthefueltank
1 Remove the suction pipe from the fuel tank.
Checkingthelterelement
2 If the lter is dirty, replace it with a new one.
3 Return the suction pipe to the fuel tank and
rmly secure.
Filter
Suction Pipe
Pull off
Pull up
1 Remove the fuel cap and insert a suction
pump into the tank.
2 Remove as much fuel as possible (with the
suction pump). Be sure that the fuel being
removed is put only into a can or other con-
tainer approved in your area for holding
amable liquids such as kerosene and Fu-
el-Oil no heavier than No.2 (Diesel)
Wrench
(24mm)
Loosen
Drain bolt
packing
Drain bolt
8 Be sure to dispose of in a safe manner as
approved in your local area the kerosene,
etc, placed in the empty container and the
materials used to clean up any spilled kero-
sene, etc. Safely clean and/or dispose of
the empty container as also approved in
your local area.
7 Wipe off kerosene or water spilled over the
tank and the surrounding area.
3 Tighten the fuel cap rmly.
4 Prepare an empty container of about 3 liters
(0.7gallons) capacity: to hold kerosene and
water remaining in the fuel tank, place the
container under the drain bolt (of the fuel
tank).
5 Next, use a 24mm wrench to remove the
drain bolt and tilt the fuel tank until the fuel is
completely drained out of the tank. (At the
same time, be careful not to lose the drain
bolt packing.)
6
Restore the drain bolt packing and tighten the
drain bolt rmly so that fuel can not leak out
(of the fuel tank).
VAL6_MPX_En.indd 12 14/04/03 9:39
13
English
■ Inspection of “dirt/dust” on the main unit
1 Check whether or not dirt/dust is on and
around the heater.
2
If dirt or dust is found, remove it with a vacu-
um cleaner or a soft, non-abrasive, cloth. Do
not use any cleansers of any type, especially
spray cleansers, as they may leave a resi-
due or inltrate the operating mechanism of
the heater and cause a re or clog or other-
wise damage the heater.
4-2. Periodic inspection
The heater must be checked periodically, and especially after periods of sustained or heavy use,
for safe and proper operation, and for service maintenance. Have your dealer inspect the heater no
less than twice a year.
5How to replace the Nozzle & Fuse
WARNING • Never service the heater while it is burning, inoperation, hotor plugged-into avoid
anyinjuryand/ortrouble.
• Beforestartinganyservicetoavoidelectricshock,pleasemakesuretheheaterisshut
downandthatthepowercordisdisconnected.
• Whenservicingtheheater,pleasewearglovestopreventpossibleinjury.
CAUTION
1 Remove the burner cover and pull out the
ame monitor, and check whether or not its
lens is dirty/foul.
2 If the lens is dirty/foul, clean the surface of
the lens with a soft cotton swab or cloth until
it is clear. Do not use any cleansers of any
type, e. g., glass cleaner, to clean the lens.
3 Replace the ame monitor. Then securely
replace the burner cover using the provided
screws.
■ Inspectionandcleaningoftheamemonitor
Lens
Cotton Swab
Soft Cloth
Flame Monitor
Observations
• Whenremovingtheamemonitor,holditbyitsmainassembly;donotpulloutthecord.
Flame Monitor
Pull out
VAL6_MPX_En.indd 13 14/04/03 9:39
14
Observations
• Becarefulnottotouchelectrodes
5 Tighten the nozzle using the nozzle wrench
until the nozzle is xed.
6 Put the burner unit back with three nuts re-
moved.
7 Put the red wire back.
8 Put the burner cover back with two screws
removed.
3 Unscrew three nuts and pull out the burner
unit.
4 Replace with a new nozzle by using the
provided nozzle wrench.
Nozzle
Nozzle Wrench
2 Disconnect the red wire of overheat protec-
tion at the back of the burner base.
6How to store the heater
CAUTION • Iftheheaterisstoredornotusedforanextendedperiodoftime,emptythefueltankto
helppreventfuelleakageandotherpossibleredangers.
When you store the heater, please disconnect the power plug from the extension cord and/or the
AC outlet and store the heater indoors where it is less humid.
Observations
• Donotstorethefueloversummermonthsforuseduringnextheaterseason.Usingoldfuelcoulddamagetheheater.
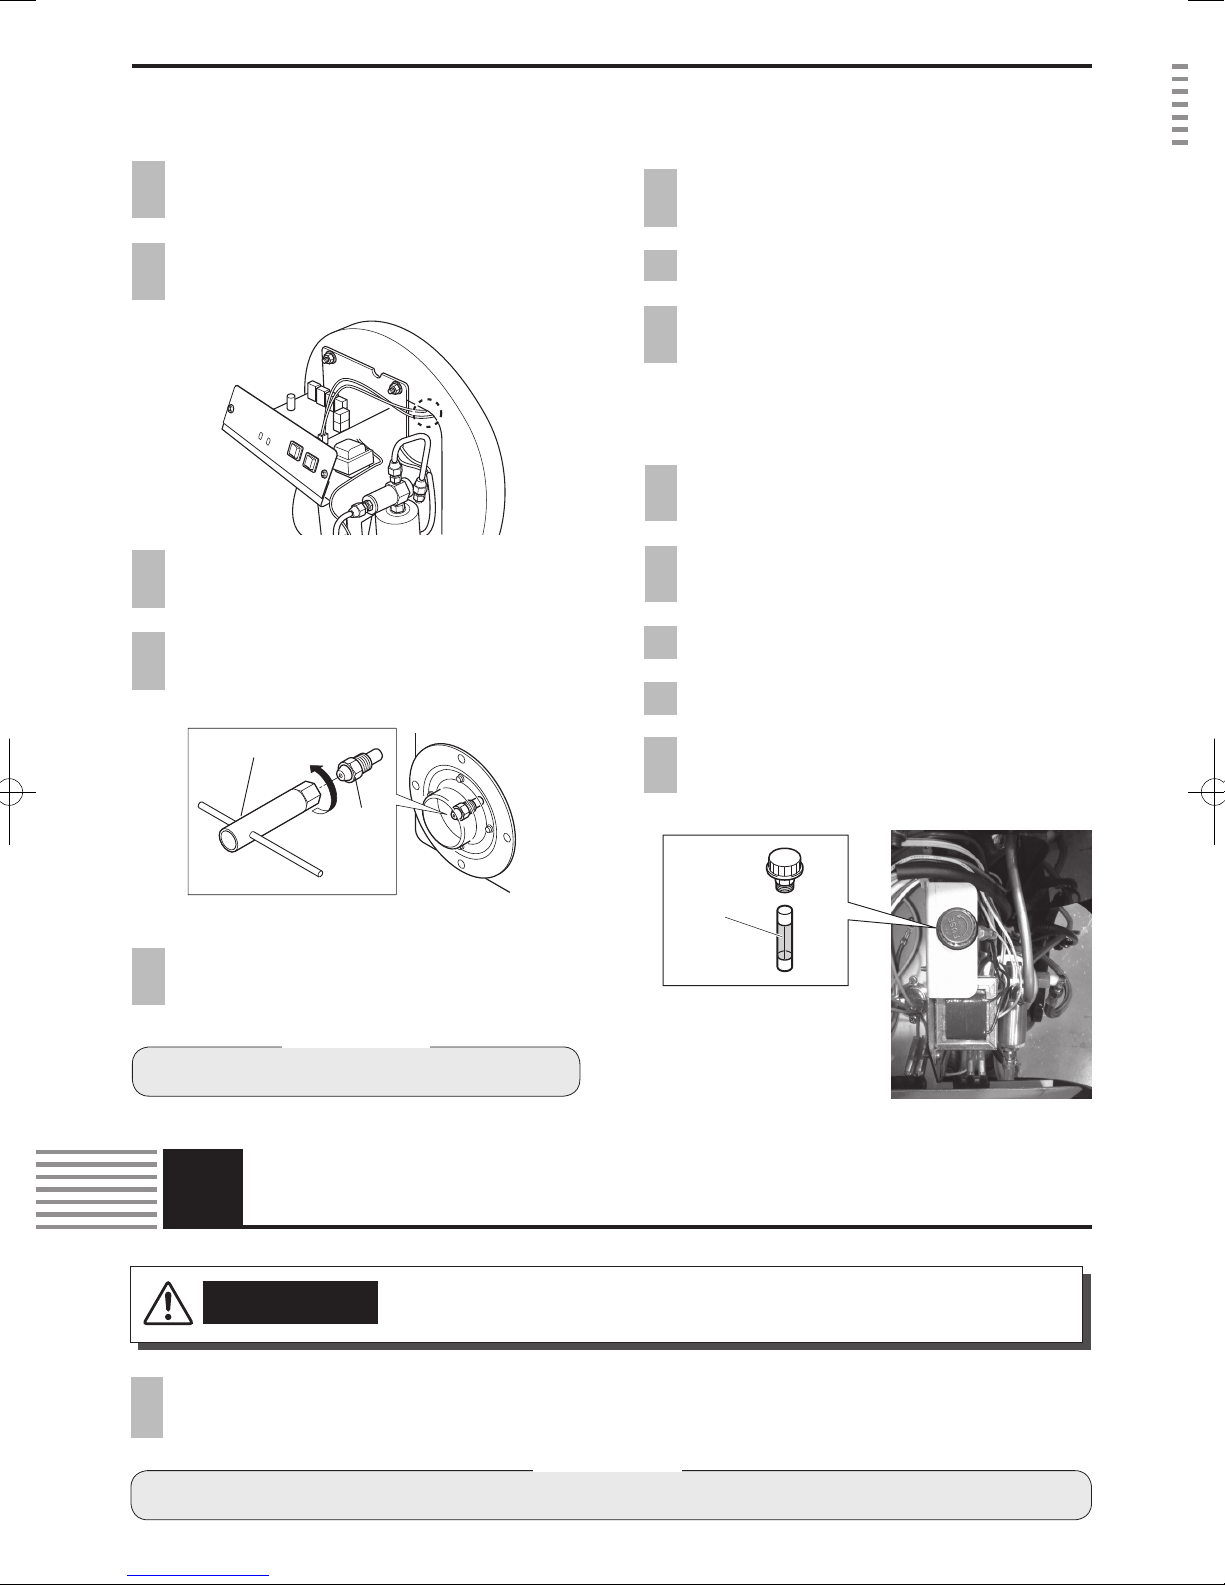
■ Replacing a nozzle
1 Unscrew two screws of the burner cover
and take the burner cover off.
■ Replacing a fuse
1 Unscrew two screws of burner cover and re-
move the burner cover.
2 Unscrew the screw cap of fuse holder and
take out the fuse.
3 Replace with a new one.
4 Put the screw cap back into fuse holder.
5 Put the burner cover back with two screws
removed.
Fuse
Open a screw cap and
take out a fuse.
Check whether the fuse
is blown out.
VAL6_MPX_En.indd 14 14/04/03 9:39
15
English
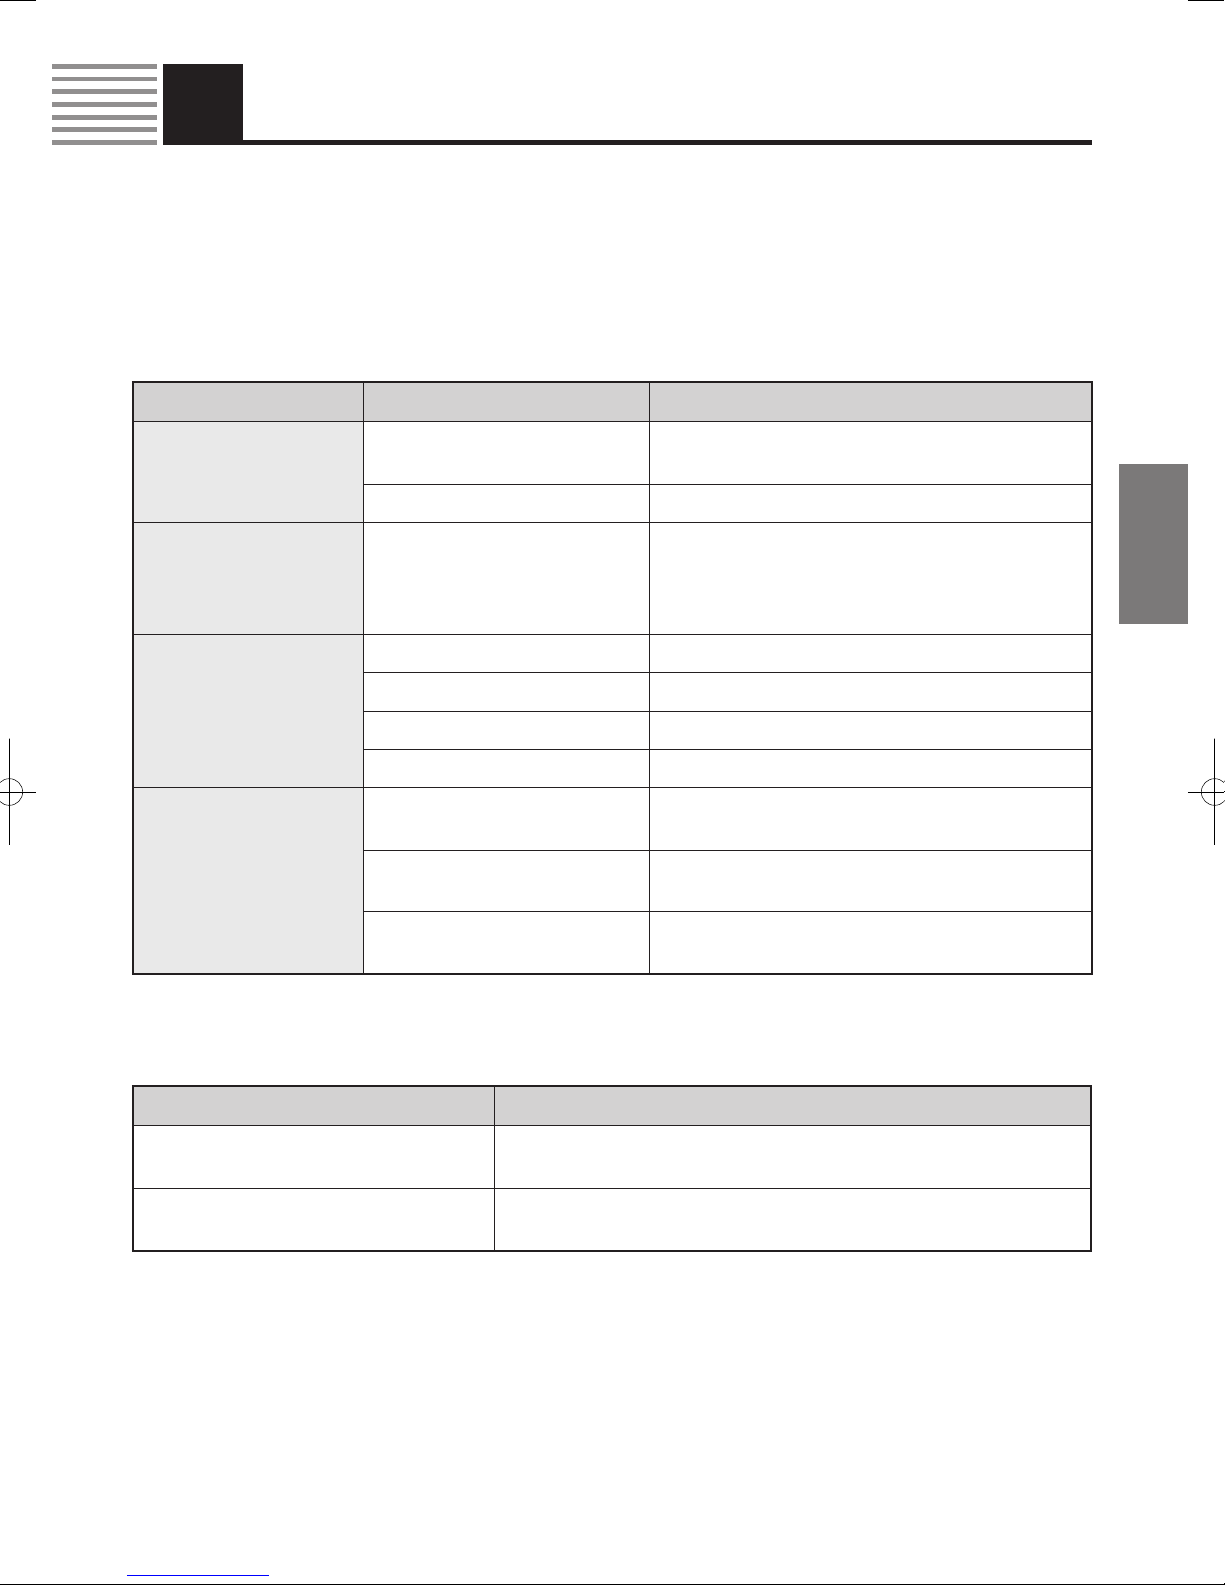
7Troubleshooting
■ When you face problems with your heater, please refer to this check-
list before consulting with your dealer.
Incasesatisfactoryresultsdonotresultbyreferringtothetable,oryouhaveproblemsnotdescribedin
thistable,pleasecontactyourdealer.Whileconsultingwithhim,pleasedescribetheproblemyouhave,
togetherwithmodelnameandserialnumberofyourheater.
(For nding the heater’s serial number, please refer to page 17.)
If the following phenomenon takes place, it is usually not a sign of trouble. Please check
again before consulting with your dealer.
Phenomenon Possible Cause Remedy
The heater does not start.
(The lamp does not light
up.)
Power cord is not connected with an
AC outlet. Power supply is cut off.
Please connect the power cord with an AC outlet, and
check the power supply.
Blown fuse Replace fuse with a new one. (Please refer to page 14.)
The heater does not start.
(The lamp is lit.) Safety devices are working.
Please confirm if “Flame Monitor” is exposed to any
type of light (sunlight or electric lamp, etc.), and move
the heater to prevent the radiation disk from detecting
any type of light directly.
The heater does not ignite.
No fuel in the fuel tank. Please pour fuel into the tank.
There is water in the fuel tank. Please clean up the tank and ll it with fresh/clean fuel.
Fuel lter element is clogged. Check the lter element and replace it with a new one.
Nozzle is clogged Replace nozzle with a new one. (Please refer to page 14.)
The flame goes out during
the operation.
Wrong or foul fuel is used. Please clean up the fuel tank and ll it with fresh/new
fuel.
Flame monitor is dirty. Please clean up the Flame Monitor
(Please refer to page 13).
Fuel lter element is clogged. Please check the lter element and replace it with a new
one.
Phenomenon Explanation
When used for the first time, smoke or
smell comes out of the heater.
Because fuel is burning together with dusts, etc. This phenomenon will
disappear after a short while.
At the time of ignition or shut-down of the
heater, noise comes from the burner section.
Noise is caused by expansion or shrinkage of the burner section due to
temperature’s up and down. This is not irregular.
VAL6_MPX_En.indd 15 14/04/03 9:39
16
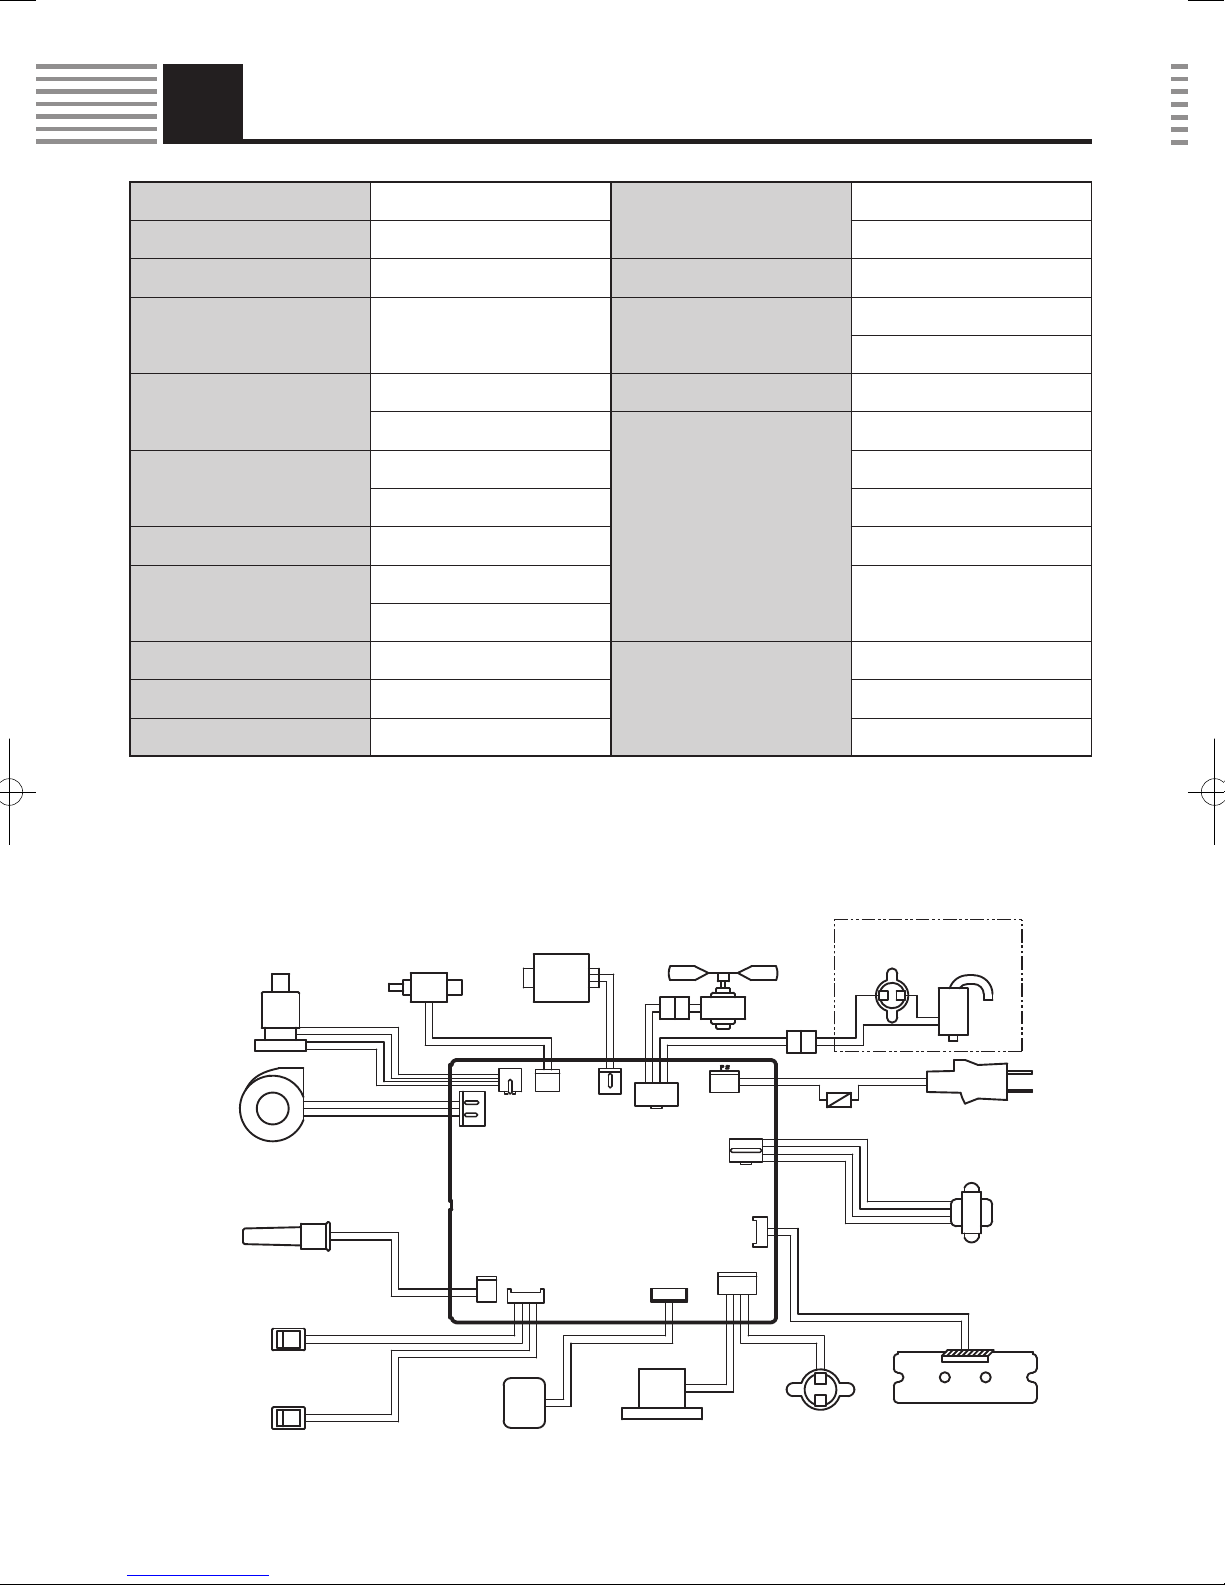
Wiring Diagram
8Specications
Trans-
former
Solenoid
Pump
Power
Plug
Igniter Circulation
Motor
Changeover Lamp
Ext .
thermo
Fuse
pre-heater unit
Overheat
Sensor
Tip-over
Sensor
Solenoid
Valve
Operation
Switch
Photo
Cell
Fan
Motor
Model Type VAL6MPX5
Power Consumption
When igniting : 110 W
Type Radiated / Direct-red When burning : 145 W
Ignition System High intensity discharge Electric Fuse 3A
Fuel
Kerosene or Fuel-Oil no heavier
than No.2 (Diesel) Operating Noise Level
High : 59.4 dB
Low : 57.8 dB
Fuel Consumption
High :0.48GAL/h , 1.55kg/h Airow 110 CFM
Low : 0.42GAL/h , 1.38kg/h
Safety Systems
• Tip-over Switch
Heat Output
High : 62,500 BTU , 18 kW • Flame Monitor
Low : 55,500 BTU , 16 kW • Electrical System Protection
Tank Capacity 6.6 gallons • Overheat Prevention
Continuous Operating Time
High : 13.7 hours • Anomaly detection system
for fan motor
Low : 15.7 hours
Dimensions (inch) 28.4 (H) × 20.5 (W) × 26.6 (D)
Accessory
• Nozzle
Weight (w/empty tank) 70.5 Lbs , 32 Kg • Filter Element
Power Supply AC 120V (60Hz) • Nozzle Wrench
VAL6_MPX_En.indd 16 14/04/03 9:39

17
English
Danger Label
Caution Label
Caution on Refueling Label / Maintenance Label
Floor Temperature Caution Label
Use the heater with a heat shielding mat on the
combustible or heat sensitive floor.
Heat shielding mat [Part# 50300-205001 (1,200 x 1,200 x 3.5mm)] to be placed
under the radiation disk to prevent from discoloring or burning the floor.
Utilisez le radiateur avec une protection thermique placée sur
le sol, s'il est en matière inflammable ou sensible à la chaleur.
Protection thermique [Part# 50300-205001 (1,200 x 1,200 x 3.5mm)] à placer
sous la zone de rayonnement pour éviter que le sol ne soit décoloré ou brûlé.
WARNING
AVERTISSEMENT
Heat shielding mat
Tapis de protection thermique
Specifications Label
>PET< 50346−203016
DANGER/DANGER
Never plug off until heater tops completely
Ne jamais debrancher avant l'arret complet de rechauffeur
Commercial-industrial occupancies only
Occupation à titre commercial ou industriel uniquement
H:62,500BTU/h,18kW
L:55,500BTU/h,16kW
H:0.48GAL/h,1.55kg/h
L:0.42GAL/h,1.38kg/h
Kerosene or Fuel-Oil no heavier than NO.2(Diesel)
/Kerosene ou gasoil.
100Wwithignitionspark/al'allumage
120Wwithcombustion/encombustion
SERIALNO.50346-
Numerodeserie
Made in Japan
VAL6MPX5
The requirements of local authorities having jurisdiction shall be followed.
Les conditions imposees par les autorites locales ayant juridiction doivent etre suivies.
Electric requirements
Conditions electriques
FUELOIL
Combustible
OUTPUT
Puissance de sortie
FUEL CONSUMPTION
Consommation de combustible
POWER CONSUMPTION
Puissance consommee
ELECTRIC
REQUIREMENTS
120V 60Hz
9Safety Labels
● Safety labels provide important information for safe use of the heater. So, please do not remove or soil them.
●
If any of the labels is unreadable or removed, please ask your dealer for a new one and replace with the new one.
VAL6_MPX_En.indd 17 14/04/03 9:39

18
VAL6 Series Heatersby SHIZUOKA SEIKI
WARRANTY POLICY
VAL6 Infrared Heater series
SHIZUOKASEIKIwarrantsthatitsheatersandcomponentpartswillbefreefromdefectsinmaterialandwork-
manshipfor a periodof24 months fromdateof purchase, whenproperlyinstalled, operated, andmaintained
inaccordancewiththeinstallationandMaintenanceInstructions,safetyguidesandlabelscontainedwitheach
unit.Ifanycomponentprovesdefectiveineithermaterialorworkmanshipduringthelimitedwarrantyperiod,
ShizuokaSeiki,atitsoption,repairthedefectivepartorequipment,orreplaceitwithanewpartorequipment.
Proof of purchase and warranty qualication must be established at time of return.
*A copy of the bill of sale must be provided at time of return.
Claim Procedure
Allclaimsaretobesubmittedtothewarrantyprocessingcenterat1877-VAL-VAL6(intheUSA).Afterthe
initialevaluationbyphonediscussion,themostappropriateagentorspecicprocedurewillbeinformed.
This limited warranty does not apply to heater, component or replacement part damage resulting from incorrect
installation,misuse,abuse,accident,actof God,neglect,mishandling, contaminatedfuel,modication, incorrect
environments,orwearfromordinaryuse.
ThewarrantysetforthaboveistheexclusivewarrantyprovidedbyShizuokaSeikiandallotherwarranties,includ-
inganyimpliedwarrantiesormerchantabilityortnessforaparticularpurpose,areexpresslydisclaimed.Inthe
eventanyimpliedwarrantyisnotherebyeffectivelydisclaimedduetooperationoflaw,suchimpliedwarrantyis
limitedindurationtothedurationoftheapplicablewarrantystatedabove.Theremediessetforthabovearethesole
andexclusiveremediesavailablehereunder.ShizuokaSeikiwillnotbeliableforanyincidentalorconsequential
damagesdirectly or indirectly related tothesales, handling or use of theequipment,and in any event Shizuoka
Seikiinconnectionwiththeequipment,includingforclaimsbasedonnegligenceorstrictliability,islimitedtothe
purchaseprice.
Somestatesdonotallowlimitationonhowlongandimpliedwarrantylasts,sotheabovelimitationmaynotapply
toyou.Somestatesdonotallowtheexclusionorlimitationofincidentalorconsequentialdamages,sotheabove
limitationorexclusionmaynotapplytoyou.Thiswarrantygivesyouspeciclegalrights,andyoumayalsohave
otherrightswhichvaryfromstatetostate.
SHIZUOKA SEIKI CO., LTD.
4-1 Yamana-cho, Fukuroi-shi, Shizuoka-pref 437-8601 JAPAN
Contact in U.S.A 1-877-VAL-VAL6 (1-877-825-8256)
VAL6_MPX_En.indd 18 14/04/03 9:39

Memo
VAL6_MPX_En.indd 19 14/04/03 9:39
50346 − 200001 C
16005 C
Printed in Japan
Manufacturer
4-1 Yamana-cho, Fukuroi 437-8601 Japan
Tel +81-538-23-3990 Fax +81-538-23-3192
l ID: VAL6
l Password: shizuoka
l http://www.shizuoka-seiki.co.jp/eg.html
USER REGISTRATION
Please enter the following temporary ID & Password and complete
the user registration form on our website. By completing your
registration, you will obtain your own ID & Password.
This allows you to download the owner's manual and/or parts list from
our website.
VAL6_MPX_En.indd 20 2016/09/08 10:57
Table of contents
Other Shizuoka Seiki Heater manuals

Shizuoka Seiki
Shizuoka Seiki VAL6 User manual

Shizuoka Seiki
Shizuoka Seiki VAL6 KBE1S User manual

Shizuoka Seiki
Shizuoka Seiki VAL6 MPX5 User manual

Shizuoka Seiki
Shizuoka Seiki VAL6 User manual

Shizuoka Seiki
Shizuoka Seiki VAL6 EP8JA User manual

Shizuoka Seiki
Shizuoka Seiki VAL6 EPX1 User manual

Shizuoka Seiki
Shizuoka Seiki VAL6 MPX Series User manual

Shizuoka Seiki
Shizuoka Seiki VAL6 KBE5S User manual

Shizuoka Seiki
Shizuoka Seiki VAL6 EPX User manual

Shizuoka Seiki
Shizuoka Seiki VAL6 User manual


