Navien Mate EQM 350 User manual

EQM
350
ýKeep this manual in an easy-to-nd location.
Please read the manual carefully to use the product as intended.
7he appearance and speciȴcations of the product are suEMect
to change without prior notice for quality improvement.
7he illustrations in this manual may Ee different from those
of the product you purchased.
User Manual


Contents
3
For safety and correct use of the product, be sure to read the manual before use.
Experience the warmth of Navien for good and healthy sleep.
Safety Precautions
Product Components
Name of Each Part
Installation Guide
Control Panel Features
- Power On and O
- Setting the Temperature
- Setting the Lock Mode (Child Lock)
- Setting the Mute Mode
- Setting the Sterilization Mode
- Setting the Timer Mode
Product storage
Caring for the Product
Error Code Guide
Trouble Shootings
Specications
Product Warranty
4
9
10
12
13
15
17
18
19
20

Safety Precautions
4
Please read the safety precautions carefully to ensure that the product is used
safely and correctly to prevent accidents and risks in advance.
Disassembly
prohibited Indication that prohibits disassembly.
Ensure Proper
Grounding Grounding for prevention of electric shock.
Warning Failure to follow the instructions may result in death or serious
personal injury of the user.
Caution Failure to follow the instructions may result in minor injury
or property damage.
Actions
Prohibited Prohibited actions are shown with emphasis.
When using the product for a long period of time, such as while
sleeping, set the temperature to less than 95°F(35°C.).
There is a risk of low temperature burns.
35
Warning/ Caution/ Actions Prohibited
There is a risk of burns.
People who are physically disabled or unable to detect high
temperatures should be careful not to use the product.
Patients with diabetes or skin disease is in risk of skin burns,
so please refrain from using this product.
Please read and follow the safety precautions.
Please use the the provided pad cover or blanket on the pad.
There is a risk of low temperature burns.
Please take caution for skin contact with the connector hose.
There is a risk of low temperature burns.
California law requires the following Prop 65 warning to be provided:
This product can expose you to chemicals including lead, lead compounds, and carbon
bisulde which are known to the State of California to cause cancer and birth defects or
other reproductive harm. For more information, go to www.P65Warnings.ca.gov.
WARNING

5
Please read and follow the safety precautions.
Warning/ Caution/ Actions Prohibited
If the power cord or plug is damaged, contact the manufacturer
or its authorized service center for replacement.
120V 220V
This product is for domestic use only for 120V/60Hz.
Always use a country-specic outlet with a grounding terminal.
A dierent voltage may cause electric shock or re. Failure to use a grounding
outlet may result in malfunction or electric shock.
Do not bend, twist, or tie the power cord by force.
There is a risk of electric shock and re.
Do not plug or touch the power plug with wet hands.
There is a risk of electric shock and injury.
Do not use multiple devices at the same time when using a multi-outlet.
There is a risk of re and electric shock.
Do not use the product in a place exposed to direct sunlight,
snow, rain, or in a wet environment.
There is a risk of electric shock or re due to heating or short circuit.
Do not use the product near a heating device such as a gas
stove
or a stove.
It may cause deformation of the product and re.
If there is a leak in the heating unit or pad, be sure to disconnect
the power plug and contact the service center.
If the product is submerged, immediately disconnect the
power plug and contact the service center.
There is a risk of malfunction, electric shock or re if operated after water damage.

6
Error!
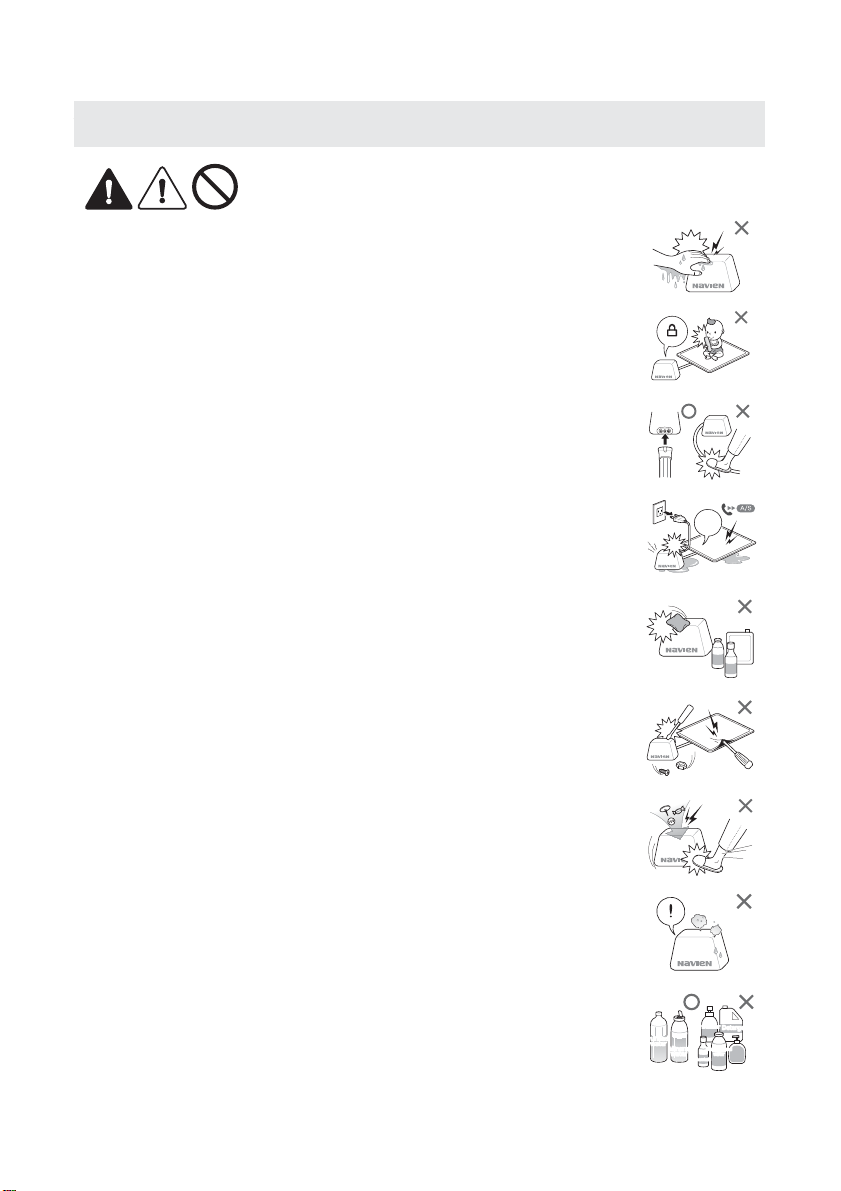
Do not operate the product with wet hands.
There is a risk of electric shock.
Do not allow infants or children from operating the product
and set the child-lock when not in use.
There is a risk of electric shock, burns and product malfunction.
If an error code or operating issue occurs while using the product,
disconnect the power cord from the outlet and contact the service
center.
There is a risk of re or electric shock due to heating or short circuit.
Do not clean the heating unit with chemicals such as benzene,
paint thinner, alcohol, or general detergents.
It may cause discoloration, deformation, breakage, electric shock or re.
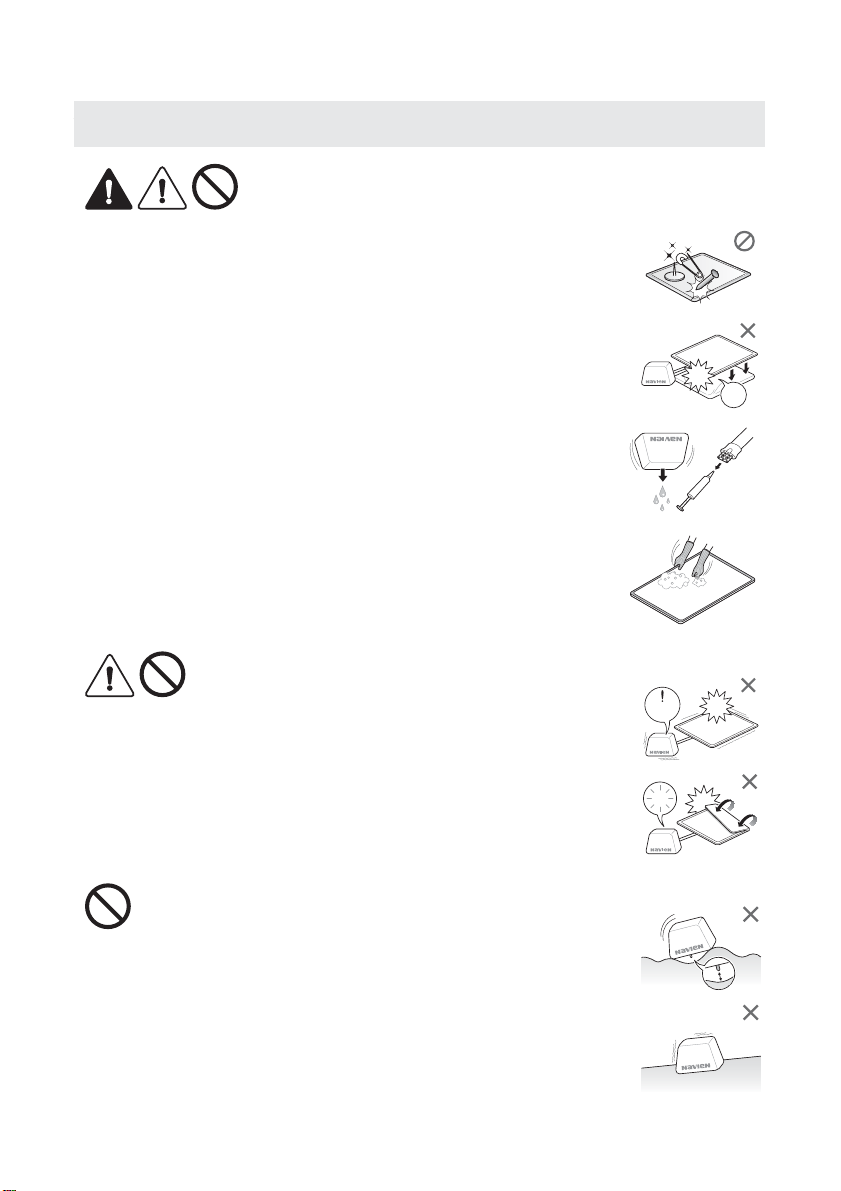
Never disassemble, repair or modify the product at your own
discretion.
There is a risk of malfunction, electric shock or re. If yproduct repair is required,
please contact the service center.
Do not kick or exert excessive force on the heating unit and do
not put foreign objects inside.
There is a risk of product malfunction and accident.
Be aware that a some steam may be released from the micro
pores of the water inlet cap during operation.
There is a risk of electric shock and burns.
ⷘ㥔
㐔⇌
㚀䂈㝠
Use of clean water (distilled water, puried water, mineral
water) is recommended. Do not use underground water or
other liquids (salt, detergent, medicine, oil, fragrances, etc.)
It may cause the product to malfunction.
DetergentDetergent
Air freshnerAir freshner
Purified
water
Purified
water
ChemicalsChemicals
Mineral
water
Mineral
water Oil
Underground
water
Underground
water
Be sure to securely fasten the connection between the Heating unit
and the pad and do not break the connecting hose or step on it.
There is a risk of product malfunction or blockage in hot water circulation.
Please read and follow the safety precautions.
Warning/ Caution/ Actions Prohibited

7
No
Wate r
Do not place heavy or sharp objects (tacks, nails,
knives, needles, etc.) on the pad or pierce the pad.
It may cause deformation of the product or leakage.
Do not use the pad with latex products to avoid a risk of
product deformation.
There is a risk of product failure.
Do not operate the product without water.
It may cause the product to malfunction.
Never crumple or fold the mattress pad when the heating
unit is operating.
It may cause the product to malfunction.
Do not place the heating unit on an uneven surface or on
the carpet.
The balance sensor at the bottom of the Heating unit may trigger and the heating
unit may not operate.
Do not place the heating unit on a slated surface.
It may cause product failure or malfunction.
Latex
on
Please read and follow the safety precautions.
Warning/ Caution/ Actions Prohibited
Caution/ Actions Prohibited
Actions Prohibited
The pad is not machine washable. Please take the pad cover
o before cleaning with a mild detergent and wipe gently.
It may cause the product to malfunction.
If not used for a long time, turn the heating unit upside
down and drain the water. Remove the water from the
pad using a residual water removal kit.

Safety Precautions
8
Watch out for low temperature burns
What is a low temperature burn ?
Main symptoms of low temperature burns
Low-temperature burns are skin damage caused by slow penetration of heat over a relatively
long period of time from temperatures of 104°F(40°C) to 111.2°F(44°C) that is not relatively hot.
According to the American Burn Association (ABA), skin deformation (protein breakdown)
occurs when exposed to 113°F(45°C) for 1 hour, 122°F(50°C) for 3 minutes, and 140°F(60°C) and
greater for 8 seconds.
It occurs in the dermis or adipocytes that are not receptive to pain, and the burned area is nar-
rower and deeper than burns caused by high temperature. It is important to use the product
safely with special care as burns are mostly caused by misuse of heat mats, heaters, and hot
packs used at home.
1. Your skin may turn red and you may feel a tingling sensation.
2. Burned area appears discolored and may be itchy.
3. Over time, the degree of pain may increase.
4. If symptoms process further, blisters may occur due to burns.
5. The burned area has a tendency to be narrower than a normal burn injury.
ýCool down the burned area using cold water or saline on the aected area with the low temperature
burn. (Please refrain from direct stimulation by applying an ice pack or with a shower.)
ýPlease visit a hospital as soon as possible to treat it.
Use a cover on the pad and cover the pad with a blanket if there is no cover. For safety, be careful not
to have skin contact with the connecting hose for a long period. People who are physically disabled
or unable to high temperatures should be careful not to use the warming pad. Patients with diabetes
or skin disease should not use the warming pad. Take caution operating the product near infants or
children. When the product is not in use, please set the child-lock. Be careful not to lie down in one
position for a long time.
If you feel itchy during use, adjust the temperature or change your posture.When sleeping, set the
temperature below the recommended temperature of
95°F(
35°C). Please refrain from using high
temperatures for a long time.
Using a bed warming mattress pad safely

Product Components
9
Heating unit (Boiler) Mattress Pad
Pad Cover User Manual / Quick Manual
Air Pump / Water Removal Kit
ýShape and color may vary depending on specications.
ýShape and color may vary depending on the product.
1EA 1EA
1EA
1EA1EA
1EA 1EA
EQM 350
Quick
Manual

Name of Each Part
10
Connection area of the
water inlet/outlet connector
ýTwo connectors on single size model.
Water inlet
Screen display
window &
Heating unit control
panel
Connector area
Mattress pad area
ýShape and color may vary depending on the product.
Heating unit (Boiler)
Mattress pad

Label Name Descriptions
Power button Used to turn on/o the product.
Mute button Used to turn on/o the mute mode.
Lock button Used to lock/unlock the heating unit control panel.
Timer button Used to turn on/o the timer mode.
Sterilization button Used to turn on/o the sterilization mode.
Level indicator lamp Displays the amount of water inside the heating unit.
High temperature
caution lamp Displays when the temperature is above 100°F(38°C).
Timer lamp Displays the timer setting status.
Mute lamp
Displays when the mute mode is on.
Sterilization lamp
Displays when the sterilization mode is on.
Operation indicator
Displays when the Step-2 power saving mode is on.
Heating Unit Control Panel Screen Display Window
11
EQM
350

Installation Guide
12
To prevent heat loss when using on the oor, please put a mattress
beneath the bed warming mattress pad.
1ft
1. Put the pad cover on the pad.
If there is no cover, cover the pad with a pad or blanket on it.
ý If used for a long period of time without a cover or blanket, there is a risk of
low temperature burns.
2. Select the location for use.
Orient the hose-side of the pad area towards the location of the feet when
in use, and leave a space between the pad cover unit and the pad over 1
ft. (30 cm). Placing the heating unit at the same height as or slightly higher
than the pad is recommended. Do not place the heating unit on uneven
oors or on carpeted or soft oors. The heating unit will not function due
to the activation of the balance sensor.
Click!
3. Connect the hose of the pad with the heating unit
Lay the connector hose at with the navien logo facing upwards and
rmly push the pad hose connector to the water outlet/inlet connector on
the back of the heating unit until you hear a "click".
6. Set desired temperature to begin use. Refer to the "Control Panel Features" page for
instructions on setting the temperature.
ý The water shortage error code may occur 2~3 times during initial use. Repeat the water replenishment
procedure according to the above instructions until enough water is replenished.
ý We recommend using distilled water, bottled water, puried water or tap water. Using tap water may cause
partial product discoloration.
ý If the water touches the safety net inside the water inlet, it can overow. Be careful to keep the water level
low enough to prevent it from touching the safety net.
ý For continuous and stable heating, it is recommended to ll water above the second stage (the mid level)
before or while using.
5. Fill the heating unit with water.
ةPrepare the water.
(The amount of water to be lled is approximately 1,500ml for King size,
1,350ml for Queen size, 1,050ml for Single size.)
تOpen the water inlet cap by turning it counterclockwise.
ثSlowly ll with water while checking the level indicator lamp.
جFill with water until the high water level is displayed on the level indicator
lamp and wait for a brief period.
ح
As the water is transferred to the pad from the heating unit, the low water level
and water shortage error will be displayed again. Fill with water as done before.
خAfter water lling is complete, close the water cap by turning it clockwise.
Then, as the water level indicator lamp blinks, the check lamp turns on.
4. Connect the power cord to the power outlet and press the power button to turn on
the heating unit. (water shortage error code) will be displayed when turned
on for the rst time.

Control Panel Features
13
You can turn the power on and o by touching the power button on the heating unit. The default
temperature is 95°F(35°C) on both sides. It will change and display the current temperature immediately.
When power is turned o and restarted, the temperature is automatically set to the previous operating
temperature.
The current temperature is displayed on the left of the display window, and the set temperature is
displayed on the right.
For single size
If the heating unit has not been operated for 30 seconds, it goes into step 1 power saving mode.
(Screen brightness decreases)If the power saving mode is maintained for more than 1 minute,
the power saving mode is entered in step 2 and the "Operation indicator" icon is displayed to
indicate normal operation. This indicator icon will display for sides that are being heated. If only
one side is being heated, the indicator icon will only be displayed on that one side. To resume
control of the heating unit, touch any button to exit power saving mode.
Power saving mode
Power On and O
The heating temperature can be set between 82°F(28°C) through 113°F(45°C). The queen and
king sizes are equipped with dual heating function which can set the left and right temperatures
independently. When setting the temperature above 100°F(38°C), the high temperature entry
mode is applied for safety and the high temperature warning lamp will be lit.
The left and right temperature of the pad can be set in
1
°F
increments with the "+/-" buttons on the
left/right display screen. When the desired temperature is displayed on the screen, setting will be
completed after 3 seconds.
ýSingle size do not have dual heating mode.
ýDual left/right heating is recommended to be used at 95°F
(
35
°C)
or higher.
Setting the left and right temperatures
Setting the Temperature
Setting temperatures over 100°F(38°C)
ة
When the "+" button is pressed to set the temperature above 99
°F
(37
°C
), " " will be displayed.
ت
Release the button and wait for a brief moment, the " " indicator and the high temperature
caution lamp will blink. (For about 1.5 seconds)
ثPressing the + after the brief moment will allow the temperature to be set above 100°F
(
38
°C)
.
If you touch + button again, you can set a high temperature over
100°F
(
38
°C)
.
Turning o heating on one side
Touch the "-" to reduce the temperature past 82
°F
(28
°C
)and " " will be displayed on the screen.

14
Lock Mode (Child Lock) can be set to prevent accidents caused by unit tampering
by infants or young children.
ةWith the heating unit on, touch the Lock button for 2 seconds to activate lock mode.
تWhen lock mode is activated, none of the buttons of the heating unit will work.
ثTouch the Lock button for 2 seconds to deactivate lock mode.
Setting the Lock Mode (Child Lock)
The notication sounds can be adjusted.
ةThe notication sounds can be controlled by touching the Mute button.
تOnce the volume has been muted, the mute indicator lamp will light up.
ثTo end mute mode, touch the Mute button.
Setting the Mute Mode
You can sterilize the water inside the pad and the heating unit.
ýCaution ýPlease DO NOT use the bed warming mattress pad when the sterilization
mode is active.
Please DO NOT consecutively activate sterilization mode.
Consecutive activation can lead to overheating errors.
Please close the water cap tightly while the sterilization mode is active,
because the water is heated at high temperature.
ةTouch the Sterilization button for 2 seconds to initiate sterilization mode.
The sterilization lamp will light up.
تThe time to completion of sterilization will be displayed on the screen, showing minutes and
seconds remaining.
ثSterilization mode lasts for 30 minutes. Once the sterilization is complete, the heating unit will
automatically turn o.
Setting the Sterilization Mode
The timer can be set for 3 to 12 hours, and the heating unit will automatically power o after
the set time has passed.
ةTouch the Timer button and the time will be start to blink on the right screen.
تSet the desired time by touching the "+/-"
ثWhen the desired schedule time is displayed, the setting is completed after 3 seconds and the screen
display changes to the temperature display.
جWhen the timer mode is activated, touch the Timer button again to cancel the timer mode.
Setting the Timer Mode

Product Storage
15
ة
Prepare a bucket or bowl to receive water from the pad. (approx. 1.8L)
ت
Hold the end of the hose and connect the water removal kit provided at the time of
purchase.
ث
Fold the pad to remove the residual water inside, or insert the included air pump into the
center of the residual water removal kit and pump slowly to remove the residual water.
How to drain the mattress pad
How to Manually Drain the Product
1
12
Make sure that the water in the heating unit and the pad has suciently cooled before
draining to prevent risk of burn.
ýIf the water has not been replaced for a long time, the mineral or other solids in the water may solidify to
create scale.
How to drain the heating unit
ةPrepare a bucket or bowl to receive the water. (approx. 1.8L)
تRemove the hose by pressing the easy connector connected to the water-inlet/water-outlet
connector at the rear of the heating unit.
ثRemove the water inlet cap by turning it counterclockwise.
جTilt the heating unit to remove the water inside and empty the heating unit.
حTo remove the remaining water from the water-inlet/outlet connector of the heating unit,
press the protruding part of the connector to extract the remaining water.
خAir dry suciently with the water inlet cap open in a shaded area.

16
If the product will not be used for a long period of time, separate the mattress
pad from the heating unit and remove the water before storing.
Dry the heating unit suciently in a shaded area, then keep in a well ventilated area away from
direct sunlight.
Lay the pad at on a at surface.
ة
Fold the pad as shown on the illustration.
ت
Store after winding the hose.
How to store the heating unit
How to store the mattress pad
1 2

Caring for the Product
17
Cleaning the heating unit
When cleaning the exterior of the heating unit, moisten a soft cloth with lukewarm water,
wring, and wipe gently.
Do not wipe the screen display and heating unit control panel with alkaline detergent.
Do not use sulfuric acid, hydrochloric acid or organic solvents (thinner, kerosene, acetone, etc.)
to clean the surface of the heating unit.
Do not attach stickers, etc. The surface may be damaged.
To clean the pad, take the cover o wipe it o with a wet towel, and dry it.
Take the cover out of the pad, then turn it inside out and zip it.
Wash it with your hands lightly in cold water.
Let the washed cover to dry naturally and cover it on a pad for reuse.
ýDo not immerse the cover in water or boil it.
ýDo not use bleach for it in severe contamination and wash it immediately.
ýDo not use machine drying.
Cleaning the mattress pad
Cleaning the pad cover

Error Code Guide
18
If an error code is constantly displayed on the display window, receive
an inspection by contacting the Navien customer support center in the US.
(877-689-1541).
Error
Code Error Description Cause Action to Be Taken
Er02 Water shortage error There is a lack of water. Replenish the water in the
heating unit.
Er05 Water tank supply
temperature sensor
error
There is a disorder in
the supply temperature. Please contact the
Navien Technical Support.
Er11 Water level detection
Error Normal water level
detection is dysfunctional. Please contact the dealer or
Navien Technical Support.
Er16 Water tank overheating
error The temperature of the
water tank is overheated. Please contact the dealer or
Navien Technical Support.
Er17 Heating disorder Error There is a disorder with
a part related to heating. Please contact the dealer or
Navien Technical Support.
Er18 Return water temperature
sensor error
There is a disorder in
the return water
temperature sensor.
Please contact the dealer or
Navien Technical Support.
Er28 Water leakage error There is a water leak
occurring from the pad
or from the boiler.
Please contact the dealer or
Navien Technical Support.

Trouble Shootings
19
If there is a problem with the product, please check the following ȴrst.
If the problem continues after checking, please contact customer support
center (877-689-1541, US).
Symptom Cause Action to Be Taken
The heating unit
works normally
but the pad is
not warm
Poor connection between
heating unit and pad
Check whether the connector of the pad
has been connected until there is a "click"
sound.
Circulation disorder due
to the location of heating
unit and pad
1) When using on a bed, check whether the
pad connecting hose is drooped and laid in
a U shape.
2) Organize the hose so that the connecting
hose is spread out for smooth circulation.
Circulation disorder due
to air pressure inside pad
1) Set at the maximum temperature and reset
the power 2 to 3 times.
2) After operating for about an hour, the air is
discharged naturally, and smooth use is
possible.
Water shortage Heating may not work if there is a shortage
of water, so suɚciently replenish water.
Power does not
turn on
Poor contact with outlet Check the connection with the outlet.
Dysfunctional
balancing sensor
Check whether the heating unit is on
a hard surface. (No Carpet)
Noise occurs
Initial high speed mode
motor Rotation
When initially connecting, high speed mode
may operate to supply water for 3 minutes and
rotating noise may be heard, but it does not
occur afterwards.
Intermittent Motor Noise
The motor will run to circulate the water in the mat
if the heating unit is plugged in but has not been
used for awhile.
The remote
control does not
work
Consumption prevention
vinyl is not removed Remove the vinyl battery cover.
Worn out battery Replace the battery.
Remote control sensor
is blocked on the heating
unit.
Clear the area near the remote control sensor
on the heating unit.
The heating
unit turns off
by itself
Timer mode Please check if the timer mode is turned on.

Detailed Specications and Dimensions
20
Category EQM350
Model name
EQM350-SSUS
EQM350-QSUS
EQM350-KSUS
Rated power consumption AC 120V, 60Hz, 290W / 340W
Water tank capacity 0.18 gal
700
Heating unit size D11 x W6.7 x H6.7 (in)
D280 x W170 x H170 (
)
Weight 4.4 lbs.
2.0
Pad 100% Polyester with environmental friendly PVC coating and
phthalate additives below standard levels
Pad size
King 76.8 x 65.0 (in)
1,950 x 1,650 (
)
Queen
76.8 x 57.0 (in)
1,950 x 1,450 (
)
Single 76.8 x 39.4 (in)
1,950 x 1,000 (
)
Cover size
King 80.7 x 68.9 (in)
2,050 x 1,750 (
)
Queen
80.7 x 61.0 (in)
2,050 x 1,550 (
)
Single 80.7 x 43.3 (in)
2,050 x 1,100 (
)
Operation method Motor circulation method (Applying BLDC motor)
Manufacturer /
Country of manufacture Republic of Korea
Certication ETL
ýPad/cover size may vary from product to product. (Product Size ± 30mm)
ýPad/cover color may vary from product to product.
This manual suits for next models
1
Table of contents
Other Navien Heater manuals