Shofu EyeSpecial C-IV Setup guide
Smart digital camera designed exclusively for dentistry
Read through the “Important Safety Instructions”
included in the package carefully before using
your camera.
Advanced Manual

ii
Before using your camera
Thank you for purchasing our EyeSpecial C-IV. The instructions mentioned below provide
necessary information on successful operation, daily maintenance and safe use of this
unit.
Please read this manual carefully before use to attain maximum benets during function
and ensure durability of this unit.
Kindly keep this manual for your future reference.
Intended use
To take intraoral photography for documentation of dental procedures.
Important precautions
For your safety
● Read through the “Important Safety Instructions” included in the package carefully for
safe and correct use.
Notice
● No part of this document may be copied or reproduced in any form by any means.
● Some information in this document might become inconsistent with the product due to
product software updates.
● The information in this document is subject to change without prior notice.
● All relevant issues have been considered in the preparation of this document. How-
ever, should you notice an omission or any questionable item in this document, please
feel free to notify your SHOFU dealer.
● In case of missing pages or disorder, please contact our local dealer for replacement.
Test shot
● Be sure to take some test shots before taking actual clinical photos to make sure that
the camera is working properly.
Data back-up
● SD memory card or Multi Media Card can be damaged by dropping or strong static
electricity and the data may be lost. Always back-up all important data in multiple loca-
tions, to your PC, CD-R, removable HDD etc.

iii
Copyright
● Any pictures that you take of existing images may be used for personal use only. Any
unauthorized copying, hiring, lending, public performance might violate the copyright
of rightful owner.
● Copyright law prohibits the use of pictures without the permissions of the rightful
owner.
Privacy policy
● The information, which can identify the specic individuals, might belong to the “Per-
sonal Information” stipulated in the “Act on the protection of the Personal Information”.
Handle all images properly in accordance with local laws and regulations.
Indemnity
● In no event shall SHOFU be liable for any infringement of privacy and damages,
including, without limitation, direct, indirect, incidental, special, consequential, or puni-
tive damages arising out of the use of the images taken with this camera.
● SHOFU will repair and replace main body and its system in case of defect within the
warranty period. However, we do not assume any responsibility for subsequent dam-
ages arising from the failure of the unit beyond the warranty period.
Disposal
● This symbol means: Do not dispose of this product together with your
household waste!
Please refer to the information of your local community or contact our
dealers regarding the proper handling of end-of-life electric and electronic
equipment. Recycling of this product will help to conserve natural
resources and prevent potential negative consequences for the
environment and human health caused by inappropriate waste handling.
For the latest information of EyeSpecial C-IV, visit our website at http://www.shofu.com. Select the
region you purchased the camera.
CAUTION
EyeSpecial C-IV conforms to the following standard for interference from radio frequen-
cies:
· Class B of the Voluntary Control Council for Interference by Information Technology
Equipment (VCCI)
· Part 15 Class B of Federal Communications Commission (FCC).
This product may cause radio interference during its use.
In such cases, users may be required to take appropriate steps. VCCI-B
· SD, SDHC, and SDXC Logos are trademarks of SD-3C, LLC.
· HDMI Logo and High-Denition Multimedia Interface are trademarks or registered trademarks of
Administrator, Inc.

iv
Contents
Before using your camera ...................................ii
Intended use........................................................ii
Important precautions.........................................ii
For your safety ..............................................ii
Notice ............................................................ii
Test shot ........................................................ii
Data back-up .................................................ii
Copyright...................................................... iii
Privacy policy............................................... iii
Indemnity...................................................... iii
Disposal........................................................ iii
Contents .............................................................iv
1 Getting to know your camera.....................1
Names of parts ....................................................1
Front view ......................................................1
Bottom view...................................................2
Back and side views......................................2
Function keys ................................................3
LCD screen indicator...........................................4
Shooting mode..............................................4
Playback mode..............................................7
Operation methods .......................................9
Getting started...................................................10
Attaching the hand strap.............................10
Attaching the lens cap strap (optional).......11
Installing batteries.......................................12
Inserting SD memory card..........................13
Removing SD memory card........................13
Removing the lens cap ...............................15
Tuning the camera on .................................15
Initial activation and setup..........................15
2 Basic technique.........................................18
Before you start taking pictures / movies .........18
Procedures........................................................18
STEP 1 Input patient information or
photograph patient record (optional)................19
Enter number...............................................19
Scanning QR code
(feature only available in conjunction with
special patient ID software) ........................20
Photograph patient record..........................21
Erase patient information............................21
Conrm patient information ........................21
STEP 2 Select shooting mode.........................22
Preinstalled modes .....................................22
Custom modes............................................24
Scanning QR code......................................25
STEP 3 Select magnication rate
(still images).......................................................28
STEP 4 Set focus distance (still images)..........30
STEP 5 Take pictures (still images)..................32
Focus and take pictures..............................32
Special functions of shooting modes................35
Mirror mode .................................................35
Face mode...................................................35
Tele-macro mode........................................36
STEP 3 Record movies .....................................37
Focus and record movies............................37
3 Advanced technique (still images)..........38
Taking photos without
auto-cropping function......................................38
How to take photos without
auto-cropping function................................39
Taking photos with manual focus......................42
How to set manual focus.............................42
How to take photos with manual focus .......43
Taking photos by adjusting focal length
manually like general digital cameras ..............45
How to take photos with focal length
set manually................................................46
4 Tips for taking photos...............................48
Tips to hold the camera.....................................48
Tips for pressing the shutter button..................48
Tips to avoid image blurring..............................49
Tips for operations.............................................49
Cause of inappropriate focus and
countermeasures........................................49
Focusing the area outside of
the AF frame................................................50
Take pictures with focus lock......................51
Fine-tuning brightness ................................52
Taking pictures with turning one side of
the ash light on ..........................................52
Focus distance in Face mode.....................53
Shadow appearing in the Face mode.........54
Inside and outside ashes for
Tele-macro mode........................................56
Tips to minimize shadow when
photographing stone models and
prostheses...................................................57
5 Playback......................................................59
Viewing your images (still images / movies).....59
Single frame playback.................................59
Reviewing other images..............................60
Thumbnail images.......................................60
Erasing images..................................................61
Erase the displayed image..........................61
Erase selected multiple images
simultaneously ............................................61
Protecting images.......................................62
Protect images............................................62
Protect selected multiple images
simultaneously ............................................62
Playing images/movies with HDMI cable ...63

v
Functions while reviewing still images..............65
Magnify / reduce images.............................65
Edit images..................................................65
Functions while replaying movies.....................68
Play..............................................................68
Pause...........................................................68
Rewind/ fast forward ...................................68
Volume.........................................................68
Stop .............................................................68
6 Transferring images to your computer...69
7 Menus..........................................................70
Shooting mode menu........................................70
Tab 1............................................................71
Tab 2............................................................73
Tab 3 ............................................................76
Tab 4............................................................78
Shortcut function in Shooting mode...........81
Playback mode menu........................................82
Setup menu .......................................................82
Tab 1............................................................84
Tab 2............................................................87
Tab 3 ............................................................89
Tab 4............................................................91
Tab 5............................................................93
QR codes for optional functions .......................96
Patient information le (.MIF)............................97
8 Note on Use................................................99
Operating temperatures..............................99
Recording media.........................................99
LCD screen (with touch panel function) ...100
Degradation of image quality....................100
Water proof and chemical resistance.......100
Others........................................................100
9 Maintenance & Storage...........................101
Maintenance..............................................101
Storage......................................................101
10 Troubleshooting.......................................102
Camera problems............................................102
Error messages...............................................103
Frequently asked questions ............................104
11 Specications ..........................................105
12 Accessories..............................................107
13 Warranty....................................................107

1
Getting to know your camera
1
1
Getting to know your camera
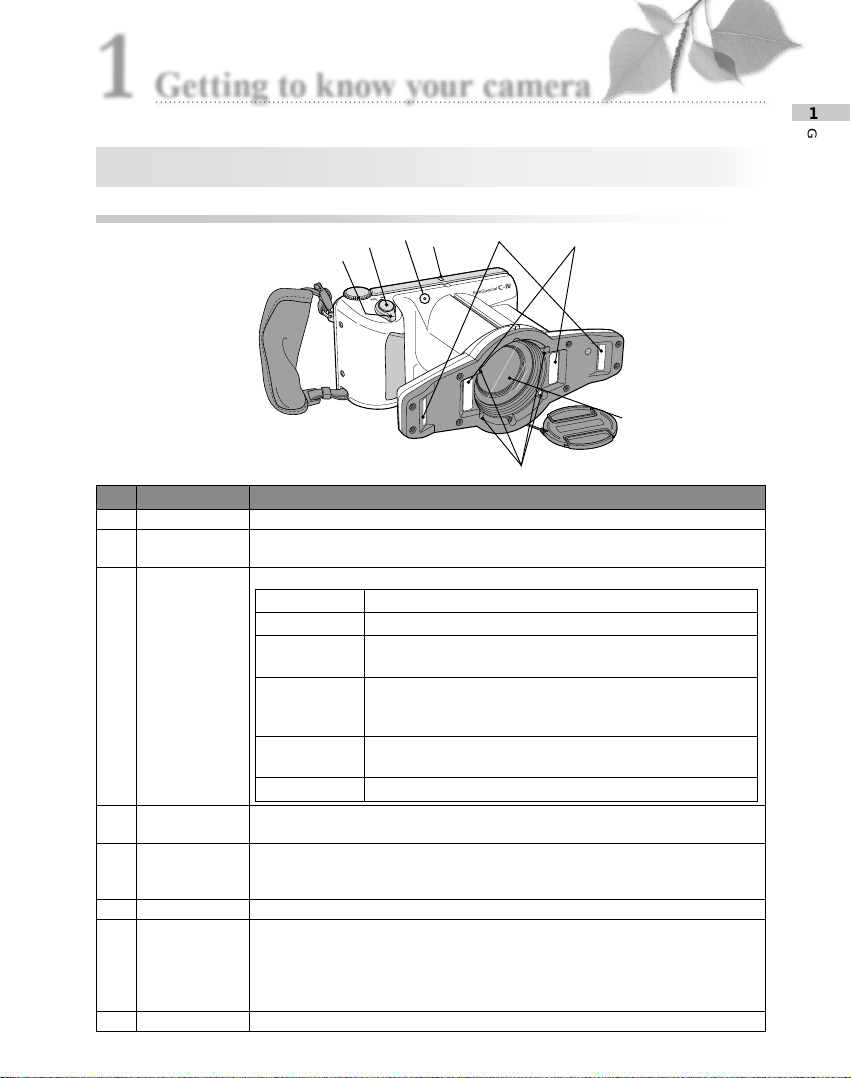
No. Part name Explanations
1 Power switch To turn the camera on / o
2Shutter button When taking photographs, half press to auto-focus. Then, press down com-
pletely to capture the image.
3Pilot lamp Indicates working state of the camera by the color and ash of the light
Action of light Working state of the camera
Green light lit. The camera is working properly.
Green light
blinking. Power save mode is activated.
Orange light lit. The camera is connecting to SD memory card.
During this time the SD memory card or batteries should not
be taken out of the camera in order to avoid losing the data.
Orange light
blinking. Malfunction is detected during activation or operation.
Red light lit. Lens error is detected.
4Outside ash Flashes in Low-glare, Whitening, Tele-macro and Isolate shade modes.
Can select to use right, left or both ashes by changing the ash mode.
5Inside ash Flashes in Standard, Surgery, Mirror, Tele-macro, and Face modes. Can select
to use right, left or both ashes by changing the ash mode (both ashes work
in Surgery and Face modes).
6Lens -
7LED light Improves focus capabilities on dark areas of the subject.
Half press the shutter button. The light remains on for 10 seconds after releas-
ing the button. The ash will then automatically turn o immediately before
taking a picture.
The lights can be turned on all the time while recording a movie.
8Microphone -
Names of parts
Front view
2345
6
7
18

2
Back and side views
No. Part name Explanations
1Strap eyelet Holds the hand strap
2Lock lever Locks the battery cover shut
3 Battery cover Holds batteries in place. Batteries are placed in the battery cells.
4Tripod socket To ax to a tripod
5Name plate Lot number etc is described on it.
6Strap hole Hole to attach the lens cap string
Bottom view
No. Part name Explanations
1 Function keys Function changes depending on the mode you select. Function
is displayed on the LCD screen.
1a:F1
1b:F2
1c:F3
1d:F4
2Dial key Changes magnication rate, forward or rewind the image taken
and scrolls through items in Menu.
3Strap mount Holds the hand strap
1d
2
1
3
4
5
6
7
9
10
8
1d
1c
1b
1a
1c
1b
1a
1
2
3
4
5
6
3
Getting to know your camera
1
No. Part name Explanations
4SET key Camera mode Function
Shooting mode Brief press : Change magnication rate
of instant playback.
Long press : Picture information turns on
and o.
Playback mode
(original size) Brief press : Display patient information.
Long press : Picture information turns on
and o.
Playback mode
Thumbnail images Brief press : Select image
Long press : -
Menu Brief press : Conrm the selected item
Long press : -
5MENU key To display Menus.
6Speaker To output key sounds and shutter sound
7Liquid crystal display monitor
(with touch panel function) To display images and menu. You can operate the camera by
directly touching the keys on the screen.
8Card slot / HDMI connector
cover SD Memory card slot and video out connector are inside.
9HDMI connector (Micro HDMI) To play images / movies on the liquid crystal projector of electric
devices with HDMI terminal.
10 SD memory card slot To insert SD/SDHC/SDXC memory card
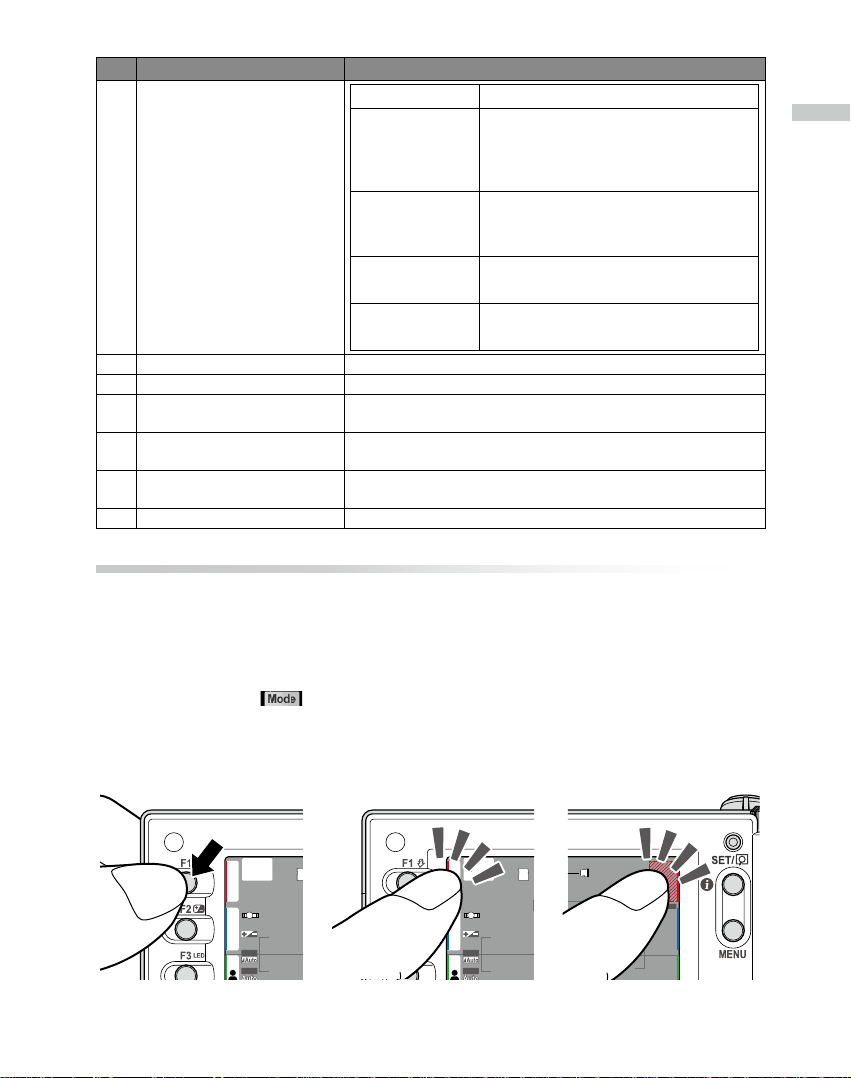
Mode
Custom
Standard
22-70cm
T
1/4 1/3
1/2.5 1/1.5 1/1.3
1/2
1.0
L R
Fine
1 2 3 4
3M
4:3
WB
FM
30 cm
+0.0
ISO
LED
Mode
Custom
Standard
22-70cm
L R
+0.0
Fine
1 2 3 4
3M
4:3
ISO
WB
FM
30 cm
LED
Mode
Custom
Standard
22-70cm
T
1/4 1/3
1/2.5 1/1.5 1/1.3
1/2
1.0
L R
Fine
1 2 3 4
3M
4:3
WB
FM
30 cm
+0.0
ISO
LED
Press keys Color barsColor tabs
Function keys
F1 – (F4 key)s are function keys which will change depending on the mode you select. They
are displayed on the upper left of the display. You can either press the key or directly touch
the screen to operate these functions. You can also use the color bars appearing on the right
side of the screen. Color bars on the right side correspond to the function keys on the left
side of the screen.
In other words, "Press (F1)", can be achieved by depressing either the physical "F1"
key, or the corresponding color bar (or tab) on the digital display on the left (or right) side of
the screen.

4
LCD screen indicator
Information described on the LCD screen for Shooting mode and Playback mode, respec-
tively, is as follows;
Shooting mode
●Still images
No. Items Explanations Reference
1Function tabs Function changes depending on the mode you select. The
functions available are displayed on the LCD monitor. -
1a: Preinstalled
modes Preinstalled modes are displayed. P.22
1b: Custom modes Custom modes are displayed. P.24
1c: Edit patient infor-
mation Menus to edit patient information are displayed. P.19
1d: Playback mode To change to Playback mode P.59
2Active shooting mode Current mode you select is displayed. P. 2 3
3Card indicator Appears when the camera recognizes the SD card. -
4Possible distance
range Possible distance range from the target at current magni-
cation rate. P. 3 0
P. 31
5[before AF] Optimal
focus distance
[after AF] Actual
focus distance
[before AF] Optimal focus distance at the current magnica-
tion rate is indicated.
[after AF] Actual focus distance from the target after focus-
ing is in green or red.
Green : Within possible distance range
Red : Outside possible distance range
P. 3 0
P. 3 2
6Close-up lens mark Appears when the close-up lens is required. P. 3 6
7Current magnica-
tion rate Magnication rate currently selected is indicated. P.28
1a
2
1
25 24 18192023
27
26
22 21
4 53 6
8
10
11
12
13
17
16
15
14
9
7
31
30
29
1b
1c
28
1d

5
Getting to know your camera
1
No. Items Explanations Reference
8Focus Indicate the focus is appropriate or inappropriate when
auto-focused.
(Green) : Focused properly
(Red) : Not focused properly
P. 3 2
9Auto-cropping Appears when auto-cropping is available. The sign is in green or
red.
Green : Auto-cropping in range
Red : Auto-cropping out of range
P. 3 2
10 Image size Horizontal to vertical ratio of the image is indicated. P.84
11 Image quality Selected image quality is indicated. P.84
12 Image information Indicated only when it’s set “ON”. P.85
13 Preview image
enlarged Appears when the preview image is magnied.
: Displayed when the center of the image is magni-
ed twice.
: Displayed when the center of the image is magnied
four times.
P.40
14 Battery indicator Remaining battery power is indicated. P.17
15 Brightness warning
sign Appears when the brightness of the object is inappropriate.
: The object is too bright.
(Whitening mode only)
: The object is too dark.
(Face and Tele-macro modes only)
-
16 Image instability Appears when the image is unstable. Hold the camera rmly
and stably. P.48
17 Storage capability Remaining storage capacity is indicated when current image
size and quality are continued to use. When “0000” ap-
pears, the memory card is full.
P.14
18 Patient information Patient information is indicated when it’s registered.
P.19 - P.21
19 AF Frame Auto-focus range. P. 3 3
20 Focusing screen Grid to focus properly P.74
21 Sharpness Sharpness of the image to be taken is indicated. * P.77
22 Contrast Contrast of the image to be taken is indicated. * P.77
23 Hue Hue of the image to be taken is indicated. * P.77
24 Instant message Operation method, shooting mode or other message is
indicated. -
25 Focus mode Indicates the focus mode. P.72
26 White balance Indicates the current white balance. P.76
27 AE mode Indicates the current Auto-Exposure mode P.75
28 ISO speed Indicates the current ISO speed. P.75
29 LED lighting Indicates that the LED light is on or o as well as its light
intensity. P.72
30 Brightness compen-
sation Indicates current state of brightness compensation. P.71
31 Flash mode Indicates the current ash mode.
is indicated while ash is being charged.
P.71
* Symbols of 21-24 are not indicated on the screen in default setting.

6
●Movies
No. Items Explanations Reference
1Function tabs Function changes depending on the mode you select.
The functions available are displayed on the LCD monitor. -
1a: Preinstalled modes Preinstalled modes are displayed. P.22
1b: Custom modes Custom modes are displayed. P.24
1c: Edit patient
information Menus to edit patient information are displayed. P.19
1d: Playback mode To change to Playback mode P.59
2Active shooting mode Current mode you select is displayed. P. 2 3
3Card indicator Appears when the camera recognizes the SD card. -
4Battery indicator Remaining battery power is indicated. P.17
5
Recordable time for a movie
Recording time Remaining recordable time is indicated.
Duration of a movie being recorded is indicated. -
6Working state ●REC is indicated while recording a movie.
■ is indicated when stop recording a movie. -
7Patient information Patient information is indicated when it’s registered.
P.19 - P.21
8Sharpness Sharpness of the image to be recorded is indicated.* P.77
9Contrast Color contrast of the image to be recorded is indicated.* P.77
10 Hue Hue of the image to be recorded is indicated.* P.77
11 Instant message Operation method, shooting mode or other message is
indicated. -
12 White balance Indicates the current white balance. P.76
13 AE mode Indicates the current Auto-Exposure mode P.75
14 LED lighting Indicates that the LED light is on or o as well as its light
intensity. P.72
15 Brightness compensation Indicates current state of brightness compensation. P.71
1a
2
13
4
5
6
15
14
13
12
1b
1c
1d
1011 9 8 7

7
Getting to know your camera
1
Playback mode
●Still images
No. Items Explanations Reference
1Function tabs Function changes depending on the mode you select.
The functions available are displayed on the LCD moni-
tor.
-
1a: Shooting mode To change to Shooting mode. P.18
1b: Enlarge image Image taken is enlarged. P. 6 5
1c: Thumbnail index Thumbnail index is displayed. P. 6 0
1d: Erase image To select images you wish to erase. P.61
2Selected mode Shooting mode used to take the photo is indicated. P. 2 3
3Card indicator Appears when the camera recognizes the SD card. -
4Image No./Total number
of images taken The No. of image currently displayed and the total number
of the images taken are indicated. -
5Date & time of the image The date and time of the picture are displayed. -
6Magnication rate Magnication rate is indicated. P.28
7Image size Horizontal to vertical ratio of the image is indicated. P.84
8Image quality Selected image quality is indicated. P.84
9Flip indicator Shows if the image taken is ipped or not.
: Original image before ip
: Flipped image
*In order to store both images before and after ip, set
“Store original image before ip” in the Setup menu.
P.87
10 Protect The image(s) having this icon is (are) locked to avoid
accidental erasing or editing. P.62
11 Battery indicator Remaining battery power is displayed. P.17
12 Patient information Patient information is indicated when entered prior to
taking a photo.
P.19 - P.21
13 Instant message Operation method, shooting mode or other message is
indicated. -
14 Register No. - File No. Folder No., in which captured image is stored, and the
File No. of the image captured are indicated.
P.90
1a
1b
1c
1d
23156
7
8
9
10
11
121314
4

8
●Movies
No. Items Explanations Reference
1Function tabs Function changes depending on the mode you select.
The functions available are displayed on the LCD monitor. -
1a: Shooting mode To change to Shooting mode. P.18
1b: Thumbnail index Thumbnail index is displayed. P. 6 0
1c: Delete a movie Press this to delete a movie currently displayed. P. 61
2Selected mode "Movie" is indicated. P. 2 3
3Card indicator Appears when the camera recognizes the SD memory
card. -
4Image No./Total num-
ber of images taken The No. of image currently displayed and the total number
of the images taken are indicated. -
5Date & time of the
image The date and time of the movie are displayed. -
6Play Press to play the movie. P.6 8
7Battery indicator Remaining battery power is displayed. P.17
8Duration of a movie Duration of the movie is indicated. -
9Patient information Patient information is indicated when entered prior to
recording a movie.
P.19 - P.21
10 Instant message Operation method, shooting mode or other message is
indicated. -
11 Folder No. - File No. Folder No., in which recorded movie is stored, and the File
No. of the movie recorded are indicated.
P.90
1a
1b
1c
2315
7
6
9 81011
4
9
Getting to know your camera
1
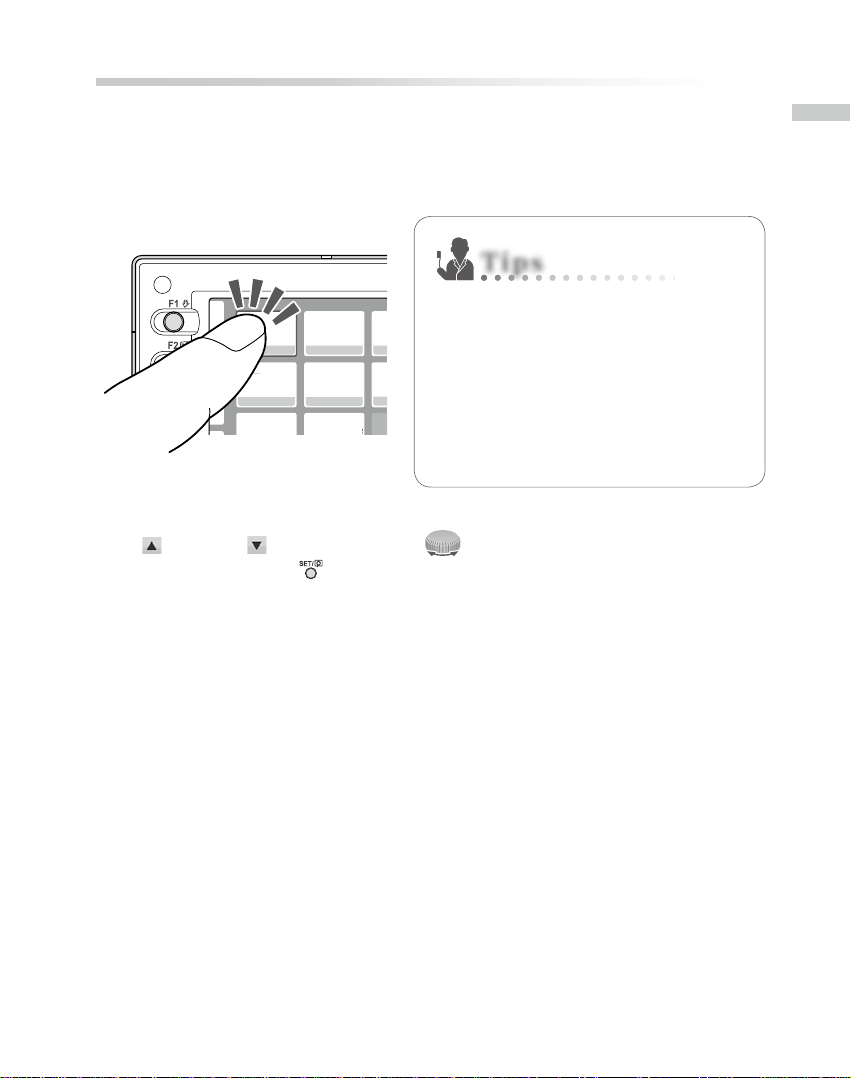
Operation methods
There are two ways to operate this camera.
●Direct screen touch
Touch one function tab you want to select.
Tips
● TouchpanelfunctionofEyeSpe-
cial C-IV
Screen keys can be operated with or with-
out gloves on, or by using a tip of a stylus.
However, securely pressing with nger is
recommended. Note that the screen does
not respond to multi-touch or swipe mo-
tions.
●Key operation
Press (F2 key) or (F3 key) or rotate the (Dial key) to select the function you would
like to perform. Then, press (SET key) to determine.
For the details of the function keys (F1-F4), refer to page 3.
Face Low glare
Shade take
10
Getting started
Perform the following preparation before you start taking images.
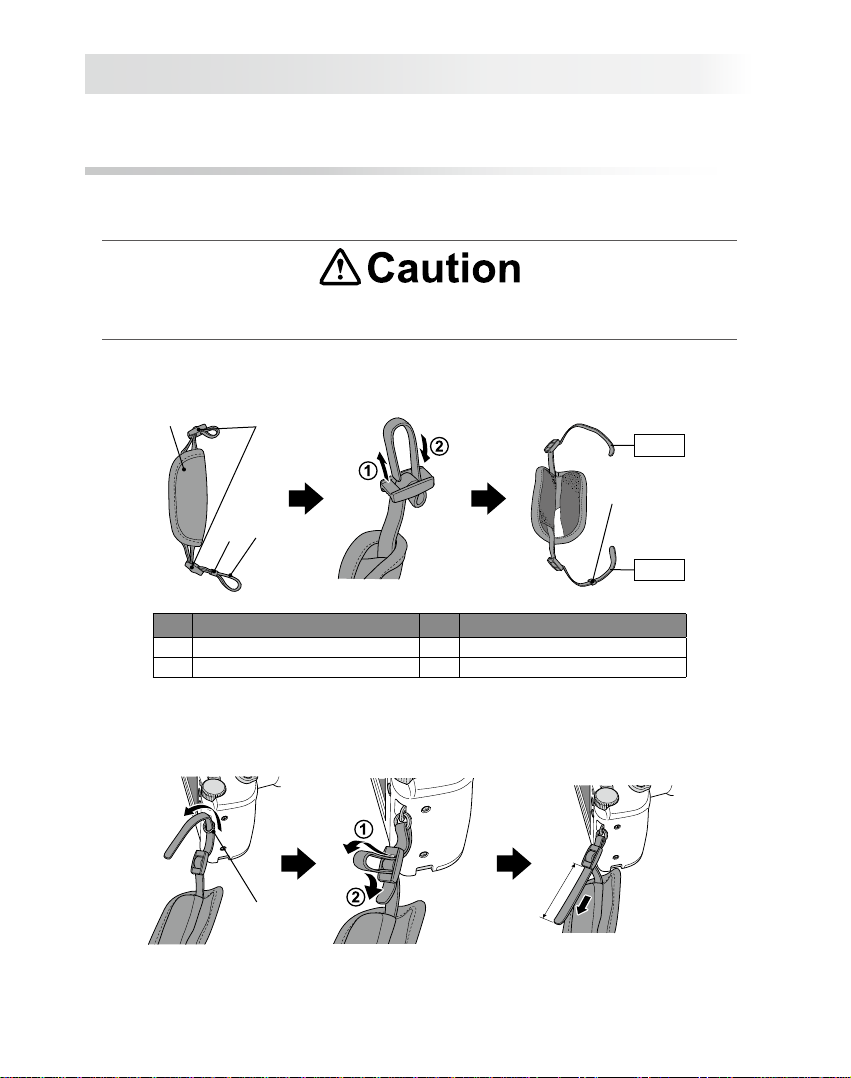
Attaching the hand strap
Attach one end of the strap to the strap mount on the lateral side of the camera and another
to the eyelet on the bottom of the camera.
● Always use the strap to avoid accidental dropping of the camera. This might cause
injuries.
1 Opentheapandpullthebeltoutofthe2adjusters.
12
3
4
4
Lower
Upper
No. Name No. Name
1Flap 3Belt
2Slide adjuster 4Retainer clip
2Attach one end of the strap to the strap mount on the upper lateral side of the
cameraandadjustthebeltlength.
Approx. 5-8cm
(2-3 inches)
Strap mount

11
Getting to know your camera
1
3Puttheotherendofthestrapthroughthestrapeyelet.Adjustthestrapwhile
holdingthecamerauntiltheoptimaltisobtained.
4 Feedthestrapendthroughtheslideadjustertox.
· Insert the strap into the buckle as pictured below.
Attaching the lens cap strap (optional)
1Loop the lens cap strap to the strap hole. Take the lens cap itself and push it
through the loop that is sticking out.
If you do not need the lens cap strap, cut it out with scissors etc.
Reference

12
Installing batteries
The battery slot is on the bottom side of the camera. Gently turn the camera upside down to
install the batteries.
1Turn the Lock lever to the position of “UN-
LOCK”. Then, slide the Battery cover to the
front side of the camera.
2Flip up the Battery cover and insert 4 rechargeable AA nickel metal hydride (NiMH)
batteries or alkaline batteries.
3Close and slide back the Battery cover to the
original position. Then, rotate the Lock lever
to the “LOCK” position.
·Make sure to rotate the Lock lever to the
“LOCK” position to avoid dropping the
batteries.
·Use only nickel-hydride batteries or alka-
line batteries. Never use manganese bat-
teries or nickel cadmium batteries.
·Never use batteries of dierent types or
dierentmanufacturestogetherormixold
and new batteries.
·Rechargeable nickel hydride batteries may be inert and consequently it might not sup-
ply power immediately after it is purchased or left unused for a long period of time.
Recharge & discharge the battery fully about 2-3 times to restore the full function of the
batteries.
·Performance time of alkaline batteries might become shorter if they have been left
unused for a long period of time since their manufacturing date.
· Avoid using batteries in extremely cold environment as low temperatures dramatically
reduce the number of pictures you can take.
Slide back the battery
cover while pressing here.
Note
Reference
13
Getting to know your camera
1
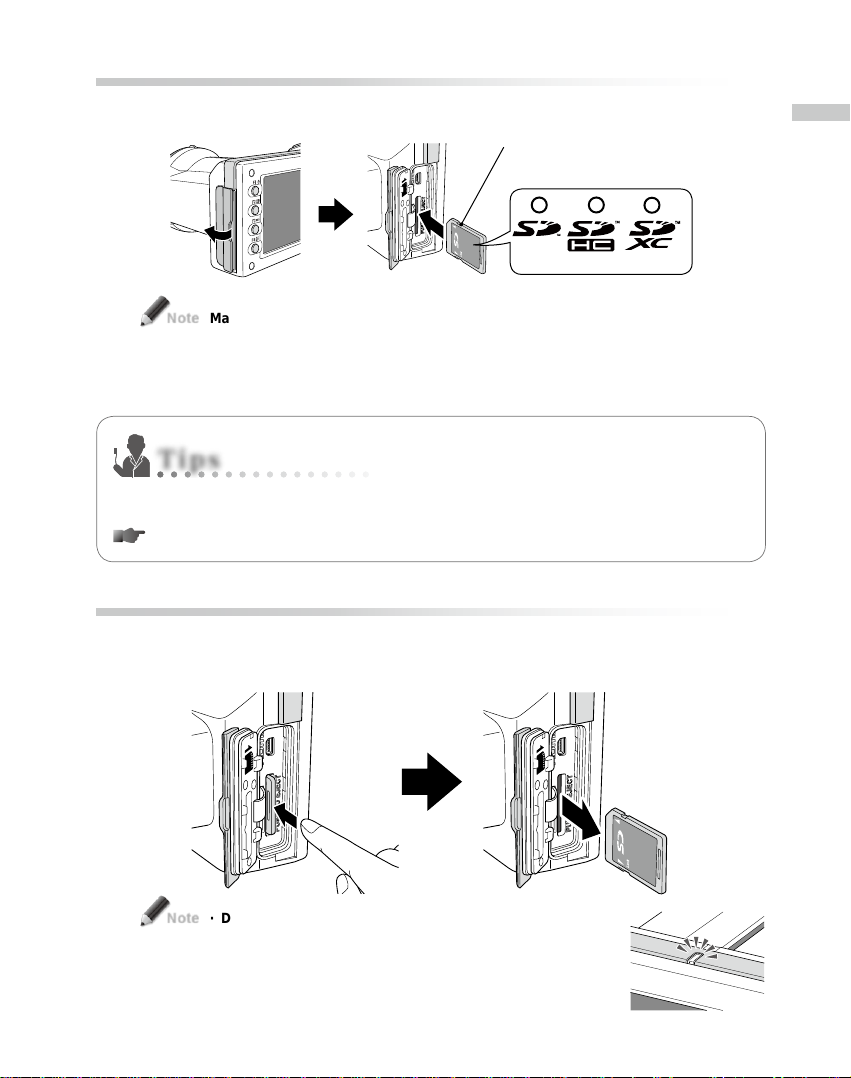
Inserting SD memory card
1Open the Card slot/HDMI connector cover and insert the SD memory card.
The card label is facing the
front side of the camera.
Up to 2GB 4 to 32GB 64 to 512GB
Make sure the card is facing the right direction. Forcing the card may damage the
camera or card.
2Close the cover securely.
If you want to use SureFile, your SD memory card must rst be formatted by the Eye-
Special C-IV camera.
P.69 “Transferring images to your computer”
Removing SD memory card
1Open the card cover. Press lightly on the edge of the memory card until you hear a
clicksoundanditwilleject.
· Do not insert or remove the memory card when the pilot
lamp is blinking in orange. Doing so may damage your
pictures, card or camera.
Note
Tips
Note

14
●Storage capacities (number of pictures)
Approximately 350 shots can be taken on a fully charged rechargeable nickel metal
hydride (NiMH) batteries (capacity 1,900mAh).
Approximately 250 shots can be taken when using new alkaline batteries (based on in-
house test results). The numbers above are just rough estimates and your results may
vary. Extensive operation of the camera setting or reviewing photographs may cause
the number of shots to be reduced.
●NoteforWi-FiSDmemorycards
Use rechargeable nickel metal hydride (NiMH) batteries for the camera when using a
Wi-Fi SD memory cards. Alkaline batteries might not be able to supply enough energy
to operate the camera properly. Also, Wi-Fi SD memory cards consume more energy
to operate than regular memory cards. The number of pictures that can be taken and
stored are less than the above mentioned number.
●Write-protectiontab
The SD Memory card has write-protected tab. Slide
down the tab to prevent valuable data from being ac-
cidentally erased from the memory card. To save, edit
or erase data on an SD memory card, unlock the card.
●Storagecapacityofamemorycard
This camera can manage approx. 9,999 images per memory card. After exceeding
5,000 shots, the message “Too many images in memory card. Please erase some imag-
es” appears on the screen when switching on the camera. When reaching 9,999 shots,
the message “Number of images reached the limit. Cannot save any more” appears and
you can no longer take photos with the memory card with no remaining capacity. Thus,
when you nd the rst message above, transfer and backup the stored data to other
storage media and erase the data stored in the SD memory card in use.
Message after exceeding 5,000 shots Message when reaching 9,999 shots
The number of photos you can store in the provided 16GB SDHC memory card with a variety of condi-
tions are shown below for your reference.
Still image (Image mode : Fine Pixels : 3M) : 9,680 shots
Movie : 340 min *Maximum time duration to record one movie is 10 minutes.
· The number of pictures you can take with one memory card varies depending on the
image size and quality you selected. The numbers provided above are for your refer-
ence.
Tips
Writable state
Write-protected
state
Note
Other manuals for EyeSpecial C-IV
3
Table of contents
Other Shofu Dental Equipment manuals


Popular Dental Equipment manuals by other brands

Durr Dental
Durr Dental Power Tower Silence 200 Installation and operating instructions

Vatech
Vatech EzRay Air W user manual

Pasta Del Capitano
Pasta Del Capitano INN 010 user manual

Ortho Technology
Ortho Technology OT-8920 Instructions for use

KERR
KERR SonicFill Instructions for use

HeyGears
HeyGears UltraCraft AirCure ChairSide quick start


KaVo
KaVo PROTAR evo Document

Durr Dental
Durr Dental CAS 1 Installation and operating instructions

Cattani
Cattani SMART Series user guide

Durr Dental
Durr Dental Tyscor VS 1 Plus Installation and operating instructions

Acteon
Acteon SOPRO SOPROLIFE user manual

DentalEZ
DentalEZ Forest installation instructions