SHOPMAX 93606C2-06A4 User manual

36"/41
11
Tool
Chests
&
Rolling
Tool
Cabinets
&
Combos
oPERATOR'S
MANuAL
SERIAL
NUMBER
PURCHASE
DATE
L = 7I:
~
1\1
cb
~~=j
R\1
if
k:::::::-'
-
-
l
~-~
Some
instructions
ond
drawings
may
not
apply
to
your
specific
unit.
Both model number
and
serial number
may
be
found
on the carton.
You
should
record
both
of
them
in
a
safe
place
forfuture
use.
WARNING&.
Jll.
7j
~
~
~
tG2
::1
i
~·
Carefully
read
and
understand
this entire operator's manual
before installing
and
using
this product.
Pay
attention to
all the cautions
and
warnings.
Your
Tools.
Your
Shop."'
. . . . ' -
..
,,
1 I " • \
, ' , \ '
I / ,
,'
, '
. I ' '
•
./J,
-~
-
1
I I . ,
I . •
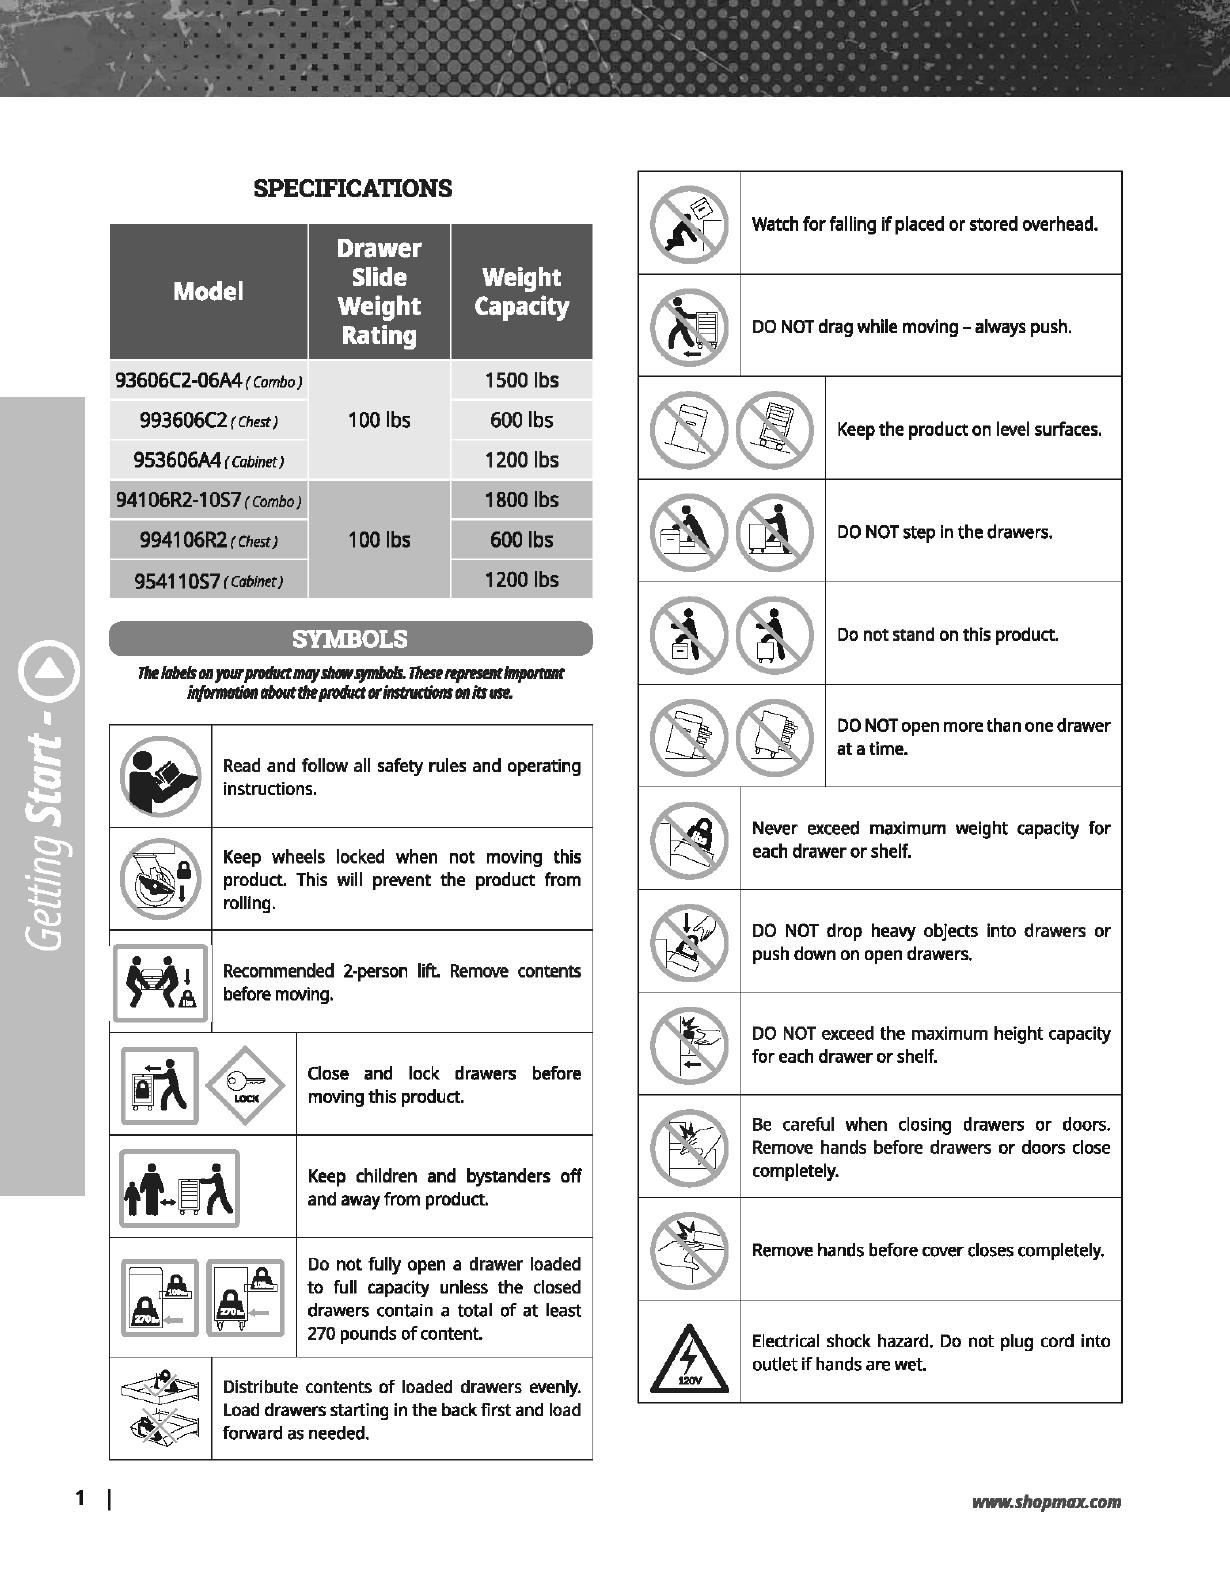
SPECIFICATIONS
93606C2-06A4
(Combo)
993606(2(Chest)
953606M(Cabinet)
100
lbs
1500ibs
6001bs
1200ibs
941
06R2-1
057
(ComboJ
9941
06R2
(Chest
1
100
lbs
1800 lbs
6001bs
95411057
(Cabinet) 1200 lbs
~
I
~
I
SYMBOLS
Read
and follow all
safe
instructions.
ty
rules and operating
Keep
wheels locked wh
product. This will prev
en
not moving this
rolling. ent the product from
Close
and lock dra
· wers before
movingthis product.
Keep
children and bysta d
d n ers
off
an
awayfrom product.
~o
not
fully open a drawer loaded
do
full capacity unless the
closed
2;~wers
contain a total
of
at least
pounds
of
content.
Distribute contents f I
Load
drawersstarti o . oaded drawers
evenly.
forward
as
needed.
ng
mthe backfirstand load
ore overhead.
Watch
for
falling
if
placed
or
st
d
DO
NOT
dragwhile moving -always push.
®®
Keep
the producton level surfaces.
DO
NOT
step inthedrawers.
Do
notstand on this product.
at
af pen morethan onedrawer
@®
DONOTo
1me.
~
Never
exceed
maximum w . h
~
each
drawer
or
shelf. elg t capacity
for
DO
NOT
drop
hea
push down on
openvyd
objects Into drawers
or
rawers.
DO
NOT
exceed
the
rna
· .
for
each
drawer
or
shel/'mum
height capacity
Be
careful when closin d
Remove
hands before dg rawers
or
doors.
completely. rawers
or
doors
close
~
Removehandsb
~
\:l)l
e orecovercloses completely.
Electrical shock hazard
outlet
if
hands are w t • Do not plug cord into
e.
MfiW.shopmacom

' ..
'
...
' ,
'
·,
''
-\
,
.......
'..
'
36"/41"Tool
Chests &Rolling Tool G:abinets &Combos
.,..
Operator's Manual
I
SIGNAL
SAFETY
WORDS DEFINITION
The
definitions
below
give
the
level
of
severity
for
each
signal
word.
I
DANGER
A I
This
symbol
is
.use~
to
ind~cat~
a
hazardous
sJtuatton
wh1ch,
if
not
avoided.
will
result
in
serious
injury
or
death.
I
WARNING
,&. I
~is
sym_bol
points
outsafety
mstruct1ons.
Read
and
follow
all
instructions
before
attempting
to
operate
this
product.
Failure
to
comply
with
these
instructions
could
result
in
serious
injury
or
death.
I
CAUTION
A I
Thi~
sy"!bol
indi~ates
a
hazard,
whtch,
ifnot
avoided,
may
result
in
minor
injury,
moderate
injury,
or
property
damage.
I
NOTE
[I] I
This
informa:ion
makes
the
product
eas1er
to
use.
ASSEMBLY
SAFETY
WARNING~
•
Assemble
only
according
to
these
instructions. lmproper
assembly
can
create
hazards.
•
Wear
ANS£-approved
safety
goggles
and
heavy-duty
work
gloves
during
assembly.
•
Keep
assembly
area
clean
and
well lit.
•
Keep
bystandersout
of
the
area
during
assembly.
•
DO
NOT
assemble
when
tired
or
when
under influence
of
alcohol,
drugs
or
medication.
• Weight
capacity
and
other product
capacities
apply to
properly
and
completely
assembled
product
only.
•
Assemble
on
aflat,
level,
hard
and
smooth
surface
capable
of
safelysupporting afully
loaded
Chest/Cabinet.
www.shopmax..com
'
\.
'
' '
\.
.
OPERATION
SAFETY
DANGER
A
•
DO
NOT
sit,
stand
orclimb
on
this unit.
•
This
product
Is
notatoynoratoy
chest.
Do
notallowchildren
toplaywith
or
nearthisitem.
•
Be
aware
of
dynamic
loading!
Sudden
load
movement
may
briefly
create
excess
load
causing
product failure.
Do
not
exceed
capacity
of
the
bench
orshelfsupporting
Top
Chest.
•
DO
NOT
open
more than
one
drawer at
once.
This
chest/
cabinet/Workbench
may
become
unstable
and
tip over
causing
personal
injuryand/or product
damage.
•
Be
careful!
when
closing
the
drawers,
the
cover
or
doors.
Remove
hands
before
the
cover/drawer/door
close
completely
to
prevent
personal
injury.
•
DO
NOT
place
any
objects
on
top
of
a
closed
lid.
WARNING&.
•
Make
sure
the lid
lock
or drawer
lock
is
in the
unlocked
position before
closing
the lid or
drawer.
Failure
to
do
so
could
resultina
defective
lock
system
and/or
personal
injury.
•
Before
locking,
make
sure
thedrawers
are
completely
closed
in orderfor
lock
system
towork properly.
•
Empty,
close,
and
lockdrawers before
moving.
•
DO
NOT
pullthis product,
push
it
when
moving.
Pushing
the
unitwill prevent
serious
ankle
and
footinjuries.
•
DO
NOT
move
the item after
stacking
the top
chest
on
the
bottom cabinet
it
could
cause
the
chest
totopple.
•
Use
only
on
flat,
level,
hard
and
smooth
surface
capable
of
safely supporting a fully
loaded
Chest/Cabinet.
Do
not
roll
Cabinet
over
concrete
seams
or other rough/uneven
surfaces.
•
DO
NOT
move
orliftwhile
loaded.
Do
notliftusing
handle(s).
•
To
prevent tipping,
move
using
supplied
handle
on
Bottom
Cabinet
only.
•
Apply
caster
brakes
unless
moving
the item.
•
Secure
thisproduct properly before moving
it
with aforklift.
•
DO
NOT
towthe product
by
mounting on truck
bed
or
any
other
moving
object.
This
may
cause
personal
injure or
product
damage.
Mountingthisproductotanyvehiclein
any
I 2

.
,..,
.. --· --
~
-
~
-
....
. \
..
, .
-,.:~--~-
v:&
..,
>.
• . . . '
..
' \
...
. ' \
• I " I
""'
•
'I
, '
\ , ' , I , .
I / '
'I
I I ' .
3
mannerwillvoidwarranty.
•
Use
asintended only. Do
not
use
for
food preparation.
•
DO
NOTalter this product
in
any
manner. For example,
do
not
weld external lockbars
or
attach electrical equipment.
• Inspect before every use;
do
not
use
if
parts are loose
or
damaged.
• Maintain product labels and nameplates. These carry
importantsafety information.
If
unreadable
or
missing, Call
us
at
841-32UJ5f6
or
B.f4.YAR.DAI.4A:,
email us
at
Info~.
com
for
a replacement.
ELECTRIC
SAFETY
DANGER
A
Follow all manufacturer's warnings and operating instructions
aboutelectric safety.
•
DO
NOTuse
in
anexplosiveatmosphere.Groundingrequired.
• ChesUCabinetplugs
must
match
the
outlet.
• Never
modify
the
plug
in
anyway.
•
DO
NOTuse
any
adapter plugs
with
earth (grounded) chest
powerstrips.
• Unmodified plugs and matching outlets will reduce
the
risk
of
electric shock.
• Electrical shockhazard. Do
not
plug
the
cord
into
the
outlet
if
your
handsarewet. Do
not
use this productneara bathtub,
a shower,
or
a swimming pool. Make sure all cords are
unplugged before
any
servicing
or
cleaning. Follow manual
for
recommended usage.
• Avoid
body
contact
with
earthed
or
groundedsurfaces.There
is
an increased risk
of
electric shock
if
your
bodyis earthed
or
grounded.
•
DO
NOT insert extension cord through
the
hole
without
grommet
in place.
• Check
the
insulation and plugs
of
extension cord before
using.
DO
NOT usecord
ifit
is
worn
or
damaged.
• Only usea three-wire extension cord
with
all three prongs
intact. Never remove
the
round groundingprong.
• Extension cord
must
be
connected
to
a 125 Volt
GFCI
protected
outlet
with
proper ground.
If
GFO
outlet
is
not
available, useanextension cord
with
GFOprotection
built
in.
•
DO
NOToverload extension cord.
• Remove extension cord
from
the
hole before moving
or
transportingstoragechesUcabineUwork station.
• Onlyusean extension cord
that
is rated
for
outdoor
use.
•
DO
NOT connect an extension cord
to
outlet
that
also
suppliescriticalsafetyequipment
with
power.
CAUTION
A
RISK
OF
ELECTRICAL
SHOCK:
Makesure all cords are unplugged
before
any
servicing
or
cleaning.
WARNING£
Changes
or
modifications
to
this
unit
not
expressly approved
by
the
party
responsible
for
compliance could void
the
user's
authority
to
operate
the
equipment.
NOTE[!]
This device complies
with
Part 15
of
the
FCC
Rules. Operation is
subject
to
the
following
two
conditions:
(1)thisdevice may
not
cause harmfulinterference, and
(2)this device must accept
any
interference received, including
interference
that
maycause undesired operation.
NOTE[!]
This equipment has been tested and
found
to
comply
with
the
limits
for
a Class B digital device, pursuant
to
Part 15
of
the
FCC
Rules. These limits are designed
to
provide
reasonable protection against harmful interference in a
residential installation. This equipment generates, uses and
can radiate radio frequency energy and,
if
not
installed and
used
in
accordance
with
the
instructions,
may
cause harmful
interference
to
radio communications. However, there is
no
guarantee
that
interference will
not
occur
in
a particular
installation.
If
this equipment does cause harmful interference
to
radio
or
television reception, which can
be
determined
by
turning
the
equipment
off
and on,
the
userIs encouraged to
try
to
correct
the
interference byone
or
more
ofthe
following measures:
• Reorient
or
relocate
the
receiving antenna.
• Increase
the
separationbetween
the
equipmentandreceiver.
• Connect
the
equipment
into
an
outlet
on a circuit different
from
that
to
which
the
receiver isconnected.
• Consult
the
dealer
or
an experienced
radionv
technician
for
help.
MfiW.shopmacom

'\,
~
'\,
~
~
:J
www.shopmax.com
' ..
'
...
' ,
'
·,
''
-\
,
.......
'..
'
36"/41"Tool
Chests &Rolling Tool G:abinets &Combos
.,..
Operator's Manual
I
'
\.
'
' '
\.
.
Use
sdssols
or
a
knife
to
cut
all
the
straps.
Uft
off
the
carton
and
dispose
of
property.
(SH
Flgurt
1&2}
AboutH
Strrlps
~
L~
I
~
~
CDittM
K~~------~~~~
~~I------~~~~
\J
:J
"-lb,ll
=====':J
I 4
.
r-~~-~
~--¥;_~
\• , .
~
-.
- ..
~
- ,
. ~
'
\
'I
'•
.·
\
, :
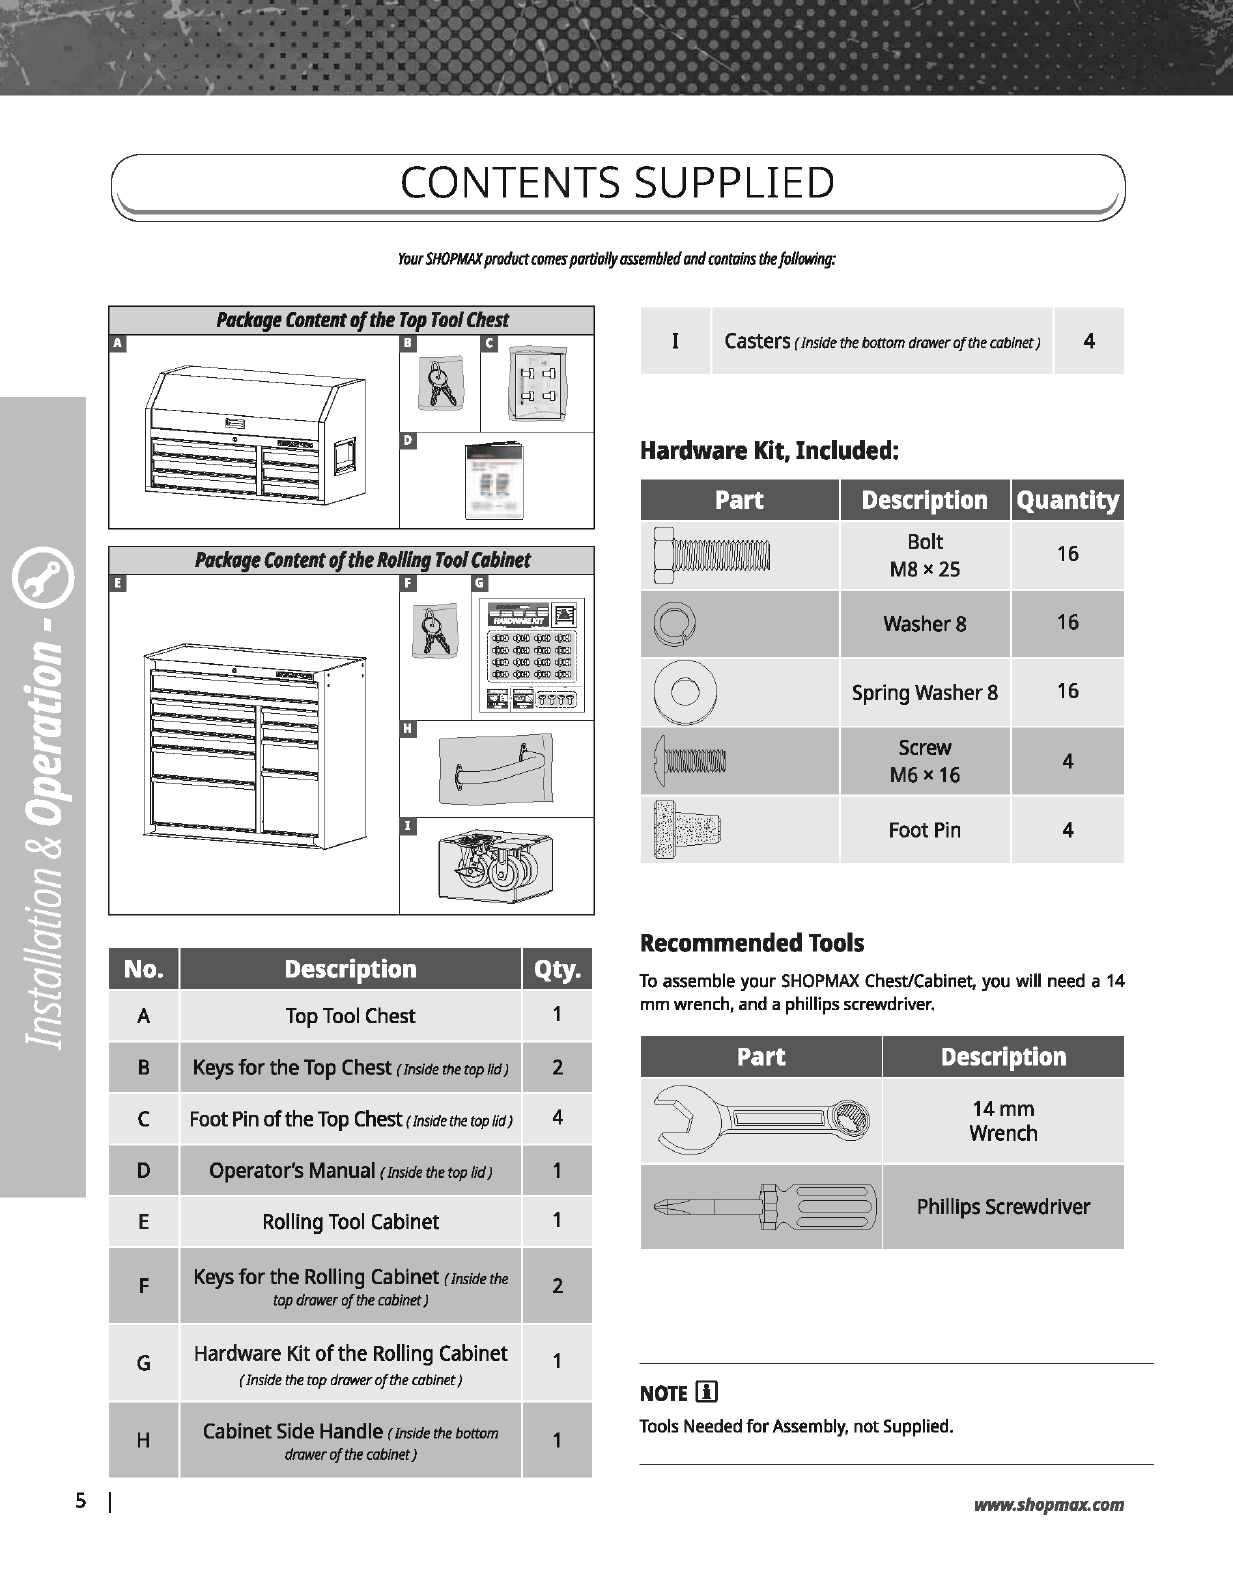
Your
SHOPMAX
product
comes
partially
assembled
and
contains
the
following:
A
c
E
G
H
s I
l'tlckage
Content
of
the
Top
Tool
Chm
Ptlckage
Content
of
the
Rolling
Tool
Cabinet
Description
Top
Tool
Chest
Keys
for
the
Top
Chest
r
Inside
the
rop
lid1
Foot
Pin
of
the
Top
Chest
(Inside
the
top
lid
J
Operator's Manual r
Inside
the
top
lidJ
Rolling
Tool
Cabinet
Keys
for
theRolling Cabinet
(Inside
the
top
drawer
of
the
cabinet)
Hardware Kit
of
theRolling Cabinet
(Inside
the
top
drawer
of
the
cabinet)
.....--
-
Cabinet
Side
Handler
Inside
the
bottom
drawer
of
the
cabinet)
1
4
1
2
1
1
Casters
(Inside
the
bottom
drawer
of
the
cabinet
J 4
Hardware
Kit,
Included:
Description
Bolt
M8
x
25
16
WasherS 16
Spring Washer 8
16
-
Screw
4
M6
x
16
Foot
Pin
4
Recommended
Tools
To
assemble
your
SHOPMAX
Chest/Cabinet, you will
need
a 14
mmwrench,
and
aphillips screwdriver.
Part
NOTE
[I)
Description
14mm
Wrench
Phillips Screwdriver
Tools
Needed
for
Assembly,
not
Supplied.
www.shopmax..com

' ..
'
...
' ,
'
·,
''
-\
,
.......
'..
'
36"/41"Tool
Chests &Rolling Tool G:abinets &Combos
.,..
Operator's Manual
I
CAUTION
A
Two
people
are
recommended
for
assembly.
BOTTOM
CABINET
CabinetSide Handle Installation
Position
the cabinet
side
handle over the
holes
on
the cabinet.
Attachwiththefour
screws
and
tightenwith a
Philips
screwdriver
(not
supplied).
~
==
---------------
Flgure3
CastersInstallation
1.
Be
sure
the drawers
are
locked
and
lay the cabinet
on
its
backside.
Using
packing
material
to
protectthe unit.
2.
Attach the two locking
swivel
casters
to the
cabinet,
on
the
same
side
as
the cabinet
side
handle,
tighten with bolts,
spring
washers
and
flat
washers.
Flgure4
www.shopmax.com
'
\.
'
' '
\.
.
3.
Repeat
to install the two static
casters
on
the opposite
side
of
thecabinet.
FigureS
TOP
CHEST
Foot Pin Installation
Press
inthefourfoot
pins
intothe bottom
of
thetop
chest.
Press
In
Figure6
Final Assembly
Using
an
assistant,
place
emptytop
chest
on
thetop
of
the
cabinet.
WARNING.&.
Make
sure
thetop
chest
is
seated
inside
thebottom
cabinet's
edges.
I 6
,..,
.
-·
-
~
-
....
. .
-,:"_'!::.-----'""'{:..
v:...
_,
J.
-
~
- ' . - .
\'
..
,
' ' . . \ ' '
• I " I
""'
•
'I
, '
\ /
/'
, , I .
·.
,
. I I I
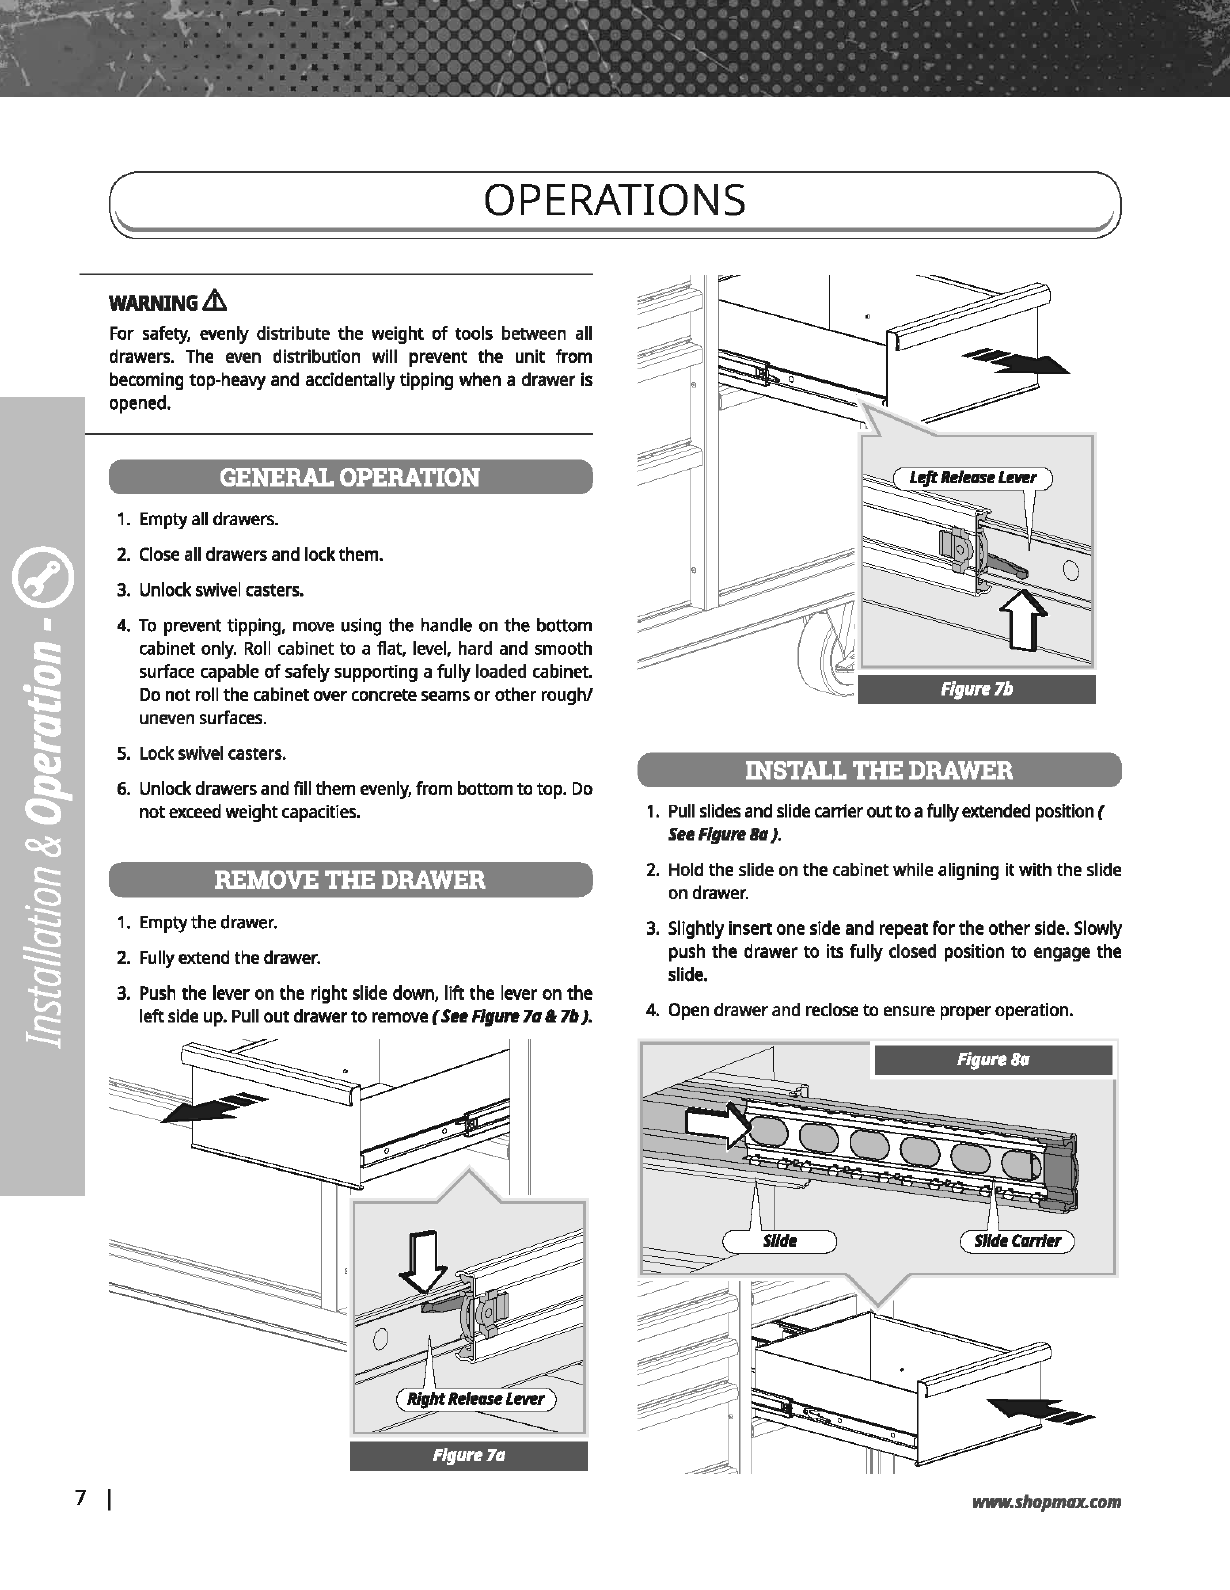
WARNINGLh
For safety, evenly distribute
the
weight
of
tools between all
drawers. The even distribution will prevent
the
unit
from
becoming top-heavy and accidentallytipping when a drawer is
opened.
7 I
GENERAL
OPERATION
1. Emptyall drawers.
2.
Close
all drawersand lockthem.
3.
Unlockswivel casters.
4.
To
prevent tipping, move using
the
handle on
the
bottom
cabinet only.
Roll
cabinet
to
a flat, level, hard and smooth
surface capable
of
safelysupporting a
fully
loaded cabinet.
Do
not
roll
the
cabinetoverconcrete seams
or
other
rough!
uneven surfaces.
5.
Lockswivel casters.
6.
Unlockdrawersand fill them evenly,
from
bottom
to
top. Do
not
exceed weightcapacities.
REMOVE
THE
DRAWER
1. Empty
the
drawer.
2.
Fullyextend
the
drawer.
3.
Push
the
lever on
the
right
slide down,
lift
the
lever
on
the
left
side up. Pull
out
drawer
to
remove
(See
Figure
7a&
7b
).
Flgure7a
Figure7b
INSTALL
THE
DRAWER
1.
Pull slides and slide carrier
out
to
afullyextended position(
See
Figure
liD).
2.
Hold
the
slide on
the
cabinetwhile aligning
it
with
the
slide
on drawer.
3.
Slightly insertone side and repeat
for
the
other
side. Slowly
push
the
drawer
to
its
fully
closed position
to
engage
the
slide.
4. Open drawerand reclose to ensure properoperation.
Figure
liD
MfiW.shopmacom

' ..
'
...
' ,
'
·,
''
-\
,
.......
'..
'
36"/41"Tool
Chests &Rolling Tool G:abinets &Combos
.,..
Operator's
Manual
I
FlgureBb
USING
THE
CASTERBRAKES
To
lockthe
swivel
casters,
step down onthelevermarked
ON.
Be
sure
to
lock all four
swivel
casters
to
prevent the chest/cabinet
from rolling.
To
unlock
casters,
push
downon the
levers
marked
OFF.
Flgure9
www.shopmax.com
'
\.
'
' '
\.
.
POWER STRIP
Passing
cords
throughthe rubbergrommet.
Be
sure
to
followall
electrical safetyprecautions.
\
Figure 10
Figure 11
Part
Description
Electric
4
Electric
Outlets
Outlets 120V-60Hz,
15Amp,
1875WaltcroraiPowerJ
USB
Slots 2
USB
Slots,
DC
SV,
Max
2.1A
Punch-outs
I
Rubber
Grommets
1additional rubber grommets
(
94106R2
·1057)
2additional rubber grommets
(93606Q.
aMI)
DANGER
A
•
DO
Nar
use
in
explosive
atmosphere.
Grounding required.
•
Electrical
shock
hazard.
Do
not
plug
cord
intothe outlet
if
your
hands
are
wet.
•
Do
not
use
thisproductnearabathtub,a
shower,
ora
swimming
pool.
I s

,..,
..
. -
~
-
....
. .
:
...,.~-~:..--
...
~....
./J.
-
~
- ' \
..
,
-,..~
'.. ' . -. '
' ' \ ' '
, I " I
""'
•
'I
, '
\ /
/'
, , I .
'.
,
. I I I
9
WARNING&
Procedures
not
specifically explained
in
this manual
must
be
performed
only
by
a qualified technician.
WARNING&
To
preventserious injury
from
tool failure,
do
not
use damaged
equipment.
If
any
part
becomes damaged, have
the
problem
corrected before
further
use.
PERIODICAL
INSPECTION
• Loose hardware.
• Misalignment
or
binding
of
movingparts.
• Brake operation.
• Caster swivel function and movement.
• Cracked
or
broken parts.
• Any
other
condition
that
mayaffect itssafe operation.
CLEAN
•
Use
milddetergentand water
to
clean drawerfronts,drawer
trim
and
the
other
surfaces.
• Grease and oil can
be
removed
with
standard, non-abrasive,
nonflammablecleaning products.
LUBRICATION
Casters
Lubricate
the
casters once a year
with
high qualityball bearing
grease. This may be required more
often
if
operating
the
tool
box
in
colderclimates.
Figure
12
Slides
Lubricate
the
slides semi-annually
with
highquality, petroleum-
based lubricant. This may be required
more
often
if
operating
the
tool
box
in colderclimates.
(
Bllll-betldng
\I
~
~
~--------------~~~
7
llr------
~~
oooooc
....__
__
Da~mper:--
__
_/
Figure
13
MfiW.shopmacom
' ..
'
...
' ,
'
·,
''
-\
,
.......
'..
'
36"/41"Tool
Chests &Rolling Tool G:abinets &Combos
.,..
Operator's Manual
I
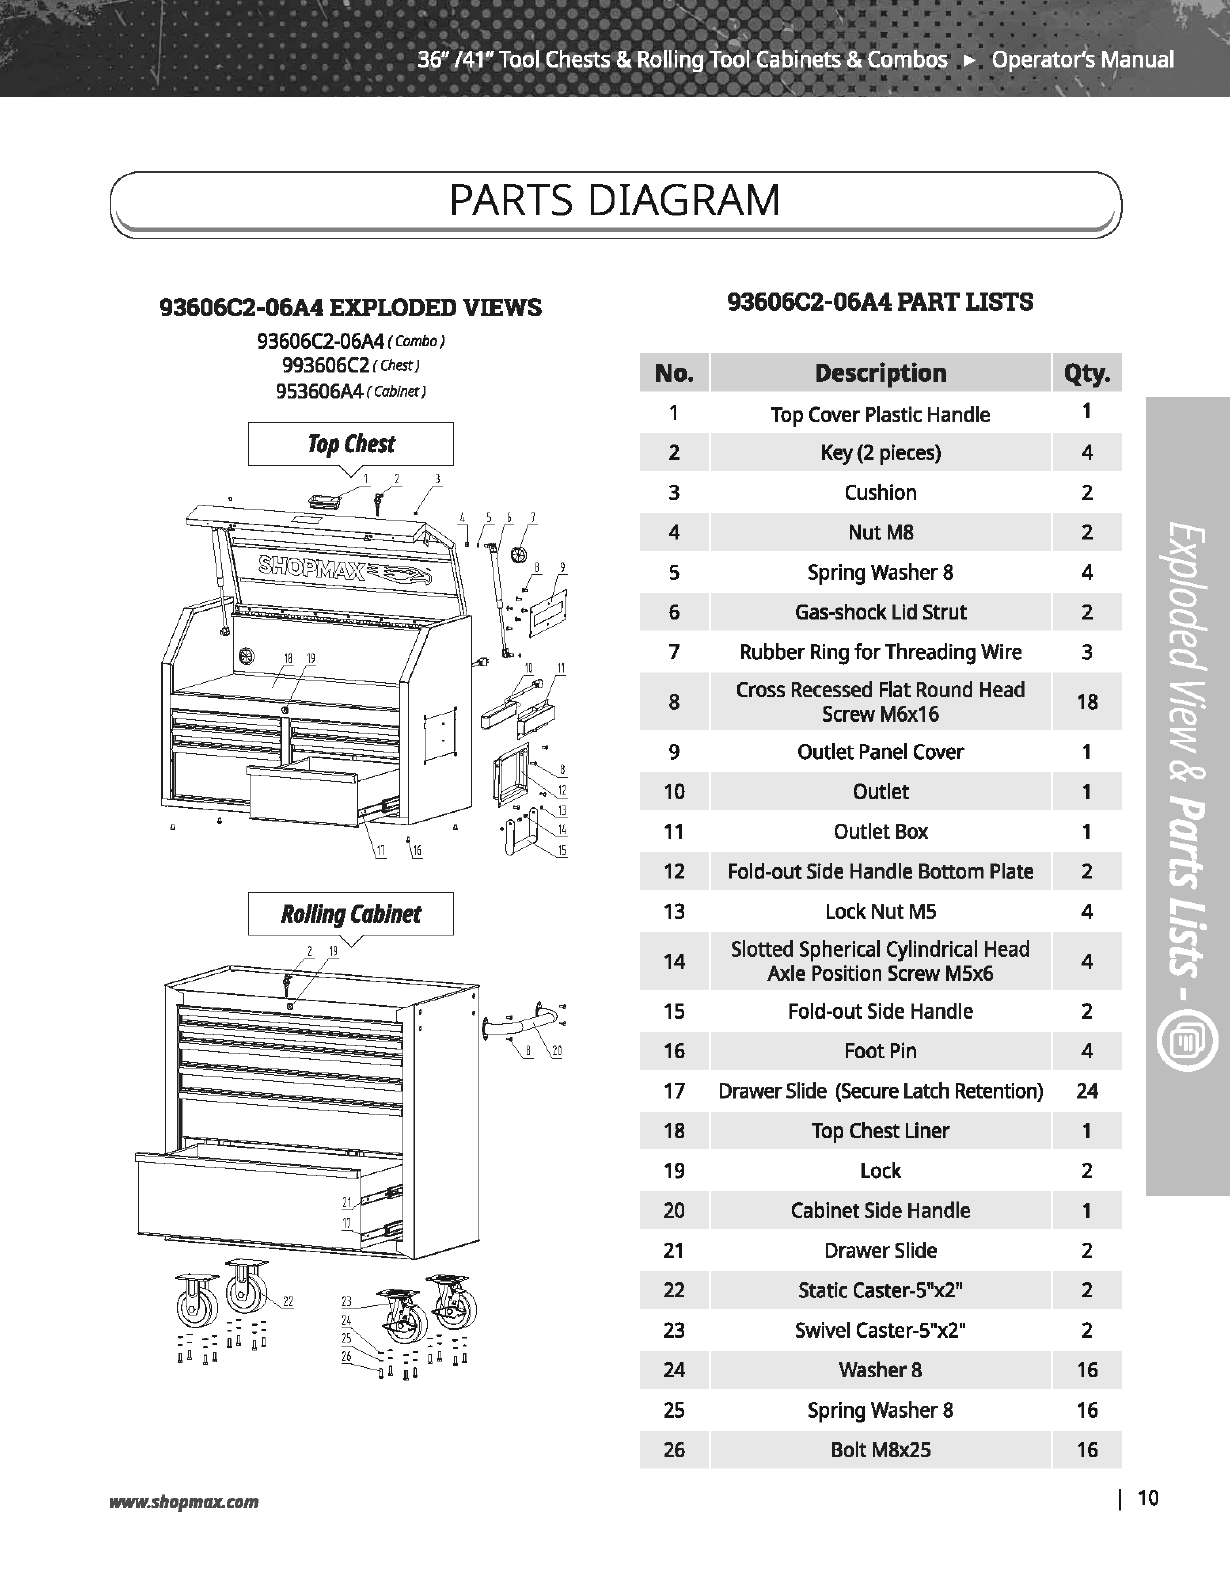
93606C2-06A4EXPLODED
VIEWS
93606C2-06A4
(Combo)
993606C2rchest)
953606A4
(Cabinet)
Top
Chest
Rolling
Cabinet
119v
rr
~
f /
~
J.
~
( ' .
.
~:
-
----
IV
~
11.._
~
www.shopmax.com
1
2
3
4
5
6
7
8
9
10
11
12
13
14
15
16
17
18
19
20
21
22
23
24
25
26
'
\.
'
' '
\.
.
93606C2-06A4PARTLISTS
Description
Top
Cover
Plastic
Handle 1
Key
{2
pieces)
4
Cushion
2
NutM8 2
Spring
Washer
8 4
Gas-shock
lid
Strut 2
Rubber
Ring
for
Threading Wire 3
Cross
Recessed
Flat
Round
Head
18
Screw
M6x16
Outlet
Panel
Cover
1
Outlet 1
Outlet
Box
1
Fold-out
Side
Handle Bottom
Plate
2
LockNut
MS
4
Slotted
Spherical
Cylindrical
Head
4
Axle Position
Screw
M5x6
Fold-out
Side
Handle 2
Foot
Pin
4
Drawer
Slide
(Secure
latch
Retention)
24
Top
Chest
Liner 1
Lock
2
Cabinet
Side
Handle 1
Drawer
Slide
2
Static
Caster-S"x2"
2
Swivel
Caster-5"x2" 2
WasherS
16
Spring
Washer
8
16
Bolt
M8x25
16
1
10
,..,
..
. -
~
-
....
. .
:
...,.~-~:..--
...
~....
./J.
-
~
- ' \
..
,
-,..~
'.. ' . -. '
' '
' ' \
, I " I
""'
•
'I
, '
\ /
/'
, , I .
'.
,
. I I I
11
1
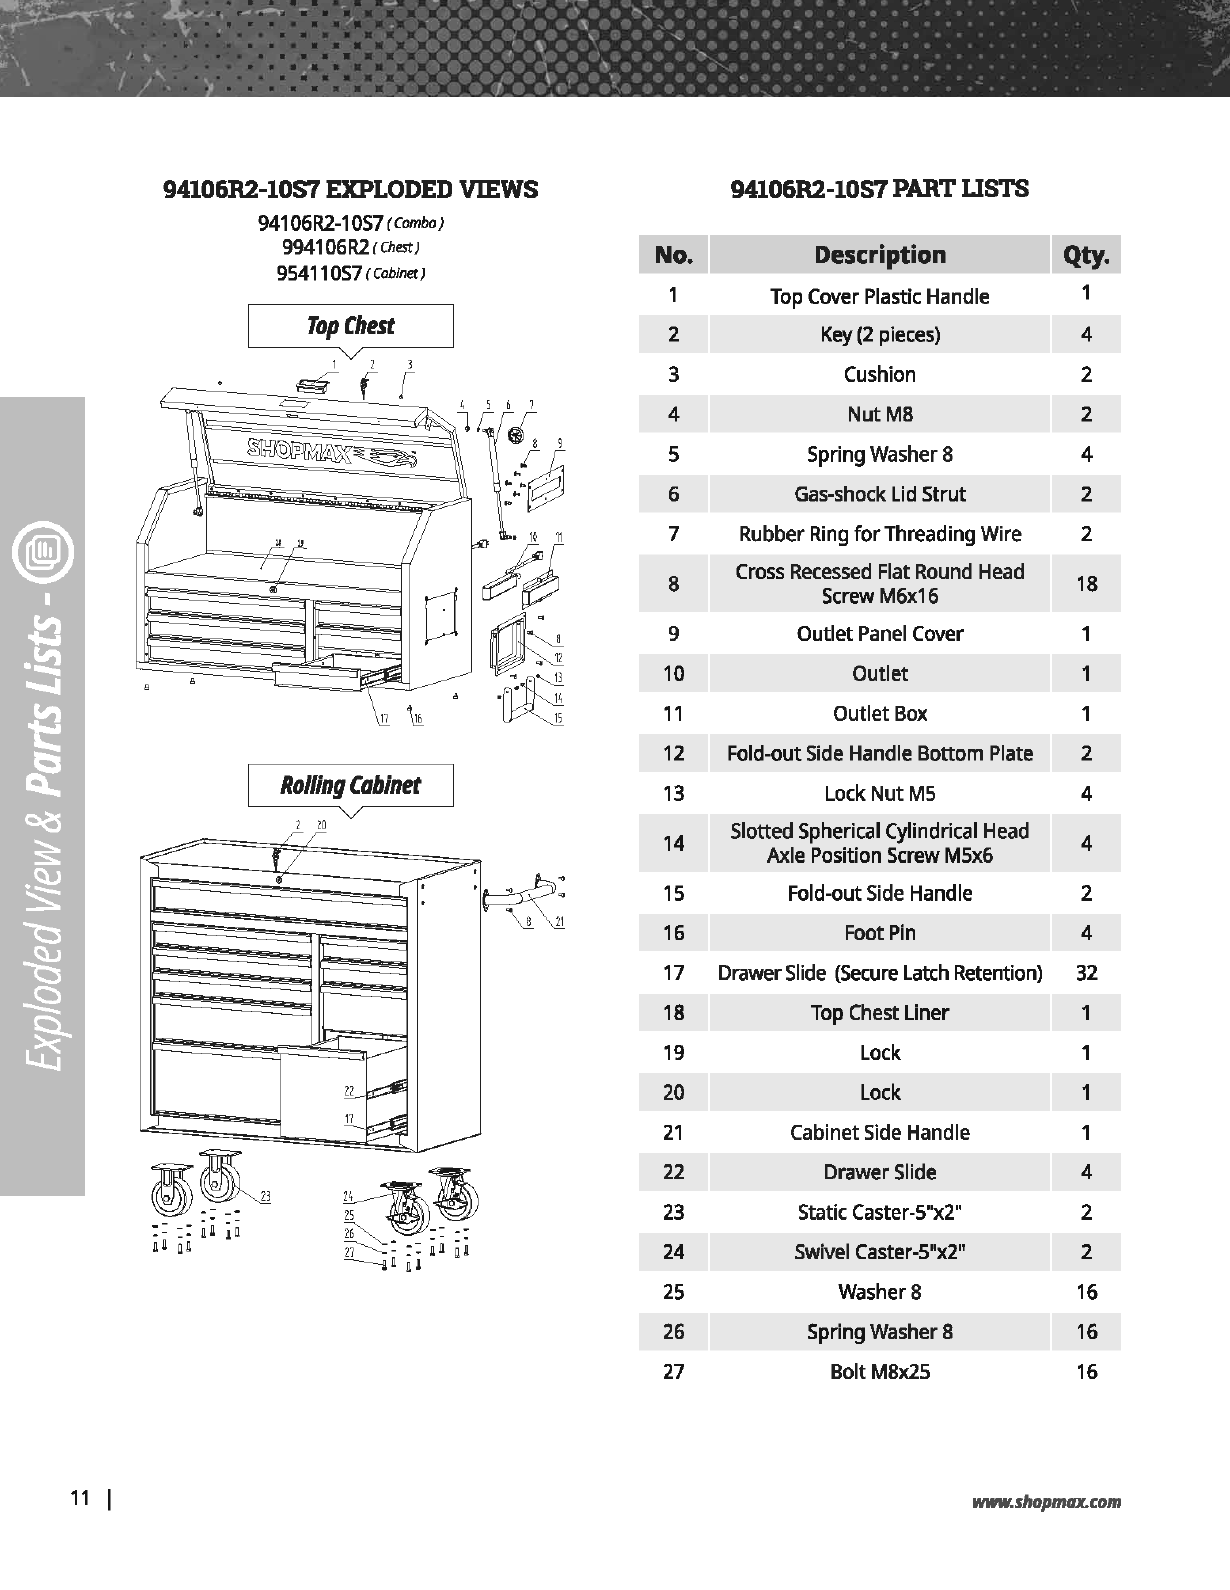
94106R2-10S7EXPLODED
VIEWS
941
06R2-1
OS7
(Combo)
9941
06
R2
(ChestJ
95411057
(Cabinet)
Top
Chest
L___~,
v~2--3
__j
8 f [
c =
~~~
\'
~
l,
,!=~~
\\
.~
1ll
r
~;t
71
~
k:::::::'"
I I
Ill
[J
~
~
--
• •
~
•
17
ill.
Rolling
Cobinet
1
20
rr
~
f/
~
~
a T • •
.
--
lJ.__
~
.1.1.._
~
94106R2-10S7PART
USTS
No.
Description
Qty.
Top
Cover
Plastic
Handle 1
2
Key
(2
pieces)
4
3
Cushion
2
4 NutMB 2
5 Spring
Washer
8 4
6
Gas-shock
Lid
Strut 2
7 Rubber
Ring
for
Threading Wire 2
8
Cross
Recessed
Flat
Round
Head
18
Screw
M6x16
9 Outlet
Panel
Cover
1
10
Outlet 1
11
Outlet
Box
1
12
Fold-out
Side
Handle Bottom
Plate
2
13
Lock
Nut
M5
4
14
Slotted Spherical Cylindrical
Head
4
Axle
Position
Screw
M5x6
15
Fold-out
Side
Handle 2
16
Foot
Pin
4
17
Drawer
Slide
(Secure
Latch
Retention)
32
18
Top
Chest
Liner 1
19
Lock
1
20
Lock
1
21
Cabinet
Side
Handle 1
22
Drawer
Slide
4
23
Static Caster-5"x2" 2
24
Swivel
Caster-S"x2"
2
25
WasherS
16
26
Spring
Washer
8
16
27
Bolt
M8x25
16
MfiW.shopmacom
' ..
'
...
' ,
'
·,
''
-\
,
.......
'..
'
36"/41"Tool
Chests &Rolling Tool G:abinets &Combos
.,..
Operator's Manual
I
'
\.
'
' '
\.
.
WARRANTY INFO
The
warranty
set
forth
below
is
given
by
YARDMAX
with
respect
to
new
merchandise
purchased
and
used
in
the
United
States
and/or
its
territories
and
possessions.
YARDMAX
warrants
its
product,
subject
to
limitations
and
exclusions
below,
against
defects
in
material
and
workmanship
for
a
period
of
three
(3)
years
commencing
on
the
date
of
original
purchase,
and
will,
at
its
discretion,
repair
or
replace,
free
of
charge
to
the
customer,
any
part
found
to
be
defective
in
material
or
workmanship
when
the
product
is
solely
used
for
residential
purposes
during
the
three
(3)
year
period.
LIWTATIONSAND EXCLUSIONS
YARDMAX's
warranty
does
not
cover
normal
wear
and
tear,
neglect,
accident,
improper
assembly,
improper
maintenance,
modification,
alteration,
improper
repair,
use
of
parts
not
approved
by
YARDMAX
or
product
damage
due
to
misuse
by
the
customer.
Replacement
of
products
or
parts
due
to
normal
wear
and
tear
is
the
responsibility
of
the
customer.
Proof
of
original
purchase
is
required.
The
warranty
is
non-transferrable.
This
limited
warranty
shall
only
apply
if
the
product
has
been
assembled,
operated,
and
maintained
in
accordance
with
Owner's
Manual
supplied
with
the
product.
No
Implied
Warranty,
including
any
implied
warranty
of
merchantability
or
fitness
for
a
particular
purpose,
applies
after
the
expiration
of
the
applicable
period
of
express
written
warranty
provided
above.
No
other
express
warranty,
whether
written
or
oral,
except
mentioned
herein,
given
by
any
person
or
entity,
including
a
dealer
or
retailer,
with
respect
to
any
product,
shall
bind
YARDMAX.
The
provisions
as
set
forth
herein
in
this
warranty
provide
the
sole
and
exclusive
remedy
arising
from
the
sale.
YARDMAX
shall
not
be
liable
for
incidental
or
consequential
damages
to
the
extent
allowable
by
law.
The
customer
may
have
other
rights
not
disclosed
herein;
and
they
may
vary
from
state
to
state.
Have
questions
oboutyour
SHOPAfAX
equipment?
Call
us
at
B47-327-IJ566
or
844-YARD~
email
us
at
www.shopmax.com
1 12

..............
-
~
.
~
--
.-
...,
___
~_...--v.....
.._,
..
-
.-..
- . ,
..
_,__.._
"~
, . .
',
'
' ' \ '
• I '
'
.,
~
'
\ ' ' , I , .
I I
·,
I •
13 1
www
.
shopmtnt.com

. .
...
~
.
• I
'
·,
''
_,
, '
\
...
\
....,
36"/41"Tool
Chests
& Rolling
Tool
C::abinets
& Combos
.,.
Operator's Manual
I
'
\.
'
' '
\.
'
lllfWW.shopmax.com
1
14

This manual suits for next models
5
Table of contents


