manuals.online logo
Brands
  1. Home
  2. •
  3. Brands
  4. •
  5. Rikon Power Tools
  6. •
  7. Tools Storage
  8. •
  9. Rikon Power Tools 25-410 Operation instructions

Rikon Power Tools 25-410 Operation instructions

Popular Tools Storage manuals by other brands

Vestil WT-2424 owner's manual

Vestil

Vestil WT-2424 owner's manual

Kendall Howard ESDW-9630-1000 owner's manual

Kendall Howard

Kendall Howard ESDW-9630-1000 owner's manual

Ryobi RWB03 Original instructions

Ryobi

Ryobi RWB03 Original instructions

Husky H27CH5TR4BGK Use and care guide

Husky

Husky H27CH5TR4BGK Use and care guide

Scheppach ts 2100 Translation from original manual

Scheppach

Scheppach ts 2100 Translation from original manual

DIVERSIFIED WOODCRAFTS SHAIN GSB-6024 Assembly instruction

DIVERSIFIED WOODCRAFTS

DIVERSIFIED WOODCRAFTS SHAIN GSB-6024 Assembly instruction

Cassese CS200 CART user & parts manual

Cassese

Cassese CS200 CART user & parts manual

Cornwell Tools CTB360AKBK Assembly instructions

Cornwell Tools

Cornwell Tools CTB360AKBK Assembly instructions

Workzone 99609 Assembly instructions

Workzone

Workzone 99609 Assembly instructions

Stanley STST83800-1 instruction manual

Stanley

Stanley STST83800-1 instruction manual

Perel ROLLER SHUTTER STORAGE CABINET Assembly instructions

Perel

Perel ROLLER SHUTTER STORAGE CABINET Assembly instructions

BGS technic 4107 manual

BGS technic

BGS technic 4107 manual

Tennsco RXHS-962484 Assembly Instructions/Parts Manual

Tennsco

Tennsco RXHS-962484 Assembly Instructions/Parts Manual

Grizzly T1240 owner's manual

Grizzly

Grizzly T1240 owner's manual

Rubi 66924 manual

Rubi

Rubi 66924 manual

Draper 77020 instructions

Draper

Draper 77020 instructions

Batavia CROC LOCK COMPACT Translation of the original instructions

Batavia

Batavia CROC LOCK COMPACT Translation of the original instructions

Pinnacle GOS196 quick start guide

Pinnacle

Pinnacle GOS196 quick start guide

manuals.online logo
manuals.online logoBrands
  • About & Mission
  • Contact us
  • Privacy Policy
  • Terms and Conditions

Copyright 2025 Manuals.Online. All Rights Reserved.

25-410
WORK STAND
Tools Required for Assembly
* 12mm or Adjustable Wrench
www.rikontools.com
25-410M2
1
23, D
4, C
5, F
LOWER
BRACE,
LONG
UPPER
LEG
6, E
7, A
9
TO ASSEMBLE
Assemble the long sides of the stand first, then complete the stand
by attaching the short ends to the long, assembled sides.
DO NOT FULLY TIGHTEN THE NUTS UNTIL THE WHOLE STAND IS
COMPLETE, AND RESTING ON A FLAT SURFACE.
1. 1. Assemble the upper brace, long (Part #3, D), to the upper leg
pieces (#7, A) with the carriage bolts (#1) and nuts (#2).
NOTE: The upper brace has a hole at each end. These two holes
should be on top when the leg stand is completely assembled.
2. Assemble the lower legs (#8, B) and the lower brace, long (#5, F) to
the upper legs. Align all three pieces and fasten together with the
bolts and nuts.
3. This will complete one long side. Repeat the process for the other 3. This will complete one long side. Repeat the process for the other
long side.
4. Assemble the upper brace, short (#4, C) to the assembled upper
legs (#7, A). NOTE: The upper brace, short, has a hole at each
end. These two holes should be on top when the leg stand is
assembled, and align with the top holes in the upper brace, long
(#3, D) for the mounting of machinery, or a top board.
5. 5. Assemble the lower brace, short (#6, E) to the long side at the
middle, upper leg and lower leg joint area.
6. This will complete one short side. Repeat the process for the other
short side to fully assemble the stand.
7. Fit the rubber feet (#9) onto the ends of the lower legs.
8. Once all parts are in place, place the stand on a flat surface and
then tighten all of the hex nuts.
DESCRIPTION QTY. MFG. PART NO.KEY NO.
1
2
3
4
5
6
77
8
9
32
32
2
2
2
2
44
4
4
P25-410-1
P25-410-2
P25-410-3
P25-410-4
P25-410-5
P25-410-6
P25-410-7P25-410-7
P25-410-8
P25-410-9
Carriage Bolt M8x1.25-16
Flanged Hex Nut M8x1.25
Upper Brace, Long (D)
Upper Brace, Short (C)
Lower Brace, Long (F)
Lower Brace, Short (E)
Upper Leg (A)Upper Leg (A)
Lower Leg (B)
Rubber Foot
8, B
WORK STAND
25-410
The 25-410 Work Stand will hold portable planers, jointers, sanders and other small machinery. The
addition of a plywood / wood table board (not included) may be required to be attached to the stand top to
secure these machines in place, if their mounting holes do not align with the four pre-bored holes in the
stand’s top corners.
Floor to Top of the Stand - 29-1/4”
Top Dimensions - 23” x 14”
Base Dimensions - 31” x 22”
MOUNTING THE PLYWOOD / WOOD TO THE STAND
- If the mounting holes in your machine line up with the four pre-bored holes in the stand’s four corners,
the addition of a plywood / wood top is not necessary. Just use these holes to fasten the machine onto
the stand with nuts and bolts.
NOTE: The RIKON 25-130H Planer will attach directly to the stand without the use of a board.
-- If a board is required, cut a piece of 5/8” to ¾” thick plywood or wood panel to the top dimensions of the
stand (23” x 14”) or a bit larger, per your preference.
- Place the wood onto the stand.
- Fasten the wood in place to the stand with screws or bolts (not included). Use the pre-bored holes in the
stand’s four corners, or bore new holes through the upper braces for added security.
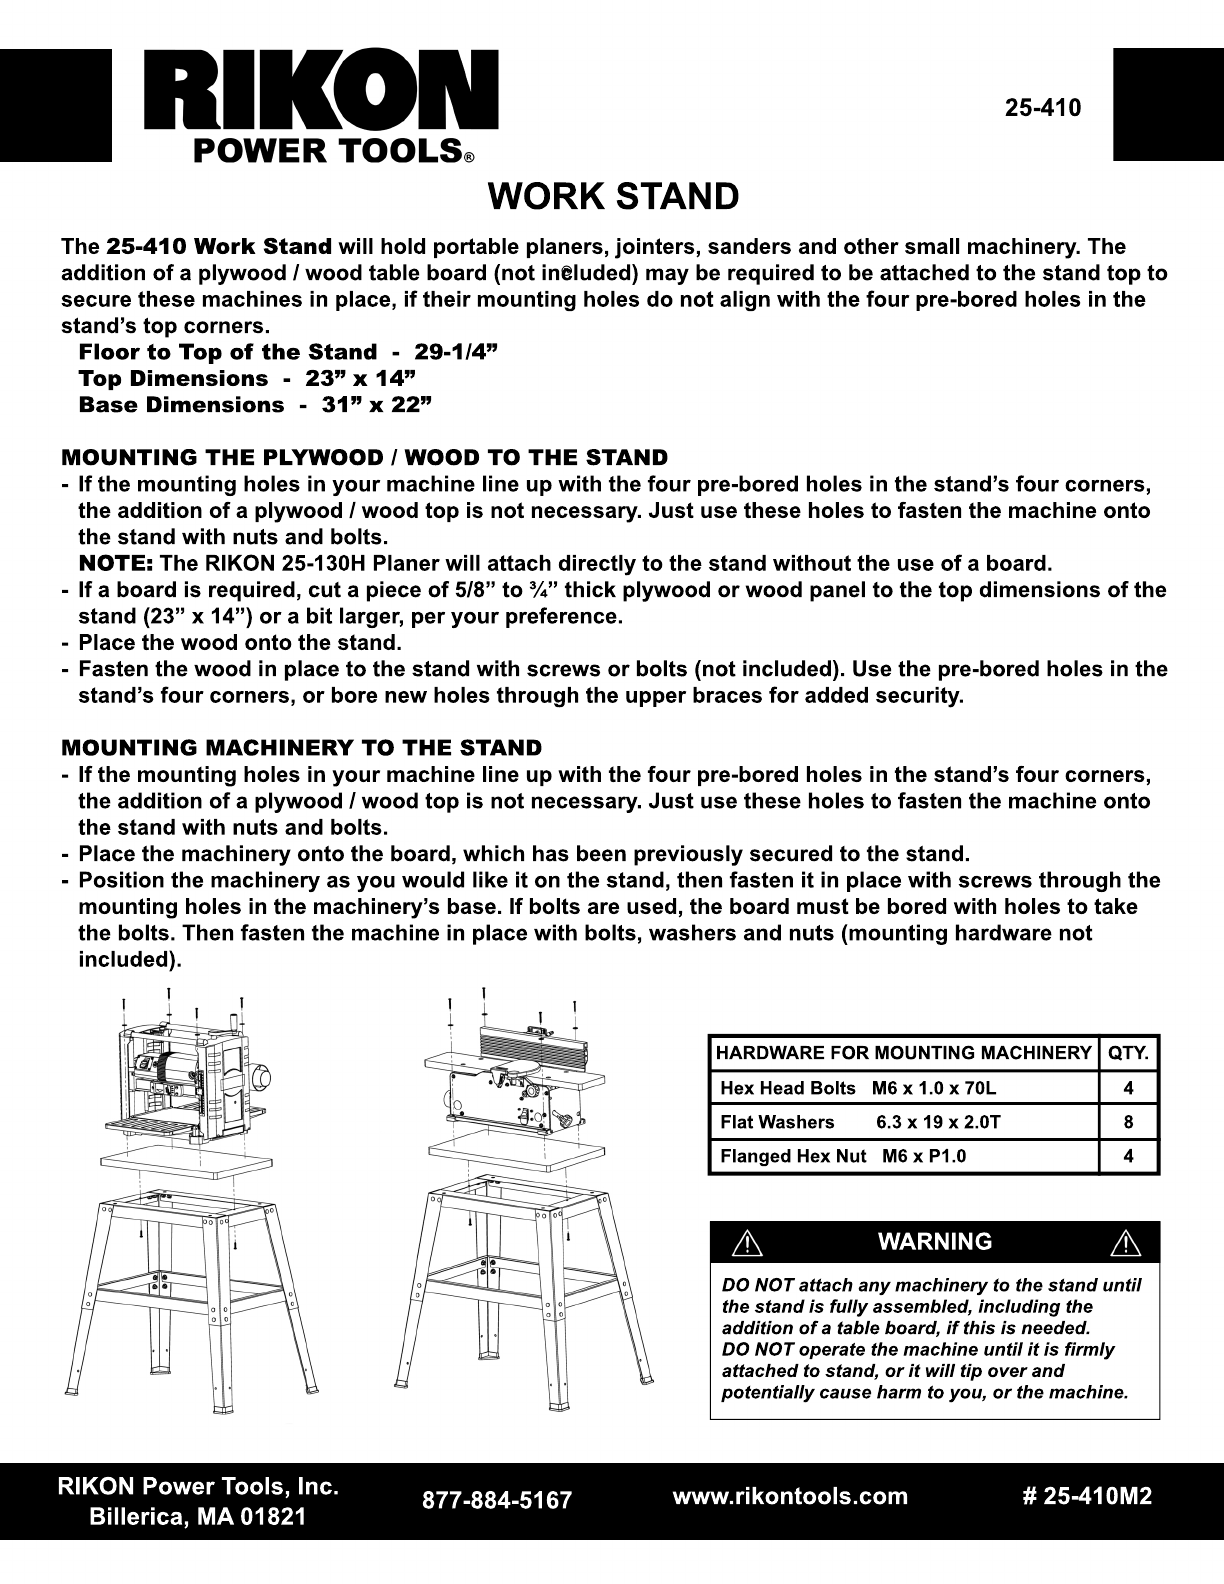
MOUNTING MACHINERY TO THE STAND
-- If the mounting holes in your machine line up with the four pre-bored holes in the stand’s four corners,
the addition of a plywood / wood top is not necessary. Just use these holes to fasten the machine onto
the stand with nuts and bolts.
- Place the machinery onto the board, which has been previously secured to the stand.
- Position the machinery as you would like it on the stand, then fasten it in place with screws through the
mounting holes in the machinery’s base. If bolts are used, the board must be bored with holes to take
the bolts. Then fasten the machine in place with bolts, washers and nuts (mounting hardware not
included).
WARNING
DO NOT attach any machinery to the stand until
the stand is fully assembled, including the
addition of a table board, if this is needed.
DO NOT operate the machine until it is firmly
attached to stand, or it will tip over and
potentially cause harm to you, or the machine.
HARDWARE FOR MOUNTING MACHINERY QTY.
4
8
4
Hex Head Bolts M6 x 1.0 x 70L
Flat Washers 6.3 x 19 x 2.0T
Flanged Hex Nut M6 x P1.0
RIKON Power Tools, Inc.
Billerica, MA 01821 877-884-5167 www.rikontools.com # 25-410M2