Shure 25 Series User manual

25, 35, and 44 Series
Phono Cartridges
©2004, Shure Incorporated
27B3116 (Rev. 2)
Printed in U.S.A.
4 – 5
0
4 – 5 3 grams
Shure cartridges can be used in DJ or Hi-Fi applications. Note: the M70BX is not
recommended for heavy scratching.
Install Your Cartridge
1. Carefully remove the stylus from the
cartridge. See Figure 1.
2. Use needle-nose pliers to connect the
colored wires from the tonearm headshell
to the corresponding pins on the cartridge.
See Table 1 and Figure 2.
Table 1. Cartridge Wiring
1. Attach the cartridge to the headshell us-
ing the screws supplied. See Figure 3.
Tighten the screws after positioning the
cartridge (and headshell weight, if desired)
according to one of the methods described
below.
2. Carefully insert the stylus into the car-
tridge.
Choose a Method for Cartridge Positioning
Hi-Fi Setup: For maximum fidelity and minimal record wear, position the
cartridge using an alignment protractor or the overhang gauge supplied with
your turntable. Level your tonearm (See Figure 7). Use Table 2 and “Setting
a Precise Tracking Force”, below, to set the typical tracking force for
your cartridge. Set the anti-skate control to the same number as the
tracking force.
Figure 4
Standard DJ Setup: Mount cartridge at rear of headshell. Set tonearm
height to 4-5. Set tracking force to 3 grams. Set anti-skate con-
trol to 0.
Figure 5
Unorthodox DJ Setup: Reverse the counterweight
and mount it flush with the end of the tonearm. Mount
cartridge (with headshell weight) flush with the front
edge of the headshell. Set an-
ti-skate control to 0.
Figure 6
HEADSHELL WIRE COLOR PIN
RIGHT “HOT” RED R
RIGHT GROUND GREEN RG
LEFT “HOT” WHITE L
LEFT GROUND BLUE LG
Figure 1
Figure 2
Figure 2
Optional Headshell
Weight (part number at
front)
Level Your Tonearm Extra Skip-Resistance for DJs:
Mount cartridge at a 23 degree angle as
shown, so that the cartridge points to the tonearm
pivot. Set anti-skate to 0.
0
23O

Setting a Precise Tracking Force
1. After mounting the cartridge on the to-
nearm, rotate the circular weight at the back
of the tonearm until the needle floats evenly
above the record.
2. Hold the circular weight in place and ro-
tate the calibration ring to read zero. The to-
nearm should still float evenly above the
record.
3. Rotate the weight until the calibration ring
indicates the desired tracking force.
Care and cleaning
• DJs: Don't use more tracking force than
necessary to prevent skipping. Excess
force will burn records, damage needles,
and reduce sound quality.
• Clean the stylus with the supplied cleaning
brush. Important: brush from the back to
the front only, as shown in Figure 9.
Table 2. Cartridge Specifications
All Cartridges and Styli
• Standard 1/2 Inch mount for DJ turntables
• Wide diameter styli for reduced record wear
Optimum Load . . . . . . . . . . 47 K Ohms, M44: 400-500 pF
M35, M70BX, SC35C: 200-300 pF
Inductance . . . . . . . . . . . . . . . . . . . . . . . . . . M44: 720 mH
M35, SC35C: 425 mH
M70BX: 600 mH
Channel Separation . . . . . . . . . . . . . . . . . . 20 dB at 1KHz
Certification
Conforms to European Union Directives, eligible to bear CE
marking; meets European Union EMC Immunity require-
ments: EN 50 082-1, 1992.
Full One-Year Warranty
Shure Incorporated ("Shure"), 222 Hartrey Avenue, Evan-
ston, Illinois 60202-3696, warrants to the owner of this prod-
uct that it will be free in normal use of any defects in work-
manship and materials for a period of one year from date of
purchase. You should retain proof of date of purchase.
Shure is not liable for any consequential damages. If this
Shure product has any defects as described above, careful-
ly repack it and send it prepaid to: Shure Incorporated, At-
tention: Service Department, 222 Hartrey Avenue, Evan-
ston, Illinois 60202-3696. Outside the United States, return
the product to your dealer or Authorized Service Center for
repair. The product will be repaired or replaced and re-
turned to you promptly. If it cannot be repaired or replaced,
you may elect to receive a refund. This warranty does not
include stylus wear.
Patent Notice
Manufactured under one or more of the following U.S. Patents: 4,275,888; 4,441,177; 4,489,442.
Instalación de la cápsula
Las cápsulas Shure pueden utilizarse con equipos de locu-
tor o de alta fidelidad. Nota: La M70BX no se recomienda
para “rasguñado” intensivo.
1. Quite cuidadosamente la aguja de la cápsula. Vea la
Figura 1.
2. Use alicates de punta para conectar los alambres del ca-
bezal del brazo con las clavijas de la cápsula, conforme a
la Tabla 1. Vea la Figura 2.
3. Acople la cápsula al cabezal con los tornillos que se
suministran. Vea la Figura 3. Apriete los tornillos tras colo-
car la cápsula (y el peso del cabezal, si lo desea) aplicando
uno de los métodos que se indican a continuación.
4. Introduzca la aguja en la cápsula.
Elección de un método para colocar la cápsula
•Configuración para alta fidelidad (Figura 4): Para
lograr la máxima fidelidad con el mínimo desgaste del
disco, coloque la cápsula con un transportador de alin-
eación o un medidor de proyección que se suministra
con el tocadiscos. Nivele el brazo (vea la Figura 7).
Consulte la Tabla 2 y el apartado “Ajuste de la fuerza de
seguimiento precisa”, que figura más adelante, para
ajustar la fuerza de seguimiento normal correspondi-
ente a la cápsula. Ajuste el control antipatinaje a la mis-
ma cifra que la fuerza de seguimiento.
•
Configuración estándar para locutores (Figura 5):
Coloque la cápsula en la parte posterior del cabezal.
Ajuste la altura del brazo a 4-5. Ajuste la fuerza de
seguimiento a 3 gramos. Ajuste el control antipatinaje a 0.
•Configuración no ortodoxa para locutores (Figura
6): Invierta el contrapeso y colóquelo a ras con el ex-
tremo del brazo. Coloque la cápsula (con el peso del
cabezal) a ras con el borde delantero del cabezal.
Ajuste el control antipatinaje a 0.
Nivele el brazo: Vea la Figura 7
Ajuste de una fuerza de seguimiento precisa
1. Tras colocar la cápsula en el brazo, gire el peso circular
situado en la parte posterior del brazo hasta que la aguja
flote uniformemente por encima del disco.
2. Sujete en su sitio el peso circular y gire el anillo gradua-
dor hasta que indique el valor cero. El brazo deberá seguir
flotando uniformemente por encima del disco.
3. Gire el peso hasta que el anillo graduador indique la fu-
erza de seguimiento deseada.
Resistencia adicional al patinaje para locutores
Coloque la cápsula a un ángulo de 23 grados, como se in-
dica, de modo que la cápsula apunte al pivote del brazo.
Ajuste el control antipatinaje a 0. Vea la Figura 8.
Cuidado y limpieza
1. Locutores: No emplee una fuerza de seguimiento supe-
rior a la necesaria para evitar el patinaje. Una fuerza exce-
siva quema los discos, daña las agujas y reduce la calidad
del sonido.
2. Limpie la aguja con el cepillo que se suministra. Impor-
tante: Cepille únicamente de atrás hacia adelante. Vea la
Figura 9.
Certificaciones
Cumple las directrices de European Union, califica para lle-
var las marcas CE; cumple los requisitos de inmunidad y
compatibilidad electromagnética de European Union: EN 50
082-1, 1992.
Declaración de patente
Fabricado bajo los términos de una o más de las patentes
siguientes en los EE.UU.: 4,275,888; 4,441,177; 4,489,442.
Garantía de un año
Shure Incorporated ("Shure"), 222 Hartrey Avenue, Evan-
ston, Illinois 60202-3696, EE.UU., garantiza al propietario
de este producto que el mismo estará libre de defectos de
fabricación y materiales cuando se utiliza de modo normal
por un plazo de un año a partir de la fecha de compra. Con-
serve el comprobante de compra. Shure no se hace respon-
sable por daños consecuentes. Si este producto Shure
tiene defectos dentro de las condiciones arriba descritas,
embale cuidadosamente la unidad y envíela porte pagado
a: Shure Incorporated, Attention: Service Department, 222
Hartrey Avenue, Evanston, Illinois 60202-3696 EE.UU. Fu-
era de los EE.UU., devuelva la unidad al distribuidor más
cercano o al centro de servicio autorizado de productos
Shure para su reparación. La unidad se reparará o sustituirá
y se le devolverá oportunamente. En caso de no poder rep-
ararse ni sustituirse, puede solicitar la devolución del im-
porte de compra. Esta garantía no cubre el desgaste de la
aguja.
Figure 2
Cartridge Replacement
Stylus
Stylus Color Stereo Output (1 KHz
at 5 cm/sec peak
recorded velocity)
Frequency
Response in
Hz
Tracking
force range
(grams)
Typical
Tracking
Force
(grams)
M44-7 N44-7 White 9.5 mV 20 to 20,000 1–3 3
M44G N44G Gray 6.2 mV 20 to 20,000 .75–1.5 1.5
M35S N35S Chartreuse 5.0 mV 20 to 20,000 3–5 4
M35X N35X White 6.0 mV 20 to 20,000 1.5–3 3
M70BX N70BX Beige 5.0 mV 20 to 18,000 1.5–3 3
SC35C SS35S Light Blue 5.0 mV 20 to 20,000 4–5 4.5

Installation des Tonabnehmers
Shure-Tonabnehmer können für DJ- oder Hi-Fi-Anwendun-
gen verwendet werden. Hinweis: Der M70BX wird nicht für
starkes „Scratching“ empfohlen.
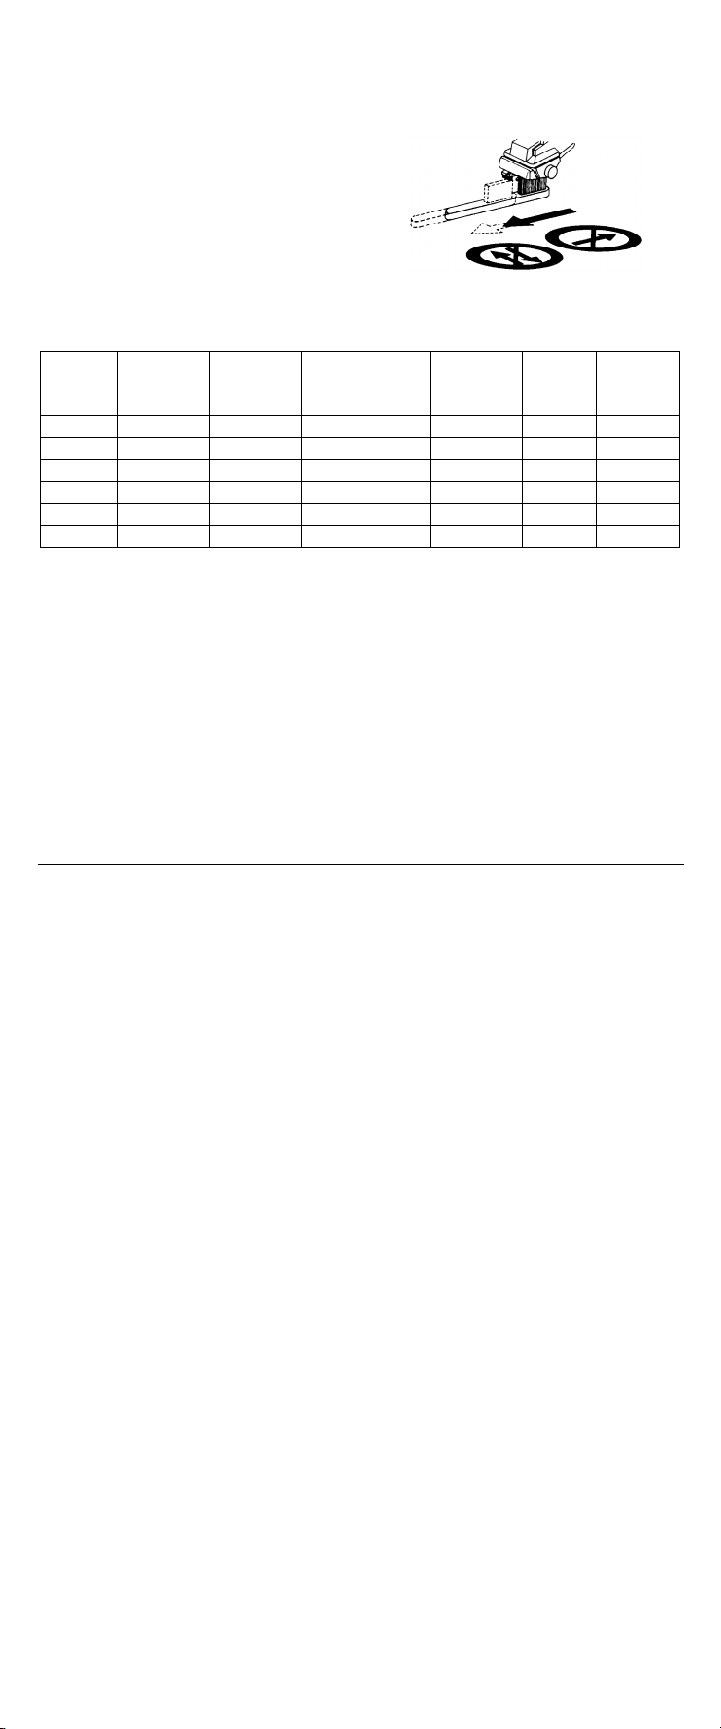
1. Die Abtastnadel vorsichtig aus dem Tonabnehmer en-
tfernen. Siehe Abbildung 1.
2. Mit einer Nadelzange wie in Tabelle 1 angeführt die
Drähte vom Tonarmkopf an den Stiften auf dem Tonabneh-
mer anschließen. Siehe Abbildung 2.
3. Den Tonabnehmer mit den mitgelieferten Schrauben am
Tonarmkopf befestigen. Siehe Abbildung 3. Die
Schrauben nach dem Ausrichten des Tonabnehmers (und
ggf. des Tonarmkopfgewichts) anhand einer der unten bes-
chriebenen Methoden festziehen.
4. Die Abtastnadel in den Tonabnehmer einführen.
Auswahl einer Methode zur Plazierung des
Tonabnehmers
•Hi-Fi-Einrichtung (Abbildung 4): Für höchste
Klangtreue und minimalen Verschleiß der Schallplatte
den Tonabnehmer mit einer Überhangmeßschablone
oder einer Überhangjustierlehre (im Lieferumfang des
Plattenspielers enthalten) plazieren. Den Tonarm nivel-
lieren (siehe Abbildung 7). Die für den Tonabnehmer
übliche Auflagekraft anhand von Tabelle 2 und „Einstel-
lung einer genauen Auflagekraft“ weiter unten ein-
stellen. Den Antiskating-Regler auf den gleichen Wert
wie die Auflagekraft einstellen.
•Standardmäßige DJ-Einrichtung (Abbildung 5): Den
Tonabnehmer an der Rückseite des Tonarmkopfs be-
festigen. Die Tonarmhöhe auf 4–5 einstellen. Die Au-
flagekraft auf 3 g einstellen. Den Antiskating-Wert auf 0
einstellen.
•Unkonventionelle DJ-Einrichtung (Abbildung 6):
Das Gegengewicht umdrehen und bündig mit dem
Ende des Tonarms anbringen. Den Tonabnehmer (mit
dem Tonarmkopf) bündig mit der Vorderkante des
Tonarmkopfs anbringen. Den Antiskating-Wert auf 0
einstellen.
Nivellierung des Tonarms: Siehe Abbildung 7.
Einstellung einer genauen Auflagekraft
1. Nach der Montage des Tonabnehmers auf dem Tonarm
das runde Gewicht an der Rückseite des Tonarms solange
drehen, bis die Nadel gleichmäßig über der Schallplatte
schwebt.
2. Das runde Gewicht festhalten, und den Eichring auf Null
drehen. Der Tonarm sollte immer noch gleichmäßig über
der Schallplatte schweben.
3. Das Gewicht solange drehen, bis der Eichring die
gewünschte Auflagekraft anzeigt.
Zusätzlicher Überspringwiderstand für DJs
Den Tonabnehmer wie dargestellt in einem Winkel von 23
Grad montieren, damit der Tonabnehmer auf das Tonar-
mgelenk zeigt. Den Antiskating-Wert auf 0 einstellen. Siehe
Abbildung 8.
Pflege und Reinigung
1. DJs: Nicht mehr Auflagekraft verwenden als notwendig,
um ein Überspringen der Nadel zu vermeiden. Zu hohe Au-
flagekraft brennt Schallplatten, beschädigt Nadeln und
reduziert die Tonqualität.
2. Die Abtastnadel mit der mitgelieferten Reinigungsbürste
reinigen. Wichtig: Nur von hinten nach vorne bürsten. Siehe
Abbildung 9.
Zertifizierung
Entspricht den Richtlinien der Europäischen Union, zum
Tragen des CE-Zeichens berechtigt; erfüllt die Anforderun-
gen der Europäischen Union für elektromagnetische Ver-
träglichkeit: EN 50 082-1, 1992.
Patenterklärung
Unter einem oder mehr der folgenden US-Patente hergest-
ellt: 4,275,888; 4,441,177; 4,489,442.
Unbeschränkte einjährige Gewährleistung
Shure Incorporated („Shure“), 222 Hartrey Avenue, Evan-
ston, Illinois 60202-3696, USA garantiert dem Besitzer
dieses Produkts für ein Jahr ab Kaufdatum, daß es bei sa-
chgemäßem Gebrauch frei von Material- und Herstellungs-
fehlern ist. Ein Beleg des Kaufdatums sollte aufbewahrt
werden. Shure haftet nicht für Folgekosten. Wenn dieses
Shure-Produkt irgendwelche der oben genannten Mängel
aufweist, das Gerät wieder sorgfältig verpacken und portof-
rei einsenden an: Shure Incorporated, Attention: Service
Department, 222 Hartrey Avenue, Evanston, Illinois 60202-
3696. Außerhalb der Vereinigten Staaten muß das Produkt
zur Reparatur an den Händler oder eine Vertragskundendi-
enstzentrale zurückgebracht werden. Das Produkt wird rep-
ariert oder umgetauscht und Ihnen umgehend zurückge-
sendet. Wenn es nicht repariert oder umgetauscht werden
kann, können Sie sich für eine Rückerstattung des Kaufpre-
ises entscheiden. Diese Gewährleistung umfaßt nicht die
Abnutzung der Abtastnadel.
Installation de la cellule
Les cellules Shure peuvent être utilisées dans les applica-
tions DJ ou Hi-Fi. Remarque : la M70BX n'est pas recom-
mandée en cas de scratching intensif.
1. Avec précaution, retirer la pointe de lecture de la cellule.
Voir Figure 1.
2. Utiliser une pince à bec fin pour brancher les fils de la co-
quille du bras de lecture aux broches de la cellule conformé-
ment au Tableau 1. Voir Figure 2.
3. Fixer la cellule à la coquille avec les vis fournies. Voir
Figure 3. Serrer les vis après avoir positionné la cellule (et
la masse de la coquille, le cas échéant) en appliquant l'une
des méthodes décrites ci-dessous.
4. Insérer la pointe de lecture dans la cellule.
Choix d'une méthode de positionnement de la
cellule
• Configuration Hi-Fi (Figure 4) : Pour maximiser la fidél-
ité et minimiser l'usure des disques, positionner la cel-
lule à l'aide du rapporteur d'alignement ou de la jauge
de dépassement fourni(e) avec la platine. Mettre le bras
de lecture à niveau (voir figure 7). Se reporter au tab-
leau 2 et à la rubrique «Réglage d'une force d'appui pré-
cise» ci-dessous pour régler la force d'appui type de la
cellule. Régler l'antiskating à la même valeur que la
force d'appui.
•Configuration DJ standard (Figure 5) : Monter la cel-
lule à l'arrière de la coquille. Régler la hauteur du bras
de lecture à 4-5 et la force d'appui à 3 grammes. Régler
l'antiskating à 0.
•Configuration DJ spéciale (Figure 6) : Retourner le
contrepoids et le monter à ras de l'extrémité du bras de
lecture. Monter la cellule (et la masse de la coquille) à
ras du bord avant de la coquille. Régler l'antiskating à 0.
Mise à niveau du bras de lecture : Voir figure 7.
Réglage d'une force d'appui précise
1. Après avoir monté la cellule sur le bras de lecture, faire
tourner la masse circulaire qui se trouve à l'arrière de celui-
ci jusqu'à ce que la pointe de lecture flotte uniformément
au-dessus du disque.
2. Maintenir la masse circulaire en place et tourner l'anneau
d'étalonnage jusqu'à ce qu'il indique zéro. Le bras de lec-
ture doit continuer à flotter uniformément au-dessus du
disque.
3. Tourner la masse jusqu'à ce que l'anneau d'étalonnage
indique la force d'appui désirée.
Résistance accrue au saut pour applica-
tions DJ
Monter la cellule à un angle de 23 degrés comme illustré de
façon à ce qu'elle soit orientée vers le pivot du bras de lec-
ture. Régler l'antiskating à 0. Voir Figure 8.
Entretien et nettoyage
1. Applications DJ : Ne pas utiliser une force d'appui
supérieure à celle qui est nécessaire pour éviter à la cellule
de sauter. Une force excessive brûle les disques, endom-
mage les pointes de lecture et diminue la qualité sonore.
2. Nettoyer la pointe de lecture avec la brosse fournie. Impor-
tant : brosser d'arrière en avant uniquement. Voir
Figure 9
.
Homologation
Conforme aux directives de l'Union européenne, autorisé à
porter la marque CE ; conforme aux spécifications d'immu-
nité CEM de l'Union européenne : EN 50 082-1, 1992.
Avis de brevet
Fabriqué sous un ou plusieurs des brevets U.S. suivants :
4,275,888; 4,441,177; 4,489,442.
Garantie totale d'un an
Shure Incorporated («Shure»), 222 Hartrey Avenue, Evan-
ston, Illinois 60202-3696, États-Unis, garantit au pro-
priétaire de ce produit que, pour un usage normal, ce pro-
duit est exempt de défauts de matériaux ou de fabrication
pour une période d'un an, à compter de la date d'achat.
Conserver la preuve de la date d'achat. Shure n'est pas re-
sponsable pour les dommages-intérêts indirects. Si ce pro-
duit Shure présente un des défauts décrits plus haut, le rem-
baller soigneusement et le retourner en port payé à : Shure
Incorporated, Attention: Service Department, 222 Hartrey
Avenue, Evanston, Illinois 60202-3696 U.S.A. A l'extérieur
des États-Unis, renvoyer le produit à réparer à un distribu-
teur local ou à un centre de réparation agréé. Le produit
sera réparé ou remplacé et sera retourné au plus tôt. S'il ne
peut être ni réparé ni remplacé, le propriétaire pourra choisir
de recevoir un remboursement. Cette garantie ne couvre
pas l'usure de la pointe de lecture.

SHURE Incorporated Web Address: http://www.shure.com
5800 W. Touhy Avenue, Niles, IL 60714-4608, U.S.A.
In U.S.A., Phone: 1-847-600-2000 Fax: 1-847-600-1212
In Europe, Phone: 49-7131-72140 Fax: 49-7131-721414
In Asia, Phone: 1-852-2893-4290 Fax: 1-852-2893-4055
International Fax: 1-847-600-6446
ᇙሪᇶመᇱᇦᆢᩜ
ᕞ
ᆅⰿ
6
KXUHᇙሪᇶመᇱᇦᆣ'-ᆲᆓᆣ+L)L㮮ᆟᘅ㮮ᆛᆁᆲᆍᄾ
ሏ
ሐ0&ᆣ
ᄽ
ሆሁሪሩᇧᇝሗᇱᇯᆟᆣᅾᥭᆵᆛᆁᆲᆏᇇ
ᄾ
ᇧᇭᇒሗᇧᇆᇙሪᇶመᇱᇦᅿᆽ㍮➕ᆋᆚᩜᾜᆋᆲᆍ
ᄾ
ᵹᇆ
ᩈ
㟭ᄾ
៎ᆢ䎶ᅸለሡᇯᇆᘅ㮮ᆋ
ᄽ
仮ᆟ☙ᆗᆚሃᇒሒᇆᇶ
ሪ
ሡᇐሪሎሩሆᇱᇷᇥᇕሙᅿᆽᇙሪᇶመᇱᇦᆢሂሡ
ᆟ
⨫
䐠ᆋᆲᆍᄾᵹᇆ
ᩈ
㟭ᄾ
ᕞ
⋤ᆢᆡᆌᇆᘅ㮮ᆋᆚᇙሪᇶመᇱᇦᇆሆᇱᇷᇥᇕሙᆟ
ᩜ
ᕞᆅᆲᆍᄾᵹᇆᩈ㟭ᄾᕫᒑᆟ儲Ⲕᆢᅸᆎᇀᅿᆢ
ⰿ
㍛ᆛᄽᇙሪᇶመᇱᇦ웉⒒ⶡᆍᆿẺᆣሆᇱᇷᇥᇕሙ
ሩᇔᇕᇒᇶᆶᆴ웊ᇆ⣆∠ᆢᗓ䗴ᆟ傳∠ᆋᆚᅿᆽᆡ
웉
웉
ᆌ
ᆛ
䑦ᆵᆲ
ᆍᄾ
ᇧ
ᇭᇒሗᇧᇆᇙሪᇶመᇱᇦᆟ
⑴
ᆋ噂ᆳᆲ
ᆍᄾ
ᇙ
ሪᇶመᇱᇦᆢᗓ
䗴
傳∠ⰿ㍛ᆢ图
⤤
+L)L傳∠
웉
ᵹ
웊
ⶆ慞ᆢ
♦
∥┬ᇆ᠓㪄ᆋᄽሚ
ᇡ
ሪᇷᆢ⪓ᇆⶆ⊕峖ᆟᆍᆿᆓᆵᄽᇐሗᇒሏሡᇶᢌ┬ᳮᆲ
웉웊
웉웊
ᆓᆣᇭሪሡᇴሪሄሙᕞ⋤ᆢᇘሪᇾሪᇽሡᇞ傎ᳮᇆᘅ㮮ᆋ
ᆚᇙሪᇶመᇱᇦᆢ
ᗓ
䗴ᇆ傳∠ᆋᆲᆍᄾᇶሪሡᇐሪሎᆣ㊺
⓹ᆟᆋᆚᆃᆔᆉᅸ웉ᵹᩈ㟭웊ᄾᒑᆢ仮ᅾᆼᆧ육㽀ᆞ
ᇶ
ሗᇱᇛሡ
ᇞ
ሩሃᇗሪᇧᆢ傳
∠윢
ᇆ
ᩈ
㟭ᆋ
ᄽ
ᇙሪᇶመᇱᇦ
웉웊
웉웊
ᆢḑ㴊ᆞᇶሗᇱᇛሡ
ᇞ
ሩሃᇗሪᇧᇆ傳∠ᆋᆲᆍᄾᇐሡ
ᇯᇧᇟሪᇴᇑሡᇞᢼ☧ᆢ⯶ᚪᆣᇶሗᇱᇛሡᇞሩሃᇗሪᇧ
ᆜ
᪒ᆌ⯶ᚪᆟᆋᆲᆍ
ᄾ
ゟ㔜㴊ᆞ'-傳∠웉ᵹ웊 ᇙሪᇶመᇱᇦᇆሆᇱᇷ
ᇥᇕሙᆢ何ᆟᩜᕞᆅᆲᆍᄾᇶሪሡᇐሪሎᆢ慞ᆉᆣ윟ᄽ
웉웊
웉웊
ᇶ
ሗᇱᇛሡᇞሩሃᇗሪᇧᆣᇞሗሎ
ᄽ
ᇐሡᇯᇧᇟሪᇴ
ᇑ
ሡ
ᇞ
ᆣᆟ傳∠ᆋᆲᆍ
ᄾ
㣿㈐ᆞ'-傳∠웉ᵹ웊 ᇙᇔሡᇭሪᇔᇕᇒᇶᇆ嚌
ᆟᆋᄽᇶሪሡᇐሪሎᆢ䅵ᆟ⩉ᅼᆚᩜᕞᆅᆲᆍᄾᇙሪᇶመ
웉웊
웊
ᇱᇦ웉ሆᇱᇷᇥᇕሙሩᇔᇕᇒᇶᇆᆴ웊ᇆሆᇱᇷᇥᇕሙ
ᆢᣓⰿᆢ䅵ᆟ⩉ᅼᆚᩜᕞᆅᆲᆍᄾᇐሡᇯᇧᇟሪᇴᇑሡᇞ
웉웊
웉웊
ᢼ
☧ᆣᆟ傳∠ᆋᆲᆍ
ᄾ
ᇶሪሡᇐሪሎᇆ㊺⓹ᆟᆍᆿᵹᇆ
ᩈ㟭
㽀
ᆞᇶሗᇱᇛሡ
ᇞ
ሩሃᇗሪᇧᆢ傳
∠
ᇙ
ሪᇶመᇱᇦᇆᇶሪሡᇐሪሎᆟᩜ
ᕞ
ᆅᆓᆽ
ᄽ
ᇶሪ
ሡ
ᇐ
ሪሎᆢ
☒
ᆢᇣሪᇛሓሗሩᇔᇕᇒᇶᇆᵤ啨ᆉᆏᄽ
塣
ᆀ
ሚᇡሪᇷᒐᆛ䇏ᆟ
㏴ᥛ
ᆍᆿᆼᅺᆟᆋᆲᆍᄾ
ᇣሪᇛሓሗሩᇔᇕᇒᇶᇆ⣆∠ᆢᗓ䗴ᆟ䐳⦇ᆋᄽ喉
መሡᇞᇆᵤ
啨
ᆋᆚᆟᆋᆲᆍᄾᆇᆢⳈᆶᇶሪሡᇐሪ
ሎ
ᆣ
ᄽ
ሚᇡሪᇷᒐᆛ䇏ᆟ㏴ᥛᆋᆚᅸᆞᆅᇀᆤᆞᆾ
ᆲ
ᆏᇇᄾ
ᇔᇕᇒᇶᇆᵤ啨ᆉᆏᄽ喉መሡᇞᇆ㪌❹ᆢᇶሗᇱ
ᇛ
ሡ
ᇞ
ሩሃᇗሪᇧᆟᆋᆲ
ᆍ
ᄾ
'
-㮮ᆢᇧᇛᇱህ岸ᆢ㣿ᩜᕞ
ᆅ
ᇙሪᇶመᇱᇦᆣᵹᆢᆼᅺᆟ┬ᆢ
偘
┬ᆛᩜᕞᆅ
ᄽ
ᇶሪሡ
ᇐሪሎᆢሂሊᇱᇷ坮ᢌᆟ
᪗
ᆃᆼᅺᆟᆋᆲᆍᄾᇐሡᇯᇧᇟ
ሪ
ᇴᇑሡ
ᇞ
ᆣᆟ傳∠ᆋᆲᆍᄾᵹᇆᩈ㟭ᄾ
ᩜ
⣷ᅸᆜᇝመሪᇹሡ
ᇞ
'- 塣ᆀᆜᆤᆞᅸᆼᅺ
ᄽ
♋倇ᕫᒐᆢᇶሗᇱᇛሡ
ᇞ
ሩ
ሃ
ᇗሪᇧᆣ
ᘅ㮮
ᆋᆞᅸᆛᆃᆔᆉᅸᄾᤡᇆᇀᆍᆂᆿ
ᆜ
ሚᇡሪᇷᆀ㟂ᆅᆚ塣ᆀᆳ
ᄽ
幹印ᆀᤩᦜᆋᆲᆍ
ᄾ
ᇧᇭᇒሗᇧᆣ
ᕞ⋤
ᆢᇝመሪᇹሡᇞሩ
ሄ
ሗᇥᆛᆁᇀ
ᅸ
ᆟᆋᆲᆍᄾ塓倇 ♋ᆎᄽ☒ᅿᆽᣓᆟ᪗ᅿᆗᆚ
ሄ
ሗᇥ
ᇆ
ᅿᆅᆲᆍᄾᵹᇆ
ᩈ
㟭ᄾ
儓僂
ㆭ
⑤嚩
⦍ᕪᆟ囯
ᄽ&(ሌሪᇝᆟ囯⻂ᄽㆭ⑤嚩
(0&
៓
峪
倇ᕼ⊄♢웛(1
⓺ᄾ
㣿傷
ᆟᆘᅸᆚ
ㆧᆢᅺᆕ
ᄽ
ᆦᆜᆘᅶᆿᅸᆣ侍⯶ᆢ䋹ᶃ㣿傷ᆟẀ
ᆙ
ᆁ侃嚦
ᄾ
⓺
尙−
ᙣ
僂
6
KXUHᆣᄽⶲ
侃
ᭇᆣ嚠Ⓘᆢᘅ㮮ᆟᅾᅸᆚⷖ印ሩ
侃
嚦ᆜᆶ
ᆟ
ㆦ峫
ᆀᆞᅸᆇᆜᇆ厂Ⱬᅿᆽ⓺尙ᙣ僂ᅸᆓᆋᆲᆍᄾᙣ
僂
ⶥ
尙ᒳᆟ侃ᭇᆀ㺺⪓ᆋᆓẺ
ᄽᙴ㪌ᆸᔪ⩡ᄽ⣛ᅸ⣁ᆋ
ᆞ
ᆝᆢ價䎶ᆟᆘᅸᆚᄽ䋹ᶃᆢᅾ∨ぞᆣᆲᆛ
ᅾ
嶁僷ᆛᅾᯕᅸ
ᇃᆏᆃᆔᆉᅸᄾሖሪማᇱᇿᆢᅾ∨ぞᆣ
ᄽ
6
KXUH,QFRUSRUDWHG(XURSH*0%+ᄽ
ᆲ
ᆓ
ᆣ
웉
ᇣሪሁᇧሉᇱᇶሗᇒሡ
웊
ᆲᆛ
ᅾ
嶁
僷ᆛᄽᆲᆓᆣ6KXUH儓᩵ᕩ㪌┝ᆲᆛᅾᯕᅸ
ᆏᆃᆔᆉ
ᅸ
ᄾ
ⶲᙣ僂ᆣᄽ侃ᭇᆢ㙱㮮ᆸ優㮮ᄽᆲᆓᆣ6KXUHᆢᘅ㮮儲
Ⲕ
ᆟᩓᆍᆿᘅ㮮ᄽ
䡰
㞼ᆢ㐎䚝ᄽᾯ㜃ᄽᒓᙴ㪌ᆟᆣ囯㮮
ᆉᇀ
ᆲ
ᆏᇇ
ᄾ
ᣒ䷇
༈ᅝ㺙䇈ᯢ
㟦
ᇨⱘ
ᣒ䷇
༈ৃҹ⫼Ѣ'-+L)L
䷇ᬜ
എড়DŽ
⊼
˖0&ϡᓎ䆂
Փ
⫼Ѣ䞡≭䷇⺕䗍DŽ
ᇚ
ଅ䩜Ң
ᣒ
䷇༈ᇣᖗഄপߎDŽ㾕DŽ
ձ
✻㸼ˈ
߽
⫼䩜༈ൟ䪇ᄤˈ
ᡞ
⬉
㒓
Ң⺕༈
ଅ
㞖
䖲ࠄᣒ䷇༈ⱘᵶ䕈ϞDŽ㾕DŽ
⫼᠔䰘㶎䩝ᇚᣒ䷇༈ᅝ㺙ࠄ⺕༈DŽ㾕DŽ
߽
⫼ҹϟ䇈ᯢⱘᮍ
⊩
Пϔ
Փᣒ䷇
༈ᅮ
ԡ
Пৢ˄㢹
䳔㽕ˈгᅮད⺕༈
䜡䞡˅ˈݡᣈ
㋻
㶎䩝
DŽ
ᇚ
ଅ䩜ᦦܹ
ᣒ
䷇༈DŽ
䗝ᢽᅮԡ
ᣒ䷇
༈ⱘᮍ
⊩
+
L)L䆒ᅮ˄˅˖Ўњ䖒ࠄ᳔
催
ⱘ
䷇
䞡
⦄ᑺ
᳔Ԣⱘଅ⠛⺼ᤳ
ᑺ
ˈ⫼ޚ
Ⳉ
ߚ
ᑺ
఼䱣䕀
Ⲭ
᠔䰘Ԍ䞣㾘ˈᇚᣒ䷇༈ᅮԡ
˄
㾕
˅DŽ߽⫼㸼ҹϟⱘĀ䆒ᅮ
㊒
⹂ⱘ
䩜
ā䇈ᯢ
ݙ
ᆍˈЎ
ᣒ䷇
༈䆒ᅮᐌ⫼ⱘ䩜
DŽ
䰆⒥ࠊ᭄
ؐ
䆒
Ϣ䩜Ⳍৠⱘ
ؐ
DŽ
ޚ'-䆒ᅮ˄˅˖ᣒ䷇༈ᅝ㺙ࠄ
⺕
༈
ⱘৢջDŽଅ
㞖催
ᑺ䆒ࠄDŽ䩜䆒ᅮ
Ў
݀
ܟ
ˈ䰆⒥
ؐ
䆒ᅮЎDŽ
⡍⅞'-䆒ᅮ˄˅˖ᡞ䜡䞡ড䕀ˈ
ᑊ
ᇚ݊ᇍ唤ଅ
㞖
ッᅝ㺙DŽᡞᣒ䷇༈˄ࣙᣀ
⺕
༈
䜡䞡˅ᇍ唤⺕༈
ࠡッᅝ㺙DŽ䰆⒥
ؐ䆒
ᅮЎ
DŽ
ଅ㞖
ᬒᑇ˖㾕DŽ
䆒ᅮ
㊒
⹂ⱘ䩜
ᣒ䷇༈ᅝ㺙ࠄଅ
㞖
Пৢˈᮟ䕀ଅ
㞖
ৢᮍⱘᔶ
䜡䞡ˈⳈ㟇ଅ䩜
ଅ⠛Ϟᮍ㓈ᣕഛࣔⱘ䯈䱭DŽ
ᇚᔶ䜡䞡
ֱ
ᣕϔᅮ
ԡ
㕂ˈ✊ৢᮟ
䕀
ޚ⦃
ˈՓ䇏ؐЎDŽℸᯊˈଅ
㞖
ҡᑨଅ⠛Ϟᮍ㓈
ᣕ
ഛࣔⱘ䯈䱭
DŽ
ᮟ䕀
䜡䞡ˈ
Ⳉ
㟇ޚ⦃ᰒ⼎᠔㽕ⱘ䩜DŽ
'-⫼
⡍
߿䰆⒥ᅝ㺙
བ᠔⼎ˈᇚᣒ䷇༈ҹᑺ㾦ᅝ㺙ˈՓᣒ䷇༈ᣛ
ଅ㞖
ⱘᬃ⚍DŽ䰆⒥ؐ䆒ᅮЎDŽ㾕
DŽ
㓈
ᡸϢ
⏙
⋕
'-
˖Ўњ䰆ℶ䏇䩜ˈ䩜ϡ㽕
䍙䖛
ᖙ
㽕
ؐ
DŽ䖛
催
ⱘ䩜
Ӯ
⚻ണଅ⠛ˈՓଅ䩜ফᤳ
ˈ
гՓ䷇
ᬜ
䰡ԢDŽ
⫼᠔
䰘⏙
⋕
ࠋ⏙
⋕ଅ䩜DŽ䞡㽕˖া㛑
Ң
㚠䴶ℷ䴶䕏䕏ഄࠋDŽ㾕DŽ
䡈
ᅮ
䅸ޚ
ヺড়ⲳᣛҸˈৃ䌈&(䆄ˈヺড়ⲳ(0&䈕ܡ
ᴵ
ӊ
˖(1
DŽ
ϧ߽
ḍҹϟϔ乍ҹϞⱘ
㕢
ϧ߽
োࠊ䗴˖
˗
˗DŽ
ܼ
䴶ϸᑈ
ֱׂ
6
KXUH˄
㟦
ᇨ݀ৌ˅䇼
ֱ
䆕ℸ
ѻ
ક
㞾
䌁фП
᮹䍋ϸ˄
˅
ᑈ
ݙ
ᴤ
᭭ࠊ
ᮍ䴶
ഛ
᮴⨩
⮉DŽབᵰᙼ䌁фⱘ
㟦
ᇨ
ѻ
ક
ֱׂ
᳝䰤ᳳݙ
থ
⫳ᬙ䱰ˈ㕢๗
ݙ
䇋ᢼ
ˈњ㾷݇Ѣ
ׂ
⧚ǃᤶ䗔ℒⱘ䆺㒚䇈
ᯢ
DŽ
⌆ˈ䇋
㘨㋏
6KXUH,QFRUSRUDWHG
(
XUR
S
H*0%+ˈ
⬉
䆱োⷕᰃ
˄᳡
ࡵ
⛁
㒓
˅ˈ㘨㋏㟦ᇨᥜ
ᴗ
ⱘ㒣䫔
ଚ
DŽℸֱ
ׂ
ϡ
ࣙ
ᣀ
Ⓓ⫼䇃
⫼
ѻ
કǃ䖱ড
㟦
ᇨⱘ
ѻ
ક
Փ⫼
䇈
ᯢǃℷᐌ⺼ᤳᤳണǃ
♒
ᤳണ
㦋ᥜ
ᴗ
ⱘ᪙㞾
ׂ
⧚ㄝ
ᚙ
މDŽ
This manual suits for next models
2
Table of contents
Other Shure Accessories manuals

Shure
Shure 27EU3222B User manual

Shure
Shure Microflex MXWANI8 User manual

Shure
Shure MVI User manual

Shure
Shure ANI4OUT-XLR User manual

Shure
Shure ANI22 User manual

Shure
Shure ANIUSB-Matrix User manual

Shure
Shure V15 Type IV SUPER TRACK IV User manual

Shure
Shure ANI22-BLOCK User manual

Shure
Shure ANI4IN Series User manual

Shure
Shure M71EB User manual
Popular Accessories manuals by other brands

ROSE DISPLAYS
ROSE DISPLAYS ANOSKYBOX-TOP LOADING 4 WAY manual

Live View Golf
Live View Golf LiveView Plus quick start guide

BS
BS 33 E Series instruction manual

ROSE DISPLAYS
ROSE DISPLAYS QUICKGRIP WITH MULTICLIPS instruction sheet

Autonics
Autonics TCD210213AD quick start guide

Nohken
Nohken FM-16 instruction manual