Shure MVI User manual

MVi
MVi -- Digital Audio Interface
The Shure compact digital audio interface, MVi, user guide.
Version: 2 (2019-C)

Shure Incorporated
2/11
•
•
•
•
•
•
1.
2.
3.
MVi
Digital Audio Interface
General Description
The Shure MVi is a compact digital audio interface used to connect a microphone, guitar, or other instrument to a
computer or mobile device. Audio and power are delivered through a single USB or Lightning connection to provide
a simple and portable recording solution. The MVi headphone output delivers the microphone/instrument signal for
real-time monitoring, in addition to audio from the computer for playback and overdubbing.
Features
Easily adjust settings with the intuitive touch panel interface
Compatible with most iDevices (iPhone, iPad, and iPod) through Lightning interface
Compatible with most computers, tablets and smart phones through USB interface
Sleek design includes all-metal housing for professional-grade durability
Headphone output allows real-time monitoring of the live signal and audio from the computer or device
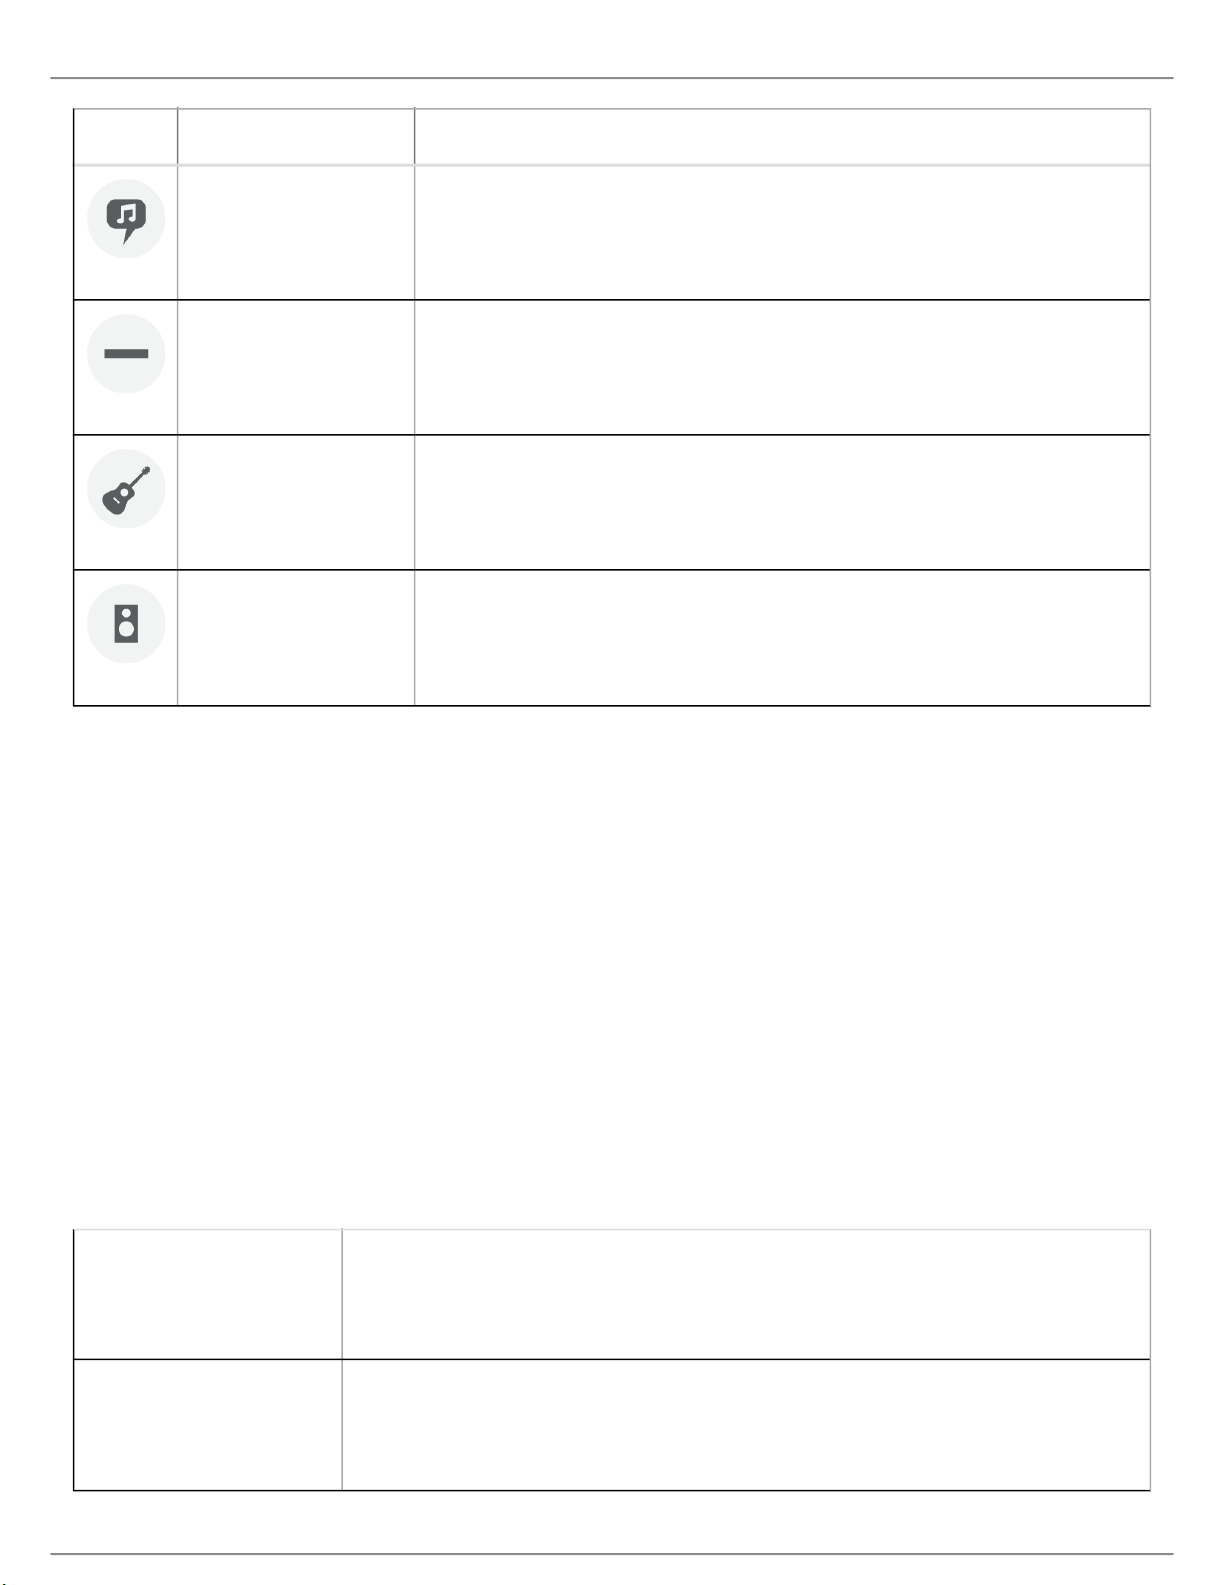
Preset DSP modes include equalization and compression settings for specific applications
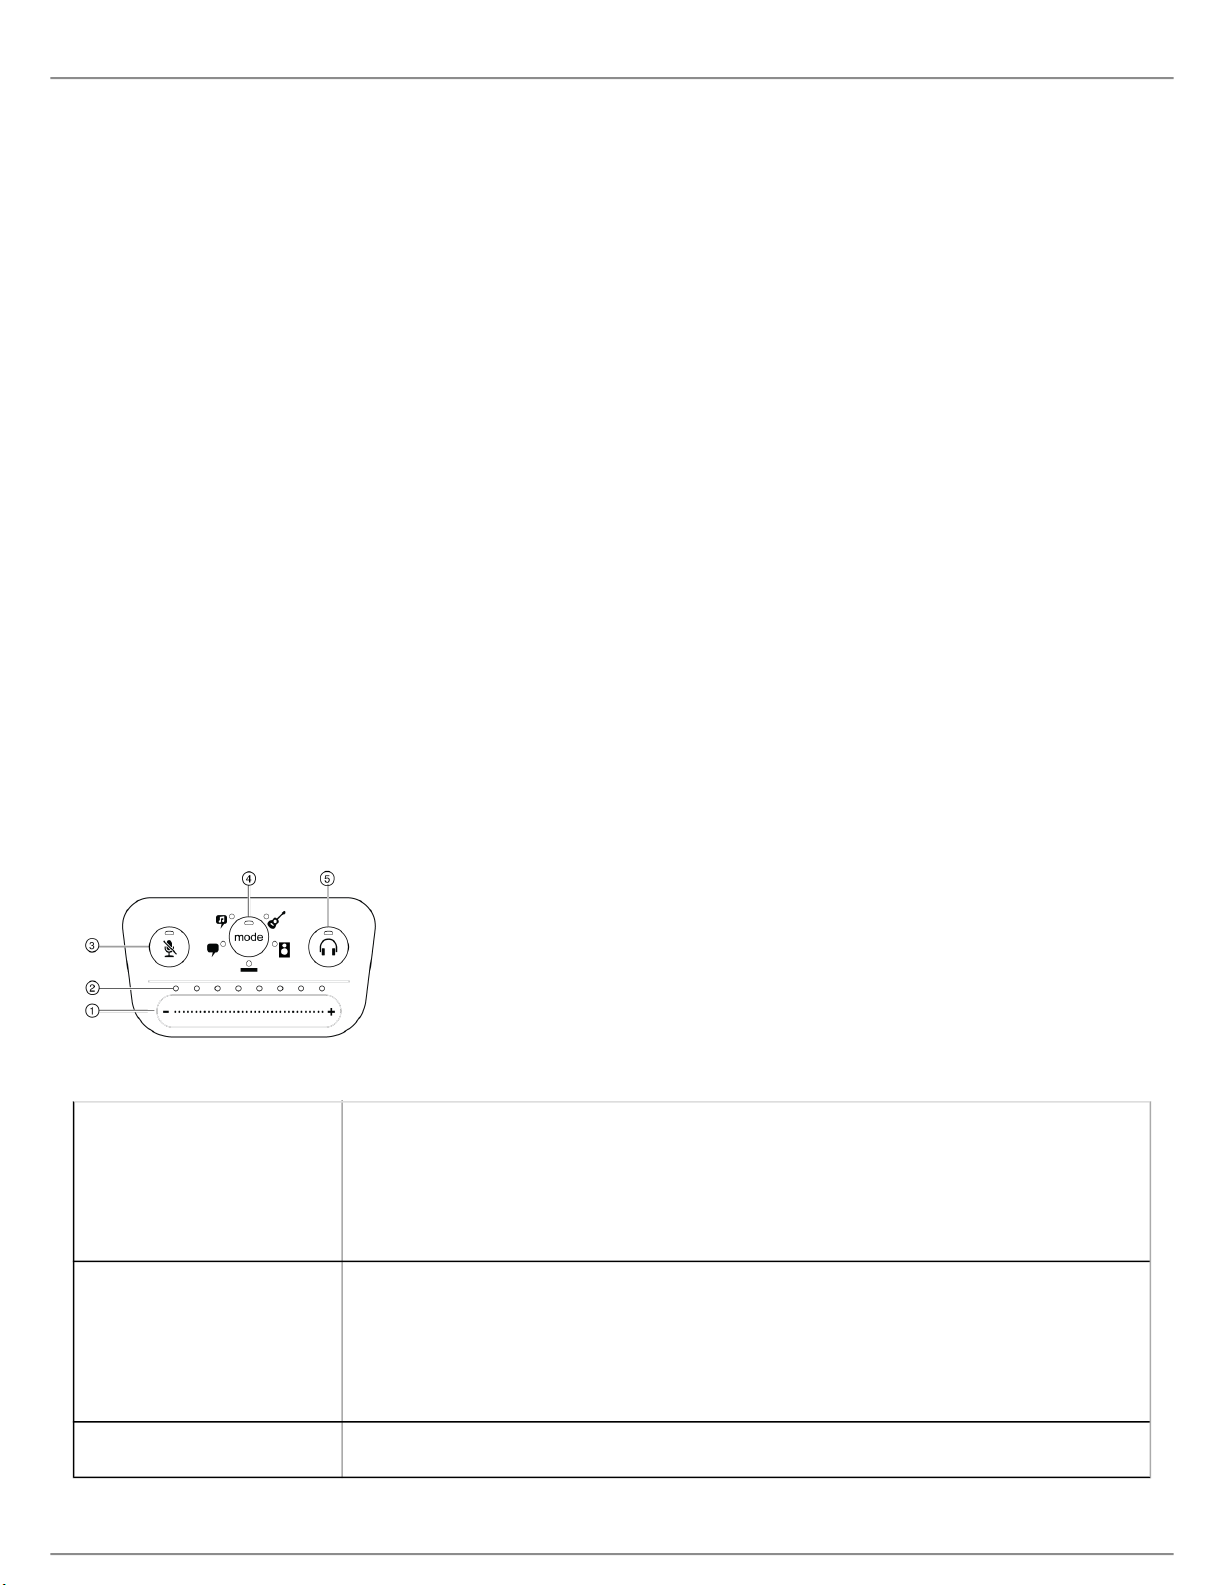
Overview
①USB connection The MicroUSB port on the MVi rear panel connects it to a computer or mobile
device through a USB or Lightning connection. Both power and audio are passed
through this connection.
②Microphone or
Instrument
A microphone, instrument, or line source plugs into the combo XLR-¼" input.
③Headphone Monitoring Connect headphones to hear real-time audio from the microphone and audio
playback from the computer.
④Controls The MVi touch-panel provides control of microphone gain, headphone level, and
recording mode selection.
Quick Setup
The MVi is compatible with most devices that have a USB or Lightning connector.
Connect the MVi to a computer or mobile device. Use the appropriate cable (USB or Lightning).
Drivers will be installed automatically. The touch panel illuminates to indicate a successful connection.
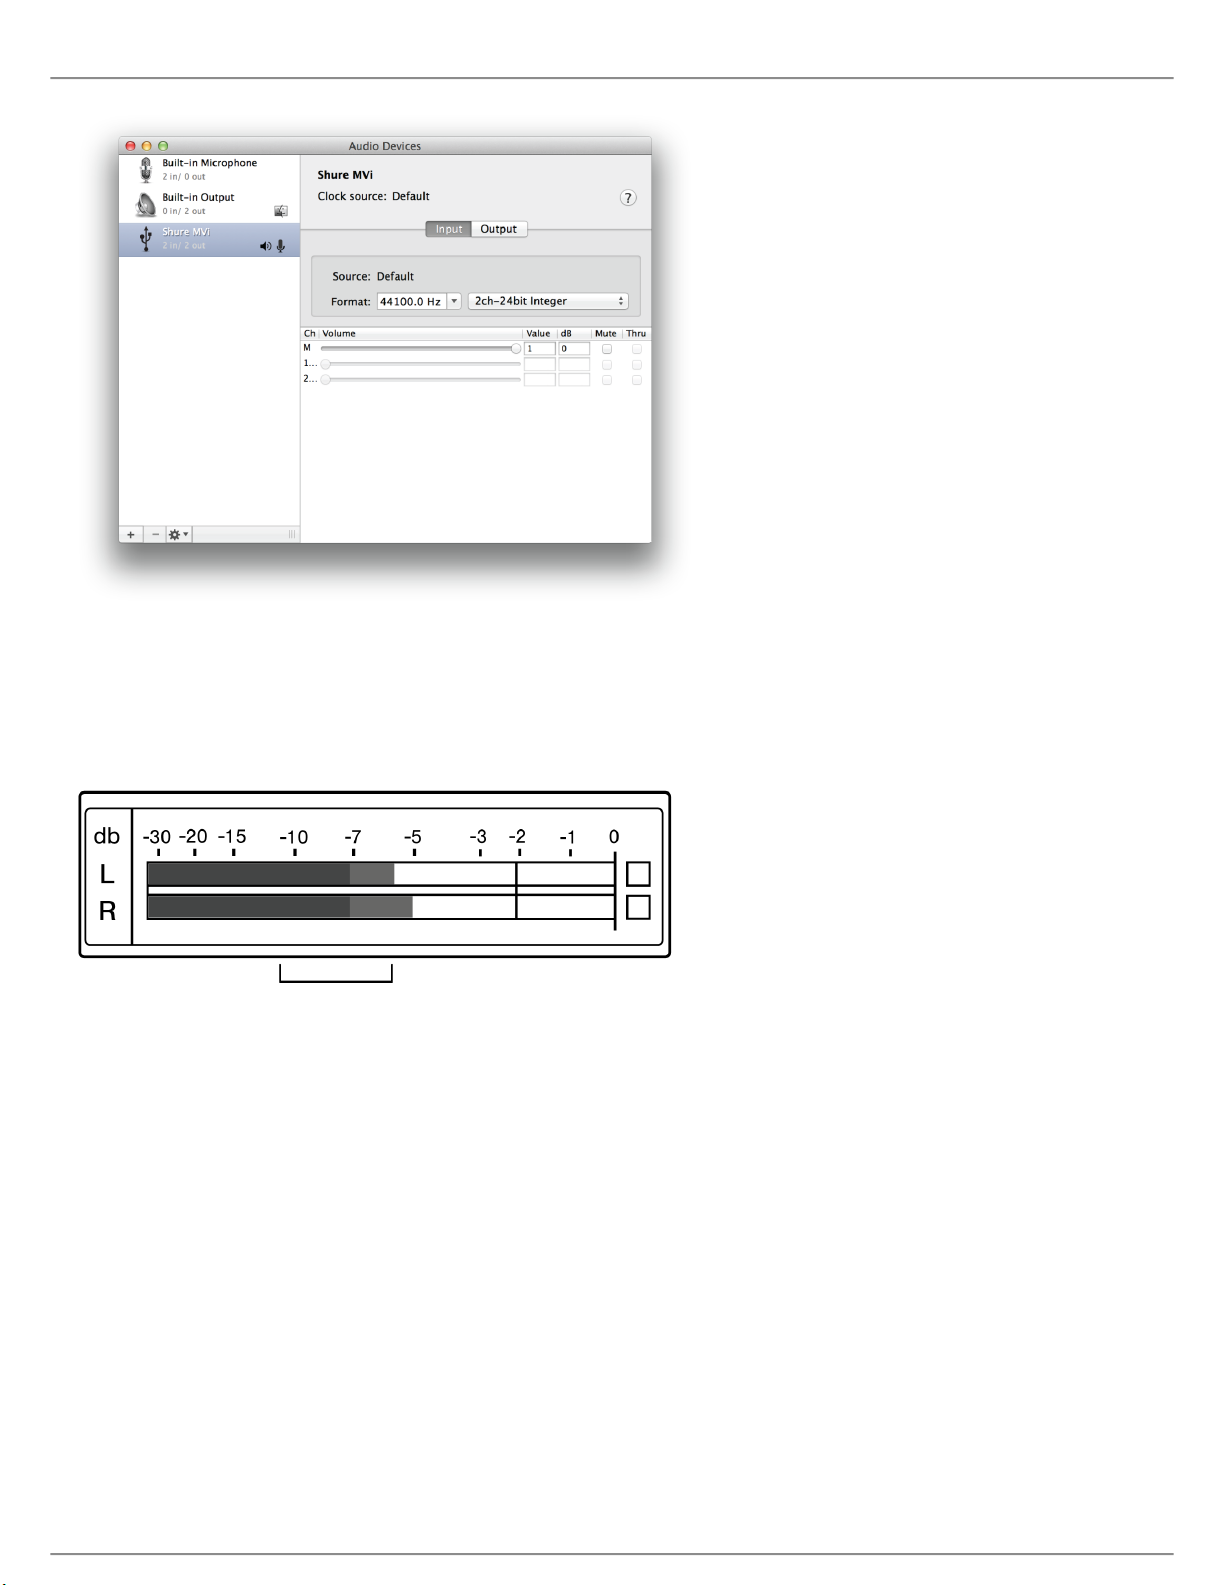
The MVi is automatically assigned as the active audio device.
If MVi is not the selected audio device, open the sound control panel and select the Shure MVi driver.
Adjust the headphone volume on the MVi device driver.
®

Shure Incorporated
3/11
4.
5.
6.
•
•
•
•
Open the Shure MVi driver from the sound control panel and raise the headphone volume from the playback
or output tab.
Plug a microphone or instrument into the input on the rear panel.
The XLR/TRS combo input is compatible with microphones, guitars, instruments, and other line-level sources.
Note: Condenser microphones require phantom power to operate. To turn on phantom power, press and hold
the mute button for 3 seconds. The PH PWR LED on the rear panel illuminates when phantom power is
activated.
Caution: Never activate phantom power if using a ribbon microphone, as this may cause damage to the
microphone.
Use the MODE button to select the preset mode that fits your application and adjust the microphone
gain to suit the application.
If the audio is too quiet or causes distortion, adjust the gain manually. Refer to the "Adjusting Microphone
Level" topic in this guide for more details.
Note: When using the MVi, you can monitor and listen to playback through the device headphone output.
Plug in headphones to monitor the real-time audio and playback.
Pressing the headphone button changes to volume control slider to adjust the headphone volume (LEDs
switch from green to orange when adjusting headphone volume).
Note: Do not use the gain adjustment to get more volume from the headphones.
You are ready to record.
Touch Panel Interface Controls
Touch Panel
①Volume Control Slider Adjust microphone or headphone level by sliding your finger across the control
surface.
Press the mode button to activate microphone level.
Press the headphone button to activate headphone volume.
②LED bar Displays microphone and headphone level. The LED color indicates the level being
displayed or adjusted.
Green: Microphone level
Orange: Headphone level
③Mute Button Press to mute and unmute the microphone.

Shure Incorporated
4/11
④Mode Selector Press to select preset mode.
⑤Headphone Volume
Selector
Press to select headphone level controls (orange LED bar). Then use the volume
control slider to adjust headphone level. Press again to return to microphone level
display (green LED bar).
Rear Panel
①Headphone output (3.5
mm)
Connect headphones to monitor audio.
②Microphone/Instrument
Input
Accepts an XLR or ¼" connection.
③Micro-USB Port Connects to a computer or mobile device with the appropriate cable.
④Phantom Power
Indicator
Illuminates when active (press and hold mute for 3 seconds to switch on/off).
1/4" Instrument Input Monitoring
The MVi features a combination XLR and 1/4" TRS input. When a 1/4" input is inserted to an MVi, input mode
switches to Hi-Z (instrument) and only flat mode is available. The flat preset mode enables the input monitor to be
turned on or off.
Note: When a 1/4" input is inserted no other preset modes are available and the Mode button toggles the input
monitor on and off.
Mode LED on: Input monitoring is enabled
Mode LED off: Input monitoring is disabled
Use input monitoring when you want to hear the input signal as you record. If you want to hear the signal after it has
been effected, turn off input monitoring and monitor through the recording device.
Preset Modes
Five selectable modes optimize settings for gain, stereo width, equalization, and compression. Set the microphone
level and try the modes to find which sounds best. Preset modes can affect the strength of the input signal, so
adjust the microphone level as needed after changing presets.
Mode Application Characteristics
Speech
speech Narrow stereo width to reject background noise, equalization that
emphasizes clarity and fullness, and gentle compression.

Shure Incorporated
5/11
•
•
•
1.
2.
3.
1.
2.
3.
Mode Application Characteristics
Singing
solo or group vocal
performances
Medium stereo width with subtle equalization to add richness and clarity for
a natural sound.
Flat
any An unprocessed signal (no equalization or compression settings used).
Adds flexibility when processing the audio after recording.
Acoustic
acoustic instruments
and quiet music
Medium stereo width with transparent compression to smooth out volume
spikes and bring out quiet passages. The equalizer setting emphasizes
detail and an overall natural sound.
Loud
live performance and
louder sources
Wide stereo to increase separation between sources. Equalization further
improves definition by reducing frequencies that can make the
instrumentation sound crowded.
Adjusting Microphone Level
Select the correct preset mode for your recording application. If you hear distortion or the audio is too low, adjust the
microphone level in the audio or sound control panel of your computer or recording device.
Tips:
Set the microphone level before adjusting headphone volume.
The headphone volume does not affect the signal level sent to the computer.
Use the volume slider on the front panel to adjust the microphone gain level.
Note: The microphone gain control is independent of the preset modes. Set your microphone level and
experiment with dynamic processing options via the preset modes.
Adjusting Headphone Level
The headphone monitoring level is affected by the MVi device level and the computer settings level. Raise your
computer volume up and easily adjust headphones through the MVi touch panel headphone control.
Accessing the Control Panel
PC Open the sound control panel and select the Recording tab.
Open the Shure MVi device.
Under the Levels tab, adjust the volume using the slider.
Mac Open the Audio Midi Settings panel.
Select the Shure MVi device.
Click on Input to adjust the gain using the slider.
®

Shure Incorporated
6/11
Mac audio settings panel
Input Meter Level
If your digital audio workstation or recording software has input meters, adjust the microphone level so it peaks
between -12 and -6 dB. Otherwise, simply listen to the audio to make sure it is loud enough and not distorting.
Peak Levels
The target range for peak levels on a typical meter is between -12 and -6 dB.
Monitoring with the MOTIV Device
The headphone output provides an equal blend of the direct microphone signal and audio playback from the
computer. This allows you to conveniently adjust the overall headphone volume with one control on the device touch
panel. To change the playback audio level relative to the direct microphone signal level, adjust the computer or DAW
mixer settings.
Tip: When first connecting the microphone to your computer, make sure to raise the volume level in the sound
control panel of the computer for a strong audio signal. Then adjust headphone level on the device for comfortable
monitoring.

Shure Incorporated
7/11
•
•
•
•
•
•
Sampling Rate and Bit Depth
Sample Rate and Bit Depth settings are found in a drop down menu in the audio or sound control panel of your
computer. You can adjust these variables to fit your needs. Select a lower sample rate for podcast recording, when it
is important to have a smaller file for easy download. Select a higher sample rate for music and more dynamic
recordings.
Tip: Record at a higher sample rate and bounce down to an M4A for a file with the highest sound quality at a
manageable size.
Tip for PC users: Make sure that the sample rate and bit depth microphone settings, found in the sound control
panel of the computer, match with the sample rate and bit depth selected in your software.
Troubleshooting
Issue Solution
The display does not illuminate Make sure that the MVi is fully plugged in.
Audio is too low Check the computer sound control panel settings. When first connecting
the MVi to your computer, make sure to raise the computer volume level.
Audio sounds bad Check the sound control panel of the computer to ensure that the MVi is
fully plugged in and recognized.
Audio is distorted Use the audio meter to ensure that volume peaks are within the target
range. If level is reaching the red peak indicator of the input meter, turn the
gain down.
Audio sounds unnatural or jittery Make sure that the sample rate and bit depth microphone settings, found in
the sound control panel of the computer, are consistent with the sample
rate and bit depth selected in your software.
Device not working with USB hub. The MVi requires 250 mA per port. Check USB hub documentation for
current/port specification.
System Requirements and Compatibility
Windows Windows 7 and higher
Minimum RAM = 64 MB
USB 2.0
Macintosh OS X Lion 10.7 and higher
Minimum RAM = 64 MB
USB 2.0

Shure Incorporated
8/11
•
•
•
•
•
iOS iOS 10.0 and higher
iPhone iPhone 5 and higher
iPod Touch 5th gen
iPad iPad 4th gen and higher
iPad Mini iPad Mini 1st gen and higher
Specifications
MFi Certified
Yes
DSP Modes (Presets)
Speech/Singing/Acoustic/Loud/Flat
Input
Combination XLR and 6.35 mm (1/4") TRS
Input Impedance
1/4 inch instrument input >1 MΩ
Bit Depth
16-bit/24-bit
Sampling Rate
44.1/48 kHz
Frequency Response
20 Hz to 20,000 Hz
Adjustable Gain Range
3-pin XLR 0 to +36 dB
6.35 mm (1/4") TRS +9 dB
[1]

Shure Incorporated
9/11
Maximum Input Level
3-pin XLR 0 dBV
6.35 mm (1/4") TRS +9 dBV
Headphone Output
3.5 mm (1/8")
Power Requirements
Powered through USB or Lightning connector
Phantom Power
+48V USB/+12V iOS
Mute Switch Attenuation
Yes
Housing
all metal construction
Net Weight
310.0 g (10.93oz.)
Dimensions
42 x 84 x 72 mm H x W x D
Cable
1 m USB cable, 1 m Lightning cable
At Minimum Gain, Flat Mode
Accessories
Furnished Accessories
1 m USB cable AMV-USB
1 m Lightning cable AMV-LTG
[1]
[1]
[1]

Shure Incorporated
10/11
•
•
•
•
Certifications
Information to the user
This equipment has been tested and found to comply with the limits for a Class B digital device, pursuant to Part 15
of the FCC Rules. These limits are designed to provide reasonable protection against harmful interference in a
residential installation. This equipment generates uses and can radiate radio frequency energy and, if not installed
and used in accordance with the instructions, may cause harmful interference to radio communications. However,
there is no guarantee that interference will not occur in a particular installation. If this equipment does cause harmful
interference to radio or television reception, which can be determined by turning the equipment off and on, the user
is encouraged to try to correct the interference by one or more of the following measures:
Reorient or relocate the receiving antenna.
Increase the separation between the equipment and the receiver.
Connect the equipment to an outlet on a circuit different from that to which the receiver is connected.
Consult the dealer or an experienced radio/TV technician for help.
Industry Canada ICES-003 Compliance Label: CAN ICES-3 (B)/NMB-3(B)
Note: Testing is based on the use of supplied and recommended cable types. The use of other than shielded
(screened) cable types may degrade EMC performance.
This product meets the Essential Requirements of all relevant European directives and is eligible for CE marking.
The CE Declaration of Conformity can be obtained from: www.shure.com/europe/compliance
Authorized European representative:
Shure Europe GmbH
Headquarters Europe, Middle East & Africa
Department: EMEA Approval
Jakob-Dieffenbacher-Str. 12
75031 Eppingen, Germany
Phone: +49-7262-92 49 0
Fax: +49-7262-92 49 11 4
Email: [email protected]

Shure Incorporated
11/11
"Made for iPod," "Made for iPhone," and "Made for iPad" mean that an electronic accessory has been designed to
connect specifically to iPod, iPhone, or iPad, respectively, and has been certified by the developer to meet Apple
performance standards. Apple is not responsible for the operation of this device or its compliance with safety and
regulatory standards. Please note that the use of this accessory with iPod, iPhone, or iPad may affect wireless
performance.
iPad, iPhone, iPod, iPod classic, iPod nano, iPod touch, and Retina are trademarks of Apple Inc., registered in the
U.S. and other countries. iPad Air and iPad mini are trademarks of Apple Inc. The trademark "iPhone" is used with a
license from Aiphone K.K.
Mac and Lightning are registered trademarks of Apple Inc.
Other manuals for MVI
4
Table of contents
Other Shure Accessories manuals

Shure
Shure M71EB User manual

Shure
Shure V-15 Type III User manual

Shure
Shure V15 Type IV SUPER TRACK IV User manual

Shure
Shure R180 User manual

Shure
Shure N35S Parts list manual

Shure
Shure ANI22 User manual

Shure
Shure SEK-2 User manual

Shure
Shure MVI User manual

Shure
Shure X100 User manual

Shure
Shure N78s User manual

Shure
Shure ANIUSB-Matrix User manual

Shure
Shure ANI22-BLOCK User manual

Shure
Shure 27EU3222B User manual

Shure
Shure ANI4OUT-XLR User manual

Shure
Shure UA888 User manual

Shure
Shure MVI User manual

Shure
Shure 25 Series User manual

Shure
Shure M95/D SERIES User manual

Shure
Shure Microflex MXWANI8 User manual

Shure
Shure ANI4IN Series User manual