Shure KSE1500 User manual

KSE1500
Electrostatic Earphone System
The Shure electrostatic earphone system, KSE1500, user guide.
Version: 3 (2020-G)

Shure Incorporated
2/21
Table of Contents
KSE1500Electrostatic Earphone System 3
IMPORTANT SAFETY INSTRUCTIONS 3
WARNING FOR ALL EARPHONES! 3
WARNING 4
General Description 5
Features 5
KSA1500 Amplifier 5
Controls and Navigation 7
Setup 8
Step 1: Connect the earphones to the amplifier 8
Step 2: Connect a sound source to the amplifier. 8
Step 3: Power on the amplifier 9
Menu Navigation 9
EQUALIZER 9
AUDIO 9
UTILITIES 10
Equalizer 10
Audio 12
Utilities 12
Firmware 12
Updating the Firmware 13
Lithium-ion Rechargeable Batteries 13
Storing Batteries 13
Battery Repair and Replacement 13
Using Earphones 13
Safely Connect and Disconnect Earphones 13
Choosing a Sleeve 14
Wearing the Earphones 14
Changing Sleeves 14
Removing the Earphones 15
Maintenance and Cleaning 15
Cleaning the Earphone Nozzle 16
Troubleshooting 16
Device Reset 17
System Requirements and Compatibility 17
Specifications 17
Kit Specifications 17
Earphone Specifications 17
KSA1500 Amplifier Specifications 18
Battery Specifications 19
Accessories 19
Furnished Accessories 19
Furnished AccessoriesSquare zipper pouchLeather ampli
fier caseFit Kit with assorted sleevesUSB cable, Micro-B
"On The Go"USB cable, Type A to MicroBUSB cable, Mi
cro-B to Lightning6-inch male to male 3.5mm cable36-inch
male to male 3.5mm cable¼inch (6.3mm) to ⅛inch
(3.2mm) stereo adapterAirline adapterInline volume con
trolRubber amp security bandsOptional AccessoriesUSB
cable, Micro-B to 30-pin 19
Certifications 20
Information to the user 20
Patent Notice 20

Shure Incorporated
3/21
1.
2.
3.
4.
5.
6.
7.
8.
9.
10.
11.
12.
13.
14.
15.
16.
17.
18.
KSE1500
Electrostatic Earphone System
IMPORTANT SAFETY INSTRUCTIONS
READ these instructions.
KEEP these instructions.
HEED all warnings.
FOLLOW all instructions.
DO NOT use this apparatus near water.
CLEAN ONLY with dry cloth.
ONLY USE KSE earphones with KSA amplifiers.
UNPLUG this apparatus during lightning storms or when unused for long periods of time.
PROTECT the power cord from being walked on or pinched, particularly at plugs, convenience receptacles, and the
point where they exit from the apparatus.
ONLY USE attachments/accessories specified by the manufacturer.
REFER all servicing to qualified service personnel. Servicing is required when the apparatus has been damaged in any
way, such as power supply cord or plug is damaged, liquid has been spilled or objects have fallen into the apparatus,
the apparatus has been exposed to rain or moisture, does not operate normally, or has been dropped.
DO NOT expose the apparatus to dripping and splashing. DO NOT put objects filled with liquids, such as vases, on the
apparatus.
The MAINS plug or an appliance coupler shall remain readily operable.
To reduce the risk of fire or electric shock, do not expose this apparatus to rain or moisture.
Do not attempt to modify this product. Doing so could result in personal injury and/or product failure.
Operate this product within its specified operating temperature range.
PROTECT the earphone cable from being pinched or cut.
DO NOT use this apparatus if the earphone cable, housing, or connector is damaged.
This product is intended for professional use only. This product should only be sold through professional sales channels.
This symbol indicates that dangerous voltage constituting a risk of electric shock is present within this unit.
This symbol indicates that there are important operating and maintenance instructions in the literature accom
panying this unit.
WARNING: Voltages in this equipment are hazardous to life. No user-serviceable parts inside. Refer all servicing to qualified
service personnel. The safety certifications do not apply when the operating voltage is changed from the factory setting.
Changes or modifications not expressly approved by Shure Incorporated could void your authority to operate this equipment.
WARNING FOR ALL EARPHONES!
For safe and correct use of earphones, read this manual before use. Keep the manual and safety information in a convenient
place for future reference.

Shure Incorporated
4/21
•
•
•
•
•
•
•
•
•
•
•
•
•
•
•
•
•
•
WARNING
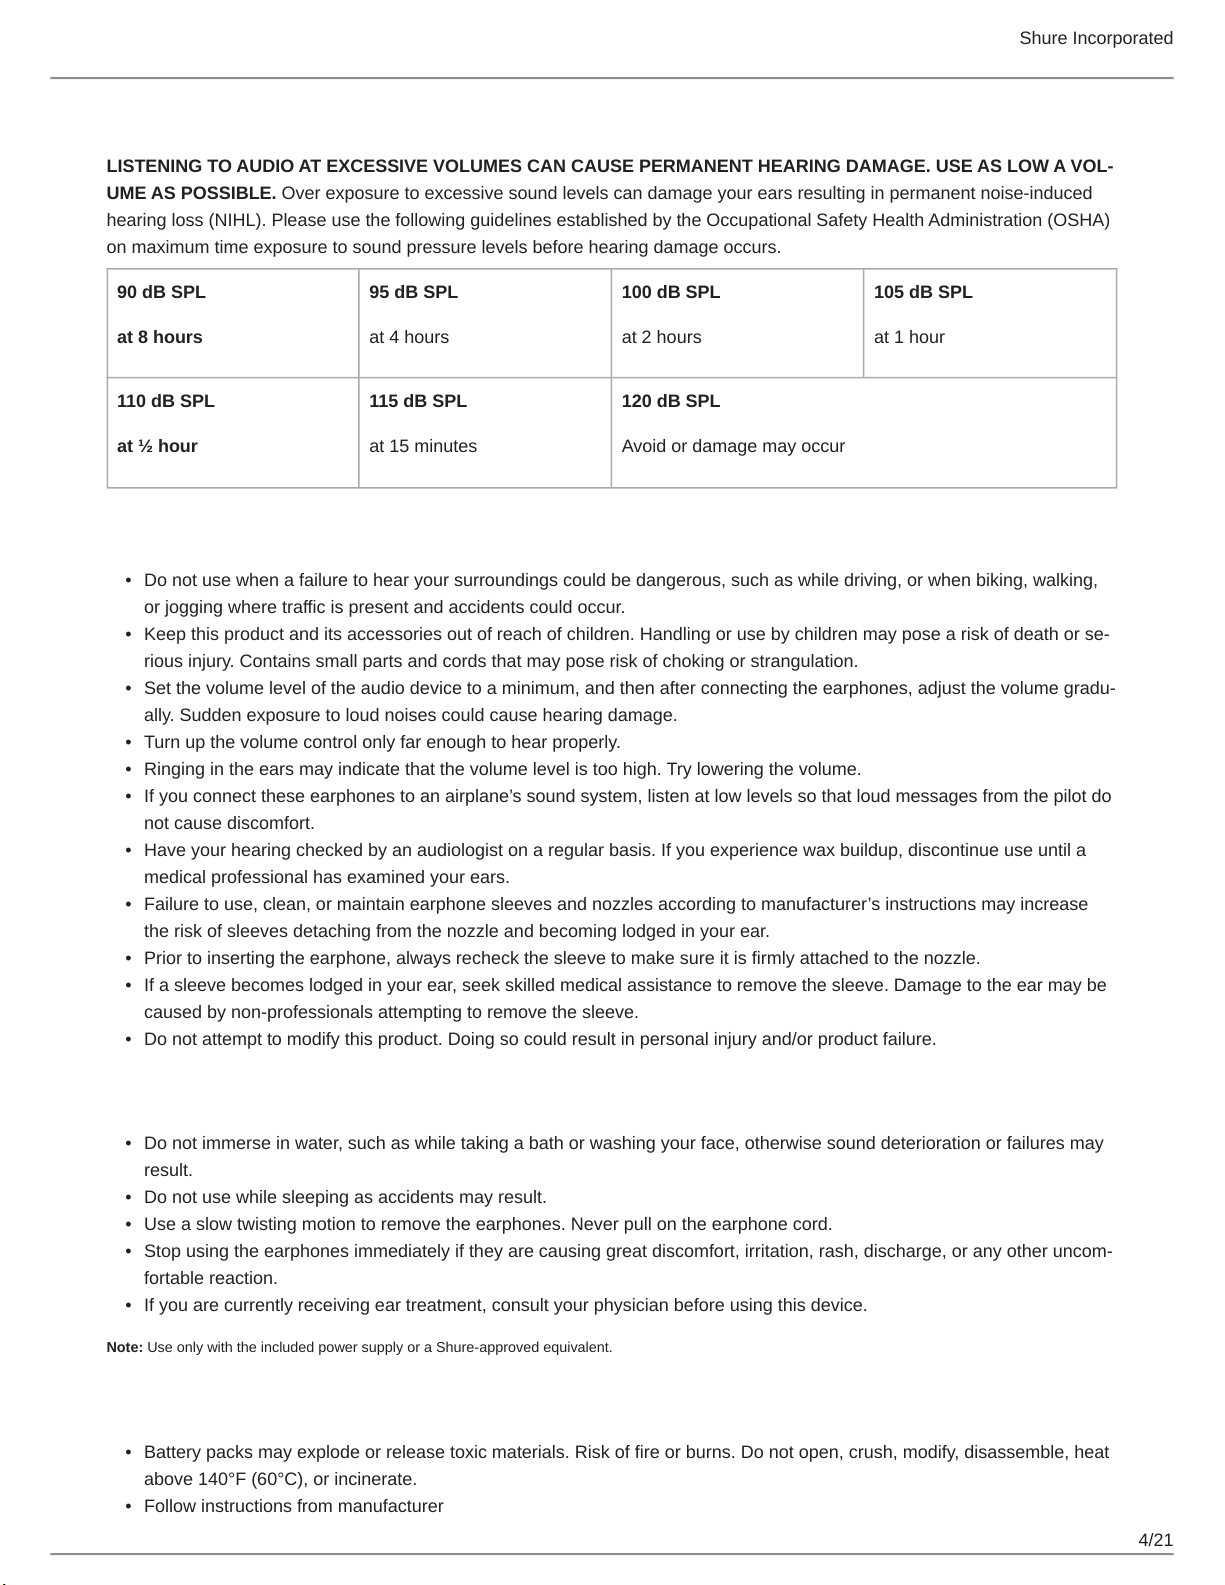
LISTENING TO AUDIO AT EXCESSIVE VOLUMES CAN CAUSE PERMANENT HEARING DAMAGE. USE AS LOW A VOL
UME AS POSSIBLE. Over exposure to excessive sound levels can damage your ears resulting in permanent noise-induced
hearing loss (NIHL). Please use the following guidelines established by the Occupational Safety Health Administration (OSHA)
on maximum time exposure to sound pressure levels before hearing damage occurs.
90 dB SPL
at 8 hours
95 dB SPL
at 4 hours
100 dB SPL
at 2 hours
105 dB SPL
at 1 hour
110 dB SPL
at ½ hour
115 dB SPL
at 15 minutes
120 dB SPL
Avoid or damage may occur
WARNING
Do not use when a failure to hear your surroundings could be dangerous, such as while driving, or when biking, walking,
or jogging where traffic is present and accidents could occur.
Keep this product and its accessories out of reach of children. Handling or use by children may pose a risk of death or se
rious injury. Contains small parts and cords that may pose risk of choking or strangulation.
Set the volume level of the audio device to a minimum, and then after connecting the earphones, adjust the volume gradu
ally. Sudden exposure to loud noises could cause hearing damage.
Turn up the volume control only far enough to hear properly.
Ringing in the ears may indicate that the volume level is too high. Try lowering the volume.
If you connect these earphones to an airplane’s sound system, listen at low levels so that loud messages from the pilot do
not cause discomfort.
Have your hearing checked by an audiologist on a regular basis. If you experience wax buildup, discontinue use until a
medical professional has examined your ears.
Failure to use, clean, or maintain earphone sleeves and nozzles according to manufacturer’s instructions may increase
the risk of sleeves detaching from the nozzle and becoming lodged in your ear.
Prior to inserting the earphone, always recheck the sleeve to make sure it is firmly attached to the nozzle.
If a sleeve becomes lodged in your ear, seek skilled medical assistance to remove the sleeve. Damage to the ear may be
caused by non-professionals attempting to remove the sleeve.
Do not attempt to modify this product. Doing so could result in personal injury and/or product failure.
CAUTION
Do not immerse in water, such as while taking a bath or washing your face, otherwise sound deterioration or failures may
result.
Do not use while sleeping as accidents may result.
Use a slow twisting motion to remove the earphones. Never pull on the earphone cord.
Stop using the earphones immediately if they are causing great discomfort, irritation, rash, discharge, or any other uncom
fortable reaction.
If you are currently receiving ear treatment, consult your physician before using this device.
Note: Use only with the included power supply or a Shure-approved equivalent.
WARNING
Battery packs may explode or release toxic materials. Risk of fire or burns. Do not open, crush, modify, disassemble, heat
above 140°F (60°C), or incinerate.
Follow instructions from manufacturer

Shure Incorporated
5/21
•
•
•
•
•
•
•
•
•
•
•
•
•
•
Do not short circuit; may cause burns or catch fire
Do not charge with products other than those specified in this user guide.
Dispose of battery packs properly. Check with local vendor for proper disposal of used battery packs.
Batteries (battery pack or batteries installed) shall not be exposed to excessive heat such as sunshine, fire or the like
Note: Battery replacement to be performed only by Shure authorized service personnel.
Please follow your regional recycling scheme for batteries, packaging, and electronic waste.
General Description
The Shure KSE1500 electrostatic earphones are the result of many years of research, development, and technological ad
vancements from the Shure engineering team. The electrostatic drivers deliver premium quality, high definition audio for the
first time in an in-ear design, which provides superior comfort and isolation from outside noise. The earphones are powered by
the KSA1500: a compact, portable electrostatic amplifier with a built-in digital-to-analog converter for connecting to a micro-B
USB source. A full set of furnished accessories includes a leather protective case, a micro-B USB cable, and interchangeable
sound isolating sleeves for a comfortable, personalized fit. From critical monitoring to casual listening, the KSE1500 earphones
reveal the detail and nuances to satisfy the most critical ears.
Features
Portable Electrostatic Amplifier
Digital-to-analog conversion when connected to a computer via micro-B USB
Supports up to 24-bit, 96 kHz digital audio
Powered by an internal, rechargeable Lithium-ion battery
Four band parametric equalizer, limiter, and input pad
Factory and custom user presets
Earphones
Low distortion characteristics
Transparent, high-definition sound
Excellent transient response
Full range frequency response
Formable wire ensuring secure cable placement

Shure Incorporated
6/21
•
•
•
•
•
KSA1500 Amplifier
①Hold Switch Locks the power button and control knob to prevent accidental adjustment
②Power / Back Button Long press: turns power on and off
Short press: returns to previous menu screen
③Control Knob Rotate to adjust volume and double-press to navigate through the menu
④Power LED Indicator
Red: The amplifier is off. Or amplifier is connected to power and the battery is charging.
Green: The amplifier is powered on. Or the amplifier is off; battery is connected to pow
er and fully charged.
Off: The amplifier is off and not connected to power.
⑤Line Audio Input 3.5 mm stereo input for connecting to analog audio sources
⑥Earphone Output LEMO output to connect Shure KSE1500 earphones
⑦OLED Display Displays system information
⑧Input Source Selector Selects line (analog) or micro-B USB (digital) audio input

Shure Incorporated
7/21
•
⑨Micro-B USB port Connects to a computer or portable audio device to receive audio or to the micro-B USB
power adapter to charge the rechargeable battery.
Controls and Navigation
Powering on / off: Long press the power button ②
Adjusting volume: Turn the control knob ①
Accessing the menu: Double-click the control knob ①
Scroll through the menu: Turn the control knob ①
Select an item: Press the control knob button ①
Return to previous screen: Press the power button ②
Lock / unlock the controls: Slide the hold switch ③ to lock and unlock the power button and control knob. When switch dis
plays red background, hold is enabled.
Home Screen
①Audio Input Source LINE: Analog audio (3.5 mm input)

Shure Incorporated
8/21
•USB: Digital audio
②Audio Input Meter Indicates the input level of the audio signal
③Audio Settings Displays settings for the input pad and equalizer
④Battery Meter Displays remaining battery life
⑤Volume Indicates the output level
Setup
Step 1: Connect the earphones to the amplifier
Plug into the amplifier with the amplifier powered off.
Note: Align the earphone cable connector with the red dot towards the front of the amplifier.
Step 2: Connect a sound source to the amplifier.
Set the INPUT switch to LINE for analog 3.5 mm sources or USB for digital sources.
3.5 mm input (analog au
dio)
Plug the audio device into the LINE IN input and set the INPUT switch to LINE. To charge
the battery while using an analog source, connect the amplifier to a computer or external
battery
Connecting to an Analog Source
USB (digital audio and
power)
Use the USB cable when listening to music from a computer or other USB-equipped device
and set the INPUT switch to USB. When connected to a computer, USB simultaneously
streams digital audio and charges the amplifier battery.

Shure Incorporated
9/21
Note: You have the option to disable automatic charging in the Utilities menu.
Connecting to a USB Source
Step 3: Power on the amplifier
The driver automatically installs when the amplifier is first plugged into a device. The KSE1500 should take over as the default
audio device.
Note: Volume controls are disabled on Windows, Mac, and iOS. Volume should be adjusted only by using the amp volume knob for best performance. Ensure
that volume is maximized in iTunes or the Windows Media Player.
Menu Navigation
EQUALIZER
Displays equalizer settings. Use the control wheel to adjust values
FLAT/BYPASS:
The equalizer is bypassed
PRESET 1 4:
Four adjustable 4-band equalizer presets: low boost, vocal boost, loudness, and de-ess
USER DEFINED 1 4:
Four adjustable 4-band parametric equalizer that you can customize to your listening preferences
AUDIO
LIMITER:
Turn limiter on for ear protection from unexpected volume spikes
INPUT PAD:
Choice of 0, -10 dB or -20 dB pads (available in line input mode.)
SAMPLE RATE:
Available in USB input mode.

Shure Incorporated
10/21
•
•
UTILITIES
Control the device parameters
DISPLAY:
Adjust screen brightness, timeout length, and flip screen
BATTERY INFO:
Displays battery status
FACTORY RESET:
Restores all settings to the factory default
FIRMWARE:
Displays software version information and allows for updates
HARDWARE:
Contains device information for reference and service
DISABLE CHARGING:
Turn automatic charging on or off
Equalizer
The 4-band parametric equalizer is used to adjust the volume of independent, adjustable frequency ranges, to precisely shape
the frequency response. Four user-defined presets can be saved in addition to four factory defined presets. The equalizer can
be bypassed for a flat frequency response.
To view or edit an equalizer setting, select:
MENU > EQUALIZER
Custom Equalizer Settings
The equalizer consists of two filter types:
Peaking filters target a specific frequency range for making gain adjustments (applies to the two middle frequency
bands).
Shelving filters adjust the gain of all frequencies above or below the selected cutoff point. In the lowshelf filter, adjust
ments affect all frequencies below the selected cutoff point. In the high-shelf filter, adjustments affect all frequencies above
the cutoff point.

Shure Incorporated
11/21
•
•
Equalizer Filter Properties
The following parameters are adjustable when creating an equalizer setting:
①Frequency Point or
Range Four independent frequency points used to select specific frequency ranges.
②Frequency (Hz) The numeric value of the selected frequency.
③Gain / Cut Adjusts the volume (±6 dB) of the selected frequency band.
④Bandwidth / Q
Adjusts the width of the frequency band affected by gain settings
Middle bands: Adjusts the width of the peaking filters
High and low bands: Adjusts the cutoff frequency of the shelving filters
Flat (Bypass)
In this mode the equalizer is bypassed for an unchanged frequency response. When using an analog input source, bypassing
the equalizer maintains a 100% analog signal path. For digital audio sources, the equalization section of the digital signal
processor is simply disabled.

Shure Incorporated
12/21
•
•
Audio
Limiter
MENU > AUDIO > LIMITER
The limiter protects your ears from unexpected volume spikes at the earphone output.
Input Pad
MENU > AUDIO > INPUT PAD
The input pad feature is available when the amplifier is receiving analog audio in line input mode. The pad attenuates the ana
log input signal to prevent clipping from high output audio sources. Enable the pad when the audio meter indicates clipping.
Begin with the -10 dB pad. If clipping persists, use the -20 dB pad.
Attenuate the source volume if the signal continues to clip with the -20 dB pad engaged.
Sample Rate
MENU > AUDIO > SAMPLE RATE
Sample rate information is displayed here.
Utilities
MENU > UTILITIES
Display Adjust screen brightness and timeout length. Flip the display up or down for visibility in either
direction
Battery Info Provides battery status: percentage charge, cycle count, temperature
Factory Reset Restores all settings to the factory default
Firmware Displays software version information and allows for updates
Hardware Contains device data for reference and service
Enable / Disable Charging
When connected to a USB source, the amplifier automatically recharges the battery. Utilize
the disable charging feature when you don't want to drain your laptop or USB source. The
next time you turn on the amplifier, it will default to enable charging.
Firmware
Firmware is embedded software in each component that controls functionality. Periodically, new versions of firmware are devel
oped to incorporate additional features and enhancements. To take advantage of design improvements, new versions of the
firmware can be downloaded and installed using the Shure Update Utility tool. Software is available for download from http://
www.shure.com/americas/products/software/utilities/shure-update-utility.

Shure Incorporated
13/21
1.
2.
3.
4.
5.
Updating the Firmware
CAUTION! Ensure that amplifier power remains on during a firmware update. Do not turn off the amplifier until the update is
complete.
The Shure Update Utility will find the latest versions of firmware. You can download the updates to your computer. Once the
download is complete, the amplifier automatically begins the firmware update, which overwrites the existing firmware.
From Shure Update Utility software, click the Updates Available button.
To download firmware to your computer (but not to devices), check the box next to the updates you want and select
Download.
Connect the amplifier to your computer with the USB cable.
From the amplifier menu, select UTILITIES > FIRMWARE > ENABLE FW UPDATE
Note: ENABLE FW UPDATE must be enabled in order for the firmware update to work.
Confirm that you want to download the latest firmware to the amplifier.
Note: The battery should be charged before updating firmware. Do not attempt to update firmware if battery percentage is less than 10%.
Lithium-ion Rechargeable Batteries
Storing Batteries
To avoid degrading battery health, keep the storage temperature range between 10°C to 25°C (50°F to 77°F).
Battery Repair and Replacement
Lithiumion batteries have no “memory effect”, and instead experience a more linear reduction in capacity. Contact Shure Ser
vice and Repair to replace the battery if you experience any issues.
Using Earphones
Safely Connect and Disconnect Earphones
Connect to the amplifier: Align the red dot on the earphone cable connector with the red dot on the amplifier earphone out
put.
Disconnect from the amplifier: Pull the knurled connector collar up to safely release the lock on the earphone cable.

Shure Incorporated
14/21
1.
2.
•
•
Choosing a Sleeve
Select an earphone sleeve that provides the best fit and sound isolation. It should be easy to insert, fit comfortably, and easy to
remove.
Soft Flex Sleeves: In small, medium, and large sizes. Made from pliable rubber.
Soft Foam Sleeves: Compress the foam sleeve between your fingers and insert into the ear canal.
Hold in place for about ten seconds while the foam expands.
Triple-Flange Sleeves: If desired, use scissors to trim the stem on the sleeve.
Wearing the Earphones
Carefully insert the earphone into the ear like an earplug, so that a tight seal is formed.
Important: If there is a lack of low frequency response (bass), the earphone sleeve may not be forming a proper seal.
Gently push the earphone deeper into the ear canal or try using a a different sleeve.
Warning: Do not push the earphone sleeve beyond the ear canal opening.
Wear earphone cables over the back of the ear to keep them in place during physical activity. Guide the cable down ei
ther the front or back of the body, and use the cable cinch to tighten up the remaining slack.
The fit of the earphone can greatly affect sound quality.
Changing Sleeves
Twist and pull to remove the sleeve from the nozzle.
Slide on a new sleeve so that it completely covers the barb and the nozzle.

Shure Incorporated
15/21
•
Caution: If the barb or any of the nozzle is exposed, the sleeve is not properly installed. Replace sleeves if they do not tightly grip the nozzle. To ensure proper
fit and performance, use only sleeves supplied by Shure (unless using custom molded sleeves).
Removing the Earphones
Grasp the body of earphone and gently twist to remove.
Note: Do not pull on cable to remove earphone.
Maintenance and Cleaning
Careful maintenance ensures a tight seal between the sleeve and nozzle, improving sound quality and product safety.
Keep the earphones and sleeves as clean and dry as possible.

Shure Incorporated
16/21
•
•
•
•
•
To clean sleeves, remove them from earphones, gently rinse in warm water and air dry. Foam sleeves require a longer
drying time. Inspect for damage and replace if necessary. Ear sleeves must be completely dry before reusing.
Wipe the earphones and sleeves with mild antiseptic to avoid infections. Do not use alcohol-based disinfectants.
Do not expose earphones to extreme temperatures.
Replace sleeves if they do not fit properly.
Do not attempt to modify this product. Doing so will void the warranty and could result in personal injury and/or product
failure.
Cleaning the Earphone Nozzle
If you notice a change in sound quality, remove the sleeve and check the nozzle of your earphone. If nozzle is blocked, clear
obstruction by using wire loop end of cleaning tool.
If no obstruction is found or if sound quality does not improve, replace the sleeve with a new sleeve.
Caution: When cleaning, do not force any object through the earphone nozzle! This will damage the earphone sound filter.
Warning: The cleaning tool is only to be used to clean the earphones. Any other use, such as using the tool to clean ears or foam sleeve, could result in injury.
The cable connectors to the earphones may collect debris or other deposits that can affect audio quality. If this happens, disconnect the cables and clean them
using a dry cotton swab.
Troubleshooting
Issue Solution
The device appears to
be working but no
sound is audible
Check that cable connections are secure
Ensure that input switch is set to the correct input source
Audio is distorted
Confirm the audio from the source is not distorted before entering the amplifier
Check that cable connections are secure
Check the amplifier input meter to make sure the amplifier input is not overloading
Amplifier does not pow
er on
The battery may require recharging
If the amplifier is plugged in, try a different micro-B USB port (or AC outlet if plugged into the
power adapter)

Shure Incorporated
17/21
Issue Solution
Earphones sound dull
or muffled Follow the instructions on cleaning the earphone nozzles with the supplied cleaning tool
Battery no longer holds
charge
Check that Disable Charging is not selected
Contact Shure Service and Repair to arrange to have the battery replaced. There are no user-
serviceable parts.
Device Reset
In the event that the amplifier malfunctions, reboot it by pressing the control knob button and the power button simultaneously
for approximately 10 seconds until the device powers down.
System Requirements and Compatibility
Windows Windows XP and higher
Macintosh Mac OS X 10.4 and higher
Specifications
Kit Specifications
Bias Voltage
200 V DC
Output Voltage
±200 V, max.
Output Current
≤ 1 mA
Sound Isolation
≤ 37 dB
Operating Temperature Range
-18 to 57 °C (0 to 135 °F)
Earphone Specifications
Transducer Type
Electrostatic

Shure Incorporated
18/21
Connector Type
Lemo Connector
Frequency Response
10 Hz to 50 kHz
Maximum SPL
1 kHz at 3% THD
113 dB SPL
Net Weight
44.0 g (1.55 oz.)
KSA1500 Amplifier Specifications
Bit Depth
16-bit / 24-bit
Sampling Rate
44.1 / 48 / 88.2 / 96 kHz
Signal-to-Noise Ratio
up to 107 dB Aweighted
Adjustable Gain Range
-40 dB to +60 dB
Limiter
Selectable Analog RMS Limiter
Equalizer
4-band Parametric
USB Input
USB Micro-B Receptacle
Line-In Input
3.5 mm (1/8")
Charging Requirements
USB-powered: 5 V/0.5 A to 1 A
Housing
Black Anodized Aluminum
Net Weight
182.0 g (6.42oz.)

Shure Incorporated
19/21
•
•
•
•
•
•
•
•
•
•
•
•
Dimensions
111 x 59 x 21 mm H x W x D
Battery Specifications
Battery Type
Rechargeable Li-Ion
Nominal Voltage
3.6 V DC
Battery Life
Analog in (BYPASS EQ mode) up to 10 hours
USB Input (EQ mode) up to 7 hours
Battery Charging Temperature Range
0 to 45 °C (32 to 113 °F)
Accessories
Furnished Accessories
Square zipper pouch
Leather amplifier case
Fit Kit with assorted sleeves
USB cable, Micro-B "On The Go"
USB cable, Type A to Micro-B
USB cable, Micro-B to Lightning
6-inch male to male 3.5mm cable
36-inch male to male 3.5mm cable
¼-inch (6.3mm) to ⅛-inch (3.2mm) stereo adapter
Airline adapter
Inline volume control
Rubber amp security bands

Shure Incorporated
20/21
•
1.
2.
•
•
•
•
•
Optional Accessories
USB cable, Micro-B to 30-pin
Certifications
Information to the user
This device complies with part 15 of the FCC Rules. Operation is subject to the following two conditions:
This device may not cause harmful interference.
This device must accept any interference received, including interference that may cause undesired operation.
Note: This equipment has been tested and found to comply with the limits for a Class B digital device, pursuant to part 15 of
the FCC Rules. These limits are designed to provide reasonable protection against harmful interference in a residential installa
tion. This equipment generates uses and can radiate radio frequency energy and, if not installed and used in accordance with
the instructions, may cause harmful interference to radio communications. However, there is no guarantee that interference will
not occur in a particular installation. If this equipment does cause harmful interference to radio or television reception, which
can be determined by turning the equipment off and on, the user is encouraged to try to correct the interference by one or more
of the following measures:
Reorient or relocate the receiving antenna.
Increase the separation between the equipment and the receiver.
Connect the equipment to an outlet on a circuit different from that to which the receiver is connected.
Consult the dealer or an experienced radio/TV technician for help.
Industry Canada ICES-003 Compliance Label: CAN ICES-3 (B)/NMB-3(B)
Note: Testing is based on the use of supplied and recommended cable types. The use of other than shielded (screened) cable types may degrade EMC per
formance.
This product meets the Essential Requirements of all relevant European directives and is eligible for CE marking.
The CE Declaration of Conformity can be obtained from: www.shure.com/europe/compliance
Authorized European representative:
Shure Europe GmbH
Headquarters Europe, Middle East & Africa
Department: EMEA Approval
Jakob-Dieffenbacher-Str. 12
75031 Eppingen, Germany
Phone: +49-7262-92 49 0
Fax: +49-7262-92 49 11 4
Patent Notice
U.S. patent number
9,210,497
Other manuals for KSE1500
3
Table of contents
Other Shure Headphones manuals

Shure
Shure KSE1200 User manual

Shure
Shure RMCE-TW1 User manual

Shure
Shure Computer Headset User manual

Shure
Shure SRH240M+ User manual

Shure
Shure Sound Isolating SE215 User manual

Shure
Shure RMCE-BT2 User manual

Shure
Shure SRH840 User manual

Shure
Shure Sound Isolating SE112 User manual

Shure
Shure Sound Isolating SE535 User manual

Shure
Shure Aonic 5 User manual