Sices MC100 User manual

File name: EAAM03701EN
Rev. 01 Date: 15/12/2014
ID Document: EAAM0371
Product: MC100
ii MC100 User’s Manual
1. ................................................................................................................3
2. ..................................................................................................................3
3. ..................................................................................................................3
Buttons (ref. to fig. 1)............................................................................................4
Indicators (ref. to fig. 1).........................................................................................5
Multifunctional display...........................................................................................7
Mode navigation (ref. to fig. 2)........................................................................7
Display area layout (ref. to fig. 3)....................................................................9
Top status bar (ref. to fig. 4)...........................................................................9
Display mode........................................................................................................9
Programming (P.xx) .......................................................................................9
3.4.1.1 Access codes.......................................................................................10
3.4.1.2 Parameters configuration .....................................................................10
3.4.1.3 Strings configuration.............................................................................11
3.4.1.4 Direct access to the latest page visited ................................................11
3.4.1.5 Protections and alarms parameters......................................................11
Status information (S.xx)..............................................................................11
Electrical measurements (M.xx) ...................................................................12
PMCBus (B.xx).............................................................................................13
History logs (H.xx)........................................................................................13
Manual commands .............................................................................................13
Manual synchronisation................................................................................13
Manual power regulation..............................................................................14
Working sequence........................................................................................15
Load control..................................................................................................15
4. .........................................................................................................15
Language selection.............................................................................................15

MC100 User’s Manual 3
NOTE: Please read this manual carefully before using the device.
1.
This manual describes the MC100 controller.
2.
ALARM –it is used to indicate a fault that make the genset operation impossible and causes the
automatic and immediate turning off of the engine with emergency procedure.
DEACTIVATION –it is used to indicate a fault that make the genset operation impossible and causes
the automatic and immediate turning off of the engine with standard procedure (with cooling period).
WARNING –it is used to indicate a fault that requires a manual operation but without the turning off of
the engine.
3.
Fig. 1 –MC100 Front view
The commands are made of 11 buttons (1a, 1b, 1c).
On the front view there are some indicators (2, 2a, 2b, 2c).
KEY MC100
1 - Buttons
2 - Indicators
4MC100 User’s Manual
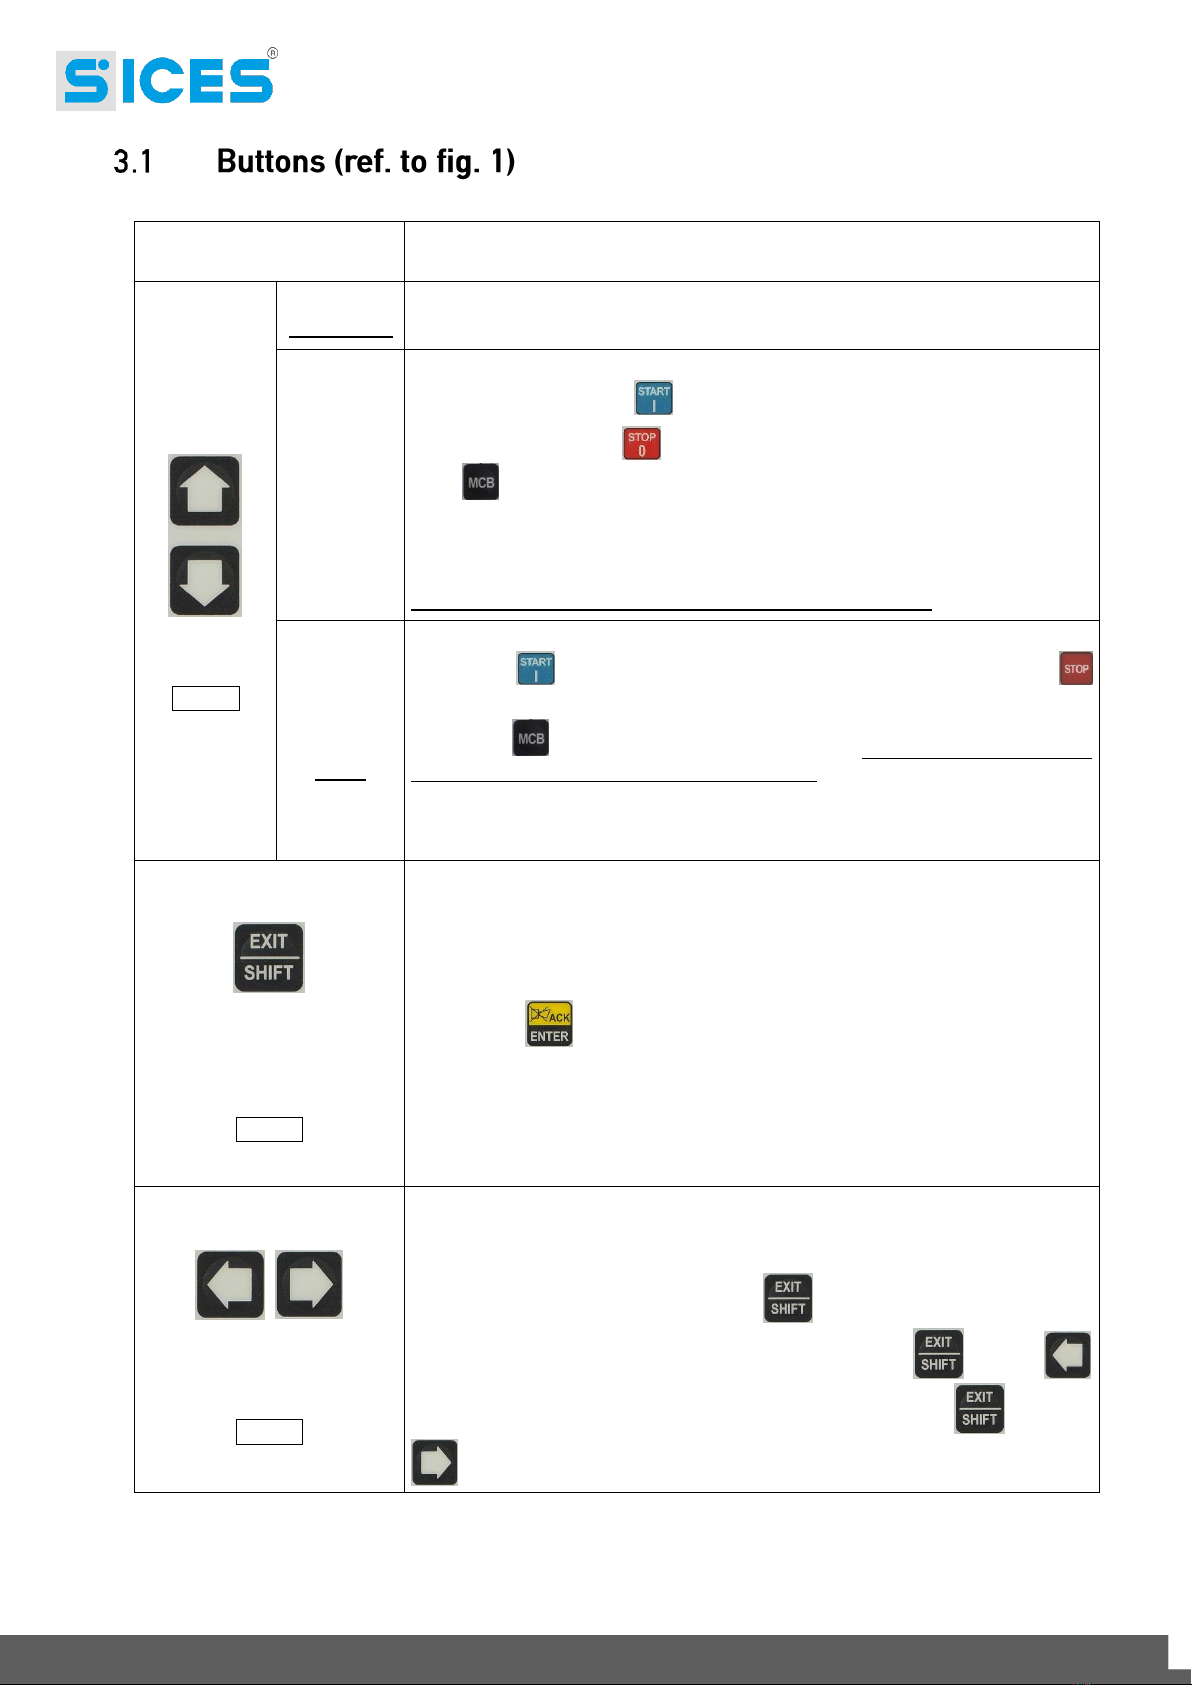
BUTTON
FUNCTION
MODE UP
MODE
DOWN
Ref. 1b
OFF/RESET
PROGRAM
The group is disabled; warnings and stops are cancelled. It is possible to
access to the parameters configuration.
MAN
The controller sets the genset manual operation.
Press the button START to start all gensets.
Press the button STOP to stop all gensets.
MCB button for the manual command in closing and opening operation
of the MCB “Mains circuit Breaker”.
Manual switch command in closing and opening operation with modes that
depend on the SW and HW configuration of the plant.
In case of voltage on BUS, the synchronization is required.
AUTO
TEST
The controller sets the automatic management of the gensets starts. Press
the START button to activate/deactivate the TEST mode; the STOP
button allows the stop of the gensets (with alarm activation).
The MCB allows the switch of the loads (only in TEST mode and
depending on the plant type and configuration).
The activation of an external input properly configured (or receiving of a
correct command via SMS or serial port) may force the start of groups and
load even with mains live or with inhibition input activated (REMOTE START).
EXIT/SHIFT
Ref. 1a
In program mode, it allows to cancel a variable value change, come back to
the upper menu, and exit the programming. By pressing it for two seconds in
any of the menu, it allows to exit the programming saving the position for a
future return.
In OFF/RESET mode, according to the page selected, by pressing it together
with ENTER for at least 5 seconds, it can reset the counters, reload the
default values for the programming parameters or cancel the history log (in
the CANBUS version, it also allows to force the exit from BUS OFF mode). If
used during the keyboard regulation functions, it aborts the function.
When the HELP information are available in the display pages, the HELP
message will be displayed on the bottom bar, by pressing the button and hold.
LEFT/RIGHT
Ref. 1a
The multifunctional display buttons allow to select the previous or next page
of display in all mode but PROGRAM. In the PROGRAM mode, they are used
to place the cursor during the strings insertion phase. The horizontal buttons,
combined with the button EXIT/SHIFT allow to regulate the contrast.
To decrease the contrast press the buttons EXIT/SHIFT + LEFT
(1a). To increase the contrast press the buttons EXIT/SHIFT + RIGHT
(1a).

MC100 User’s Manual 5
BUTTON
FUNCTION
UP/DOWN
Ref. 1a
Up/Down buttons. They allow to select the modality of the multifunctional
display. In PROGRAM and HISTORY LOG they allow to scroll the menus and
the variables / registrations. During the setting, they allow to
increase/decrease the variable value.
If used in combination with the EXIT/SHIFT button, they allow to scroll
the menus by ten at a time or increase/decrease the variables by ten at a time.
ENTER/ACK
Ref. 1a
It allows to activate the programming and enter a submenu, start a variable
modification and confirm said operation. It also allows to activate the
HISTORY LOG function and it permits to enter in the selected log and to
“accept” any warning of fault on the non-volatile memory at the power-up.
It acknowledges the presence of a fault and it deactivates the horn.
KM/KG
GCB
Ref. 1c
GC310/GC350 manual or “TEST” is used to switch the load between the
genset and the mains (the switch towards the mains is always possible, while
towards the genset it is possible only if the related electrical measurements
are in tolerance).
GC500 controls the genset circuit breaker or the switch. Its function depends
on the plant configuration. In case of working in parallel and at least one
source that supplies the BUS, the pushbutton activates the unloading pad
before the opening of the circuit breaker.
If it required to open it without waiting for the pad, hold the pushbutton down
for a few seconds until its opening.
START
Ref. 1b
In MAN mode it can be used to control the start of the genset.
In AUTO mode, it activates/deactivates the TEST mode. At the controller
power-up, if used together with STOP it allows to enter special functions.
STOP
Ref. 1b
It is used to control the engine stop. In AUTO, TEST or REMOTE START it
activates a stop. If it is pressed in OFF/RESET mode, it carries out a LAMP
TEST of all light indicators. At the controller power-up, if used together with
START it allows to enter special functions.
Led off
Led steady on
Led flashing
Signalling
Function
Ref. 2b
PROGRAM
OFF/RESET
It indicates that the operating mode is OFF/RESET
It indicates that the operating mode is PROGRAM
The controller is in a different operating mode
MANUAL
It indicates that the operating mode is MAN

6MC100 User’s Manual
Signalling
Function
Ref. 2b
The controller is in a different operating mode
Ref. 2b
AUTO
TEST
It indicates that the operating mode is AUTO
Flashing at 50% it indicates that the operating mode is TEST
Flashing at 90% % it indicates that the operating mode is
REMOTE START.
The controller is in a different operating mode
Ref. 2b
STATUS
The display is in “STATUS” mode.
The display is in “PROGRAM” or another mode.
Ref. 2b
MEASURES
The display is in “MEASURES”.
The display is in “PROGRAM” or another mode.
Ref. 2b
EVENTS
The display is in “EVENTS” mode.
The display is in “PROGRAM” or another mode.
Ref. 2
ALARM
WARNING
It indicates the presence of at least a alarm, a deactivation or an
unload.
It indicates the presence of at least a warning that has not been
acknowledged by the pushbutton “ACK/ENTER”yet.
There are no alarms or warnings
Ref. 2
AUX. LINK
It indicates the activation of at least one of the two serial ports.
It indicates the activation of the serial port TEST mode.
It indicates the activation of a serial port command (the second
serial port is managed by the signalling only if configured as
communication port and not as I/O).
It indicates the deactivation of at least one of the two serial ports.
Ref. 2c
PMCBUS
It indicates that the interface PMCBUS is on, working and in
ERROR-ACTIVE mode.
Flashing at 25% it indicates a communication fault: the port is in
ERROR-PASSIVE mode.
Flashing at 75% it indicates a communication fault: the port is in
BUS-OFF mode.
CAN-BUS is disabled.
Ref. 2c
MAINS LIVE
Mains voltages and frequencies are on and steady in tolerance,
or that the digital input function “40-External Mains Sensor” is on.
Mains voltages and frequencies are off, or that the digital input
function “40-External Mains Sensor” is off.
Flashing at 50% between the two previous statuses.
Flashing at 25% mains voltages and frequencies are on but not
tolerance.
Mains voltages anomaly or wrong rotation cycle.
Flashing at 75% mains voltages and frequencies are on but over
the tolerance.
Voltage on on the genset bar.
MC100 User’s Manual 7
Signalling
Function
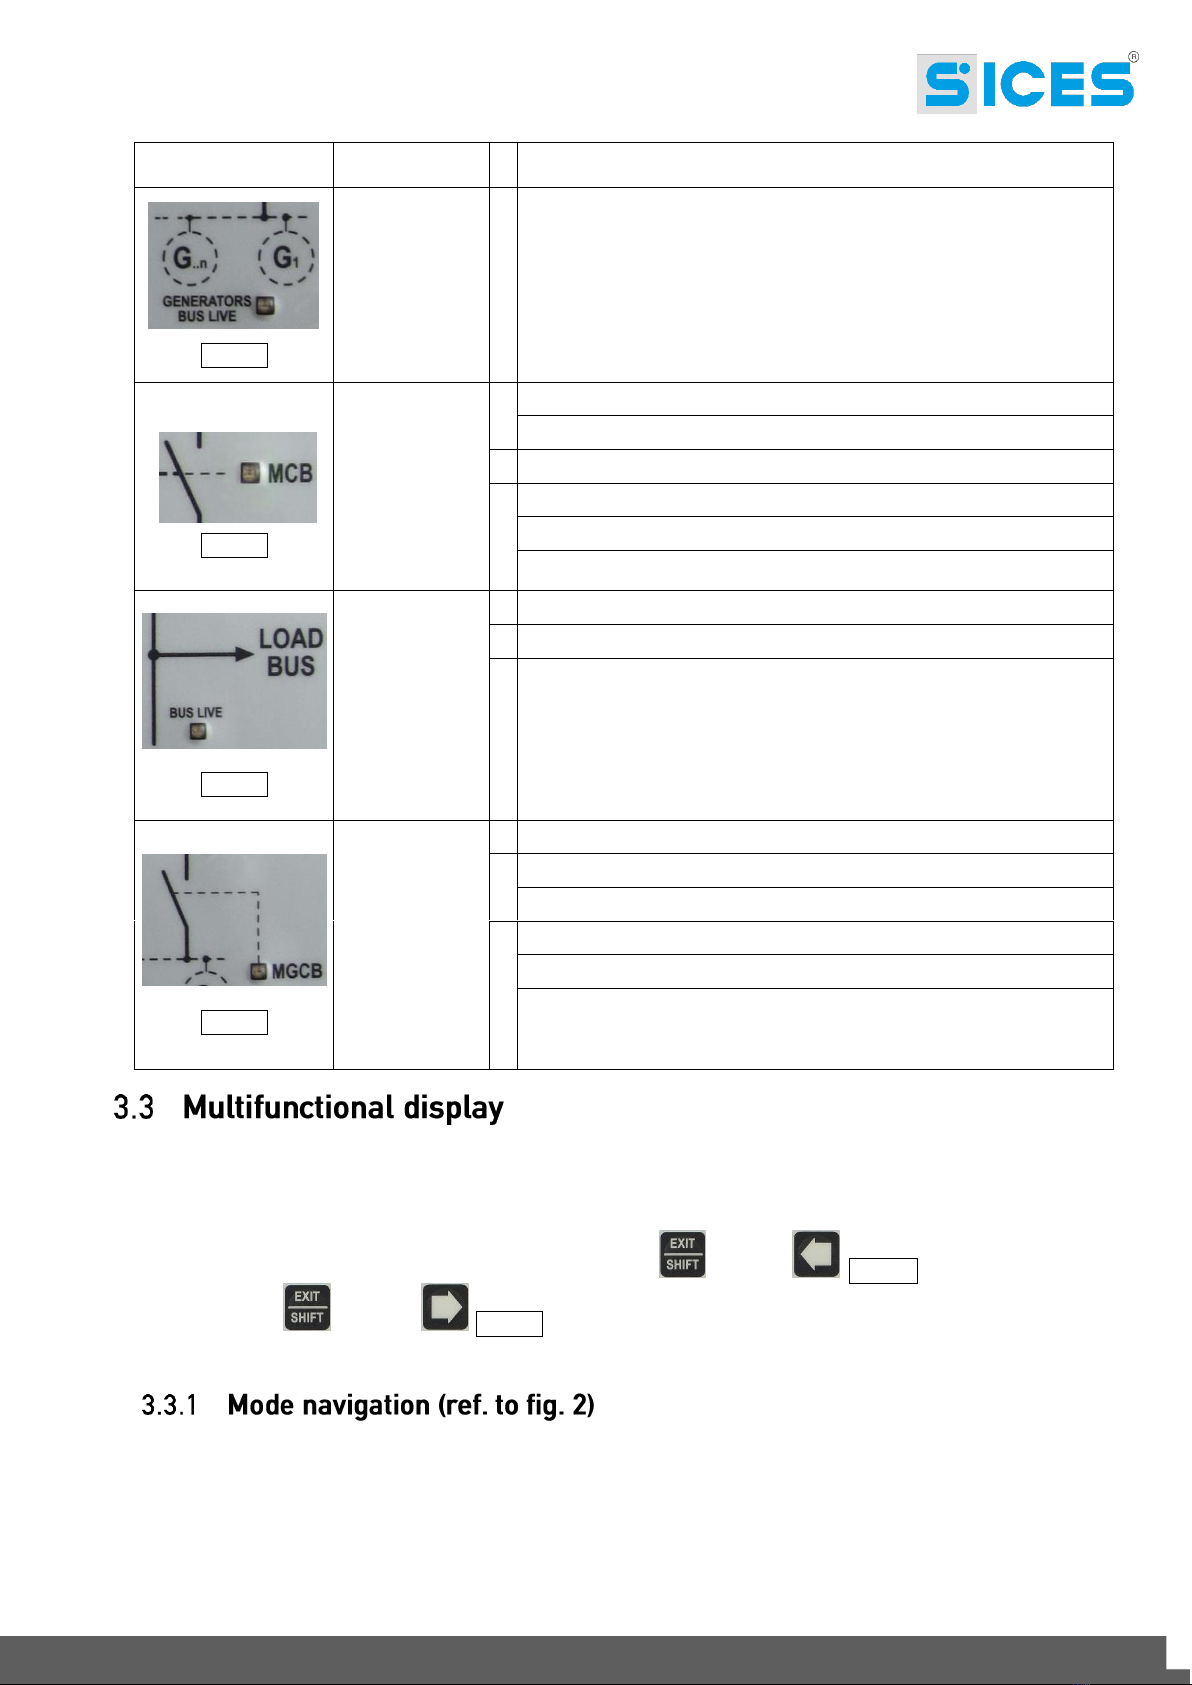
Ref. 2c
GENERATOR
BUS LIVE
Voltage off on the genset bar.
Ref. 2c
MCB
MCB open.
MCB not configured or off.
MCB closed.
Flashing at 25% MCB open at closing command.
Flashing at 75% MCB closed at opening command.
Flashing at 50% in case of synchronization with led BUS LIVE.
Ref. 2c
BUSLIVE
Voltage on on the LOAD BUS.
Voltage off on the LOAD BUS.
Flashing at 50% in case of synchronization on MCB or MGCB.
Alternate flashing on MCB or MGCB.
Ref. 2c
MGCB
MGCB open.
MGCB closed.
MGCB not configured or off.
Flashing at 25% MGCB open at closing command.
Flashing at 75% MGCB closed at opening command
Flashing at 50% in case of synchronization with led BUS LIVE.
The backlit light is managed by the controller, which provide to turn it off if no buttons are pressed in
configurable time (P.4502). In order to turn it on, just press any of the buttons. It is possible to deactivate
the automatic power-off bringing the parameter P.4502 to 0.
The contrast is configurable by pressing EXIT/SHIFT + LEFT Ref. 1a to decrease it or
EXIT/SHIFT + RIGHT Ref. 1a to increase it.
The display has different visualization modes composed by different pages.
8MC100 User’s Manual
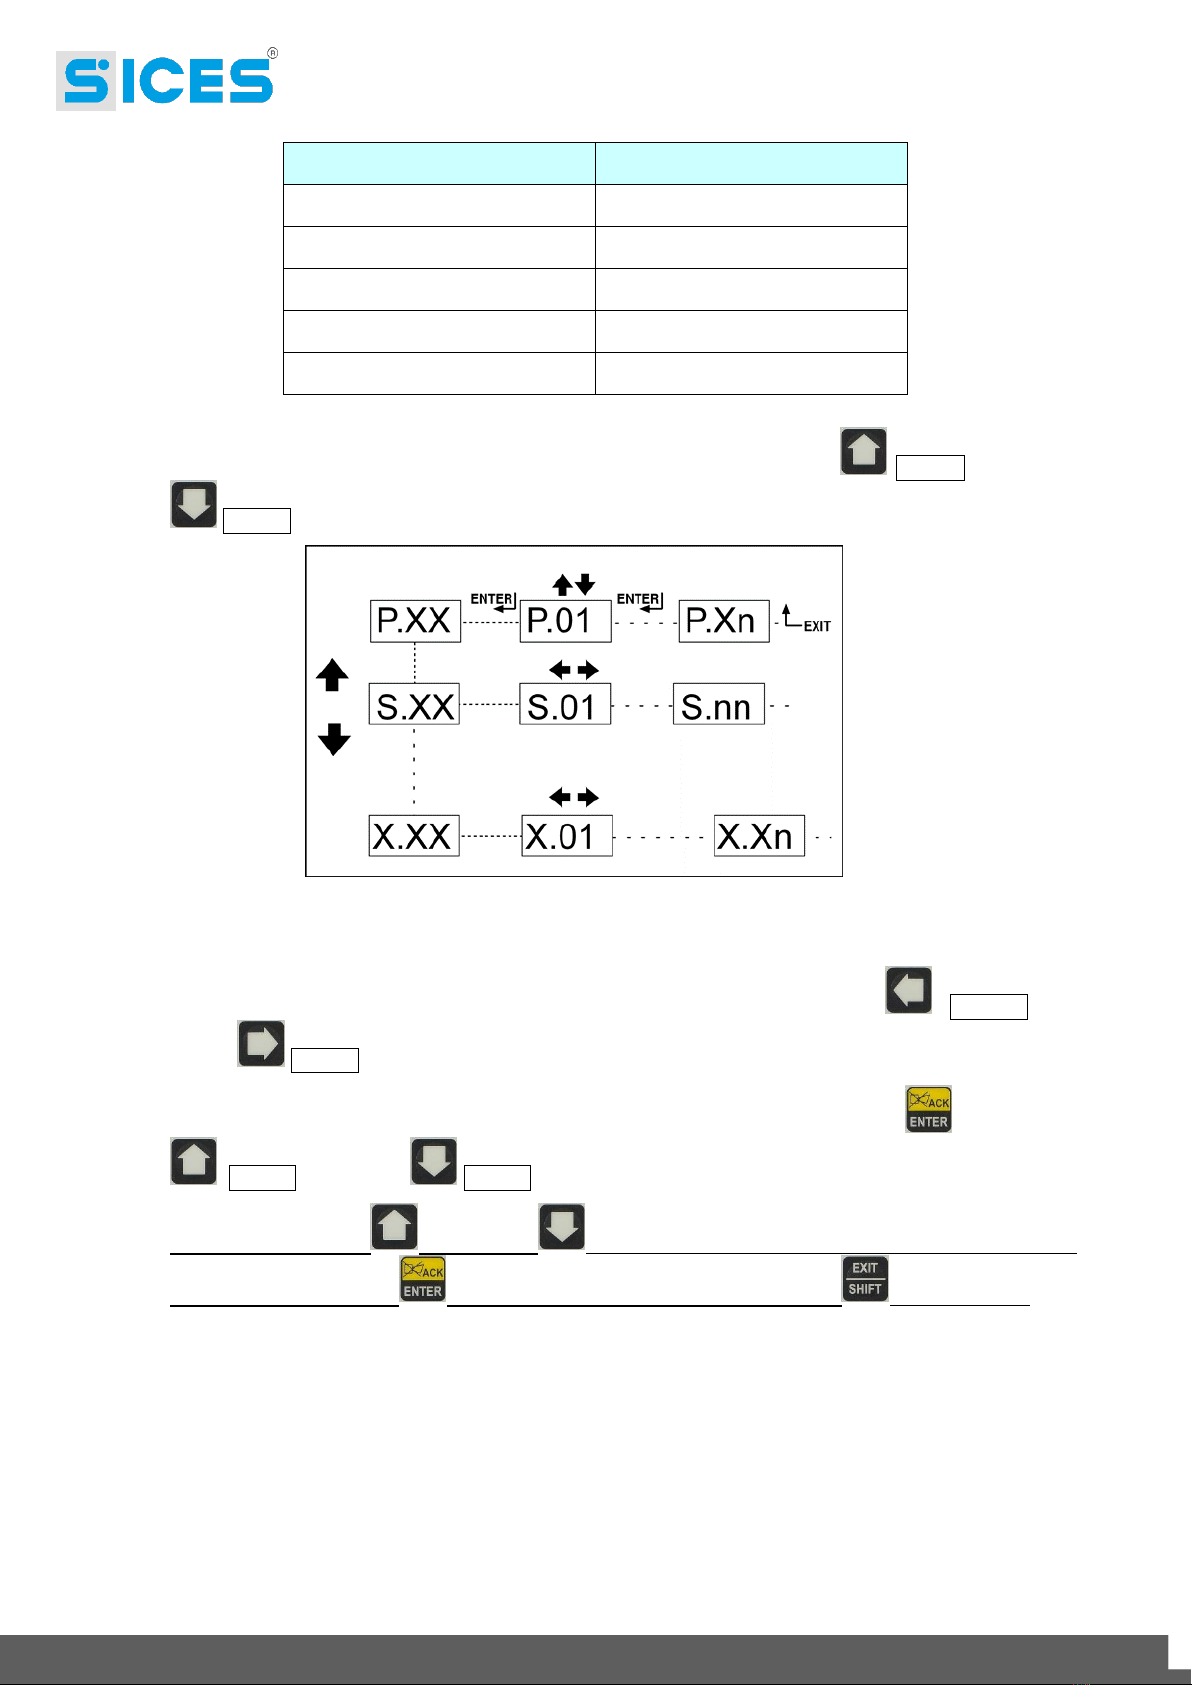
Mode
Page
Programming
P.XX
Status information
S.XX
Electrical measures
M.XX
PMCBus
B.XX
History Log
H.XX
Generally, surfing among modes is possible by means of the buttons UP Ref. 1a and DOWN
Ref. 1a.
In order to visualize the pages in the mode, use the button LEFT Ref. 1a and
RIGHT Ref. 1a.
In some modes (e.g.: mode P.xx and mode H.xx), it is necessary to press ENTER , and then UP
Ref. 1a and DOWN Ref. 1a to surf among pages.
Note: In case the UP and DOWN buttons are used to manage the mode functions, it is
required to press ENTER to activate these functions and EXIT/SHIFT to deactivate it.
Fig. 2 –Surfing among modes
MC100 User’s Manual 9
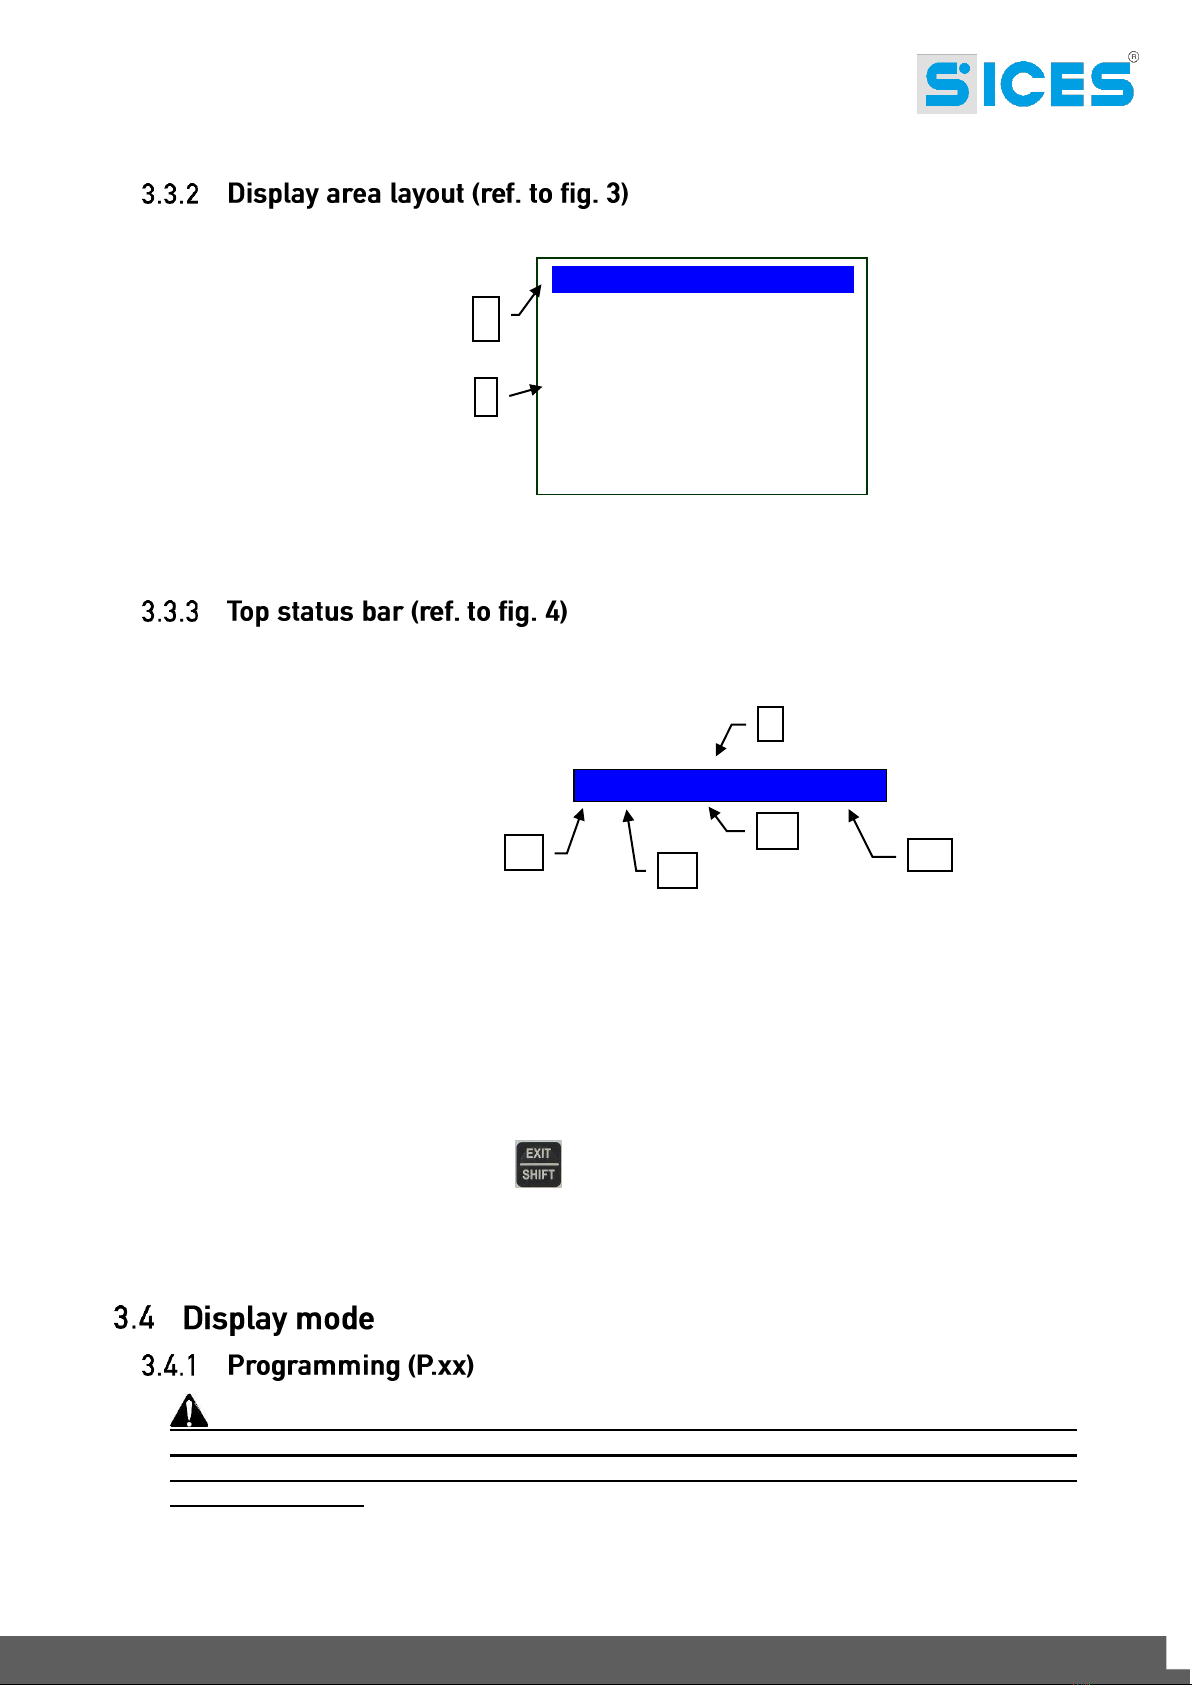
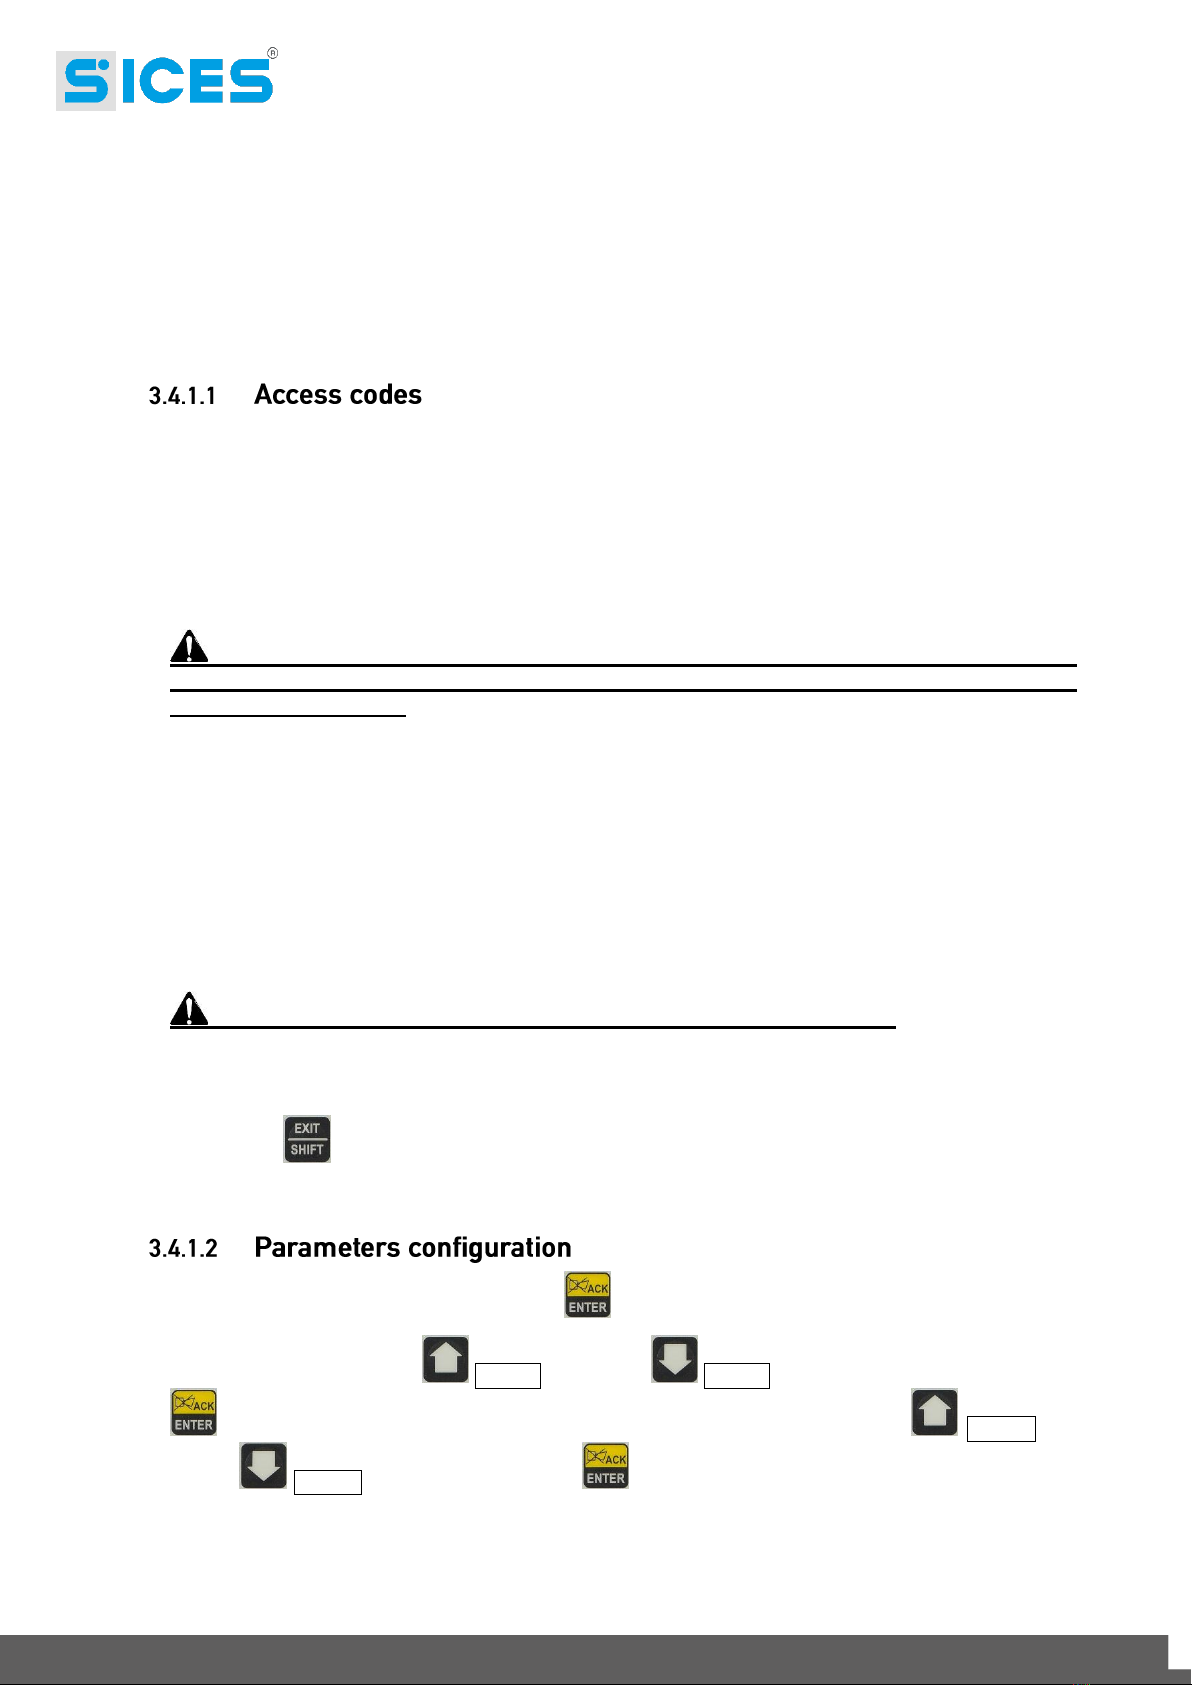
The upper status bar contains surfing, time and/or status information.
The present mode is indicated by the proper space on the top status bar (1a).
The mode (1a), together with the page (1b), allow to individuate and refer to a page unequivocally.
The system status (2) displays part of the information of the page S.01 (status info) which is useful for
the operator, because it can be displayed even if it is accessing other pages of display modes.
In some pages, pressing EXIT/SHIFT , the top status bar is replaced, for the time in which it is
pressed, by a System Status message. If the message is not available, the status bar is not displayed
until the button is released.
WARNING: a wrong programming of one or more parameters can cause
malfunctioning or damages to things and/or people. The parameters changes must be
carried out only by skilled personal. The parameters can be protected by password (see
par. Access code).
B.03 TOT. PMCB 18:23
kWh :230000
kvarh: 172500
kW : 1235.8
kvar : 930.6
MDPt (kW): 1500.0
DPRt (%) : 82.3
1
2
KEY:
1 –Status bar
2 –Data area
Fig. 3 –Display areas
Fig. 4 –Top status bar display
1b
1c
1d
1a
B.03 TOT. PMCB 18:23
KEY:
1a –Mode
1b –Page
1c –Page title
1d –Hour
2 –System status
2
10 MC100 User’s Manual
This mode allows to display and change the programming parameters.
Each parameter is associated to a numeric code made of 4 digits (e.g. P.1101), which identifies the
variables independently by the language used.
The first line under the top status bar allows to identify the present menu by means of the identification
number of the menu and by the associated text.
In this line it is displayed a couple of numbers on the right. The first indicates which entry of the menu is
selected or which page is displayed, the second indicates how many entries or pages can be displayed
in the present menu/submenu.
The programming access can be conditioned by 4 different levels of PASSWORD listed in a priority
order.
1. SICES Password
2. Manufacturer Password
3. Installer Password
4. User Password
Warning: In case of loss, it is possible to reconfigure the password by accessing
with an higher-level password. In case of loss of the “MANUFACTURER” password, turn
to the support service.
The first page (0000-Access Code) of the menu SYSTEM requires the configuration of the access code
if one or more passwords have been assigned.
No password is assigned if equal to 0.
As USER, it is possible to display and change the User password only.
As INSTALLER, it is possible to display and change the User and the Installer password.
As MANUFACTURER, it is possible to display and change all three passwords.
As SICES, it is possible to display and change some parameters of plant configuration, related to the
parallel functions.
Warning: The critical parameters cannot be changed by the User.
The pages related to the Password configuration are displayed in the menu SYSTEM if in possession
of the change rights.
If once inserted the password in the programming, the Password configuration is not displayed, press
EXIT/SHIFT to go back to the previous menu and access again.
The access code configured is valid for a period of about 10 minutes since the end of programming.
After this period of time, the access code has be set again in order to access the programming again.
Activate the mode by pressing ACK/ENTER .
Use the scrolling buttons UP Ref. 1a and DOWN Ref. 1a to select a menu and ACK/ENTER
to access. Select the variable or the submenu with the scrolling buttons UP Ref. 1a and
DOWN Ref. 1a. Pressing ACK/ENTER , if there are no submenus, they are displayed the
pages of the variables of that menu entry.
The value of the variable is displayed in square brackets, for example: [400].
MC100 User’s Manual 11
Press ACK/ENTER to change the variable; the square brackets [ ] will flash. Use the vertical
scrolling buttons UP Ref. 1a and DOWN Ref. 1a to change the value and press
ACK/ENTER to confirm or EXIT/SHIFT to cancel.
In order to change the variables, the operating mode must be “OFF/RESET”. Some variables can be
changed also with operating mode different from “OFF/RESET”.
If it couldn’t be possible to change a variable, it would be represented in the following way: <4100>,
indicating that it is not possible to change the parameter.
Press EXIT/SHIFT to exit the programming menu.
Some parameters require the configuration or the change of strings.
In this case, by pressing ACK/ENTER the square brackets [ ] which include the variable will flash
and it will be activate a cursor under the first character of the string. With the scrolling buttons LEFT
and RIGHT , it is possible to select the character to change. Then, using the scrolling UP
Ref. 1a and DOWN Ref. 1a it is possible to change the character selected. The operation
has to be repeated for all the characters that have to be changed.
By pressing ACK/ENTER (confirm) or EXIT/SHIFT (discard) the procedure is concluded.
It is possible to access directly to the last page displayed in the programming. This can happen if, when
exiting the programming, the button EXIT/SHIFT is hold down for 2 seconds instead of going back
to the main menu.
The same result is obtained by entering the programming after that the controller has automatically exit
the programming. This can happen if no operation is done for 60 seconds or if the operating mode is
changed in MAN or AUTO.
The protections and the alarms are generally configurable by means of proper variables. It is also
configurable the time of intervention associated to the protection.
If the time of the intervention is equal to 0, the protection is disabled.
In this mode, the information on the system status are supplied. It is possible to scroll the different pages
by means of the horizontal scrolling buttons LEFT and RIGHT .
Page S.01 displays system status information. Part of these information are displayed on the upper
status bar.
Page S.02 is automatically displayed in case of fault. Each fault is displayed by an initial letter that define
the type of alarm:
"A” : Alarm

12 MC100 User’s Manual
“D” : Deactivation
“U” : Unload
“W” : Warning
The letter is followed by a numeric three digits code that identifies that fault.
The alarm code which has not been acknowledged by the ACK/ENTER button yet, will flash in
reverse.
Page S.03 displays the generic status acquired by the plant through the digital inputs of the controller.
Page S.04 displays the serial communication status. In case of operating problems, check the
information on this page. In case of use of a GSM modem, the telephone operator and the radio signal
are displayed too.
Page S.05 displays the PMCBus communication status.
Communication status of the bus. There are three possible signalization:
- ERROR-ACTIVE: normal operation
- ERROR-PASSIVE: there are faults, but the communication is still working.
- BUS-OFF: the controller disconnected because of too many faults.
The communication faults counters are indicated. If the cause of the malfunctioning has been removed,
it is possible to force the BUS-OFF exit by holding the buttons ACK/ENTER + EXIT/SHIFT
down for five seconds.
Page S.06 displays specific controller information: date/hour, internal temperature, voltage, serial
number (ID CODE), internal code and firmware revision.
Page S.07 displays the digital inputs status acquired by the controller.
“0” indicates input not active. "1” indicates input active.
Page S.08 displays the digital outputs status acquired by the controller.
“0” indicates input not active. "1” indicates input active.
Page S.09 displays the measures acquired by the analogue inputs of the controller.
It is possible to scroll the different pages by means of horizontal scrolling buttons LEFT
and RIGHT .
In this mode the measurements acquired by the controller on the mains are fully displayed.
Page M.01 displays the single-line diagram of the plant and measures of active power and power factor.
Page M.02 displays the main electrical measures (Voltages, Frequency and Rotation cycle) of the
Mains.
Page M.03 displays the main electrical measures (Voltages, Frequency and Rotation cycle) of the
Genset.
Page M.04 displays the phase currents of the Genset/Load/Mains and the auxiliary current.
Page M.05 displays the active power, the power factors and the type of load, phase and total.
Page M.06 displays the reactive and apparent power, phase and total.
MC100 User’s Manual 13
Page B.01 (available only if the controller is configured for the Parallel/Mains management) displays the
codes of the mains protections during the parallel phase.
The protection codes are stored, with reverse flashing, until they are acknowledged by the button
ACK/ENTER .
In this page it is possible to change the power supplied in the application of parallel with the mains BASE
LOAD and IMPORT/EXPORT
Page B.02 displays the synchronizing information. By the use of the synchroscope and in MAN mode,
it is possible to carry out the manual synchronization (see par. 3.5.1).
Page B.03 displays the information related to the gensets connected to the PMC-Bus (Active and
Reactive energy, Active, Reactive and Nominal power and Load percentage).
Page B.04 displays the information related to the controllers connected to the PMC-Bus.
Page B.05 (B.06, B.07, B.08 available only if 6 or multiple of 6 gensets have been activated) display
the information related to each genset connected to the PMC-Bus (PMC-Bus genset address, active
and reactive power).
In AUTO mode, it is possible to manually manage the operating sequence of gensets (see par. 3.5.3).
Pages B.09 and B.10 display the information related to the load. The first page displays the operating
status, the genset rotation cycle, the master genset identification and the priority list.
It is possible to manually select the master genset (see par. 3.5.4).
The second page displays the required power, the activation threshold, the deactivation, the power
percentage and the function status.
Page B.11 (available only if the function has been configured) displays the information related to the
management of the load to activate/deactivate the loads (active outputs, function status and the power
percentage (also in reverse).
For the function configuration, refer to document EAAM0360XX (Parameters table).
In this mode it is possible to access the visualization of the events and data.
Every record is identified by number, date and hour.
The number is displayed in the first line of the multifunctional display together with the total number of
records.
Considering that the log, once reached the maximum capacity, overwrites the oldest record, the
identification number can change in time.
In order to activate the mode, press the button ACK/ENTER . A menu will guide to the selection
of the desired function.
WARNING: Before proceeding with the manual synchronisation, check that the
configuration impedes the closing of the circuit breaker in case the adjustment of speed
and phase is not correct.

14 MC100 User’s Manual
By selecting the mode MAN with the pushbuttons UP Ref. 1b and DOWN Ref. 1b it is
possible, depending on the type of plant, to control the closing of MCB by means of the manual
synchronisation.
In MAN mode with gensets started with START , genset and mains/bar voltage live (led MAINS
LIVE on, led BUS LIVE steady on and led MGCB steady on), the function is activated by pressing the
pushbutton related to the open circuit breaker MCB .
Pressing the button, the circuit breaker is commanded to close, but the function of manual SYNCHRO
is activated and the synchronisation page B.02 is automatically displayed.
In order to adjust the engines speed and/or the voltage manually, press the button ACK/ENTER
and the buttons LEFT and RIGHT to select between speed or voltage adjustment; use the
buttons UP Ref. 1a and DOWN Ref. 1a to change the value in percentage (%). When the
synchronoscope indicates that it is possible to command the closing, press the circuit breaker button
MCB again and hold it down till its closing.
In any moment, by pressing EXIT/SHIFT the speed manual commands are deactivated and it is
possible to change screen.
By changing the screen, all the manual synchronisation procedure is cancelled.
Note: The function described is available only if it has not been set the use of an external potentiometer
for the speed control; in this case, the speed change will be carried out by means of the potentiometer.
Ensure that, after the circuit breaker closing, the speed demanded is the most
closed to the nominal one in order to allow the controller to adjust the power properly.
Warning: Considering that there may be set low power ramps, check the command
with the value of “Power required” displayed on the same screen and not with the value
of power actually provided.
In applications of parallel with the mains with the function BASE LOAD or IMPORT/EXPORT, it is
possible to manually adjust the power to be provided without changing directly the parameter that
defines the adjustment power.
Visualize the screen M.01 and press ACK/ENTER Ref. 1a or "cosfi required"; use the button UP
Ref. 1a to increase the value and DOWN Ref. 1a to decrease the value, which is set in
percentage (%). The value that will be changed is highlighted in negative.
Press ACK/ENTER to exit the adjustment procedure.
Note: The function described is available only if it has not been set the use of an external potentiometer
for the speed control.
MC100 User’s Manual 15
It is possible, through the screens B.05, B.06, B.07 and B.08, to manage the operation of each
genset and to change the kind of operation among:
AUTO Mode
The controller starts/stops the genset in relation to the load required.
Mode ON
The genset is always on.
Mode OFF
The genset is always off.
Press ACK/ENTER and use the vertical scrolling buttons UP Ref. 1a and DOWN Ref.
1a to select the genset interested.
Press the buttons LEFT and RIGHT to select the genset operating sequence required and
press ACK/ENTER again to exit this mode.
The load control function manages the start/stop of the gensets based on the power required and/or set.
In detail, this function allows to:
In parallel with the mains it allows to start/stop the gensets necessary for the supply of the energy
required.
In parallel in stand-by mains it allows to start/stop the gensets necessary for take of the load
connected
Guarantee a time rotation cycle of all gensets activated.
This function is enabled only in the modes AUTO and REMOTE START.
4.
The controller has the possibility to display text messages in different languages.
In order to select a different language from the one set, visualize the screen S.06 (CONTROLLER).
To change the LANGUAGE press ACK/ENTER ; the square brackets [ ] will flash. Use the vertical
scrolling buttons UP and DOWN to display the LANGUAGE available and press
ACK/ENTER to confirm or EXIT/SHIFT to cancel.

SSSTTTTTGHTY
1
This document is owned by SICES s.r.l.. All rights reserved.
SICES s.r.l. reserves the right to modify this document without prior notice.
SICES has made any effort to ensure that the information herein provide are correct; in any case
SICES does not assume any liability for the use these information.
The disclosure by any means of this document to third parties is not allowed.
Other manuals for MC100
1
Other Sices Industrial Equipment manuals


