signia Styletto User manual
Hearing
Systems
Styletto Charger
User Guide

2
Content
Before you art 3
Intended use 3
How you can use the charger 4
Components 5
Turning the charger on or o 6
Charging and charging atus 7
Charging hearing inruments 7
Charging the internal battery 9
Checking the battery capacity 11
Frequently asked queions 12
Important safety information 14
Personal safety 14
Product safety 18
Important information 19
Maintenance and care 19
Requirements for the electrical plug 19
Explanation of symbols 20
Operating, transport, and orage conditions 21
Disposal information 22
Conformance information 22

3
Before you art
Intended use
This device is intended to charge our specic hearing
inruments with built‑in power cells (lithium‑ion
rechargeable batteries). Your Hearing Care Professional
will advise you on the compatible models.
Observe and follow the operating conditions in section
"Operating, transport, and orage conditions".
CAUTION
Read this user guide thoroughly and completely
and follow the safety information in this document
to avoid damage or injury.

4
How you can use the charger
You can use your charger in three dierent ways.
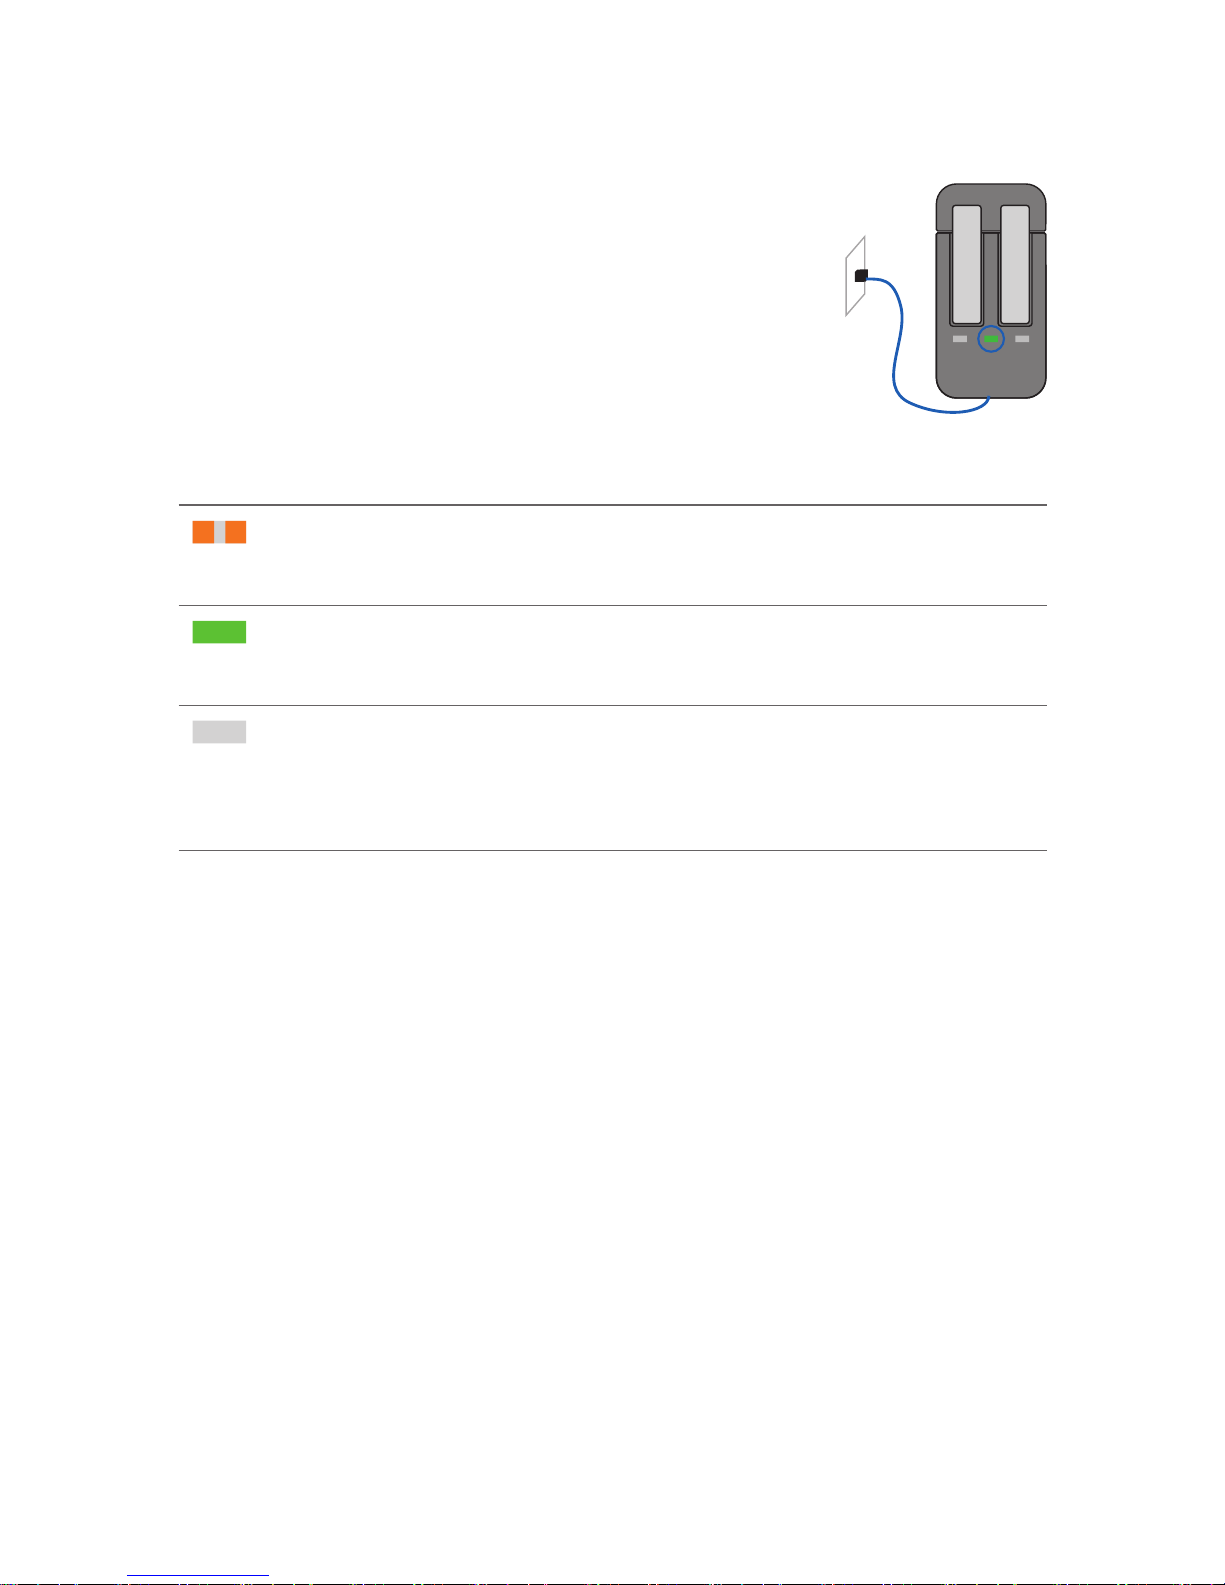
Charging via electrical outlet
When the charger is plugged in, it charges
the hearing inruments (if they are
placed in the charger) and it charges the
integrated battery at the same time.
The middle atus LED permanently shows
the charging atus of the charger. The
hearing inruments' charging atus is shown by pushing
the button.
Mobile charging
When you are mobile with no electrical outlet
available, you can ill charge your hearing
inruments. Energy is fed from the charger's
integrated battery into your hearing inruments.
The charger mu be turned on to do so.
The charging atus of charger and hearing inruments
is shown by pushing the button.
5
Safekeeping
When no charging is needed, turn the charger
o and safely ore your hearing inruments
inside of it. The charger can only be turned o
when it is not plugged in.
No charging atus can be displayed.
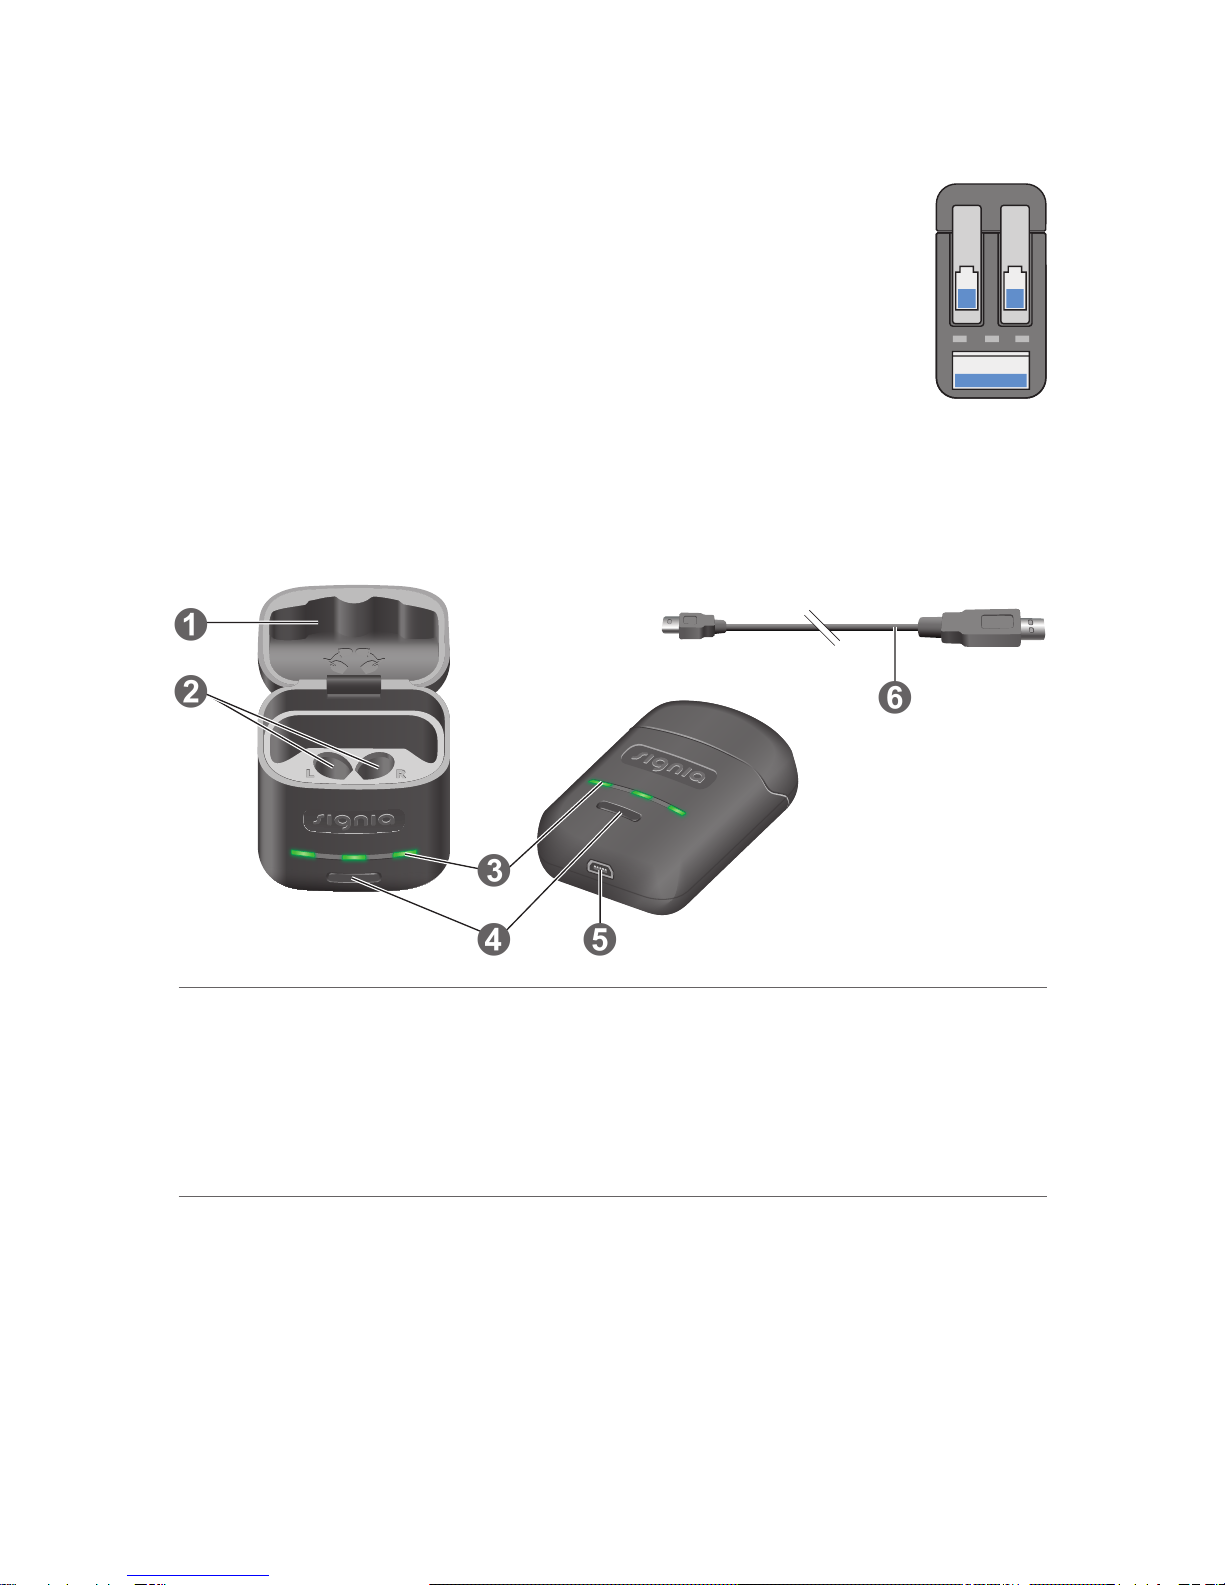
Components
➊
➋
➎
➏
➌
➍
➊Lid
➋Charging slots
➌Status LEDs
➍Button
➎USB port for power supply
➏USB power cable

6
Turning the charger on or o
When the charger is connected to an electrical outlet, it is
automatically turned on and cannot be turned o.
During mobile charging, press and hold the button for
5 seconds to turn the charger on or o.
● When the charger turns on, the atus of the hearing
inruments and the atus of the charger's internal
battery are displayed for 5 seconds.
● When the charger turns o, the middle LED ashes
red for approximately 10 seconds.
7
Charging and charging atus
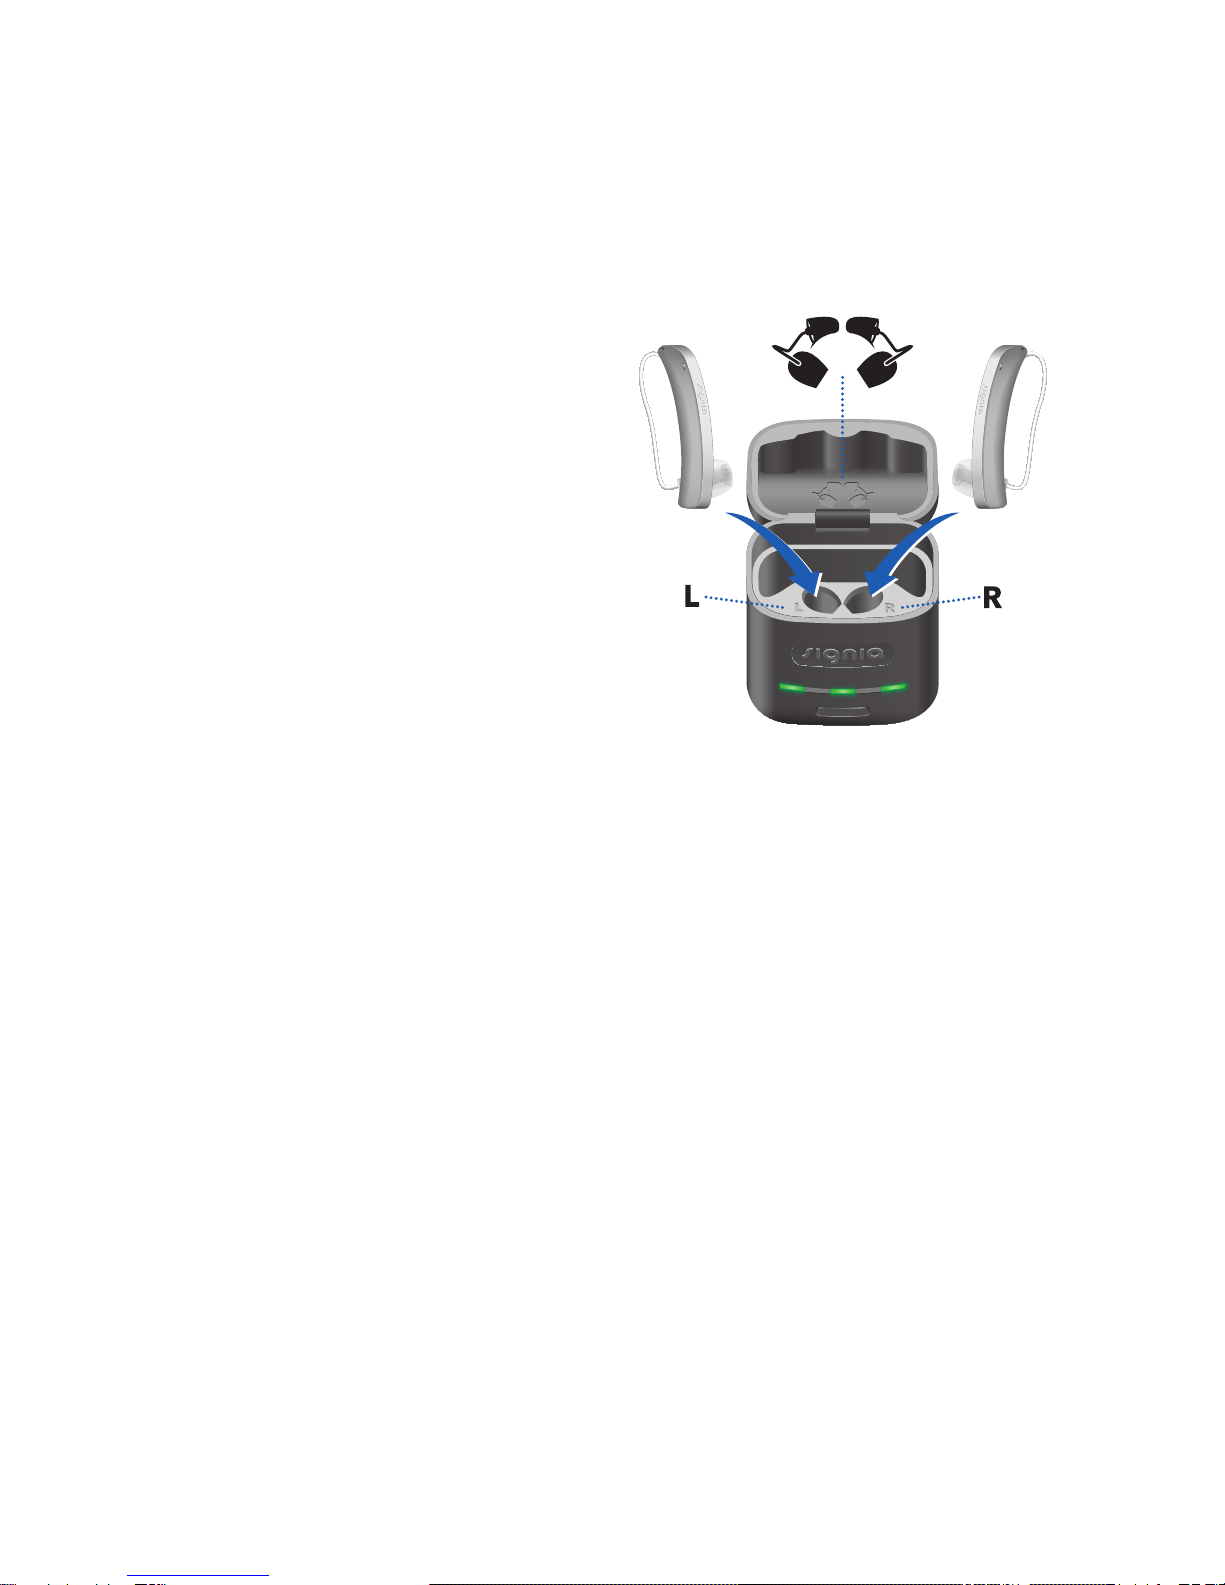
Charging hearing inruments
XIf you have earmolds
attached to your
Stylettos, please remove
them prior to charging.
You will have to reinall
them once your Stylettos
are charged.
XPlace the right hearing
inrument in the
charging slot marked
with an "R", and the left
hearing inrument in
the charging slot marked
with an "L".
XStow the ear pieces nicely. Viewed from above, it
should look like the picture in the charger’s lid.
XClose the charger's lid (optional).
XThe hearing inruments are automatically turned o
and art charging. The charging atus is shown for
5 seconds.
If the atus LEDs do not light up when you insert the
hearing inruments, check the following:
● The hearing inruments are not correctly placed.
Push them slightly into their charging slots or close the
charger's lid.
8
● The charger is not connected to an electrical outlet
and it is o. Press and hold the button for 5 seconds to
turn on the charger.
● The charger's internal battery is too low for mobile
charging. Connect the charger to an electrical outlet.
NOTICE
If you put a hearing inrument in the wrong
charging slot, the receiver cable may be damaged
when closing the charger's lid.
Charging atus
The outer LEDs indicate the charging atus
of the hearing inruments. Note that the atus
is only displayed immediately after putting the
hearing inruments in the charger, or when you
briey press the button. When the charger is o,
no atus is displayed at all.
LED Status description
Flashing green
Hearing inrument is being charged.
Green
Hearing inrument is fully charged.
LED is o
No hearing inrument is in the charger,
hearing inrument is not placed correctly, or
charger is o.

9
Charging the internal battery
NOTICE
Use of incompatible parts poses a risk of
malfunction.
XUse only the USB power cable that is provided
with the charger.
XEnsure your electrical plug complies with
the requirements. Refer to the section
"Requirements for the electrical plug".
XConnect the micro‑USB side of the USB power cable
to the charger ➊.
XConnect the other side of the USB power cable to a
suitable electrical plug ➋.
➊➋
The internal battery arts charging. When hearing
inruments are inserted, they art charging as well. The
charging atus of the charger is shown permanently.
10
Charging atus
The middle LED indicates the charging
atus of the charger and its internal
battery.
While the internal battery is being charged,
the charging atus is indicated as follows:
LED Status description
Flashing orange
Internal battery is being charged.
Green
Charger is fully charged.
LED is o
Cooling phase. Charging is resumed when the
device has cooled down.
For an overview of the hearing inruments'
charging atus, refer to the section
"Charging hearing inruments".

11
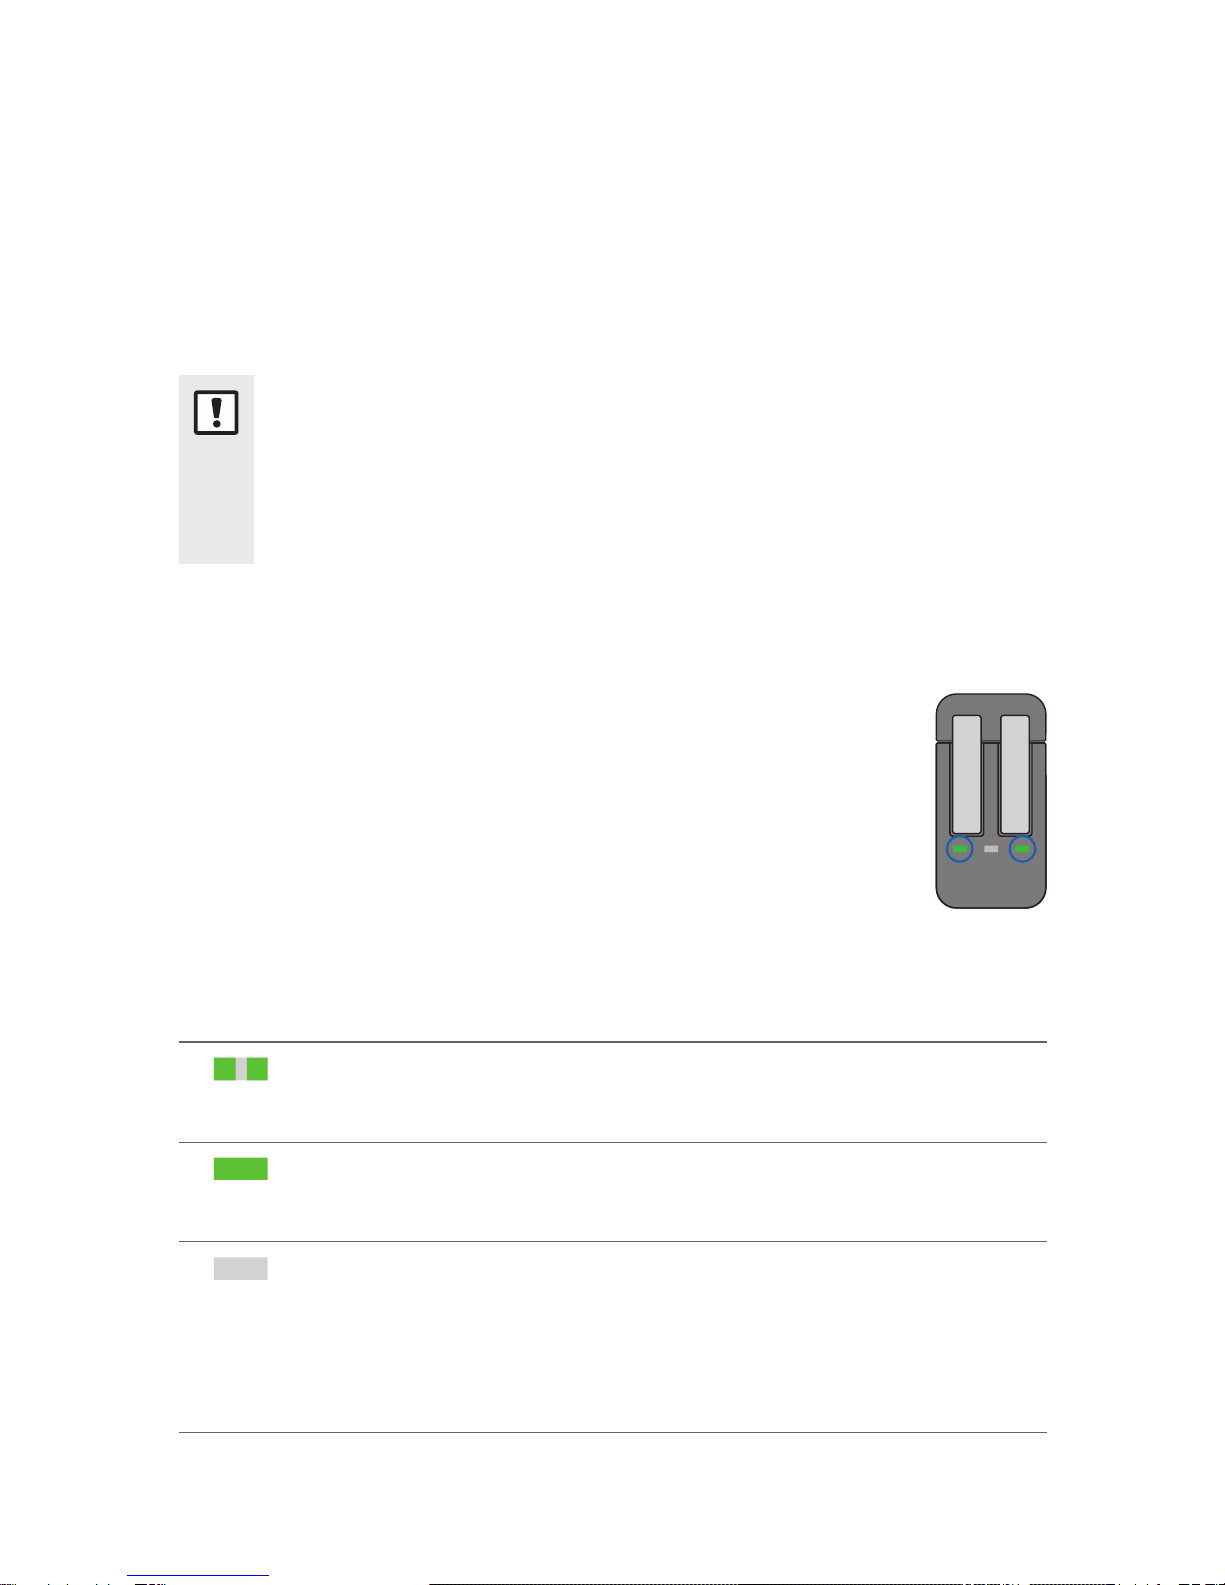
Checking the battery capacity
To check whether the charger's internal battery
has enough capacity to fully charge your hearing
inruments when you are mobile:
XDisconnect the charger from the electrical
outlet.
XBriey press the button.
The middle LED indicates the atus of the charger's
internal battery for 5 seconds.
LED Status description
Flashing green
Internal battery has enough capacity to fully
charge two hearing inruments.
Orange
Internal battery does not have enough capacity to
fully charge two hearing inruments.
If the atus LED does not light up when you press the
button, check the following:
● The charger is o. Press and hold the button for
5 seconds to turn on the charger.
● The charger's internal battery is too low to display the
atus. Connect the charger to an electrical outlet, wait
several minutes and try again.

12
Frequently asked queions
You may have some queions on how to be charge
your hearing inruments. Read the queions and
answers below. If you have more queions, your Hearing
Care Professional will help you.
"Why do my hearing inruments not turn on
when I take them out of the charger?
Check the following:
● The charger is o. Press and hold the button for
5 seconds to turn on the charger. Refer to the section
"Turning the charger on or o".
● The charger's internal battery is too low. Connect the
charger to an electrical outlet.
Now take your hearing inruments out of the charger.
"
How can I turn o my hearing inruments
without charging them?
XPlace the hearing inruments in the charger. Ensure
that they are inserted correctly (atus LEDs light up).
The hearing inruments are automatically turned o
and art charging.
XDisconnect the charger from the electrical outlet.
XPress and hold the button for 5 seconds to turn o the
charger. Charging ops.

13
"
Even when fully charged, my hearing inruments
do not la for a full day of use. What should I do?
If the fully charged hearing inrument's charge does not
la for a full day of use (16 hours) then we recommend
returning the hearing inruments for servicing to the
Hearing Care Professional.
"
Even when fully charged, my charger cannot fully
charge two hearing inruments. What should I do?
If the charger's fully charged internal battery does not la
for at lea 2 full charges of your hearing inruments then
we recommend returning the charger for servicing to the
Hearing Care Professional.
"What should I pay attention to when charging?
The hearing inruments and charger mu be clean
and dry. Observe the operation conditions in section
"Operating, transport, and orage conditions". Avoid
charging at high temperatures, as this can shorten the life
span and capacity of the power cell.
If you use the charger in a very warm environment, note
that it will op charging if the charger's temperature
exceeds 42 °C (107 °F) in order to cool down. The middle
LED will op ashing orange during the cooling phase.
Charging resumes automatically after the device has cooled
down. Do not touch the hearing inruments until the middle
LED resumes blinking, the hearing inruments may be hot.

14
Important safety information
Personal safety
WARNING
Risk of electrical shock!
XDo not use obviously damaged devices and
return them to point of sale.
WARNING
Risk of injury!
XDo not use obviously damaged devices and
return them to point of sale.
WARNING
Note that any unauthorized changes to the product
may cause damage to the product or cause injury.
XUse only approved parts and accessories. Ask
your Hearing Care Professional for support.
WARNING
Risk of explosion!
XDo not use your device in explosive
atmospheres (e. g. in mining areas).
15
WARNING
Risk of burns!
XDo not place anything other than your hearing
inruments in the charger.
WARNING
Choking hazard!
Your device contains small parts which can be
swallowed.
XKeep hearing inruments, batteries and
accessories out of reach of children and
mentally disabled persons.
XIf parts have been swallowed consult a physician
or hospital immediately.
WARNING
Charging syems may interfere with measuring
devices and electronic equipment.
XIn hospitals: The charger complies with
CISPR 24 and CISPR 32. Therefore the use of
the charger in hospitals should be permissible.
Nevertheless the charger may interfere with
highly sensitive devices. In those cases
appropriate eps shall be taken (increase
diance from sensitive devices or disconnect
the charger from power supply).

16
WARNING
Interference with implantable devices
XThe device can be used with all
electronic implants that comply with the
ANSI/AAMI/ISO 14117:2012 Electromagnetic
compatibility andard for human implants.
XIn case your implant does not comply with the
ANSI/AAMI/ISO 14117:2012 andard, consult
the manufacturer of your implantable device for
information about the risk of diurbance.
Safety information on lithium-ion rechargeable
batteries
WARNING
A lithium‑ion rechargeable battery is permanently
built into your device. Incorrect use of the device
can cause the lithium‑ion rechargeable battery to
bur.
Risk of injury, re or explosion!
XFollow the safety inructions for lithium‑ion
rechargeable battery in this section.
● Observe the operating conditions. Refer to the section
"Operating, transport, and orage conditions".
● Pay special attention to protect your device from
extreme heat (e.g. re, microwave oven, induction
oven or other high induction elds) and sunlight.

17
● Charge your hearing inruments only with the
approved charger. Ask your Hearing Care Professional
for support.
● Do not disassemble the device.
● Do not use the device in explosive atmospheres.
● Do not use devices that are deformed or obviously
damaged.
● Do not use the device when its performance after
charging decreases considerably. Return the device to
your Hearing Care Professional.
● Do not dispose of the device in re or water.
Replacement and repair have to be performed by a
professional. Therefore:
● Do not repair or replace the lithium‑ion rechargeable
battery yourself.
● In the unlikely event of a lithium‑ion rechargeable
battery buring or exploding, keep all combuible
materials away.
In any of the above cases, return your device to the
Hearing Care Professional.

18
Product safety
NOTICE
XProtect your device from extreme heat. Do not
ore it in direct sunlight.
NOTICE
XProtect your devices from high humidity.
NOTICE
XDo not dry your devices in the microwave oven.
NOTICE
Do not drop. Internal components may get
damaged.

19
Important information
Maintenance and care
NOTICE
Risk of injuries caused by electric shock!
XIf cleaning is required, disconnect the charger
from the power supply.
XClean the charger with a soft, dry tissue.
XNever use running water or immerse the charger in
water.
XDo not erilize or disinfect the charger.
Requirements for the electrical plug
Use an electrical plug with an output voltage of 5 V and a
maximum output current of 500 mA.
WARNING
Risk of electric shock!
XConnect the charger only with a USB power
supply which complies with IEC 60950‑1 and/or
IEC62368‑1.

20
Explanation of symbols
Symbols used in this document
Points out a situation that could lead to serious,
moderate, or minor injuries.
Indicates possible property damage.
Advice and tips on how to handle your device
better.
"
Frequently asked queion.
Symbols on the device or packaging
CE compliance label, conrms compliance
with certain European Directives, refer to
section "Conformance information".
Indicates the legal manufacturer of the device.
Do not dispose of the device with general
domeic wae. Read more in section
"Disposal information".
Read and follow the inructions in the user
guide.
Other manuals for Styletto
3
Table of contents
Languages:
Other signia Batteries Charger manuals


