Silver Marine Phoenix 530 User manual
Phoenix 530
Phoenix 530 (H)
Phoenix 570
Phoenix 570 (H)
Phoenix 610
Phoenix 610 (H)
Phoenix 660
Phoenix 660 (H)
Owner’s manual
www.silvermarine.com

1
Owner’s Manual-Volume 1
CAREFULLY READ THIS MANUALBEFORE OPERATING YOUR
BOAT.
NOTICE:
THE OWNER’S MANUAL IS IN TWO VOLUMES:
-VOLUME 1
DEALS WITH OPERATING PRECAUTIONS AND SAFETY
RECOMMENDATIONS.
-VOLUME 2
DEALSWITHTECHNICALSPECIFICATIONSANDASSEMBLYPROCE-
DURE OF THE BOATAND ITS EQUIPMENTS.
2
BOATS ARE FUN, AND WE WANT YOU TO ENJOY YOUR BOAT FOR
YEARS TO COME. PLEASE SPEND SOME TIME READING YOUR
OWNER’S MANUALAND SAFETY PRECAUTIONS TO UNDERSTAND
THE OPERATION AND SAFETY CONSIDERATIONS OF THIS BOAT.
AND REMEMBER: SAFETY FIRST.
VOLUME 1
GENERALITIES-PRECAUTIONS-SECURITY
CONTENTS
Glossary of Symbols
An important Message-Validity
Certification-Identification
Manufacture’s ID plate
Type of motor and adjustment
1. type of motor
2. type of propeller
3. installing the motor
4. adjustment
Operating instructions
Environment
PAGE
3
4
5
5-6
7
7
8
8-9
10-13
14
Handling
1. mooring and towing
2. lifting/davits
3. hauling on trailer
Maintenance
1. cleaning
2. winter-storage
3. regular inspections
4. how to repair small punctures
5. rigid inflatable boats:
small repair
Troubleshootingguide
Warranty-General conditions
At your service
PAGE
15
15
16
17-18
18
18
19
19
20
21
22

3
GLOSSARY OF SYMBOLS
Throughout this manual there are advisories of safe operation.
The symbols below are advisories relative to various types of situations.
SECURITY SYMBOLS
GENERAL ADVISORY SYMBOLS
THIS PROCEDURE OR BEHAVIOR COMPLIES WITH THE
INSTRUCTIONS.
GIVES IMPORTANT INSTRUCTIONS
NOTICE:
DENOTESAHAZARD OR UNSAFE PRACTICE WHICH MAY RESULT IN
MINOR INJURY OR PRODUCT OR PROPERTY DAMAGE.
THIS PROCEDURE OR BEHAVIOR DOES NOT COMPLY WITH
THE INSTRUCTIONS THUS RISKING DAMAGE EQUIPMENT.
DENOTESA HAZARD WHICH MAY RESULT
INJURY OR DEATH IF NOT AVOIDED.
DENOTESAN IMMINENT HAZARD WHICH MAY RESULT
IN DEATH OR SEVERE INJURY IF NOTAVOIDED.
4
AN IMPORTANT MESSAGE
Congratulations on your purchase of an inflatable boat. We take pride in bringing you a quality product
which will offer you years of pleasure.Your boat is an investment which deserves your care and attention.
This manual has been compiled to help you to operate your craft with safety and pleasure. It contains
details of the craft, the equipment supplied or fitted, its systems, and information on its operation and
maintenance. Read it carefully, and familiarize yourself with the craft before using it. Serious personal
injury and death can occur in and around boats. To prevent these tragic accidents, please read,
understand and strictly enforce all safety rules.
*If this is your first craft, or you care changing to a type of craft you are not familiar with, for your own
comforts and safety, please ensure that you obtain handling and operating experience before ’assuming
command’ of the craft. Your dealer or national sailing federation or yacht club will be pleased to advise
you of local sea schools or competent instructors.
VALIDITY AND COMPOSITION
VALIDITY AND COMPOSITION
Our commitment to constantly keep pace with the latest advances in technology requires that
we reserve the right to change the characteristics or the availability of a boat model for the benefit of our
customers.
The information in this manual concerns this boat at the time of issue. This is in no case contractual.
THIS OWNER’S MANUAL MUST BE ON YOUR BOAT, IN ASECURE
PLACE, AND EASILYACCESSIBILE BY THE PILOT.
KEEP WITH THE OWNER’S MANUAL WITH ALL THE OPERATING
MANUALSDELIVEREDBYTHEMANUFACTURERSOFYOURBOAT’S
EQUIPMENT (MOTOR, BATTERY…)
THIS MANUAL IS PART OF THE BOAT’S STANDARD EQUIPMENT.
HAND IT OVER TO THE NEW OWNER IF YOU SELL THE CRAFT.
WE TAKE NO RESPONSIBILITY FOR THE CONSEQUENCES OF
ACTIONS NOT COMPLYING WITH THE INSTRUCTIONS GIVEN IN THIS
MANUAL.
NOTICE:
5
APPROVAL / CERTIFICATION / IDENTIFICATION
All our boats comply with ISO standard 6185 established by the International Standards Organization,
and with the European Directive 94/25/EC changed by the directive 2003/44/EC.
We are a member of NMMA (National Marine Manufacturer’s Association),
Record below the data indicated on the manufacturer’s plate provided on the inside of the transom. You
may need them to help identify your boat for insurance purposes in case of theft or for after-sales
service.
Carefully record the model (4) and the serial number (9) of your boat.

6
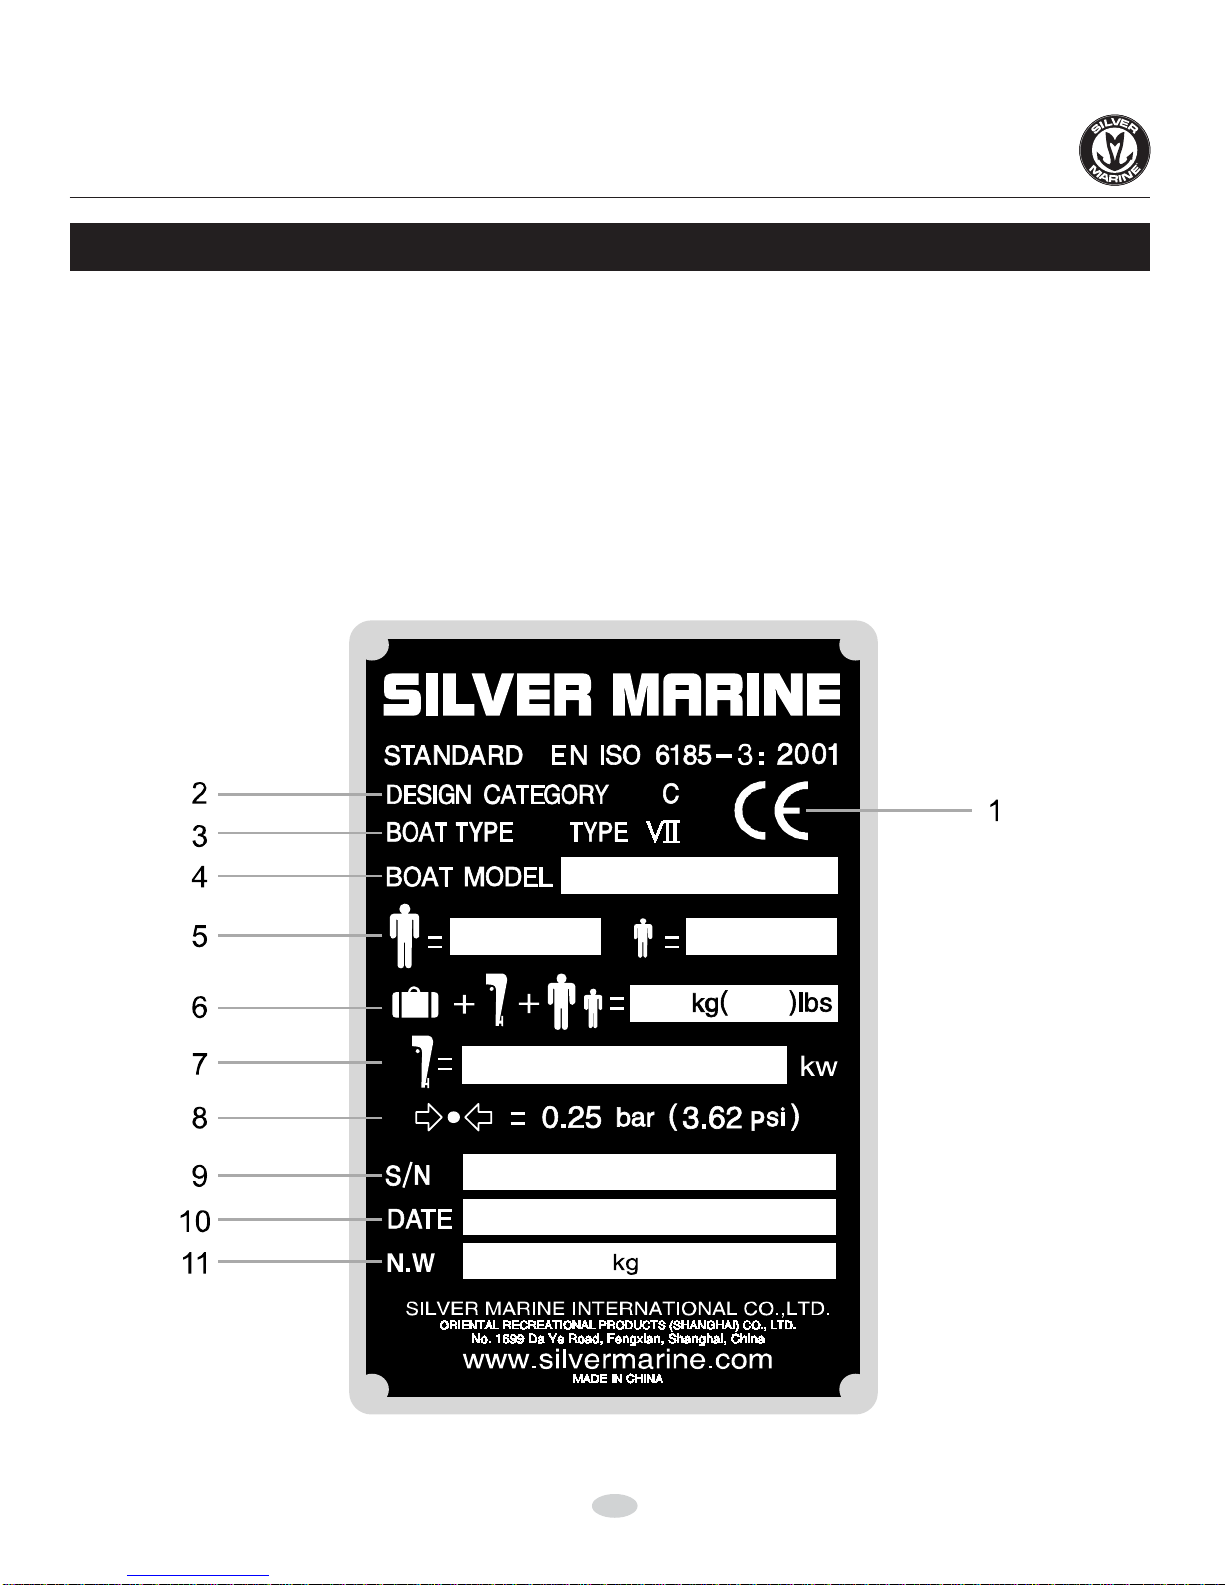
MANUFACTURER’SPLATE
The indications on the manufacturer’s plate on the transom are important: they give information about
limitations imposed by local or national regulations.
However, these indications are not a complete list: the security requirements (obligatory) security
equipment of the boat, maximum authorized distance you can navigate from a shelter, etc. may change
according to the country or state. Always refer to local regulations to be informed on additional
requirements.
(1) CE: sign of the certification to the European directive 94/25/EC and 2003/44/EC, with the certification
organism number and the year of CE certification.
(2) Design Category (European directive 94/25/EC and 2003/44/EC). In Europe, your boat has been
designed to navigate under different categories:
(3) BOAT TYPE:
Your boat complies with ISO 6185 Standard. The motor rating defines its category.
(4) BOAT MODEL: Commercial name of the model.
(5) Maximum number of people authorized on board (adults + children) according to ISO and DIN
standards.
(6) Maximum load capacity of the boat allowed by the constructor expressed in Kilograms and in
pounds (people + motor and its fuel tank filled to the top + diverse loads).
(7) Maximum outboard power allowed by the constructor for the boat expressed in kilowatts.
(8) Pressure of the buoyancy tube in Bars and Psi. Other parts of the boat can require different pressures.
Refer to the INFLATION chapter of the Owner’s Manual volume 2.
(9) S/N: Boat’s serial identification number. Needed for any after-sale service operation and accessories
or spare parts purchase.
(10) Date:
(11) N. W: Net Weight of your Boat.
ISO CATEGORY II V VII
Motor rating in KW 0 – 4.5 KW 4.5 – 15 KW >15 KW
Motor rating in HP 0 – 6 CV/HP 6 – 20 CV/HP >20 CV/HP
BE RESPONSIBLE, TAKE NOTICE OF THESE PARAMETERS
WHEN YOU PLAN YOUR NAVIGATION PROGRAM,AND DO NOT
GO TO SEAIF THE CONDITIONS ARE LIKELY TO EXCEED
THESEPARAMETERS.
Category
Navigation
Wind speed (Beaufort scale)
Significant height of wave to
consider (H1/3; in meters)
B
“offshore”
Up to, and including 8
Up to, and including 4
C
“inshore”
Up to, and including 6
Up to, and including 2
D
“sheltered waters”
Up to, and including 4
Up to, and including 0.5
A
“ocean”
Exceeding 8
Exceeding 4
7
TYPE OF MOTOR AND ADJUSTMENT
1. TYPE OF MOTOR
1.1 Motor’s power
The maximum and recommended powers are listed in the table of technical specifications (volume
2 of the manual).
For smaller outboards, go for tiller control, giving direct control over the boat and allowing for quick
maneuvering.Above 25 CV/HP, for greater comfort and safety, we recommend that you choose a
steering console.
1.2 Motor weight
The motor’s weight has a great influence on the planning, stability and performances of the inflatable
boat. For equal power, we recommend that you choose a light motor.
You must never exceed the maximum authorized motor weight indicated on the manufacturer’s
plate.
1.3 Motor shaft length
There are different shaft lengths available for boats. Check which length is required for yours, and use
the proper size (refer to Owner’s Manual volume 2).
2. TYPE OF PROPELLER
In order to choose the optimal propeller for your principal use, your boat and its motor must be
tested at sea. Ask your Dealer to assist you.
In general, the propeller provided with the motor is adapted to all type of navigation. Nevertheless,
according to the principal use you intend to make of the boat, go for:
A lower pitch when the boat is heavily loaded or used for water skiing.
A higher pitch that will increase the speed potential (if the boat is lightly loaded).
THE PROPELLER IS DANGEROUS.
KEEPAWAY FROM THE PROPELLER.
Where the maximum power exceeds the maximum recom-
mended power it must be treated with extreme care. It is di-
rected at experienced users using their boats for very specific
purposes (carrying heavy loads, etc.).
It is recommended that you choose your outboards’ power in
accordance with your principal boating activities.
Over-powered boat can be difficult to control. Under-powered
and you may not have that margin of security necessary to go
upwind or against the currents.
NEVER USE MOTOR POWER HIGHER THAN INDICATED ON THE
MANUFACTURER’S ID PLATE: IT COULD RESULT IN LOSS OF
CONTROL, AND YOU WOULD BE BREAKING THE LAW.
NOTICE:
8
INSTALLING ANDADJUSTING THE MOTOR
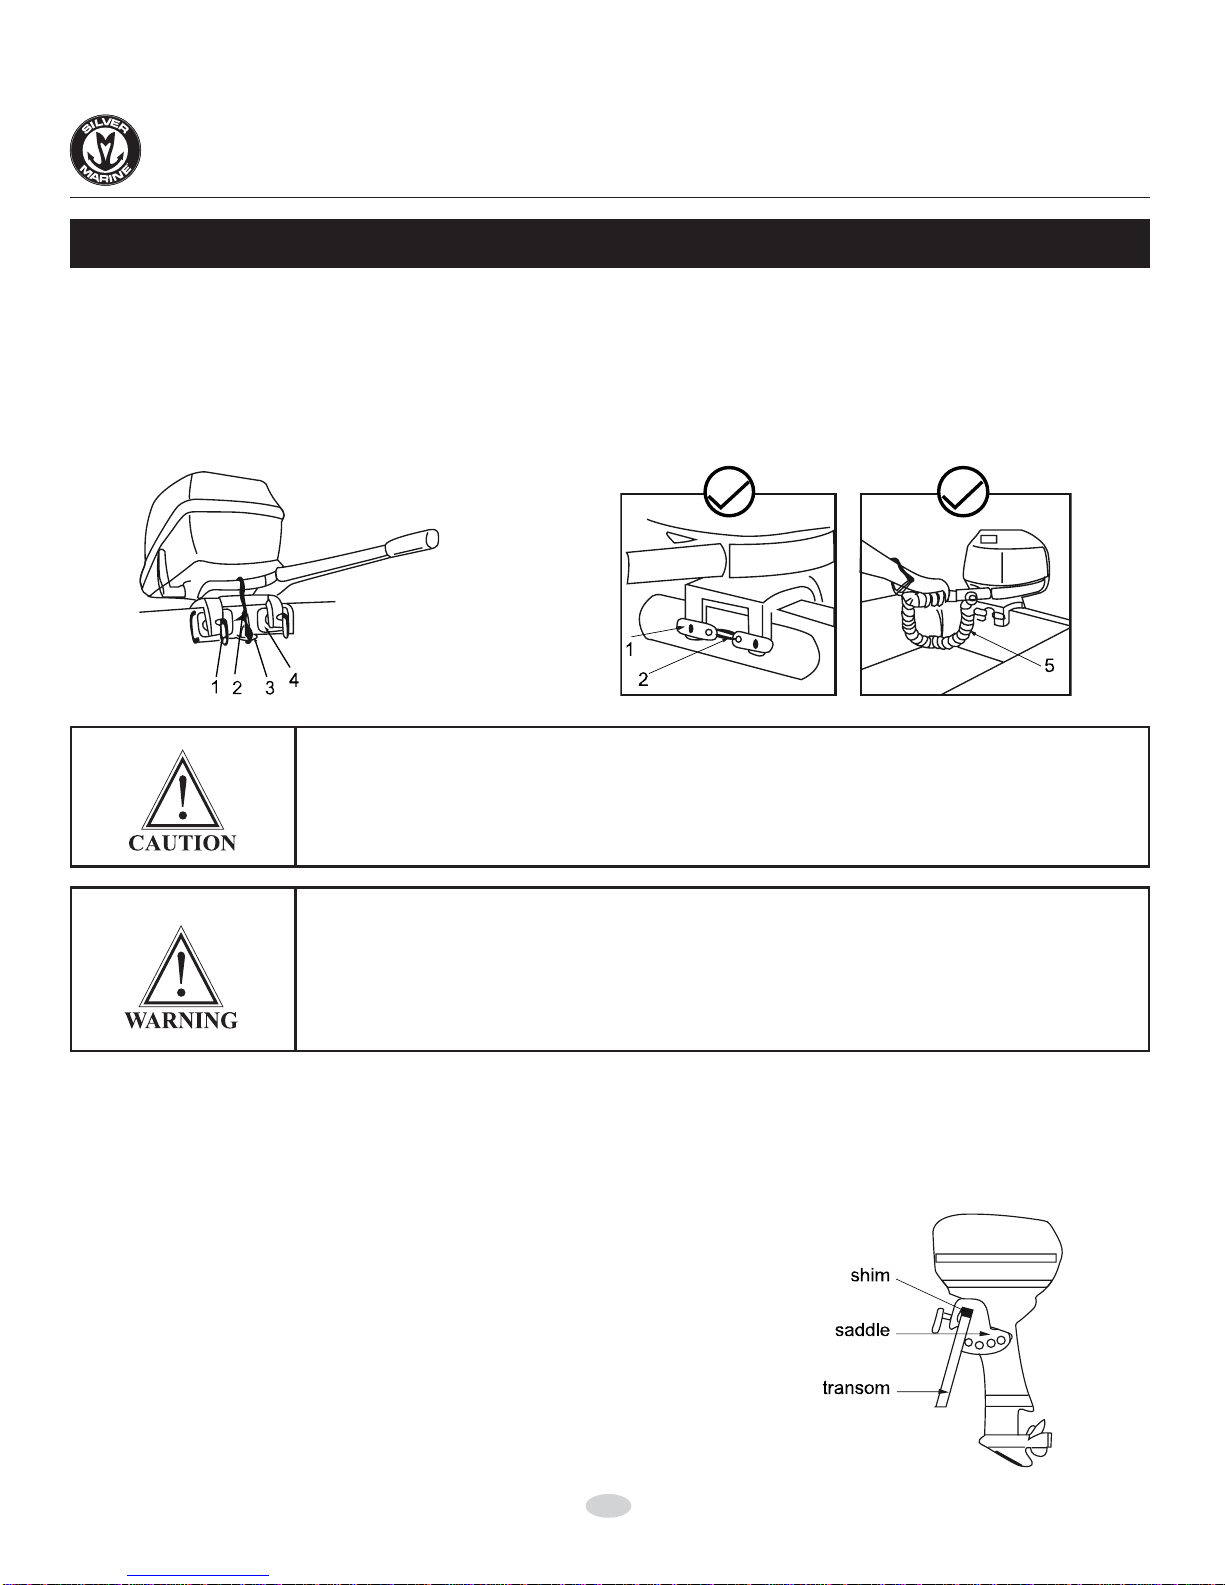
3. INSTALLING THE MOTOR
Install the motor along the centerline of the boat, in the middle on the mounting plates (4)
Fully tighten the brackets (1) by hand and check that they are still properly tightened after 15 minutes of
running. Secure the motor to the loop (3) on the motor tightening plate (4) with a safety cable (2). All
motors about 4 CV/HP are equipped with a security stop switch lanyard (5). Always use it (refer to
information contained in the “operating instructions” section).
FOR OUTBOARDS NOT BOLTED TO THE TRANSOM: REGULARLY CHECK THAT
THE BRACKETS STAY PROPERLY TIGHTENED.
FOR OUTBOARDS WITH REMOTE STEERING UNIT: REGULARLY CHECK IT IS IN
GOOD WORKING ORDER, AND CHECK THE TIGHTENING OF THE NUT CONNECT-
ING THE STEERING SYSTEM TO THE MOTOR.
THE BOLTING OF THE MOTOR TO THE TRANSOM IS SUGGESTED FROM 10 CV/
HP AND HIGHLY RECOMMENDED FROM 25 CV/HP AND ABOVE.
FOR ALL OUTBOARDS FROM 25 CV/HP AND ABOVE WE RECOMMEND THE
INSTALLATION OF A REMOTE STEERING UNIT.
4. ADJUSTMENTS
The motor requires a double position adjustment in tilt and height that greatly and directly impacts on
the boat’s attitude. You will have to adjust the motor in height only once.
On the contrary, to optimize performances and good maneuverability, you will have to adjust the angle
of the motor in relation to the transom depending on the navigation conditions:
4.1 Motor height
The motor is mounted on the transom.
According to different brands of motors,
even inside the same type of shaft, the length of
the shaft can vary (few centimeters). It is generally
necessary to add a shim to ensure correct height.
Motor adjusted too high = ventilation may occur
with loss of forward thrust (cavitation).
Motor adjusted too low = loss of speed
and more difficult steering may occur (splashes).
9
ADJUSTING THE MOTOR
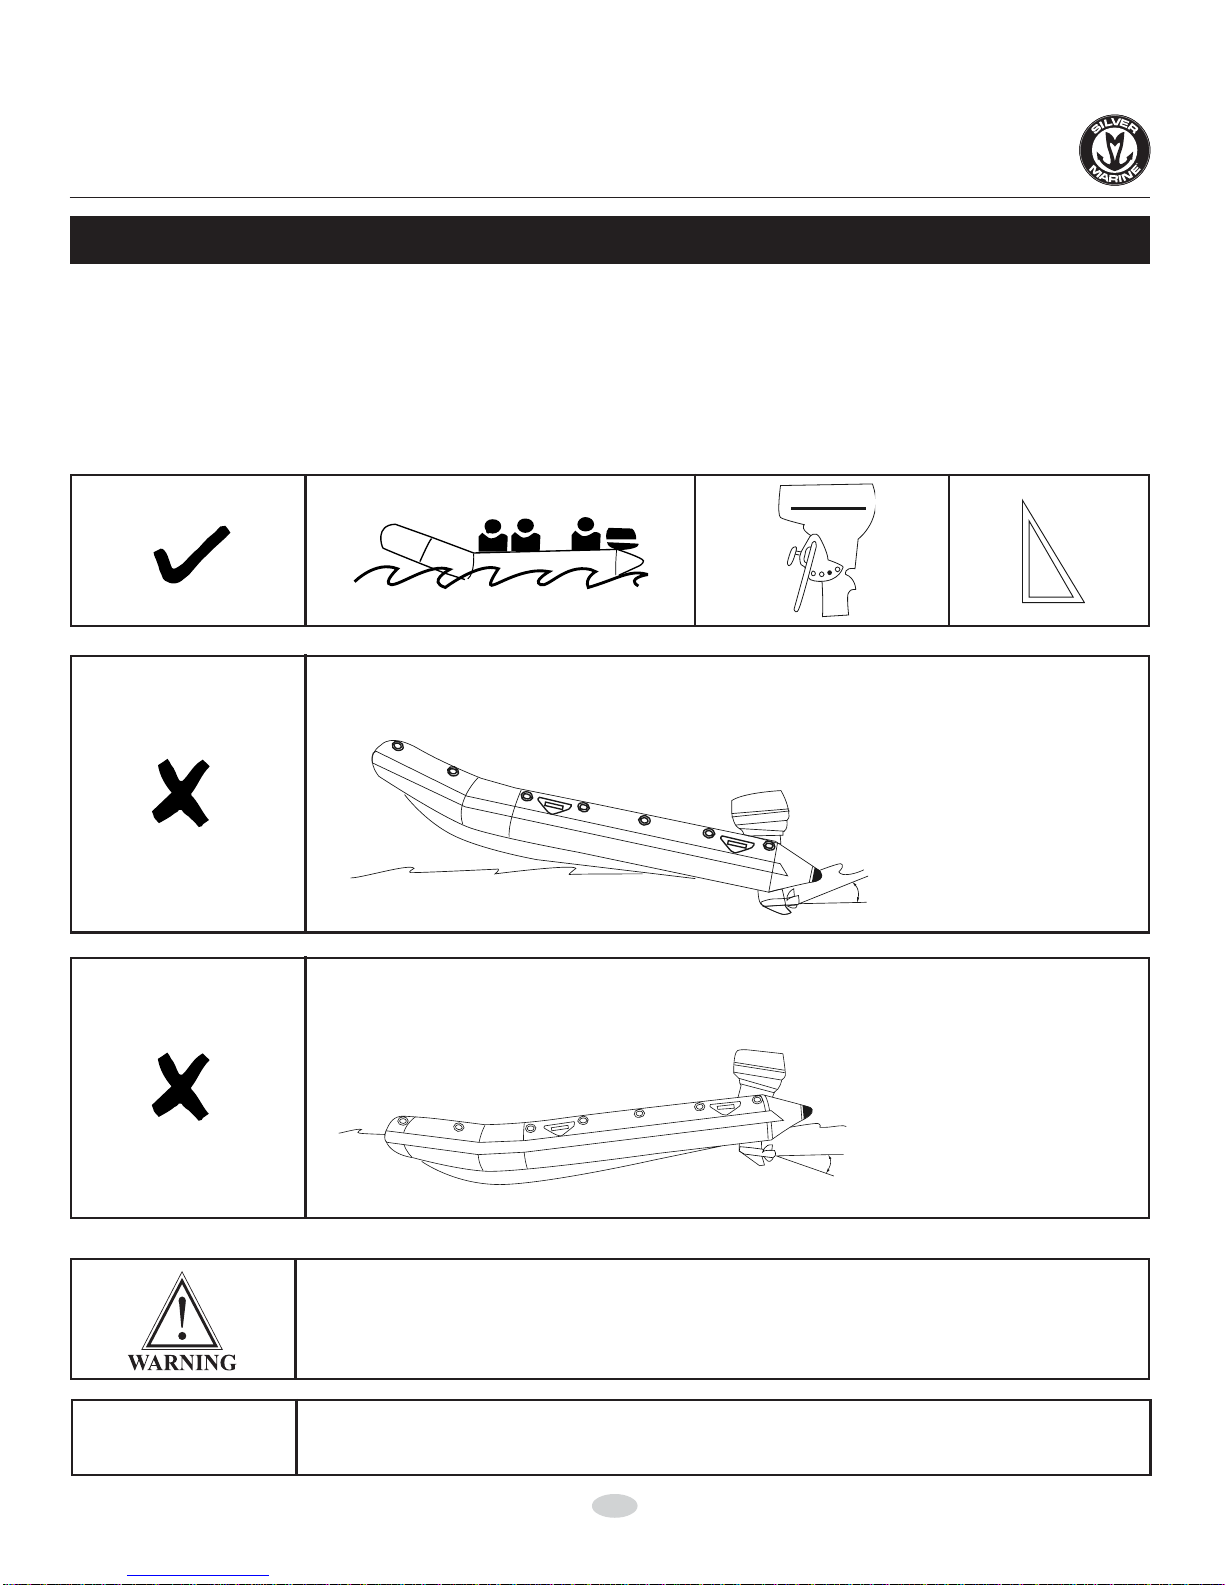
4.2 Motor position (TRIM)
As a rule, the motor must be positioned so that the axis of the propeller is parallel with the water surface.
However, an adjustment of the tilt is often recommended (see the chapter Operating instructions of this
manual).
The adjustment of the tilt can be manual or assisted by an electric Trim (when equipped).
Motor tilted outwards too far from the transom: the boat will porpoise.
MAKE MODIFICATIONS ON THE TRIM WITH MOTOR SHUT OFF.
Forspecific informationconcerningthe motoritself,refertothemotor’smanualNOTICE:
Motor tilted inwards too near the transom: the boat will nose down.
10
OPERATING INSTRUCTIONS
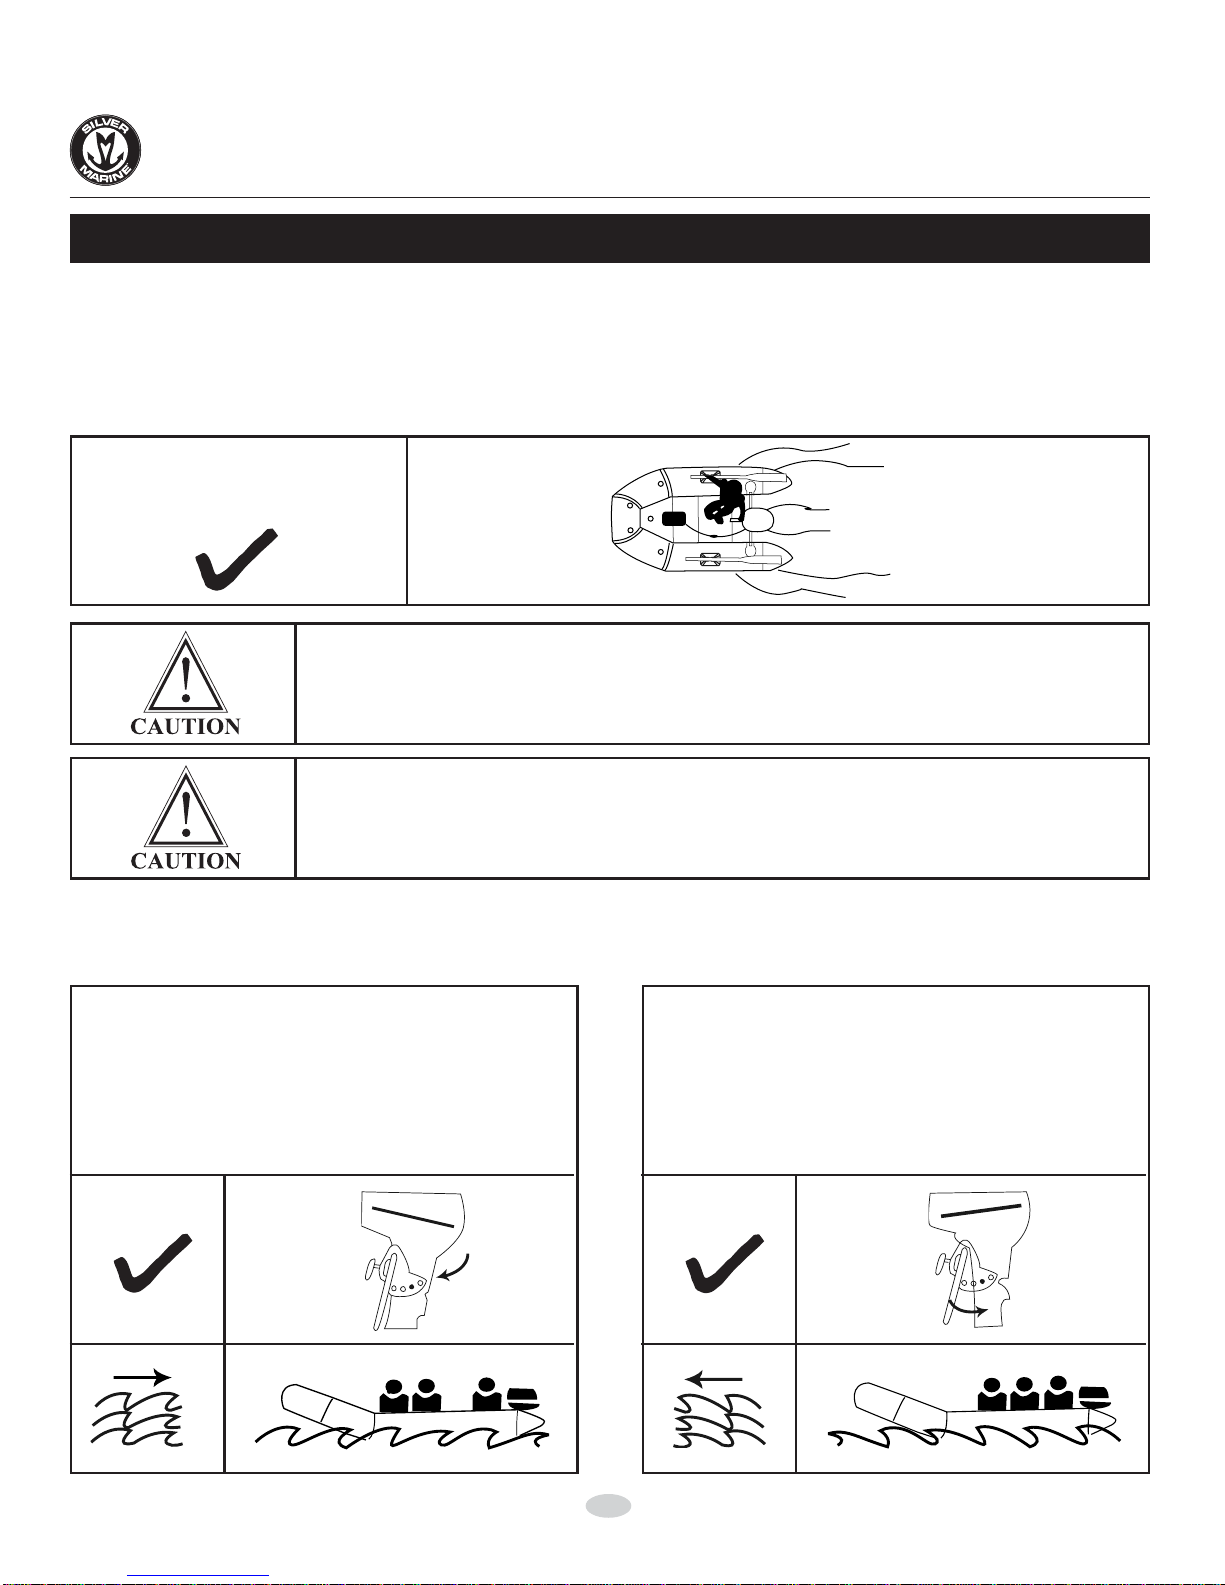
Distribution of the load
Evenly distribute the load. (i.e, placing the fuel tank on the front can help to offset the weight of the
outboard).
To counterbalance the effects of the propeller’s rotation on the compartment of the boat, we recom-
mend that the pilot remains on the starboard side.
Depending on the navigation conditions and the waves direction, you must adjust the distribution of the
load and the Trim.
ABAD DISTRIBUTION OF THE LOAD CAN DESTABILIZE THE BOAT AND
MAY RESULT IN A LOSS OF CONTROL.
THEBOATREACTS MOREROUGHLYWHEN LIGHTLYLOADED.BE PAR-
TICULARLY CAREFUL WHEN YOU ACCELERATE OR CHANGE
DIRECTION.
An example of good
load distribution:
In a “head on” sea,
- load the bow
- the tilt pin should be in the 2nd or the 1st
hole position
NegativeTRIM
In a “following” sea,
- load the stern
- the tilt pin should be in the 3rd or the 4th
position
PositiveTRIM

11
OPERATING INSTRUCTIONS
SAFETY FIRST: LEARN HOW TOAVOIDACCIDENTS
CHECK-LISTBEFOREDEPARTING
GET REQUIRED INFORMATIONAND INFORM OTHER PASSENGERS:
v GET INFORMED on local regulations and hazards related to water activities
and boat operation.
v CHECK weather forecast, local currents, tides and wind conditions.
vADVISE someone on land of the time you plan to be back.
v EXPLAIN basic boat operation to all passengers that can operate the boat in
case of emergency.
v LEARN how to determine the distance you can cover with a full fuel tank, and
remember that bad weather conditions can alter this.
Always be sure you have enough fuel to reach a shelter.
CHECK CONDITION OF THE BOATAND EQUIPMENT:
v CHECK inflation pressure.
v INSPECT the valves caps. Remove the self bailer plug.
v CHECK the tightening of the motor clamps. If it is not bolted, don’t forget to
secure the engine with a safety lanyard attached to the bracket and the motor
plate.
v BE SURE the safety stop switch lanyard operates correctly.
v TOP OFF fuel and oil level.
v DO NOT FORGET to fill up the oil level if your motor has a separate oil tank.
v CHECK the security of your fuel tank. Install it at the spot provided.
v BE SURE motor is not in gear before starting.
vCHECKtheloadisevenlydistributed(seechapterOPERATINGINSTRUCTION).
CHECK that required safety equipment is on board:
(check the laws and regulations of the country or locality
in which you are boating)
v One personal flotation device (PFD) per person.
v The foot-pump, oars, repair kit and tool kit.
v The mandatory equipment.
v The boat papers and your boating license.
v Lights are required if operating after dark.
12
OPERATINGINSTRUCTIONS
SAFETY FIRST: LEARN HOW TOAVOIDACCIDENTS
RULES TO OBSERVE DURING NAVIGATION
Be responsible: do not neglect the safety rules, this could jeopardize your life and the lives of others.
Learn to always keep control of your boat.
Always operate with courtesy and respect.
Respect local regulations and practices.
Near the shore, navigate in the designated boating areas.
At sea, weather conditions can rapidly deteriorate. Always be sure that you can reach a shelter
rapidly.
vUSEPERSONALFLOTATIONDEVICE(PFD):PFDarerequiredequipment.
Wear them.
v ALWAYS USE THE STOP SWITCH SAFETY LANYARD: Your outboard
comes equipped with a stop switch safety lanyard to prevent a runaway boat
in case the operator falls overboard. Wear it around your wrist or affix to the
clothes you are wearing.
v NOALCOHOL / DRUGS: Do not drink alcohol or take drugs before or while
operating your boat. Maintain passenger sobriety.
v DO NOT EXCEED THE AUTHORIZED NUMBER OF PERSONS OR
WEIGHT.
v MAKE SURE YOUR PASSENGERS REMAIN SEATED: Sitting on the
buoyancy tubes may be comfortable at rest or at low speeds provided your
passengers use the grab line. At planning speeds, in rough water or during
sharp turns, all passengers should position themselves in seats (standard or
option) or on the floor.
v NO BOW RIDING: Bow riding is illegal in most areas and is extremely
dangerous: in case of falling, the man overboard is in the way of the propeller.
v BE ESPECIALLY CAREFUL WHEN DOCKING: Arms and legs may be
injured if they are outside the boat.
v KEEP CLEAR OF SWIMMERS AND DIVERS: Always avoid areas where
divers/swimmers are in the water. Keep a sharp lookout especially when
operating near beaches and launch sites. Shut off the motor when operating
near someone in the water.
The Alpha flag indicates proximity of divers. You MUST stay at a safe
distance (minimum 50 meters).
vAVOID SHARPTURNSAT HIGH SPEEDS: You could be get ejected from
the boat.
v Do NOT make a sudden change in direction without advising passengers.
13
OPERATING INSTRUCTIONS
SAFETY FIRST: LEARN HOW TOAVOIDACCIDENTS
RULES TO OBSERVE DURING NAVIGATION
v BATTERY:
-Avoid sparks and open flames near battery (Hydrogen gas from battery may
explode).
- Do not allow contact between positive and negative poles.
- Turn off engine before inspecting or servicing battery.
v BEWARE: Avoid all contact between the buoyancy tubes and sharp ob-
jects or aggressive liquids (such as acid).
vINSPECTANDMAINTAIN STEERING SYSTEM:An improperly maintained
system may fail, causing sudden loss of control.
vAVOIDTHERISKSOFEXPLOSIONORFIREHAZARDS:Ensureyourfuel
system is in good order and maintain it properly.
vAVOID SMOKING ON BOARD and most particularly while filling the fuel
tank.
v IF FUEL HAS SPILLED ON THE FLOOR: Wash off with water.
IN CASE OF ACCIDENT
In case of accident, do not panic, and reassure passengers. Be aware that the boat, even damaged, is
often the best shelter and facilitates your rescue.
An inflatable boat is practically unsinkable, even full of water. If after an accident, a compartment deflates,
bring it inside the boat, restore the load balance to the opposite side of the deflated compartment and
return at reduced speed. In case of collision or an impact with a floating object, stop to examine the hull,
the buoyancy tubes, the motor and its attachments and return to shore at a low speed.
Take your boat to your Dealer for inspection before using it again.
NEGLECTING INSPECTIONS AND REPAIRS MAY LEAD TO SERIOUS
INJURY AND WILL REDUCE THE LIFE OF YOUR BOAT.

14
ENVIRONMENT
RESPONSIBLE BOATING BEGINS WITH YOU
With your inflatable boat, you can discover the richness of the marine environment. Help keep it beautiful.
Enjoying time on the water is great, but it comes with a responsibility to ensure a strong healthy
environment. Please, respect your environment by applying the following basic safety rules:
The health of your environment depends on us all acting responsibly to ensure a clean tomorrow. If each
ofus followsthesefewsimplerules, wecanhelptokeep theEarth’sresourcesintactfor futuregenerations.
To respect the environment, we have printed this manual on non-chloride recycled paper.
v AVOID CREATING EXCESSIVE WASH.
v KEEP OUT OF DESIGNATED SWIMMING AREAS.
v RESPECT ALL FISH LIFE. Respect the laws for bag limits and practice
catch and release sportsmanship.
v USE NON-POLLUTING ANTIFOULING PAINT AND NON POLLUTING
CLEANINGAGENTS.
v BE CAREFUL NOT TO OVERFILL THE FUEL TANK: The surplus would go
into the sea.
vDON’TMAKEUNNECESSARYNOISE.Excessivenoiseshouldbeavoided,
particularly around launching ramps and populated areas.
v DO NOT DISCHARGE OIL OR FUELS INTO THE WATER. In most areas
it is illegal and in all areas it causes pollution and harms plant and animal life.
v DO NOT LITTER. Dispose of garbage and trash properly. If there is no
appropriate refuse disposal, bring back your trash.
v DON’T MAKE EXCESSIVE WAKE. Remember that the wake your boat
trails behind can be destructive to the shore, as well as to other boaters. A
boat wake crashing on the shore can cause and accelerate erosion and dam-
age the environment.
15
HANDLING
1. MOORING AND TOWING
1.1 MOORING
Use the hull’s mooring ring.
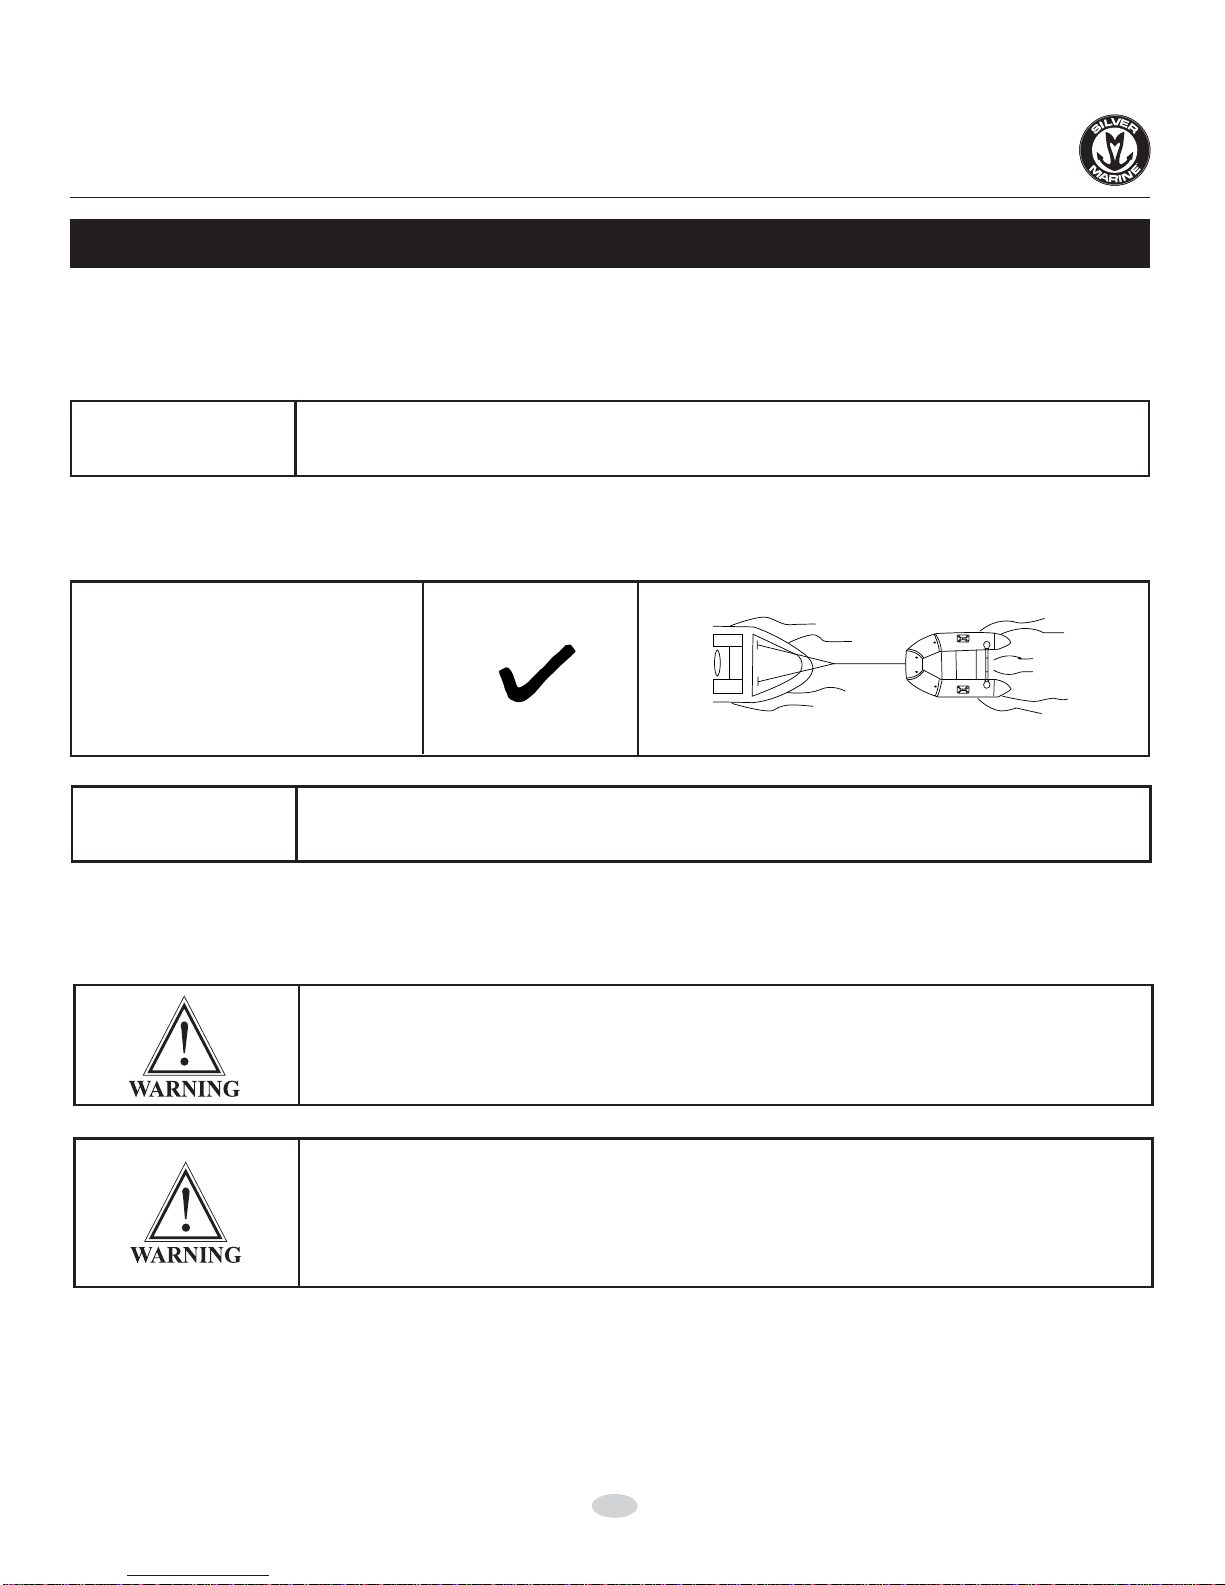
1.2 TOWING
Use a single line attached to the mooring ring.
2. LIFTING – DAVITS
To hoist your boat and place it on davits, use the davit lifting rings.
When moored, the self bailers should remain open to drain the rain
water.
NOTICE:
Towing must be done at low speed and in good weather conditions.
NOTICE:
NOBODY ON BOARD DURING THE LIFTING
WHEN BEING HOISTED OR PLACED ON DAVITS, THE BOAT MUST BE
EMPTY(NO EQUIPMENT)AND TIPPEDTOWARDTHEREAR. SELFBAIL-
ERS SHOULD REMAIN OPEN TO DRAIN THE RAIN WATER.
Unload the boat before tow
ing (bags, fuel tank,
outboard).
16
HANDLING
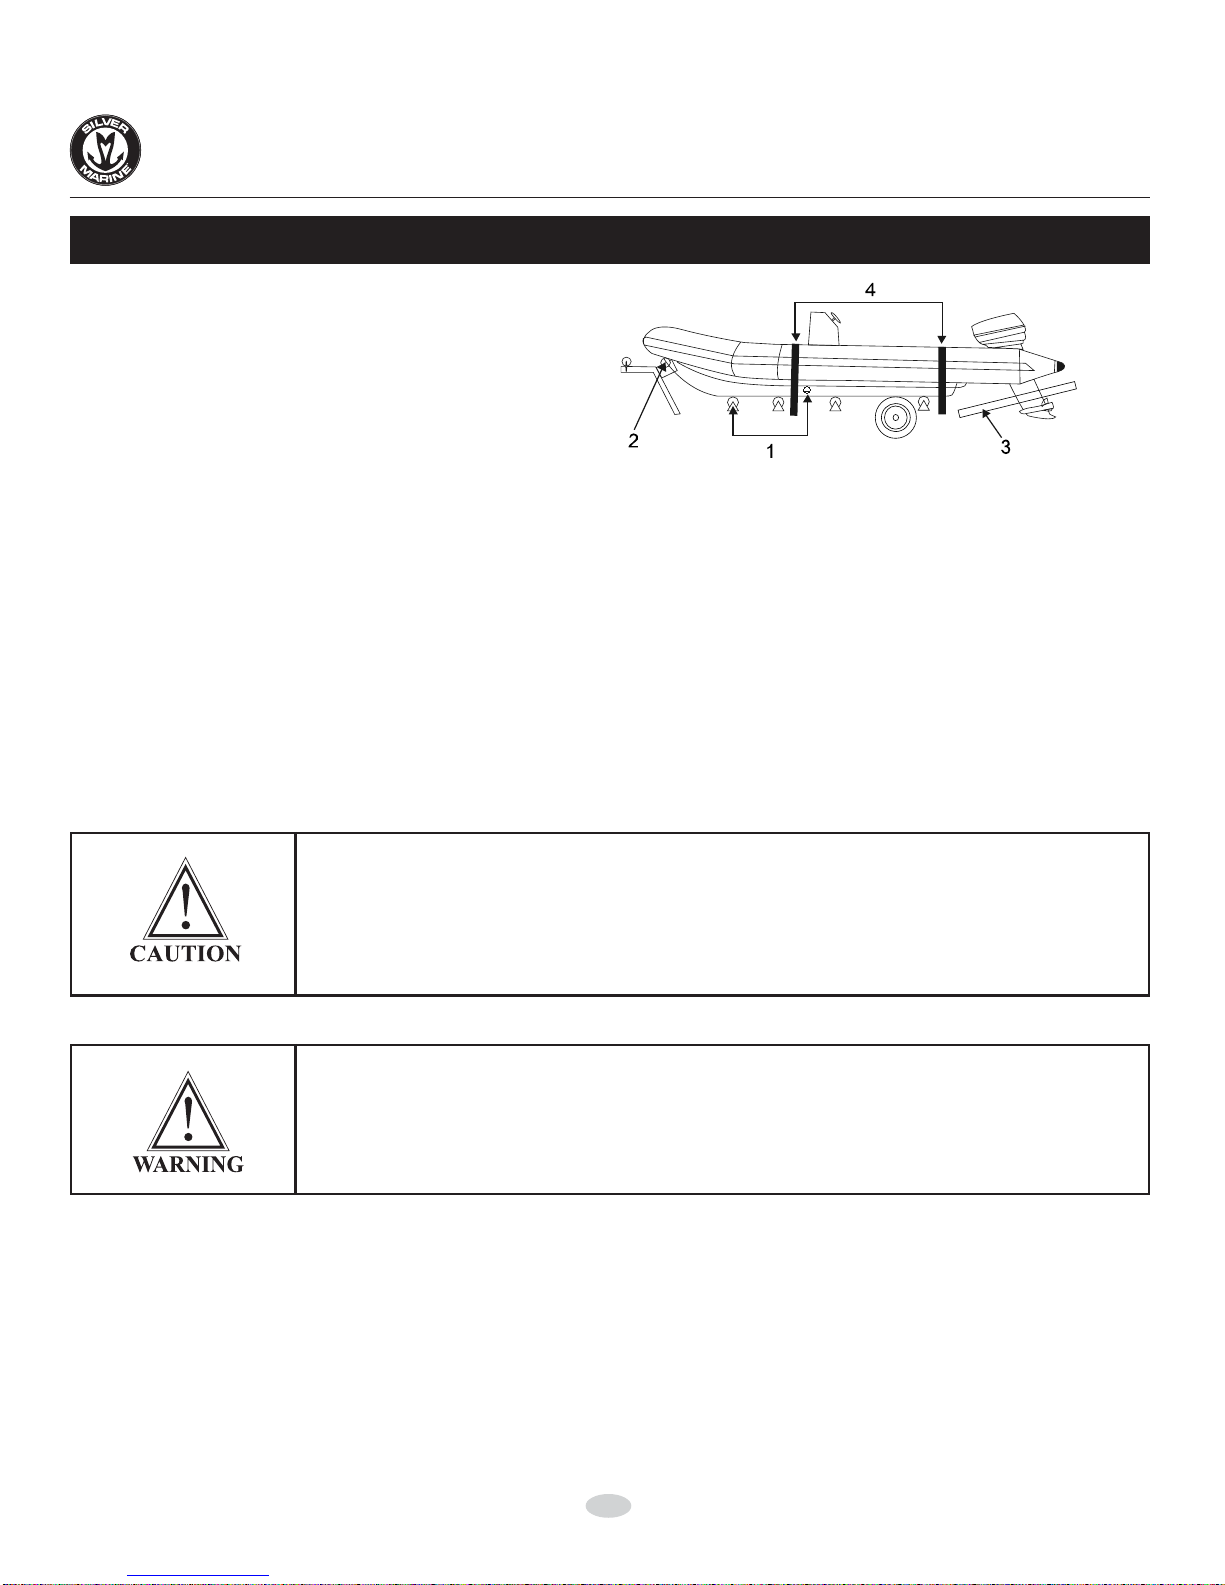
3. HAULING ON TRAILER
v The boat must be properly inflated.
v The self bailer should remain open.
Adjust the rollers -or supports- (1) of the trailer to fit the hull.
Haul the boat onto the trailer using the mooring ring (2).
Check if the boat is stable.
Place the motor in the down or trailing lock position so
that it can rest on the support provided on the trailer (3).
v Tie down the straps and ensure the buoyancy tubes are protected against chafing (4).
v Following the traffic rules you have to protect the propeller with a cover.
ON THE ROAD: BOAT MUST BE EMPTY OF LOOSE EQUIPMENT
WHEN TRANSPORTED ON TRAILER.
NOBODY ON BOARD DURING TRANSPORTATION ON TRAILER.
ABAD POSITION OF THE BOAT ON THE TRAILER MAY RESULT IN
DAMAGE TO YOUR BOAT AND EQUIPMENT.
NEVER EXCEED THE TRAILERS’ AUTHORIZED WEIGHT
CAPACITY.
17
MAINTENANCE
The buoyancy tube of your boat is made of fabric using plastomer. Maintenance is easy but essential
for the longevity of your boat.
1. CLEANING
1.1 Clean your boat often, and always before wintering
Inflate the buoyancy tube
Open the self bailer and wash the boat with a hose to remove sand and other particles.
Clean with soap and fresh water.
Remove all traces of tar (use theACCESS product from your dealer if required).
Check the tube and high pressure air floor for leaks, with foamy soap and water.
Rinse with fresh water and dry thoroughly.
When deflating
Check that the valves and gaskets are clean and not damaged.
Check the self bailer is not clogged.
1.2 Check airtightness of your boat:
1.3 CLEANING OF THE HULL.
Wash the deck and hull with clear water and soap. Dry thoroughly.
Check the self bailer is not clogged.
Open the drainage holes caps to evacuate water.
NEVER USE HIGH PRESSURE CLEANING EQUIPMENT, IT IS LIKELY
TO DAMAGE THE BOAT.
NOSTRONGDETERGENTS(ACID,TRICHLORETHYLENE…),SILICONE-
BASED PRODUCTS OR SIMILAR AGENTS TO BE PLACED ON TUBES.
IF A SPILL OCCURS, WASH OFF WITH WATER.
LOSS OF PRESSURE
Loss of pressure over 24 hours is not unusual. (ISO 6185 standard
permits a certain amount of pressure loss). Add air as necessary.
If loss of pressure exceeds 10 mb (0.14 PSI)/5 hours for buoyancy tube,
and 35 mb (0.49 PSI)/5 hours for high pressure air-floor: Check airtight-
ness of your boat.
Temperature has a great influence on air pressure.Avariation of 1 C
results in a variation in the same way of about +/-4 mb (0.06 PSI).
If you have a problem with an air leakage: first, check all valves are intact
and in closed position (nothing clogging valve). Do not hesitate to contact
your dealer.
NOTICE:

18
MAINTENANCE
1.4 Maintenance of stainless steel
We use only top quality stainless steel, which is resistant to corrosion.
However, salt water is a harsh environment and maintenance is required to avoid corrosion.
1.5 Maintenance of the seats and marine plywood floor
Wash the seats and floor with soap and fresh water, and dry thoroughly.
Paints and varnishes not only are decorative elements, they also protect the materials.
As soon as flakes or scratches appear on the surface, have them repainted using polyurethane – based
products.
2. WINTER – STORAGE
When storing your boat, keep it in a clean and dry place that is not affected by major variations in
temperature and other damaging factors. You may store the boat:
Deflated and rolled up in its bag.
Assembled and lightly inflated.
3. REGULAR INSPECTIONS:
Check frequently the signaling, straps and lines. Replace used elements.
Check frequently the tightness of the screws and nuts, particularly the motor’s bolting to the
transom. Remember that on some rigid inflatable boats, the plate supporting the motor is also bolted to
the hull.
Regularly examine your fuel system, replace old damaged elements, and check the tightness of
the clamping rings.
NOTICE:
Stainless steel is not permanent
Avoid contamination that results from contact with iron tools: Use
chromed tools.
Avoid scovring its surface.
Frequently wash with fresh water.
Grease or polish it regularly and restore it with an appropriate product (ask
yourDealer)
FORLONGTERMSTORAGEINTHESUN (ESPECIALLYIN TROPI-
CAL REGIONS), PROTECT YOUR BOAT WITH A BREATHABLE CAN-
VAS COVER.
RODENTS CHEW ON FABRIC INCLUDING INFLATABLE BOAT
MATERIAL. STOREAWAY FROM RODENTS.
IF YOU CHOOSE TO STORE YOUR BOAT INFLATED, MAKE SURE YOU
DO NOT SUBJECT IT TO DEFORMATIONS.
19
MAINTENANCE
4. HOW TO REPAIR SMALL PUNCTURES
5. SMALL REPAIRS ON THE HULL
The small scratches can be reduced or removed with polish or other appropriate products.
The deeper scratches can be repaired with polyester mastic. In this case, ask help from your
dealer.
NOTICE: FOR MAJOR REPAIRS, TAKE YOUR BOAT TOADEALER WHO CAN PER-
FORMAFTER SALES SERVICE.
Cleaning:
- Grease remover of the alcohol type.
Repairing:
- Patch.
- Tube of special glue, ready for use (carefully replace the cap on the
tube of glue. If properly sealed, it keeps perfectly).
- Brush.
- Relative humidity less than 60%.
- temperature between 18 and 25 °C
-Avoid undertaking repairs:
Ÿ In direct sunlight
Ÿ In rain
- Check that the buoyancy tube is fully deflated and lies flat.
- Cut out a round patch at least 5 cm larger than the cut.
- Clean the damaged part of the boat and the corresponding side of the
patch with a grease remover of the alcohol type.
- Draw the shape of the patch exactly where it will be applied.
- Polish the glue area on Hypalon® material before gluing.
- Allow to dry for 5 minutes.
-Apply 3 thin layers of glue on both the patch and the roughened area
on the boat and let dry for 5 minutes between each layer until tacky.
- When the 3rd layer is dry, apply the patch without pressing and adjust
the position if required.
- Press out the air bubbles which may have formed under the patch.
- Smooth the patch with a round object (ex: a spoon) starting from the
center of the patch.
- Clean the excess glue with a solvent.
- Do not expose the repair to sun or rain.
- Let dry for 24 hours before inflating.
- Do not leave the tube in the sun or next to heat sources or direct
flames.
-Always work in a ventilated area, avoid inhaling glue vapors or swallow-
ing it. Avoid contact with the skin or the eyes
REPAIR KIT
CONDITIONS
NECESSARY FOR
SUCCESSFUL
REPAIR
PREPARATION
GLUING
PUTTINGONTHE
PATCH
USE OF BOAT
AFTER REPAIR
This manual suits for next models
17
Table of contents
Other Silver Marine Boat manuals


Popular Boat manuals by other brands


Jeanneau
Jeanneau SUN ODYSSEY 41 DS owner's manual

Meridian
Meridian 490 Pilothouse owner's manual

Advanced Elements
Advanced Elements AdvancedFrame Expedition AE1009 owner's manual

Robo Marine Indonesia
Robo Marine Indonesia GEOMAR user manual

Swallow Boats
Swallow Boats BayRaider owner's manual

X SHORE
X SHORE EELEX 8000 owner's manual


