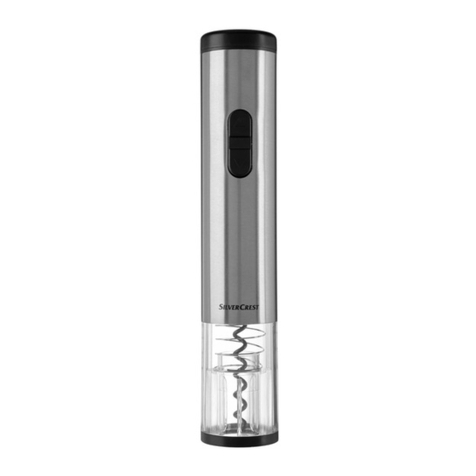
Silvercrest SKE 6 A1 User manual

TIRE-BOUCHON ÉLECTRIQUE
Mode d’emploi
IAN 100655
ELECTRIC CORKSCREW SKE 6 A1
ELECTRIC CORKSCREW
Operating instructions
ELEKTRISCHER KORKENZIEHER
Bedienungsanleitung
ELEKTRISCHE KURKENTREKKER
Gebruiksaanwijzing
ELEKTRISK KORKSKRUV
Bruksanvisning

GB/IE Operating instructions Page 1
SE Bruksanvisning Sidan 7
FR/BE Mode d'emploi Page 13
NL/BE Gebruiksaanwijzing Pagina 19
DE/AT/CH Bedienungsanleitung Seite 25
Before reading, unfold the page containing the illustrations and familiarise yourself with all functions of
the device.
Vik ut bildsidan och ha den till hands när du läser igenom anvisningarna och gör dig bekant med
apparatens/maskinens funktioner.
Avant de lire le mode d'emploi, ouvrez la page contenant les illustrations et familiarisez-vous ensuite avec
toutes les fonctions de l'appareil.
Vouw vóór het lezen de pagina met de afbeeldingen open en maak u vertrouwd met alle functies van het
apparaat.
Klappen Sie vor dem Lesen die Seite mit den Abbildungen aus und machen Sie sich anschließend mit allen
Funktionen des Gerätes vertraut.


1
SKE 6 A1
GB
IE
Contents
Introduction . . . . . . . . . . . . . . . . . . . . . . . . . . . . . . . . . . . . . . . . . . . . . . . . . . . . . . . . . . .2
Intended use . . . . . . . . . . . . . . . . . . . . . . . . . . . . . . . . . . . . . . . . . . . . . . . . . . . . . . . . . .2
Package contents. . . . . . . . . . . . . . . . . . . . . . . . . . . . . . . . . . . . . . . . . . . . . . . . . . . . . . .2
Appliance description . . . . . . . . . . . . . . . . . . . . . . . . . . . . . . . . . . . . . . . . . . . . . . . . . . .2
Technical data . . . . . . . . . . . . . . . . . . . . . . . . . . . . . . . . . . . . . . . . . . . . . . . . . . . . . . . . .2
Safety guidelines. . . . . . . . . . . . . . . . . . . . . . . . . . . . . . . . . . . . . . . . . . . . . . . . . . . . . . .3
Inserting/replacing batteries . . . . . . . . . . . . . . . . . . . . . . . . . . . . . . . . . . . . . . . . . . . . .4
Handling. . . . . . . . . . . . . . . . . . . . . . . . . . . . . . . . . . . . . . . . . . . . . . . . . . . . . . . . . . . . . .4
Cleaning and care . . . . . . . . . . . . . . . . . . . . . . . . . . . . . . . . . . . . . . . . . . . . . . . . . . . . . .5
Storage. . . . . . . . . . . . . . . . . . . . . . . . . . . . . . . . . . . . . . . . . . . . . . . . . . . . . . . . . . . . . . .5
Troubleshooting. . . . . . . . . . . . . . . . . . . . . . . . . . . . . . . . . . . . . . . . . . . . . . . . . . . . . . . .5
Warranty and service . . . . . . . . . . . . . . . . . . . . . . . . . . . . . . . . . . . . . . . . . . . . . . . . . . .6
Disposal . . . . . . . . . . . . . . . . . . . . . . . . . . . . . . . . . . . . . . . . . . . . . . . . . . . . . . . . . . . . . .6
Importer . . . . . . . . . . . . . . . . . . . . . . . . . . . . . . . . . . . . . . . . . . . . . . . . . . . . . . . . . . . . . .6

2SKE 6 A1
GB
IE
Introduction
Congratulations on the purchase of your new
appliance.
You have selected a high-quality product.
The operating instructions are part of this product.
They contain important information on safety, usage
and disposal. Before using the product, familiarise
yourself with all handling and safety guidelines.
Use the product only as described and for the range
of applications specified. Please also pass these
operating instructions on to any future owner(s).
Intended use
This corkscrew is intended exclusively for the
uncorking of standard commercial wine bottles
(natural or plastic corks).
It is not designed for the uncorking of champagne
bottles.
This corkscrew is not suitable for removing/opening
other types of bottle closures, such as crown corks
or screw caps.
It is exclusively intended for use in private house-
holds. Do not use this corkscrew in a commercial
setting.
It is not intended for any other use or use beyond
that specified.
Package contents
▯ Electric Corkscrew
▯ 4 x AA batteries, 1.5 V LR6
▯ Foil cutter (also functions as a stand)
▯ Operating instructions
NOTE
► Check for completeness directly after
unpacking.
► Remove all packaging material.
Appliance description
1Decorative cap
2Battery compartment
3Catch
4button
5button
6Foil cutter
7Corkscrew thread
Technical data
Power supply: 4 x 1,5 V
Power consumption: 2.5 A
Battery type: 1.5 V, Mignon, AA, LR6

3
SKE 6 A1
GB
IE
Safety guidelines
WARNING! RISK OF INJURY!
► This appliance may be used by children aged 8 years and above and
by persons with limited physical, sensory or mental capabilities or lack
of experience and knowledge, provided that they are under supervision
or have been told how to use the appliance safely and are aware of the
potential risks.
► Children must not use the appliance as a plaything.
► Cleaning and user maintenance tasks may not be carried out by children
unless they are supervised.
► Take care when handling the tip of the corkscrew and the foil cutter.
WARNING!
Safety information for handling batteries:
► Never throw batteries into the fire. Do not recharge batteries. There is a risk
of explosion and injury!
► Never open batteries and never solder or weld batteries. There is a risk of
explosion and injury!
► Check the condition of the batteries at regular intervals. Leaking batteries
can cause damage to the appliance.
► If you do not intend to use the appliance for an extended period, remove
the batteries.
► If the batteries have leaked, use protective gloves. Clean the battery com-
partment and the battery contacts with a dry cloth.
► Keep batteries out of the reach of children. Children might put batteries into
their mouth and swallow them. If a battery is swallowed, medical assistance
must be sought immediately.
ATTENTION! MATERIAL DAMAGE!
Never immerse the appliance in water or other fluids.

4SKE 6 A1
GB
IE
Inserting/replacing batteries
ATTENTION! MATERIAL DAMAGE!
► When inserting the batteries, observe the
polarity indicated on the battery compart-
ment cover!
► Always use Mignon AA, LR6 batteries.
► Always use batteries of the same type.
1) Remove the decorative cap 1by turning it so
that the arrow on the decorative cap 1points
towards the marking "Open". Remove the
decorative cap 1.
2) Open the battery compartment 2by pulling
the catch 3towards you and unlatching the
battery compartment 2.
3) Remove the old batteries, if present.
4) Insert the new batteries as per the polarity
diagram provided on the cover of the battery
compartment.
5) Close the battery compartment 2so that the
catch 3clicks into place.
6) Replace the decorative cap 1so that the arrow
on the decorative cap 1points towards the
marking "Open". Turn the decorative cap 1
so that the arrow points to the marking "Close".
The decorative cap 1is now firmly back in
place on the appliance.
Handling
NOTE
► Do not attempt to remove champagne corks
with the corkscrew! These can get caught in
the appliance..
Figure 1
1) Use
the foil cutter
6
to cut open the foil sleeve
encasing the bottle cork:
Place the foil cutter
6
onto the closed bottle of
wine as shown in Figure 2.
2) Press it together firmly with your thumb and
forefinger. Grip the bottle firmly with one hand
so that it cannot fall over.
Figure 2
3) Turn the bottle of wine through 360 degrees.
You may have to repeat this several times
before you can remove the foil sleeve capsule.
✕✓

5
SKE 6 A1
GB
IE
4) You can now remove the cut foil sleeve.
5) Grip the bottle firmly with one hand so that
it cannot fall over. Place the corkscrew onto
the wine bottle. Press it down firmly until the
corkscrew thread 7perceptibly penetrates
the cork.
6) Then keep the lower button 5depressed.
The corkscrew thread 7is screwed into the
cork and then pulls it out of the bottle neck.
Keep a firm grip on the wine bottle and the
corkscrew while doing this.
7) Do not release the lower button 5until the
cork has been completely removed from the
bottle neck.
8) Remove the corkscrew from the bottle and hold
it with the opening pointing downwards.
Then press the button 4. The cork is now
unscrewed from inside the corkscrew.
9) Release the button 4as soon as the cork
falls out of the corkscrew.
NOTE
► You can use the foil cutter 6as a stand for
the corkscrew:
Simply insert the corkscrew into the notch
on the top surface of the foil cutter 6. This
provides the corkscrew with a secure stand.
Cleaning and care
ATTENTION! MATERIAL DAMAGE!
Never immerse the appliance in water or
other fluids!
► Do not use abrasive or aggressive cleaning
materials. These may damage the surfaces
of your appliance.
■ Clean the housing of the corkscrew and the foil
cutter 6only with a slightly damp cloth. In case
of stubborn soiling, pour a few drops of a mild
detergent onto the damp cloth. Ensure that no
moisture enters the corkscrew during cleaning!
Storage
■ Always clean the appliance thoroughly before
storing.
■ If you do not intend to use the appliance for an
extended period of time, remove the batteries.
■ Store the cleaned appliance in a clean, dust-free
and dry place.
Troubleshooting
The appliance is not working.
■ The batteries are discharged/weak.
–Insert new batteries as described in the
section "Inserting/replacing batteries".
■ The appliance is defective.
–Contact Customer Service.

6SKE 6 A1
GB
IE
Warranty and service
You are provided a 3-year warranty on this
appliance, valid from the date of purchase.
This appliance has been manufactured with care
and inspected meticulously prior to delivery.
Please retain your receipt as proof of purchase.
In the event of a warranty claim, please contact
your Customer Service unit by telephone. This is the
only way to guarantee free return of your goods.
The warranty only covers claims for material and
manufacturing defects, not for damage sustained
during carriage, components subject to wear and
tear or damage to fragile components such as
switches or batteries. This appliance is intended
solely for private use and not for commercial
purposes.
The warranty shall be deemed void in the instance
of misuse or improper handling, use of force and
interventions which were not carried out by one
of our authorised Service centres.
Your statutory rights are not restricted by this warranty.
The warranty period is not prolonged by repairs
effected under the warranty. This also applies to
replaced and repaired components. Any damage
and defects present at the time of purchase must be
reported immediately after unpacking, but no later
than two days after the date of purchase. Repairs
effected after expiry of the warranty period shall
be subject to charge.
Service Great Britain
Tel.: 0871 5000 720 (£ 0.10/Min.)
E-Mail: [email protected]
IAN 100655
Service Ireland
Tel.: 1890 930 034
(0,08 EUR/Min., (peak))
(0,06 EUR/Min., (off peak))
E-Mail: [email protected]
IAN 100655
Hotline availability:
Monday to Friday 08:00 - 20:00 (CET)
Disposal
Under no circumstances should
the appliance be disposed of
in standard household waste.
This product is subject to
the provisions of European
Directive 2012/19/EU.
Dispose of the appliance via an approved waste
disposal company or your municipal waste disposal
facility. Please observe applicable regulations.
Please contact your waste disposal facility if you
are in any doubt.
Used batteries must not be
disposed of in household
waste.
Consumers are legally obligated to dispose of bat-
teries at a collection point in their community / city
district or at a retail store.
The purpose of this obligation is to ensure that
batteries are disposed of in an environmentally
congruent manner. Only dispose of batteries when
they are fully discharged.
The packaging is made of environmen-
tally friendly materials which you can
dispose of at local recycling centres.
Importer
KOMPERNASS HANDELS GMBH
BURGSTRASSE 21
44867 BOCHUM
GERMANY
www.kompernass.com

7
SKE 6 A1
SE
Innehållsförteckning
Inledning . . . . . . . . . . . . . . . . . . . . . . . . . . . . . . . . . . . . . . . . . . . . . . . . . . . . . . . . . . . . .8
Föreskriven användning. . . . . . . . . . . . . . . . . . . . . . . . . . . . . . . . . . . . . . . . . . . . . . . . .8
Leveransens innehåll. . . . . . . . . . . . . . . . . . . . . . . . . . . . . . . . . . . . . . . . . . . . . . . . . . . .8
Beskrivning . . . . . . . . . . . . . . . . . . . . . . . . . . . . . . . . . . . . . . . . . . . . . . . . . . . . . . . . . . .8
Tekniska data . . . . . . . . . . . . . . . . . . . . . . . . . . . . . . . . . . . . . . . . . . . . . . . . . . . . . . . . .8
Säkerhetsanvisningar. . . . . . . . . . . . . . . . . . . . . . . . . . . . . . . . . . . . . . . . . . . . . . . . . . .9
Lägga i/Byta batterier . . . . . . . . . . . . . . . . . . . . . . . . . . . . . . . . . . . . . . . . . . . . . . . . .10
Användning . . . . . . . . . . . . . . . . . . . . . . . . . . . . . . . . . . . . . . . . . . . . . . . . . . . . . . . . . .10
Rengöring och skötsel. . . . . . . . . . . . . . . . . . . . . . . . . . . . . . . . . . . . . . . . . . . . . . . . . .11
Förvaring . . . . . . . . . . . . . . . . . . . . . . . . . . . . . . . . . . . . . . . . . . . . . . . . . . . . . . . . . . . .11
Åtgärda fel. . . . . . . . . . . . . . . . . . . . . . . . . . . . . . . . . . . . . . . . . . . . . . . . . . . . . . . . . . .11
Garanti och service . . . . . . . . . . . . . . . . . . . . . . . . . . . . . . . . . . . . . . . . . . . . . . . . . . . .12
Kassering . . . . . . . . . . . . . . . . . . . . . . . . . . . . . . . . . . . . . . . . . . . . . . . . . . . . . . . . . . . .12
Importör. . . . . . . . . . . . . . . . . . . . . . . . . . . . . . . . . . . . . . . . . . . . . . . . . . . . . . . . . . . . .12

8SKE 6 A1
SE
Inledning
Ett stort grattis till din nyinköpta produkt.
Du har valt en produkt med hög kvalitet.
Bruksanvisningen ingår som en del av leveransen.
Den innehåller viktig information om säkerhet, an-
vändning och återvinning. Läs noga igenom alla
användar- och säkerhetsanvisningar innan du börjar
använda produkten. Använd endast produkten enligt
beskrivningarna och i de syften som anges här.
Lämna över all dokumentation tillsammans med
produkten om du överlåter den till någon annan
person.
Föreskriven användning
Den här vinöppnaren får endast användas för att
öppna vinflaskor som är vanligt förekommande i
handeln (med plast- eller naturkork).
Den är inte avsedd för att dra ut korkar på flaskor
med mousserande vin.
Vinöppnaren ska inte användas för att öppna
andra typer av förslutningar som t ex kron- och
skruvkorkar.
Den är endast avsedd för privat bruk i hemmet.
Använd den inte yrkesmässigt.
All annan eller utökad form av användning strider
mot föreskrifterna.
Leveransens innehåll
▯ Elektrisk korkskruv
▯ 4 st. AA-batterier, 1,5 V LR6
▯ Folieskärare (fungerar även som fot)
▯ Bruksanvisning
OBSERVERA
► Kontrollera att leveransen är komplett så snart
du packat upp den.
►Ta bort allt förpackningsmaterial.
Beskrivning
1Dekorkåpa
2 Batterifack
3 Låsanordning
4 Knapp
5 Knapp
6Folieskärare
7Korkskruv
Tekniska data
Spänningsförsörjning: 4 x 1,5 V
Strömförbrukning: 2,5 A
Batterityp: 1,5 V, Mignon, AA, LR6

9
SKE 6 A1
SE
Säkerhetsanvisningar
VARNING! RISK FÖR PERSONSKADOR!
► Den här produkten kan användas av barn som är minst 8 år och av personer
med begränsad fysisk, sensorisk eller mental förmåga eller bristande er-
farenhet och/eller kunskap om de hålls under uppsikt eller har instruerats
i hur produkten används på ett säkert sätt och inser vilka risker det innebär.
► Barn får inte leka med produkten.
► Rengöring och allmän service får bara göras av barn om någon vuxen
håller uppsikt.
► Var försiktig när du handskas med korskruvens spets och folieskäraren.
VARNING!
Anvisningar för säker hantering av batterier:
► Kasta aldrig in batterier i en eld. Ladda aldrig upp batterier (som inte är
uppladdningsbara). Då finns risk för explosion och personskador!
► Öppna, löd eller svetsa aldrig batterier. Då finns risk för explosion och
personskador!
► Kontrollera batterierna regelbundet. Läckande batterier kan orsaka skador
på produkten.
► Ta ut batterierna om du inte ska använda produkten under en längre tid.
► Ta på skyddshandskar om batterierna läcker. Rengör batterifacket och
batterikontakterna med en torr trasa.
► Barn får inte handskas med batterier. De kan stoppa dem i munnen och
svälja dem. Om någon råkar svälja ett batteri måste man genast söka
medicinsk vård.
AKTA! RISK FÖR MATERIALSKADOR!
Du får absolut inte doppa ner produkten i vatten eller andra vätskor.

10 SKE 6 A1
SE
Lägga i/Byta batterier
AKTA! RISK FÖR MATERIALSKADOR!
► Kontrollera alltid att batterierna läggs in med
polerna så som framgår av märkningen på
batterifackets lock!
► Använd alltid batterier av typ Mignon AA, LR6.
► Använd alltid batterier av samma typ.
1) Ta av dekorkåpan 1genom att vrida den så
att pilen på dekorkåpan 1pekar mot marke-
ringen "Open" på vinöppnaren. Ta av dekor-
kåpan 1.
2) Öppna batterifacket 2genom att dra låsan-
ordningen 3mot dig och låsa upp batteri-
facket 2.
3) Ta eventuellt först ut de gamla batterierna ur
facket.
4) Lägg alltid in de nya batterierna med polerna
så som framgår av märkningen på batterifack-
ets lock.
5) Stäng batterifacket 2så att låsanordningen 3
snäpper fast.
6) Sätt på dekorkåpan 1så att pilen på dekor-
kåpan 1pekar mot markeringen "Open". Vrid
sedan dekorkåpan 1så att pilen pekar mot
markeringen "Close". Nu sitter dekorkåpan 1
fast på produkten igen.
Användning
OBSERVERA
► Dra inte ut några korkar på flaskor med
mousserande vin med den här vinöppnaren!
De kan fastna i produkten..
Bild 1
1) För att skära upp
folien runt flaskhalsen använ-
der du folieskäraren
6
:
Sätt folieskäraren
6
på den oöppnade vinflas-
kan så som visas på bild 2
.
2) Tryck ihop den med tummen och pekfingret.
Ta ett stadigt tag om vinflaskan med ena
handen så att den inte välter.
Bild 2
3) Vrid flaskan i 360 grader. Eventuellt måste
du upprepa proceduren några gånger innan
folien kan tas av.
✕✓

11
SKE 6 A1
SE
4) Ta sedan bort folien.
5) Ta ett stadigt tag om vinflaskan med ena handen
så att den inte välter. Sätt vinöppnaren över
vinflaskans hals. Tryck ned den ordentligt så
att du känner att korkskruven 7tränger in i
korken.
6) Håll sedan den undre knappen 5intryckt.
Korkskruven 7skruvas nu in i korken och drar
sedan ut den ur flaskans hals. Håll ett stadigt
grepp om både flaskan och vinöppnaren.
7) Släpp inte den undre knappen 5förrän
hela korken dragits ut ur flaskhalsen.
8) Ta bort vinöppnaren från flaskan och håll den
med öppningen nedåt. Tryck sedan en gång
på knappen 4. Korken kommer nu ut ur
vinöppnaren.
9) Släpp knappen 4så snart korken faller ut
ur vinöppnaren.
OBSERVERA
► Du kan använda folieskäraren 6som fot till
vinöppnaren:
Stick bara in vinöppnaren i öppningen på
folieskärarens 6ovansida. Då står vinöpp-
naren stadigt.
Rengöring och skötsel
AKTA! RISK FÖR MATERIALSKADOR!
Doppa aldrig ner produkten i vatten eller
andra vätskor!
► Använd inte slipande medel eller starka ren-
göringsmedel. De kan skada produktens yta.
■ Rengör bara vinöppnarens utsida och folieskä-
raren 6med en fuktig trasa. Envisa fläckar
tar du bort med några droppar milt diskmedel
på trasan. Akta så att det inte kommer in fukt i
vinöppnaren när den rengörs!
Förvaring
■ Rengör produkten noga innan du ställer undan
den.
■ Ta ut batterierna om du inte ska använda pro-
dukten under en längre tid.
■Förvara den rengjorda produkten på ett rent,
dammfritt och torrt ställe.
Åtgärda fel
Produkten fungerar inte.
■ Batterierna är helt eller mycket urladdade.
–Lägg då in nya batterier så som beskrivs i
kapitel Lägga i/Byta batterier.
■ Produkten är defekt.
–Kontakta kundservice.

12 SKE 6 A1
SE
Garanti och service
För den här produkten lämnar vi 3 års ga-
ranti från och med inköpsdatum. Produkten har
tillverkats med omsorg och testats noga innan
leveransen. Spara kassakvittot som köpbevis.
För garantiärenden ber vi dig kontakta vår
kundtjänst per telefon. Bara då kan du skicka in
produkten utan kostnad.
Garantin gäller endast för material- eller fabrika-
tionsfel, den täcker inte transportskador, förslitnings-
delar eller skador på ömtåliga delar, tex knappar
och batterier. Produkten är endast avsedd för privat
bruk och ska inte användas yrkesmässigt.
Garantin gäller inte vid missbruk och felaktig
behandling, användande av våld och vid ingrepp
som inte gjorts av vår auktoriserade servicefilial.
Dina lagstadgade rättigheter begränsas inte av
denna garanti.
Garantitiden förlängs inte för att man utnyttjat ga-
rantin. Det gäller även för utbytta och reparerade
delar. Eventuella skador och brister som existerar
redan vid köpet måste rapporteras så snart pro-
dukten packats upp, dock senast två dagar efter
inköpsdatum. När garantitiden är slut måste man
själv betala för eventuella reparationer.
Service Sverige
Tel.: 0770 930739
E-Mail: [email protected]
IAN 100655
Service Suomi
Tel.: 010309 3582
E-Mail: kompernass@lidl.fi
IAN 100655
Tillgänglighet Hotline:
Måndag till fredag kl. 08.00 – 20.00 (CET)
Kassering
Produkten får absolut inte
kastas bland hushållsso-
porna. Den här produkten
faller under det europeiska
direktivet 2012/19/EU.
Lämna in den till ett godkänt återvinningsföretag
eller din kommunala avfallsanläggning. Följ gäl-
lande föreskrifter. Kontakta din avfallsanläggning
om du har några frågor.
Vanliga batterier och uppladd-
ningsbara batterier får inte
kastas bland hushållssoporna.
Den som använder någon typ av batterier är skyldig
enligt lag att lämna in dem till ett insamlingsställe i
sin kommun eller stadsdel eller lämna tillbaka dem
till återförsäljaren.
Den här bestämmelsen är till för att batterier ska
kunna återvinnas utan att skada miljön. Lämna
bara in urladdade batterier för återvinning/
destruktion.
Förpackningen består av miljövänligt
material som kan lämnas in till den
lokala återvinningen.
Importör
KOMPERNASS HANDELS GMBH
BURGSTRASSE 21
44867 BOCHUM
GERMANY
www.kompernass.com
13
SKE 6 A1
FR
BE
Table des matières
Introduction . . . . . . . . . . . . . . . . . . . . . . . . . . . . . . . . . . . . . . . . . . . . . . . . . . . . . . . . . .14
Usage conforme . . . . . . . . . . . . . . . . . . . . . . . . . . . . . . . . . . . . . . . . . . . . . . . . . . . . . .14
Matériel livré . . . . . . . . . . . . . . . . . . . . . . . . . . . . . . . . . . . . . . . . . . . . . . . . . . . . . . . . .14
Description de l'appareil. . . . . . . . . . . . . . . . . . . . . . . . . . . . . . . . . . . . . . . . . . . . . . . .14
Caractéristiques techniques . . . . . . . . . . . . . . . . . . . . . . . . . . . . . . . . . . . . . . . . . . . . .14
Consignes de sécurité . . . . . . . . . . . . . . . . . . . . . . . . . . . . . . . . . . . . . . . . . . . . . . . . . .15
Mise en place / remplacement des piles . . . . . . . . . . . . . . . . . . . . . . . . . . . . . . . . . . .16
Commande. . . . . . . . . . . . . . . . . . . . . . . . . . . . . . . . . . . . . . . . . . . . . . . . . . . . . . . . . . .16
Nettoyage et entretien . . . . . . . . . . . . . . . . . . . . . . . . . . . . . . . . . . . . . . . . . . . . . . . . .17
Entreposage. . . . . . . . . . . . . . . . . . . . . . . . . . . . . . . . . . . . . . . . . . . . . . . . . . . . . . . . . .17
Dépannage . . . . . . . . . . . . . . . . . . . . . . . . . . . . . . . . . . . . . . . . . . . . . . . . . . . . . . . . . .17
Garantie et service . . . . . . . . . . . . . . . . . . . . . . . . . . . . . . . . . . . . . . . . . . . . . . . . . . . .18
Mise au rebut. . . . . . . . . . . . . . . . . . . . . . . . . . . . . . . . . . . . . . . . . . . . . . . . . . . . . . . . .18
Importateur . . . . . . . . . . . . . . . . . . . . . . . . . . . . . . . . . . . . . . . . . . . . . . . . . . . . . . . . . .18

14 SKE 6 A1
FR
BE
Introduction
Toutes nos félicitations pour l'achat de votre nouvel
appareil.
Ainsi, vous venez d'opter pour un produit de grande
qualité. Le mode d'emploi fait partie de ce produit.
Il contient des remarques importantes concernant
la sécurité, l'usage et la mise au rebut. Avant l'usage
du produit, veuillez vous familiariser avec toutes les
consignes d'utilisation et de sécurité. N'utilisez le
produit que conformément aux consignes et pour
les domaines d'utilisation prévus. Si vous cédez le
produit à un tiers, remettez-lui également tous les
documents.
Usage conforme
Ce tire-bouchon est exclusivement conçu pour
déboucher des bouteilles de vin du commerce
(bouchons en liège ou bouchons en plastique).
Il n'est pas conçu pour le débouchage de bou-
chons de champagne.
Le tire-bouchon n'est pas approprié pour enlever /
ouvrir d'autres types de fermetures de bouteilles,
comme par ex. des capsules ou des bouchons à vis.
Il est exclusivement réservé à un usage domestique.
Ne l'utilisez pas dans un contexte professionnel.
Tout usage autre ou dépassant ce cadre est réputé
non conforme.
Matériel livré
▯ Tire-bouchon électrique
▯ 4 piles AA, 1,5 V LR6
▯ Coupe-capsule
(pouvant également servir de support)
▯ Mode d'emploi
REMARQUE
► Vérifiez directement après le déballage que
tout est bien complet.
► Retirez tous les éléments d'emballage.
Description de l'appareil
1Capuchon décoratif
2Compartiment à piles
3Verrouillage
4Touche
5Touche
6Coupe-capsule
7Spirale
Caractéristiques techniques
Alimentation en tension: 4 x 1,5 V
Consommation
électrique : 2,5 A
Type de piles: 1,5 V, mignon, AA, LR6

15
SKE 6 A1
FR
BE
Consignes de sécurité
AVERTISSEMENT ! RISQUE DE BLESSURE!
► Cet appareil ne doit pas être utilisé par des enfants de moins de 8 ans ni
par des personnes ayant des capacités physiques, mentales ou sensorielles
réduites ou qui n'ont pas l'expérience et les connaissances nécessaires,
à moins qu'elles ne soient sous la surveillance d'une personne responsable
de leur sécurité ou qu'elles n'aient reçu de cette personne des directives
concernant l'utilisation de l'appareil et qu'elles comprennent les dangers
pouvant en résulter.
► Ne pas laisser les enfants jouer avec l'appareil.
► Il est interdit aux enfants de nettoyer ou d'entretenir l'appareil sans surveillance.
► Faites attention au moment de manipuler la pointe du tire-bouchon et le
coupe-capsule.
AVERTISSEMENT!
Consignes de sécurité relatives à la manipulation des piles:
► Ne pas jeter de piles dans le feu. Ne pas recharger les piles.
Risque d'explosion et de blessures!
► N'ouvrez jamais les piles et n'essayez jamais de les braser ni de les souder.
Risque d'explosion et de blessures!
► Vérifiez régulièrement les piles. Des piles qui coulent peuvent causer des
dommages à l'appareil.
► Si vous n'utilisez pas l'appareil pendant une période prolongée, retirez les piles.
► Si les piles présentent des fuites, mettez des gants de protection. Nettoyez
le compartiment à piles et les contacts des piles à l'aide d'un chiffon sec.
► Conservez les piles hors de portée des enfants. Les enfants pourraient
mettre les piles dans leur bouche et les avaler. En cas d'ingestion d'une pile,
consulter immédiatement un médecin.
ATTENTION! RISQUE DE DÉGÂTS MATÉRIELS!
Ne plongez en aucun cas l'appareil dans l'eau ou d'autres liquides.

16 SKE 6 A1
FR
BE
Mise en place /
remplacement des piles
ATTENTION!
RISQUE DE DÉGÂTS MATÉRIELS!
► Lors de la mise en place des piles, veillez
toujours à respecter la polarité indiquée dans
le compartiment à piles !
► Utilisez toujours des piles de type Mignon
AA, LR6.
►Utilisez toujours des piles du même type.
1) Retirez le capuchon décoratif 1en le tournant
de telle manière que la flèche sur le capuchon
décoratif 1indique l'inscription "Open" sur
le tire-bouchon. Retirez ensuite le capuchon
décoratif 1.
2) Ouvrez le compartiment à piles 2 en tirant le
verrouillage 3vers vous et en déverrouillant
le compartiment à piles 2.
3) Retirez les piles usagées, si déjà en place.
4) Placez les nouvelles piles conformément à la
polarité figurant sur le couvercle du comparti-
ment à piles.
5) Fermez le compartiment à piles 2afin que le
verrouillage 3s'enclenche.
6) Insérez le capuchon décoratif 1de telle ma-
nière sur l'appareil que la flèche sur le capuchon
décoratif 1indique l'inscription "Open".
Tournez ensuite le capuchon décoratif 1de
telle manière que la flèche indique l'inscrip-
tion "Close". Le capuchon décoratif 1est à
présent à nouveau fermement enclenché sur
l'appareil.
Commande
REMARQUE
► Ne retirez pas de bouchons de champagne
à l'aide du tire-bouchon ! Ils peuvent en effet
rester coincés dans l'appareil.
Figure 1
1) Pour couper le manchon à feuille au-dessus du
bouchon
, veuillez utiliser le coupe-capsule
6
:
Posez le coupe-capsule
6
comme indiqué sur la
Figure 2
sur la bouteille de vin fermée.
2) Appuyez fermement avec le pouce et l'index.
Serrez fermement la bouteille de vin avec une
main pour éviter qu'elle ne se renverse.
Figure 2
3) Tournez la bouteille de vin de 360 degrés.
Il faudra éventuellement recommencer plusieurs
fois cette opération jusqu'à ce que vous puissiez
enlever la capsule du manchon à feuille.
✕✓

17
SKE 6 A1
FR
BE
4) Retirez ensuite le manchon à feuille coupé.
5) Serrez fermement la bouteille de vin avec une
main pour éviter qu'elle ne se renverse.
Posez le tire-bouchon sur la bouteille de vin.
Appuyez-le fermement dessus jusqu'à ce que
vous sentiez que la spirale 7pénètre sensible-
ment dans le bouchon.
6) Maintenez alors enfoncée la touche inférieure
5. La spirale 7est vissée dans le bouchon
et le tire ensuite du goulot de la bouteille.
Continuez de tenir fermement la bouteille de
vin et le tire-bouchon.
7) Ne relâchez la touche inférieure 5qu'une
fois que le bouchon a été complètement sorti
du goulot de la bouteille.
8) Retirez le tire-bouchon de la bouteille et tenez-le
avec son ouverture tournée vers le bas.
Appuyez ensuite sur la touche 4.
Le bouchon est alors extrait de l'intérieur du
tire-bouchon.
9) Relâchez la touche 4dès que le bouchon
tombe du tire-bouchon.
REMARQUE
► Vous pouvez utiliser le coupe-capsule 6
comme support pour le tire-bouchon :
insérez tout simplement le tire-bouchon dans
l'évidement sur la partie supérieure du coupe-
capsule 6. Le tire-bouchon bénéficie ainsi
d'une bonne assise.
Nettoyage et entretien
ATTENTION!
RISQUE DE DÉGÂTS MATÉRIELS!
Ne jamais plonger l'appareil dans de l'eau
ou d'autres liquides !
► N'utilisez pas de produits nettoyants abrasifs
ou agressifs. Ceux-ci peuvent en effet endom-
mager les surfaces!
■ Nettoyez le boîtier du tire-bouchon ainsi que le
coupe-capsule 6exclusivement à l'aide d'un
chiffon légèrement humidifié. En cas d'encras-
sement tenace, ajoutez quelques gouttes de
liquide vaisselle doux sur le chiffon humide.
Veillez à ce qu'aucune forme d'humidité ne
pénètre dans le tire-bouchon lors du nettoyage !
Entreposage
■ Veillez à bien nettoyer l'appareil avant de le
ranger.
■ Si vous n'utilisez pas l'appareil pendant une
durée prolongée, retirez les piles.
■ Conservez l'appareil nettoyé dans un endroit
sec, propre et exempt de poussières.
Dépannage
L'appareil ne fonctionne pas.
■ Les piles sont mortes/faibles.
–Mettre en place les nouvelles piles, comme
indiqué au paragraphe "Mise en place /
remplacement des piles“.
■ L'appareil est défectueux.
–Adressez-vous au service après-vente.
Other manuals for SKE 6 A1
1
This manual suits for next models
1
Table of contents
Languages:
Other Silvercrest Kitchen Utensil manuals

Silvercrest
Silvercrest SPW 1000 B2 User manual

Silvercrest
Silvercrest SKE 6 A1 User manual

Silvercrest
Silvercrest KH 1099 User manual

Silvercrest
Silvercrest KH 1219 User manual

Silvercrest
Silvercrest SMWS 1000 A1 User manual

Silvercrest
Silvercrest SKV 1200 A1 User manual

Silvercrest
Silvercrest SKE 3.6 A1 User manual
Popular Kitchen Utensil manuals by other brands

Ernesto
Ernesto 106724 Care and maintenance instructions

Prince Castle
Prince Castle Tomato Saber 943 Series Specifications

DS Produkte
DS Produkte Z 09744 instructions

Gaggenau
Gaggenau VG415315SG instruction manual

Beper
Beper 90.920A use instructions

Haushalt International
Haushalt International 26104 manual