Siren Siren 1GB User manual

User’s Guide

Unpacking
Siren Flash MP3 Player
Premium Earbuds
Carrying Case
Armband
AAA Battery
USB Cable
Installation CD
Quic Start Guide
Customer Service Card
Bonus Trac List
Cop yri g ht/T r ad emar ks
© 2006 Siren, Inc.. All rights reserved. Mar eted by Siren, Inc., San Jose, CA 95118.
Siren shall not be liable for any errors contained herein or for any damages arising out of or related to this document of the information
contained herein, even if Siren has been advised of the possibility of such damages. This document is intended for informational and
instructional purposes only. Siren reserves the right to ma e changes in the specifications and other information contained in this
document without prior notification. Siren disclaims any obligation to update the information contained herein. Siren is a registered
trademar of Siren, lnc.
MPEG Layer-3 audio coding technology licensed from Fraunhofer IIS and Thomson Multimedia.
This product is protected by certain intellectual property rights of Microsoft Corporation. Use or distribution of such technology outside
of this product is prohibited without a license from Microsoft or an authorized Microsoft subsidiary. Microsoft, Windows Media, and the
Windows Logo are trademar s or registered trademar s of Microsoft Corporation in the United States and/or other countries.
All other product names may be trademar s of the companies with which they are associated.
2

Table of Contents
1 - Getting Started
Welcome ..................................
4
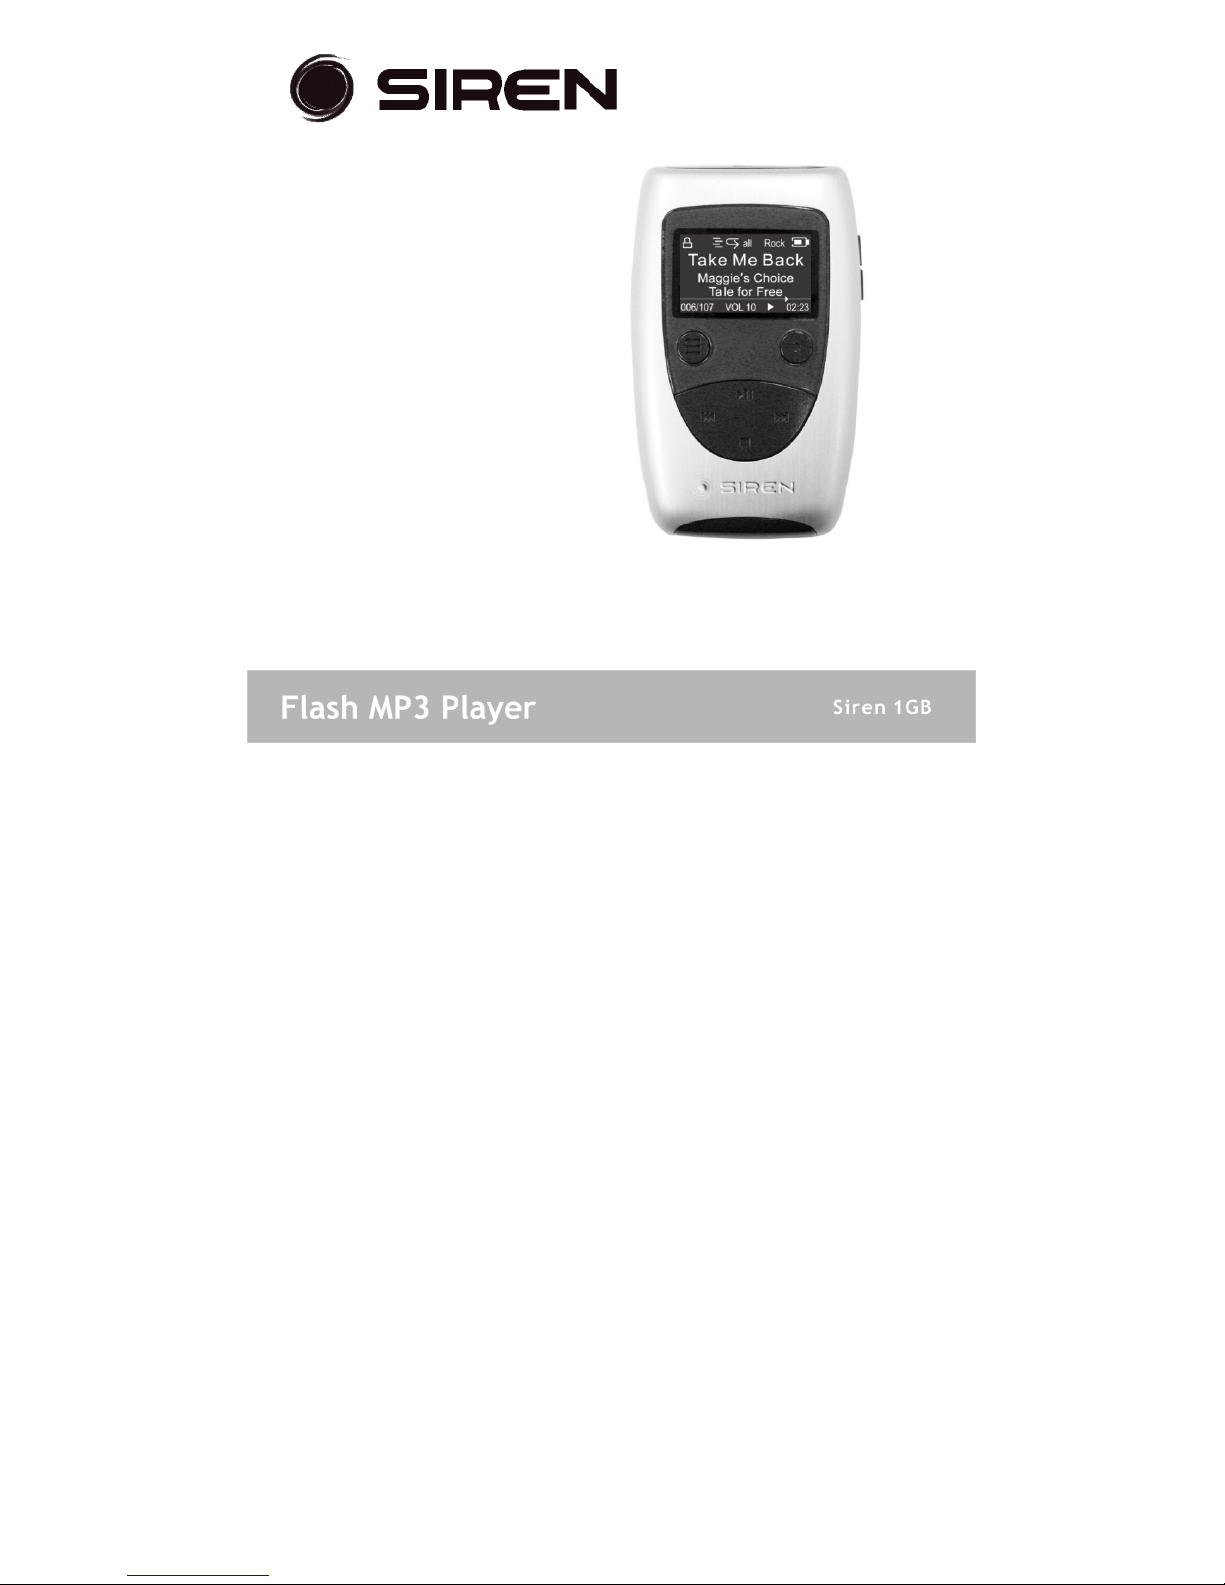
Player Overview ..........................
5
LCD Overview .............................
7
Inserting the Battery ....................
8
Connecting the Earbuds .................
8
Installing the Software ...................
9
2 - Loading Your Tunes
Connecting the Player to your
Computer .................................
10
Using Windows Media Player ...........
11
Adding Trac s to your Media Library ........ 13
Ripping Trac s from your CDs ............... 15
Transferring Trac s to the Player .......... 16
Using Other Music Management
Applications ...............................
17
Using the Player as a
Removable Drive .........................
18
Safely Disconnecting the Player ........
19
3 - Using the Player
Basic Operations .........................
20
Powering On the Player ..................... 20
Basic Playbac ................................ 20
Adjusting the Volume ....................... 20
Loc ing the Keys ............................. 20
About Menu Navigation ....................... 20
Main Menu Overview .....................
21
Playing Albums, Artists & Genres ......
22
Using the FM Tuner .....................
23
Switching to FM Tuner Mode .............. 24
Searching for FM Stations ................. 24
Saving Presets ............................... 24
Selecting Presets ........................... 24
FM Radio Recording & Playbac .......
25
Recording FM Broadcasts .................. 25
Playing Your FM Radio Recordings ........ 25
Voice Recording & Playbac ............
26
Recording Your Voice ...................... 26
Playing Your Voice Recordings ........... 26
Adjusting Equalizer Settings ...........
27
Setting the 5-Band Equalizer ............. 27
Selecting a Preset EQ Setting ............ 27
4 - Customizing Your Player
Inside the Settings Menu ...............
28
Shuffle/Repeat Options ................... 28
Power Saving Options ...................... 28
Contrast Options ............................ 29
Resume Playbac Options ................. 29
Player/Storage Information ............
29
About Firmware Upgrades ................ 29
5 - Need Help?
Troubleshooting .........................
30
Technical Specifications ...............
34
Siren Limited Warranty .................
36
Important Safety Instructions .........
38
Product Care .............................
39
FCC Compliance .........................
40
3

1 - Getting Started
elcome
Congratulations on your purchase of this Siren digital audi
o
player.
This slee , elegant unit fits in the palm of your hand and plays all your favorite MP3 and
WMA files. It even doubles as a recordable FM tuner and voice recorder.
Cool Features
MP3 and WMA playbac
PC & Mac support
Slee , small and elegant
128x64 Mono Bac lit LCD
1GB
SD/MMC Expansion slot
FM Tuner / FM Recording / Voice Recording
5 Band Adjustable EQ with Presets
up to 16 hours of battery life
Premium Earbuds
USB 2.0 Compatible
4

Player Overview
1
Stereo Hea dp hone J ack -
Connects to the supplied earbuds or other headphones
equipped with a 1/8” (3.5mm) stereo mini-plug.
2
LCD Sc reen -
Displays the current status of the player; see page 7.
5

3
Control Pad - Controls playbac and selects menu options:
PLAY/PAUSE - Starts and pauses playbac .
STOP - Stops playbac .
PREV - S ips to the previous trac (or to the start of the current trac ). Press
and hold to scan bac ward.
NEXT - S ips to the next trac . Press and hold to scan forward.
4
Battery Cover - Remove to install a single AAA battery (al aline or NiMH).
5 PO ER Button - Turns the player on. Press and hold to turn the player off.
6 HOLD Switch - Loc s the controls to prevent accidental operation.
7 VOLUME +/- Buttons - Adjust the volume.
8 MENU Button -Displays the player’s main menu.
9
ENTER - Ma es selections in the menu system.
10
Mini-USB Port- Connects the player to your computer using the supplied USB cable.
6

LCD Overview
Indicators:
1 EQ Setting - Displays current EQ mode (Normal, Roc , etc.)
2 Shuffle - Displays current Shuffle mode (On or Off).
3 Repeat - Displays current Repeat mode (Repeat One, Repeat All, or Off).
4 Hold - Displays current Hold status (On or Off).
5 Battery Level - Displays current Battery status (Full, Medium or Low).
6 Trac Info - Displays current Title, Artist, and Album.
7 Progress Bar - Graphically displays elapsed playbac time.
8 Trac Status - Displays:
Elapsed Time
Playbac Status Icon (Play, Pause, Stop, etc.)
Volume Level
Current Trac Number/Total Number of Trac s
6

In s e rt i n g the Batte r y
1 Remove the battery cover as shown
2 Insert the supplied AAA battery, paying attention to the correct polarities
(+ and -).
3 Replace the cover.
Conn e ct i ng t he Ea r b u d s
Connect the supplied earbuds as shown.
6

System Requirements
— Intel Pentium® II 300 MHz or
above
— 128 MB RAM minimum
— 150 MB available hard
drive space
— USB port
— CD-ROM drive
— Operating Systems
— Supported: Windows
98SE/ME/2000/XP/Mac OS X
Please note: This player does not support the playbac of playlists. You will be able
to transfer playlist songs to your player and play them li e any other song on your
player, but referencing the songs by specific playlist name is not supported.
Installing the Software
If you are running Windows 98SE please
first install the required drivers found on
the enclosed CD before your connect your
Siren player.Turn on your computer and
insert the CD in the CD-ROM drive.
No driver installation is required for
Windows ME/2000/XP or Mac OS X.
Chec out the on line User’s Guide on the CD.
6

2 - Loading Your Tunes
Connecting the Player to your Computer
In order to download trac s to the player, you must first connect the player to your PC
or Mac using the supplied USB cable.
1 Connect the smaller end of the supplied USB cable to the mini-USB port on the
player as shown.
2 Connect the larger end of this cable to any available USB port on your computer.
The player will power on automatically.
If this is the first time you have connected the player to a PC running
Windows ME, 2000, or XP, your PC will detect “New hardware” and install
the required drivers automatically.
3 The USB icon appears on the player’s LCD screen.
4 You’re now ready to load your tunes...
Notic e For ind ows 98S E Us ers
• If you connect the player to a PC running Windows 98SE, you must first
install the Windows 98SE driver; see page 9.
6

Using indows Media Player
You can use Windows Media Player 9.0 and 10 to manage your music files, copy trac s
from your audio CDs, transfer trac s to the player, and more. The following is an
overview of the options on the Windows Media Player tas bar:
indows Media Player 9:
1 Now Playing - Watch/listen to currently playing media.
2 Media Guide - Search for media (music, movies, etc.) online.
3 Copy from CD - Burn CD Audio trac s to WMA format.
4 Media Library - Create playlists and manage your media files.
5 Radio Tuner - Tune into streaming radio stations.
6 Copy to CD or Device - Copy trac s to your player or to a recordable CD.
7 Premium Services - Subscribe to an online music service, where you can browse and
purchase trac s for your player.
8 Skin Chooser - Choose a loo and feel for your Windows Media Player.
6

1 2 3 4 5 6
1 N o w P l a y i n g - Watch/listen to currently playing media.
2 L i b r a r y - Create playlists and manage your media files.
3 R i p - Copy CD Audio trac s to WMA format.
4 B u r n - Copy MP3/WMA trac s to a recordable CD.
5 S y n c - Copy MP3 or WMA trac s to your player.
6 G u i d e - Search for media (music, movies, etc.) online.
indows Media Player 10:
6

Ad d i n g T r a c k s t o y o u r M e d i a L i b r a r y
Windows Media Player will automatically gather all MP3 and/or WMA files on your PC into a
media library, where they can be played, edited, burned to CD, or copied to your digital audio
player.
indows Media Player 9:
1 Clic Tools > Search for Media Files (or press F3).
2 In the “Add to Media Library by Searching Computer” dialog box, browse to the
drive and folder where your music files are stored.
3 Clic Search.
4 Windows Media Player will automatically add all trac s in the selected folder(s)
to your media library.
5 When searching is complete, clic Close.
6

1 Clic Tools > Search for Media Files (or press F3).
2 In the“Loo in”: dialog box, browse to the drive and folder where your music files are
stored.
3 Clic Search.
4 Windows Media Player will automatically add all trac s in the selected folder(s) to your
library.
5 When searching is complete, clic Close.
indows Media Player 10:
6

Ripping Tracks from your CDs
You can also use Windows Media Player to build your music library by encoding your
Audio CD's to music files.
Windows Media Player 9:
1 Insert an Audio CD.
2 Clic Copy from CD.
The contents of the CD will be displayed.
By default, all trac s are chec ed.
3 Unchec any trac you do not want to
encode into a music file.
4 Clic the Copy Music button to begin
encoding the selected trac s.
NOTE: You can change your trac encoding options by selecting Tools > Options >
Copy Music.
5 When finished, Windows Media Player will automatically add the new trac s to
your media library.
indows Media Player 10:
1 Insert an Audio CD.
2 Clic Rip.
The contents of the CD will be displayed.
By default, all trac s are chec ed.
3 Unchec any trac you do not want to
encode into a music file.
4 Clic the Rip Music button to begin encoding the selected trac s.
NOTE: You can change your trac encoding options by selecting Tools > Options > Rip
Music.
5 When finished, Windows Media Player will automatically add the new trac s to
your library.
6

Transferring Tracks to the Player
To copy files from your PC to the player:
indows Media Player 9:
1 Ma e sure the player is powered on and connected to
your PC using the supplied USB cable.
2 Clic Copy to CD or Device.
3 Under "Items on Device” select "Removable Dis " to
view the contents of the player.
4 Under "Items to Copy", browse to the folder containing the trac s you want to
add to the player.
5 Clic the chec box(es) next to the desired trac name(s).
6 Clic Copy.
7 The selected trac (s) are copied to the player.
When you're finished copying files, see page 19 to safely unplug the player.
indows Media Player 10:
1 Ma e sure the player is powered on and connected to
your PC using the supplied USB cable.
2 Clic Sync.
3 Clic Edit Playlist to add trac s to transfer to your
player. Clic OK once all desired trac s have been added.
4 You should now see the trac s you wish to transfer to
your player listed and chec ed on the left side of the
Windows Media Player screen under " Sync List ". If you
wish to not transfer any of the listed trac s, unchec them.
6 Clic Start Sync.
7 The selected trac (s) are copied to the player.
When you're finished copying files, see page 19 to safely unplug the player.
6

Using Other Music Management Applications
• NOTE: Many online music stores offer their own music management applications,
which may or may not be compatible with the player. The player supports playbac
of MP3, WMA, and WMA DRM files. WMA DRM music files must be copied to the
player via Windows Media Player or the music management software compatible
with your online music store.
The player is NOT compatible with iTunes.
6

Using the Player as a Removable Drive
If you prefer, you can simply drag and drop files to the player, which appears as a
removable hard drive on your PC or Mac. Using this method, any type of file
(homewor , presentations, pictures, etc. ) can be placed on the player as if it
were a portable drive. Only MP3 and WMA files will playbac while stored on the
player, however.
NOTE: The player will not play DRM-protected files (such as those purchased from
online music stores) unless they are copied to the player via Windows Media player or
the music management software compatible with your online music store.
1 Ma e sure the player is powered on and connected to your computer using the
supplied USB cable.
2 Double-clic the “My Computer” icon on your Windows des top.(Note: Windows
XP users may need to clic the Start button and select “My Computer” from the
menu).The player appears as
a “Removable Dis ” icon with its
own drive letter. If a memory card
has been installed, this additional
card will show up as an additional
drive.On a Mac, the player appears
as a drive on the des top.
3 Double-clic the dis icon to view
its contents.
4 Drag and drop your music files
from your computer to the player.
You can also copy and paste files to
the player using any standard
Windows method.
5 When you’ve finished copying
files, see page
19
to safely
unplug the player.
6

Safely Disconnecting the Player
If you are using Windows ME/2000/XP, it is recommended that you safely unplug the player
as follows:
1 Double-clic the “Safely Remove Hardware” icon in the Windows toolbar.
2 Select the player from the list of Hardware Devices.
3 Clic Stop.
4 Clic OK to confirm.
5 Clic Close.
6 It is now safe to unplug the player from your
PC.
• NOTE: Ma e sure all file transfers are
complete before disconnecting the player.
6

3 – Using The Player
Basic Operations
Powering On the Player
To turn on the player, press POWER button .
To turn off the player, press and hold POWER button .
Basic Playback
To play the current trac , press PLAY/PAUSE .
To pause playbac , press PLAY/PAUSE again.
To stop playbac , press STOP .
To s ip to the previous trac (or to the start of the current trac ), press PREV .
To s ip to the next trac , press NEXT .
To scan bac ward within a trac , press and hold PREV .
To scan forward within a trac , press and hold NEXT .
Adjusting the Volume
To adjust the volume, press VOLUME+/-.
20
Other manuals for Siren 1GB
1
Other Siren MP3 Player manuals