Sitex SP-110 User manual

SP-110 Autopilot
OPERATION
www.si-tex.com
SP-110-SS30 210/25/2011
Warning!
WHEN USING THE AUTOPILOT AN ADEQUATE WATCH SHOULD BE
MAINTAINED AT ALL TIMES.
THE AUTOPILOT MUST BE PLACED IN MANUAL MODE WHEN EVER
THE VESSEL IS STATIONARY
THE AUTOPILOT SHOULD NOT BE USED WHILE NAVIGATING IN
RESTRICTED WATERS
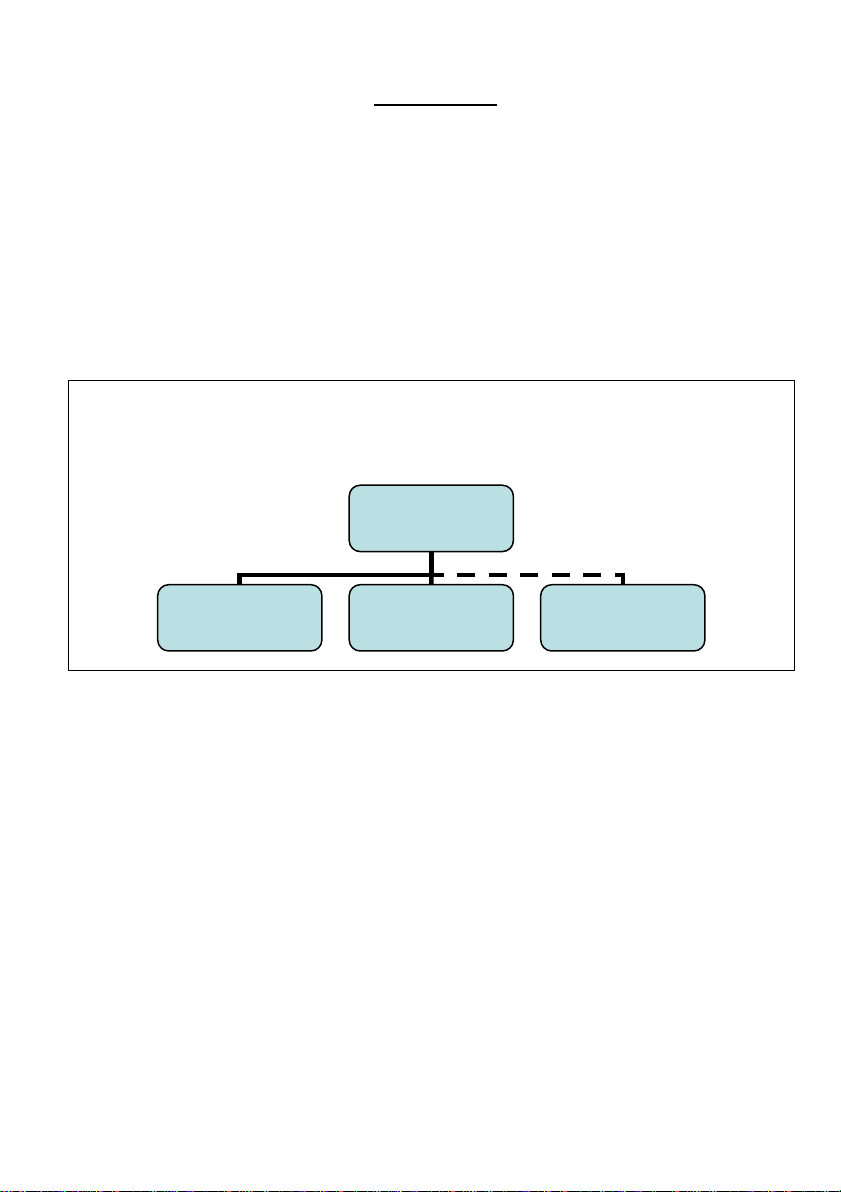
SP-110 System Block Diagram
*Dashed line only applicable for SP-110R when rudder feedback unit (RFU) is
required.
Refer to Installation & Service Manual for information on installation of autopilot
system and interconnection diagrams.
SP-110
Display
Compass
Drive
Unit
RFU

SP-110-SS30 310/25/2011
Basic Operation –Non Rudder Feedback Version
Switch on power to autopilot. Display shows boat heading - example H123. MANUAL
light (LED) will be on. Steer vessel to course.
To engage autopilot for automatic steering:
Press AUTO. Display will show heading for autopilot to steer - example A123. AUTO
light (LED) will be on.
Press ◄ to adjust course to port. Press ► to adjust course to starboard
To disengage autopilot for manual steering:
Press AUTO. Display will show boat heading. MANUAL light on
To set rudder response (rudder angle ratio)
Press MODE. Display will show a number - example r 05.
Press ► to increase rudder setting. Press ◄ to decrease setting.
3 seconds after adjustment pilot will return display to normal.
To switch LCD back light on or off.
Press MODE MODE
Press ◄ or ► to turn light on. Press ◄ or ► again to turn light off.
To return pilot to normal continue pressing MODE.
Waypoint Steering
Note: Before engaging waypoint steering mode, a route or destination must
be programmed and selected in the GPS plotter for the autopilot to follow
To engage waypoint steering:
Press both AUTO and MODE buttons together. GPS light will be on.
The autopilot will lock on to “course to steer” as requested by the GPS plotter.
Displays shows bearing to waypoint (BTW).
If no GPS data is received by the SP-110, “NO GPS DATA” alarm will function. Both
GPS and ALARM lights will flash on and off.
To disengage GPS mode:
Press AUTO button. Pilot will return to MANUAL operation.
.

SP-110-SS30 410/25/2011
Basic Operation –Rudder Feedback Version
Switch on power to autopilot. Display shows boat heading - example H123. MANUAL
light (LED) will be on. Steer vessel to course.
To engage autopilot for automatic steering:
Press AUTO. Display will show heading for autopilot to steer - example A123. AUTO
light (LED) will be on.
Press ◄ to adjust course to port. Press ► to adjust course to starboard
To disengage autopilot for manual steering:
Press AUTO. Display will show boat heading. MANUAL light on
To set sensitivity (course deadband):
Press MODE. Display will show a number - example: S 04
Press ◄ to decrease sensitivity. Press ► to increase. Low number = narrow deadband.
High number = wide deadband
3 seconds after adjustment pilot display reverts to normal.
To set rudder response (rudder angle ratio):
Press MODE - MODE. Display will show a number - example r 05
Press ► to increase rudder setting. Press ◄ to decrease setting.
Low number = small rudder angle. High number = large rudder angle.
3 seconds after adjustment pilot display reverts to normal.
To view rudder angle:
Press MODE - MODE –MODE:
Display shows rudder angle position –example Pt 02 (2º port rudder)
Display will change with rudder movement.
To return pilot to normal continue pressing MODE
To switch LCD back light on or off:
Press MODE - MODE –MODE –MODE:
Press ◄ or ► to turn light on. Press ◄ or ► again to turn light off.
To return pilot to normal continue pressing MODE.
For waypoint steering refer page 3.

SP-110-SS30 510/25/2011
Jog Steering
Switch on power to autopilot. Display shows boat heading - example H123. MANUAL
light (LED) will be on.
To operate steering:
Press ◄ to turn rudder to port. Press ► to turn rudder to starboard.
NOTE. Do not press either ◄ or ► for more than 4 seconds as the rudder
may drive hard over into the stops. Driving the steering into the physical
stops will damage your autopilot
Wind Operation
ATTENTION! Wind operation is available only if wind data is supplied from a wind
system which provides NMEA output - $**MWV. If the wind data is interrupted for
more than 10 seconds, the pilot returns to basic operation mode ( MANUAL).
Switch on power to autopilot. Display shows boat heading - example H123. MANUAL
light (LED) will be on. Steer vessel to course.
To engage Wind mode:
Press ◄and ► buttons together. Display shows relative* wind direction –example
P030 - this indicates wind direction at 030º on the port bow. –example S030 - this
indicates wind direction at 030º on starboard bow.
* Depending on boat speed. If boat has speed forward then wind is apparent
Steer boat to initial tack course.
Press AUTO to engage autopilot.
Example 1. Wind direction is 045º on port side display shows P045. Press ◄ for 3
seconds. Boat will alter course (tack) until wind direction is at 045º starboard and
display will show S045. Total tack angle is 90º.
Example 2. Wind direction is 035º on starboard side display shows S035.
Press ► for 3 seconds. Boat will alter course (tack) until wind direction is at 035º on
port side and display will show P035. Tack angle is 70º.
Tack angle can be adjusted in small amounts by pressing ◄ or ► momentarily. Each
press alters angle by 1º in relevant direction. Maximum tack angle recommended is for
wind direction of 045º port to 045º starboard.

SP-110-SS30 610/25/2011
GPS as a Heading Source (no Compass)
A compass is not used with this system.
Display will show COG heading from GPS –example C123. If a compass is
reconnected the display will change to compass heading –example H123.
Refer to Basic Operation pages 3 or 4 to use the pilot.
Basic Trouble Shooting
Display does not indicate
Check supply voltage is 12 volts DC (Red and Black)
Check in-line fuse
Display shows heading but rudder does not move when AUTO is selected
Check MANUAL light is on.
Press AUTO. Check AUTO light is on
Check voltage at the motor connections (yellow & yellow/black wires) when ◄ or
► is pressed several times.
Check motor or pump set wiring
Check motor brushes
Check the hydraulic system:
1. Ensure there is sufficient hydraulic fluid.
2. Purge the system of possible air locks / contamination.
3. Ensure that any flow restricting valves are not completely closed.
4. Check all pipe connections for leaks.
Autopilot cannot be used in Wind Steering Mode
Check Wind Speed & Direction system is switched on
Check wire connections from wind system to autopilot
If any fault cannot be found, consult your dealer.

SP-110-SS30 710/25/2011
Warranty
SI-TEX products are thoroughly inspected and tested before shipment from
the factory and are warranted to be free of defects in workmanship and
materials for a period of one year from the date of shipment from the factory.
This warranty is extended to and is solely for the benefit of the original
consumer purchaser.
All units in need of repair will be repaired without charge to the purchaser
during the above mentioned period in accordance with the following terms and
conditions:
1. The defective unit is returned "freight prepaid" to Si-Tex Marine
Electronics 25 Enterprise Zone Drive, Suite #2 Riverhead, NY 11901.
2. Proof of purchase is supplied and original Serial Numbers on
equipment have not been changed.
3. Information is provided regarding the nature of the failure or problem
occurring.
4. A return address is supplied to enable the equipment to be returned
by road freight. Any other means of transport will be charged to the
customers account and must be paid in advance.
This warranty does not cover defects or damages caused by unauthorised
service or damage through accident, misuse or abuse. The owner is also
responsible for providing reasonable maintenance and weather protection
of the equipment.
SI-TEX shall not be liable for damage or loss incurred resulting from the
use and operation of this product. SI-TEX reserves the right to make
changes or improvements to later models without incurring the obligation
to install similar changes to equipment already supplied. Some states do
not allow the exclusion or limitation of incidental or consequential
damages; therefore the above limitations or exclusions may not apply to
you. This warranty gives you specific legal rights and you may also have
other rights, which vary from state to state.
Additional Information Refer to SI-TEXwebsite
Other manuals for SP-110
2
Table of contents
Other Sitex Autopilot System manuals


