Sitex T-760 Series User manual

MARINE RADAR
EQUIPMENT
INSTRUCTION
MANUAL


i
FIRST-AID TREATMENTS
Procedure for cardiopulmonary resuscitation (CPR) using the AED
(Automated External Defibrillator)
A person is collapsing.
- Secure the safety of the surrounding area.
- Prevent secondary disasters.
Check for response.
- Call while tapping the shoulder.
Breathing
Recovery position
- Lay the injured or
ill person on
his/her side and
wait for the arrival
of the emergency
services.
Not responding
Ask for help.
- Make an emergency call.
Call an ambulance ( 911,119,112,999 etc)
- Ask to bring an AED.
Listen to the appeal of the
injured or ill person and give
the necessary first-aid
treatment.
Responding
Not breathing
Give 2 rescue breaths; omittable Note(1)
Give CPR.
- 30 chest compressions
- Give 2 rescue breaths; omittable Note(1)
Note(1) Omission of rescue breathing:
If there is a fear of infection because the
injured or ill person has an intraoral injury,
you are hesitant about giving mouth-to-mouth
resuscitation, or preparing the mouthpiece for
rescue breathing takes too long, omit rescue
breathing and proceed to the next step.
Open the airway.
- Check for breathing.
Arrival of an AED
- Turn on the power.
- Use the AED by following its voice prompts.
Fitting of the electrode pads, etc.
Automatic electrocardiogram
analysis
- Do not touch the injured or ill
person.
Electric shock is needed.
Electric shock is not needed.
Delivery of electric shock
Resume CPR from chest
compressions by following the
voice prompts of the AED.
When the injured or ill
person has been
handed over to the
emergency services or
has started moaning or
breathing normally, lay
him/her on his/her side
in a recovery position
and wait for the arrival
of emergency services.
When to
stop CPR
A person is collapsing.
- Secure the safety of the surrounding area.
- Prevent secondary disasters.
The AED
automatically
analyzes the
heart rhythm
every 2 min.
FIRST-AID TREATMENTS
ii
Procedure for Cardiopulmonary Resuscitation (CPR) Using the AED
(Automated External Defibrillator)
1.Check the scene for safety to prevent secondary disasters
a) Do not touch the injured or ill person in panic when an accident
has occurred. (Doing so may cause electric shock to the
first-aiders.)
b) Do not panic and be sure to turn off the power. Then, gently
move the injured or ill person to a safe place away from the
electrical circuit.
2.Check for responsiveness
a) Tap the shoulder of the injured or ill and shout in the ear saying, "Are you OK?"
b) It the person opens his/her eyes or there is some response or gesture, determine it as
"responding." But, if there is no response or gesture, determine it as "not responding."
3.If responding
a) Give first-aid treatment.
4.If not responding
a) Ask for help loudly. Ask somebody to make an emergency 119
call and bring an AED.
•Somebody has collapsed. Please help.
•Please call an ambulance. (Call 911,119,112,999 etc. by local number)
•Please bring an AED.
•If there is nobody to help, call an ambulance by yourself.
5.Open the airway
a) Touch the forehead with one hand. Lift the chin with the two
fingers of the middle finger and forefinger of the other hand and
push down on the forehead as you lift the jaw to bring the chin
forward to open the airway. If neck injury is suspected, open the
airway by lifting the lower jaw.
6.Check for breathing
a) After opening the airway, check quickly for breathing for no more
than 10 seconds. Put your cheek down by the mouth and nose
area of the injured or ill person, look at his/her chest and abdomen, and check the following
three points.
•Look to see if the chest and abdomen are rising and falling.
•Listen for breathing.
•Feel for breath against your cheek.
Are you OK?
Please call 911.
Please bring an AED.
iii
FIRST-AID TREATMENTS
b) If the injured or ill person is breathing, place him/her in the recovery
position and wait for the arrival of the emergency services.
•Position the injured or ill person on his/her side, maintain a clear and
open airway by pushing the head backward while positioning their
mouth downward. To maintain proper blood circulation, roll him/her
gently to position them in the recovery position in the opposite
direction every 30 minutes.
7.Give 2 rescue breaths (omittable)
a) If opening the airway does not cause the injured or ill person to
begin to breathe normally, give rescue breaths.
b) If there is a fear of infection because the injured or ill person has an
intraoral injury, you are hesitant about giving mouth-to-mouth
resuscitation, or getting and preparing the mouthpiece for rescue
breathing takes too long, omit rescue breathing and perform chest
compressions.
c) When performing rescue breathing, it is recommended to use a
mouthpiece for rescue breathing and other protective devices to
prevent infections.
d) While maintaining an open airway, pinch the person's nose shut
with your thumb and forefinger of the hand used to push down the
forehead.
e) Open your mouth widely to completely cover the mouth of the injured or ill person so that no
air will escape. Give rescue breathing twice in about 1 second and check if the chest rises.
8.Cardiopulmonary resuscitation (CPR) (combination of chest compressions and
rescue breaths)
a) Chest compressions
1) Position of chest compressions
•Position the heel of one hand in the center of the chest, approximately between the nipples,
and place your other hand on top of the one that is in position.
Roll gently in the opposite
Mouthpiece for
CPR mask
FIRST-AID TREATMENTS
iv
2) Perform chest compressions
•Perform uninterrupted chest compressions of
30 at the rate of about 100 times per minute
•While locking your elbows positioning yourself
vertically above your hands.
•With each compression, depress the chest wall to a depth of approximately 4 to 5 cm.
b) Combination of 30 chest compressions and 2 rescue
breaths
1) After performing 30 chest compressions, give 2 rescue
breaths. If rescue breathing is omitted, perform only chest
compressions.
2) Continuously perform the combination of 30 chest
compressions and 2 rescue breaths without interruption.
3) If there are two or more first-aiders, alternate with each
other approximately every two minutes (five cycles of compressions and ventilations at a
ratio of 30:2) without interruption.
9.When to stop cardiopulmonary resuscitation (CPR)
a) When the injured or ill person has been handed over to the
emergency services
b) When the injured or ill person has started moaning or breathing
normally, lay him/her on his/her side in a recovery position and
wait for the arrival of emergency services.
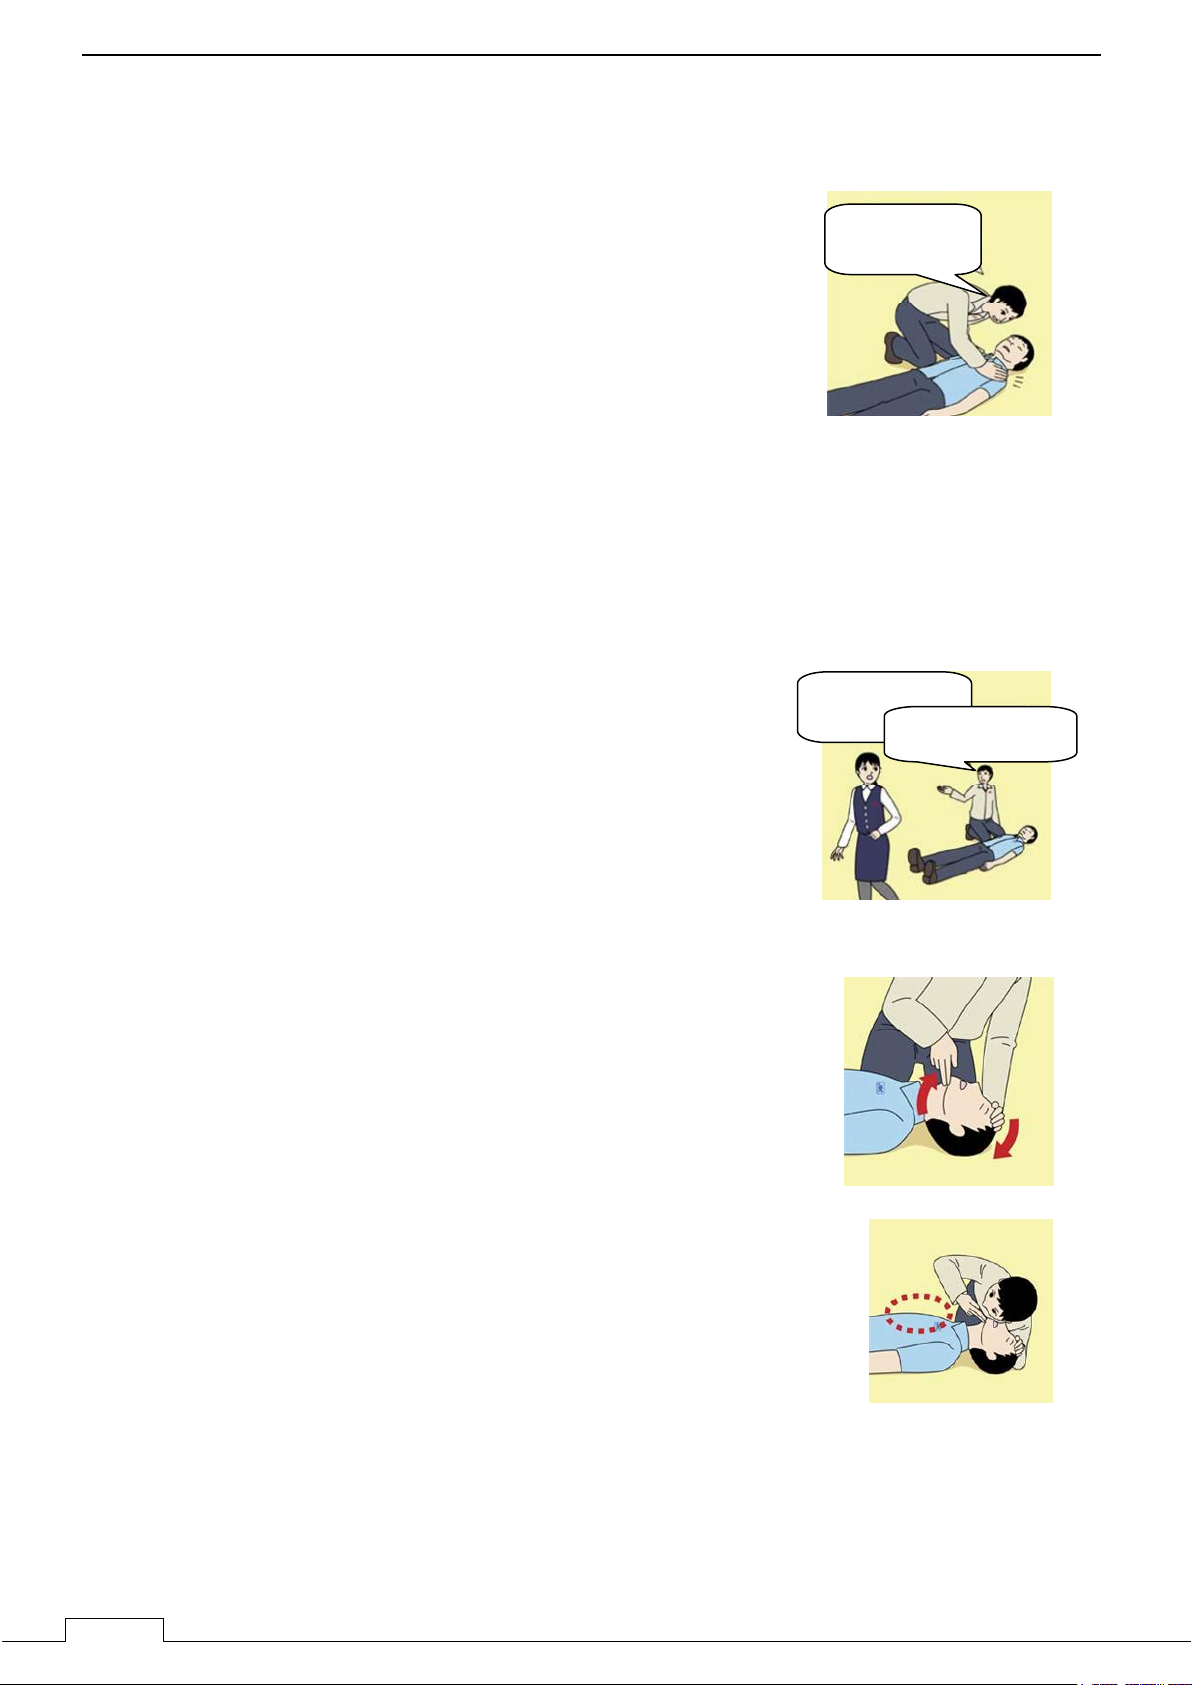
10.Arrival and preparation of an AED
a) Place the AED at an easy-to-use position. If
there are multiple first-aiders, continue CPR
until the AED becomes ready.
b) Turn on the power to the AED unit.
Depending on the model of the AED, you
may have to push the power on button, or the AED automatically turns on when you open
the cover.
c) Follow the voice prompts of the AED.
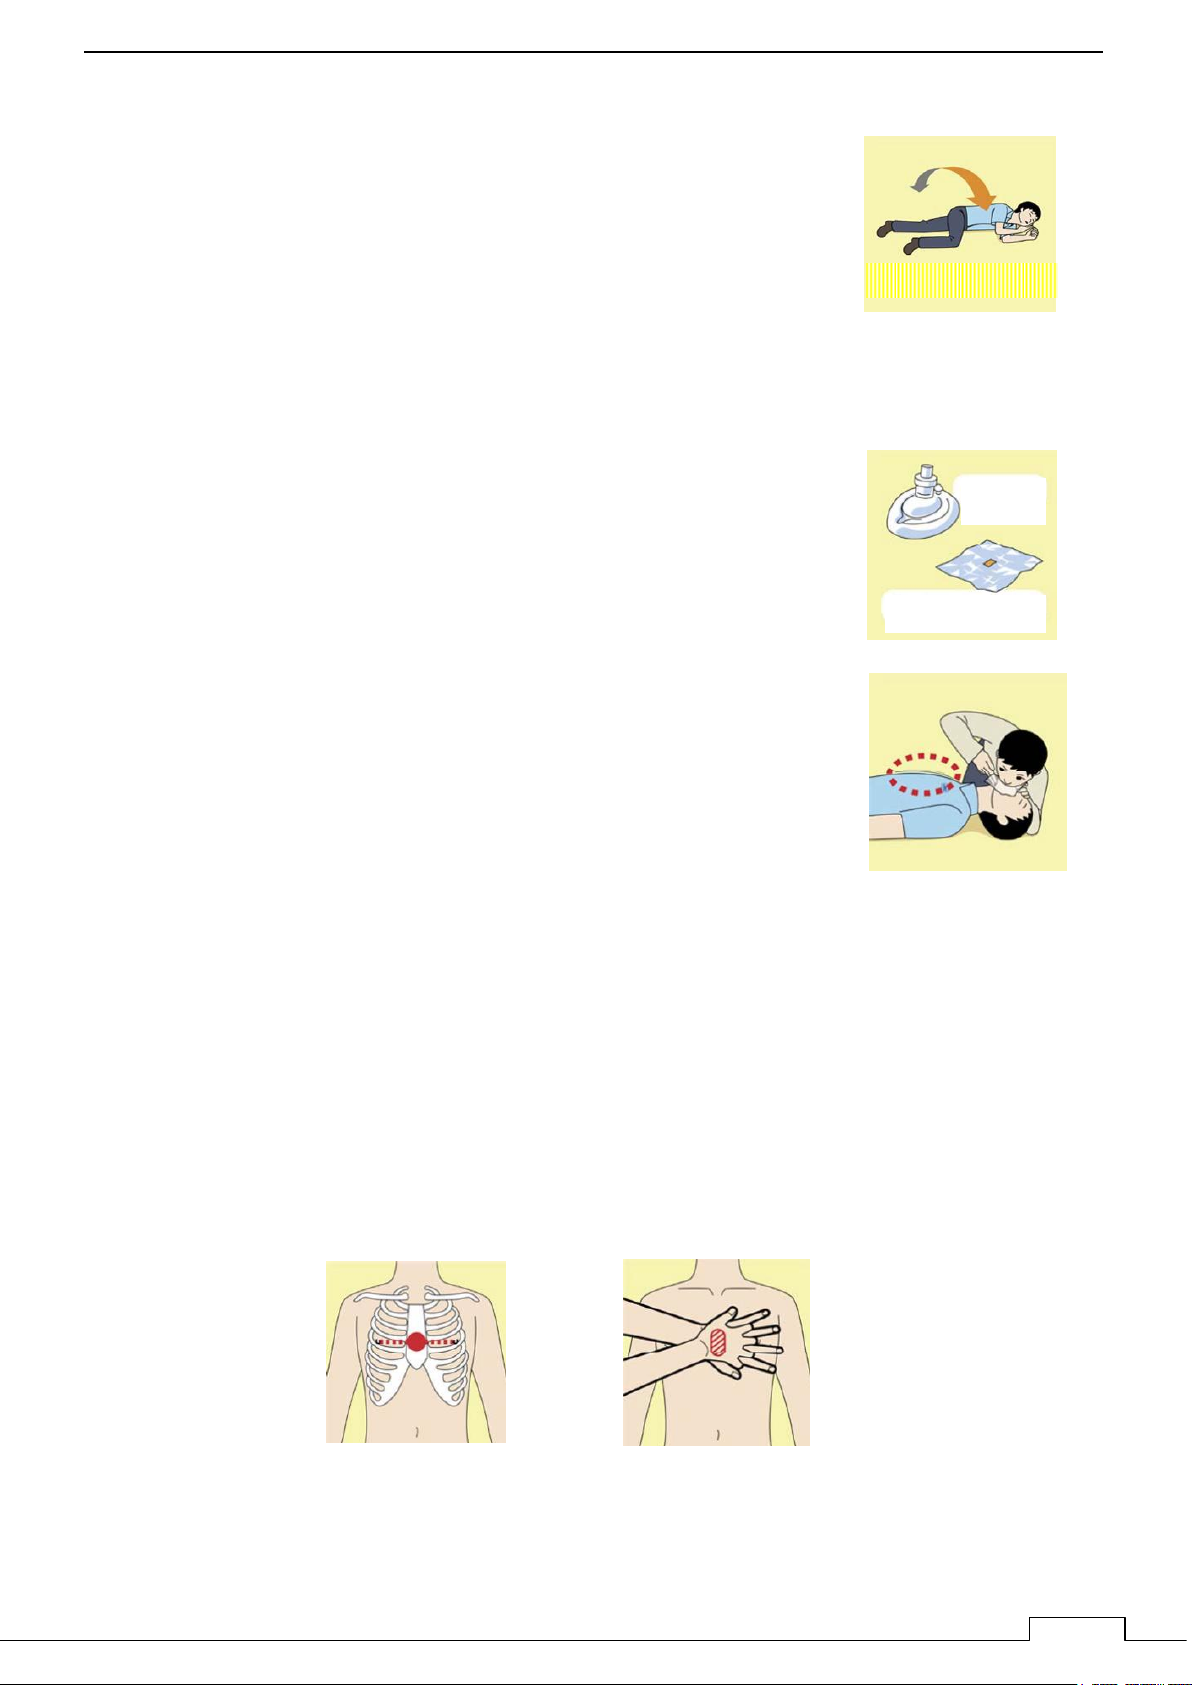
11.Attach the electrode pads to the injured or ill person's bare chest
a) Remove all clothing from the chest, abdomen, and arms (male or
female).
b) Open the package of electrode pads, peel the pads off and
securely place them on the chest of the injured or ill person, with
the adhesive side facing the chest. If the pads are not securely
30 times
Compress
with these
parts (the
heels of
both
hands).
2 times
Turn on the power.
v
FIRST-AID TREATMENTS
attached to the chest, the AED may not function. Paste the pads
exactly at the positions indicated on the pads, If the chest is wet
with water, wipe dry with a dry towel and the like, and then paste
the pads. If there is a pacemaker or implantable cardioverter
defibrillator (ICD), paste the pads at least 3cm away from them. If a
medical patch or plaster is present, peel it off and then paste the pads. If the injured or ill
person's chest hair is thick, paste the pads on the chest hair once, peel them off to remove
the chest hair, and then paste new pads.
c) Some AED models require to connect a connector by following voice prompts.
d) Do not put child pads on adults (older than 8 years).
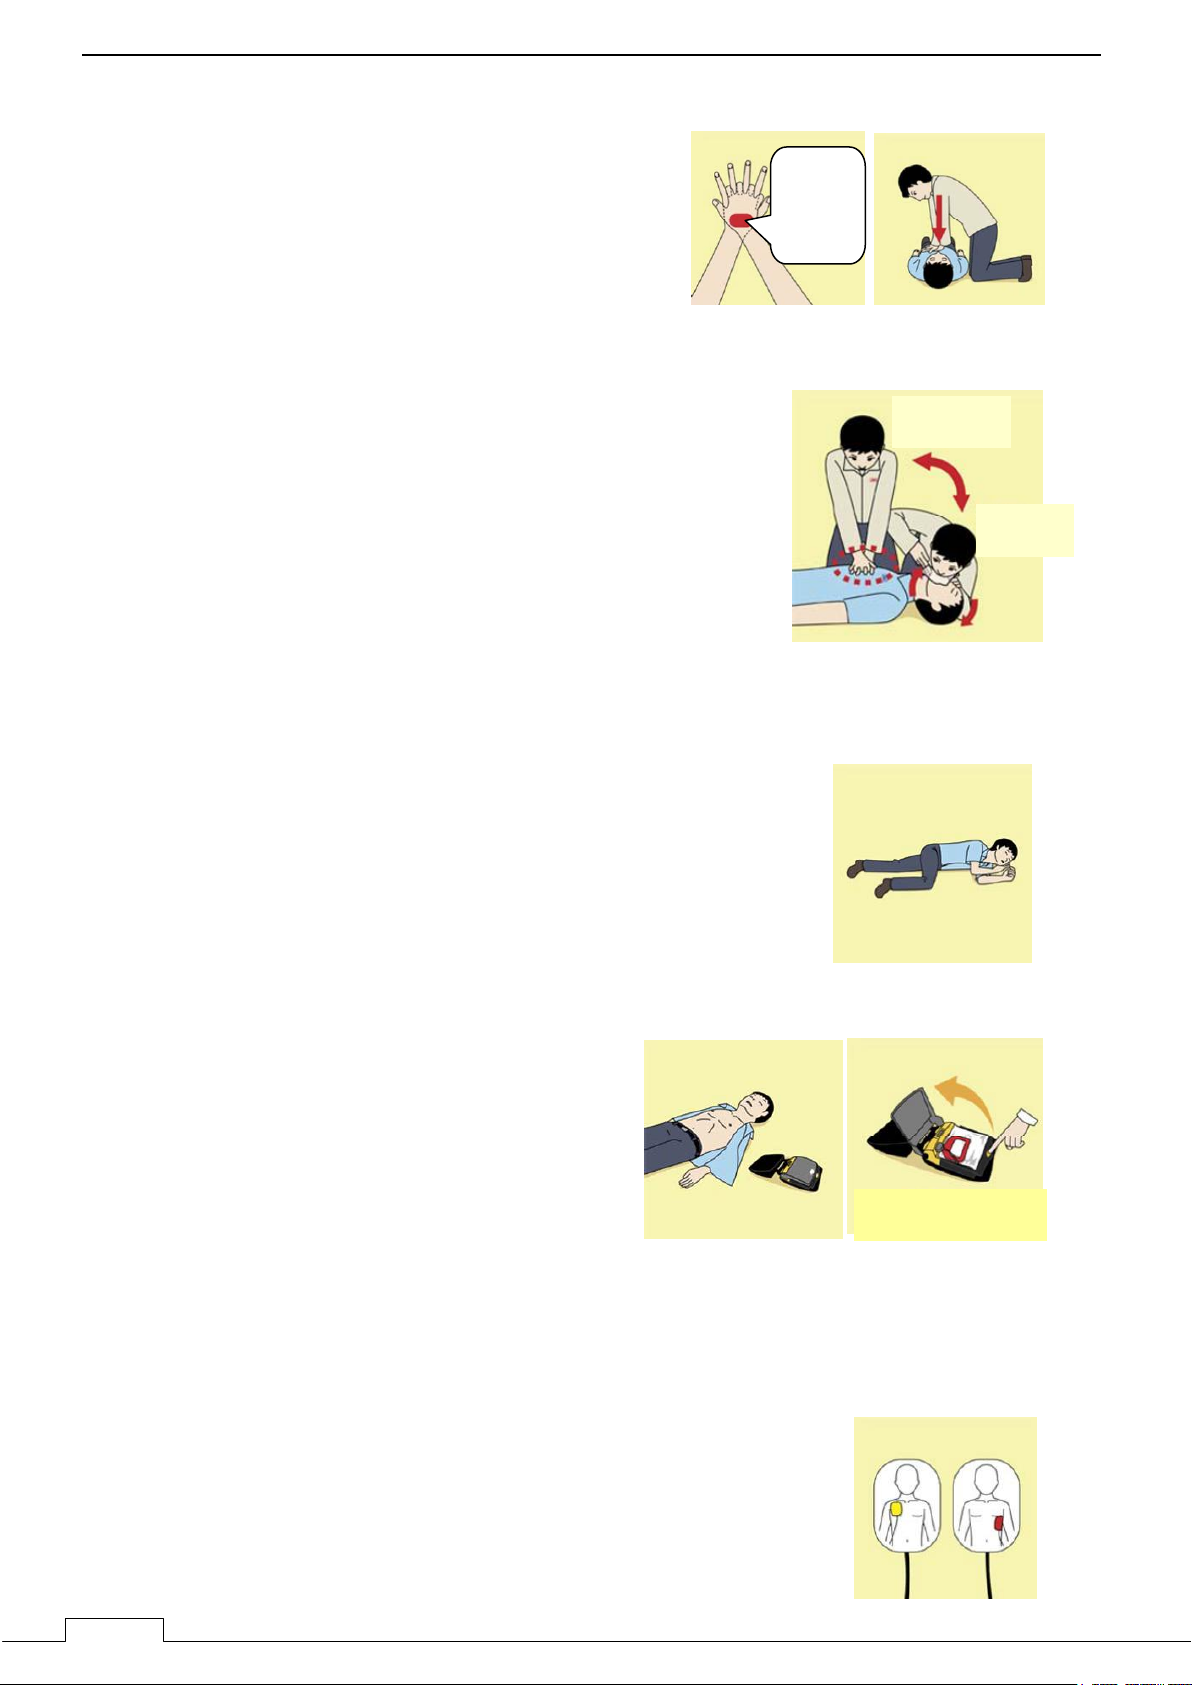
12.Electrocardiogram analysis
a) The AED automatically analyzes electrocardiograms. Follow the
voice prompts of the AED and ensure that nobody is touching the
injured or ill person while you are operating the AED.
b) On some AED models, you may need to push a button to
analyze the heart rhythm.
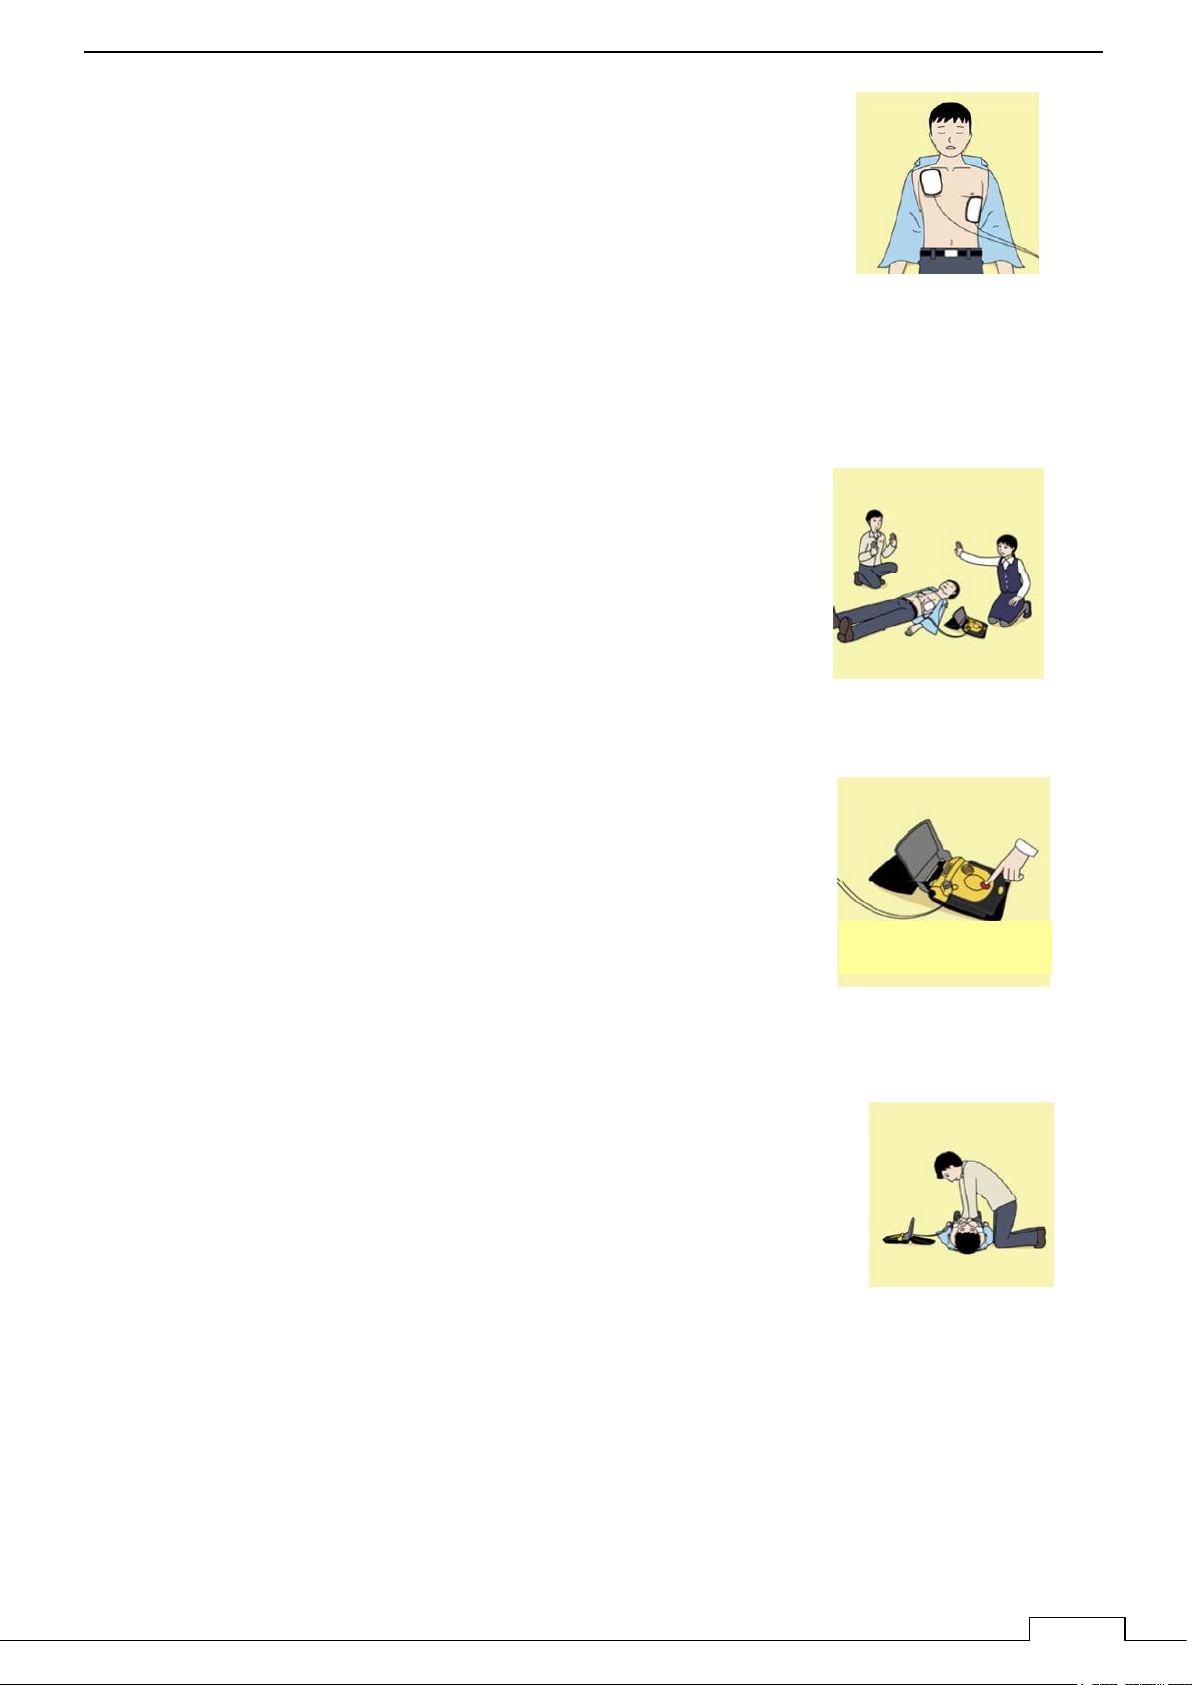
13.Electric shock (defibrillation)
a) If the AED determines that electric shock is needed, the voice
prompt saying, "Shock is needed" is issued and charging starts
automatically.
b) When charging is completed, the voice prompt saying, "Push the
shock button" is issued and the shock button flashes.
c) The first-aider must get away from the injured or ill person, make
sure that no one is touching him/her, and then press the shock button.
d) When electric shock is delivered, the body of the injured or ill person may jerk.
14.Resume cardiopulmonary resuscitation (CPR).
Resume CPR consisting of 30 chest compressions
and 2 rescue breaths by following the voice prompts
of the AED.
15.Automatic electrocardiogram analysis
a) When 2 minutes have elapsed since you resumed cardiopulmonary resuscitation (CPR), the
AED automatically analyzes the electrocardiogram.
b) If you suspended CPR by following voice prompts and AED voice prompt informs you that
shock is needed, give electric shock again by following the voice prompts.
If AED voice prompt informs you that no shock is needed, immediately resume CPR.
Press the shock button.

FIRST-AID TREATMENTS
vi
16.When to stop CPR (Keep the electrode pads on.)
a) When the injured or ill person has been handed over to the emergency services
b) When the injured or ill person has started moaning or breathing normally, lay him/her on
his/her side in a recovery position and wait for the arrival of emergency services.
PREFACE
vii
PREFACE
Thank you very much for purchasing the SI-TEX marine radar equipment, T-760 series.
This equipment is a marine radar equipment designed to obtain safe operation of marine
ships. This equipment consists of a scanner unit and a display unit as its main units.
Before operating the equipment, be sure to read this instruction manual carefully for
correct operation.
Maintain this instruction manual so that operators can refer to it at anytime.
Refer to this manual when any inconvenience or defect occurs.
In this equipment manual, contains an easy operational bridge card on the appendix
page.
Please copy it and equip around the display unit.
About equipment type names:
T-760 is a radar series model name.
Individual name is changed according with the combination of units.
T-760 Series
T-760 Display Unit NCD-2256(ST) + Scanner Unit NKE-1066(NL)
T-761 Display Unit NCD-2256(ST) + Scanner Unit NKE-2044(NL)

CHECKING THE SUPPLIED ITEMS
viii
CHECKING THE SUPPLIED ITEMS
STANDARD SUPPLY ITEMS
Standard supply items are as follows.
The normal installation cable length is 10m between scanner and display.
Optional special length cables are prepared by SI-TEX if request.
Option cable is provided with a length of 5m, 15m, 20m, or 30m.
(Please order it if necessary)
SCANNER UNIT 1 set
DISPLAY UNIT 1 set
SUN COVER 1Piece
INSTALLATION CABLE (SCANNER TO DISPLAY) 1Piece (Standard 10m)
POWER CABLE (DC input cable 2m) 1Piece
STANDARD SPARE PARTS 1Piece (7ZXRD0032: SPARE FUSE: 58V/7.5A 2pices)
INSTRUCTION MANUAL 1Piece (This book)
TEMPLATE SHEET FOR SCANNER MOUNTING SCREW HOLES 1Piece
NOTE:
This radar display is possible to use AIS, TT, LL_ position, Depth, and N-UP functions.
But those all functions need the signal input from GPS, AIS, GYRO, LOG, ECHO SOUNDERS.
ALL external signals are connected using NMEA cable.
This cable is sold separately as an optional accessory, it is not included in the standard supply
items.
Option units. (Not included in standard supplied items)
Please order to SI-TEX agent or factory if necessary.
☆SCANNER to DISPLAY Cable: 5m, 15m, 20m, 30m
☆NMEA Signal connection cable: length 1m
☆RGB external monitor connection unit (NQA-2447) (Not include a RGB monitor)
☆Rectify unit (NBD-865): AC100/220V to DC24V

ix
BEFORE OPERATION
BEFORE OPERATION
■PICTORIAL INDICATION
Various pictorial indications are included in this manual and are shown on these equipment so that
you can operate them safety and correctly and prevent any danger to you and/or to other persons
and any damage to your property during operation. Such indications and their meanings are as
follows.
Understand them before you read this manual.
!
DANGER
This indication is shown where incorrect equipment
operation due to negligence may cause death or
serious injuries.
!
WARNING
This indication is shown where any person is supposed
to be in danger of being killed or seriously injured if this
indication is neglected and these equipment are not
operated correctly.
!
CAUTION
This indication is shown where any person is supposed
to be injured or any property damage is supposed to
occur if this indication is neglected and these
equipment are not operated correctly.
■ EXAMPLES OF PICTORIAL INDICATION
Electric Shock
The mark represents CAUTION (including DANGER and
WARNING).
Detailed contents of CAUTION ("Electric Shock" in the
example on the left) is shown in the mark.
Disassembling
Prohibited
Prohibited
The mark represents prohibition.
Detailed contents of the prohibited action ("Disassembling
Prohibited" in the example on the left) is shown in the mark.
Disconnect
the power plug
!
Instruction
The mark represents instruction.
Detailed contents of the instruction ("Disconnect the power
plug" in the example on the left) is shown in the mark.

BEFORE OPERATION
x
■RUSSIA CTP MARK
According to the requirements of clause 20 of Technical Regulations about safety of Maritime
transport objetcs, approved by Resolution of the Russian Federation Goverment #620 dated August
12, 2010 and requirements Technical Regulation of the Russian Federation Goverment #623 dated
August 12, 2010 navigation & radiotelephone equipment should be marked by company –
manufacturer with market-circulation mark the way it is determined by Legislation of the Russia
federation on technical regulation.
According to the airticle 27 PZ No184 –FZ of Federal Law about Technical Regulation dated
December 12, 2002 and Resolution of the Russian Federation Goverment dated 19.11.03 No0696
navigation equipment has an appropriate marking. The marking can be perfomed by one of four
variants, depending on surface colour of equipment.
The images should be grey scale and should contrast against the surface colour (ref. to the
Resolution of the Russian Federation Goverment No696 <<About market circulation mark>> dated
November 19, 2003).
The marking of Radio and navigation equipment should be done by the manufacturer (supplier)
according to the clause 2 of the article 27 of the Federal Law No.184 –FZ << About technical
Regulation>> and should be applied right to device surface.
Type 1
Type 2
Type 3
Type 4

WARNING LABEL MOUNTING POINT
xi
WARNING LABEL MOUNTING POINT
Warning label is patched on the equipment visible surface.
Do not try to remove, break or modify the label.
NKE-1066(NL) SCANNER UNIT
NKE-2044(NL) SCANNER UNIT

xii
WARNING LABEL MOUNTING POINT
NCD-2256(ST) DISPLAY UNIT
PACKING LIST
xiii
PACKING LIST
The packing lists of each unit are as follows.
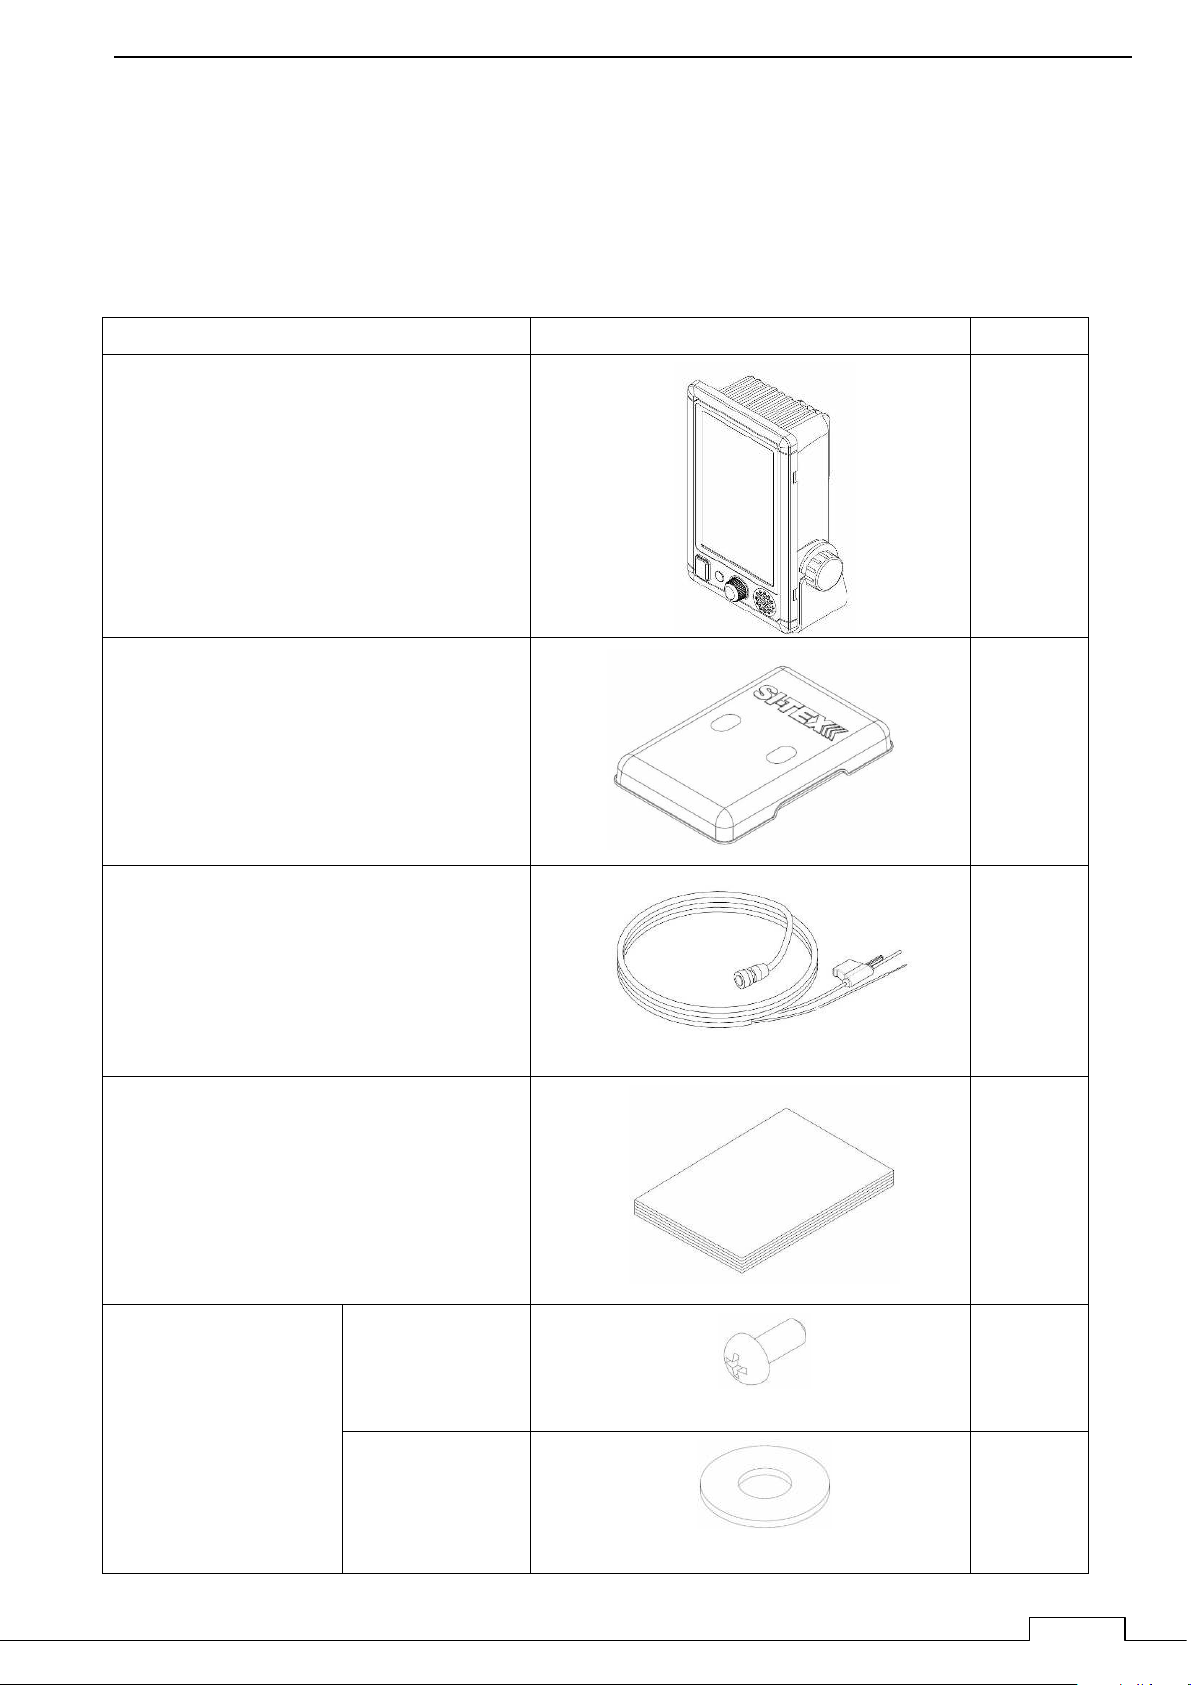
NCD-2256(ST): DISPLAY UNIT
Parts Name
Figure
Qty.
Display Unit
[NCD-2256(ST)]
1
Sun Cover
[MTV305319*]
1
Power Cable
[CFQ-9900]
1
Instruction Manual
[H-7ZPRD0909*]
1
Mounting Hardware
[MPTG32528*]
Screw
[5X20(L)]
5
Washer
[W5Bs]
5

xiv
PACKING LIST
Parts Name
Figure
Qty.
Attached parts
[MPXP35291*]
Name plate
[MPNN49122*]
1
Fuse
[H-7ZXRD0032*]
2
Read Me
[H-7ZPRD0910*]
1
Template
[MTZ304757*]
1
NMEA Cable (Option)
[H-7ZCRD1689*]
1
“ * ” means revision, such as A, B and so on.

PACKING LIST
xv
NKE-2044(NL): SCANNER UNIT
Parts Name
Figure
Qty.
Scanner Unit
[NKE-2044(NL)]
1
Mounting Hardware
[MPXP35114*]
Bolt
[M8X30
SUS304]
4
Spring
Washer
[SW8 SUS]
4
Washer
[W8 SUS]
4
Instruction
for
Equipment
[MTZ304691*]
1
Template
[MTZ302447*]
1
Installation Cable
[CFQ9924-10]
1
“ * ” means revision, such as A, B and so on.

xvi
PACKING LIST
NKE-1066(NL): SCANNER UNIT
Parts Name
Figure
Qty.
Scanner Unit
[NKE-1066(NL)]
1
Mounting Hardware
[MPXP35115*]
Bolt
[M8X30
SUS304]
4
Spring
Washer
[SW8 SUS]
4
Washer
[W8 SUS]
4
Instruction
for
Equipment
[MTZ304694*]
1
Template
[MTZ304696*]
1
Installation Cable
[CFQ9924-10]
1
“ * ” means revision, such as A, B and so on.

xvii
EQUIPMENT APPEARANCE
EQUIPMENT APPEARANCE
T-760 is a series name.
Individual TYPE name is changed by combination of units.
TYPE T-760 NCD-2256(ST) + NKE-1066(NL)
TYPE T-761 NCD-2256(ST) + NKE-2044(NL)
T-760 Series system diagram
1.5feet Scanner Unit
(NKE-1066(NL))
Radome diameter 450mm
2feet Scanner Unit
(NKE-2044(NL))
Radome diameter 620mm
*STANDARD LENGTH: 10m
OPTION LENGTH:
5m/15m/20m/30m
T-761 RADAR
T-760 RADAR
7inch WIDE VGA COLOR LCD DISPLAY
(NCD-2256(ST))
Installation cable:
CFQ9924-5, 10, 15, 20, 30
External Navigational
Signal input.
NMEA 3 input ports
CFQ-9900
Ship’s Main Power
(Power Cable length 2m)
*INCLUDING FUSE IN PLUS LINE
FUSE TYPE: 58V/7.5A
(10.8-31.2VDC)

EQUIPMENT APPEARANCE
xviii
NKE-1066(NL) SCANNER UNIT
NKE-2044(NL) SCANNER UNIT
This manual suits for next models
1
Table of contents
Other Sitex Marine Equipment manuals


Popular Marine Equipment manuals by other brands


ProFurl
ProFurl Nex 0.9 installation manual

Humminbird
Humminbird PiranhaMAX 155 Installation and operation manual

TMQ
TMQ AP46 Operation and installation manual

MOFLASH SIGNALLING
MOFLASH SIGNALLING SB150-1 Series INSTALLATION & TECHNICAL INFORMATION

Mercury
Mercury NMEA 2000 instructions

DMT
DMT Alpha Series user manual


