SK magic ACL-140 User manual

magic Motion Air Purifier
ACL-140
Motion Air Purifier
2 3
Product Features
Table of Contents
Table of Contents
IMPORTANT SAFETY INSTRUCTIONS
Read the safety instructions before using this product.
•Product Features Pg. 3
•Safety and Cautions Pgs. 4-8
•Parts Overview Pg. 9
•Air Purification Process Pg. 10
•Before Using the Appliance Pg. 11
•Control and Display Panel: Functions Pgs. 12-14
•Care and Maintenance Pgs. 15-16
•Filter Replacement Pg. 17
•Troubleshooting Pgs. 18-19
•Unit Specifications Pg. 20
※ For the purpose of quality control, the exterior design can change without announcement.
• Please read and follow the instructions in Safety and Cautions for using
your Air Purifier.
• Please place this user manual where you can easily reach for future
reference.
Product Features
1 Air Purification
This Air Purifier is an air purifying appliance that filters particulate matters (PM) and
harmful gases.
2 Fan Speed Setting (High/Medium/Low)
You can select the fan speed applicable to the indoor air quality condition.
3 Automatic Operation
The appliance can select fan speed applicable to the air condition automatically
and conducts power saving (Operates in Auto mode)
4 Pop-up
You can adjust air outlet of the appliance for effective air purification.
5 Motion Sensing
The appliance can sense the direction where particulates are generated by
daily activities in the house. The appliance rotates the direction of air intakes
for effective air purification.
6 Ultra-Streaming Mode
Ultra-streaming mode enables release of intensive airflow through the front
outlet of the appliance. It also operates intensive suction simultaneously.
7 Hidden Display
Hidden display LED technology provides
selective display of various information.
8 IoT Function
You can remotely control the appliance with
SK magic application in your smart phone and
check the indoor air condition.

4 5
Safety and Cautions
Safety and Cautions
Safety and Cautions
Safety and Cautions
• The following instructions are intended to prevent unexpected danger or damage
by using the product safely and correctly.
• Precautions related to safety are classified as following depending on the degree of
risk and damage caused by misuse, and the urgency of the risk.
• This product is not intended for use by person (including children) who has a lack
of physical, sensory, or mental capabilities and who does not have experience or
knowledge and can' t use the product safely without supervision or instruction.
• Children should be supervised to ensure that they do not play with the appliance.
Cases where severe injuries or death can be caused if violated
Cases where injuries or damages on the appliance can be caused if violated
This icon indicates the potential risks and cautions in operation.
This icon indicates prohibition of described activity.
This icon indicates what user must follow when operating.
Warning
Caution
Safety and Cautions
Warning
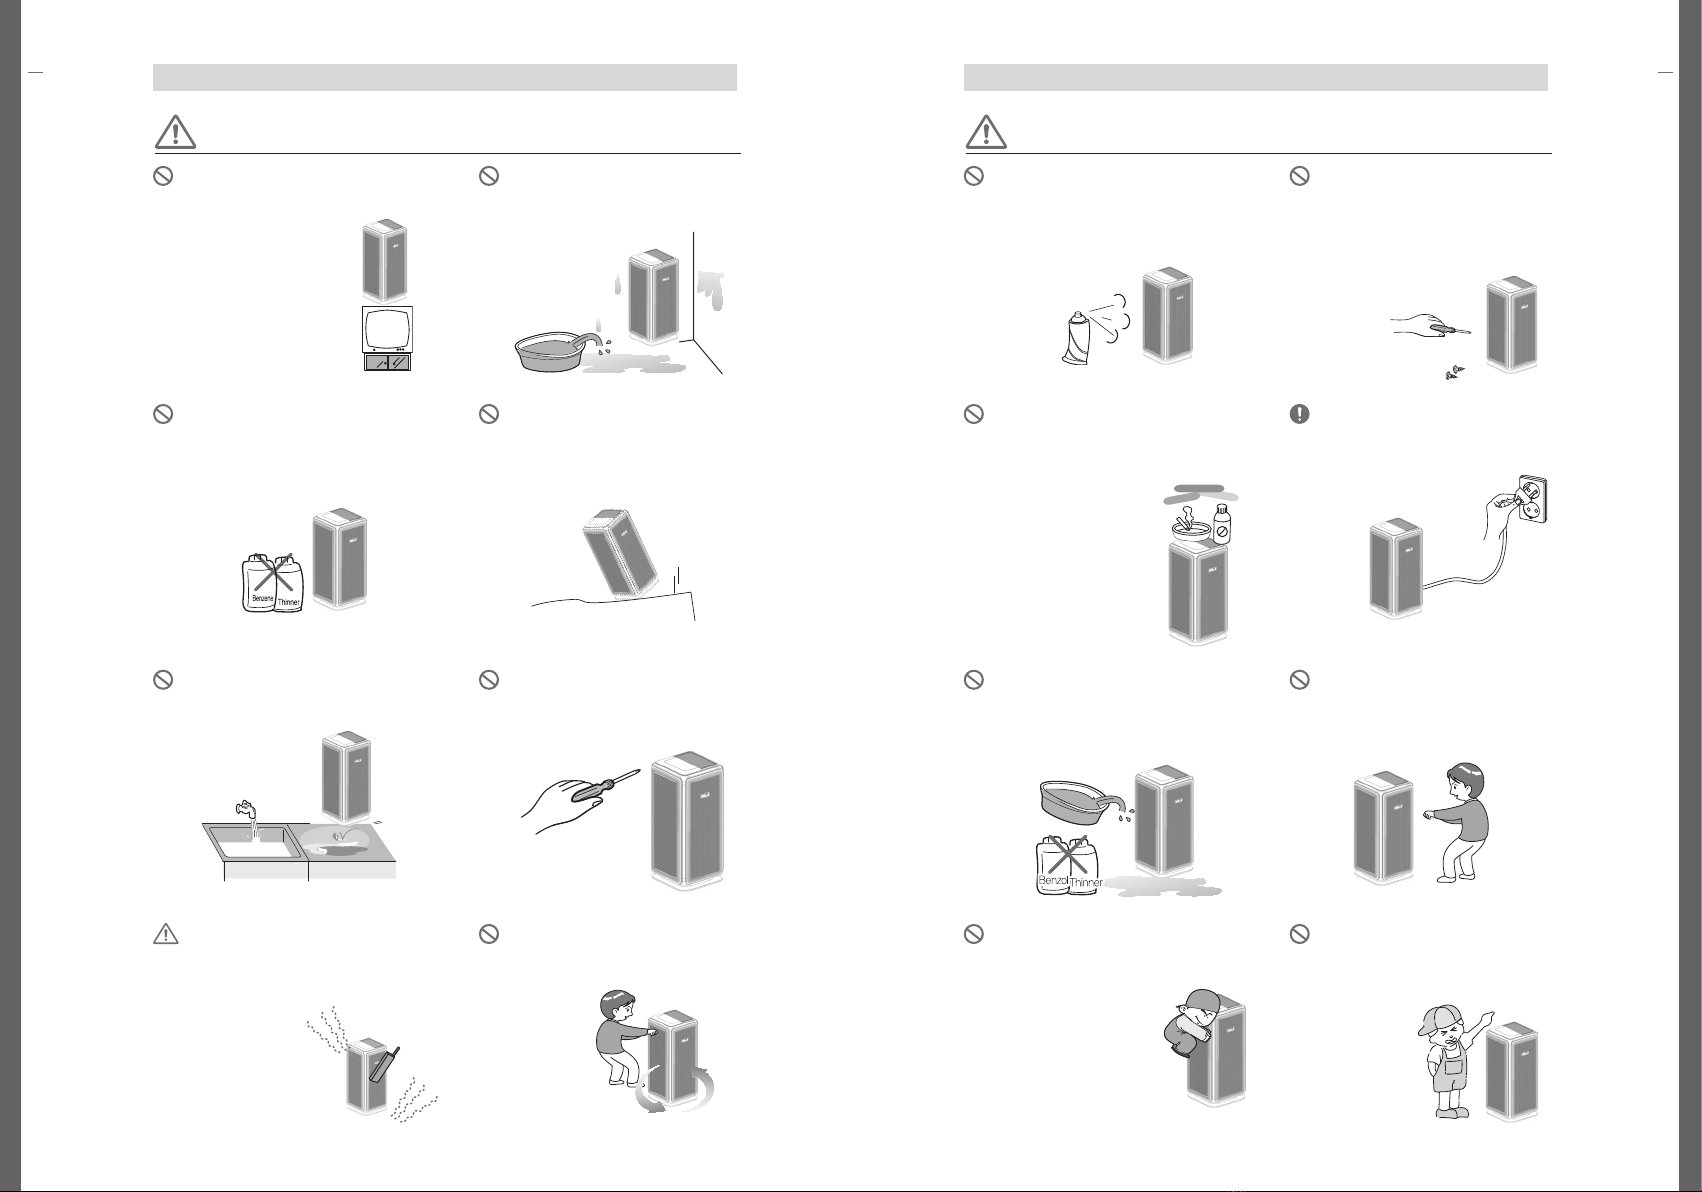
Do not use when the plug is damaged or
it is loosely fit with an electrical outlet.
• It may cause electric shock and/or fire
hazard.
• If the plug is damaged, please
call the purchase location or
the customer service
center for replacement.
The appliance must be plugged into
a 220-240V, 50Hz/60Hz outlet only.
• It may cause
malfunction or
damage.
Warning
If you find water enters the power
connection, unplug the appliance
immediately and do not use until it is
completely dry.
• It may cause electric shock and/or fire hazard.
Do not use the appliance for a
special purpose (i.e., preservation
of art works or
academic artifacts,
business use).
• It may cause quality
degradation of the
preserved goods.
Please unplug the appliance when not
using it for long period.
• It may cause property loss from fire hazard.
Be careful not to have your body
part or an alien substance be
caught on the latch of the front
cover.
• It may cause bodily injury and/or
malfunction of the appliance.
If power cord is damaged do not replace
it yourself. Call the customer service
center to replace your power cord.
• It may cause electric shock, bodily injury
and/or fire hazard.
Do not place the appliance near an
electric heater.
• It may cause fire hazard.
Please wipe pins and connection part of
the plug when particles or water enters
the appliance.
• It may cause electric shock, fire hazard,
and/or short circuit.
Do not plug multiple electronic
appliances on one power outlet.
• Overload can cause power outage
and/or fire hazard.
Do not pull the plug when you move the
appliance.
• It may cause
malfunction or
damage.
Do not touch the power plug with
wet hands.
• Unplugging the
power with wet
hands may
cause electric shock.
Do not bend or place a heavy object
on the plug that causes damage or
deformation.
• Damaged plug
can cause
electric shock
and/or fire
hazard.
Do not plug-unplug repetitively.
• Damaged plug and/or power outlet may
cause electric
shock and/or fire
hazard.
6 7
Safety and Cautions
Safety and Cautions
Safety and Cautions
Warning Warning
Do not place the appliance on another
electronic appliance (e.g., electric
heater, television).
• It may cause fire hazard,
electric shock, and/or
malfunction of the
appliance.
Do not let inflammable substances (e.g.,
insecticide, air freshener) enter the air
intakes.
• It may cause fire hazard and/or degradation of
performance.
Do not install the appliance in wet
surroundings.
• It may cause electric shock, short circuit
and/or fire hazard.
Do not decompose, repair, or
modify the appliance by yourself.
• It may cause malfunction oriented
electric shock, bodily injury, and/or fire
hazard.
• Please call the customer
service center for
repair.
Do not use the appliance near combustible
gas or inflammable substance.
• It may cause damage on the appliance,
electric shock, and/or fire hazard.
Do not place water bowl, chemicals,
foods, small metal pieces, or inflammable
substances on the appliance.
• If entering, it may cause electric shock and/or
fire hazard.
• Blockage on air
intakes/outlets may
cause malfunction of the
appliance.
Do not install the appliance on
uneven surfaces.
• It may cause bodily injury and/or
damage on the appliance.
Unplug when cleaning.
• It may cause electric shock and/or fire
hazard.
Do not stick the sensor with sharp
object (e.g., ice pick).
• It may cause electric shock.
Do not push or lean on to the
appliance. The appliance may fall.
• It may cause bodily injury and/or
malfunction of the appliance.
When rotating, do not forcibly stop
the appliance.
• It may cause malfunction of the
appliance.
Safety and Cautions
Never immerse the appliance in water.
• It may cause electric shock.
Do not sprinkle water, use benzol or
thinner to clean the appliance.
• It may cause damage on the appliance,
electric shock, and/or fire hazard.
If you hear strange sound, smell
something burning, or see a smoke from
the appliance, unplug immediately and
call the customer service center.
• It may cause
electric shock
and/or fire
hazard.
Do not let children to hang on or climb up
the appliance.
• It may cause bodily injury and/or malfunction
of the appliance.
Do not let your finger or any alien
substance on air intakes/outlets.
• It may cause bodily injury and/or
malfunction of the appliance.
A/S
Safety and Cautions
Caution
Install the appliance away from
direct sun light.
• It may cause decolorization.
Do not use the appliance in a place with
a lot of smoke, odor, or grease.
• It may cause degraded performance.
8 9
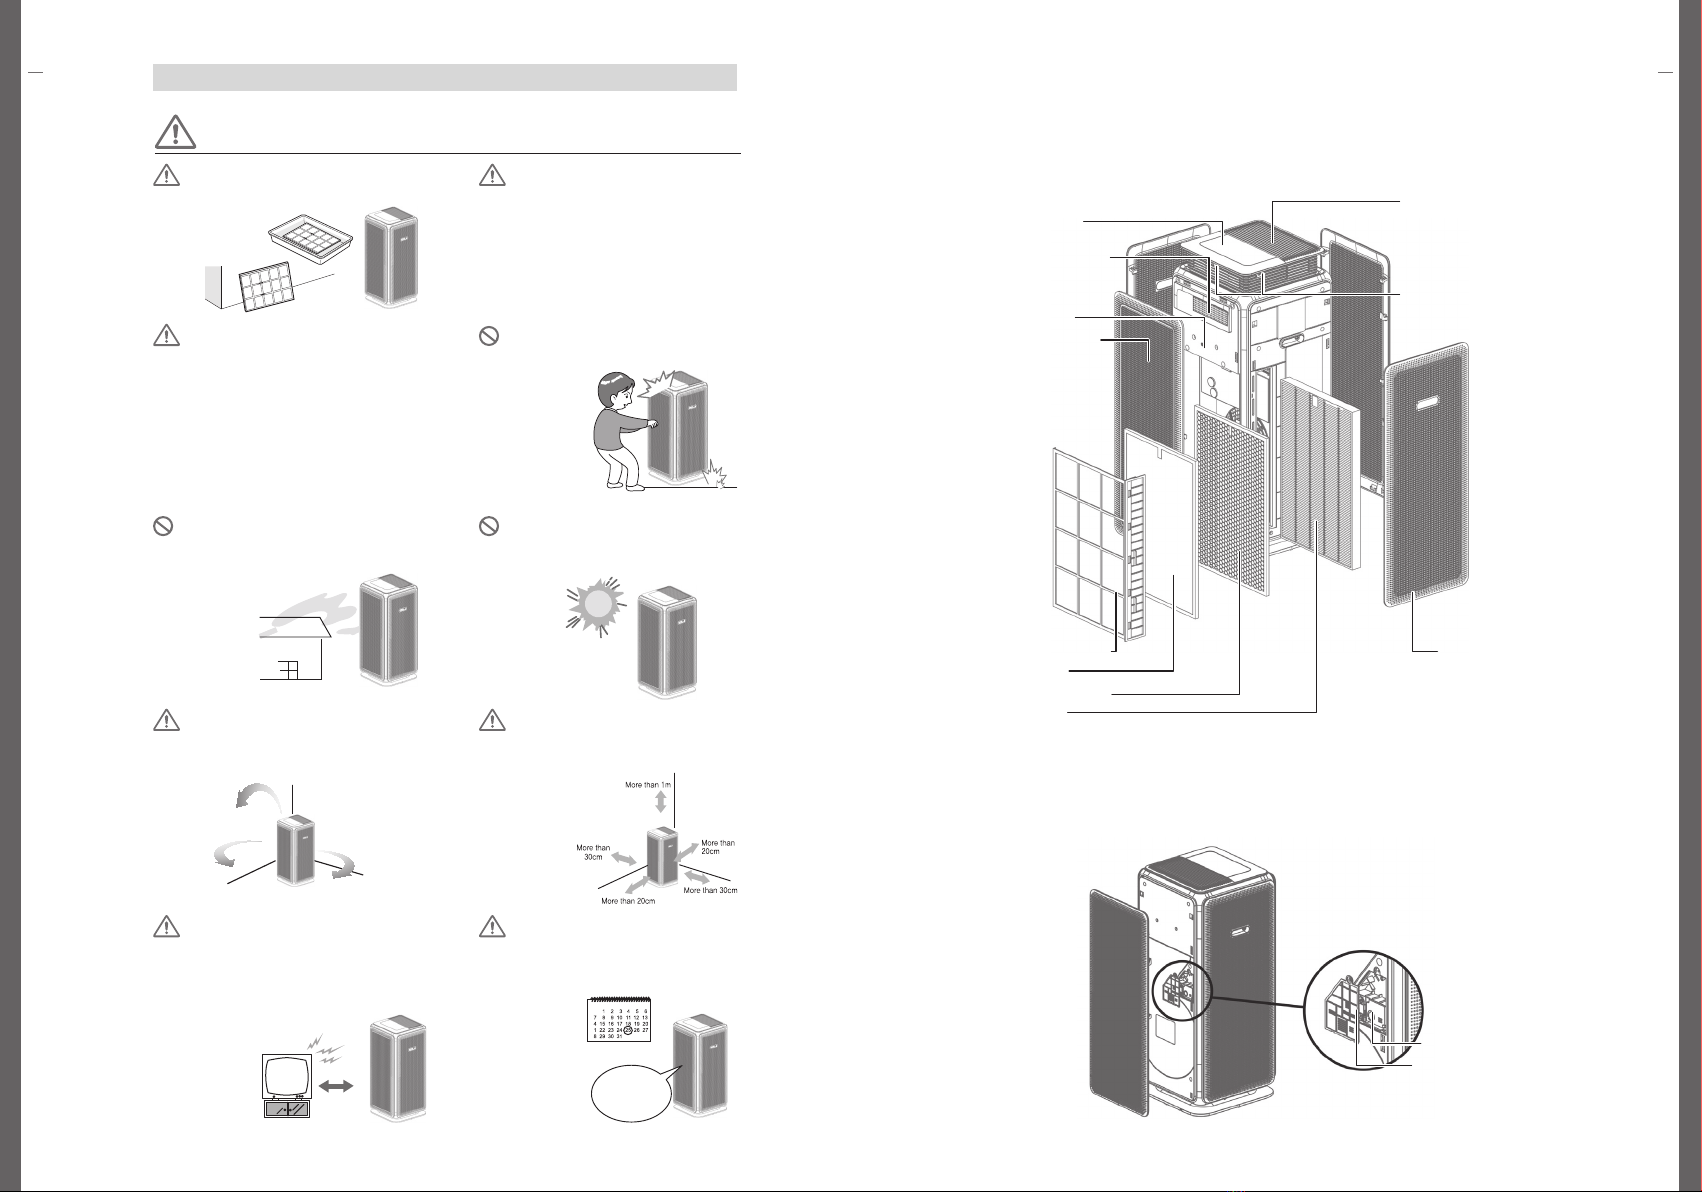
Parts Overview
Safety and Cautions
Parts Overview
smoke
More than 2m
Filter
Replacement
Clean the pre-filter regularly with water
and use when completely dry.
After cleaning, ensure to follow the
assembly order.
• Operating without parts (filter, front
cover, etc.) may cause malfunction.
Ensure to secure more than 30cm
(left and right), 1m (above) around
the appliance.
• If too close, walls
and the ceiling
may be polluted.
Install the appliance where no obstacle
blocks the airflow.
Replace the filters in a timely manner.
• If not, it may cause degraded
performance.
Install the appliance more than 2m away
from other electronic appliances (e.g.,
TV).
• If not, it may cause electronic jamming.
Install the appliance on stable and even
surface.
• Using the appliance on a carpet may cause
vibration.
• Using the appliance on a rug or a blanket may
cause malfunction of the sensor or a fall.
Do not apply immoderate force or
shock on the appliance.
• It may cause
damage
on the
appliance.
Air Outlets
Motion Detecting Sensor
(PIR sensor)
Air Intakes (front)
Gas Sensor
Control Panel
LED Display (front)
Side Cover
Microfiber Pre-filter
DUST Filter
Deodorization Filter
HEPA Filter
Temp/humidity Sensor
Dust Sensor
< Front >
< Back >
Air Outlets
Motion Detecting Sensor
(PIR sensor)
Air Intakes (front)
Gas Sensor
Control Panel
LED Display (front)
Side Cover
Microfiber Pre-filter
DUST Filter
Deodorization Filter
HEPA Filter
Temp/humidity Sensor
Dust Sensor
10 11
Before Using the Appliance
Air Purification Process
Air Purification Process Before Using the Appliance
● Microfiber Pre-filter :
Removes relatively large particulates, human and animal hairs.
● DUST Filter : Improves the purifying capacity and removes mid-sized particulates.
● Deodorization Filter : Remove harmful gases, bad odor from daily activities.
● HEPA Filter : Removes PMs (including ultrafine PMs smaller than PM1.0) in the air.
Microfiber Pre-filter DUST Filter Deodorization Filter HEPA Filter
Air Purification
1) This appliance provides a 4-stage air purification process.
2) Operating without filters shall not have the purifying effect in the air.
3) During the first day of usage, you may find the smell of new filters.
The smell disappears after few days.
4) Using the appliance in a bad odor surroundings could cause shortened
replacement cycle and the odor might permeate the deodorization filter.
In such a case, ventilate the space to reduce the odor first and use the
appliance after removing the remaining Odor.
Filters Usage Instruction
Installing Filters
3) Remove the plastic packaging and assemble filters in the following order.
DUST Filter Deodorization Filter HEPA Filter
4) Assemble in this order: (1) HEPA filter, (2) Deodorization filter, (3) DUST
filter, (4) Microfiber pre-filter.
※ Install DUST filter and pre-filter together upon inserting. Push the pre-filter
until you hear a click from the upper and lower latches.
pre-filter
5) Align the upper edge of the appliance and
the side cover, then push the lower part
until you hear a click.
Side Cover
1) (1) Lift the top of the front cover
upwards and pull to remove it.
(2) Remove the pre-filter cover
pull it out.
2) (1) Remove the right side cover
by grasping the lower edge,
gently pulling forward, and lift.
(2) Remove the pre-filter by
unhooking the upper and lower
latches, and pull it out.
Side
Cover
Pre-filter
Pre-filter
cover

[Power] Button
•Press the button to turn on/off the product.
• By plugging the power and pressing the power button, the
appliance rotates to relocates itself to starting position, then
operates air purification mode with low speed.
[Fan Speed] Button
• Press the button to select the fan speed you need.
• Every time you press the button, the display icon changes to low,
medium, or high speed.
[Timer] Button
• The timer can be set to let the appliance operate for a specified
period of time.
• Each time you press the button, it selects 1H, 4H, and 8H (if
pressed repeatedly, the timer will be set off). When the set time
has elapsed, the appliance will automatically switch off.
Display
Mode
[Display Mode] Button
• It indicates the PM10, PM2.5, and PM1.0 concentration.
※ Press Display Mode button to change the displayed information in the
following order: PM2.5, PM10, temperature, humidity, PM1.0, and LED off.
※ When LED display is off, press any button on the control panel to turn it on.
※ When Child Lock is activated, the display shall only be turned on when you
deactivate the Child Lock.
[Mode] Button
• Press the button to select the mode of operation.
• Each time you press the button, it selects Auto, Motion, Sleep, and Ultra-
Stream.
Auto
• The appliance selects the fan speed automatically according to the ambient
air quality (PM and gas concentration).
Sleep
• In Sleep mode, the appliance operates quietly for comfortable sleeping.
※ LED lights on operation display and control panel will turn off after 10
second LED.
Ultra
Stream
• Ultra-streaming mode enables release of intensive airflow through the front
outlets of the appliance. It also activates auto purification and motion sensing
simultaneously.
• The appliance selects the fan speed automatically according to the ambient
air quality (PM and gas concentration).
Motion
• The appliance can sense the direction where particulates are generated by
daily activities in the house with Smart Sensor technology. The appliance
rotates the direction of air intakes for effective and optimal air purification.
• The appliance selects the fan speed automatically according to the ambient
air quality (PM and gas concentration).
[WiFi] Button
• Press the button to activate WiFi mode.
※ Please refer to loT guides in SK magic Application for the details of this
mode.
※ LED light on the WiFi button even when the appliance is turned off as
standby for remote control.
※ When the product is registered and securing the online connection, LED
light on WiFi button will turn on.
Child Lock
[Child Lock] Button
• Press the button to activate Child Lock mode.
• Press the button for 3 seconds to activate Child Lock mode. The buttons
on Control and Display panel will be deactivated. Press the button for 3
seconds to deactivate Child Lock mode.
※ When locked, you shall not be able to operate the buttons on the Control
and Display panel.
12 13
Control and Display Panel: Functions
Control and Display Panel: Functions
Control and Display Panel: Functions Control and Display Panel: Functions
• When the appliance first powers up, the preliminary run will stabilize the
sensor operation for 1 minute.
• It takes about 30 seconds for the fan to turn on as it powers up.
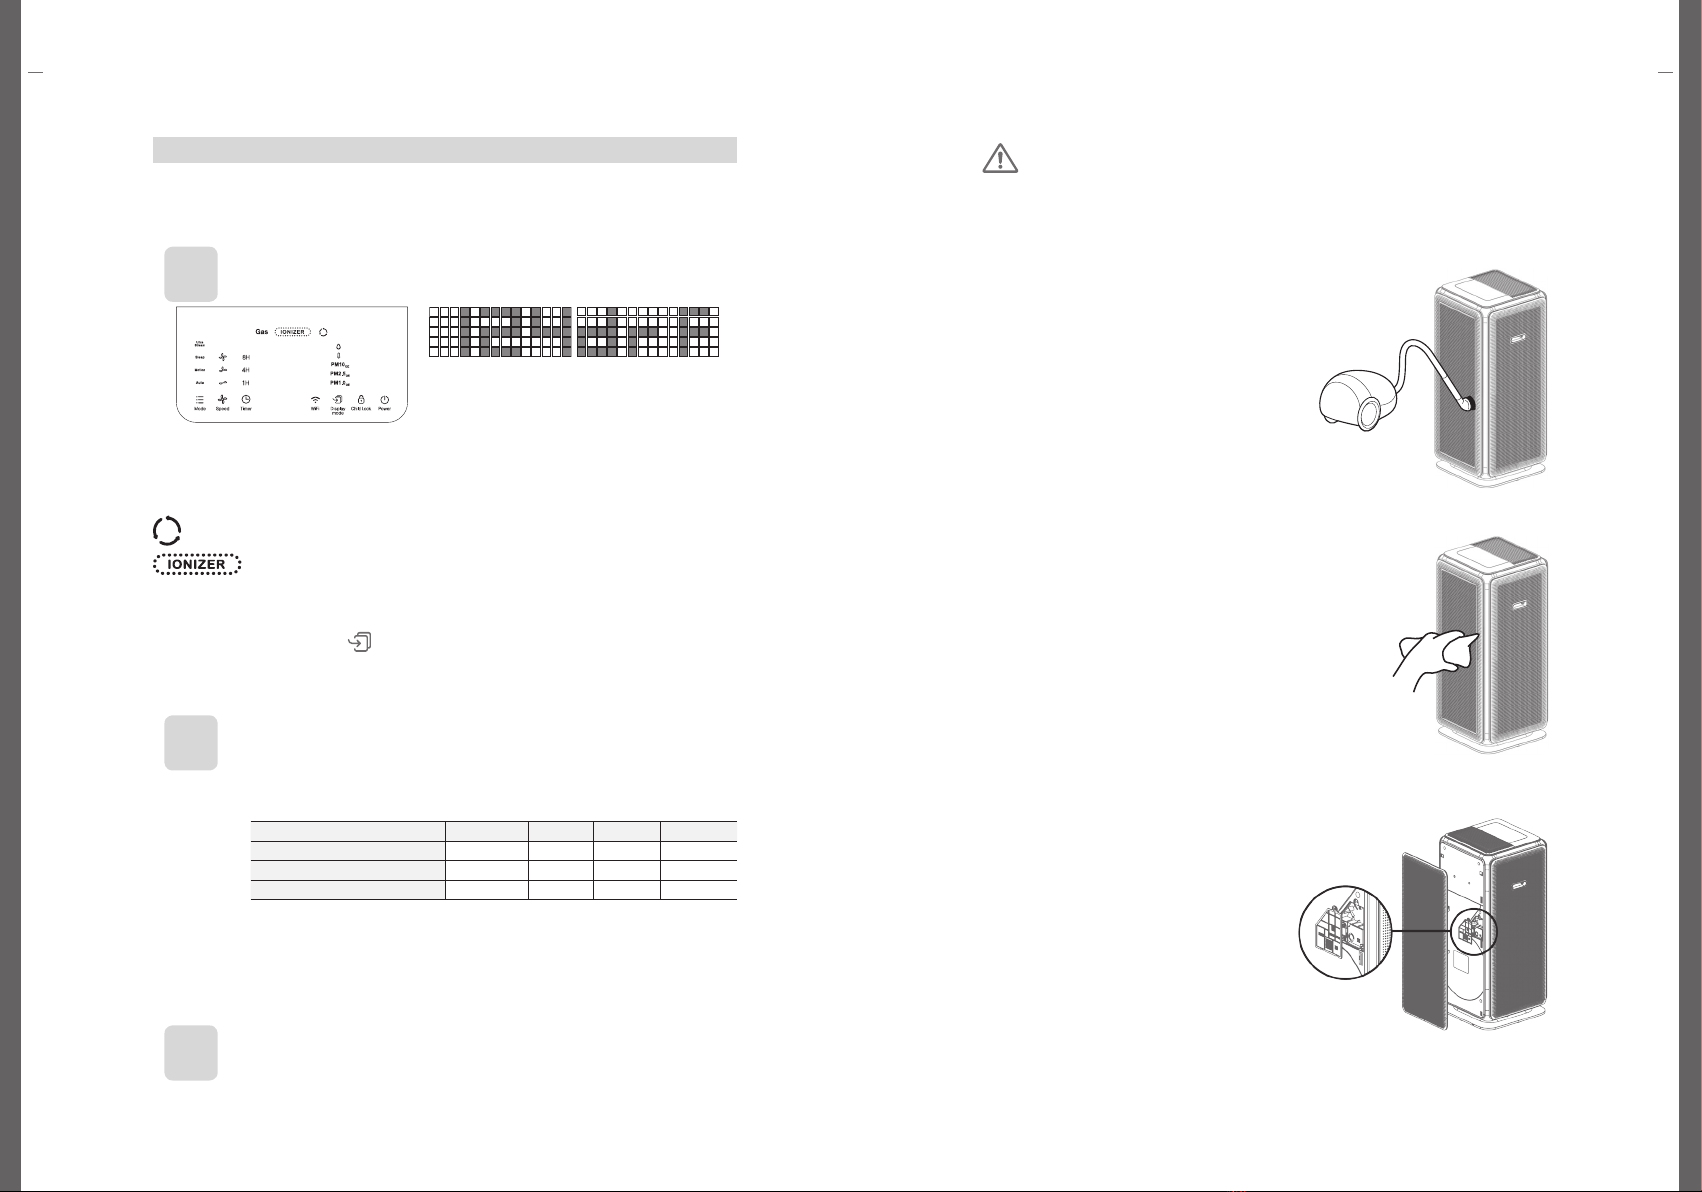
< Control and Display Panel > <Operation Display Panel>
Control and Display Panels on the Top
14 15
Care and Maintenance
Control and Display Panel: Functions
Control and Display Panel: Functions
Control and Display Panels on the Top
Check General Air Quality
• The General Air Quality indicates the current air condition according to 4 levels (good,
normal, bad, and very bad)
• The front Display panel will indicate the General Air Quality when the appliance operates.
• Press Display Mode button to change the displayed information in following order:
PM2.5, PM10, temperature, humidity, PM1.0, and LED off.
• When connected to IoT, the indoor air quality shall be displayed as you click on
Display Mode.
• The PM concentration levels indicated in the appliance shall differ from the PM level
in other air purifier products. It could also differ from the PM level forecasted by
MOE(Ministry of Environment). The PM level measurement by MOE applies Gravimetric
method and Beta attenuation monitor. On the other hand, this appliance measures
number of PM in the air, then converts the data to PM mass concentration, which may
differ from actual PM concentration level.
•PM10: PM in the air smaller than 10㎛
• Ultrafine PM (PM2.5): PM in the air smaller than 2.5㎛
• Ultrafine PM (PM1.0): PM in the air smaller than 1.0㎛
Note
• General Air Quality displays the integrated information of PM10, PM2.5, and PM1.0. The
information on General Air Quality shall differ from current concentration level of PM10,
PM2.5, and PM1.0 indicated in colors.
• General Air Quality displays the worst condition among the current level of PM10,
PM2.5, and PM1.0. General Air Quality shall indicate Bad when the current level of
PM2.5 or PM1.0 is Bad, even when the current level of PM10 is Good.
Note
< PM Concentration > < Front Cover Open >
※ The actual display may differ from the above display.
Turns on when Ionizer operates. (Operates in any modes other than Sleep mode)
LED Color Ice Blue Green Orange Red
General Air Quality Good Normal Bad Very Bad
Ultrafine PM (PM2.5, PM1.0) below 15 16-35 36-75 above 76
Fine PM (PM10) below 30 31-80 81-150 above 151
• When using different appliances in the same space, indoor air circulation may cause
different PM concentrations to be indicated in the appliances.
• Different environmental factors (i.e., distance from a construction site, vacuum cleaner usage,
and making a bed) may cause differences in the indicated PM concentration.
• In a surrounding condition with yellow dust or introduction of outside air, the PM
concentration may be continuously displayed as high.
Note
Care and Maintenance
[Cleaning the Body of the Appliance] (Once in 2-4 weeks)
Wipe away dust with a soft dry cloth
from the body of the appliance.
Clean the air intakes and outlets with a
vacuum cleaner.
※ In case of severe pollution, wipe with a
wet cloth. (Do not use an abradant)
[Cleaning the Front Cover] (Once in 2-4 weeks)
Remove the front cover from the
appliance and clean the cover with a
dry cloth or a soft brush to wipe away
dust.
※ In case of severe pollution, wipe with a
wet cloth. (Do not use an abradant)
[Cleaning the Sensor] (Once in 4 weeks)
1. Remove the rear cover. Clean the
sensor cover in (PM filter) with a vacuum
cleaner or a brush.
2. Reinstall the rear cover after cleaning.
※ If not regularly cleaned, performance of the
PM sensor will be degraded.
※ The frequency of cleaning differs by
surroundings. In the surroundings with
more PM, more frequent cleaning shall be
needed.
• Ensure to unplug before cleaning.
• Do not use organic solvents (e.g., solvent, thinner, etc.), bleaching agent,
detergents containing chloride and/or an abradant.
• Do not apply water or immerse the appliance in water when cleaning.
Caution
• drF
(Front cover open)
: Displays when front cover is open.
• d r S
(Side cover open)
:
Displays when side cover is open.
• drA (Front/Side cover open)
: Displays when the front and side cover is open.
• Gas
:
The Gas icon indicates current gas level in the air in Ice Blue/Green/Orange/Red.
Ventilation icon lights on when gas level stays in Red level for 10 minutes.

16 17
Care and Maintenance
Filter Replacement
Care and Maintenance
[Cleaning Microfiber Pre-filter] (Once in 2-4 weeks)
1. Remove the front cover by grasping
the lower edge, gently pulling
forward, and lift.
(When reassembling, use the hook
on the upper edge then push the
lower part until you hear a click.)
2. Clean the pre-filter with a vacuum
cleaner to remove particulates.
3. In case of severe pollution, wash
with water.
Remove the side cover by grasping
the lower edge, gently pulling
forward, and lift.
(When reassembling, use the hook
on the upper edge then push the
lower part until you hear a click.)
• Remove the pre-filter by unhooking
the upper and lower latches, and
pull it out.
4. Displace DUST filter from the pre-
filter, then clean the pre-filter with a
neutral detergent.
• After drying the pre-filter
completely, reapply DUST filter on
the pre-filter and insert the filters
back.
•Reinstall the side cover.
•Ensure to unplug before cleaning.
•You can wash or remove particulates from the pre-filter.
•If not regularly cleaned, performance of the appliance will be degraded.
• Do not wash DUST filter, Deodorization filter, and HEPA filter as they are not
washable.
Caution
Side
Cover
Pre-filter
Filter Replacement
※ PM on HEPA filter is not removable.
The reason for blackening of your HEPA filter is an evidence of good filtering
capacity. It is safe to use until the next filter replacement cycle.
● Filter Replacement
● Filter Cleaning and Replacement Cycle
● Replacing DUST Filter, Deodorization Filter, HEPA Filter
1. Remove the side cover by grasping
the lower edge, gently pulling
forward, and lift.
(When reassembling, use the hook on the
upper edge then push the lower part until you
hear a click.)
2. Remove the pre-filter by unhooking
the upper and lower latches, and
pull it out.
3. Remove the plastic packaging and assemble filters
in the following order: (1) HEPA filter,
(2) Deodorization filter, (3) DUST filter,
(4) Microfiber pre-filter. Ensure to
check the front and rear of the filter.
• Install DUST filter and pre-filter together upon reinserting.
Filter Types Cleaning Replacement Remarks
Micro Pre-filter Once / 2-4 weeks -Washable
DUST Filter -4 months Not Washable
Deodorization Filter -12 months Not Washable
HEPA Filter -12 months Not Washable
Pre-filter
• When assembling the filter, ensure to check the front side of the filter (where
label is located)
• For the optimal performance, please use the original filter by SK magic only.
• Unplug the power before replacing the filter.
Caution
Side Cover
18 19
Troubleshooting
Troubleshooting
Problem(s) What You need to Check Possible Solutions
I don’t feel the
air from the air
outlet.
•Is the appliance plugged in? • Plug the appliance on 220-240V,
50Hz/60Hz power outlet.
• Is there a light on the display
panel?
• Press the power button and select the
function you need.
• Is the house under power
outage?
• Use the appliance when power comes
back.
I can’t change
the fan speed.
• Is the appliance on manual
operation?
• Press the fan speed button to select the
fan speed you want.
• Is the appliance on auto mode? • If there is no change in pollution level,
the fan speed would not change.
Check the change in pollution level.
The airflow is
getting weaker
than before.
• Have you been keeping up with
the filter cleaning/replacement
cycle?
• Check the filter cleaning/replacement
cycle and conduct an accordant
action.
• Please call customer service center.
LED display
is off.
•Can you feel the airflow? •Press any button for activation.
• If the appliance is under Child Lock,
deactivate Child Lock.
The air outlets
produce a
strange smell.
• If used when smoking or
cooking, the strong odor may
permeate the filters. You may
have to replace the filters.
• Ensure to ventilate before using the
appliance.
You may have to replace the filters if
strong odor permeates the filter.
• Have you been keeping up with
the filter cleaning/replacement
cycle?
• Check the filter cleaning/replacement
cycle in the user manual to conduct
an accordant action or call customer
service center.
As soon as
I turn on the
power, the LED
light flickers.
• Did you turned the appliance on
just after plugging it?
• The LED light flickers to comprehend
the current indoor air condition for 30
seconds when it turns on. It will display
the air quality within 30 seconds.
PM
concentration
stays high
on the LED
display. (It does
not change to
Green.)
• Have you checked whether the
door or windows in the room
open?
• In the surroundings with introduction of
outside air, it may take longer to lower
the PM concentration.
• Is the pollution (PM) sensor
clean?
• Clean the pollution (PM) sensor.
PM
concentration
stays low on
the LED display.
(It does not
change from
Green.)
• Have you not installed the
appliance on the space where
pollution is easily detected?
• Move the appliance.
• Isn't the air condition of the room
staying clean?
• If the color on LED display changes
when you hang your laundry nearby
the appliance, it is operating well.
The color on
the LED display
changes too
often.
• Have you opened and closed
the door of the room frequently?
• Opening/closing the door or rapid
change in temperature may be
environmental factors for changes in
PM concentration.
Troubleshooting
Problem(s) What You need to Check Possible Solutions
The fan speed
stays on high
even when the
color on the
LED display is
Green.
• Is the appliance on manual
operation?
• In case of manual operation, your
selected fan speed prioritizes the PM
concentration. Adjust the setting for the
change.
Current humidity
is always
indicated as
high.
• In places with higher humidity
(e.g., rooms close to kitchen
or bathroom) the humidity level
could usually be indicated as
high.
• If the humidity level does not change
when placed in other rooms, please
call the customer service center.
The humidity
level indicated
on the appliance
differs from the
one on other air
purifier.
• The precision or response rate
differs for every hygrometer.
The gas
pollution stays
on high.
• In case of initial operation or operation after long period of nonuse, the gas
pollution level may be indicated as high temporarily.
(It takes about 24 hours for the gas sensor to be stabilized, which is not a
malfunction.
• If the gas pollution level stays high, it might be a case that the surroundings are
exposed to harmful gases that are not detected by humans.
I connected the
appliance with
my Wi-Fi, but
the application
in my smart
phone does not
recognize the
connection.
• You may want to reconnect the appliance.
• Ensure your router is on.
• You may want to check the internet connection.
The pop-up of
the appliance
is slanted.
The appliance
looks strangely
rotated.
• In case of obstacles or
intervention from pressures by
objects around the appliance
may dislocate the pop-up or
rotating position.
• Unplug, then plug the appliance back.
The pop-up and the rotating position
shall be reset to initial setting.
Troubleshooting
20 21
MEMO
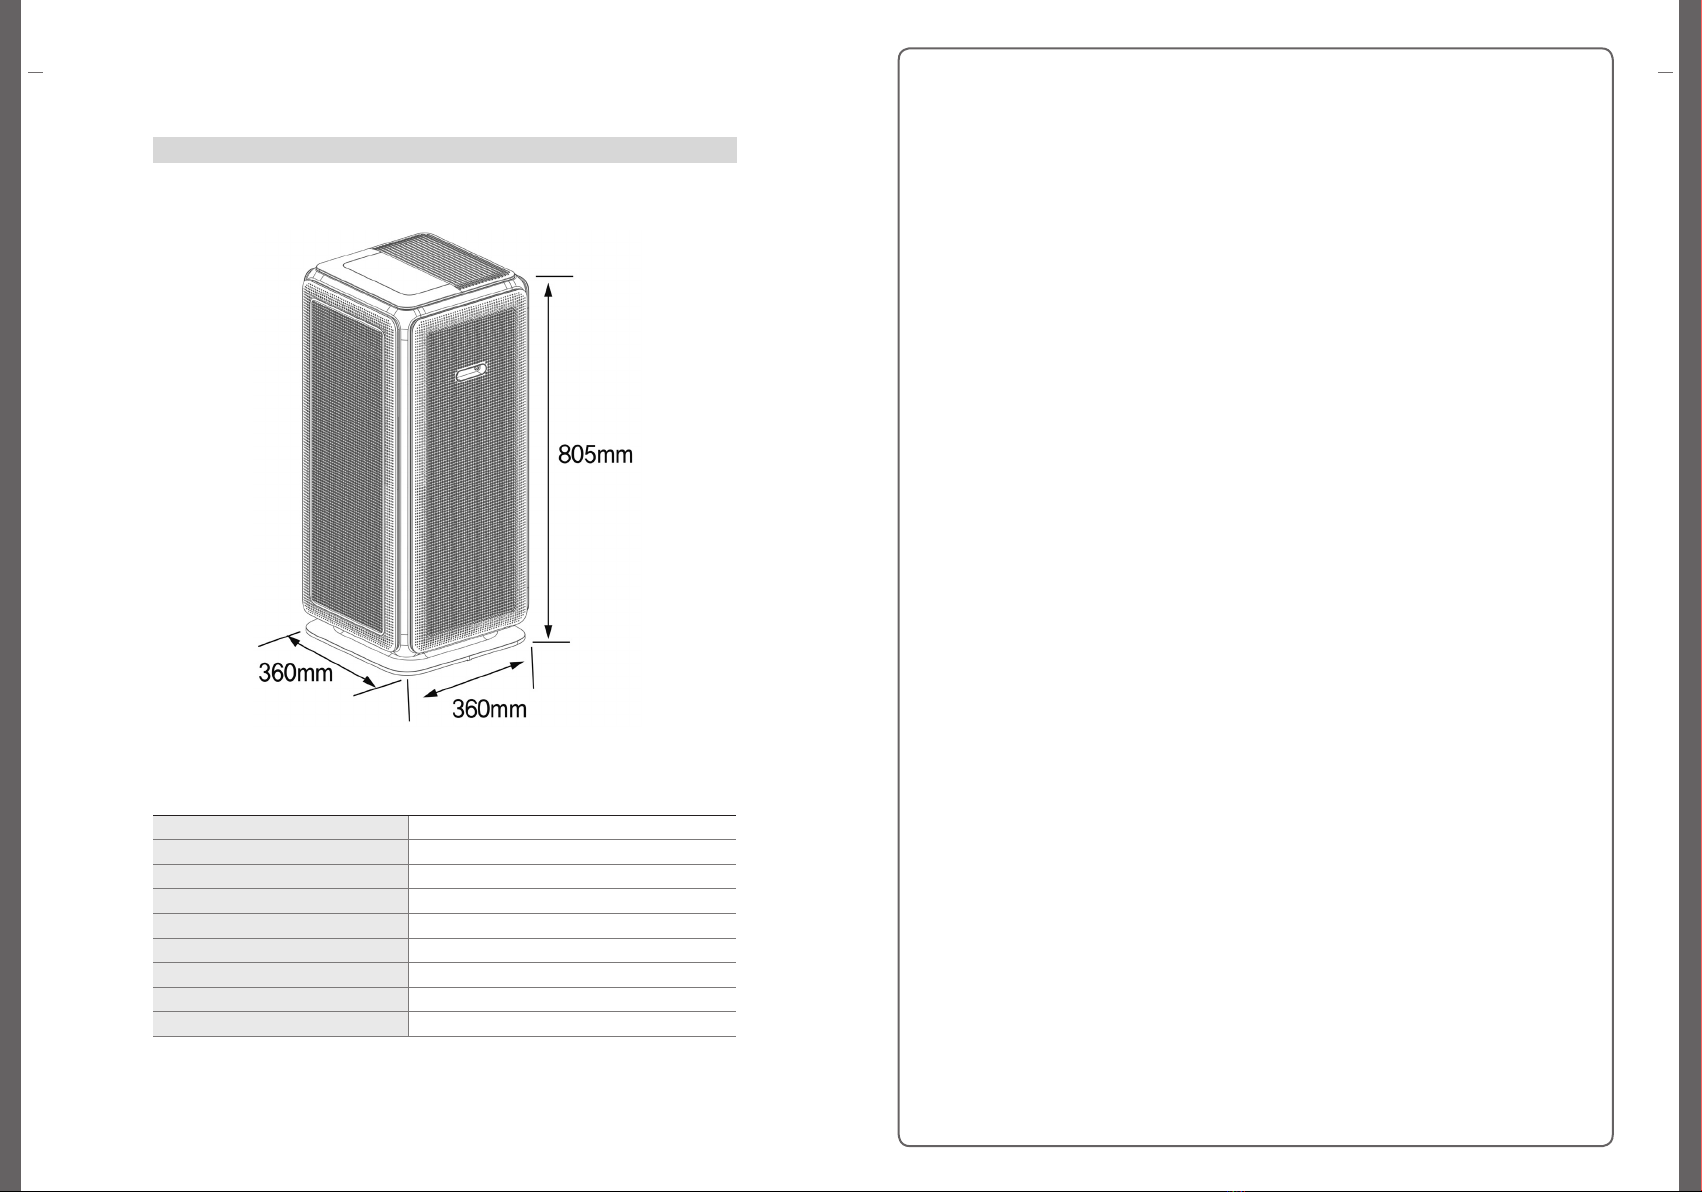
Unit Specifications
Product Name Air Purifier
Model No. ACL-140
Power Voltage 220-240V, 50Hz/60Hz, Single Phase
Power Rate 48.0W
Insulating Class Class 2
PM Collection Method Mechanical PM Collection
Recommended Place of Installation Household
Room Area Served 46.2㎡
Weight 17.0kg
Unit Specifications
※ The appearance and product specifications may be changed to improve the product performance.
Model A C L-14 0

Product Warranty
Cold water
(For home use)
Product Warranty
Period 1 year
Part Preservation
Period 7 years
Regarding the Service
SK magic Co., Ltd. provides the warranty for the product as under according to the
Consumer Dispute Resolution Standards by item (Fair Trade Commission Notice).
A designated partner shall provide services when requested.
Seller’s Name and Contact Information
Month Day Year
Warranty period when using general product for business use is shortened to half. (Business facilities, camping facilities, public places, etc.)
The warranty period is estimated from the product purchase date. If the product purchase date is impossible to check, the warranty
period is estimated from the date after 3 months from the product manufacturing date or the custom clearance date of the product.
Consumer Damage Type
Compensation Detail
Rental Membership
Lump Sum
Within Warranty
Period
After Warranty
Period
Failure byany
defect in
performance
or function
naturally
occurred
during normal
uses
Consumer’s
Intentional or
Accidental
Damage on
Performance
or Function
Others
Customer’s request for
replacement or refund regarding
a failure occurred within 14 days
after purchase
Repair required for a Failure
occurred within 1 year after
purchase
Repair required for a Failure
occurred within 1 month after
replacement
Impossible repair within Warranty
Period due to an obsolete part
Two time Failures with the Same
Defect
Three time Failures with the Same
Defect
Repair Impossible during the Part
Reservation Period
The Company Lost the Product
Consigned by a Consumer
Damage occurred during
Shipment or Installation of a
product when purchasing the
product
Possible for Repair
Repair Impossible during the
Part Reservation Period
Failure by natural disaster (Lightning,
Fire, Earthquake, Flood, etc.)
Part Replacement requested when No
defect in performance or function
※Since a fee is charged for a service requested if there is no failure, please read User Manual before requesting a service.
※This warranty is applicable only in the Republic of Korea. Since this warranty is not issued again, please preserve this warranty with User Manual.
Product Replacement
or Rental Registration
Fee (including the
advanced rental fee)
Refund
Free Repair
Free Repair
Product Replacement
Free Repair
Product Replacement
(3 Failures in 1 year)
Product Replacement
(5 Failures in 1 year)
Product Replacement
Product Replacement
Free Repair or Product
Replacement
Paid Repair
Replacement with an
Alternative after
Receiving Fee
corresponding to
Paid Repair
Free Repair
Paid Repair
Not Applicable
Not Applicable
Free Repair
Not Applicable
Paid Repair (Free Repair
for Premium Membership)
Paid Repair (Free Repair
for Premium Membership)
Paid Repair (Free Repair
for Premium Membership)
Refund by adding 5% of
the purchase price to
the amount from the
application of straight-
line depreciation to the
purchase price
Refund by adding 10%
of the purchase price to
the amount from the
application of straight-
line depreciation to the
purchase price
Replace the
product when it is
not resolved after
repair free of charge
Paid Repair
Product Replacement by
applying straight-line
depreciation after Receiving
Fee corresponding to Paid
Repair
Paid Repair
Paid Repair
Product Replacement
or Full Refund
Free Repair
Free Repair
Replacement with a
Product in the same class
Free Repair
Product Replacement
Product Replacement
Product Replacement
Product Replacement
or Full Refund
Free Repair or Product
Replacement
Paid Repair
Product Replacement
after Receiving Fee
corresponding to
Paid Repair
Paid Repair
Paid Repair
Not Applicable
Not Applicable
Not Applicable
Not Applicable
Paid Repair
Paid Repair
Paid Repair
Refund by adding 5% of
the purchase price to the
amount from the
application of straight-
line depreciation to the
purchase price
Refund by adding 10%
of the purchase price to
the amount from the
application of straight-
line depreciation to the
purchase price
Not Applicable
Paid Repair
Product Replacement by
applying straight-line
depreciation after
Receiving Fee corresponding
to Paid Repair
Paid Repair
Date of Purchase (Entry column by the seller)
22 23
Product Warranty
MEMO

SK magic Customer Service Center 1800-18-7878
www.skmagic.com.my
Table of contents
Other SK magic Air Cleaner manuals


