SK magic ACL-25C1A User manual

magic Air Purier
ACL-25C1A (All Clean 285C)
ACL-20C1A (All Clean 267C)
P.N : M510300013 (REV.01)
Please scan for Customer Support Mobile Page
ACL20C1AUSWH
(All Clean 267C)
ACL25C1AUSCE
(All Clean 285C)
• Please thoroughly read the safety information in this manual before using the product to ensure
proper usage.
• Store the manual somewhere safe and accessible so that it can be accessed in the future.
• This product is for domestic use (U.S.A) only and cannot be used in other countries with different
power supply and voltage requirements.
• The design and appearance of this product are subject to change without prior notice.

2
Safety Information 3
Product Features 8
Before First Use 9
Filter Installation 9
Wheel Cap Removal 10
Product Description 11
Parts 11
Control Panel 12
Display 14
Usage 16
Air Purification Process 16
Filtration 16
Dust Sensor Sensitivity 17
Filter Replacement 19
Cleaning 22
Exterior 22
Front and Rear Covers 22
Sensor 23
Pre-filter 24
Air Outlet 26
Troubleshooting 30
Technical Data 33
Warranty Information 34
Contents

3
READ AND SAVE THESE SAFETY INSTRUCTIONS BEFORE USING THIS AIR PURIFIER
• When using electrical appliances, use caution to reduce the risk of hazards such as fire,
electrical shock, and injury.
• This product is not intended for use by persons (including children) who lack physical,
sensory , or mental abilities, or who lack experience and knowledge to safely use the
product without supervision or instruction.
• Supervise children and do not allow them to play around the product.
WARNING
Failure to follow warning items may result in serious injury or death.
CAUTION
Failure to follow caution items may result in minor injury or product damage.
WARNING
Read these instructions carefully before using the product.
Place the product where it is not at risk of being tipped or knocked over.
Place the product near a power outlet. Avoid using extension cords or power strips to avoid
tripping hazards.
DO NOT COVER the power cord or plug with anything. You should place the product in low-
traffic areas to reduce to risk of people tripping over the cord.
DO NOT use the product if the power cord will not fit into your power outlet.
Contact a professional electrician if your power outlet is loose or worn out.
NEVER use the product on a slope. Only use the product in an upright position.
TURN OFF and UNPLUG the product when it is not being used.
Before unplugging the product, make sure it is turned off, then grip the power cord to remove
from the power outlet. DO NOT pull from the cord.
DO NOT USE the product if the power cord or power outlet is damaged, the product is
malfunctioning, or if the product has been damaged in any other way.
DO NOT USE the product outdoors.
DO NOT USE the product if it is not fully assembled.
DO NOT USE the product if combustible gases or vapors are present.
DO NOT USE the product in areas near water, such as your bathroom, laundry area, or other
places exposed to rain or moisture.
DO NOT PLACE OR ALLOW foreign objects to obstruct the ventilation or exhaust openings.
Doing so may result in electric shock, damage to the product, and injury.
DO NOT BLOCK any air intakes or outlets.
Safety Information

4
DO NOT PLACE any heavy objects on the product.
TURN OFF and UNPLUG the product before attempting to service it.
Do not use a damaged power cords or loose outlets.
• Doing so may cause electric shock or fire.
• If the power cord is damaged, contact the place of purchase or service center to exchange it.
Be sure to plug the power cord into a 120V, 60Hz outlet.
• Failure to do so may result in product failure or damage.
Do not use the product with unstable voltage for an extended period.
• Doing so may result in fire.
Do not pull on the power cord to move the product.
• Doing so may result in product failure or damage.
Do not touch the power cord with wet hands.
• Doing so may result in electric shock.
Do not damage or deform the power cord by bending it excessively or pressing it with heavy
objects.
• Doing so may damage the power cord, resulting in a fire or electric shock.
This appliance has a polarized plug (one blade is wider than the other). To reduce the risk of
electric shock, this plug is intended to fit in a polarized outlet only one way.
• If the plug does not fit fully in the outlet, reverse the plug. If it still does not fit, contact
a qualified electrician. Do not attempt to defeat this safety feature.
Do not connect and disconnect the power cord repeatedly.
• Doing so may result in electric shock or fire.
If water has entered the power supply module, unplug the power cable and dry the product
completely before use.
• Failure to do so may result in electric shock or fire.
Do not use the product for unintended purposes such as preservation of artwork or academic
materials, or for business use.
• Doing so may result in deterioration in the quality of preserved items.
Wipe off any dirt or water on the pins and contacts of the power cord.
• Failure to do so may result in electric shock, fire, or short circuit.
Do not plug multiple electric appliances into one outlet at the same time.
• Doing so may result in power failure or fire.
Unplug the product during thunderstorms or when it is not being used for an extended period.
• Failure to do so may result in fire.
When opening the filter cover, make sure not to allow your body or any foreign objects to
become trapped on the top of the product.
• Doing so may result in injury or product failure.
If the power cord is damaged, do not attempt to change it.
• Doing so may result in electric shock, injury, or fire.

5
Do not install the product near an electric heater.
• Doing so may result in fire.
Do not allow pets to bite the power cord.
• Failure to do so may result in electric shock or fire.
Do not place electric appliances on the product, such as heaters and TVs.
• Doing so may result in fire, electric shock, or malfunction.
Do not install the product in humid, dusty, or splashed water.
• Doing so may result in electric shock, injury, or fire.
Do not use flammable gas or substances near the product.
• Doing so may result in product cracking, electric shock, or fire.
This product is intended for home use and should not be installed or used in an automobile or
any other area with a shifting or unstable surface.
• Doing so may result in injury or product damage.
Do not insert sharp objects, such as an ice pick, into the sensor.
• Doing so may result in electric shock.
If you hear a strange sound, smell burning, or see smoke coming from the product,
immediately unplug the power cord and contact our service center.
• Failure to do so may result in electric shock or damage.
If the leakage of explosive gas, such as isobutane, propane, or LPG, is detected in the place
where the product is installed, ventilate the area immediately without touching the product or
power cord.
Never immerse the product in water.
• Doing so may result in electric shock.
Do not spray flammable substances, such as pesticides or air fresheners, on the air inlet.
• Doing so may result in fire or deterioration.
Do not open, repair, or modify the product.
• Doing so may result in electric shock, injury, or fire.
• Please contact our service center for repairs.
Do not place water containers, chemicals, food, small metals, or flammable substances on the
product.
• If any objects enter into the product, it may result in electric shock, fire, and damage.
• If an object blocks the air outlet, the product may not operate normally, causing a
malfunction.
Disconnect the power cord before cleaning the product.
• Failure to do so may result in electric shock or fire.
Do not spray directly with water or clean the product with benzene or thinner.
• Doing so may result in electric shock or fire.
Do not put your fingers or foreign objects into the air inlet or air outlet.
• Doing so may result in injury or product failure.

6
Due to the nature of the product, the fan can be removed and washed. Separated components
are not toys. Do not allow children to play with them.
• Doing so may result in injury.
Do not push or lean on the product.
• Doing so may result in the product falling over and causing injury or product failure.
Do not let children hang or climb on the product.
• Doing so may result in injury and product failure.
CAUTION
Wash the pre-filter regularly with water, and use it only after sufficiently drying it.
Install the product on stable and level ground.
• Vibration may occur when used on uneven, unstable surfaces, such as carpet.
• Using it on a carpet or blanket may cause the sensor to malfunction or result in the product
falling over.
Make sure to assemble the parts after cleaning.
• Operating without some components, such as the filter and filter cover, may result in
malfunction.
Do not install the product in a location where there are strong odors, smoke, or oil, such as in
cafeteria or meat restaurant.
• Doing so may result in fire or deterior ation.
Do not install the product in a location exposed to direct sunlight.
• Doing so may result in discoloration or decolorization.
Allow at least 1 ft (about 30 centimeters) of space between the product and its surroundings
and leave at least 3 1/4ft (about 1 meter) of space above the product.
• Failure to do so may contaminate the ceiling and walls.
Do not apply force or shock to the product.
• Doing so may result in product damage.
To ensure proper air circulation, install the product so nothing obstructs the airflow on the
sides, back, or front of the product.
Do not install the product near curtains.
• Doing so may affect the product’s performance.
Install the product at least 6 1/2ft (about 2 meters) away from electronic devices, such as TVs.
• Radio interference may occur.
Replace used filters with new filters when it’s time to replace them.
• Failure to do so may result in degraded performance.
Be careful not to expose the product to freezing temperatures.
Do not operate with the filter detached.
• Doing so may reduce the cleaning properties of the filter and result in malfunction.

7
FCC Notice
The following notice is related to the transmitter module contained in this product. This
product has been tested and found to comply with the limits set forth for Class B digital devices,
pursuant to Part 15 of the FCC Rules. These limits are designed to provide reasonable protection
against harmful interference in residential installations. This product generates, uses, and can
emit radio frequency energy. If not installed and used in accordance with the instructions,
this product may cause harmful interference for radio communications. However, there is no
guarantee that interference will not occur in a particular installation. If the product does cause
harmful interference for radio or television reception, which can be determined by turning the
product off and on, the user is encouraged to try one or more of the following measures:
• Reorient or relocate the receiving antenna.
• Increase the distance between the product and the receiver.
• Connect the product to a power outlet on a different circuit from the one the receiver is
connected to.
• Consult your dealer or an experienced radio/TV technician for help.
This product complies with part 15 of the FCC Rules. Operation is subject to the following two
conditions:
(1) This product may not cause harmful interference.
(2) This product must accept any interference received, including interference that may result in
undesirable operation.
Any changes or modifications in the construction of this device that is not expressly approved by
the party responsible for compliance could void the user’s authority to operate the equipment.
FCC RF Radiation Exposure Statement
This product complies with FCC radiation exposure limits set forth for uncontrolled
environments. This transmitter must not be co-located or operated in conjunction with any
other antenna or transmitter. This product should be installed and operated with a minimum
distance of 20 cm (7.8 inches) between the antenna and your body. Users must follow the
specific operating instructions to satisfy RF exposure compliance.
This product is not a medical device. It is not intended to diagnose, treat, cure, or prevent any
disease or condition, and it is not a replacement for medical care from a medical professional.
If you require medical care for any disease or condition, seek assistance from a qualified
medical professional. If you have any disease or medical condition, consult your physician
before using this product. Use of this product other than as directed and intended may result
in adverse results.

8
This is a hygienic, easily detachable product designed to keep the
inside of the product clean.
The All-in-One Care filter provides effective solution for eliminating
various harmful airborne contaminants.
AUTO
Auto Mode
Depending on the air quality of the indoor air, the fan speed will
be automatically adjusted and the cleaning function will operate.
(Operated by selecting Auto mode.)
Sleep Mode
During Sleep mode, the cleaner will operate at the minimum speed
and all LEDs, except the Sleep mode LED, will be turned off.
Product Features
9
Before First Use
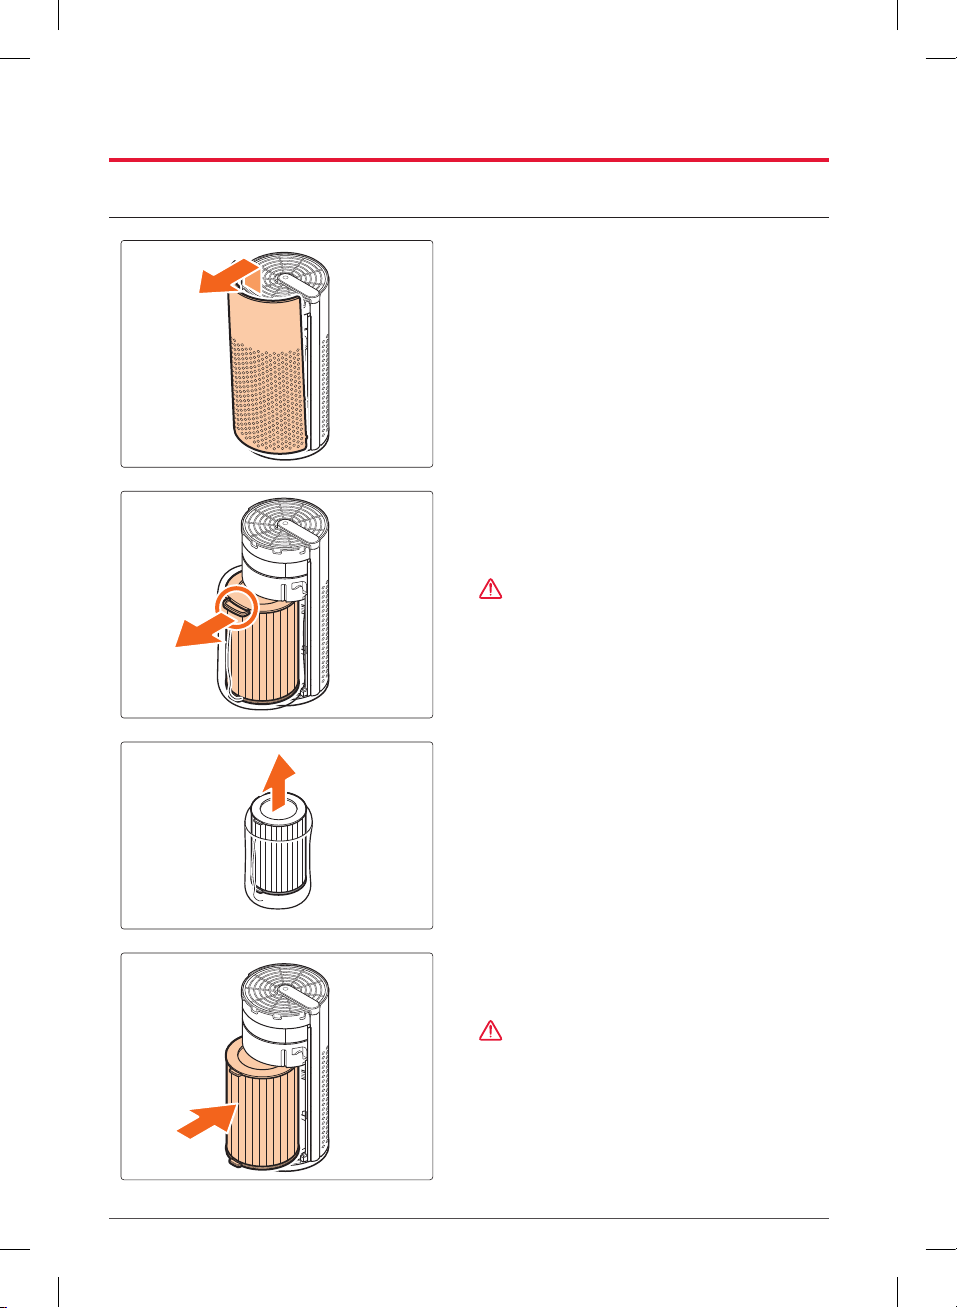
Filter Installation
1. Remove the front cover by slightly lifting
it upward and pulling it.
2. Remove the All-in-One Care filter by
holding the handle at the top of the filter
and pulling it outward.
CAUTION
• Be sure to hold the product’s body tightly
to prevent it from falling over.
3. Remove the plastic packaging from the
new filter that will be installed.
4. Assemble the All-in-One Care filter with
the Pre-filter.
CAUTION
• Be sure to hold the product’s body tightly to
prevent it from falling over.
10
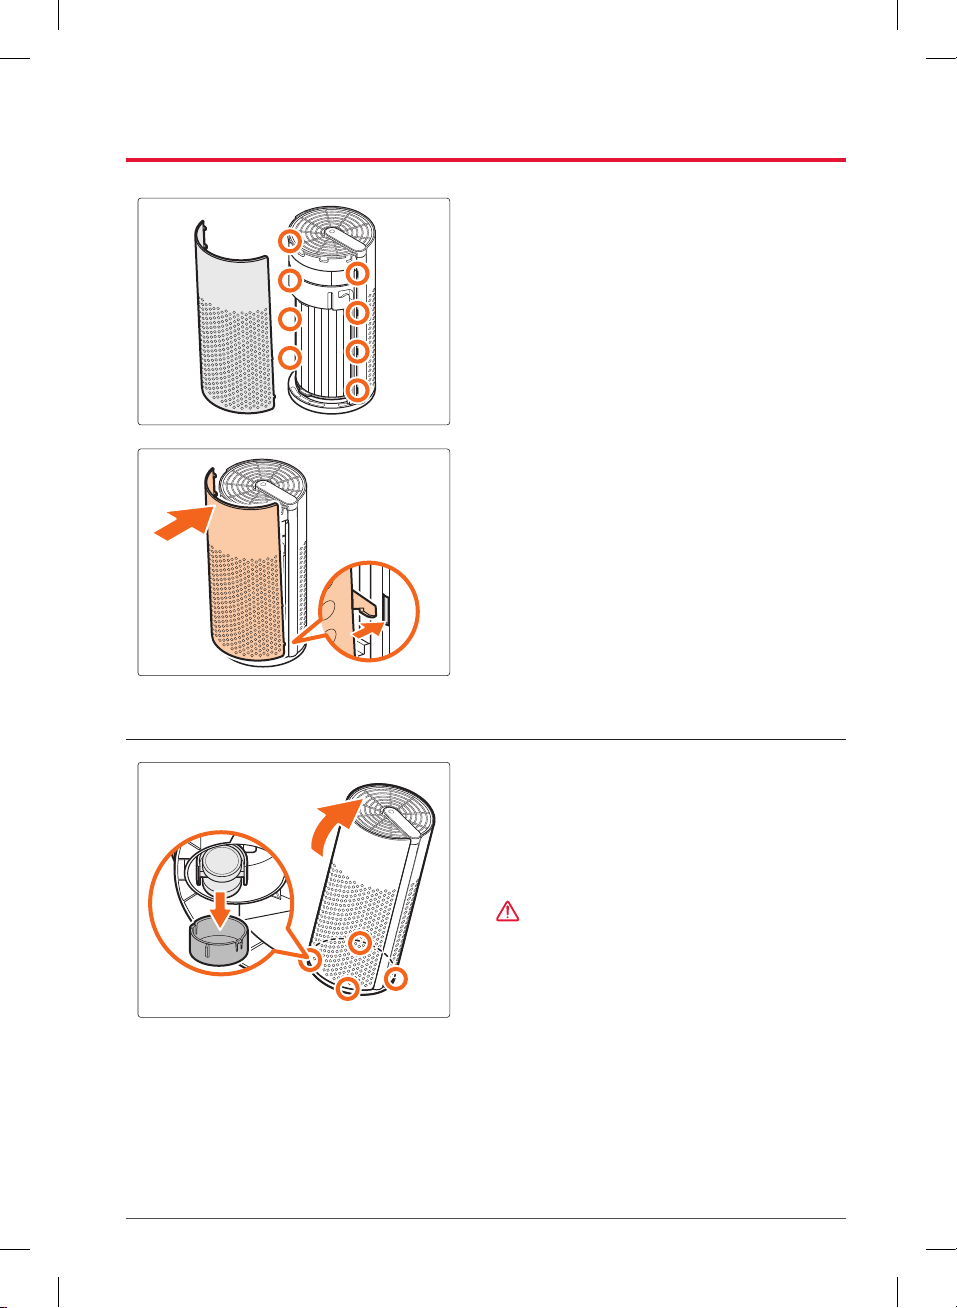
5. Attach the front cover by hooking the
cover onto the product and lowering the
cover downwards to reattach it.
• It is easier to assemble by attaching
the front cover’s lower hooks first.
Wheel Cap Removal
Tilt the product slightly and remove the wheel
caps before use.
• There are 4 wheel caps in total.
• The product is equipped with wheels that
can move back and forth.
CAUTION
• Be careful when moving the product via
wheels on surfaces like rugs, carpets, or
mats, as it may tip over and result in injury
or product damage.
• When using without removing the wheel
cap, vibrations may occur in the product.
• When removing the wheel caps, hold the
product firmly so that the product does not
slip or fall.
–If the product falls, it may result in
product failure and injury.

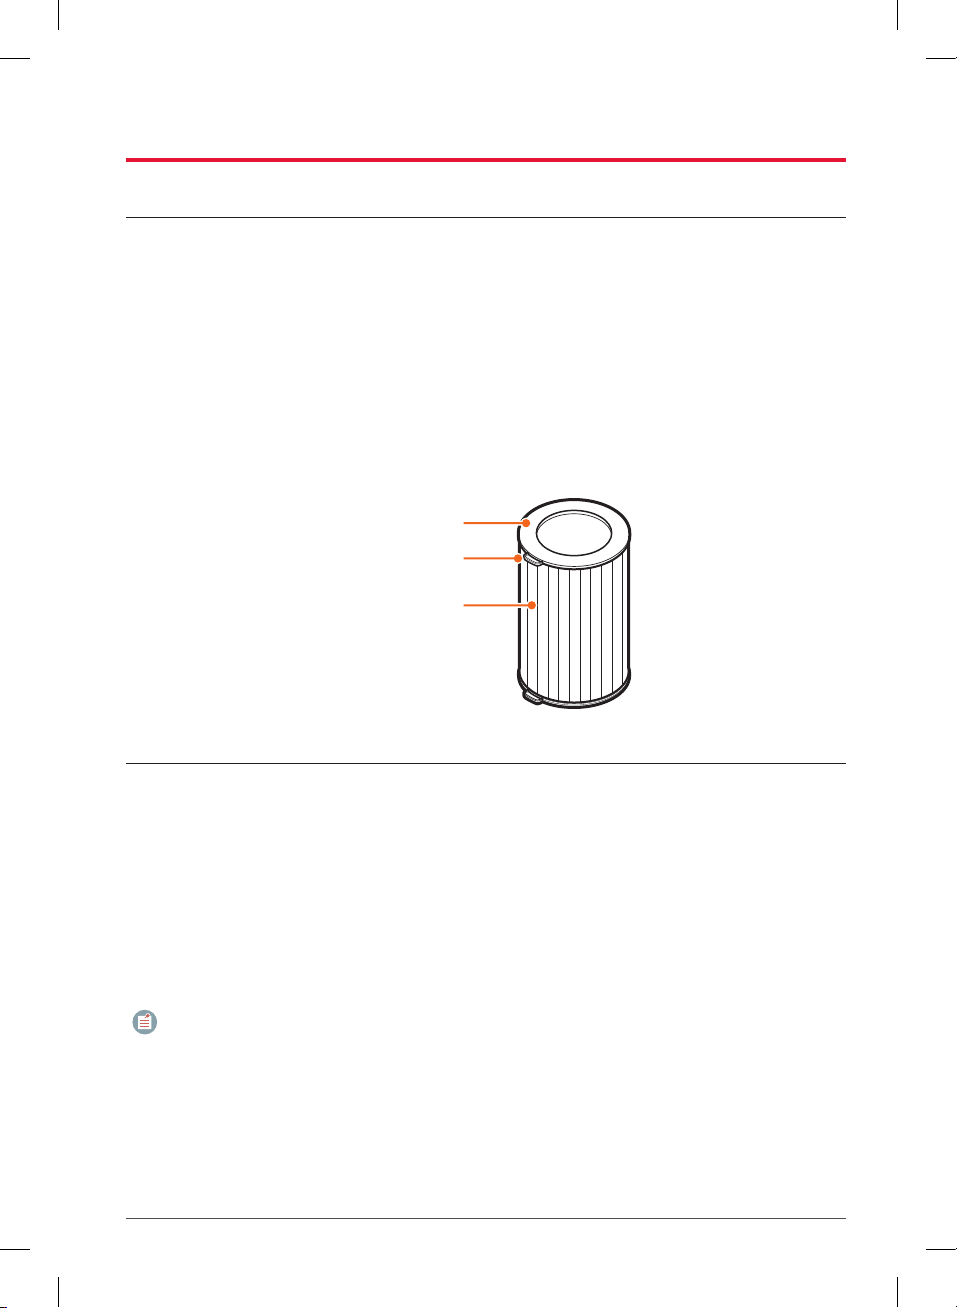
11
External grill
Control panel
Power cord
Wheel
Wheel cap
Pre-filter
Front cover
Gas
sensor
Dust sensor
Internal grill
Fan cap
Fan
Rear cover
Flow path
All-in-One Care filter
Filter handle
The presence of some uneven dot particles on the exterior panel is a natural outcome of the
production process, which uses eco-friendly raw materials, and is not a defect.
Parts
User manual IoT manual Plastic removal notice
Product Description
12
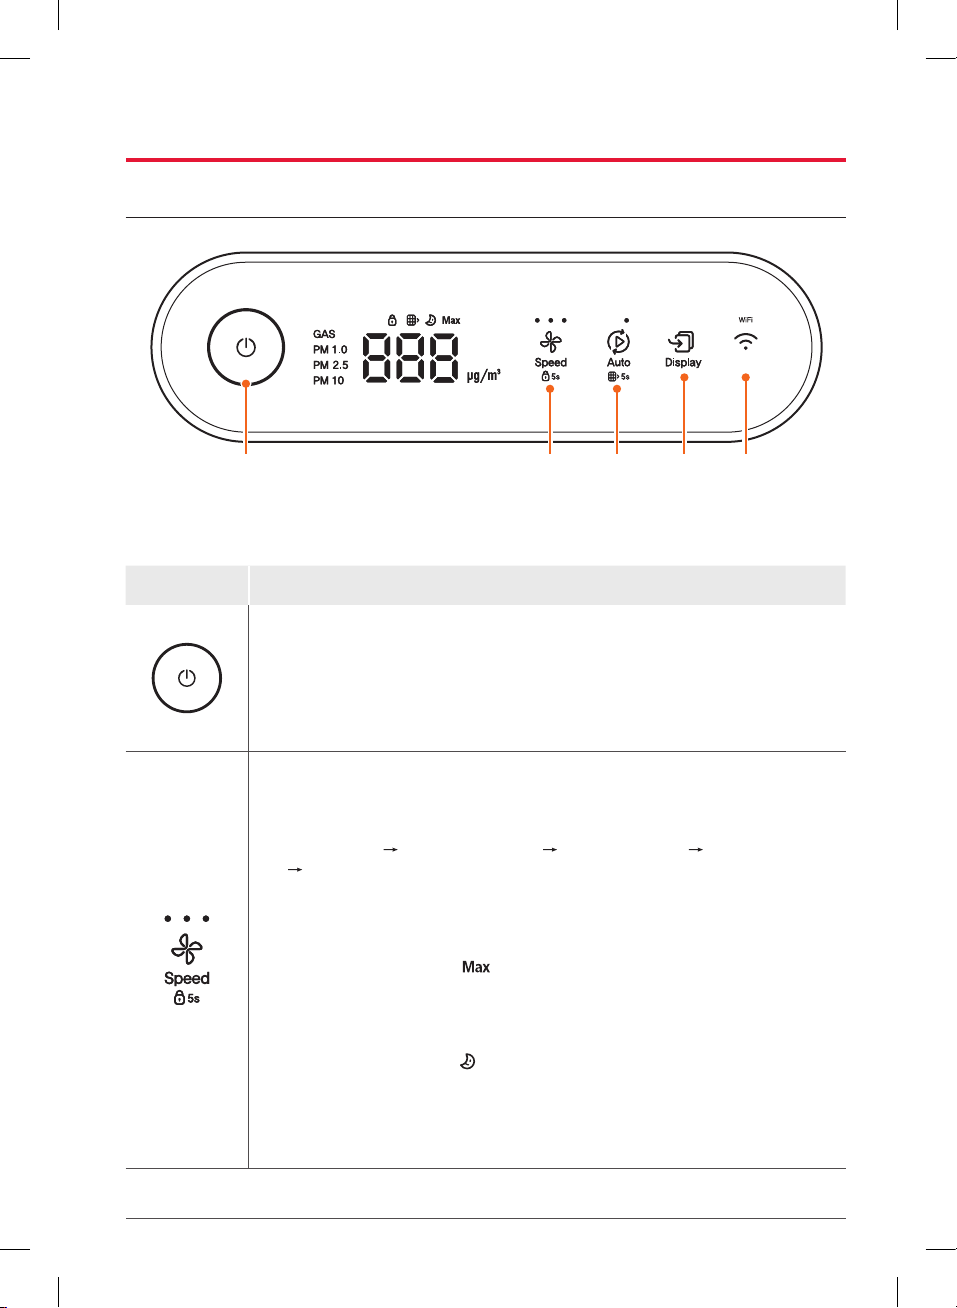
Control Panel
Power button,
Clean lamp
Speed
button
Auto
button
Display
button
Wi-Fi
button
Button Description
• Press this button to operate or stop the product.
• The guide ring displays the air quality (dust + gas).
–Good: Blue, Normal: Green, Bad: Orange, Very Bad: Red
• Press this button to cycle through the Low, Medium, and High speed
settings. The default speed is Low. Press this button to cycle through the
speed settings as follows:
•Low speed ••Medium speed •••High speed •••Turbomode
Sleep mode
• Press the [Speed] button while operating at High speed to enter Turbo
mode.
–The same •••light as used for High speed will turn on.
–For Turbo mode, the icon will appear.
• Press the [Speed] button two times while operating at High speed to
enter Sleep mode.
–All the LEDs will turn off and the RPM will change.
–For Sleep mode, the icon will appear.
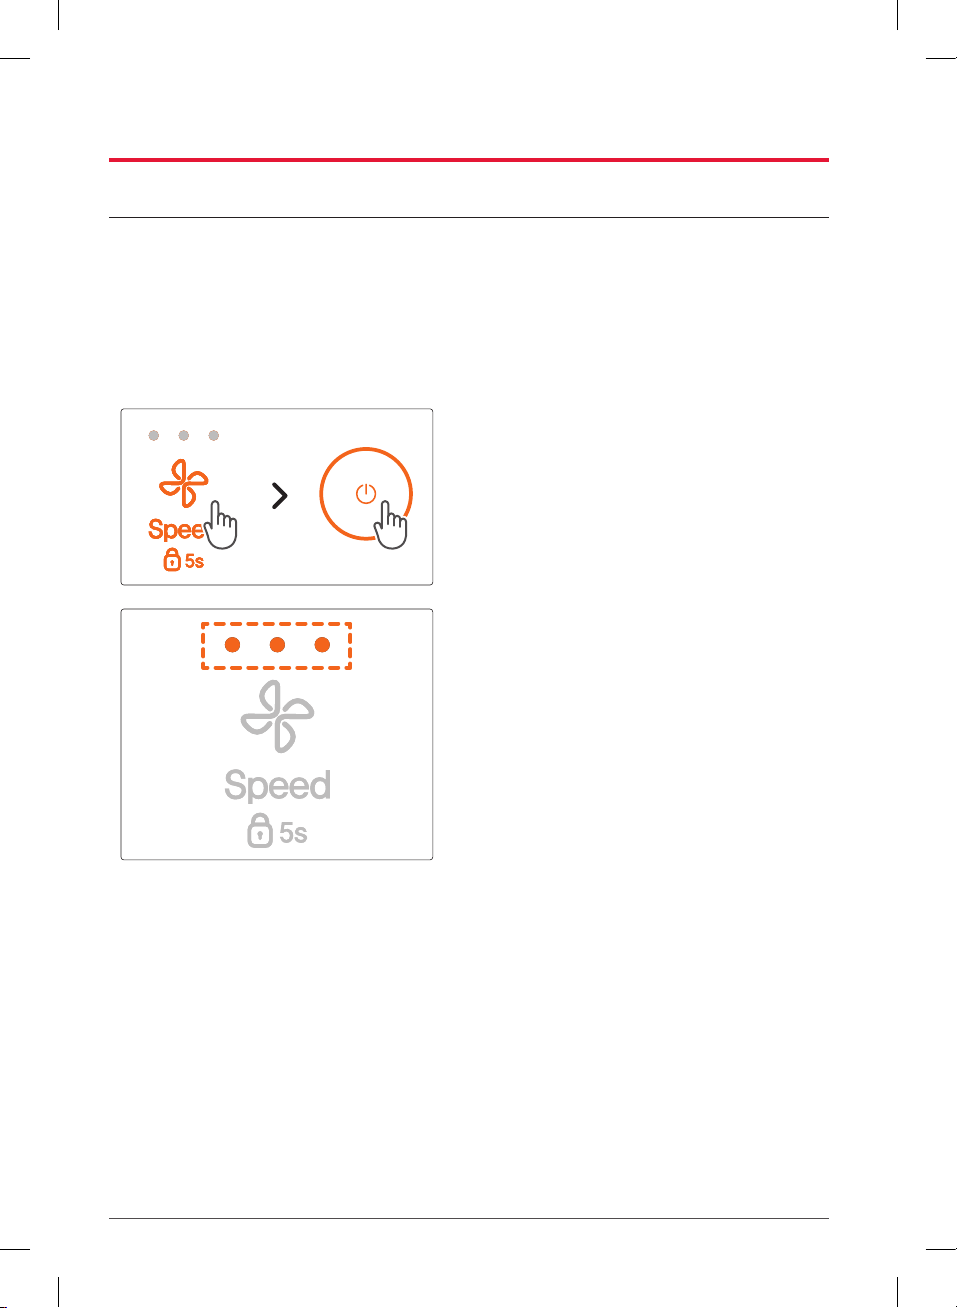
• Press and hold the [Speed] button for 5 seconds to operate the key lock.
–When locking, operation of the Touch unit on the display will turn off
until unlocked.
13
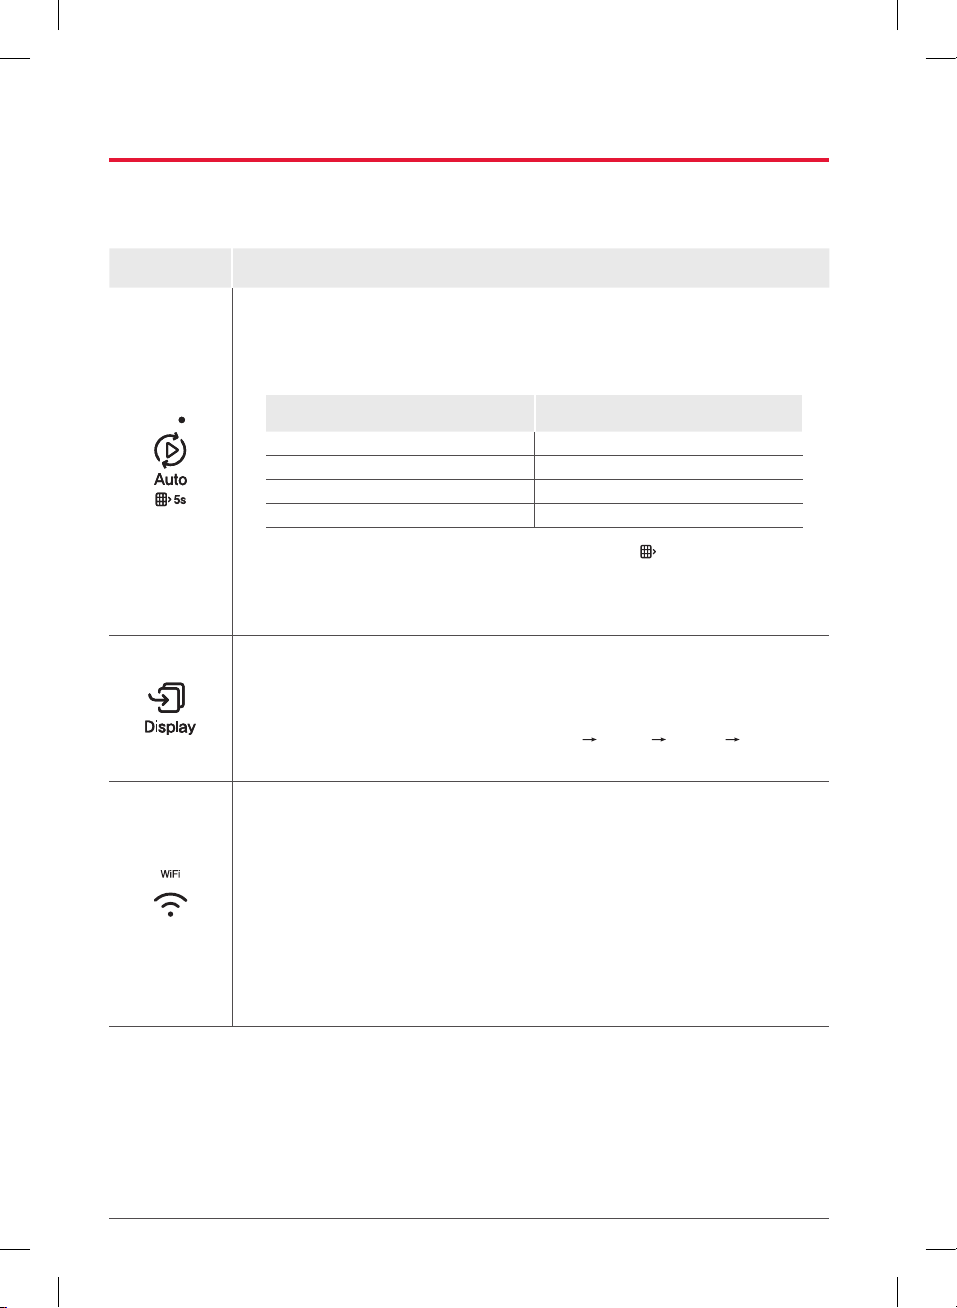
Button Description
• On the pictogram • appears during [Auto] mode operation.
• The speed LED indicates the dust concentration as shown in the table
below.
Dust concentration Speed LED indications
Extreme
• • •
Bad
• • •
Normal
• •
Good
•
• After the product is used for a certain period, the icon will appear.
–Press and hold the [Auto] button for more than 5 seconds to reset it,
and the timer will restart.
• Press the [Display] button to cycle through the current numerical values
of PM 1.0, PM 2.5, and PM 10.
–The default is a screen displays PM 2.5, and when clicked, it will
change in the following order: PM 2.5 PM 10 PM 1.0 OFF
(IoT)
• Press this button to use Wi-Fi when it is available. You connect the
product to the app.
• Press and hold the [WiFi] button for 3 seconds to switch to pairing mode
and the Wi-Fi LED will blink.
–Pairing mode lasts for 10 minutes, and if not connected to the Wi-Fi
router within 10 minutes, the LED will turn off.
–Please refer to the IoT manual for more details.
• The Wi-Fi LED will turn on when the product link is complete.
14
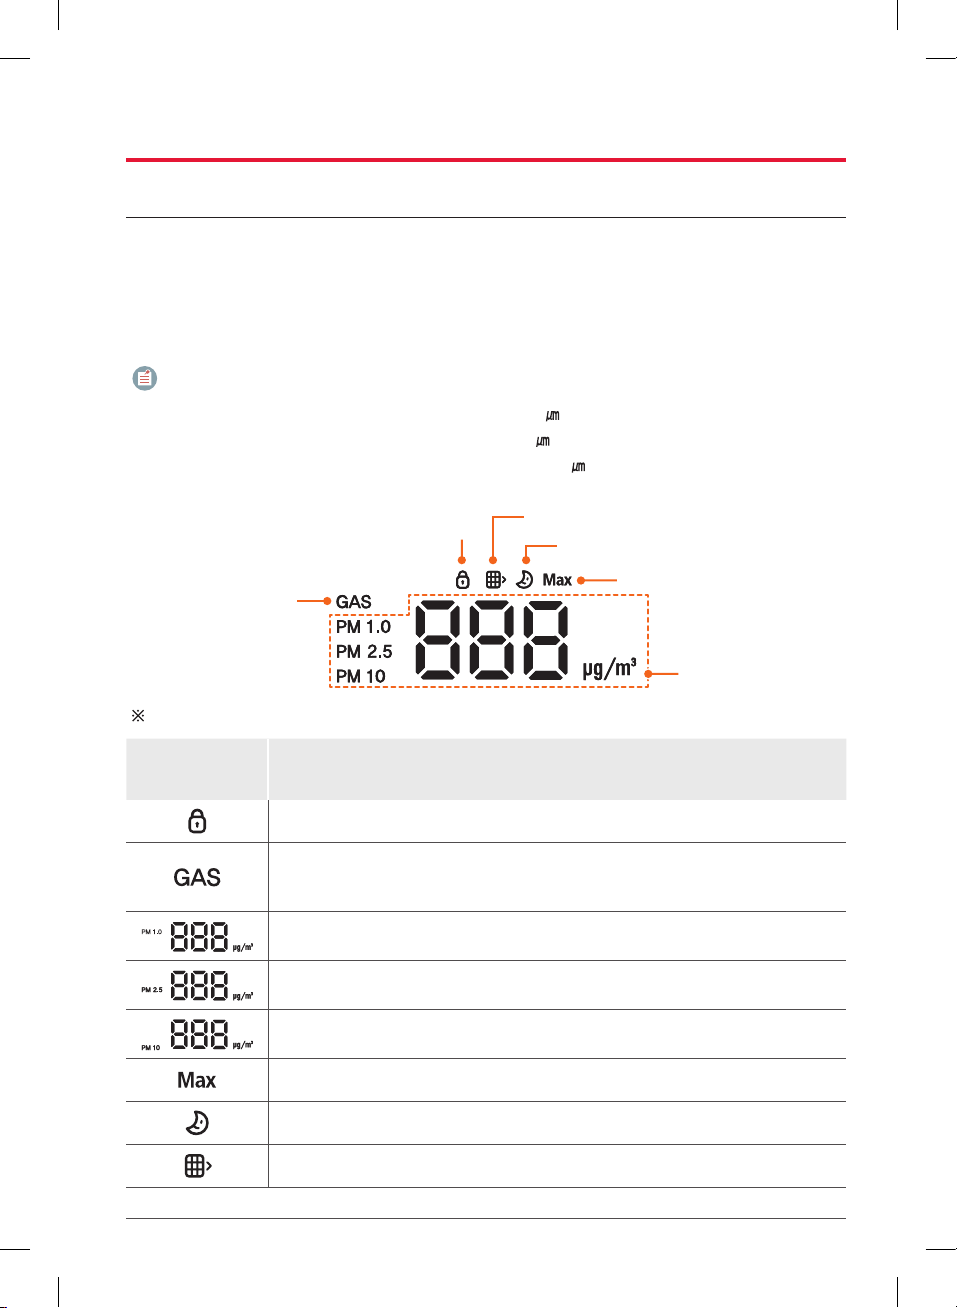
Display
Comprehensive Air Quality Check
• The comprehensive air quality, depending on coarse particles, fine particles, and gas pollution
levels, will be displayed in 4 levels: Good, Normal, Bad, and Very bad.
• The color of the clean lamp changes depending on the comprehensive air quality.
(Good: Blue, Normal: Green, Bad: Orange, Very bad: Red)
NOTE
• Coarse particles (PM 10): Dust with a diameter of 10 or less
• Fine particles (PM 2.5): Dust with a diameter of 2.5 or less
• Ultrafine particles (PM 1.0): Dust with a diameter of 1.0 or less
Gas pollution level
The above image may differ from the actual appearance.
Lock
mode Sleep mode
Turbo mode
All-in-One Care filter
replacement notification
Current dust
concentration
Indicator
Lamp Description
• Displays the product’s button lock status.
• Turns on with white letters when the GAS sensor responds: Normal,
Bad, Very Bad.
• Turns off when it is ”Good.”
• Displays the dust concentration levels for PM 1.0.
• Displays the dust concentration levels for PM 2.5.
• Displays the dust concentration levels for PM 10.
• Turns on when Turbo mode is operating.
• Turns on when Sleep mode is operating.
• Turns on when the filter needs to be replaced.

15
• The clean lamp will turn on when the air cleaner is operating.
• Each time the [Display] button on the upper control panel is pressed, it will cycle between
PM 10, PM 1.0, Screen Off, and PM 2.5; the default setting is PM 2.5.
• If different products are used in the same space, differences in the concentration of coarse
particles and fine particles may occur due to air circulation.
• There may be differences between coarse particles and fine particles, depending on the
usage environment, such as if the product is near a construction site, you are using a
vacuum cleaner, or cleaning blankets.
• In environments where yellow dust occurs or outside air is introduced, the color may be
consistently displayed as Very bad.
NOTE
• The colors of the comprehensive air quality will be displayed by comprehensively
considering coarse particles, fine particles, and gas conditions.
• The comprehensive air quality is displayed based on the worst condition among coarse
particles, fine particles, and gases.
In other words, if coarse particles and gases have a “Good” condition, but fine particles
have a “Bad” condition, the comprehensive air quality will be displayed as “Bad”.
Clean Lamp Blue Green Orange Red
Comprehensive air
quality Good Normal Bad Very bad
Fine particles
(PM 2.5, PM 1.0) Less than 12 13 - 35 36 - 55 56 or higher
Coarse particles
(PM 10) Less than 54 55 - 154 155 - 254 255 or higher
• The figures indicated above are based on the results of SK magic’s own independent testing.
Different results may be observed from product to product and vary depending on the
measuring methodology used. Your results may vary.
Check Message Verification
Check
Message Description
If the control panel is not placed on the external grill, a buzzer will sound
and the drt notification will appear.
• Make sure to place the control panel on the external grill.
CAUTION
• If a drt notification appears, the motor will not rotate.
16
Air Purification Process
• This product will work more effectively in a room with all the doors and windows closed.
• Dust and Particulate Setting: The [AUTO] setting will help remove airborne particulates
from the air for general cleaning and odor reduction.
• Pre-filter: Removes relatively large household dust particles, hair, and pet hair.
• All-in-One Care filter:
–Removal of hazardous gases: Removes substances that cause everyday odors and haze,
such as cigarettes, food, and animal odors, as well as
hazardous gases and VOCs that cause sick house syndrome.
–Removal of fine particles: Removes not only coarse particles that cause allergies from
the air, but also fine PM 2.5 particles and yellow dust.
All-in-One Care filter
Filter handle
Pre-filter
Filtration
1. This product consists of 2 filters that provide the All-in-One air care solution.
2. Using the air cleaner without the filters has no air cleansing effect.
3. When first purchased, new filters may smell. The smell will disappear naturally if used for
more than a day, so use it with confidence.
4. If the air cleaner is used in a foul-smelling environment, the life of the All-in-One Care filter
will be shortened rapidly. In severe cases, odors may seep into the All-in-One Care filter.
If excessive odor occurs, ventilate the area to remove severe odors. It is recommended to
use the product to remove the remaining odor after ventilation.
NOTE
• The Pre-filter can be attached using Velcro. When washing the Pre-filter with water,
remove it from the circular All-in-One Care filter before cleaning it. After washing it, dry it
completely and reattach it using Velcro.
• When washing with water, the Pre-filter may become wrinkled, but this will not adversely
affect the performance of the filter.
Usage
17
Dust Sensor Sensitivity
The initial setting of the dust sensor sensitivity is normal.
If there is no change in the comprehensive air quality even after operating the product in a state
of high indoor air quality pollution level for about 1 hour or more, or if the indoor air quality
pollution level is high but maintains a clean state, the dust sensor sensitivity can be adjusted as
follows:
Setting the Dust Sensor Sensitivity
1. While the power is off, press and hold the
[Speed] button for 3 seconds, then press
the [Speed] button within 2 seconds of
hearing the “ding” sound.
2. Press the [Speed] button to select
Insensitive, Normal, or Sensitive modes
for the dust sensor.
• The initial mode is set to Normal,
and each time the [Speed] button
is pressed, it will cycle between
Insensitive, Normal, and Sensitive, and
the Speed LED will change depending
on the mode.
–• (Insensitive)
When selecting the sensitivity
mode, the • (Insensitive) Speed LED
will turn on, and the dust sensitivity
will decrease.
–• • (Normal)
When selecting the sensitivity
mode, the • • (Normal) Speed LED
will turn on, and the dust sensitivity
will operate in standard mode.
–• • • (Sensitive)
When selecting the sensitivity
mode, the • • • (Sensitive) Speed
LED will turn on, and the dust
sensitivity will increase.

18
3. After selecting the desired sensitivity
mode by pressing the [Speed] button,
press the [Auto] button to confirm the
setting, and and you will hear a “ding”
sound.
• After confirming the settings, turn on
the power to use the product normally.

19
• These notices are guidelines only. Any filter will need to be changed more often depending
on the amount of particulates passing through the product. High amounts of air
particulates , such as dust, dander, or cigarette smoke, will result in any filter working less
effectively and necessitate more frequent filter changes.
• You should check the Pre-filter and All-in-One Care filters from time to time depending on
how often you use the product. If there are strong or heavy odors in your home, you may
need to change your filters more often.
• To maintain intended performance, please only use SK magic product filters.
• The particulate matter adsorbed on the All-in-One Care filter will not be released outside via
the outlet. The change in the color of the surface of the All-in-One Care filter is due to the
fact that it has an excellent dust-filtering function, so it can be used safely until replacement.
• It is recommended to re
place the Pre-filter every 4 months to ensure long-lasting
functionality.
CAUTION
• Always unplug the power cord before replacing the filter.
• When assembling the filter, be sure to check the front (the side with a pull-out handle).
• After replacing the filter, turn on the product and press the [Auto] button for 5 seconds.
When the beep sounds, the filter replacement notification will be turned off and the filter
life timer will be reset. If the filter is replaced with a new filter and you do not receive a
filter replacement notification, perform a filter reset. (The filter replacement notification is
a function that applies only to the All-in-One Care filter, and the Pre-filter does not have a
separate filter replacement notification lamp.)
Filter Cleaning and Replacement Cycle
Filter Cleaning Replacement Remark
Pre-filter Once every 2-4 weeks 4 months
(recommended) Washable
All-in-One Care filter - 12 months Unwashable
The filter replacement cycle may vary depending on the usage environment.
(For how to clean the Pre-filter, refer to “Cleaning” - “Pre-filter.”)
Filter Replacement

20
Replacing the Pre-filter and All-in-One Care Filter
1. Remove the front cover by slightly lifting it
upward and pulling it.
2. Remove the All-in-One Care filter by
holding the handle at the top of the filter
and pulling it outward.
CAUTION
• Be sure to hold the product’s body tightly
to prevent it from falling over.
All-in-One Care filter
3. Remove the plastic packaging from the new
filter.
• Replace filters according to the
replacement time.
• The Pre-filter can be separated from the
All-in-One Care filter by removing the
Velcro.
This manual suits for next models
1
Table of contents
Languages:
Other SK magic Air Cleaner manuals


