Skil-Care ChairPro 909370 User manual
Mounting Bracket
LED
A
B
C
D
E
F
Fig. 1
Fig. 2
Skil-Care’s new ChairPro Seat Belt Alarm combines a wheelchair belt with
an alarm for double wheelchair safety. The belt attaches to the chair and
provides security while the user is seated. When the buckle is opened, an
alarm is activated. To assist long-term acre facilities maintain a restraint-free
environment, Skil-Care has selected a durable buckle that is easily released
by most wheelchair users.
PURPOSE
The ChairPro Seat Belt Alarm is designed to alert caregivers when a patient/
resident has released the wheelchair safety belt buckle and may leave from
the wheelchair.
CAUTIONS
1. The ChairPro Seat Belt Alarm is not a substitute for proper supervision.
Fall-risk and wander-risk patients or residents should be monitored regularly.
2. Check battery each time alarm is used. If weak, replace the 9-volt battery.
3. LED should glow when buckle is closed. If LED fails to glow, check battery.
Replace if necessary.
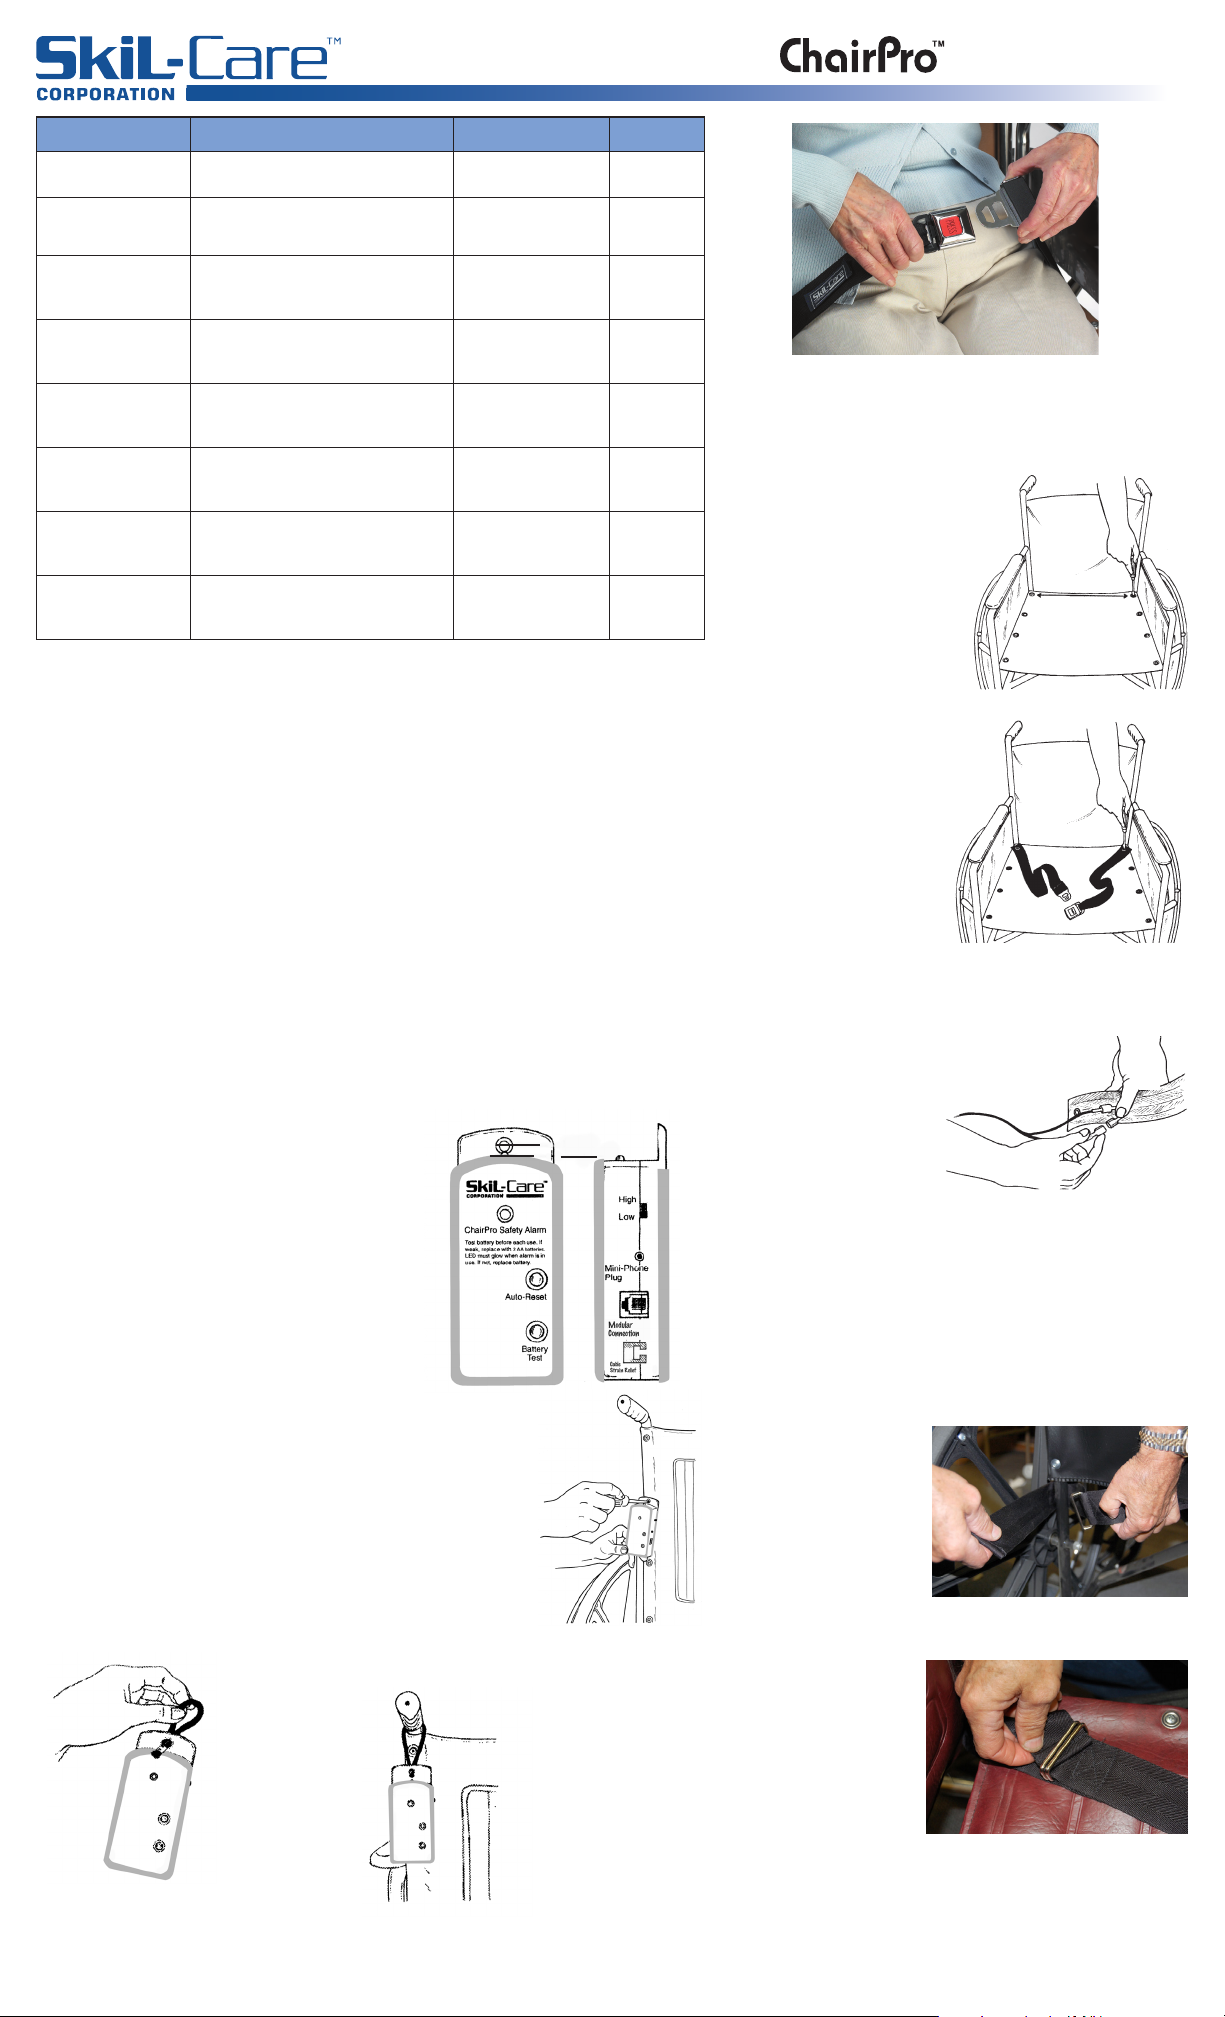
INSTALLATION
Alarm Unit
You may choose one of the following
two ways to attach the alarm unit to the wheelchair.
Attachment of Alarm Unit
Mounting Bracket
1. Remove the second-from-top screw from either the left or
right side of the wheelchair backrest.
2. Remove grommet from screw, place the screw through
hole on alarm unit mounting bracket, and fasten screw to
wheelchair backrest. (Illustration A)
Cord Loop
1. Insert enclosed cord
loop through bracket hole.
(Illustration B)
2. Hang from wheelchair
push-handle (Illustration C)
SEAT BELT INSTALLATION
WHEELCHAIR BELT INSTALLATION (Grommet)
1. Remove the rearmost screws
from the left and right sides of the
wheelchair seat. (Illustration D)
2. Remove the grommets from
the screws, place screws
through the grommets at
the ends of both belt
sections, and refasten the
screws to the wheelchair seat.
(Illustration E)
3. Select either hole in
belt depending upon desired
length, closer holes will yield
a shorter length,
holes closet to the end
will yield a longer length.
4. Attach the two “spade”
connectors on the connector
wire to those on the seat belt.
(Illustration F)
Note, that for removable arm
wheelchairs it may be easier
to install the belt after the arm
is removed.
5. Place connector cord through the space between
the wheelchair seat and backrest. Make certain that
it is away from wheels and other moving parts.
WHEELCHAIR BELT INSTALLATION (Loop)
1. UnThread the loop end of the belt.
2. Remove the arm of the wheelchair
(if removable arms)
3. Lay belt on
wheelchair while
holding loop end,
place loop end around
the bottom of the
wheelchair (Fig. 1).
4. Place loop and
webbing under
both rectangular
rings (Fig. 2)
See Reverse
Side for Loop
installation 5-6.
Re-Order # Description Belt Length Unit
909370 Metal Press Release Seat Belt Alarm with
ChairPro Alarm Unit and Grommets 50”L Set
909373 Metal Press Release Seat Belt Alarm with
ChairPro Alarm Unit and Grommets 70”L Set
909385
Metal Press Release Seat Belt Alarm with
ChairPro Alarm Unit and Adjustable Loop
Attachment
45”L Set
909386
Metal Press Release Seat Belt Alarm with
ChairPro Alarm Unit and Adjustable Loop
Attachment
65”L Set
909392
Metal Press Release Seat Belt Alarm with
Grommets Only
(ChairPro/MultiPro Alarm sold separately)
50”L Set
909394
Metal Press Release Seat Belt Alarm with
Grommets Only
(ChairPro/MultiPro Alarm sold separately)
70”L Set
914117
Metal Press Release Seat Belt Alarm with
Adjustable Loop Attachment Only
(ChairPro/MultiPro Alarm sold separately)
45”L Set
914118
Metal Press Release Seat Belt Alarm with
Adjustable Loop Attachment Only
(ChairPro/MultiPro Alarm sold separately)
65”L Set
Seat Belt Alarm
Safety Alarm
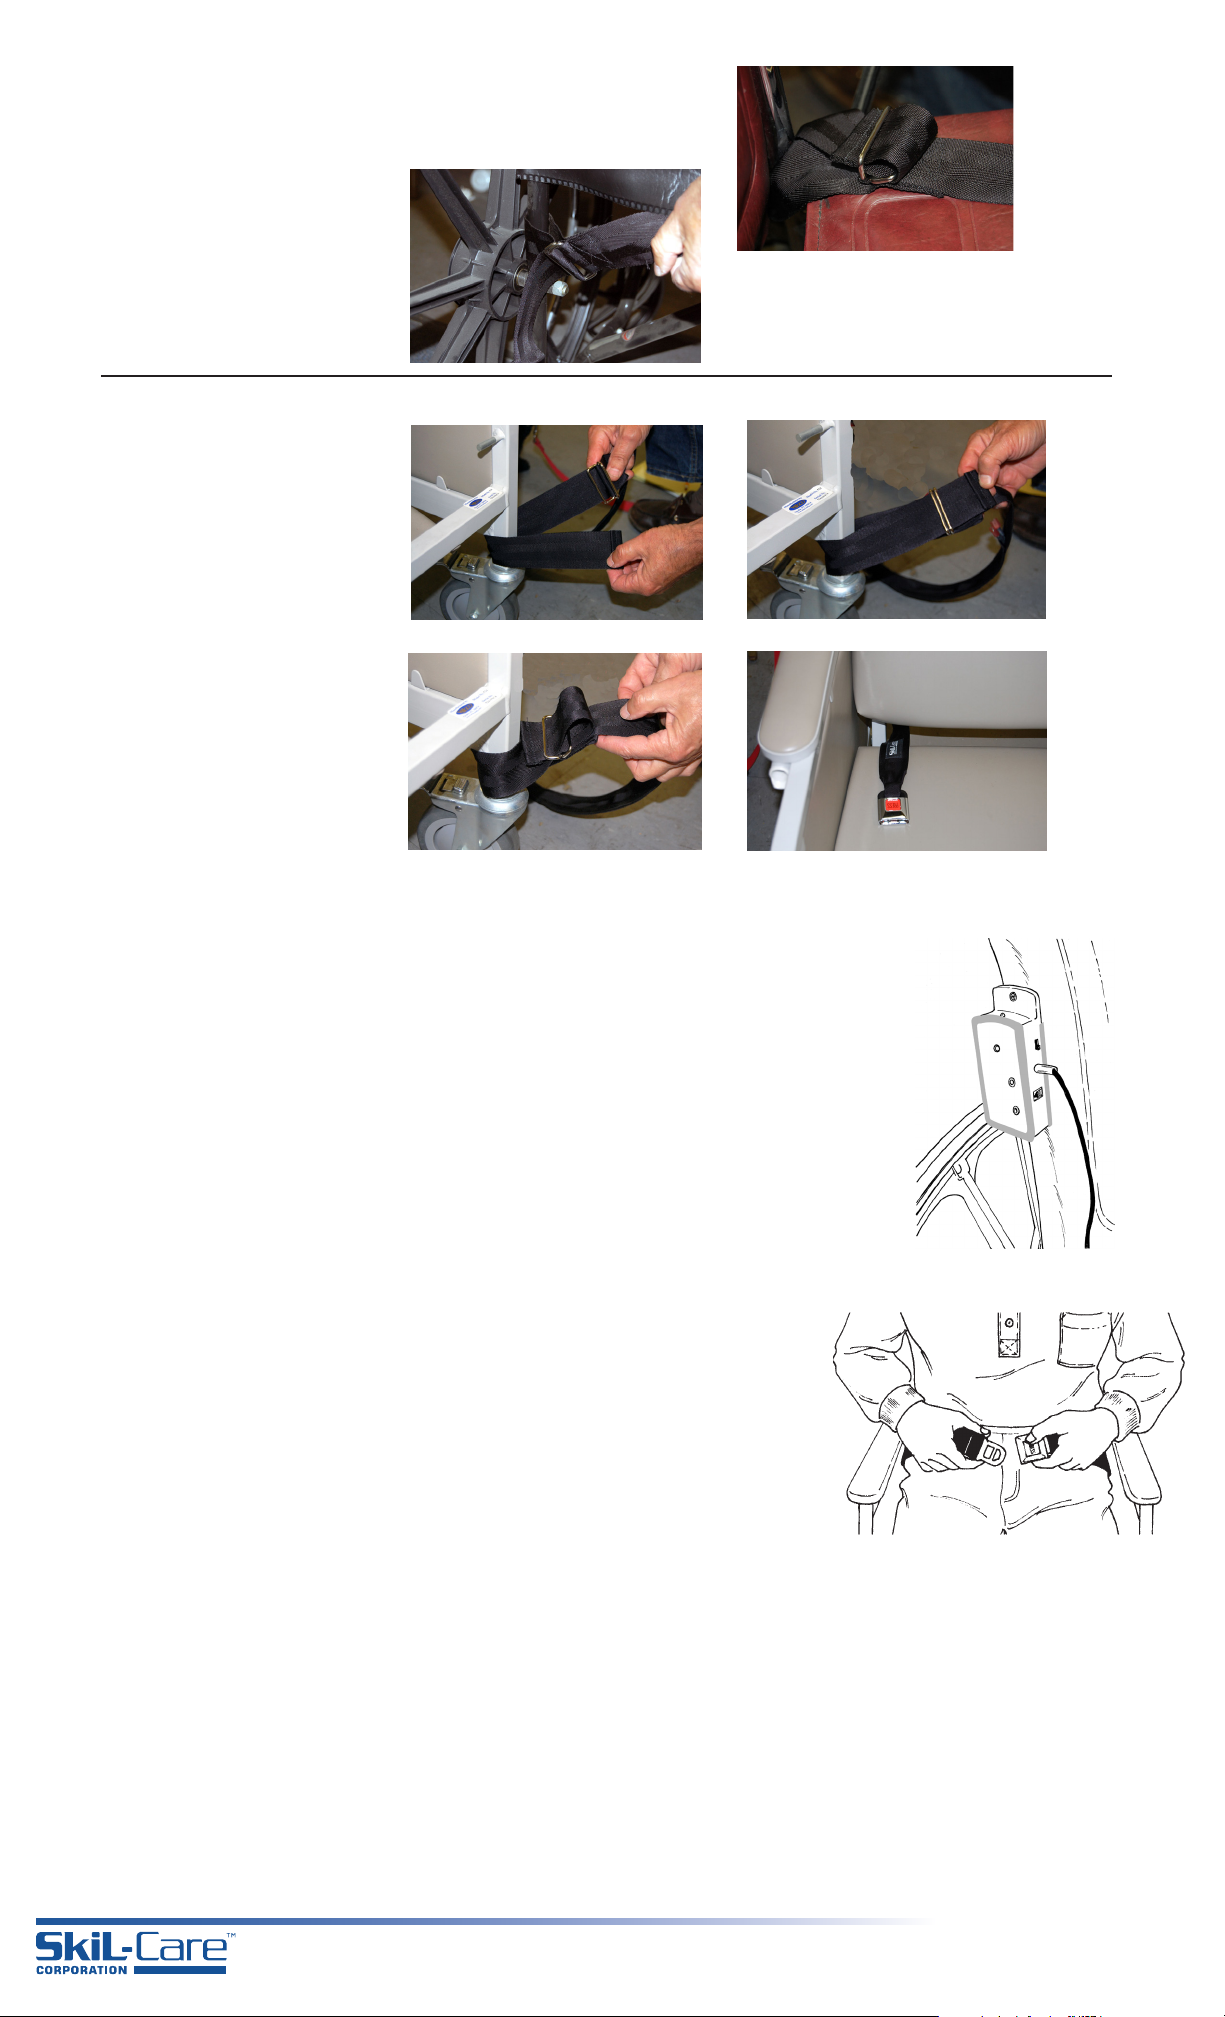
Fig. 3
Fig. 4
Fig. 1 Fig. 2
A
B
Fig. 3
A
B
Fig. 4
G
H
WHEELCHAIR INSTALLATION (Loop) cont.
5. Then place webbing over ring “A” and under ring “B” (Fig. 3)
6. Pull end until taut. Place arm back on wheelchair and repeat again
for alternate side of wheelchair (Fig. 4)
After both belts are attached to the
wheelchair, place the belt around the
resident and adjust the belt so that it is
snug but not uncomrfortably tight.
GERI-CHAIR/UTILITY CHAIR INSTALLATION (Loop)
1. Unthread the loop end of the belt.
2. Wrap loop end of the belt around the
chair leg (Fig. 1).
3. Thread the loop end of the belt
under both rectangular rings (Fig. 2).
4. Then place webbing over ring “A” and
under ring “B” (Fig. 3). Do not tighten
loop until the belt is adjusted.
5. Thread end of buckle through the seat
and place on seat (Fig. 4)
6. Repeat process for other side of chair
7. Adjust length of belt so that it is snug
but not too tight.
Note: There are adjustments with the
tri-glide on he belt and to a lesser degree,
adjustment with the loop end.
OPERATION
1. Remove battery compartment cover on left side of alarm unit and install two “AA” batteries.
2. Press Battery Test button. If alarm doesn’t sound, check battery connection and retest. If alarm fails
to sound, replace battery.
3. Insert mini-phone jack into Mini-Phone Plug receptacle on right side of alarm. (Illustration G) Alarm
will sound. Press Auto-Reset to silence alarm.
4. Before using, test unit by inserting the metal tab into the buckle. Check alarm to make certain that
LED is glowing. Then release buckle. Alarm should sound. Press Reset button to silence alarm.
If alarm fails to sound, make certain that spade connectors and phone jack are securely in place.
5. Select High or Low alarm volume using switch on right of alarm.
6. Important: If the alarm is activated, it may be silenced by pressing the Auto-Reset button.
The alarm is now in stand-by mode. Do not secure buckle when unit is not being used.
Doing so will cause the LED to glow and shorten battery life. Alarm will
automatically reset itself when the metal tab is inserted into the buckle. There is no
On/Off switch.
7. Place belt around user’s waist and secure by placing tab into buckle. Adjust belt to
proper t.
Use the slider buckle to adjust the length of belt. If the belt is too long or short see
step 4 under “Wheelchair Installation (Grommet)”.
8. The belt is released by pressing the “Press” button. (Illustration H)
SAFETY REMINDERS
1. Check battery before each use. If alarm is weak or fails to sound, replace the two “AA” batteries.
2. When unit is in use, check LED regularly. If it is not glowing, replace the two “AA” batteries.
GUARANTEE
The alarm unit, belt, and buckle are replacement guaranteed against defects in materials and workmanship under conditions
of normal use for a period of one year from date of purchase. Please return defective part to dealer from whom the system was
purchased. The dealer will send the defective part to Skil-Care and arrange for shipment of a replacement. The guarantee does not
cover the batteries supplied with the unit.
Distributed by: Skil-Care Corporation
This manual suits for next models
7
Other Skil-Care Security System manuals


Popular Security System manuals by other brands


Secure
Secure USAB-1 operating instructions

B&B
B&B 480 SERIES Operation & maintenance manual

ADEMCO
ADEMCO VISTA-20P Series Installation and setup guide

Inner Range
Inner Range Concept 2000 user manual

Johnson Controls
Johnson Controls PENN Connected PC10 Install and Commissioning Guide

Aeotec
Aeotec Siren Gen5 quick start guide


