Skully FENIX AR User manual

1
SKULLY
Fenix AR
USER’S MANUAL

2

3
The SKULLY Fenix AR provides an entirely new riding experience. It
changes the way you see and interact with your surroundings. The Fenix
AR also requires you to adopt new habits and alter existing patterns to
take full advantage of its groundbreaking technology.
That’s why it’s essential that you read and understand the following
manual completely. Remember, the Fenix AR is primarily a safety
device, and it must be used as directed to provide maximum protection.
It is highly recommended that your wear and familiarize yourself with
the Fenix AR before riding with it. Please be aware of local traffic laws
that may apply to the use of certain features of the Fenix AR.
RIDE WITH ABSOLUTE SITUATIONAL
AWARENESS
The SKULLY Fenix AR provides an entirely new riding experience. It changes the way
you interact with your surroundings. The Fenix AR also requires you to adopt new habits
and alter existing patterns to take advantage of its ground-breaking technology.
That’s why it’s essential that you read and understand the following manual completely.
Familiarize yourself with the features and use of the helmet, before going on a ride.
Remember, the Fenix AR is primarily a safety device, and it must be used as directed to
provide maximum protection.

4
SAFETY INFORMATION
Ride safely. The SKULLY Fenix AR is designed to provide maximum safety and comfort.
However, motorcycle riding presents specific challenges and risks. The Fenix AR can help
reduce but not eliminate risk of injury. Please observe all applicable traffic laws and use caution
when riding a motorcycle.
Riding a motorcycle or off-road vehicle implies the user accepts the risk that some reasonably
foreseeable impacts will exceed the helmet’s capacity to protect against injury.
Use the Fenix AR only as instructed by this manual. Failure to do so may result in unsafe riding
conditions and will void the warranty. Make no modifications to the helmet.
Before riding, make sure your helmet fits properly and that you are comfortable with the size and
the weight of the helmet. The helmet chinstrap must be securely fastened at all times when riding
with the Fenix AR. Failure to fit and fasten the helmet properly may cause the helmet to come
off the wearer in an accident and result in severe injury or death.
For proper fit and safety, the helmet must always be worn with the lining attached (see page 10)
The Fenix AR is designed to provide maximum protection for the rider. However, the helmet
should be handled carefully to avoid reducing the protection it provides. Dropping the helmet on
the ground can degrade performance and should be avoided. If the helmet is dropped from a
moving vehicle, it could sustain serious damage that is not visible.
After your helmet has experienced a substantial impact, its safety features may be compromised.
The damage may not be visible, but the ability of the helmet to protect wearer is reduced. Shock-
absorbing materials within the helmet will have become compacted, reducing the ability to
absorb further shocks. Check the warranty for repair or replacement details.
If you think your helmet’s safety performance is compromised for any reason, DO NOT USE the
helmet for riding. A helmet that has been involved in a serious impact should be destroyed and
replaced. If you are uncertain, stop using the helmet and contact SKULLY for an evaluation.
Do not attempt to modify the helmet in any way. Do not remove or add any parts or change any
physical aspect of the helmet. Doing so may reduce the ability of the helmet to protect the wearer
and will void the warranty.
Do not use the top vent, spoiler and chin skirt as a handle. These pieces are designed for specific
functions and are not intended to support the weight of the helmet.
Keep the visor closed at all times when riding. The visor protects you from wind, dust, stones,
insects and other minor road debris. It does not provide protection against all hazards.
Do not place your helmet on the gas tank. Escaping vapors can damage the fabric of Fenix AR’s
protective liner.

5
Because the Fenix AR uses Bluetooth® wireless technology, it may cause interference with other
communication systems. You should switch off the Fenix AR:
•IN HOSPITALS AND AROUND MEDICAL DEVICES
•IN AIRCRAFT
•NEAR BLASTING SITES
Follow all instructions posted in these circumstances (or others) regarding wireless devices.
Use caution when viewing the Heads-Up Display. Use only as directed and avoid concentrating
on the HUD while riding. Failure to do so can cause distractions that may result in injury or
death.
Please be aware of and obey local traffic laws that may apply to the use of certain features of the
Fenix AR. You must be of legal driving age in the jurisdiction in which you ride.
Do not throw or sit on the helmet. Do not ride with the helmet hanging from a helmet holder or
hang the helmet from an angled hook.
Do not expose the liner of the helmet to bright sunlight.
Do not operate the helmet in temperatures that exceed 122° F (50° C)
Do not store the helmet for any extended time in temperatures that exceed 140° F (60° C)
Do not expose helmet to harsh chemicals, including bleach, ammonia, gasoline, or other
solvents. Additionally, substances such as insect repellent and brake fluid can damage the helmet
and reduce its ability to provide protection. See Care and Cleaning instructions on page 21 for
more information.
The ability of the helmet to protect the wearer is limited. No helmet protects against all possible
or foreseeable impacts.
The Bluetooth® word mark and logos are registered trademarks owned by Bluetooth SIG,Inc. and any use of such
marks by [licensee name] is under license. Other trademarks and trade names are those of their respective owners.

6
TABLE OF CONTENTS
PACKAGING CONTENTS .............................................................................................7
GETTING TO KNOW YOUR FENIX AR.....................................................................9
CHINSTRAP INSTRUCTIONS/ QUICK-RELEASE LATCH..................................10
EQRS – EMERGENCY QUICK RELEASE STRAPS / CHIN SKIRT /
SUPPLEENTAL PADS……...12
VISOR ADJUSTMENT AND REMOVAL ..................................................................12
CHARGING THE HELMET.........................................................................................13
TURNING ON THE FENIX AR ...................................................................................15
CONTROL BUTTON FUNCTIONS/INDICATOR LIGHTS ...................................15
GETTING ACQUAINTED WITH FENIX AR............................................................16
ADJUSTING THE HUD.................................................................................................17
MOBILE APP..................................................................................................................17
BLUETOOTH PAIRING & OPERATING INSTRUCTIONS ..................................18
USING NAVIGATION...................................................................................................19
ADDITIONAL SETTINGS............................................................................................19
FIRMWARE UPDATES.................................................................................................19
CONNECTING TO MUSIC VIA BLUE TOOTH………………………………..….20
VOICE COMMAND MENU .........................................................................................21
SKULLY INITIAL CONFIGURATION………………………………...……...……22
CLEANING AND CARE ...............................................................................................26
FAQS.................................................................................................................................27
FENIX AR USERS MANUAL TECH SPECS .............................................................28
COMPLIANCE................................................................................................................29
FCC COMPLIANCE.......................................................................................................29
LIMITED WARRANTY/TERMS AND CONDITIONS OF USE .............................28
SKULLY RETURN POLICY………………………………………………………….35
7
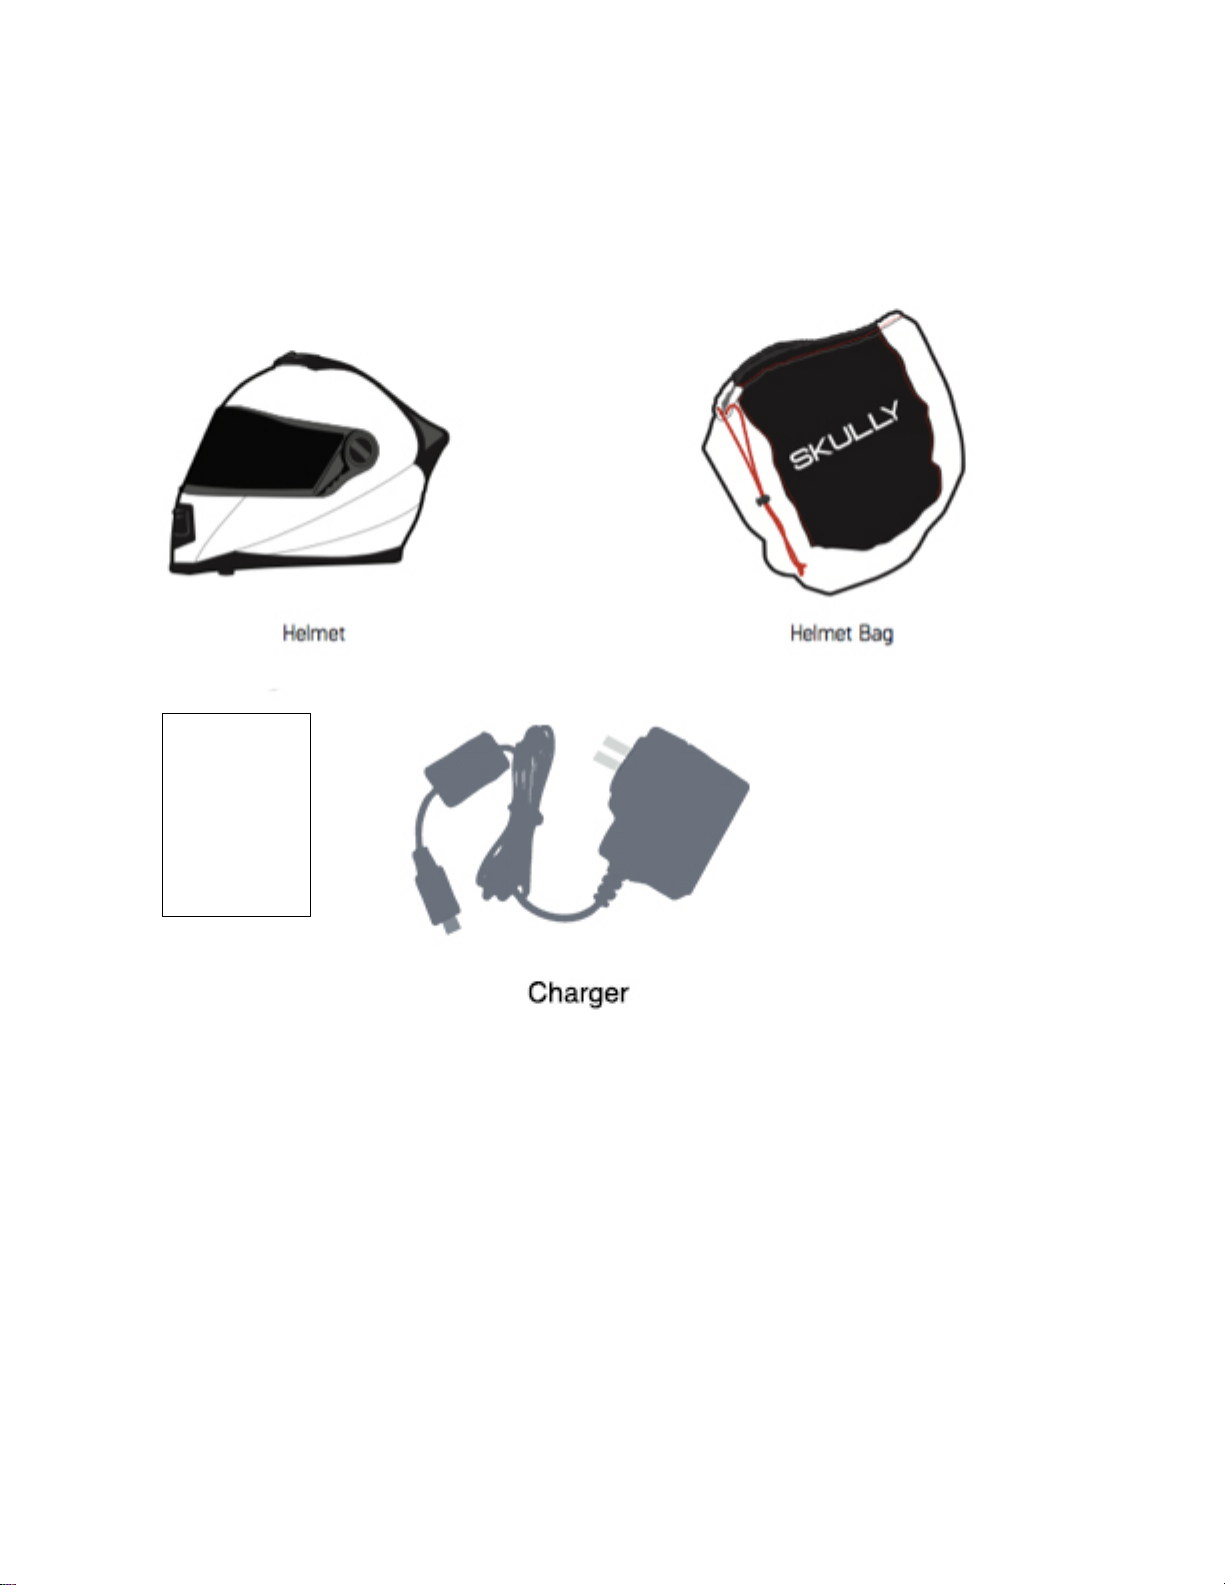
PACKAGE CONTENTS
1
SKULLY
FENIX AR
Quick Start
GUIDE

8

9
GETTING TO KNOW YOUR FENIX AR
1. Control button
2. SKULLY Heads-Up
Display (HUD)
3. HUD adjustment knob
4. LED status indicator lights
5. Air vents
6. Anti-fog Visor
7. Blindspot camera
8. Quick-release latch/ Micro
USB Charging port
9. EQRS Straps
10. Chin Skirt
11. Reflective Strip
12. Replaceable Cheek pads
13. Speakers
14. Microphone
5
5
10
CHINSTRAP INSTRUCTIONS
The chinstrap should be fastened as tightly as possible without causing pain or choking. The
strap should be secured tightly against your jaw and have no slack. You should not be able to
remove the helmet from your head when the chinstrap is fastened. Please note that the chinstrap
must be securely fastened at all times when riding with the Fenix AR. Periodically check to
make sure the chinstrap has not loosened with use. Tighten if necessary.
QUICK-RELEASE LATCH
The Fenix AR chinstrap features a quick-release latch. Pull the strap on the ratchet assembly to
loosen.

11
EQRS – EMERGENCY QUICK RELEASE
STRAPS
The Fenix AR has Emergency Quick Release Straps (EQRS) intended for use by first
responders. The straps are positioned on the front of the cheek pads. Secure the helmet with one
hand while inserting the index and middle finger from the other hand under the strap and pull,
CHIN SKIRT
The Fenix AR helmet provides a chin skirt to help reduce ambient noise and wind flow into the
helmet. The chin skirt has an easily removable rear portion that is attached to the fixed front flap.
You may elect to ride with/without the chin skirt, according to your personal preference.
Supplemental Comfort Pads
Six (6) individual comfort pads are supplied with the Fenix AR. Trim padding and remove
adhesive backing and apply on the back side of the inner liner to offer a customized fit.
Alternative liner size packages are available and can be ordered on the SKULLY website.

12
VISOR ADJUSTMENT AND REMOVAL
To Remove visor:
1. Secure the helmet either in your lap or a padded surface.
2. Fully open visor.
3. Push the circular black button and detach visor side, repeat on other side.
To reattach the visor:
1. Secure the helmet either in your lap or a padded surface.
2. Place visor in the fully open position
3. Place visor hole over the black button and apply light rearward pressure to visor. The
visor will “click” into place, repeat for other side.
Excessively scratched visors may obstruct your view of the road and should not be used during
riding. Replacement visors can be ordered from the SKULLY website.

13
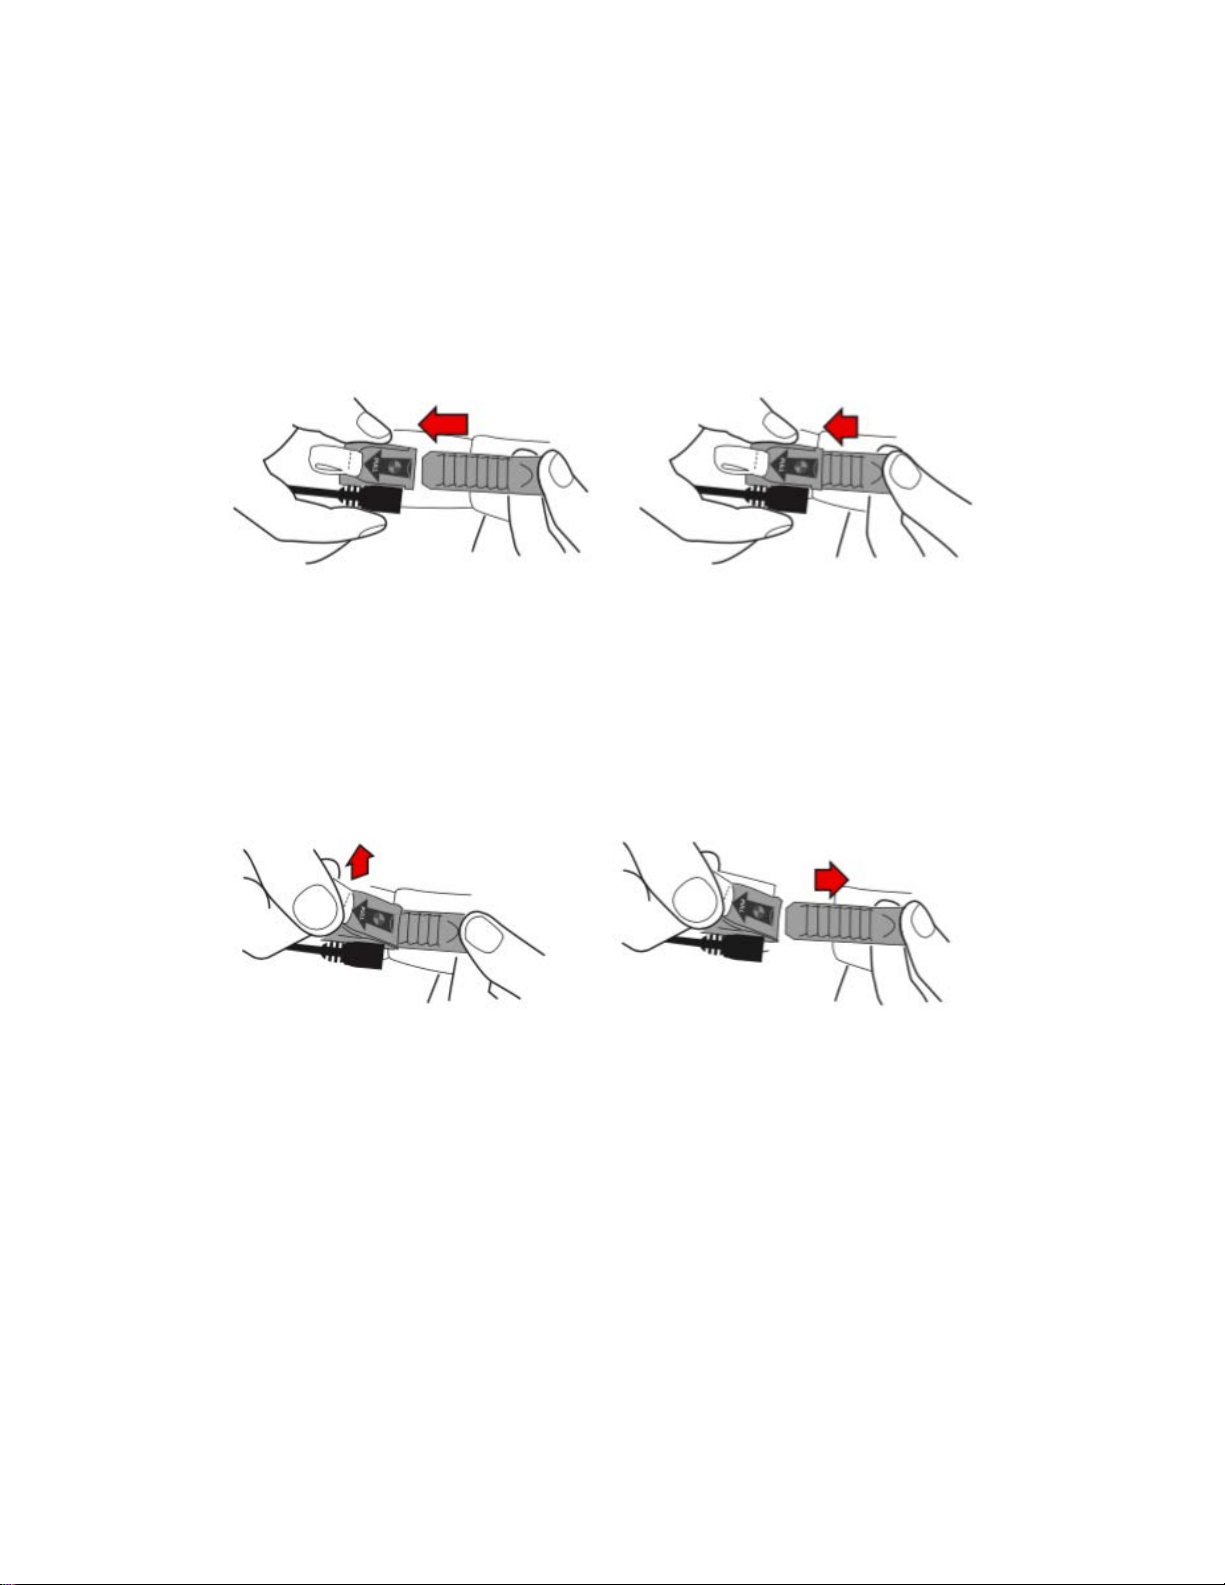
CHARGING THE HELMET
Use the supplied USB cable and a wall charger to charge the Fenix AR before powering the
helmet. Plug the micro USB cord into the port adjacent to the quick-release strap and secure to
the supplied wall charger.
The Fenix AR utilizes a sophisticated battery charging system. Indicator lights on the back of the
helmet show battery charge status.
Helmet Power On
●●●
3 solid red lights
battery fully charged status
while riding
●●o
2 solid red lights on left
battery ⅔ charged status
while riding
●oo
1 solid red light on left
battery low while riding
(●)oo
1 blinking red light on left
battery very low while
riding
Helmet Charging
(●)oo -> o(●)o-> oo(●)
all 3 lights blink green in order
from left to right over and over
battery charging, battery
level 30-55%
●(●)o -> ●o(●)
1 solid green light on the left, 2
green lights on right blink green
in order from left to right
over and over
battery charging, battery
level 55-80%
●●(●)
2 solid green light on the left, 1
green light blinking on right
battery charging, battery
level 80-95%
●●●
3 solid green lights
battery fully charged
Additional
●●●
1 solid red light on left, 1 solid
green light in center, 1 solid
blue light on right
helmet is starting up
oo(●) -> o(●)o-> (●)oo->ooo
all 3 lights blink bright blue in
order from right to left. left led
lights up dim blue until pattern
reaches it, then bright blue,
then all leds turn off and entire
sequence repeats
helmet is updating
software
(●)o(●) -> ooo-> (●)o(●)
left and right lights blink blue,
turn off, sequence repeats
helmet can be discovered
by other Bluetooth devices
(●)(●)(●) -> ooo-> (●)(●)(●)
all three lights blink blue
together, sequence repeats
helmet is paired with a
phone by Bluetooth
(●)(●)(●)
all three leds flash magento on
and off at the same time
together
Error

14
If the helmet is completely discharged, it will take approximately 7 hours to fully charge.
Additional battery chargers can be used to extend the helmet battery life, external chargers
should be a minimum 2amp charger; order additional chargers from the SKULLY website.
15
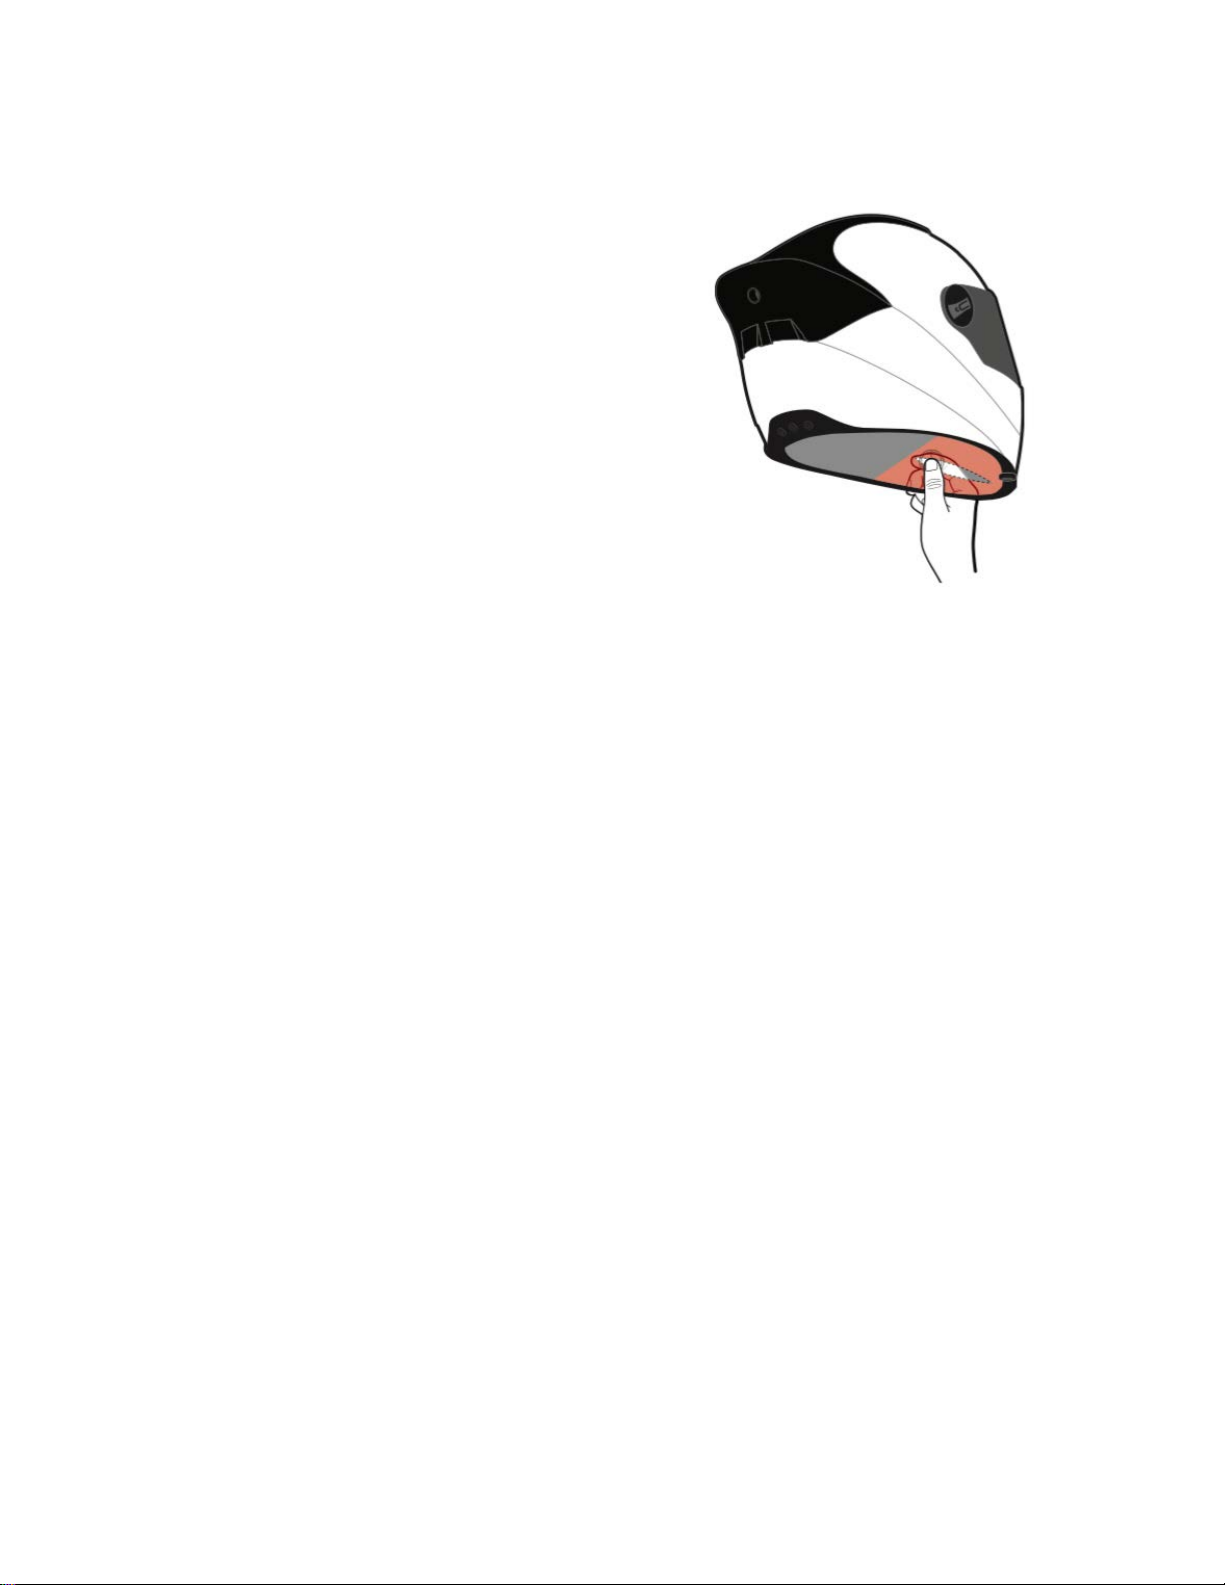
TURNING ON THE FENIX AR
The control button is located in the left side of the chin bar inside the helmet.
1. Take your left thumb and find the button on
the inside of the helmet, in front of your
chin and slightly to the left. Press the button
once briefly (you should feel it click)
2. Grab the 2 straps on the bottom of the
helmet, pull apart, and put it on your head.
3. Wait 2-3 Seconds, you should see the heads-
up display (HUD) flash white, and show the
SKULLY logo
4. Pair your helmet with your smartphone,
within 3 minutes of powering helmet.
5. To turn off the Fenix AR, press and hold the
control button down for at least 4 seconds.
6. The control button also operates other
features such as music, navigation, and
hands-free calling.
CONTROL BUTTON FUNCTIONS
Power on (if helmet is off)
After helmet is on:
1 Click: Play music; Pause music when music is playing; answers incoming phone call
2 Clicks: Plays next song; rejects incoming phone call
3 Clicks: End navigation Screen and displays BlueTooth firmware version.
4 Clicks: No action
5 Clicks – re-initiates Bluetooth pairing mode for 3 minutes
Long press of 6+ seconds: turn helmet off
GETTING ACQUAINTED TO FENIX AR

16
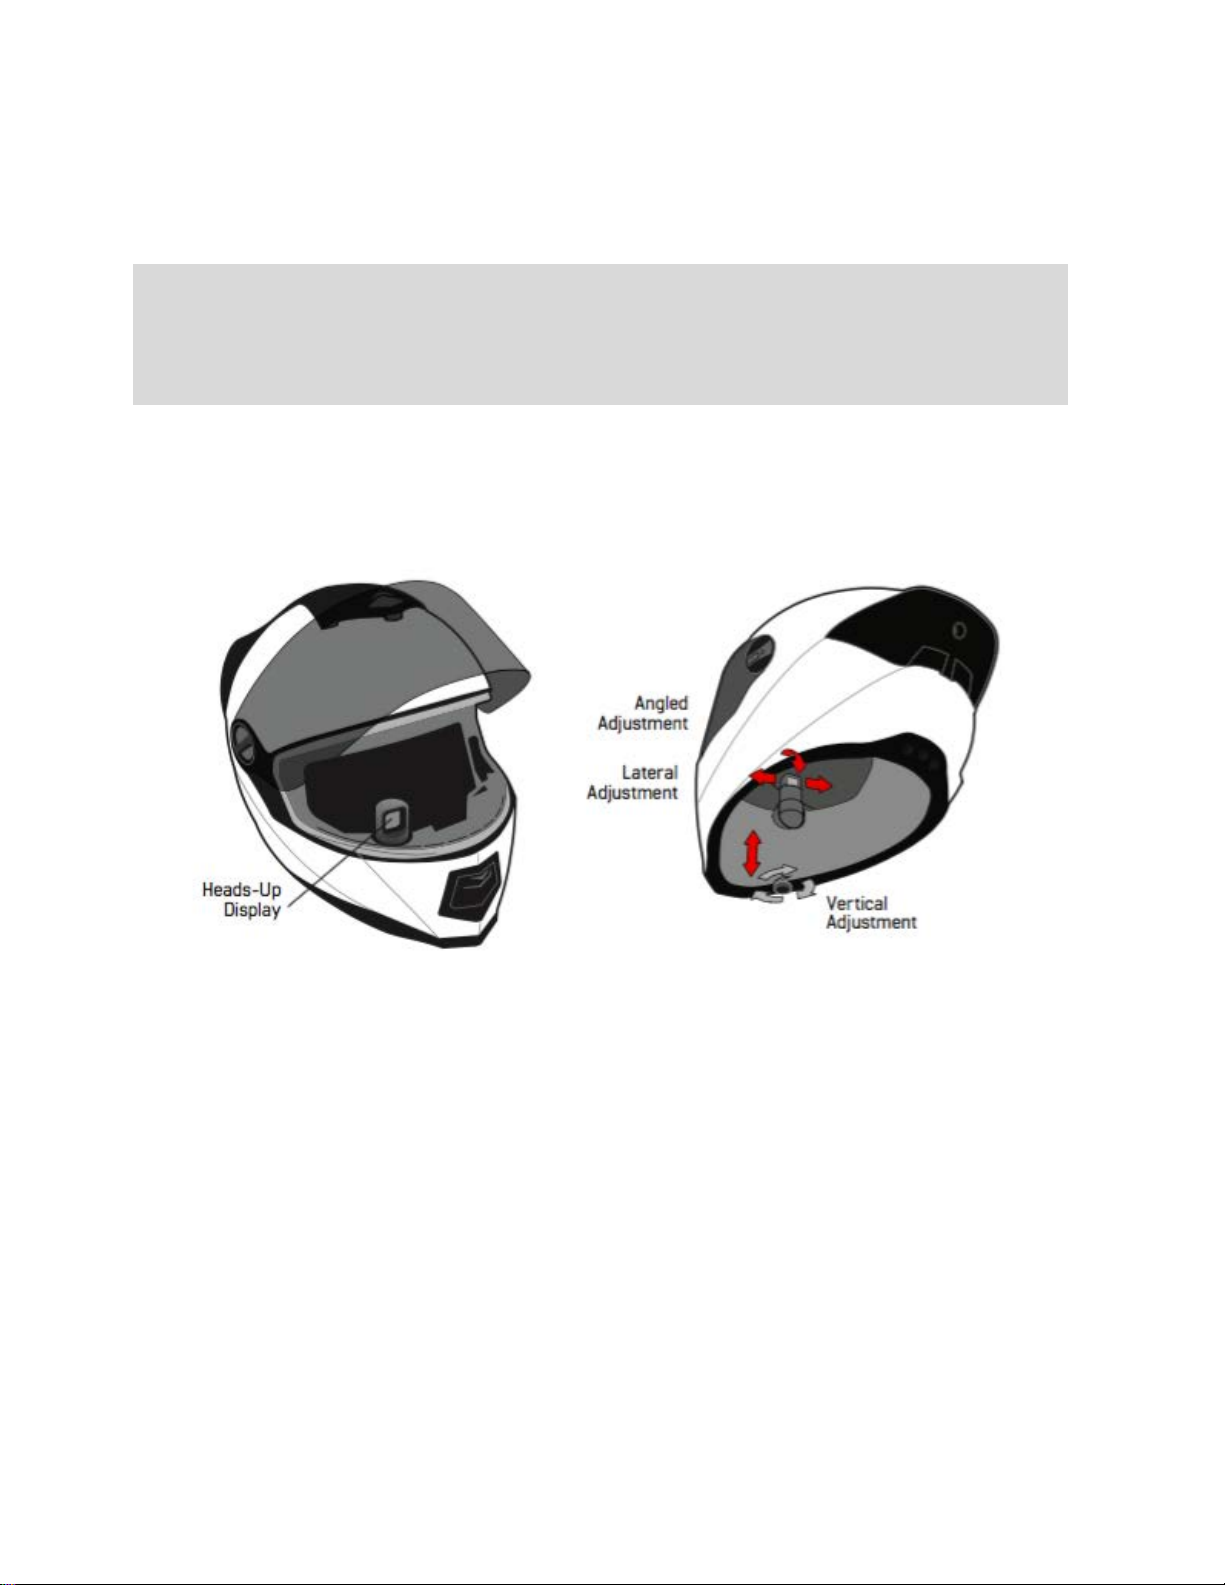
The Heads-Up Display (HUD) provides a rearview camera, blindspot detection, GPS navigation,
and other information.
Please take time to familiarize yourself with the HUD and blindspot camera before riding your
motorcycle. Using the HUD and Blindspot camera will be a new experience and you should be
comfortable with it before riding. The rearview camera utilizes a wide-angle lens; riding with a
passenger somewhat limits the full rear view, but doesn’t inhibit its use.
You must familiarize yourself with the features and operations of the Fenix AR prior to use. We
recommend the following steps:
1. In an outdoor environment, secure helmet to your head and power on the Fenix AR
helmet.
2. While standing, look at the HUD and notice rear view camera display and blind spot
capabilities.
3. Walk around the outside perimeter and occasionally glance at the HUD. Take note that
glancing at the HUD will become a natural reaction, similar to looking at a rear-view
mirror while driving a car.
4. After you are comfortable with the helmet, select a low traffic area such as a
neighborhood or large parking lot and start a low speed ride to acclimate yourself to the
Fenix AR experience. Please be aware of local traffic laws that may apply to the use of
certain features of the Fenix AR
5. The HUD display in the Fenix AR helmet provides an infinite focus that does not require
your eye to re-adjust each time you glance at the display.
6. Certain motorcycles may inhibit clear visibility to the right-hand side mirror. Careful
attention must be made when using the helmet to accommodate for each specific
motorcycle and its riding style.
The rearview display is not a replacement for turning your head or using your side mirrors during
lane changes. The system may be affected by various conditions such as weather (rain, snow,
etc.), status of approaching vehicles road condition. Similar to some mirrors, objects in the rear
view HUD image are closer than they appear.
Always check the surrounding area visually before making an actual lane change. The system is
only designed to assist you in checking for vehicles at your rear when making a lane change and
assisting with reducing blind spots. Always make it your responsibility as a driver to take
caution when riding and making lane changes.
17
ADJUSTING THE HUD
The HUD can be adjusted vertically (up and down), laterally (side to side), and the viewing angle
can also be rotated within a limited range. For the ideal view, adjust the HUD until the viewing
rectangle is centered within the screen.
Vertical
Use knob on bottom right of helmet to raise and lower the HUD
Rotation
The HUD twists left and right for optimum viewing position
Pitch
Push/pull the HUD slightly forward/back to change the angle for optimum
viewing position
Please note that only slight movements are required to adjust the HUD. Do not attempt to force
the HUD if you feel resistance.
MOBILE APP
Download the SKULLY Mobile app from the Google Play Store or Apple App Store. Note: You
must download the SKULLY Fenix AR app to activate many of the helmet’s functions.
System Requirements: Windows 7 or higher, Mac OS X v10.6.8 or later
For Android™: Go to Google Play Store, look for “SKULLY Smart Helmet”, click on download
For IOS: Go to the Apple App Store, look for “SKULLY Smart Helmet”, click on download
Before you can activate your Fenix AR, you must review and agree to the safety information and
terms and conditions on your phone screen.

18
BLUETOOTH PAIRING INSTRUCTIONS
System Requirements: Windows 7 or Higher, Mac OS X v10.6.8 or later
IOS and Android have inherent Bluetooth differences when paired with devices. Each
smartphone operating system update may impact how your devices communicates with the Fenix
AR helmet. Currently, both smartphone operating systems will automatically connect with the
Fenix AR helmet if you were previously connected. For example, if you stop your motorcycle,
remove your helmet and leave it with the motorcycle and walk into a store, you may lose your
Bluetooth connection. However, the connection will be re-established after your phone is
brought back into range.
First Time Pairing Instructions:
Follow these instructions for both Android and iOS: Turn on helmet
1. Make sure Bluetooth is activated on your phone
2. Turn Fenix AR on, the helmet is in pairing mode for 3 minutes after powering up helmet
(click control button 5 times to re-initiate pairing, if needed)
3. Go to Settings, Tap on Bluetooth, tap on the helmet serial number located on the helmet
ratchet strap (entry starting with SK___________ followed by 9 numbers)
a. After pairing, helmet serial number will be displayed with a ✓
iPhone Users – QR Code Pairing
iPhone users can pair their helmets using the previous instructions or alternatively can use use
the quick start QR code method.
1. Make sure Bluetooth is activated on your phone
2. Turn Fenix AR on, the helmet is in pairing mode for 3 minutes after powering up helmet
(click control button 5 times to re-initiate pairing, if needed)
3. Then, using the mobile app:
a. Press on the “gear” icon at the bottom right of home screen
b. Select “Helmet”
c. Configure helmet by pressing “Connect to Helmet”.
d. Activate the Helmet by scanning helmet strap QR Code.
e. After pairing, helmet serial number will be displayed with a ✓
USING NAVIGATION MODE

19
• Tap top search bar and enter your destination.
• Results for destination should appear under search bar after a brief wait.
• If results do not appear, ensure phone has internet connectivity.
• Tap a location result.
• Select route preference.
• Tap start at bottom of screen.
• Confirm phone starts navigating to the destination.
• Confirm helmet shows navigation data across top of Heads-Up Display.
To cancel navigation, press X in upper right corner of screen, or use voice command – “Ok
Skully – Stop Navigation”, or click on helmet control button 3 times.
ADDITIONAL SETTINGS
Use the companion app to tailor your Fenix AR riding experience.
•Identify your “Home Address” and “Work Address”
•Press the “Gear” icon to specify your profile information
•Camera Setting – Specify your type of riding, sport or touring mode, this changes the rear
camera display
•Add your Spotify/Pandora login information
•Navigation Settings – select metric or imperial units
•Check for firmware updates and version number
Firmware Updates
Firmware updates will be made available through the SKULLY app. When connecting the Fenix
AR to the app, a version check is initiated. If a new version is available, you will be prompted to
upgrade. Firmware updates are conducted over the air (OTA), via a network connection.
CONNECTING TO MUSIC VIA
BLUETOOTH

20
Connect with Bluetooth for Music streaming from your iOS or Android device
•Power on helmet
•Music can be streamed from any Bluetooth Music app
•To stream music from your iOS or Android device, simply pair the helmet to the desired
device and initiate the music app.
•Spotify Users can login into their Spotify account using the Skully mobile app
Other manuals for FENIX AR
2
Table of contents
Other Skully Motorcycle Accessories manuals


