SKY-HERO ANAKIN ARF User manual

1
1
GUIDE
NATURAL BORN RACER
Anakin User guide V1.0
Version

2
2
TABLE OF CONTENT
INTRODUCTION
1. SAFETY ADVICE
2. GENERAL INSTRUCTIONS AND GUIDELINES FOR USE
3. REQUIRED EQUIPMENT
PREPARE YOUR ANAKIN
1: CONNECT YOUR RX
2: INSTALL VTX ANTENNA
3: CALLIBRATION OF FLIGHT CONTROLLER & ESC’S
4: SETUP ANAKIN SETTINGS IN FLIGHT CONTROLLER
5: LOAD A SKY-HERO ANAKIN PID PROFILE FILE
ANAKIN FRAME ADJUSTEMENTS
1. ARMS’ GEOMETRY
2. MOTORS TILT ANGLE
3. CAMERA ANGLE
4. ATTACHING PROPELLERS ON MOTORS
USING LINK9
STARTING SEQUENCE
WARRANTY TERMS
1
INTRODUCTION
CONGRATULATIONS on your purchase of a SKY-HERO Anakin, we hope that it will provide you with many years of fun and entertainment.
SKY-HERO products are designed and developed in Belgium (Europe), but distributed and supported across the globe through a network of dealers and
outlets that can provide assistance and advice.
The SKY-HERO ethos is simple; provide cool, exible, high quality aircra, and back all products with a fair and reasonable support service.
SAFETY ADVICE
THIS AIRCRAFT IS NOT A TOY!
All SKY-HERO aircra can be considered as a sophiscated leisure products, which require handling with care and cauon in order to avoid injury to
yourself or others. Ensure that you fully review all of the informaon in this instrucon manual and familiarise yourself with the characteriscs of this
SKY-HERO aircra before aempng to y it.This instrucon manual has been designed with safety in mind and is provided to help you assemble your
aircra and to prepare it for use. Assembly of this aircra requires basic mechanical and electrical skills and ying this type of aircra requires basic
coordinaon skills and some pracce.
GENERAL INSTRUCTIONS AND GUIDELINES FOR USE
The aircra should not be own by children and denitely not anyone under the age of 14
Failure to follow and comply with the safety advice and recommendaons in this manual, can result in serious injury to you, others or property.
You should always check the local laws and regulaons of the country where you will operate the aircra, to ensure you are in com- pliance with them.
In parcular you should avoid any sensive areas such as Military establishments, Airports, Power staons and populated areas.
Always keep an adequate safe distance around the aircra, ensuring that you avoid proximity to buildings, people and anything which is outside of your
control.
The aircra is controlled by radio signal which can be subject to interference outside of your control, a loss of radio contact with the aircra puts it out
of your control and could cause unpredictable results.
Never y the aircra in conned or built up areas, where you might lose visibility of the aircra.
Never y the aircra in bad weather or strong winds, doing so could cause you to lose control with unpredictable results.
Never approach the aircra unl the propellers have stopped turning and never try to touch it whilst it is in ight.
Keep your baeries away from children, young children could aempt to put them in their mouth with dangerous consequences.
Do not expose the aircra to water, moisture or liquids.
Do not aempt to y the aircra when baery power is low (including transmier baery).
Before each ight, make sure that all propellers are securely aached, that there is no damage to the aircra or its electronics and wiring.
Always disconnect the baery power to the aircra before turning o the transmier and always turn the transmier on (checking the posion of all
controls) before connecng the baery
Always following the instrucons provided with your Flight Controller and any accessory equipment such as transmier, baery chargers etc.
REQUIRED EQUIPMENT
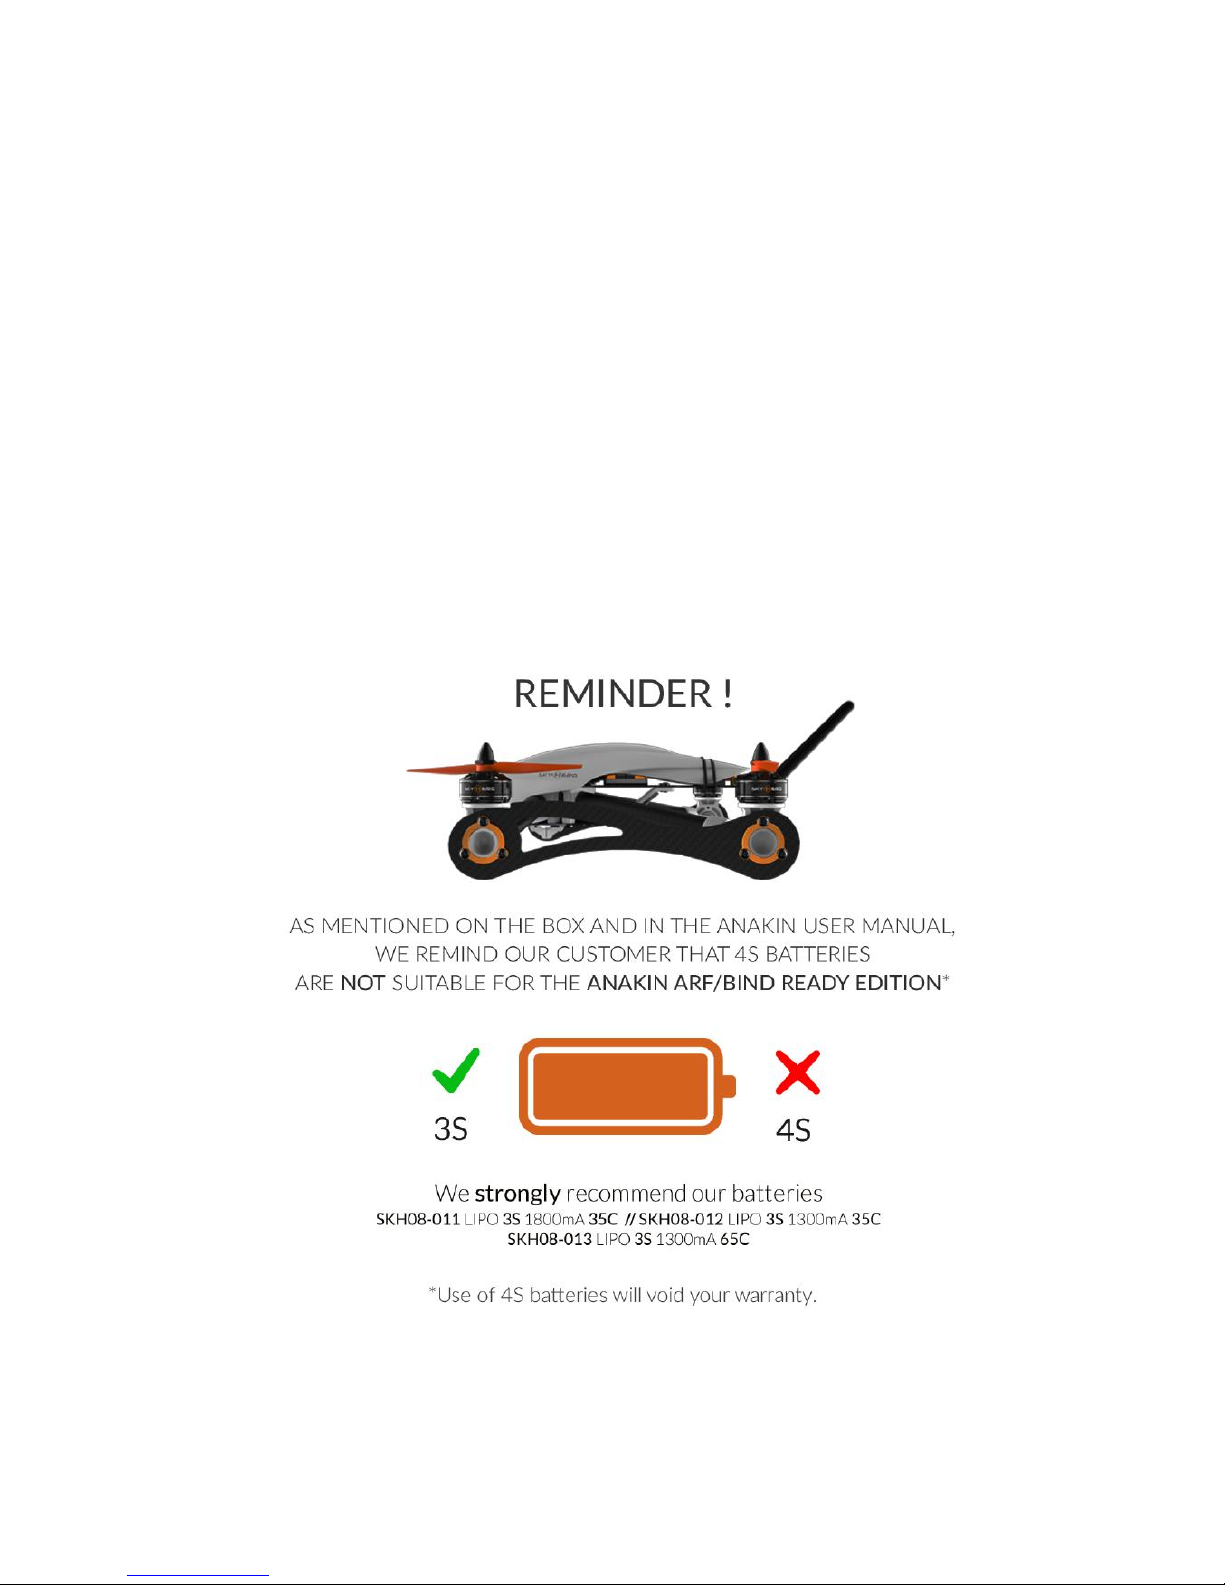
At least one Lipo 3S 1300 mAh or greater is recommended.
Link9 of other compable radios (See page 3)
Basic toolset
2
3
3
INTRODUCTION
CONGRATULATIONS on your purchase of a SKY-HERO Anakin, we hope that it will provide you with many years of fun and entertainment.
SKY-HERO products are designed and developed in Belgium (Europe), but distributed and supported across the globe through a network of dealers and
outlets that can provide assistance and advice.
The SKY-HERO ethos is simple; provide cool, exible, high quality aircra, and back all products with a fair and reasonable support service.
SAFETY ADVICE
THIS AIRCRAFT IS NOT A TOY!
All SKY-HERO aircra can be considered as a sophiscated leisure products, which require handling with care and cauon in order to avoid injury to
yourself or others. Ensure that you fully review all of the informaon in this instrucon manual and familiarise yourself with the characteriscs of this
SKY-HERO aircra before aempng to y it.This instrucon manual has been designed with safety in mind and is provided to help you assemble your
aircra and to prepare it for use. Assembly of this aircra requires basic mechanical and electrical skills and ying this type of aircra requires basic
coordinaon skills and some pracce.
GENERAL INSTRUCTIONS AND GUIDELINES FOR USE
The aircra should not be own by children and denitely not anyone under the age of 14
Failure to follow and comply with the safety advice and recommendaons in this manual, can result in serious injury to you, others or property.
You should always check the local laws and regulaons of the country where you will operate the aircra, to ensure you are in com- pliance with them.
In parcular you should avoid any sensive areas such as Military establishments, Airports, Power staons and populated areas.
Always keep an adequate safe distance around the aircra, ensuring that you avoid proximity to buildings, people and anything which is outside of your
control.
The aircra is controlled by radio signal which can be subject to interference outside of your control, a loss of radio contact with the aircra puts it out
of your control and could cause unpredictable results.
Never y the aircra in conned or built up areas, where you might lose visibility of the aircra.
Never y the aircra in bad weather or strong winds, doing so could cause you to lose control with unpredictable results.
Never approach the aircra unl the propellers have stopped turning and never try to touch it whilst it is in ight.
Keep your baeries away from children, young children could aempt to put them in their mouth with dangerous consequences.
Do not expose the aircra to water, moisture or liquids.
Do not aempt to y the aircra when baery power is low (including transmier baery).
Before each ight, make sure that all propellers are securely aached, that there is no damage to the aircra or its electronics and wiring.
Always disconnect the baery power to the aircra before turning o the transmier and always turn the transmier on (checking the posion of all
controls) before connecng the baery
Always following the instrucons provided with your Flight Controller and any accessory equipment such as transmier, baery chargers etc.
REQUIRED EQUIPMENT
At least one Lipo 3S 1300 mAh or greater is recommended.
Link9 of other compable radios (See page 3)
Basic toolset
2
4
4
PREPARE YOUR ANAKIN
3
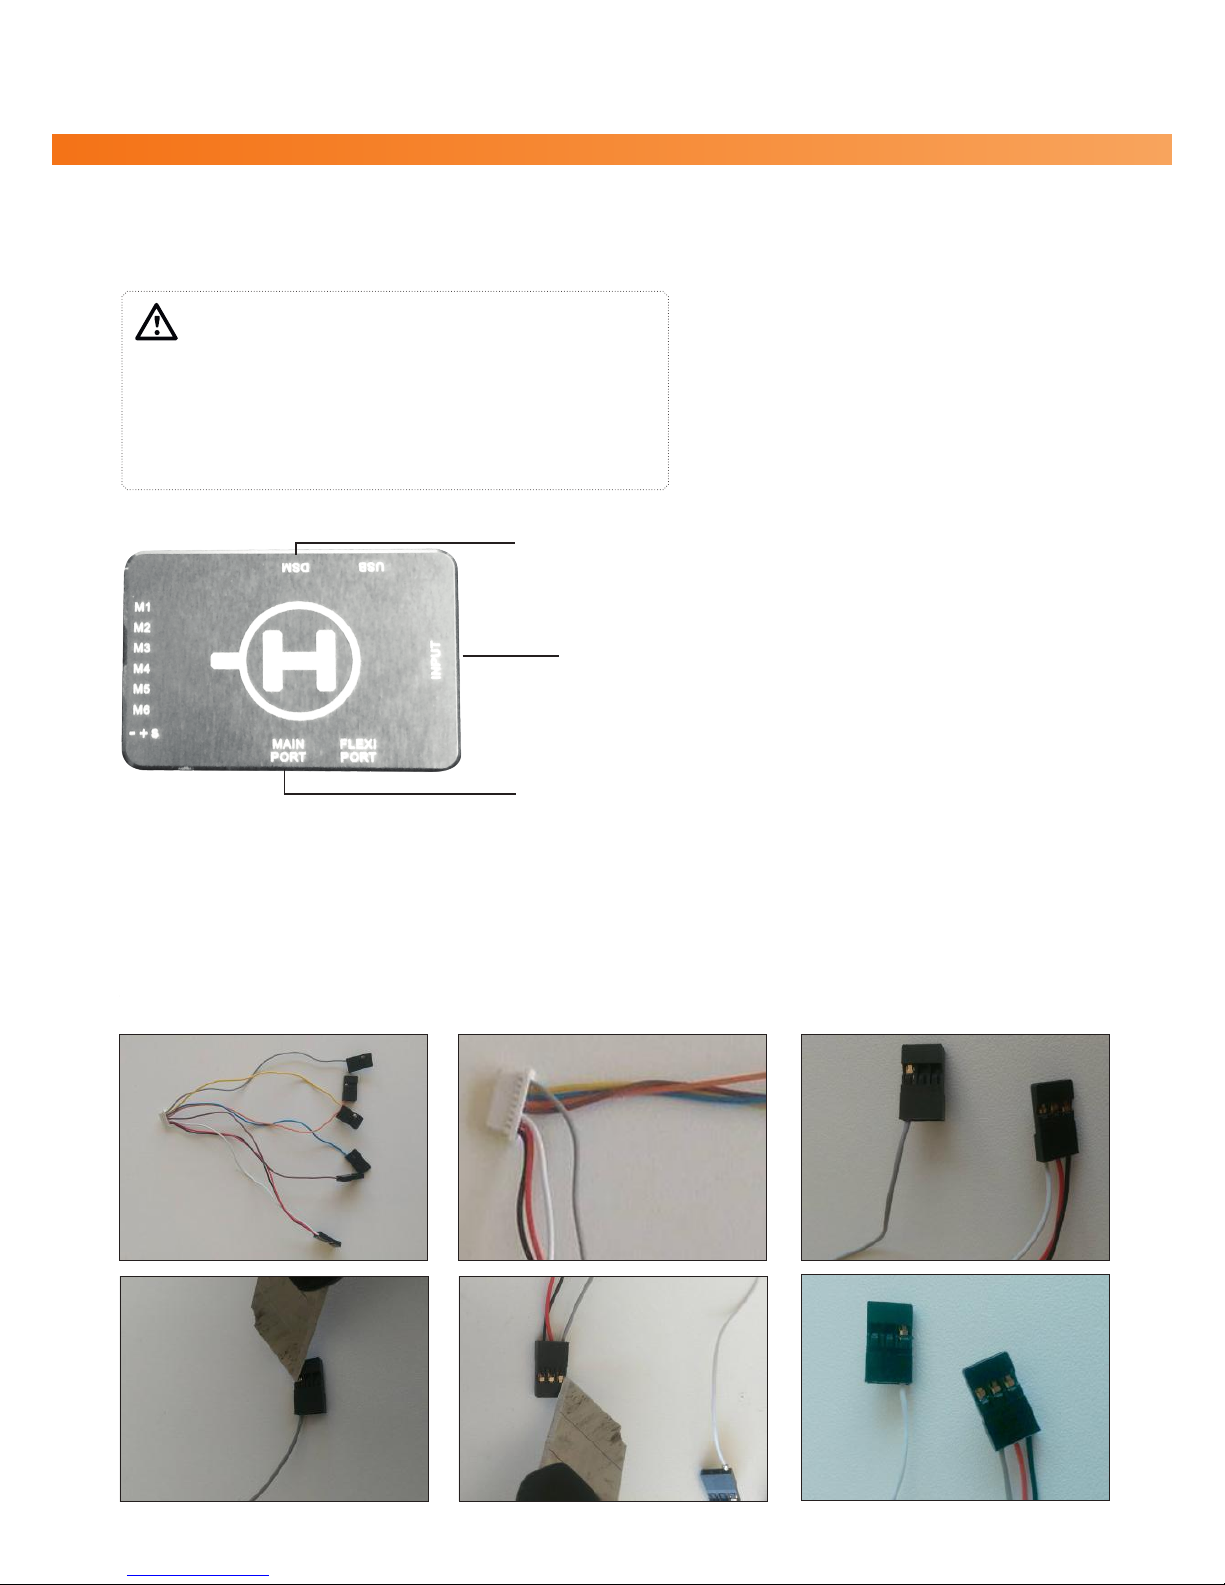
To your RX (Receiver) PPM & S.BUS
To your RX (Receiver) - DSM
For PPM & S.BUS please use black, red, yellow and blue cable.
YELLOW: Not used
BLACK: Ground
RED: +5V
BLUE: Signal
This instrucon is for seng up the inbuilt CC3D ight controller that comes with your ANAKIN FPV ARF.
If you use Sky-Hero Link 9 radio with its receiver go to page XX
Mount your receiver on the upper frame with double-sided tape.
Sky-Hero CC3D ight controller is only compable with:
S-BUS receivers
JR & Spektrum Satellite receivers
PPM receivers
Please note that PWM (Pulse With Modulaon) is NOT SUPPORTED!
Pay aenon to bind your R (receiver) to your T (your radio) before connecng it to the Sky Hero CC3D Flight controler
Sky Hero CC3D
You will need to know exactly what kind of receiver you are using as dierent receivers request totally dierent setup steps. ANAKIN FPs inbuilt
Sky-Hero CC3D supports 3 kinds of receivers: PPM, S.BUS and DSM.
PP PLSE POSIION ODLAION
A PPM signal (oen referred to as a PPM stream) is basically a series of PM signals (described above) sent one aer another on the same wire. So
instead of connuously sending the informaon for 1 channel or servo, the informaon for all servos or ESCs is sent in a row on the same wire. The
advantage of such a PPM signal is that only one signal wire is needed instead of all the individual wires.
For PPM receiver, the HITE and REY wire of the mul colored signal wire needs to be swapped FIRST, then connect the REY RED BLACK plug to
the PPM output of your receiver, no other wires need to be connected. See below:
S.BUS
The S.Bus is another communicaon protocol from Futaba that can also be used on other radios like Taranis and Radiolink. It also combines all output
channel informaon into single servo lead.
For S.Bus receiver, use the S.Bus signal wire and connect it to the S.Bus port on the main board, remove the mul colored PMPPM signal cable from
its socket.
DSSPEKRR SAELLIE ONNEION
Another receiver opon is the SpektrumR Satellite. It allows a SpektrumR or OrangeR satellite receiver to be connected to the CC3D.
For JR/Spektrum/DSM satellite receiver, plug the signal wire on the satellite to the DSM port on the main board. Then swap the ORANGE and BLACK
wire at any end of the plug. (see explanaon on next page)
USING LINK9 RADIO & RECEIVER
Please referr to the related chapter on page 14
STEP 1: CONNECT YOUR RX
signal cable from the
Wire 1 (black): Gnd/Negave
Wire 2 (red): Posive
Wire 3 (yellow): Not used
Wire 4 (blue): S.Bus Signal
NOTE: Only wire 1, 2 and 4 are used for the
S.Bus connecon. In our example that means
Black, Red and Blue - but colours may be
dierent for some cable.
one of the 4 wire cables.
«Input» socket.
PPM
S.BUS
For PPM receivers, the wires numbered 3 and 8 must be swapped FIRST, to make one PPM connector comprising of wires 1, 2, and 8.
(shown in the picture below as wires coloured black, red and grey) This conguraon is only compable with OpenPilot + one shot ESC’s.
If you use LibrePilot, or anything else, please check online, e.g: Youtube, RCGroups,...

5
4
4
PREPARE YOUR ANAKIN
3
To your RX (Receiver) PPM & S.BUS
To your RX (Receiver) - DSM
For PPM & S.BUS please use black, red, yellow and blue cable.
YELLOW: Not used
BLACK: Ground
RED: +5V
BLUE: Signal
This instrucon is for seng up the inbuilt CC3D ight controller that comes with your ANAKIN FPV ARF.
If you use Sky-Hero Link 9 radio with its receiver go to page XX
Mount your receiver on the upper frame with double-sided tape.
Sky-Hero CC3D ight controller is only compable with:
S-BUS receivers
JR & Spektrum Satellite receivers
PPM receivers
Please note that PWM (Pulse With Modulaon) is NOT SUPPORTED!
Pay aenon to bind your R (receiver) to your T (your radio) before connecng it to the Sky Hero CC3D Flight controler
Sky Hero CC3D
You will need to know exactly what kind of receiver you are using as dierent receivers request totally dierent setup steps. ANAKIN FPs inbuilt
Sky-Hero CC3D supports 3 kinds of receivers: PPM, S.BUS and DSM.
PP PLSE POSIION ODLAION
A PPM signal (oen referred to as a PPM stream) is basically a series of PM signals (described above) sent one aer another on the same wire. So
instead of connuously sending the informaon for 1 channel or servo, the informaon for all servos or ESCs is sent in a row on the same wire. The
advantage of such a PPM signal is that only one signal wire is needed instead of all the individual wires.
For PPM receiver, the HITE and REY wire of the mul colored signal wire needs to be swapped FIRST, then connect the REY RED BLACK plug to
the PPM output of your receiver, no other wires need to be connected. See below:
S.BUS
The S.Bus is another communicaon protocol from Futaba that can also be used on other radios like Taranis and Radiolink. It also combines all output
channel informaon into single servo lead.
For S.Bus receiver, use the S.Bus signal wire and connect it to the S.Bus port on the main board, remove the mul colored PMPPM signal cable from
its socket.
DSSPEKRR SAELLIE ONNEION
Another receiver opon is the SpektrumR Satellite. It allows a SpektrumR or OrangeR satellite receiver to be connected to the CC3D.
For JR/Spektrum/DSM satellite receiver, plug the signal wire on the satellite to the DSM port on the main board. Then swap the ORANGE and BLACK
wire at any end of the plug. (see explanaon on next page)
USING LINK9 RADIO & RECEIVER
Please referr to the related chapter on page 14
STEP 1: CONNECT YOUR RX
signal cable from the
Wire 1 (black): Gnd/Negave
Wire 2 (red): Posive
Wire 3 (yellow): Not used
Wire 4 (blue): S.Bus Signal
NOTE: Only wire 1, 2 and 4 are used for the
S.Bus connecon. In our example that means
Black, Red and Blue - but colours may be
dierent for some cable.
one of the 4 wire cables.
«Input» socket.
6
5
Then turn on your radio and create a new xed-wing airplane model, assign a 3 posion switch to channel .
9
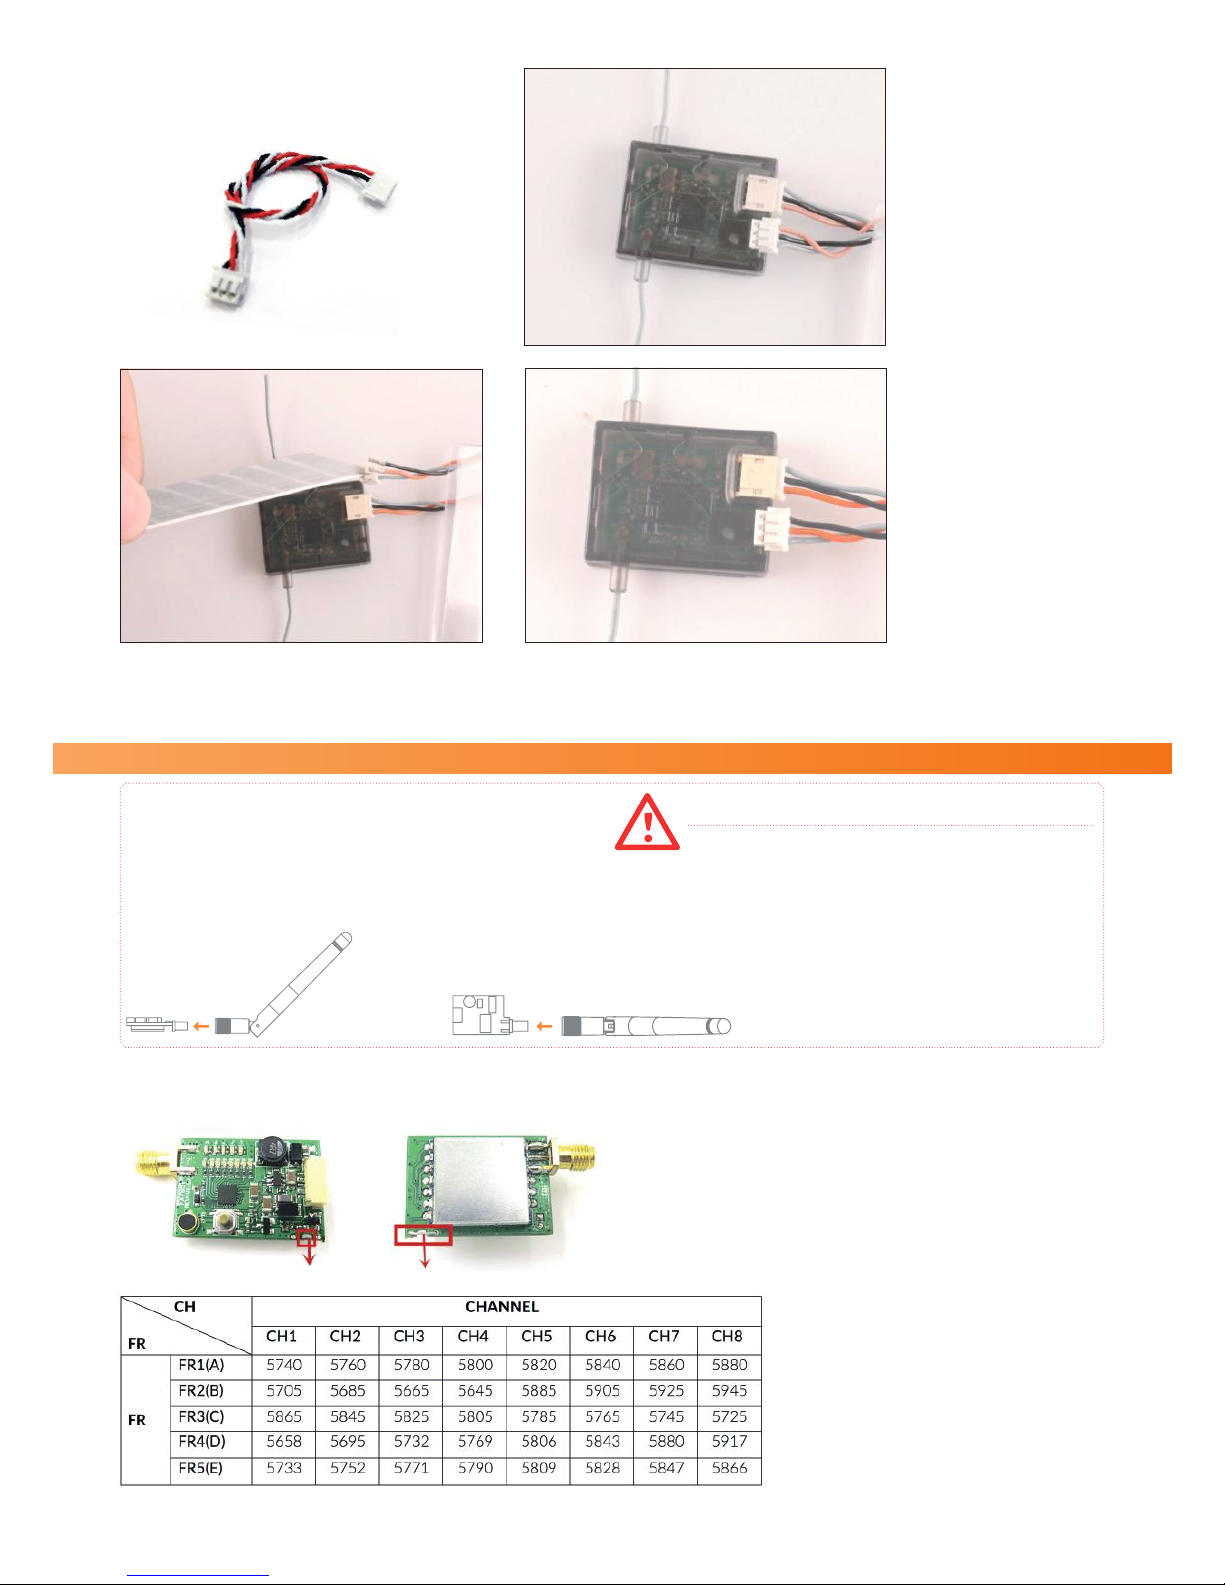
CONNECT THE ANTENNA TO YOUR VTX . IDEO TRANSMITTER EORE CONNECTN THE MN TTER
OTHERISE YO MAY CASE IRREERSIBLE DAMMAES THE IDEO TRANSMITTER MAY BRN OT ERY ICKLY
ERY IMPORTANT ARNIN
Original DSMDSM Satellite Receiver iring
se knife p or similar to pull the BLACK and RED wire out of
the plug and put back in reverse order.
DSM2/DSMX satellite receiver signal wire swap
How it should looks when completed.
Anakin T is set by default on a m conguraon. According to your local policies you can amplify the emission signal up to m.
To do so, you have to follow the instrucons described in the pictures beneath
Cut the wire to turn 25mW to 200mW or reconnect it to turn from 200mW to 25mW.
STEP 2: INSTALL TRANSMITTER (VTX) ANTENNA
CHANGE VTX POWER
Sky-Hero VTX table for your reference
For DSMSpektrumR please use black, red, white cable

7
STEP 3 CALLIBRATION OF FLIGHT CONTROLLER & ESC’S
This step is mandatory if you’are not using a LINK9
Aer wiring and radio seng, download and install the OpenPilot CS soware to setup the CC3D.
PLEASE NOTE THAT THE CC3D IS NOT SUPPORTED BY OPENPILOT IN RELEASES HIGHER THAN 15.02.02
Connect your computer to your ANAKIN ARF Flight controller with a SB cable. Click the ehicle Setup iard icon to start the setup.
You will be asked to choose the receiver type among four opons,
please choose your receiver according to the introducon above,
if you make the wrong choice here the receiver wont work. Click
Nextwhen done.
Download OpenPilot Soware (VERSION 15.02.02)
Windows NSIS installer:
hpwww.sky-hero.comsowaresOpenPilot1..OpenPilotIN31...exe
M S X :
hpwww.sky-hero.comsowaresOpenPilot1..OpenPilotMACOS1...dmg
Linux 32 bit Debian package :
hpwww.sky-hero.comsowaresOpenPilot1..OpenPilotLIN31...deb
Linux 64 bit Debian package :
hpwww.sky-hero.comsowaresOpenPilot1..OpenPilotLIN41...deb
Nothing needs to be changed here, just click Next
Nothing needs to be changed here, just click Next
Click Next to Firmware pdate.
Download OpenPilot So ware (VERSION 15.02.02)
Windows NSIS installer:
hp:/www.sky-hero.com/sowares/Anakin/OpenPilot/15.02.02/OpenPilot_WIN32_15.02.02.exe
Mac OS X distribu on image :
hp:/www.sky-hero.com/sowares/Anakin/OpenPilot/15.02.02/OpenPilot_MACOSX_15.02.02.dmg
Linux 32 bit Debian package :
hp:/www.sky-hero.com/sowares/Anakin/OpenPilot/15.02.02/OpenPilot_LINUX32_15.02.02.deb
Linux 64 bit Debian package :
hp:/www.sky-hero.com/sowares/Anakin/OpenPilot/15.02.02/OpenPilot_LINUX64_15.02.02.deb

8
7
The wiard will calibrate the ESC end points. Tick the 3 boxes as showing
above and make sure to follow the instrucon steps.
Click Next to calibrate on ESC output
On the ESC menu we have Standard ESC, Rapid ESC and OneShot ESC.
ANAKIN ARF is equipped with with OneShot ESCs, if you are using
PPM, SBS or DSM receiver the OneShot ESC will be acve in blue rather
than grey out, choose OneShot ESC and click Next.
Now the basic conguraon has completed, review the sengs and click
Next. Now you will proceed with the sensors calibraon for the CC3D.
Put the ANAKIN FP on a at surface, click Calculate buon to start
the calibraon, and click Next when done.
Click Next to calibrate on ESC output
Select Mulrotor and click Next
Keep the default uadcopter , click Next to setup ESC

9
8
Click Next
Now the wiard will calibrate the output of the highlighted motor in the diagram. Please double check if the motors rotang direcon is the same as the one showing in the
diagram.
Follow the instrucons to nd the neutral rate (slowest constant speed) of the rst motor and click Next, then do the same for the three other motors. Click Next to con-
nue.
se the default seng here unless you know what you are doing, then
click Next.
Click the Save buon to save all previous sengs.
Click Finish and back to the home page

10
9
STEP 4: SETUP ANAKIN SETTINGS IN FLIGHT CONTROLLER
This step is mandatory if you’are not using a LINK9
Now the basic setup of CC3D is completed, you need to double check that everything is done correctly.
o back to OpenPilot homepage and click Conguraon tab at the bot-
tom and have a look at the H Sengs.
If you’ve chosen PPM receiver in the wiard
Click Hardware tab on le, check the Flexi Port and Main Port sengs
and make sure they are the same as on the screenshot. If theres any die-
rence please change accordingly and click Save.
If you’ve chosen S.Bus receiver in the wiard
Click Hardware tab on le, check the Flexi Port and Main Port sengs
and make sure they are the same as on the screenshot. If theres any die-
rence please change accordingly and click Save.
If you’ve chosen DSM receiver in the wiard, there are TO
things to check:
1. Click Hardware tab on le, check the Flexi Port and Main Port sengs
and make sure they are the same as the screenshot. If theres any die-
rence please change accordingly and click Save.
. Click Input tab on the le, and click RC Input tab you should see
the following page, double check if the contents under “Input Channel
Conguraon secon are the same as the screenshot below, If theres any
dierence please change accordingly and click Save.
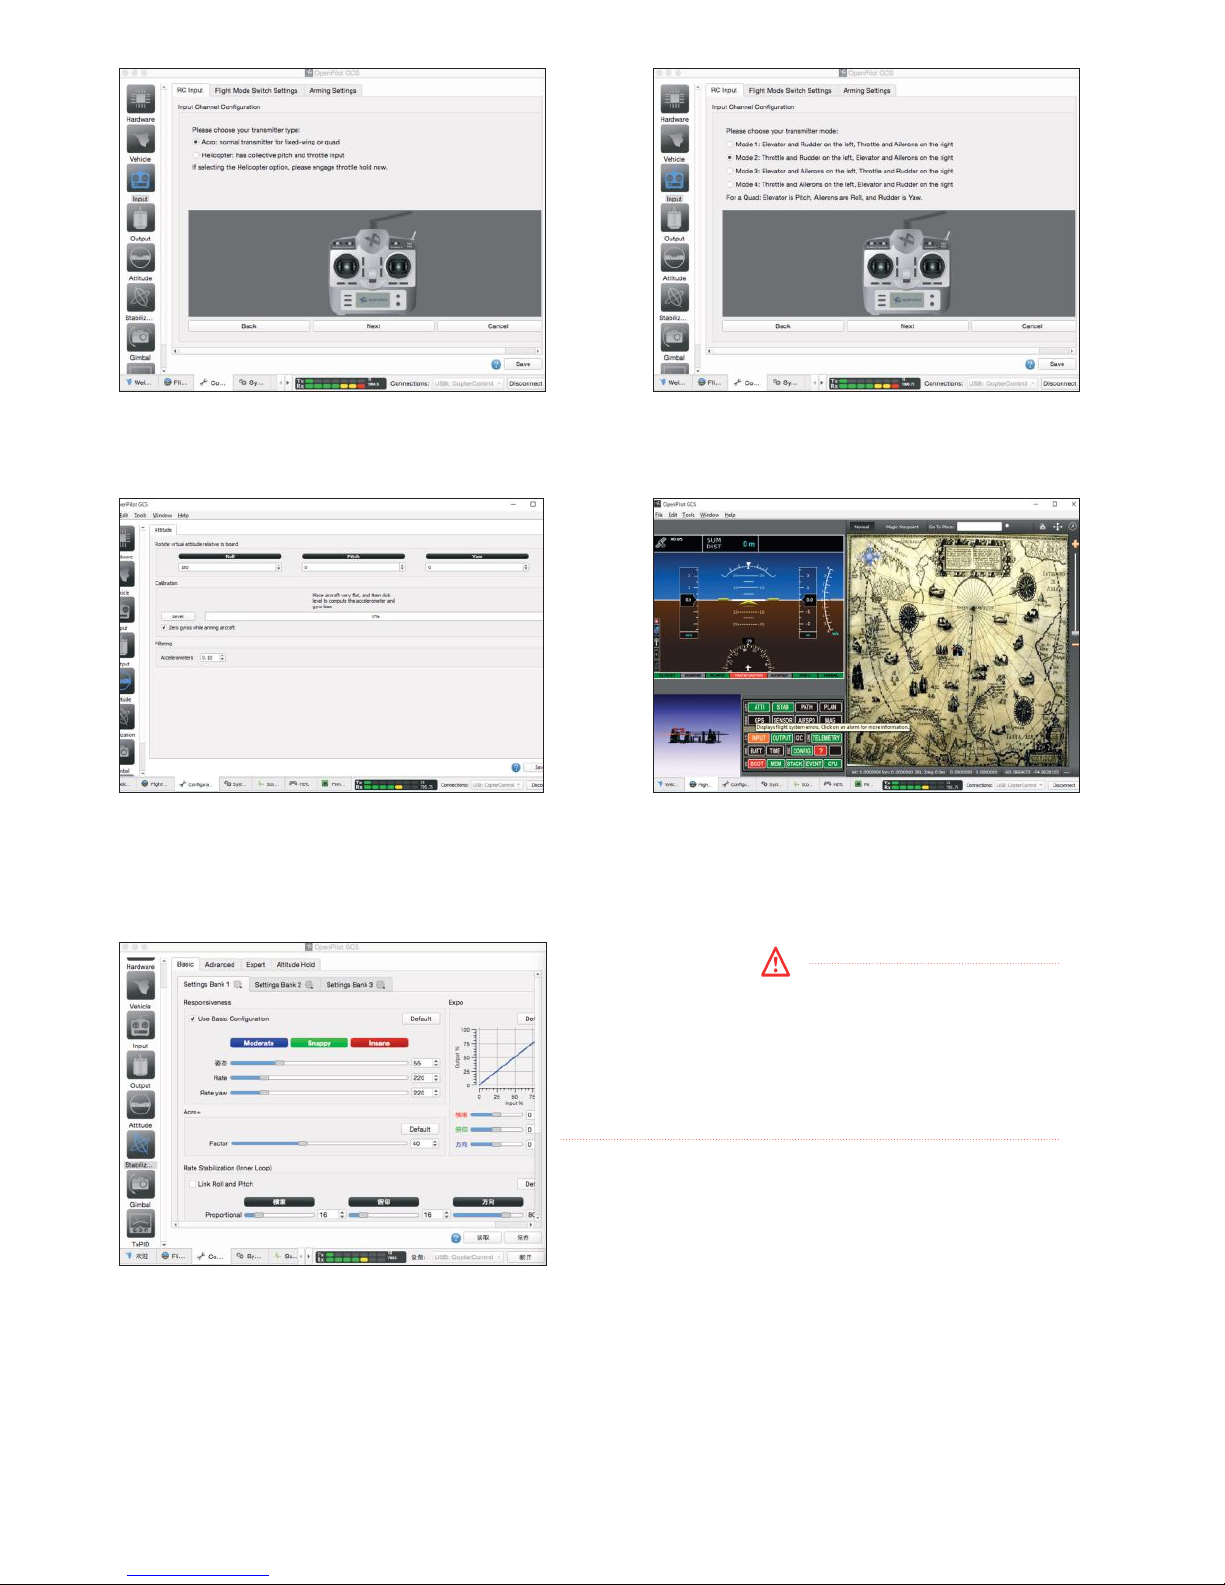
Now its me to calibrate the radio, click Input tab on the le and click on Start Transmier Setup iard.
Accept the safety noce by click OK Click Next
11
10
Select Acro then click Next. Select the correct mode according to your transmier and click Next,
carefully follow the screen prompt unl the calibraon process is nished.
Make sure you fully understand the arming process and select the pre-
ferred arming combinaon under “Arming Sengs”. Dont forget to click
Save to save all the sengs.
Click “Atude” tab from the le, and make sure you put 1 into the
Roll seng. This is very important, failing to do so will cause an instant
crash on your rst ight.
Click “Flight data” tab from the boom bar, check the hud and make sure it
corectly reect all the movements of the ANAKIN.
WARNING:
PLEASE DO NOT MODIFY THESE SETTINGS UNLESS YOU
ARE FAMILIAR WITH CC3D AND KNOWS WHAT YOU ARE
DOING. SAVED MISCONFIGURE MAY CAUSE HARDWARE
ISSES THAT BEYOND END SERS REPARABILITY AND CAN
ONLY BE FIXED BY PCB REPLACEMENT.

12
11
From the main interface, click the File menu and select Import
A Sengs
Browse your computer to the le you have previously down-
loaded. It has an .uav extension and click Open.
Click Save to Board Flash, close it aer the progress bar shows
1 done. Your ANAKIN FP is now upgraded with the
selected prole.
This step is not mandatory! Whether you use Link9 or a another radio controller.
Please make sure to use a Sky-Hero prole le. You can
dnlad enilt rle le on the Sky-Hero website.
FOR YOUNG PILOTS (beginners):
Early beginners setup: hpwww.sky-hero.comsowaresPIDSbeginner.uav.ip
Gentle setup: hpwww.sky-hero.comsowaresPIDSanakinr1...uav.ip
FOR ADVANCED PILOTS:
Standard setup: hpwww.sky-hero.comsowaresPIDSintermediate.uav.ip
FOR EXPERTS:
Sky-Hero expert default hpwww.sky-hero.comsowaresPIDSfactorypilot.uav.ip
Sky-Hero team pilot: Yves Coppye setup: hpwww.sky-hero.comsowaresPIDSanakinyves1...uav.ip
STEP : LA A SER ANAIN PI PRILE ILE (AIRRAT EAVIR)
FOR YOUNG PILOTS (beginners):
Early beginners setup: hp:/www.sky-hero.com/media/downloads/PIDS/beginner.uav.zip
Gentle setup: hp:/www.sky-hero.com/media/downloads/PIDS/anakin_r _15.02.02.uav.zip
FOR ADVANCED PILOTS:
Standard setup: hp:/www.sky-hero.com/media/downloads/PIDS/intermediate.uav.zip
FOR EXPERTS:
Sky-Hero expert default: hp:/www.sky-hero.com/media/downloads/PIDS/factory_pilot.uav.zip
Sky-Hero team pilot: Yves Coppye setup: hp:/www.sky-hero.com/media/downloads/PIDS/anakin_yves_15.02.02.uav.zip
13
12
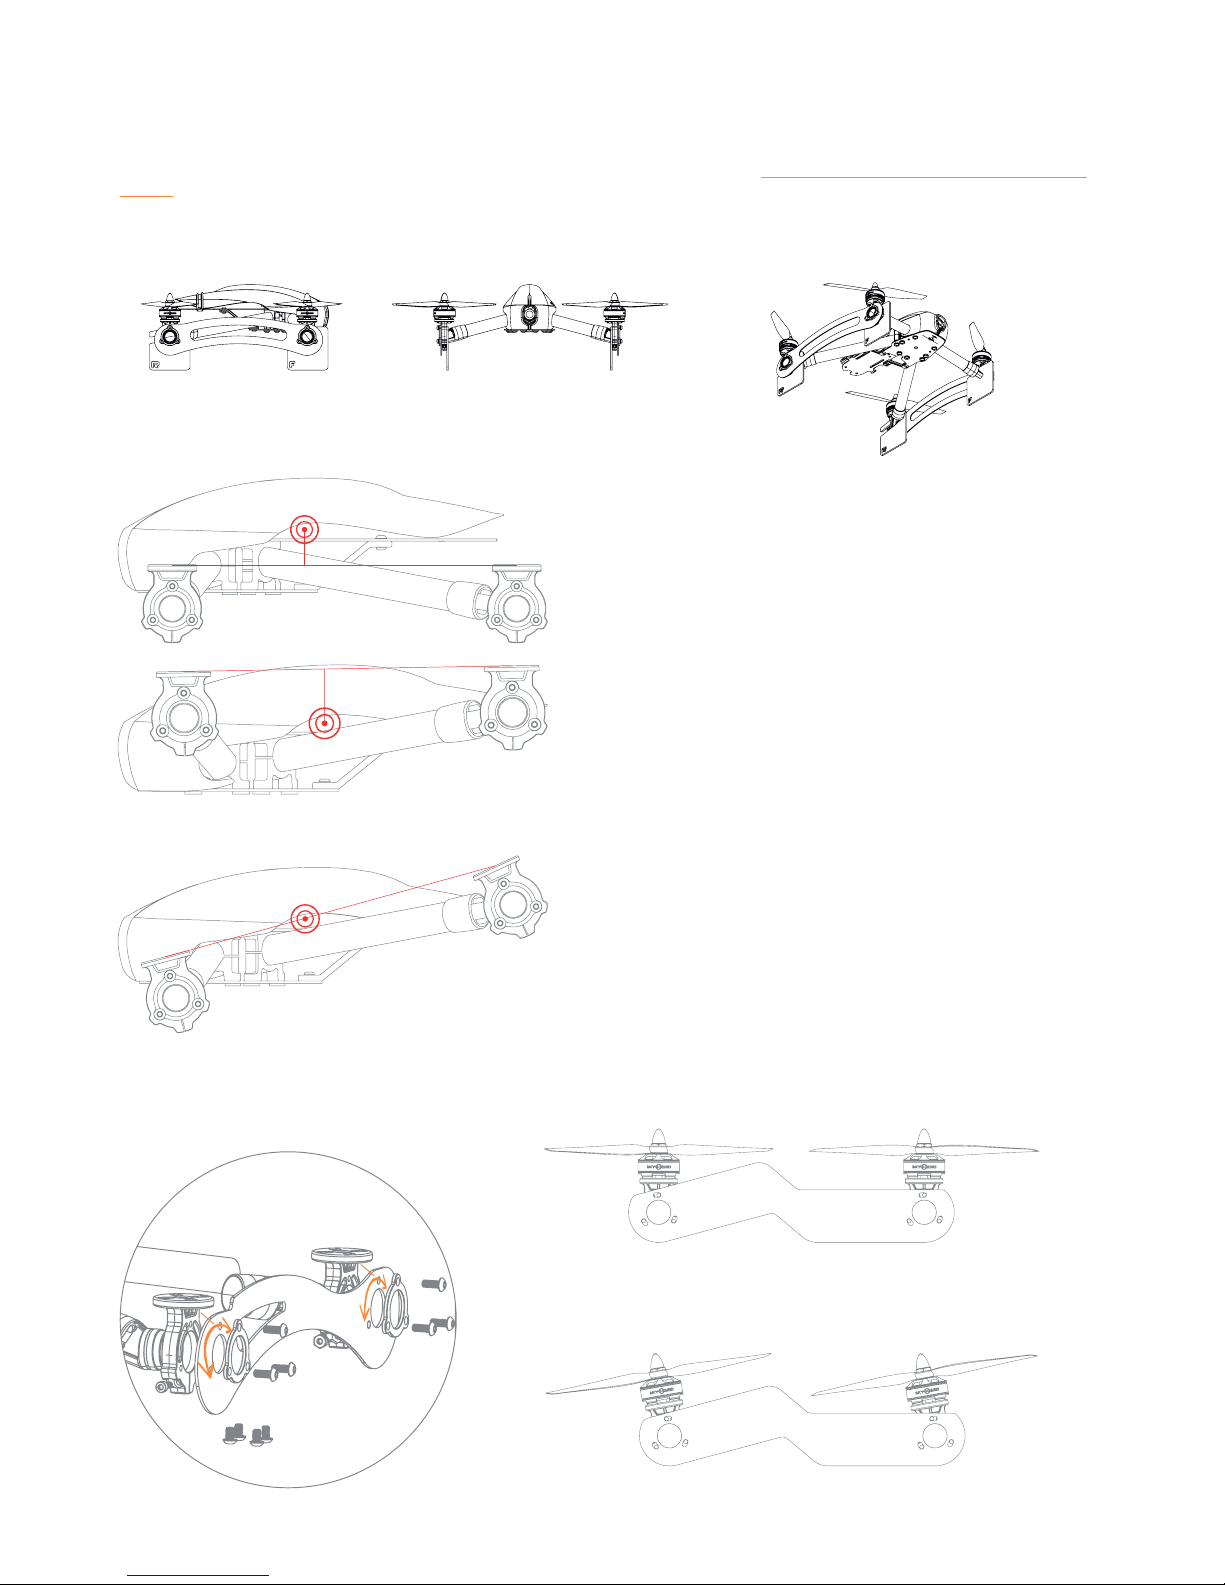
4
HIGH C.G. POSITION
(Front tube down + rear tube down)
High posion C..
High ground clearance
More agressive reacons
Beer turn in
Neutral turn out
LOW C.G. POSITION
(Front tube up + rear tube up)
More stable forward ight, stable turn out,
slower turn in.
CROSSED SETUP
(Front tube down + rear tube up)
Neutral C.. posion
15°angle for mobius camera
+15° to FPV camera
Lower drag
Best overall racing setup
Highest speed
Most neutral recons
Feels more locked in
From 0° Neutral reacon, more drag, less speed
To 10° Yaw eciency decrease, less drag, more speed and ight me
10°
0°
4R
ANAKIN FRAME ADSTEMENTS
Anakin has been conceived to be adjustable in many ways. You can play with several frame adjustments to make a perfect match between your prole
and the ight behaviour of the frame Arms geometry, Motor Tilt Angle Camera Angle.
They can be combined almost to innity. To make changes on the frame, please refer to the Anakin
Assembly Instrucon Manual (AIM) AnakinAIM
v1..pdf
(click on the link or go to www.sky-hero.com)
Also, included in the box, you will nd jigs to calibrate the geometry of Anakin. e strongly advice you control the geometry of the frame especially
aer a crash.
AA
COUPE
A-A
ECHELLE
1 : 2
AA
COUPE
A-A
ECHELLE
1 : 2
1. ARMS EOMETRY
. MOTORS TILT ANLE
ADJUSTMENTS
14
13
5
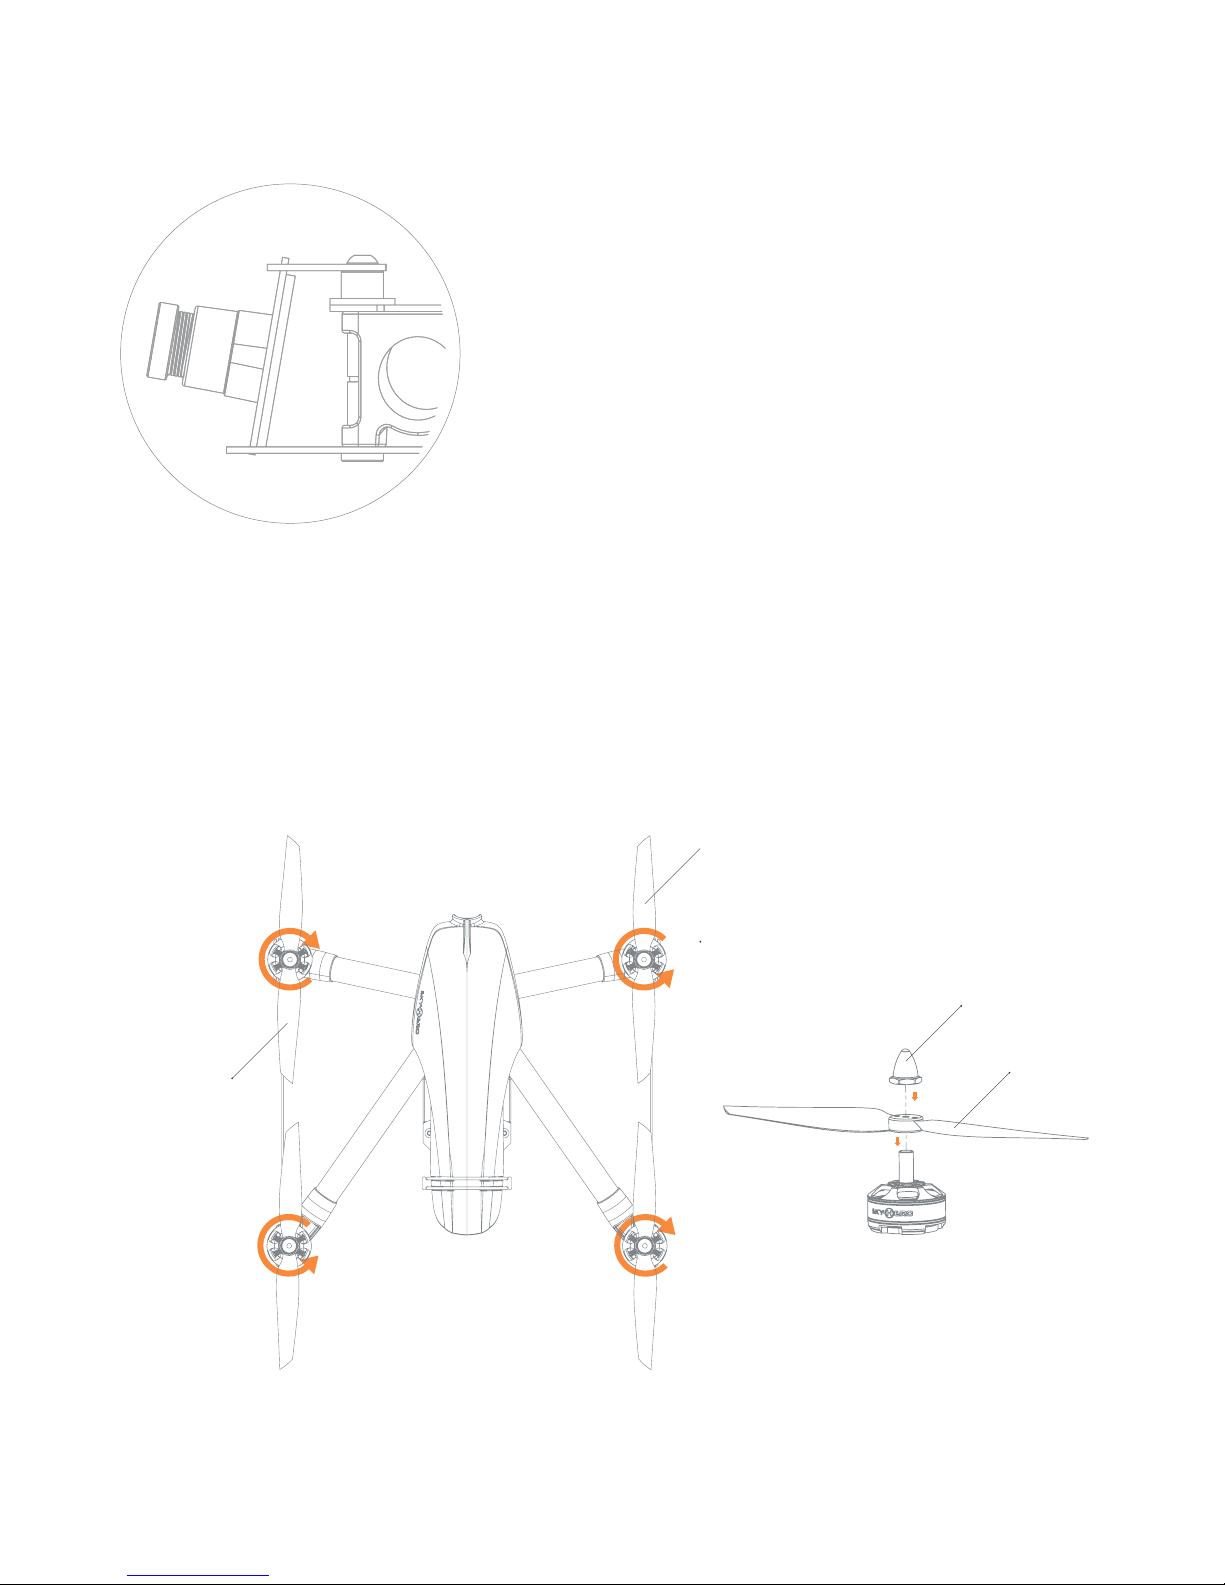
4. ATTACHIN PROPELLERS ON MOTORS
PROP NUT
PROPELLER
CW
CW
CCW
CCW
4
4R
Install the propeller sha (supplied with your motors) on each motors, depending of the diameter of the prop sha, you might need to use an insert on
the washer that comes with your propellers to ensure a ght t to the sha and proper alignement.
Sky-Hero recommends that you use a propeller balancer to balance your propellers, then install the propellers on each motors - (ensuring that their
direcon of rotaon corresponds to the diagram below)
3. CAMERA ANGLE
0. 10° = Flat vision, ideal to start and learn
10. 20° Perfect nd stage FP experience
Anakin has been conceived to be adjustable in many ways. You can play with several frame adjustments to make a perfect match between your prole
and the ight behaviour of the frame Arms geometry, Motor Tilt Angle Camera Angle.
15
14
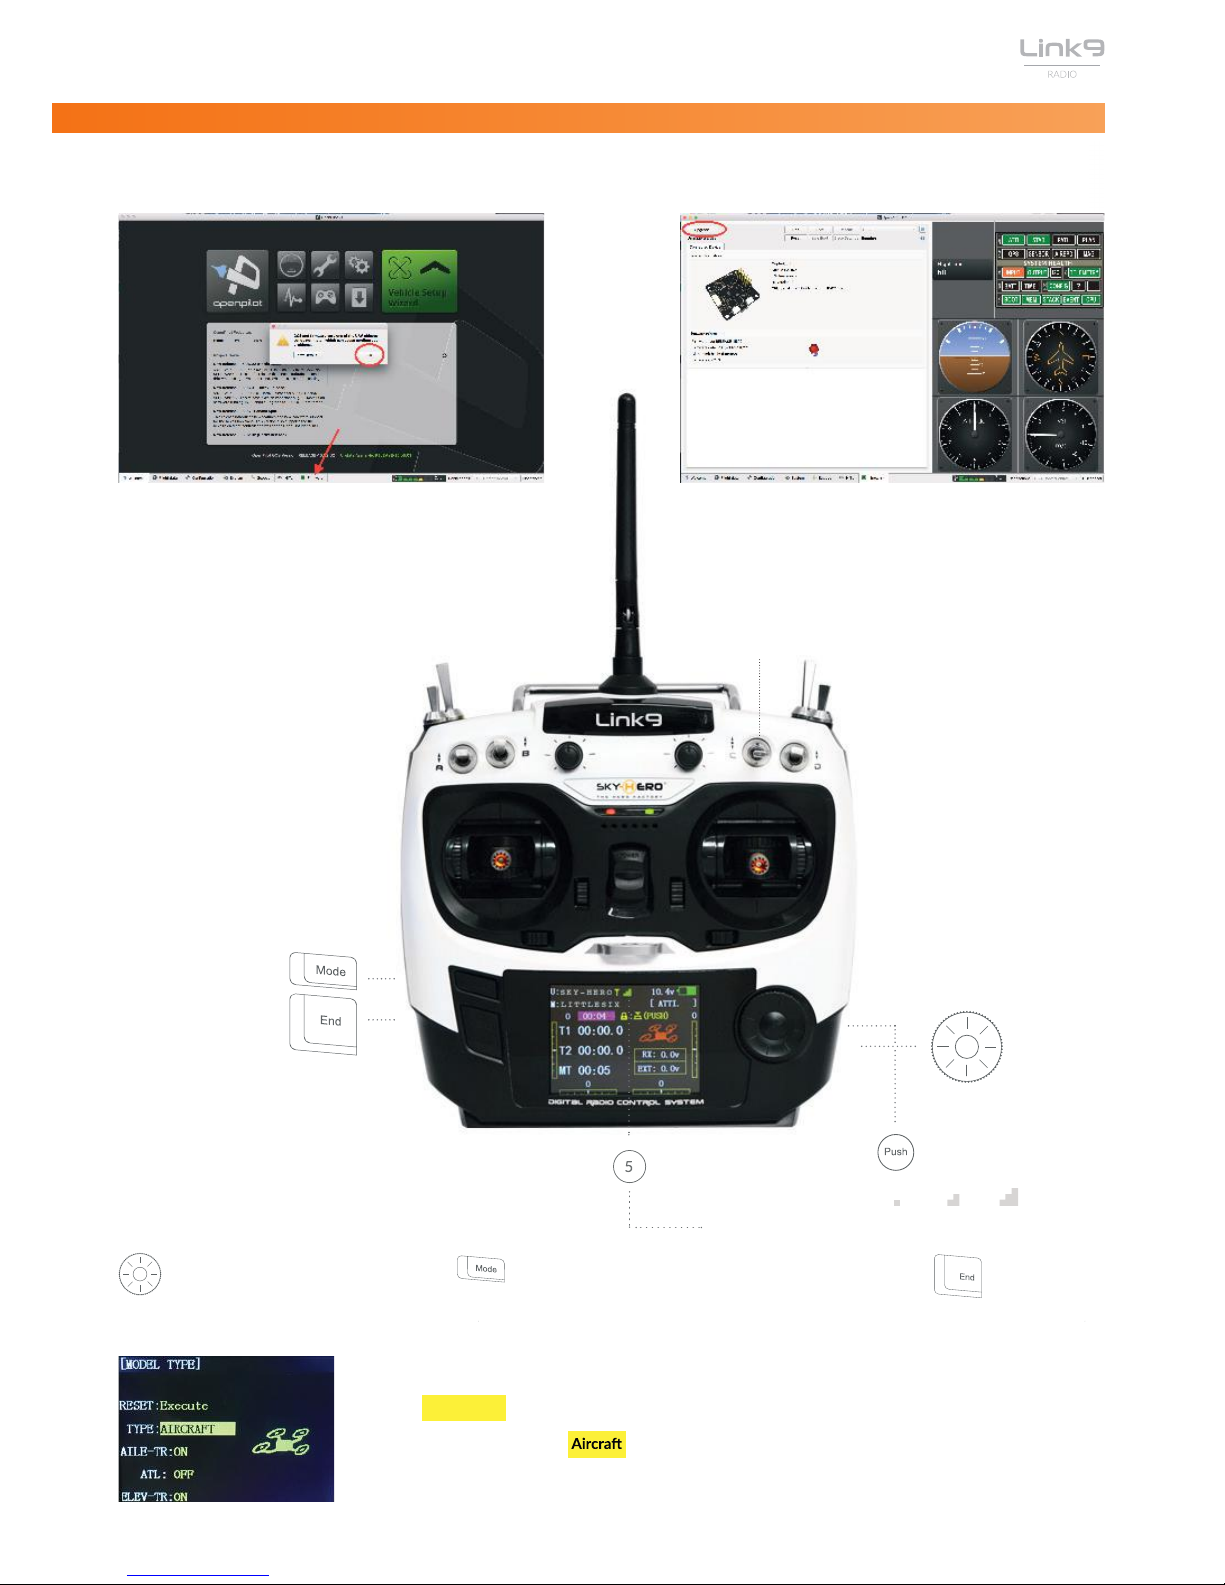
RADIO NAVIGATION SYSTEM
Push 2 sec to unlock screen
Push to enter or validate choice
Push to enter menu
Basic menu > advance menu > basic menu > etc...
- Enter basic menu
- Enter Model type
- Select -type- and change to
- Push 2x to validade
Push to exit
Signal power level: LowM id High
Dial
USING LINK9
FLIGHT MODE (C switch)
1. Stabilied Super So
. Stabilied So
3. Rate
CONFIGURATION PROCEDURE
This step is mandatory if you are using a LINK9
To use your Anakin ARF with your Link9 YO MST rst upgrade the Sky-Hero CC3D ight controller with the latest rmeware. To do so, you must
previously download the
OpenPilot Soware (ERSION 1..) - see page - and do the following
CHANGE MODEL TYPE
Discard the message warning you do not have the latest version by clicking
OK. Then click on the Firmeware Tab at the boom of the applicaon.
Then click on PRADE and wait unl the nalisaon of the process.
DO NOT click on «UPGARDE & ERASE». If you do so you will have to
go through the enre process 3 4 of the PREPARE YOR ANAKIN
chapter.

16
15
7
- Now you can see your signal power level on your Link9 radio
Signal power level: Lo id High
HOW TO CONNECT & BIND (with Sky-Hero LINK9 RX & TX)
FLIGHT MODES
1. STABILIZED SUPER SOFT: (ATTITDE MODE) - Switch 3 in P poson
Anakin comes back to a at posion when LEFT STICK is back to neutral posion - The maximal angle of the drone is ERY LIMITED.
2. STABILIZED SOFT: (ATTITDE MODE) - Switch 3 in MIDDLE poson
Anakin comes back to a at posion when LEFT STICK is back to neutral posion - The maximal angle of the drone is LIMITED.
3. RATE: (RATITDE MODE) - Switch 3 in DON poson
Anakin comes back to a at posion when LEFT STICK is back to neutral posion - The maximal angle of the drone is NLIMITED.
Then:
Turn your Link9 on
Plug your lipo in your model
Push and hold the bind buon unl the Led start blinking
Push again the buon again unl it starts blinking blue (meaning S.BS-
mode)
Once the Led turns solid blue, its bound
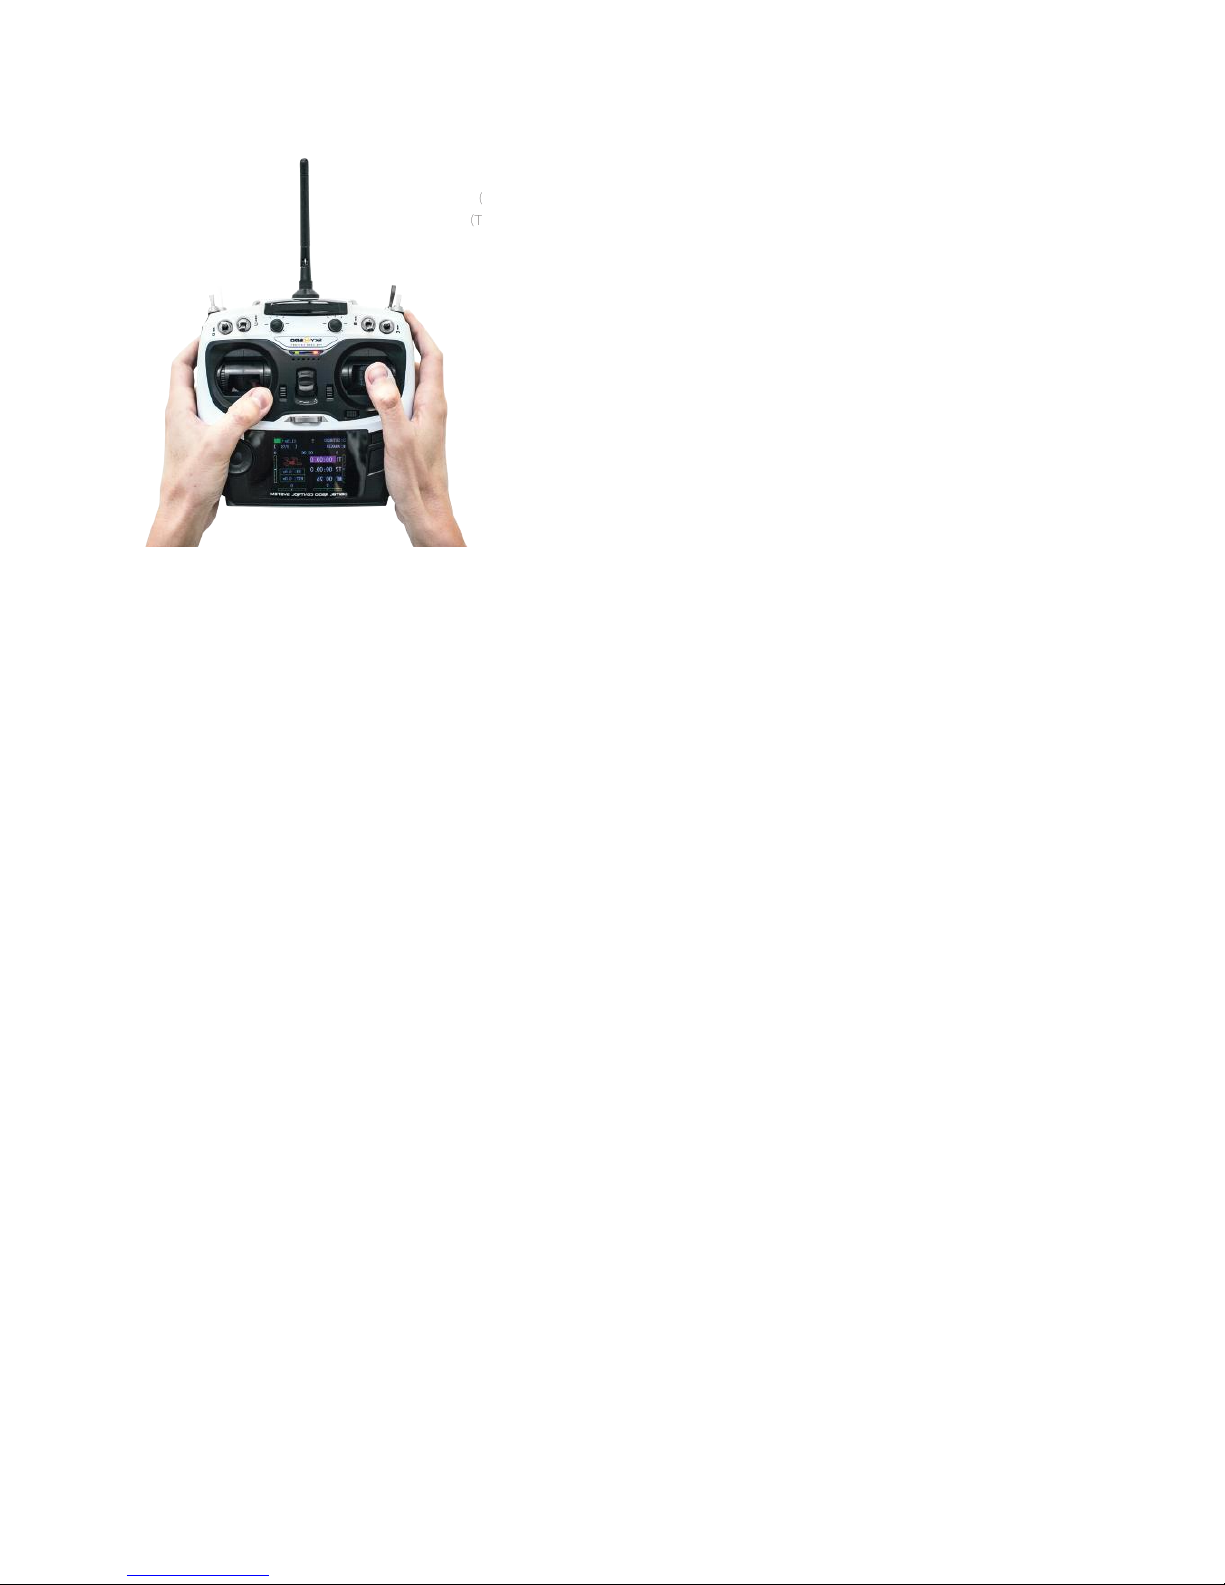
BASIC COMMANDS
See hereunder how to control your Anakin.
T: it cannot hold the central posion when released.
Roll: it can return to the central posion when released.
Pitch: it can return to the central posion when released
Yaw: it can return to the central posion when released.
LEFT STICK RIGHT STICK
ODE 1
Pitch: it can return to the central posion when released
Roll: it can return to the central posion when released.
T: it cannot hold the central posion when released.
Yaw: it can return to the central posion when released.
LEFT STICK RIGHT STICK
ith Link9. you have to connect with the cable as shown on the picture.
(Yellow cable is not used)
To CC3D Flight
Controller «Main» port
17
16
BEFORE TAKE OFF
1: OPERATE YOUR AIRCRAFT SAFELY
Refer to and follow all safety precauons menoned in the eneral Instrucons and uidelines for use secon of this manual.
Ensure that you always turn on your transmier before connecng the aircra baery power. Aer ying, make sure that you always disconnect the
aircra baery before turning o the transmier.
On the transmier, ensure switches are to neutral posion and the throle control is at the lowest posion.
Check that your aircra is ready for ight with no loose screws or ngs (pay special aenon to the propellers) insert a baery into the baery bay
and use the provided strap to secure the baery in place.
Connect the baery cable to the connector on the aircra.
(Important make sure you keep the aircra level and sll while connecng the baery)
ait for the LED lamp (located on the underneath of the aircra) to ash green rapidly it should do this twice (without a short interval between each
set of ashes).
You should wait unl the LED is only ashing reen without any Red ashes this indicates that you have sucient Satellites located for safe PS
mode ying. Beginners are strongly recommended to y in PS mode and become fully condent and capable with the aircra before ying in ATTI or
Manual modes
3: FLIGHT TEST YOUR ANAKIN
Fly minutes in hover and then land your aircra.
Disconnect the baery and check the temperature of the motors and tubes they may be warm, but must not be hot. Recharge the baery and check
the capacity (mAh) that your charger puts back into the baery. This mAh value will cor- respond to the power consumpon of your Anakin during the
minute ight.
4: CALCULATING YOUR IDEAL FLIGHT TIME
If for example you use a mAh baery and aer minutes of racing, you put it on charge and mAh of power is put back into the baery.
To translate this into your ideal ight me, you need to divide the capacity of the baery (mAh) by recharged mAh amount (mAh) and mul-
ply the result by the duraon of your ight in minutes ( min).
Example . x min 1 min 3. This is your approximate maximum ight me.
For safety reasons, we would advise that you do not y beyond more than of the maximum ight me.
In our example, if you y for about 1 minutes, you should have enough power to return and land without risking damage to your baery.
If your transmier has a countdown or a mer funcon, it is advisable to use it indy condions and cold temperatures can adversely aect your max
ight me.
Note You need to calculate the ight me individually for each typespecicaon of baery that you have.
STARTING AND STOPPING MOTORS
PSH OH ONROLS O ORNER POSIION
HIS AY E HANED IN OPENPILO SOFARE
STARTING SEQUENCE
MODE 2
12

18
17
LIMITED WARANTY
WARRANTY AND REPAIRS
SKYHERO
I O SKYHERO
SKYHERO
:
I
F
I -
WARRANTY PERIOD
E : SKYHERO P -
P
WARRANTY LIMITATIONS
( P
SKYHERO S
Y A
P SKYHERO
SKYHERO
I
: SKYHERO -
SKYHERO
SKYHERO
D
ATTENTION
R
DAMAGE LIMITATION
SKYHERO -
I SKYHERO SKYHERO
SKYHERO
I
QUESTIONS, ASSISTANCE AND REPAIRS
SKYHERO
P SKYHERO
REPAIRS UNDER WARRANTY
I SKYHERO P
P -
P SKYHERO
P
-

19
18
www.sky-hero.com
Table of contents
Other SKY-HERO Quadcopter manuals


