Smalvic FI-36 Technical manual
EN
BUILT-IN ELECTRIC OVENS
USE, INSTALLATION AND MAINTENANCE INSTRUCTIONS
MODELS
-FI-36
-FI-45
-FI-60
-FI NB60
-FI-65BB
-FI-70
-FI-NC90
-FI-MA
-FI-SC90
-FI-TWIN
PRODUCT LABEL

9880022300-EN-180714.doc
2
EN
WORK MODES
(E) STATIC
(EG) STATICO GRILL
(V) VENTILATED
(W) MULTISITEM
(M) MULTI-FUNCTION
TYPE OF PROGRAMMING
(CM) MECHANICAL TIMER
(PSC) MECHANICAL PROGRAMMER FOR COOKING END TIME
(OR) ANALOG COOKING END PROGRAMMING CLOCK
(PE5) 5 KEY ELECTRONIC PROGRAMMER
(PE6) 6 KEY ELECTRONIC PROGRAMMER
TABLE OF CONTENTS
USER GUIDE page
GENERAL WARNINGS 3
USER GUIDE FOR OVEN 5
CONTROL PANEL 5
MECHANICAL TIMER CM 6
COOKING END PROGRAMMER PSC 7
OR ANALOG COOKING END PROGRAMMING CLOCK 7
PE5 – PE6 ELECTRONIC PROGRAMMER 8
OVEN FUNCTIONS 11
POSITION OF INTERNAL GRILLS 14
USE OF THE GRILL 14
MAINTENANCE AND CLEANING 15
REMOVING THE OVEN DOOR 16
REMOVING/MOUNTING THE GLASS INSIDE THE OVEN DOOR 17
REMOVING/MOUNTING THE LATERAL GUIDES 20
REMOVING/MOUNTING THE SLIDING GUIDES (IFANY) 21
REPLACING THE OVEN LIGHT BULB 22
INSTALLATION INSTRUCTIONS 22
FEATURES OF THE CABINET 23
INSERTING THE OVEN INTO THE CABINET 23
OVEN ELECTRICAL CONNECTION 25
ASSEMBLY/REPLACEMENT OF THE POWER SUPPLY CABLE 26
EARTH CONNECTION 26
TECHNICAL AFTER-SALES ASSISTANCE AND SPARE PARTS 27
TABLES OF REFERENCE 28

9880022300-EN-180714.doc
3
EN
■GENERAL WARNINGS ■
This product is in compliance with the EU 2002/96/EEC Directive.
The crossed out "wheeled bin" symbol on the appliance indicates that at the end of its
life-span, the product, as it has to be separately treated from domestic waste, must be
conferred to a differential collection centre for electric and electronic appliances or
redelivered to the dealer at the time of purchasing a new equivalent appliance.
The user is responsible, at the time of disposal, for taking the device to the appropriate
collection point. Failure to do so shall result in punishment in accordance with the
current legislation on waste disposal.
Proper differentiated collection is necessary so that the obsolete device can be sent on
for environmentally friendly recycling, treatment and dismantling, in order to avoid any
possible negative environmental impact or health risk and to permit re-use of the
constituent materials.
More detailed information about available systems for collection may be obtained from
the local waste disposal services, or from the shop where the device was purchased.
The manufacturer declines all civil or criminal liability in the event of poor or
improper installation of the device.
The manufacturer also reserves the right to many any necessary and useful amendments
to its products without prior notice.
Dispose of the various packaging materials in compliance with the applicable local
Standards.
Carefully read this instruction manual prior to installing or using this device, in order to
have all the necessary information for correct installation, maintenance and use of the
same.
It is essential for this instruction manual to be kept together with the device for its entire
life-span, also in case of transfer to other persons.
This appliance has been designed for domestic use and only for the cooking and heating
of food. Any other use, different to that indicated in this manual must be considered
improper and consequently dangerous.
The product is in compliance with the 89/109/EEC European Directive as it is destined
to come into contact with food products.
This household appliance is compliant with the provisions of the European
Community Directives
- LOW VOLTAGE DIRECTIVE – 2006/95/EC
- ELECTROMAGNETIC COMPATIBILITY DIRECTIVE – 2004/108/EC
The product identification data is stated on the relevant plate applied on the front of the
oven. The plate must never be removed.
Installation must only be carried out by qualified staff in compliance with the local
regulations in force and following the indications in this manual.
Important: do not lift or pull the oven with your hands.

9880022300-EN-180714.doc
4
EN
In case of malfunctioning, disconnect the appliance from the electric mains (do not pull
the power supply cable to disconnect the plug) and contact the authorised original spare
parts technical after-sales centre.
Do not, in any case, attempt to repair the device.
Correct use of the oven
- This appliance is not intended for use by persons (including children) with reduced
physical, sensory or mental capabilities, or lack of experience and knowledge, unless
they have been given supervision or instruction concerning use of the appliance by a
person responsible for their safety.
- Children should be supervised to ensure they do not play with the appliance. - The use
of the device is only intended for adults, keep children out of reach.
- The appliance produces heat both in the functioning phase and due to inertia, even
when just turned off. Do not touch parts inside the oven during these phases and limit
contact with the external parts. Keep children away from the appliance when operating.
The accessible parts can become very hot.
- To insert or extract containers or accessories from the oven, always use suitable
protective gloves.
- Use only containers able to resist to high temperatures
- Do not leave the appliance unattended during cooking operations that may release
greases or oils that may catch fire.
- Never cover or lean on the walls or lower part of the oven, with sheets of aluminium or
other objects such as pans or trays that could damage the product.
- Do not use the oven to store objects when it is not in use, otherwise damage could be
caused to both the oven and the objects when the appliance is switched on.
- Do not sit on or place weight on the open door and do not hang weights on the handle
as to do so could damage the product and cause malfunctions.
- Before maintenance or cleaning, unplug the oven and, if just used, wait for it to cool.
- Pay attention to the flow of air that leaves the oven when the door is opened when the
same is hot.
- Do not use jets of steam for cleaning, which could reach and damage electrical parts.
- If the supply cord is damaged, it must be replaced by the manufacturer, its service
agent or similarly qualified persons in order to avoid a hazard.
Attention, this appliance must be earthed in compliance with the standards in
force.
For installation of the oven see the “installation instructions” chapter
Correct use of the oven
- Pre-heat the oven for the strictly necessary time only
- Open the door only when necessary to avoid unnecessary heat losses
- Keep the gaskets clean and efficient to avoid heat dispersion which can cause damage
- Always turn off the oven when no longer in use
- To reduce the formation of condensate owing to the humidity in food, it is always
necessary to pre-heat the oven before introducing the foodstuffs. However formation of
condensate on the door glass or on the walls of the oven does not compromise its
functioning and will tend to disappear with the cooking.
9880022300-EN-180714.doc
5
EN
Prior to oven commissioning:
Unplug the device.
Remove all internal packaging and accessories from the oven. Clean the internal
surfaces with hot water or neutral detergent (see “maintenance and cleaning” paragraph).
Rinse thoroughly with a damp cloth. Wash all oven accessories in the same way and dry
everything thoroughly.
Attention:
- Never use this device to warm the premises
-Do not obstruct the passage of cooling air by blocking the ventilation holes of the room
and ducts on the appliance.
- Before installation, check that the local power supply is compatible with the data
indicated on the product label.
- During use, do not touch the heating elements inside the oven.
- The accessible parts can become very hot during use, it is recommended to keep
children out of reach.
■GUIDE TO USING THE OVEN ■
THE GENERAL FUNCTIONS DESCRIBED BELOW ARE THOSE OF ALL THE
MODELS. CHECK THOSE OF YOUR OVEN.
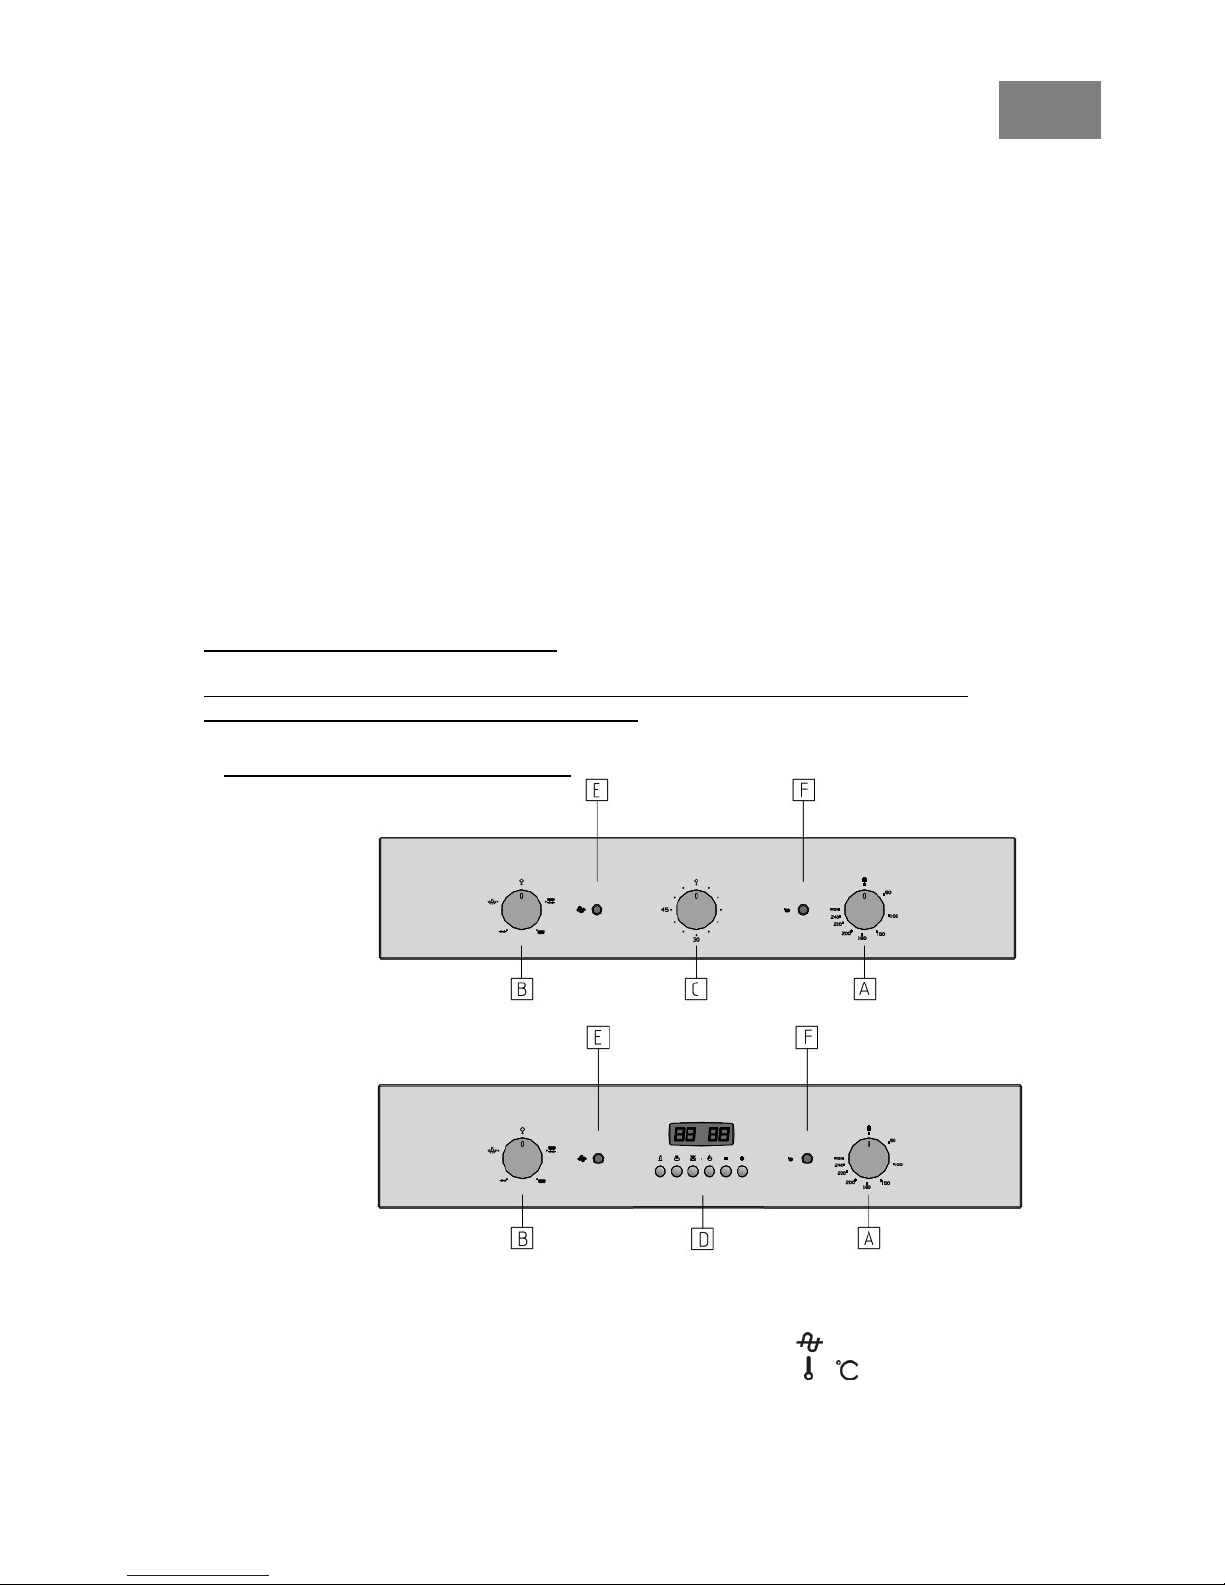
■STANDARD CONTROL PANEL ■
A= Thermostat D = Clock / Programmer OE/OR/PE
B= Function selector E= Power Indicator LED
C= CM/PSC timer F= Oven Operating LED
The positions and the types can vary depending on the models.

9880022300-EN-180714.doc
6
EN
Important:
Before using the oven for the first time, allow it to run on empty and at maximum for
about 1 hour. Ventilate the premises well, possibly by opening the windows. This will
allow the evacuation of the combustion fumes of production residue such as grease, oil
and resin from processing.
Power indicator LED
When on, it indicates that the oven is live and on.
Oven operating LED)
When this LED turns on it means the oven is in the pre-heating phase. When it turns off
it means the oven has reached the set temperature. When it blinks intermittently it means
that the temperature inside the oven is maintained constantly at the value set on the
thermostat.
Oven temperature thermostat:
The oven thermostat controls the desired cooking temperature for all oven options
including those which foresee use of the Grill. Turning the relative knob clockwise, it
controls the temperature inside the oven at the desired value between 50° and 270°C.
Functions switch or selector
The switch activates the type of functioning desired for cooking.
The functions available vary depending on the model.
■CM MECHANICAL TIMER ■
The mechanical timer can be used as a warning with acoustic
signal at the end of the time period necessary for cooking. To
select the desired time, turn the knob to the corresponding time in
minutes. When this time has passed, the timer will emit an acoustic
signal. Resetting the timer does not interrupt cooking.
9880022300-EN-180714.doc
7
EN
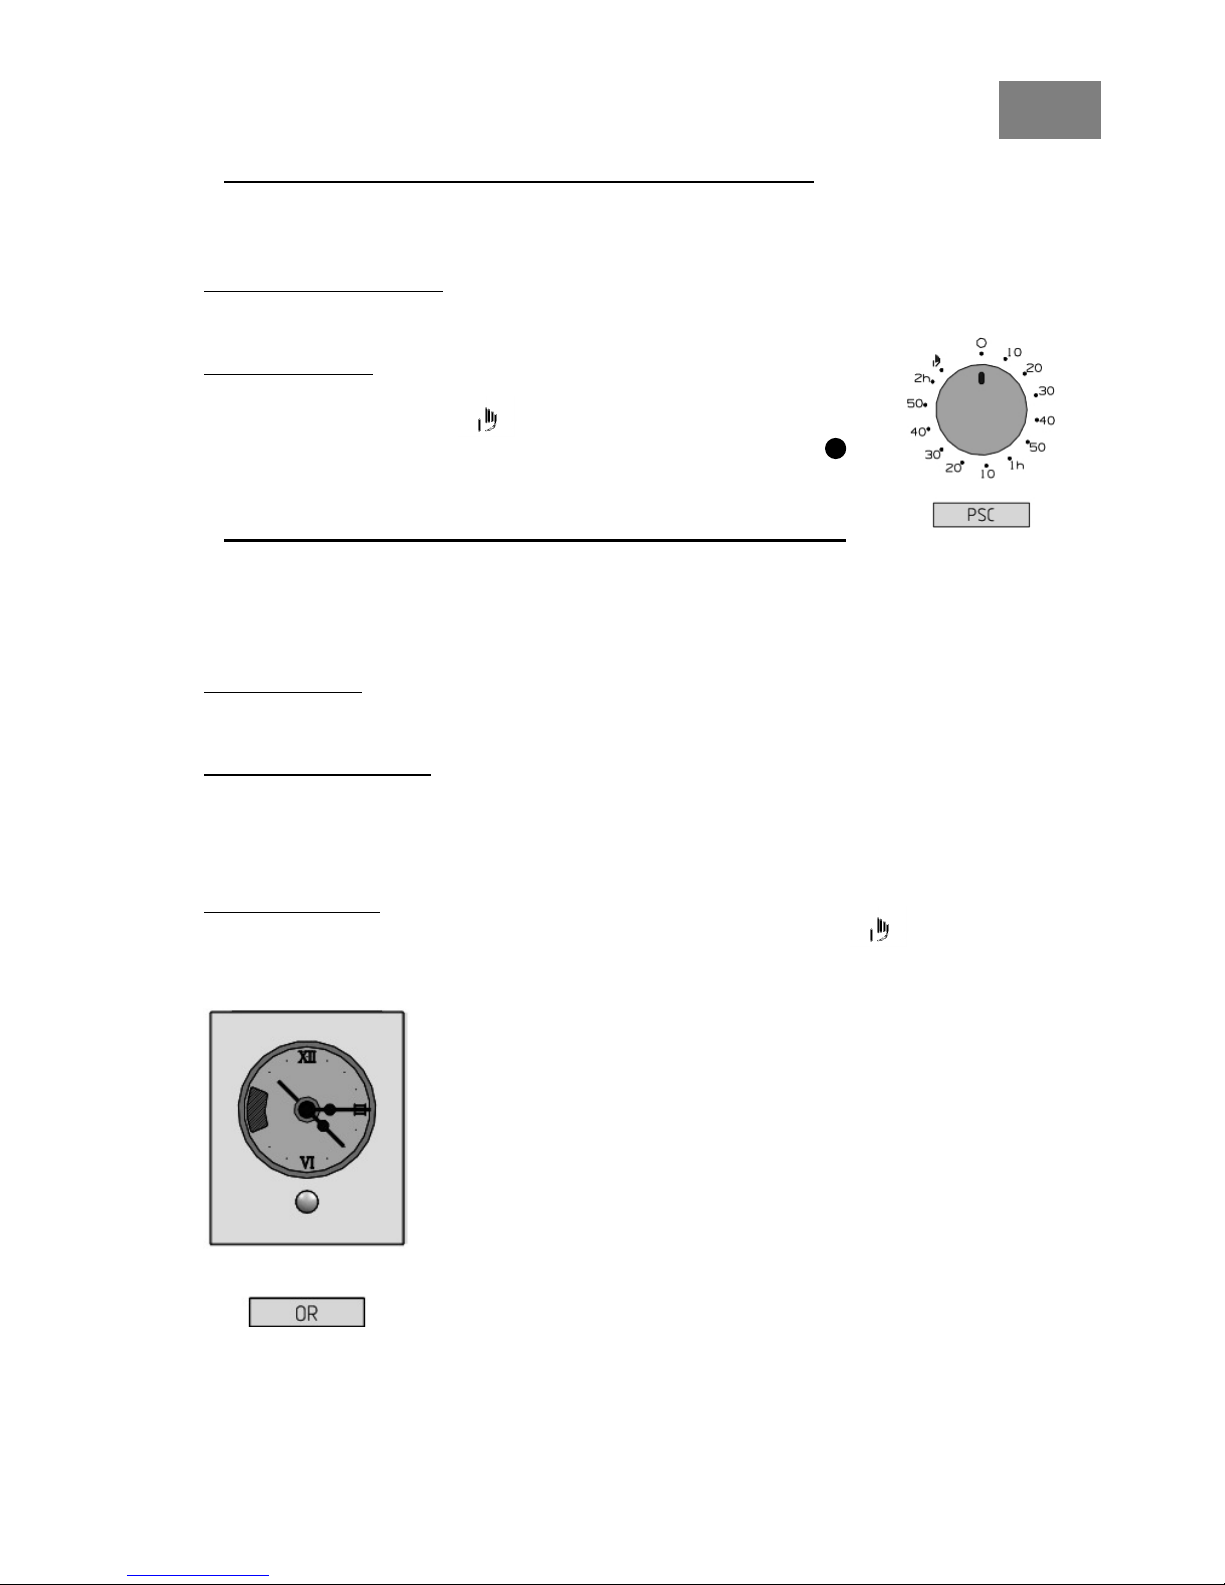
■PSC MECHANICAL COOKING END PROGRAMMER ■
Allows programming interruption of cooking for a certain amount of time (maximum 2
hours).
Programmed operation: Turn the knob clockwise and select the desired cooking time.
The time count will start immediately. When time is up, the oven will automatically turn
off and an acoustic signal will mark the end of cooking.
Manual operation
For standard use of the oven without programming, turn the knob anti-
clockwise until the symbol
Please note: the oven does not work if the knob is at position
■OR ANALOG COOKING END PROGRAMMING CLOCK ■
Besides showing the time, like the PSC it enables programming of the end of cooking
(up to 3 hours).
Be careful, the knob must always be turned clockwise for any regulation.
Setting the time: pull the knob lightly and turn it clockwise until the clock is set at the
current time. The clock runs even when the oven is off. Should power be cut, the clock
stops and must be readjusted when power is restored.
Programmed operation: turn the knob clockwise and select the desired cooking time.
The time count starts immediately. When the set minutes are up, the oven will turn off
automatically and an acoustic signal will mark the end of cooking. In order to turn the
acoustic signal off, bring the programmer to Orotating the knob clockwise. If you wish
to interrupt cooking before time is up, bring the programmer to O.
Manual operation:
Turn the knob clockwise until the hand reaches the manual symbol
The oven cannot work if the programmer is at O.

9880022300-EN-180714.doc
8
EN
■PE5 – PE6 ELECTRONIC PROGRAMMER ■
PE5 – 5 KEYS
PE6 – 6 KEYS
Symbols
Timer button
Cooking duration programming button
Cooking end programming button
Manual button (only for PE6 - 6 keys)
Number decrease button
-
Number increase button +
Setting the time
Once the current is connected, flashing numbers appear on the display. Proceed as
follows to regulate the time:
PE5 – Press at the same time the keys and then press +
and
-
to set the
required time. After a few seconds the time is fixed.
PE6 – Press the key and act in the same way as model PE5
By pressing and holding the keys +or
-
the numbers will advance more quickly.
The time can be set whenever you wish, but if there are programs set they will be
cancelled.
Manual operation
PE5 – For manual operation with this model, do not intervene on the programmer but
act using the temperature function knobs.
PE6 – Press , the symbol A disappears. Now act on the functions and temperature
knobs. In the event programming is activated, manual functioning is not possible until
they are cancelled.
Semi-automatic operation (with cooking time setting)
PE5- PE6 - Press , the symbol Awill start to flash and the numbers 0.00 appear.
Set the required cooking time by pressing key +.
After a few seconds the time re-appears and the letter Aremains fixed.
Turn the functions and temperatures selector knob onto the desired values.
At the end of the set time, an acoustic signal indicates the end of cooking, the letter A
starts to flash and the oven turns off.
Turn the knobs to the off position. In order to interrupt the acoustic signal and to cancel
programming, press and at the same time.

9880022300-EN-180714.doc
9
EN
Semi-automatic operation (with end cooking time setting)
PE5- PE6 - Press the key , the symbol Awill start to flash and the time set on the
clock will remain. With the key +set the cooking end time. After a few seconds the
time re-appears and the letter Aremains fixed. Now turn the two knobs to the desired
temperature and cooking time.
When the set time is reached, the acoustic signal indicates the end of cooking, the letter
Astarts to flash and the oven turns off.
Turn the knobs to the off position. In order to interrupt the acoustic signal and to cancel
programming, press and at the same time.
Automatic operation
PE5- PE6 - Press , the symbol Awill start to flash and the numbers 0.00 appear.
Press the key +
to set the cooking time.
Press the key and the symbol Awill start to flash and the current time remains.
Press the key +to set the cooking end time. After a few seconds the time re-appears and
the letter Aremains fixed. The oven will remain off and will turn on automatically
according to what you set.
At the end of the pre-set time, an acoustic signal indicates the end of cooking, the letter
Astarts to flash and the oven turns off.
Turn the knobs to the off position. In order to interrupt the acoustic signal and to cancel
programming, press and at the same time.
Example: it is 11:30 am, a cooking time of 30 minutes is set and you wish for the
cooking to end at 1:00 pm. The oven will turn on at 12:30 and off again at 1:00 pm.
Timer function
PE5 – PE6 – Press and release it. The flashing symbol and the numbers
0:00 appear.
\With the key +set the desired time. After a few seconds the symbol stops
flashing and the clock returns.
When the set time is reached, the symbol starts to flash again and the acoustic
signal starts. Press +or
-
to stop the acoustic signal.
After a few seconds, the clock will re-appear. To view the remaining time, press the
button .
To cancel this function, press and reset the time to 0.00 by pressing
-
. This function
can be used for manual cooking.
Acoustic signal
PE5 – PE6 – The acoustic signal keeps ringing for about 6 minutes; to stop the signal,
press +or
-
. It is possible to adjust the volume of the signal; there are three levels
which you can select by pressing the
-
key.

9880022300-EN-180714.doc
10
EN
Setting errors (automatic mode)
PE5 – PE6 – Programming is incorrect if the time on the clock is in between the start
and end time of cooking. In this case, the acoustic signal will sound and the symbol A
starts to flash.
Program cancellation
PE5 – PE6 – To delete a program set, just press the keys simultaneously
Child safety function (where foreseen)
PE5 – PE6 –The "child safety" program is identified by the symbol on the
programmer display.
It is an additional function that can block access to the functionality of the electronic
programmer keys both when the oven is running and as a preventative measure when the
oven is off.
When activated, this function prevents children or other persons from pressing the
programmer keys thus modifying the previous program or from starting the oven.
Every programmer signal that intervenes while the oven is on when the safety lock is
activated can be eliminated by pressing any of the keys. The safety lock will remain
active.
To activate or deactivate this child safety function (lock), proceed as follows:
1) To activate it: press +and keep it pressed for at least 3 seconds until the symbol
appears on the programmer screen highlighting this function.
2) To deactivate it: press the key +
and keep it pressed until the symbol
disappears from the programmer screen.
NOTES: - The lock must be deactivated to display the remaining cooking time.
- After having set a program, wait for the symbol Aor AUTO to stop flashing before
activating the lock function

9880022300-EN-180714.doc
11
EN
■OVEN FUNCTIONS ■
(the oven symbols and their respective functions)
Oven light
The oven light can be turned on independently at any time in the case of models with
this symbol. The light stays on also with other functions. For the models without this
symbol, the light turns on for each oven function selection.
Traditional static cooking (mod-E;EG;W;M)
With the simultaneous heat distribution coming from above and below, this function is
for baking food that requires slow cooking with the constant addition of liquids. Ideal
for any type of roast, bread, cakes and biscuits in general. Use only one shelf for this
type of cooking. Otherwise the temperature will not be distributed properly.
Upper cooking (mod-E;M)
This function activates the heat element at the top. The intense heat diffused from above
is excellent for finishing off the baking of food that is cooked on the inside but not
entirely on the surface.
Lower cooking (mod-E;EG;W;M)
In this case the bottom heating element starts working. Unlike cooking with the upper
cooking method, this function is recommended for perfecting the cooking of dishes that
are already cooked on the surface but require further cooking in the centre. The intense
heat from below is excellent for roasting meat which is not so tender.
Intensive cooking (mod- W;M)
The activation of the top and bottom heat elements together with the fan ensures even
distribution of the intense heat produced. The hot air circulating inside the oven evenly
cooks and browns different dishes, on one or more levels, that require similar
temperatures. In meat roasts the optimisation of heat distribution allows cooking at
lower temperatures reducing the dispersion of sauces. This helps keep the meat more
tender and reduces the decrease in weight.
Slow cooking (mod- W)
This function combines the lower heat element and the fan. This is best for baking
delicate food such as cakes needing rising which is facilitated by heat coming from
below. Just like the lower heat cooking method, slow cooking can be used to finish
baking dishes already browned on the surface but not yet ready on the inside.
Pizza function (FTO model)
This is the most powerful function. Both the lower element and the circular element at
the back of the oven work at the same time, with forced ventilation of air inside. In this
way, there is a head of temperature towards the bottom that makes this type of cooking
perfect for pizzas or for cooking anything quickly.
In any case, always pre-heat the oven and wait for it to reach the required temperature
before putting in the food.

9880022300-EN-180714.doc
12
EN
Please note that quick heating requires the oven to work at the maximum power
declared for this model (see table page 29)
Food warmer function (FTO model)
With this function, the temperature is constantly maintained at 80°C, very useful for
heating and keeping previously cooked food warm.
Ventilated cooking (mod- V;M)
This type of cooking is recommended for dishes placed on several levels even differing
one from another without mixing their smell. Even hot air circulation allows baking
slowly and homogeneously.
Electric grill (mod-E;EG;V;M)
With this selection only the internal part of the electric element at the top of the oven
functions. The feature of the Grill to send out intense heat makes it possible to use the
oven for both grilling and roasting. The immediate browning of meats prevents the
leaking of liquids, keeping them tender. For this type of cooking it is necessary to keep
the door open. With this function, in models where arranged, it is possible to use the
spit. Consult the “Use of the Grill” paragraph
Ventilated electric grill (mod-V;W;M)
This function permits grilling in a softer manner thanks to the use of forced air. Forced
circulation of air inside the oven increases heat penetration in food and prevents burning
on the surface. For this type of cooking, the door must remain open. Depending on the
models, it is possible to cook with the aid of the spit (if set-up). Consult the “Use of the
Grill” paragraph
Oven fan (mod-V;W;M)
Only the fan is functioning without any heating element. This function can be used to
defrost and/or dry the food to be cooked, only with the movement of air circulating at
ambient temperature. This permits the defrosting of dishes without altering their taste or
appearance.
Spit (mod-FI60 E;FINC90 W-M;FIMA W;FISC90 W-M)
It is possible to use the spit in models that have this function. In models FI SC90, the
spit is positioned transversally with the connection on the back of the oven (in models
FI-MA and FI NC90, the connection is on the right wall of the oven) and its functioning
is automatic in all functions, even if the symbol is not present. To use it act as follows.
Introduce the dish fixed with the appropriate fork hooks in the spit rod and place
everything in the spit stand previously arranged in its housing on the drip tray.
The spit grip made of insulating material must be used only to remove the spit rod from
the oven and it must be removed during cooking.

9880022300-EN-180714.doc
13
EN
FI70 – FISC90 FINC90
In models FI60, (only for FI60 E models) the spit is positioned lengthwise with the
connection on the back of the oven in the middle. In this case also, insert the dish fixed
with appropriate fork hooks of the split rod (depending on model). The spit grip made of
insulating material must be used only to remove the spit rod from the oven and it must
be removed during cooking.
FI60
It is recommended to insert foods into the oven when it has been pre-heated

9880022300-EN-180714.doc
14
EN
■POSITION OF THE INTERNAL GRILLS FOR SPECIFIC COOKING ■
Position n. 1 and 2 from bottom
Frozen cakes, Long roasts, Turkey, Cakes, Meat Steak well done;
Position n. 2 from bottom.
Cakes, Sandwich Load, Toast, Casserole, Wholemeal bread, Meat;
Position n. 2 and 3 from bottom.
Biscuits, Fine cut meat;
Position n. 3 from bottom.
For Browning with Grill.
This data regarding the cooking positions are indicative and can be interpreted on the
basis of your own experience.
■USE OF THE GRILL ■
To optimise Grill cooking, switch on the grill oven and pre-heat for at least 10 minutes.
Introduce the dish inside the oven in the nearest position to the Grill, depending on the
type of food to cook. Always use the Grill with door closed and for a maximum time of
15 minutes.
With the grill it is possible to cook fish, vegetables, small spits and various types of
meat, with the exception of lean game meat. Finely cut meat and fish must always be
grilled very quickly greasing them slightly with oil using a suitable brush and always
placed on the grill. In turn, the grill must be placed nearest to the upper heating element,
proportionally to the thickness of the dish, to avoid burning it on the surface and not
cooking it enough inside. Only salt the meat after cooking or it will be less juicy. Never
prick food during cooking, not even to turn them. Their juice would run making the
grilled food dry.
Meat can be arranged in suitable containers or cooked directly on the grill. In the latter
case, always pour some water in the drip pan then insert it in the guides under the grill.
This prevents the grease in the dripping pan from burning and creating bad odours.
Attention: during use of the Grill, the accessible parts can overheat. It is therefore
advisable to keep children at a safe distance.
Never use the oven to heat the premises or the room you are in.
Tangential fan
This appliance is provided with a tangential fan for cooling the control panel and the
oven door handle. This fan starts working a few minutes after the start of cooking, when
the oven reaches a certain temperature (the time varies according to model) and also
avoids the overheating of the cabinet housing. The hot air expelled from below the
control panel will continue to escape also after the oven has been switched-off, until the
temperature falls to a normal level.

9880022300-EN-180714.doc
15
EN
■MAINTENANCE AND CLEANING ■
Disconnect the electric power supply before performing any type of maintenance
on the product
Do not clean the device with steam cleaners.
Do not use rough, abrasive materials or sharp metal scrapers to clean the oven door, as
they can scratch or damage the surfaces and cause the glass to break. Do not use acid
products (like anti-scaling agents) as they can damage the enamelled parts.
Turn off the heating elements, wait for the internal parts of the oven to cool down before
touching or cleaning them. Pay greater attention to the cooking grills. Clean the oven
with care. When cleaning with a wet sponge or soft cloth, take all due care if the surface
is hot as it will produce steam and you will risk scalding yourself. Moreover, some
detergents create noxious fumes on contact with the heat.
Periodic maintenance
Regularly check the state of the rubber gasket located around the oven opening. It
guarantees the correct functioning of the oven. If gasket damage is noted, contact the
nearest technical after-sales centre.
Cleaning the surfaces
The enamelled or stainless steel parts must be treated with caution. Use water or specific
products, accurately drying with a soft cloth. Do not use abrasive products. In case of
tough deposits on enamelled parts, use a plastic sponge or similar, soaked in hot water
and vinegar. It can become very difficult to remove food residues or stains from oils,
sugars, fats, etc. if they are not immediately removed after use of the oven. It will make
removing them easier if the internal parts of the oven are cleaned while they are still
warm.
Due to an increasing presence of new products on the market it is not possible to
establish a list of items suitable for cleaning this device. Read the manufacturer
instructions carefully to verify the possible use of the detergent.
9880022300-EN-180714.doc
16
EN
■REMOVING/MOUNTING OF THE OVEN DOOR ■
To remove and insert the oven door, follow the instructions below.
Fully open the door and in both hinges insert a metal rod (not supplied) with a diameter
of about 3 mm in the hole shown in the figure.
Pressed door model Door model with profiles
Grasp the door with both hands on the sides down. Lift the door slightly and remove the
hinges from 2 locations. Pull the door toward you to release the hinges from the
openings of the frame of the oven.
Re-insertion of the oven door
Act in reverse order, holding the door sideways with both hands towards the bottom and
inserting the hinges in the openings of the front oven frame, (pay attention to the
positioning of the foot joint).With the oven door fully opened, remove the two metal
rod from hinges.
Close the oven door slowly and make sure that it has been correctly inserted and aligned
with the lateral edges.
Attention!
With the door dropped, never remove the 2 metal rods that hold the hinges locked.
Do not rest weights on the door or hang them on the handle, they could damage the
products, creating malfunctions
Moreover, do not use the oven until the oven door has been re-mounted correctly.

9880022300-EN-180714.doc
17
EN
■REMOVING/MOUNTING THE GLASS INSIDE THE OVEN DOOR ■
General notes
To make it easier to clean the door, you can remove the glass inside it. To take it out,
follow the instructions below according to the door model mounted on the oven.
Important: To remove the internal glass you need to remove the door from the
oven (see paragraph on “Removing the oven door”) and place it on a steady surface
that ensures the necessary steps are conducted safely.
Attention: Do not use any kind of blunt or sharp tool that may break the glass or
damage the door.
Pay attention to which way you place the glass surfaces when you put them back,
as they cannot be turned around. If they are not positioned correctly, this may
affect the operation of the oven or even seriously damage the appliance.
Pressed door model (remove the door from the oven)
You can use thin cylindrical objects (for instance two coins with a diameter of roughly
25mm and 2mm thick). Insert them between the enamelled door and the glass in the
areas right near the clips Athat lock the glass into place in the upper part of the door.
Press until you hear a “click”, which means that the clip has come out. Now lift the glass
and take it out. The intermediate glass you will find immediately underneath (in versions
where this applies) must only be removed by qualified personnel.
fig. 1
9880022300-EN-180714.doc
18
EN
fig. 2 fig. 3
fig. 4 fig. 4/A
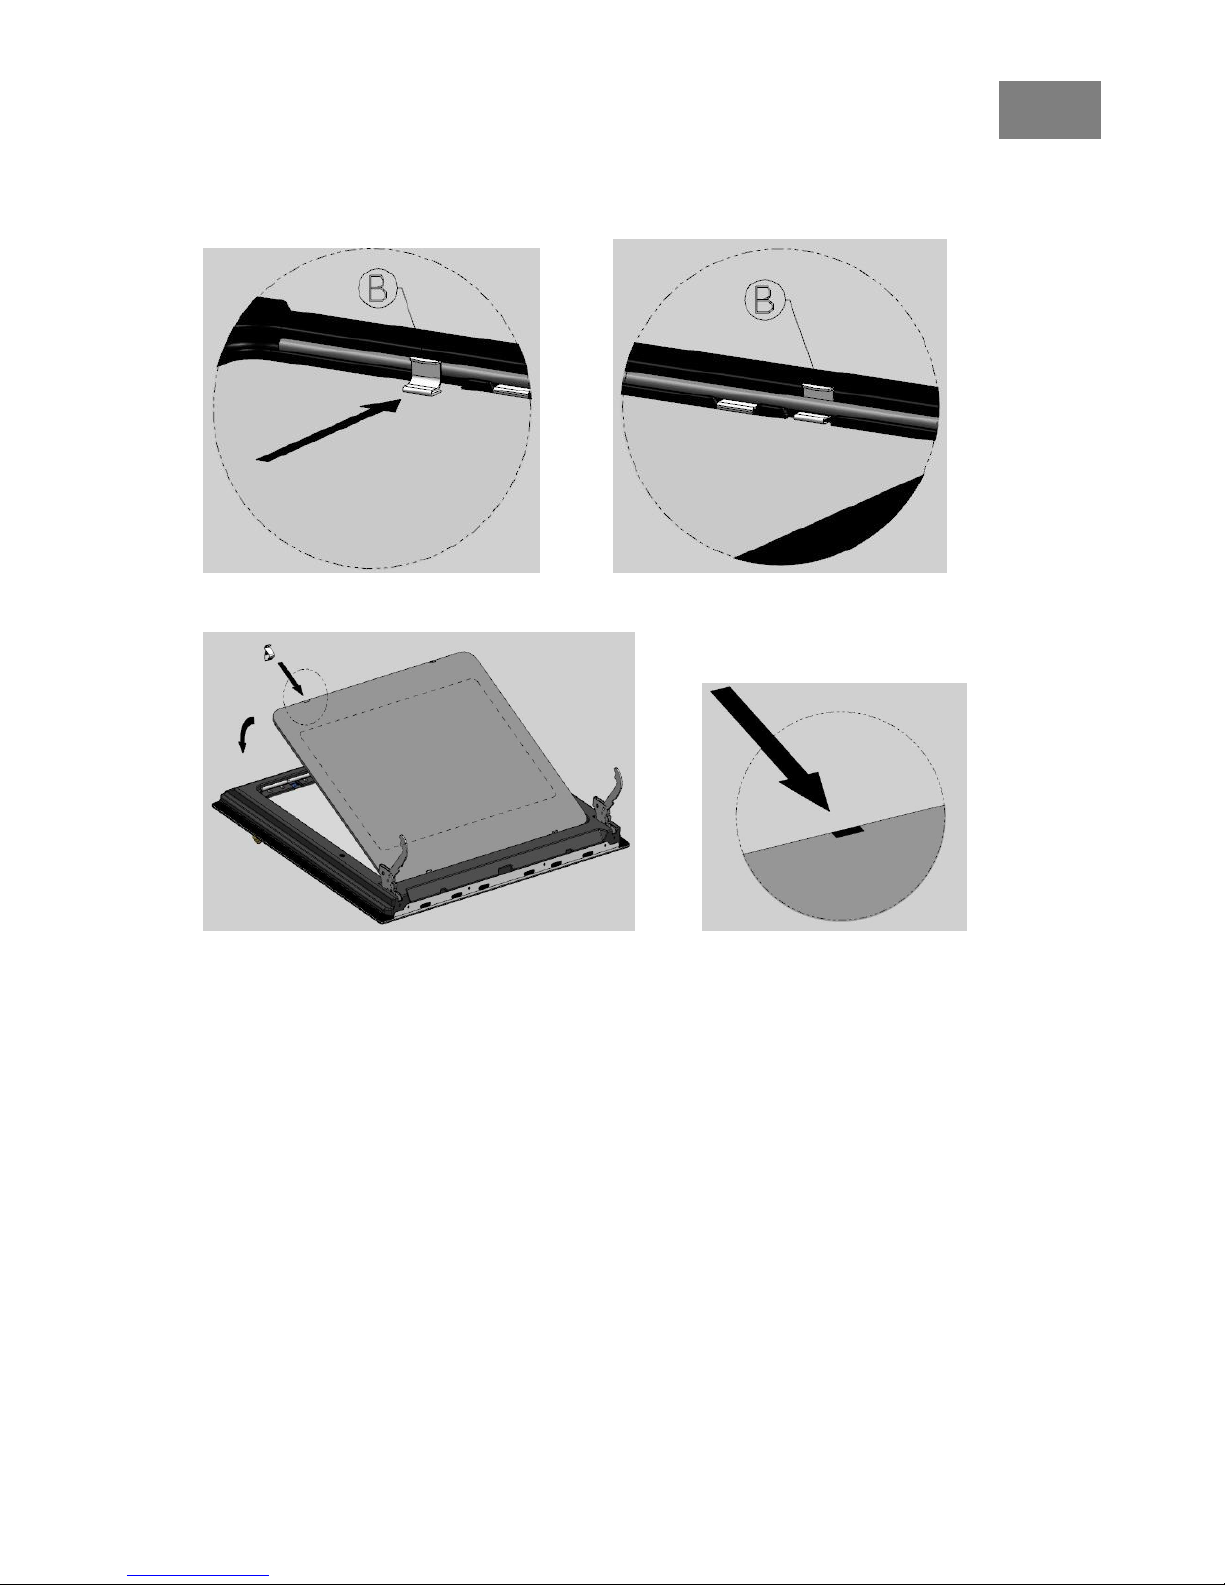
To install the glass again (pay attention to putting it in the right way round, the part with
the graphics must be towards the inside), position the upper clips Anear the designated
silk-screen printed notches in the glass (fig. 4/A). Insert the latter in the lower clips B,
which must be positioned correctly into place in the door (fig. 2). Also make sure you
position the silicone rubber cylindrical gaskets correctly (fig. 3). Now put the upper part
of the glass into place and exert a slight pressure directly on the area featuring the upper
clips A, until a click tells you that the glass has been locked into place correctly (fig. 4).
Before mounting back the door, make sure the glass is firmly secured into place

9880022300-EN-180714.doc
19
EN
Door model with profiles (remove the door from the oven)
For this door model, along with the outer glass, you can also take out the intermediate
glass (in models fitted with one)
Remove the oven door, unscrew the 4 clamping screws of the steel plates C(fig. 5) that
lock the glass surfaces into place. The glass surfaces can now be removed by slipping
them out.
fig. 5
fig. 6 fig. 7
Carry out the same steps in reverse order to place back the glass surfaces. Take the
utmost care to ensure they are in the right order and are placed the right way round (the
clear glass must be towards the inside and the position of the lettering on the glass
surfaces must be as in (fig. 6). Also make sure the protective gaskets are positioned
correctly. Some models have a glass anchoring clip that must be repositioned correctly
(fig.7) by keeping the clip Dagainst the painted strip on the upper part of the door and
inserting the intermediate glass Eand inner glass Finto place (as shown in the figure)
Before mounting back the door, make sure the glass is firmly secured into place
CAUTION! THE REMOVAL AND INSTALLATION MUST BE CARRIED OUT
ACCURATELY AND WITH THE HIGHEST CARE IN ORDER TO AVOID
THE BREAKAGE OF THE GLASSES
Attention. Do not remove the hinge locking hooks from their seat when the door is not
mounted in the oven. Do not close the hinges without the weight of the door as it causes
a violent closing of the springs.
9880022300-EN-180714.doc
20
EN
Do not rest weights on the door and do not hang them on the handle, they might damage
the product and cause malfunctioning.
Moreover, do not use the oven until the oven door has been re-mounted correctly.
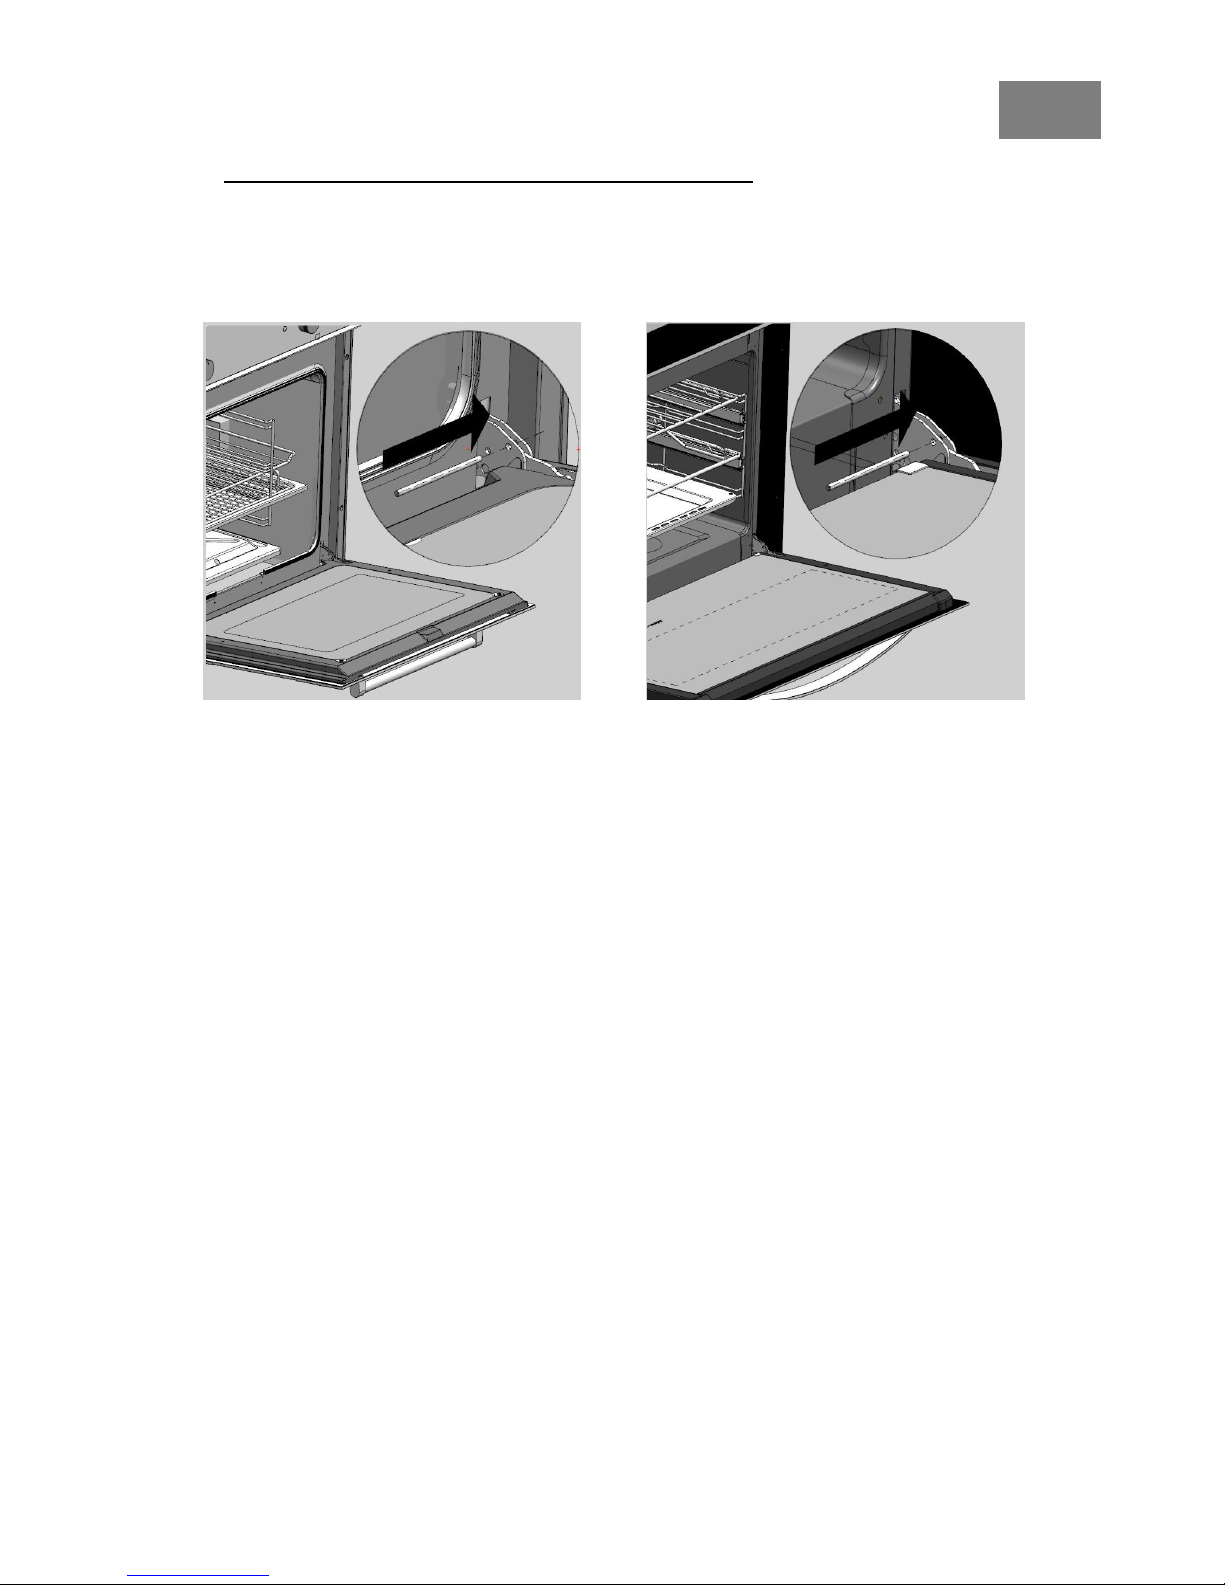
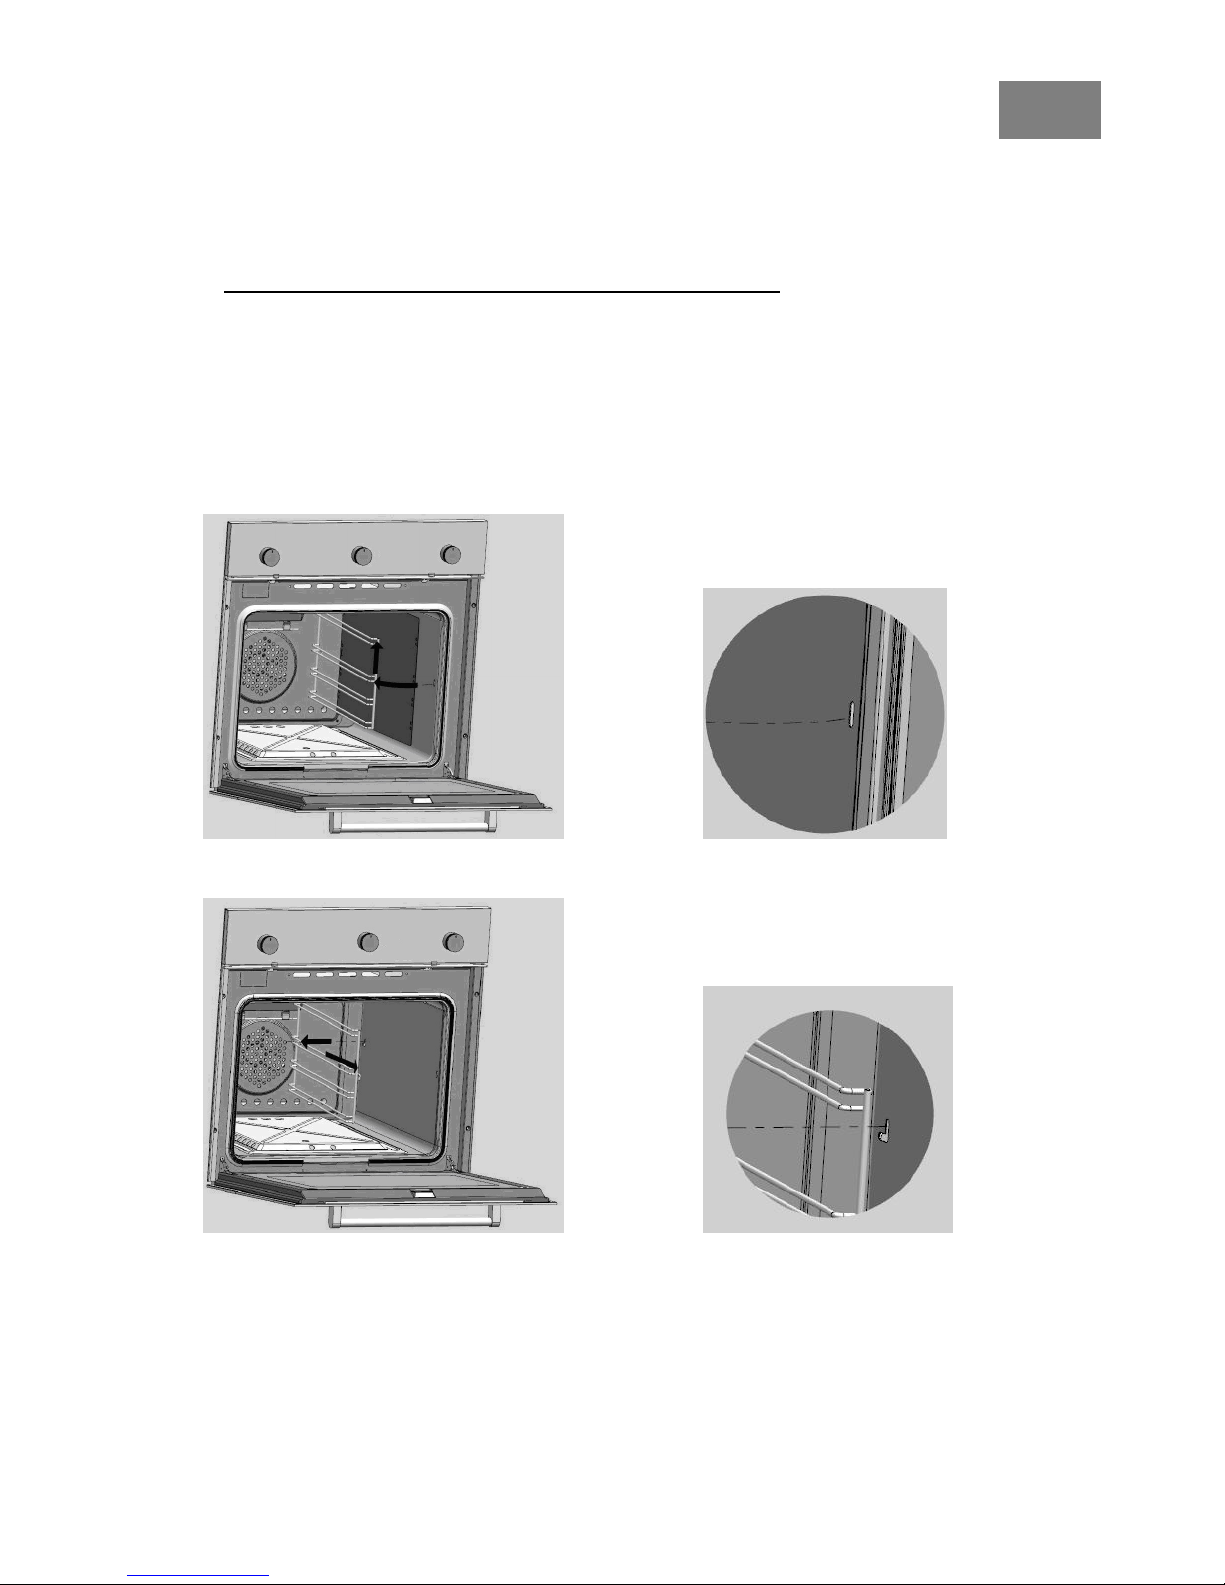
■REMOVING/MOUNTING THE LATERAL GUIDES ■
Proceed as follows to release the lateral guides:
take the guide by lifting it up at the front and pull it towards the inside of the oven
(fig.1) so that the guide's hook comes out from the slot on the oven's wall.
now pull the guide towards you and lift it by taking it out from its housing at the back
(fig.2).
fig. 1
fig. 2
To place back the guides, carry out the steps in reverse order. Always make sure you do
not damage the enamel on the oven's walls.
This manual suits for next models
9
Table of contents
Other Smalvic Oven manuals


Popular Oven manuals by other brands


Electrolux
Electrolux EOC69400X user manual

Dieter Knoll Collection
Dieter Knoll Collection DKS38024XK user manual

Bakers Pride
Bakers Pride VHVA-1828-E1 Specifications

Hotpoint
Hotpoint 6112 Installation and operating insctructions

Bosch
Bosch HBL 44 Series use and care manual

Hotpointt Ariston
Hotpointt Ariston 7OFK 637J X RU/HA operating instructions


