Smarfody mojo User manual

Model number : GTG-T100
SMARFODY SCOOTER
USER GUIDE

Dear Customer :
Thank you for choosing our Smarfody folding scooter with
magnesium frame.
For the correct operation, please read this manual carefully
before operating the scooter. If you can't understand all of
the contents completely or you need any assistance, please
contact the scooter dealer in your country or Smarfody
Mobility Technology.
Smarfody Mobility Technology.
E-mail :
marketing@smarfody.com
sales@smarfody.com
Warning : Failure to note the warning in this manual will cause
your personal injury.
Notication : Failure to note the notication in this manual will
damage the Mateta.
We believe that Smarfody scooter will not only bring comfort and
convenience on your movement, but also make you feel even more
joyful about your life.
CONTENT
1
1
1
1
1
1
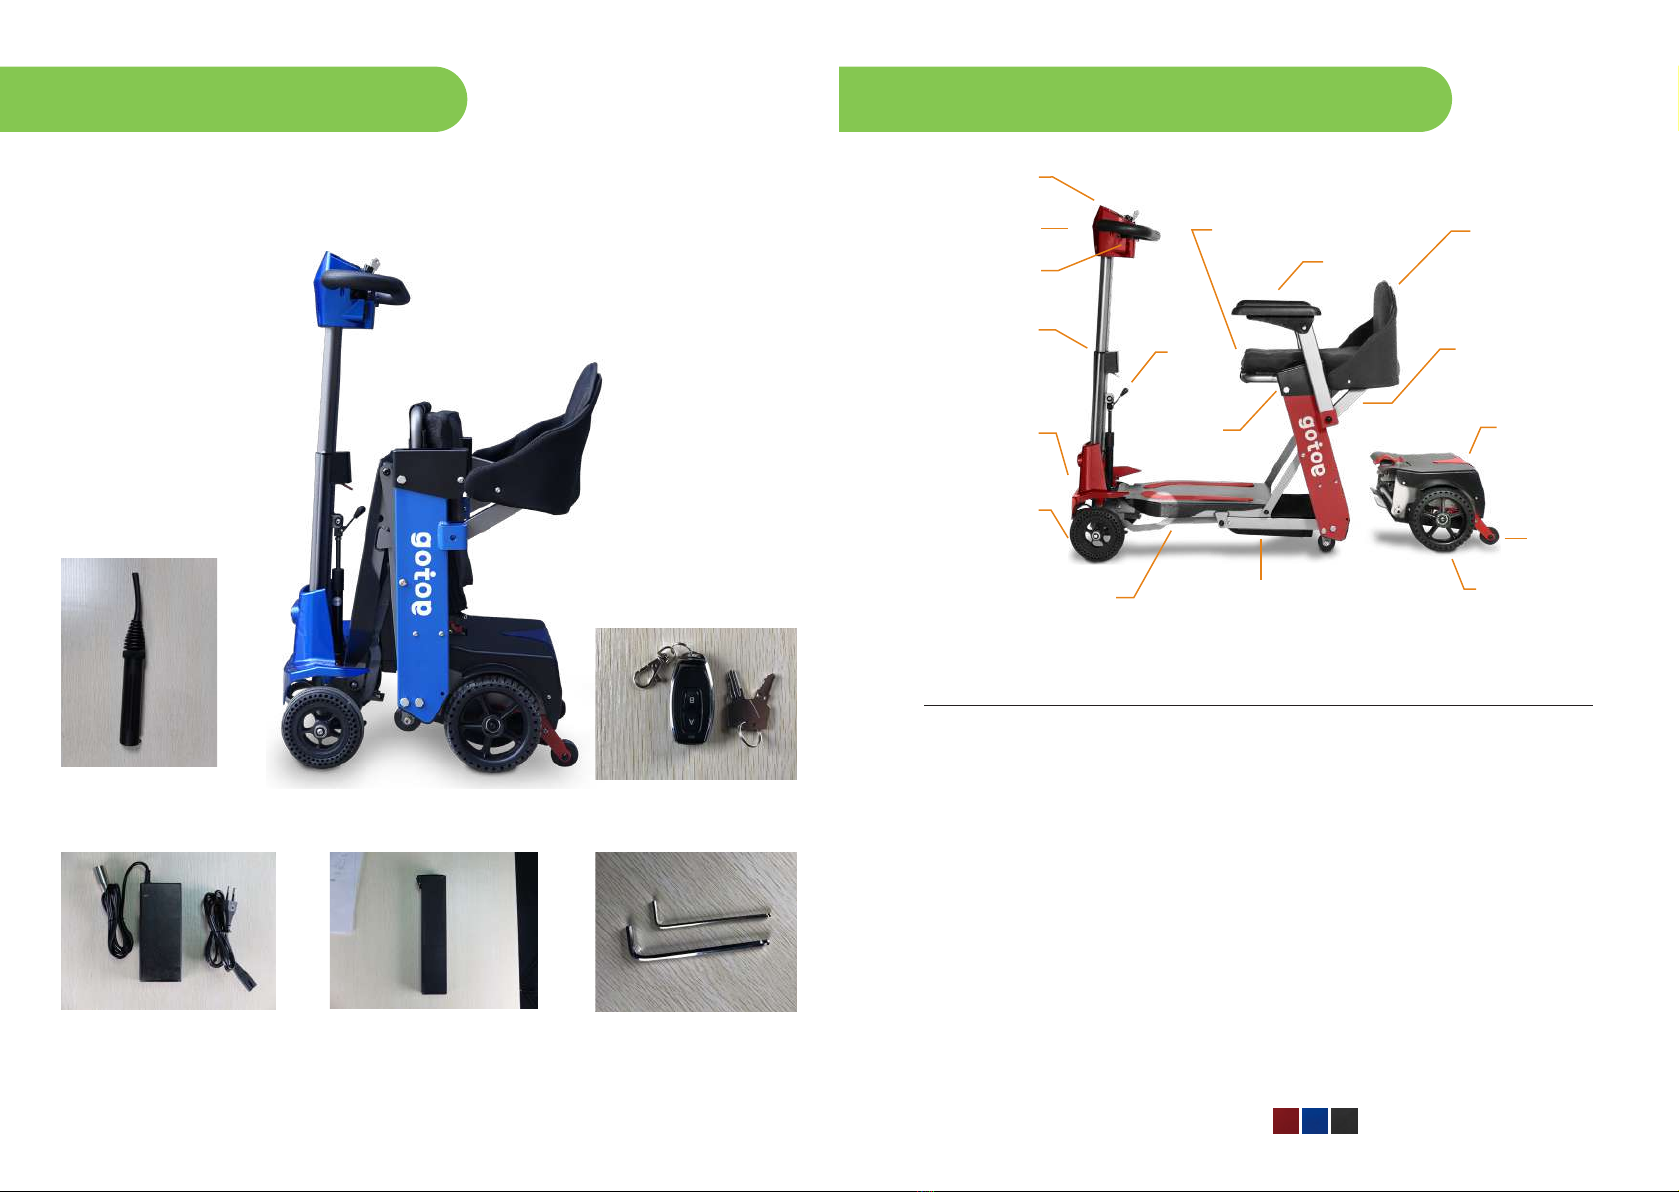
1. Contents list in the carton
2. Conguration guide and specication
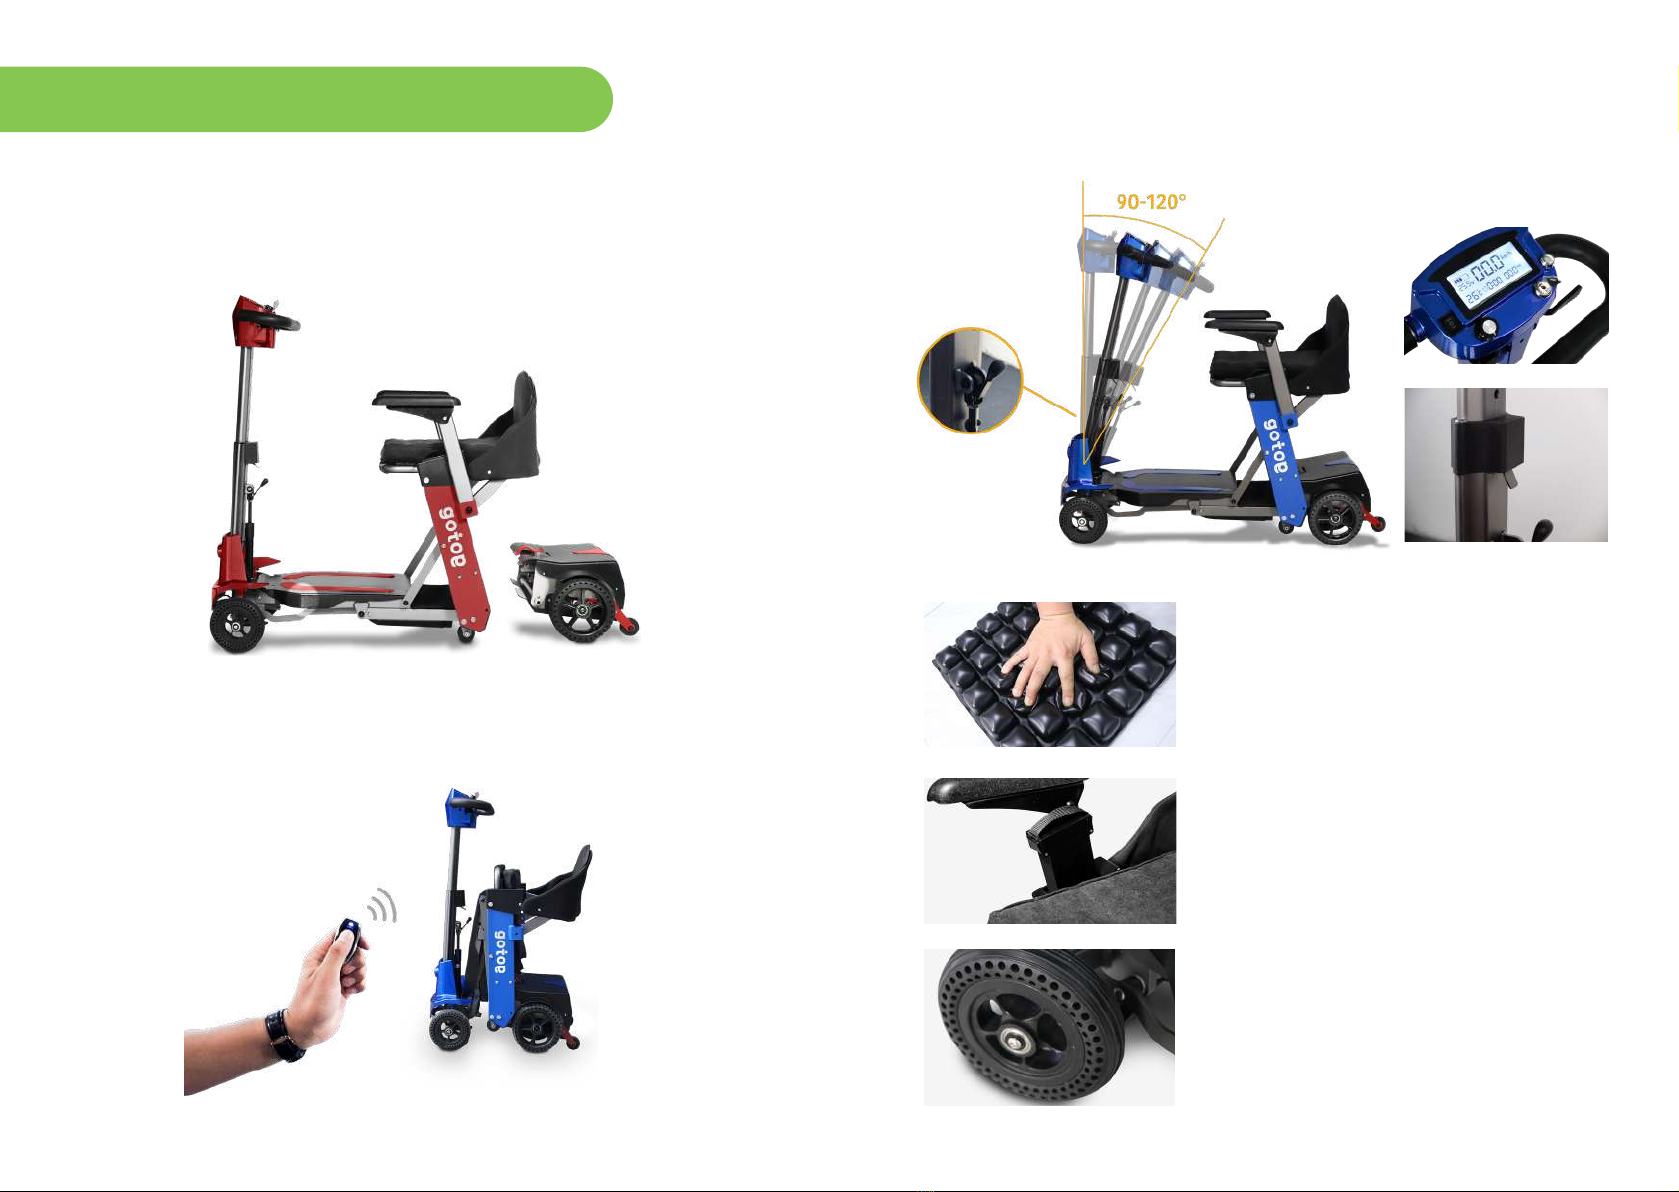
3. Detailed description of main function
4. Operation instruction
5. Safety requirements
6. Basic troubleshooting
1 2
Contents list in the carton Configuration guide and specification
Scooter body parts
Control Panel
Air cushion
Armrest
Backrest
Rear axle group
Anti-wheels
Rear wheels
Lithium
battery
Magnesium alloy frame
Seat
supporting
frame
Handle
Drive lever
Riser of
the handle
Front cover
Front wheels
Foot pedal
Tiller
Lithium battery
Remote control
Charging cable
Hand pump
Hex key
Model number
GTG-T100
SPECIFICATION
Folded Size
Unfolded Size
Safe Gradient
Turning Radius
Max Capacity
Max drive distance
Max Speed
Motor
Lithium Battery
Driving system
Tires
Charger
Brake system
Weight
Color optional
510x497x690mm
1010x497x935mm
0~12°
1. 4 m
125 kg
15 km+
0~6 km/h
24V 120w
24V 10Ah
Rear wheel drive
Honeycomb Tires
24V 2.5AH Off Board
Electromagnetic Brake
11.5+8.7 kg (Frame. Motor, wo Batt)
(Red,blue,Gun)
3 4
1. Magnesium alloy frame with disassemble engine system which
light the weight to 21kg and more stronger. Easily for the
transportation and storage.
2. Remote control automatic folding function,automatic folding
within seconds, effortlessly carry the scooter.
Detailed description of main function 3. 90°-120°angle adjustable and telescopic selection tiller upper
control with intelligent LCD display, flexible for different users.
4. Balanced air adjustable cushion,
independent air cells for pressure
relief, hand pump can adjust
the cushion to suit for individual
comfort.
5. Lithium battery suits for airline
traveling friendly.
6. 6’ front wheels and 7’ rear wheels
with shock-reduction honeycomb
tire.

5 6
1. Folding and unfolding
2. Start & On/O Switch
3. LCD display
Operation instruction
4. Inflating the air cushion
1.Zipopenthe outsideof
cushionandthere isthe
airvalveinthecorner.
2.Fitthepumphoseover
thevalve,turnitclockwise
tightly.(Turnit counter
clockwisetoremove)
3.Turnitclockwisetightly.
(Turnitcounterclockwise
toloose)
4. Inflate cushion until it
begins to slightly arch
upward.
5. Zip up the outside of
cushion after finishing
pumping to avoid the
damage to the air valve.
Manual folding switch: to turn on/
off the auto-folding function.
Fold/unfold the scooter by
remote control
LCD display
Battery charge
level indicator
Voltage of the
battery
Temperature
of the battery
Current time Mileage indicator
Speed
indicator
Manual
folding switch Horn
Drive lever
(backward)
speed
controller
Key
switch
Drive lever
(forward)

7 8
5. Battery installation and uninstallation
Pull up the strap on the battery to take the battery out easily. Otherwise, put the
battery into the slot. Done!
Press the riser of the handle to adjust the stem height and position then let go of it.
Press the telescopic selection tiller to adjust the stem to the suitable angle then
let go of it.
3. Adjust the screw
height to change
the tilt angle of the
armrest.
4. Turn the screw to the
suitable height with
the hex key in the
toolkit.
5. Put the armrest
back. Done!
6. To adjust the armrest
vertically up and
down to the desired
position.
9. Armrest adjustment
6. Power charging
8. Handlebar tilt adjustment
7. Handlebar height adjustment
1.Turn the charger cover counter
clockwise open.
1. The default angle is
horizontal.
2. Plug the power cable to charge the
scooter.
2. Raise up the armrest.

Bar10
Bar9
Bar8
Bar7
Bar6
Bar5
Bar4
Bar3
Bar2
Bar1
9 10
11. Scooter & battery Maintenance
10. How to install mojo? Basic troubleshooting
Keep the scooter and its battery in a dry environment with optimal temperature
when not in use. Do not leave the scooter in the rain, freezing cold or under the
sun in a middle of a sunny day. Keep the battery dry. Negative environmental
conditions can damage the battery. Swipe it out by a cleaning rag after every
use. Do not need to take the battery out when not in use. Always keep the
battery charged to avoid totally depleting it before charging, which can help a lot
to prolong its life.
The battery needs to be charged or there is a bad connection of the
battery. Check the connection of the battery. If the connections are good,
try to charge the battery.
There is a bad connection of the motor. Check all connection between
the motor and the controller.
The motor has a short circuit of a battery connection. Contact your
service agent.
Not used.
Not used.
The S-Drive can’t be driven, which may be because the battery charger is
connected or the seat is not in the driving position.
Joystick is out of order. Make sure the joystick is in the parking position
before switching on the scooter power.
A controller fault is indicated. Make sure that all connections are secure.
The parking brakes have a bad connection. Check the parking brake and
motor connection. Make sure the controller connections are secure.
An excessive voltage has been applied to the controller, which is usually
due to a battery connection problem. Check battery connection.
Attention:
1.All sound is based on the buzzer from the scooter. (One light on the screen
represents one sound from the scooter.)
2.If it doesn't work itself out, please contact the local distributor for judgment
and repair to avoid secondary damage to the scooter.
rear axle wrench
rear axle group
seat, main part of the scooter
1
1
2
2
3
3
1. Pull up the rear axle wrench until the
anti wheel touches the ground.
2. Lift up the seat at a 45-degree angle.
3. Push the rear axle group closer to
the seat and hitch them together.
4. Press down the rear axle wrench
and lay down the seat.
5. Done!

11 12
Safety requirements
1. Driven Road1. Driven Road
• The scooter should be used on the city road or inside the
house, it can also be used on bumpy roads, but it can affect the
sense of use and comfort.
• Waming : Don’t climb more than the specified climbing
angle(0-12 ). Please do the manual instruction before
operation.
2. Preventive measures2. Preventive measures
• Don’t operate your scooter before you fully read and
understand this manual.
• Don’t carry passengers or drunk driving when you drive the
scooter.
• Ensure the seat is xed and fastened.
• Slow down when driving on the uneven or soft ground and
before turning.
• Forbid to change the initial setting or retting your scooter.
• Be careful when driving in the busy streets, please consult local
authorities about the trafc rules for scooters.
• Hold your hands on the hand-bar and put your feet on the
footplate when driving.
• Forbid to use the scooter on the moving vehicle.
• Maximum capacity is 135kg.
• Prohibit to reverse the scooter on rough slopes.
Warranty StatementWarranty Statement
Distributor is responsible for repairing or replacing any problems
of material, manufacturing or assembly that emerge under normal
usage.
WARRANTY CARD
User Name PI No.
Address Phone No.
Model Purchase date
Warranty Period Warranty is for 12 months, batteries are for 6 months
Manufacturer Smarfody Mobility Technology Co., LTD
Distributor
Address Phone No.

Smarfody Mobility Technology Co., LTD
Address : Room 205, Building C, Dinghao Baotun High-tech
Industrial Park, Houjie Town, Dongguan, Guangdong, China
Email : Alexwu@smarfody.com
Distributed By
This manual suits for next models
1


