Smart Electrician 370-1973 User manual
WARNING:
TO AVOID RISK OF ELECTRICAL SHOCK
TURN OFF OR DISCONNECT FROM POWER
WHILE INSTALLING OR SERVICING UNIT
- When using product, basic precautions should always be followed.
- Read and follow these instructions and observe all warnings.
- Carefully read and understand the information given in this manual
before beginning installation. Failure to do so could lead to electric
shock, fire, or other injuries which could be hazardous or even fatal.
- Save these instructions and warnings.
- This item is damp rated. NEVER submerge this product in water!
- Do not use in on hot surfaces.
- Do not remove the lens protecting the LED.
- Do not use in areas near a gas source.
- It is NOT possible to change the LED light source.
- This light is not intended for use in potentially explosive
environments. This is NOT a vapor proof light.
- Do not dismantle this light. The LED chips are not replaceable.
- This work light is NOT A TOY and is not suitable for use by children.
- When using outdoor lights, basic safety precautions should be
followed to reduce the risk of fire or electric shock.
- Under wet or damp conditions, use only GFCI protected circuits.
- Keep plugs and receptacles dry at all times.
- Keep light at least 16 feet away from pools, spas, or standing water.
- Do not use with extension cords near water.
- Use only outdoor rated extension cords with 3-prong ground plug.
- Keep product away from all flammable materials such as curtains.
- Do not pull on power cord to move this product.
- Inspect cords and connections for any wear or damage before use.
- Never use product if light is damaged or bare wires are exposed.
- Always make sure light is
on a firm, level surface.
- Always plug the light into a
properly grounded circuit.
WARNING
CAUTION
Question/Comment/Missing Part? Customer Service 1-800-865-6799
Question/Comment/Missing Part? Customer Service 1-800-865-6799
Assembly & Installation: 370-1973 | 14000LM Work Light with Tripod
Assembly & Installation: 370-1973 | 14000LM Work Light with Tripod
This product is guaranteed against failure due to factory defects in
materials or workmanship for one (1) year from the date of purchase.
This warranty is non-transferable and applies only to the original owner.
Proof of purchase required for repair or replacement. This warranty does
not cover normal wear of parts or damage resulting from any misuse of
the product. Misuse of the product includes but is not limited to: using in
extreme weather conditions, opening the housing of the product, or
attempted remodel/alterations made to product.
- Do not look directly at the LED lights for any length of time.
- Do not shine the light directly into other people’s eyes.
- Do not remove protective lens covering LED lights.
EYES
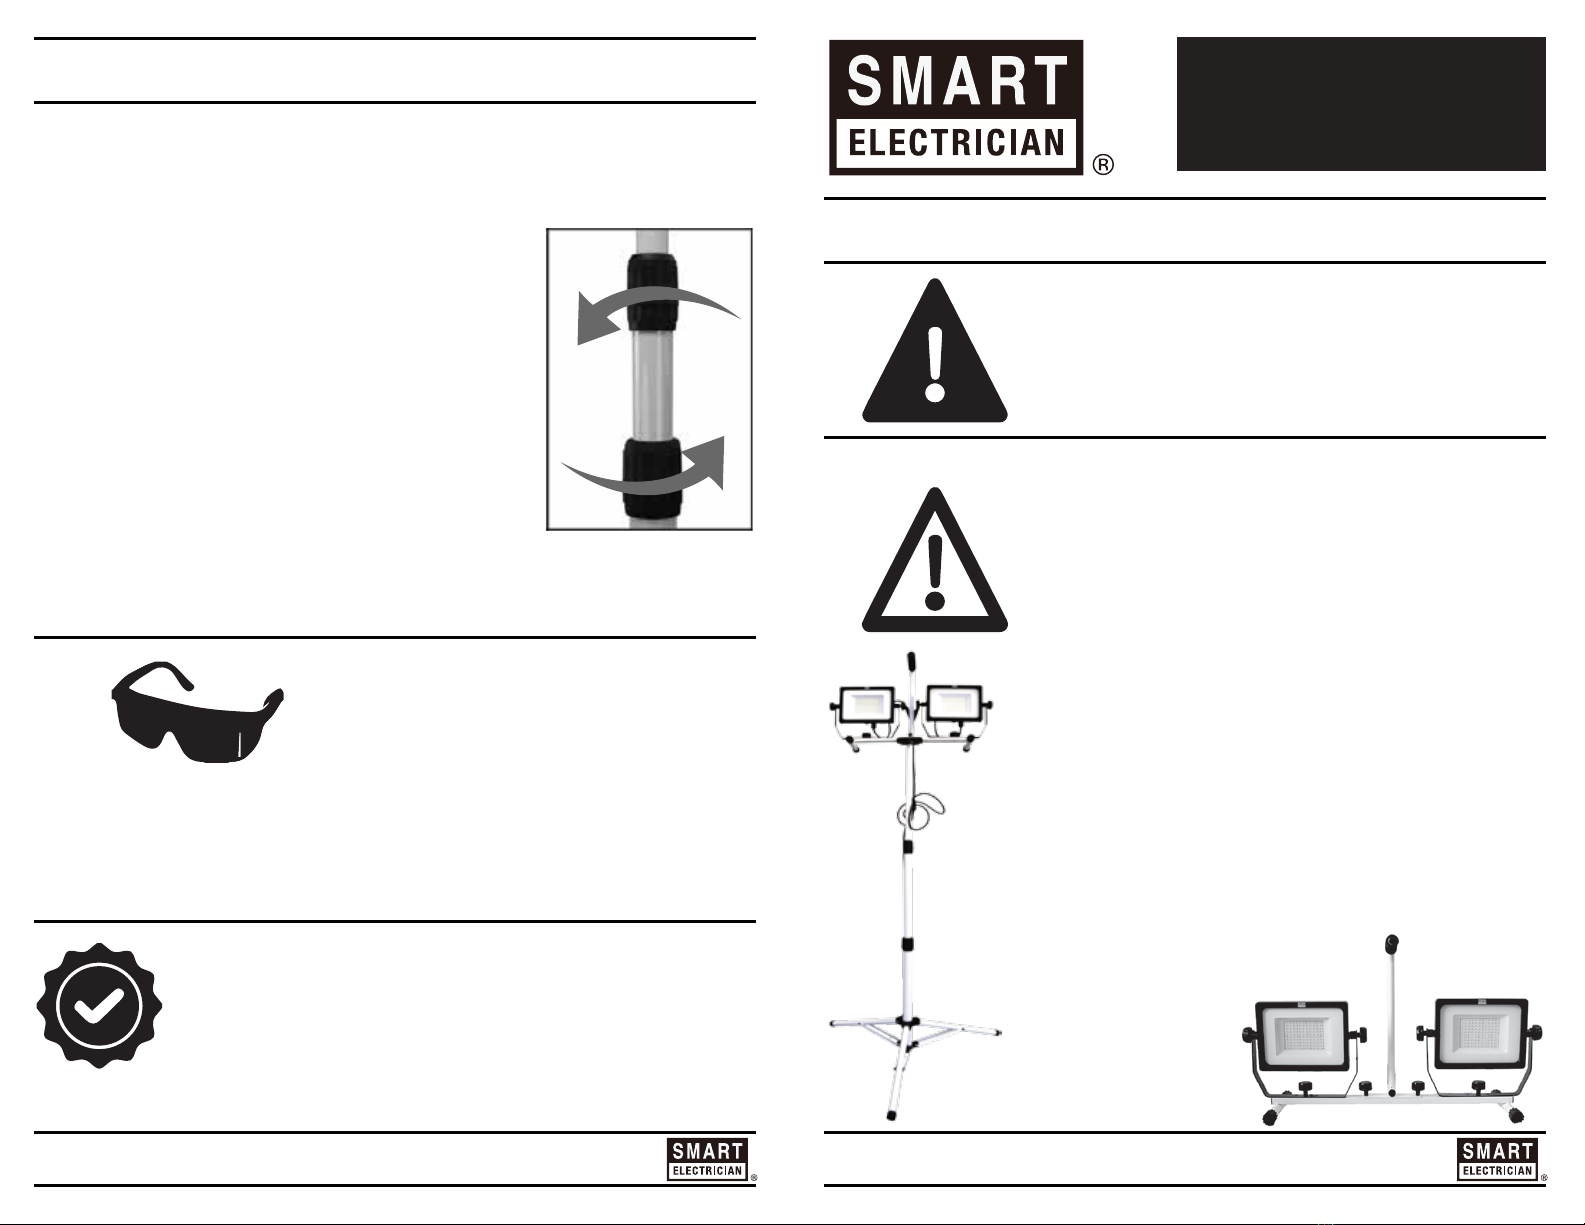
Extend the tripod from 3 to 5 feet. Unlock locking collars by
twisting counter clockwise. Lift the pole up to desired height.
Twist clockwise to relock locking collar.
NOTE: Do not overextend tripod pole.
If at any time product seems unsecure
or unsturdy, make sure that tripod pole
is not extended too far, and that tripod
base is fully extended to support the
weight of the product.
STEP 5:
LOCK
UNLOCK

Assembly & Installation: 370-1973 | 14000LM Work Light with Tripod Assembly & Installation: 370-1973 | 14000LM Work Light with Tripod
Attach light head fixtures to mounting bar
using (2) mounting knobs.
ASSEMBLY: ASSEMBLY CONTINUED:
STEP 1:
Attach handle to mounting bar using 2 plastic mounting knobs.
Attach cord to handle with screw.
STEP 4:
Loosen locking knob and pull
legs away from the ceter pole
until all legs are fully extended.
Retighten locking knob firmly.
Note: It is possible to utilize tripod
without legs fully extended, as long
as all 3 outer legs touch the ground,
however full extention is highly
recommmended for maximum
security and sturdiness.
STEP 2:
Attach portable stand to tripod by pinching red buttons in.
Align holes on the underside of the light bar with locking
tabs on tripod stand. Release red tabs to lock.
*Use product with or without tripod stand at any time, using the
quick release red buttons to detach or reattach the light heads!
Make sure the portable light bar is connected completely to the locking
tabs on the tripod stand. Lift the portable handle to confirm. Failure to
complete this step may cause injury or damage to the lights.
STEP 3:
NOTE:
Step 1
Step 2
NO
YES
Popular Work Light manuals by other brands


Opal
Opal E-FECT II user manual

LPDi
LPDi LE384 LED Installation, operation and maintenance instructions

SPT
SPT SUPERDOME Installation manual and operating instructions

Huvema
Huvema Jarrer WL R15LD Series instruction manual

Goobay
Goobay 44872 user manual

brennenstuhl
brennenstuhl Jet-Light ELH 21 operating instructions


