SMART SPM4000-SS User manual
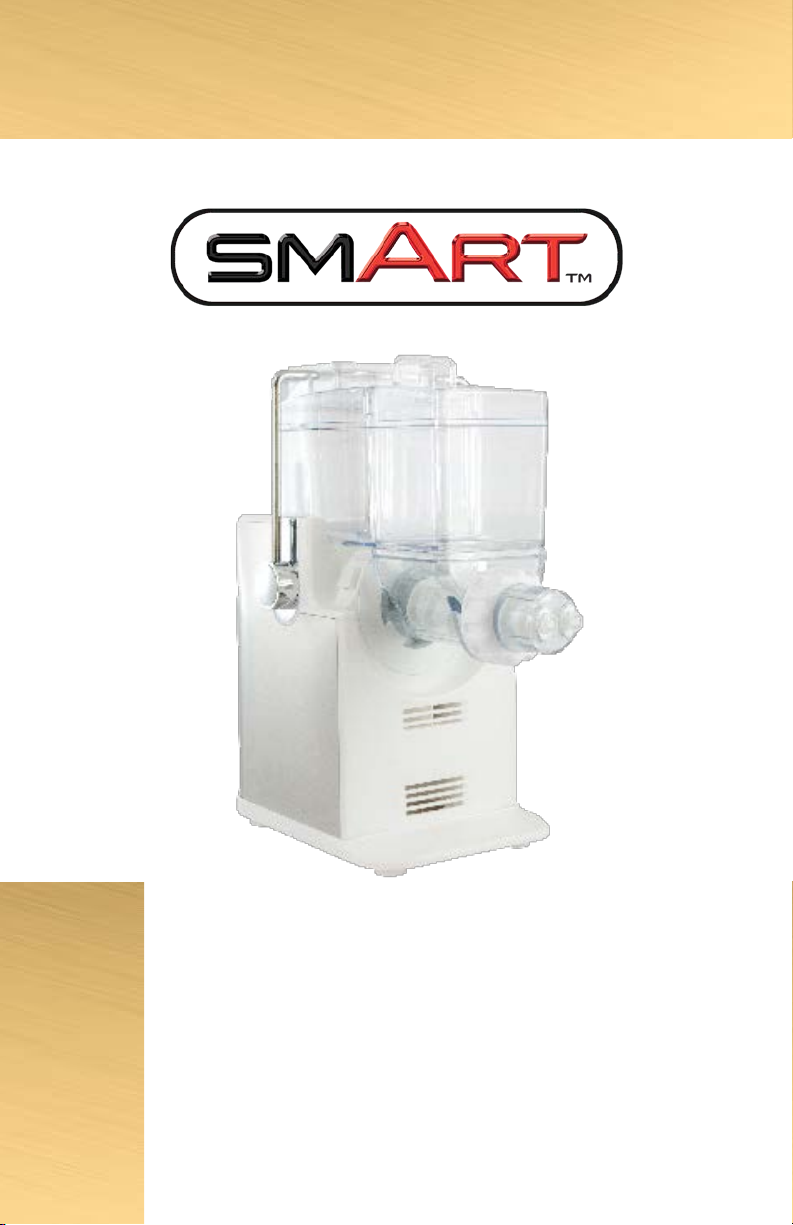
SPM4000-SS
SMART Pasta Maker
Instruction Manual

ENGLISH
3
ENGLISH
THE SMART CHOICE
Visit www.smartworldwidefun.com for more fun products.
CONTENTS
NOTICE BEFORE USE . . . . . . . . . . . . . . . . . . . . . . . . . . . . . . . . . 4
PRODUCT STRUCTURE . . . . . . . . . . . . . . . . . . . . . . . . . . . . . . . . 5
OPERATING INSTRUCTIONS . . . . . . . . . . . . . . . . . . . . . . . . . . . . . 7
TROUBLESHOOTING . . . . . . . . . . . . . . . . . . . . . . . . . . . . . . . . .12
CARE & MAINTENANCE . . . . . . . . . . . . . . . . . . . . . . . . . . . . . . .12
QUICK SIX MIN RECIPES . . . . . . . . . . . . . . . . . . . . . . . . . . . . . . .13
TECHNICAL SPECIFICATIONS . . . . . . . . . . . . . . . . . . . . . . . . . . . . 21
SMART CONVERSION TABLE. . . . . . . . . . . . . . . . . . . . . . . . . . . . . 21
CIRCUIT DIAGRAM. . . . . . . . . . . . . . . . . . . . . . . . . . . . . . . . . . . 21
RETURNS & WARRANTY . . . . . . . . . . . . . . . . . . . . . . . . . . . . . . . 22
Your safety and the safety of others is very important.
We have provided many important safety messages in this manual and
on your appliance. Always read and obey all safety messages.
This is the safety alert symbol.
This symbol alerts you to potential hazards that
can kill or hurt you and others.
All safety messages will follow the safety alert symbol.
All safety messages will tell you what the potential hazard is, tell you how to reduce the
chance of injury, and tell you what can happen if the instructions are not followed.
SAFETY
Appliance Specications:
220-240 Volts, 50~60 Hertz,180 Watts
SGS

ENGLISH
4
ENGLISH
NOTICE BEFORE USE
Important
For safety purposes, read the instructions carefully before using
the appliance. Retain the User Manual for future reference.
The appliance is designed for domestic use only, and may only be
installed and operated in accordance with this User Manual.
1. The appliance should be placed on a at surface during operation.
2. The appliance can only be used by children aged 8 years or above and by persons with
reduced physical, sensory or mental capabilities or lack of experience and knowledge if they
have been given supervision or instruction concerning use of the appliance in a safe way and
understand the hazards involved. Children shall not play with the appliance.
Cleaning and user maintenance shall not be performed by children
unless they are aged 8 years or above and supervised. Keep the appliance
and its cord out of reach of children younger than 8 years old.
3. Unplug the appliance when not in use or before cleaning. Avoid splashing water onto or
submerging the appliance in water or other liquids to prevent short-circuit or electric shock.
4. Dry your hands before plugging in or unplugging the appliance.
5. If the power cable is damaged, it must be replaced by the manufacturer,
its service agent or aqualied technician in order to avoid hazards.
6. Keep the power cable away from the moving parts of the appliance.
7. Do not put any metal or foreign objects inside the appliance to prevent electric shock or
malfunctioning.
8. Do not touch the moving parts of the appliance when it is connected to the power supply.
9. Disassembly or repairs must only be carried out by an authorised professional.
10. In case of a malfunction or damages, stop operation immediately
and contact customer service or service centre for repair.
11. Before operation, make sure the appliance has been properly assembled.
12. Switch o the appliance and disconnect from power
supply before assembly and disassembly.
13. Keep the appliance away from heat sources, stoves and operating microwaves.
14. Do not operate the appliance in a high or low temperature environment.
15. Do not operate appliance without loading.
16. Do not use the appliance for purposes other than those intended.
17. Use only original parts and accessories purchased from the manufacturer.
18. Only open or lock the kneading chamber when the kneading blade has
come to a complete stop and the appliance has been powered o.
19. Do not use high temperature sterilization when cleaning parts and accessories.
20. After operating the appliance for 20 minutes, stop for 20 minutes.
21. Make sure the electrical rating shown on the rating
plate corresponds with your home electricity
supply. Do not share a socket with other electrical appliances.
22. Before operating the appliance, make sure the plug is properly
and securely inserted to prevent electrocution or re hazards. Do
not use the appliance if the power socket is worn or loose.
23. Do not unplug the appliance by pulling the power
cable to avoid electrocution or short-circuit.
24. Do not place any objects on top of the appliance to avoid damages.
25. When not in use, unplug the appliance and store it in a dry and ventilated environment.
26. The appliance is for indoor use only.

ENGLISH
5
ENGLISH
Product Structure
Main Unit
13
1
5
3
12
11
10
9
8
7
6
1. Extrusion Box 8. Unlock Button
2. Extrusion Rod 9. Safety Bracket
3. Locking Collar 10. Kneading Chamber
4. Nozzle 11. Kneading Blade
5. Fan 12. Top Cover
6. Main Unit 13. Chamber Partition
7. Control Panel
24
ENGLISH
6
ENGLISH
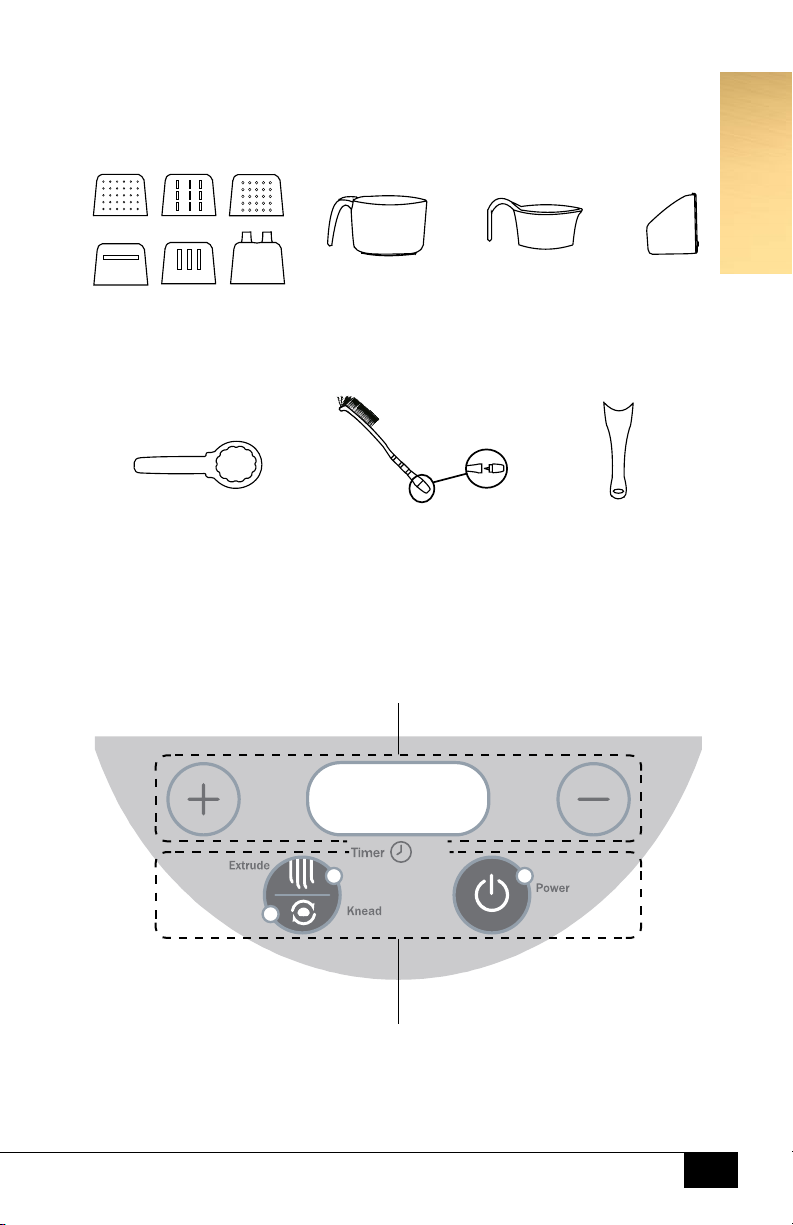
Control Panel
Timer Control & Display
Functional Control & Display
Sixtypesof
Pasta Die
Flour
Measuring
Cup
Water
Measuring
Cup
Spanner Brush Cutter
Mixing
Bowl
Accessories
ENGLISH
7
ENGLISH
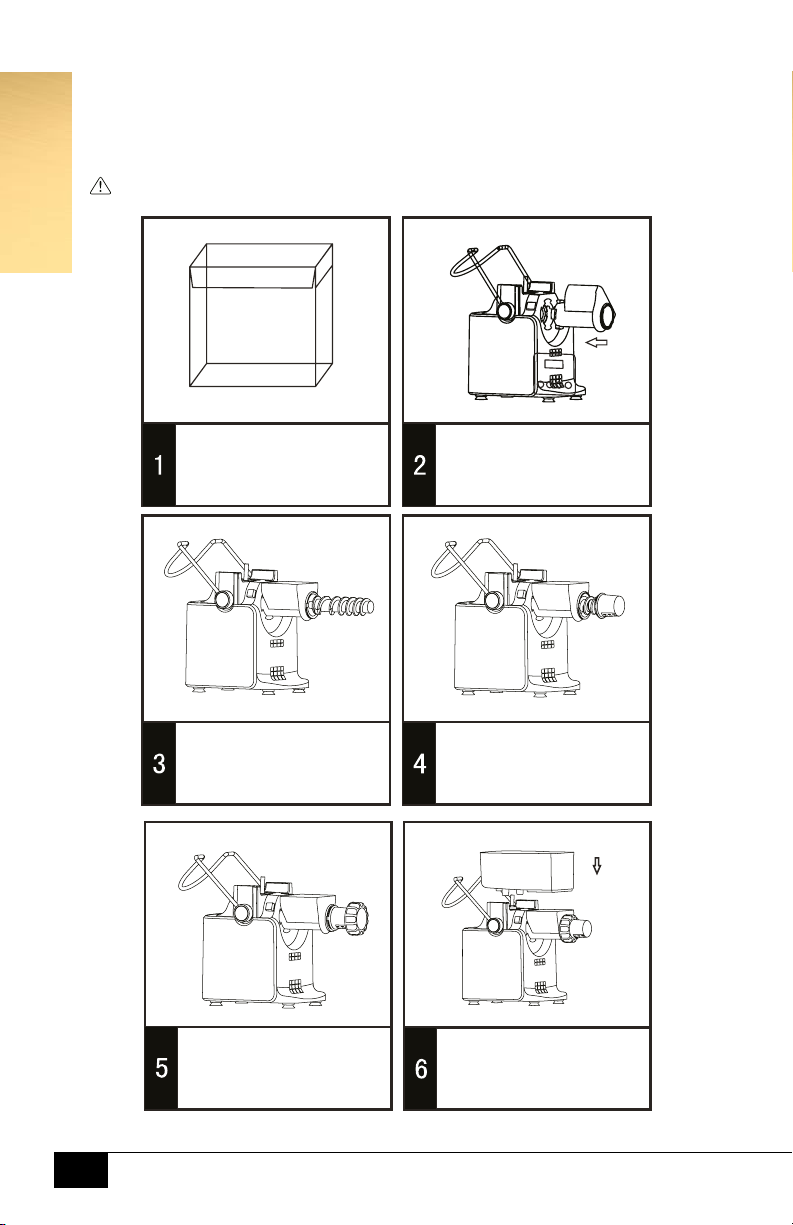
Operating Instructions
Installation (Note: Make sure the power is turned o before installation)
Make sure the power is always unplugged before assembling.
After unpacking, place the
applianc e & all the accessories
onto a stable, dry table.
Insert the extrude r bowl &
rotate 45 degrees until it is
locked into place.
Instal l the extruder into the
extruder bowl.
Connect the pasta die onto
the extruder .
Screw the lockin g ring until
extruder is secure.
The mixing bowl has three gaps,
align them into the top position
of the main motor body.

ENGLISH
8
ENGLISH
Note:
Connect the extrusion nozzle to the extrusion rod according to the direction of arrow.
Ensure the locking collar is screwed on tightly.
The safety bracket must be fastened to the top cover, otherwise the appliance will not operate.
Fit the mixing blade into the
mixing bowl.
Insert the bowl partition into
the mixing bowl through the
slot in the openin g above the
extrude r bowl.
Fit the top cover onto the
mixing bowl, ensurin g it is
positioned correctly .
Lift the lockin g bar onto the
top cover, making sure the top
cover is firmly secure d in
place on the mixing bowl.
Lockin g lever

9
Operating Instructions
Dismounting & Cleaning
ENGLISH
Make sure the power supply is disconnected before dismounting, and remove the parts in the reverse
order of installation. To remove the extrusion chamber, press the unlock button while rotating the extrusion
chamber clockwise. Clean the main unit with a slightly damp cloth, and the other parts with water. Clean out
our residue with brush. After cleaning, air-dry the appliance and store it in a dry and ventilated environment.
Check the extrusion rod and the seal at the bottom of the kneading chamber for our residue. Gently
take out the tail of the brush, and use it to pick out our residue on the extrusion rod, otherwise it will be
dicult to x the extrusion nozzle at the right position. Pick out the seal ring of the kneading chamber
gently with hard and ne object (such as chopstick). Flush it with water and put the seal back in place.
NOTE: The extrusion chamber cannot be removed without pressing the unlock button.
NOTE: DO NOT submerge the main unit in water or other liquids.
NOTE: After cleaning the seal ring, remember to attach it back to the kneading chamber.
Plastic Seal
unlock button
10
ENGLISH
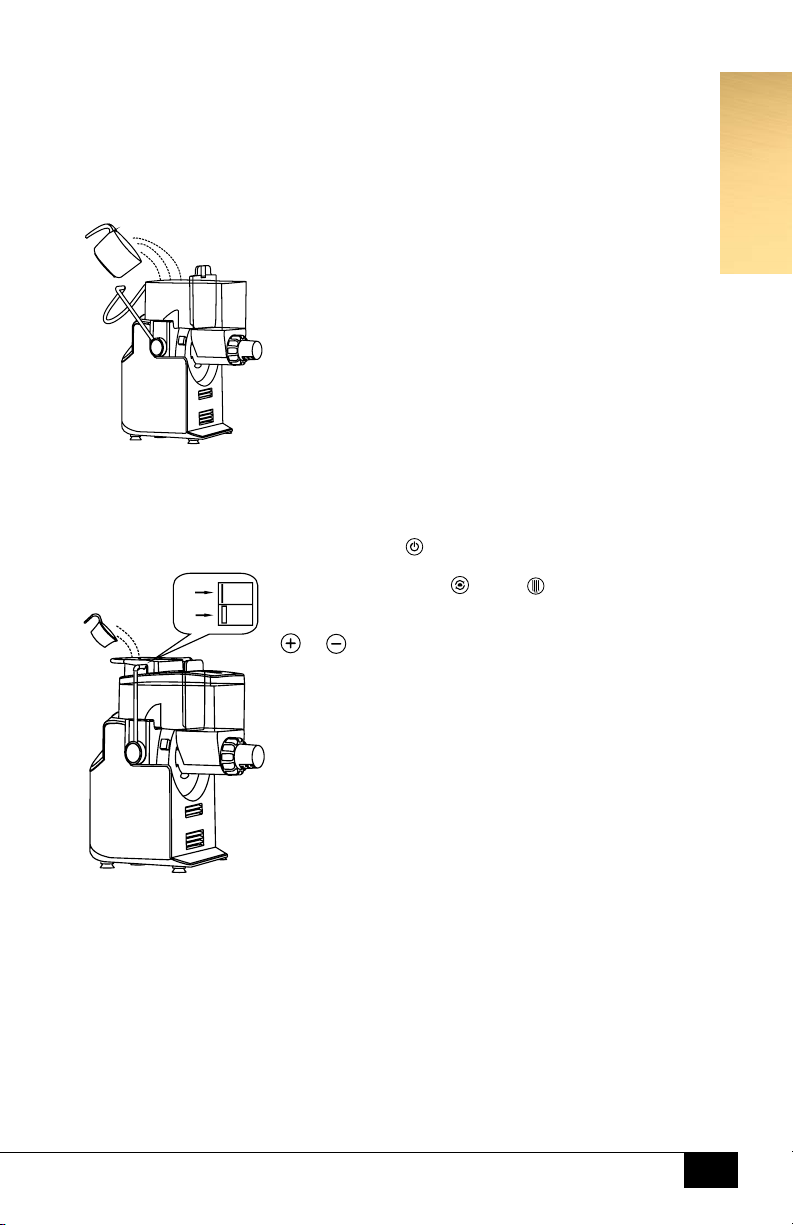
Operating Instructions
Adding Flour
1. Place the appliance on a stable and leveled surface,
make sure the appliance has been properly installed.
2. Open the top cover, make sure the kneading blade
and Chamber Partition are properly in place.
3. Add a cup of our into the kneading chamber.
4. Close the top cover and secure with safety bracket.
Note:
• Make sure the release button is in the direction of the
extrusion nozzle when inserting the
chamber partition. Ensure the
chamber partition is completely inserted.
• Disconnect the power when adding our.
5. Press the‘Power ’ button. The
corresponding indicator
lights up. Press the‘Knead /Extrude ’ button. The
corresponding indicator lights up. Kneading begins.
The default kneading time is 5 minutes. Press
‘ ’ or ‘ ’ to adjust kneading time.
6. Use the measuring cup to pour an appropriate amount
of water into the kneading chamber.
Note:
• Press the“Knead/Extrude” button before adding water
into the kneading chamber (according to personal
preferences).
• It is recommended to add a small amount of salt
and oil to the water (the recommended amount is 5g
of salt and 5ml of oil; adjust according to personal
preferences).
• You can add dierent kinds of vegetable juice (e.g.
tomato, spinach juice etc.) or eggs to the water. Mix
well and pour into the kneading chamber.
Do not open the top cover during the kneading
process.
Mixing and Kneading
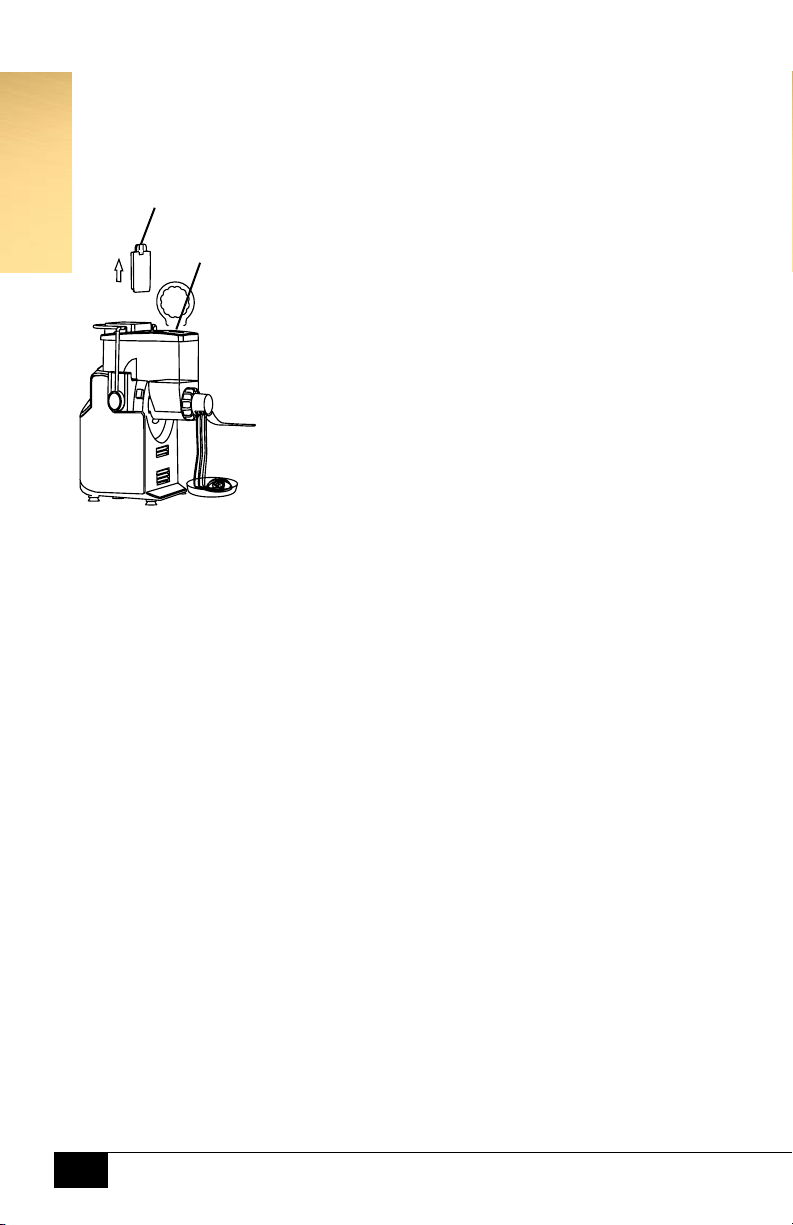
200g
Add
Water
11
7. Put a dish under the extrusion nozzle.
8. When the kneading process is completed, an alarm will
sound, press‘Power ’button and take
out the chamber partition.
The dough will be pushed into the
extrusion chamber automatically.
If more kneading is needed, press ‘+’ button to
increase kneading time (add more water if necessary).
9. Slot the spanner, if needed, through the dedicated hole
on the Extrusion Chamber. Push the dough gently; make
sure the Extrusion Rod is in contact with the dough.
10. During the extrusion process, the Fan
helps to dry noodles quickly.
11. Cut noodles, if you wish, using the Cutter.
12. After extrusion, press the ‘Power ’ button to turn o
Note:
• Make sure the our is kneaded into a dough before
taking out the Chamber Partition.
• To ensure ecient extrusion, apply pressure on the
dough inside the extrusion chamber.
• Stop appliance for 20 minutes after every 20-minute
operation.
• After extrusion, repeat the above steps to make another
batch of noodles.
• If you do not intend to make another batch, disconnect the power
and dismount the parts for cleaning and storage.
Do not open the top cover during the extrusion process.
Do not add our into the kneading chamber during the extrusion process.
Operating Instructions
Extrusion
Recommended Mix & Its Proportions
•Add half a teaspoon of salt into every 200g of our
•Two whisked egg + one cup of water = 110ml in total
•Add a tea spoon of oil into the whisked eggs
Note: Since each kind of our needs a unique water amount, our / water ratio is subjected
to adjustment.
ENGLISH
Take out the Bowl
Partition.
Press Down
The Dough

12
Trouble Shooting
Note: If the problem persists, please contact our customer service.
Care & Maintenance
1. Disconnect appliance from the power supply before cleaning.
2. Keep appliance dry at all times.
3. When not in use, store appliance in a well-ventilated and dry environment.
4. Clean after each use.
5. Clean the main unit with a slightly damp cloth only.
Other parts can be cleaned with water.
6. After cleaning, air-dry the parts before storage.
ENGLISH
Incident Possible Reasons Corrective Action
Power connected. Power button
pressed. Appliance does not operate.
1. The power plug is not fully inserted.
2. Due to extended operation,
the appliance has been
shutdown for protection.
3. Faulty fuse.
1. Make sure the power is
properly connected.
2. Restart appliance after 20-30 mins.
3. Replace fuse.
During the rst few operations a
smell emanates from appliance.
This is normal for new motors. If the smell persists after a few uses,
contact our customer service centre.
Abnormal vibration and noise. The extrusion rod is not installed
correctly / The extrusion nozzle is
installed incorrectly / The locking
collar is not screwed properly.
Check the extrusion rod,
extrusion nozzle and locking
coller, then reinstall them.
Creaky noise when appliance
is in operation.
The seal ring inside the kneading
chamber is not well lubricated.
Add a drop of edible oil to the seal ring.
The control panel displays 'EO' The dough is too dry or there
is too much dough.
Move the dough back into the
kneading chamber, add an adequate
amount of water, or reduce the amount
of dough and restart the process.

13
QUICK 6 MINUTE RECIPES
The Noodle Knowledge
Noodles contain proteins, fat, carbohydrates etc. They are easy
to digest and absorb. They can improve anaemia, enhance
immunity, balance nutrition and enrich absorption.
Tip: Fresh noodles should not be stored for too
long in order not to lose the nutrients.
Making More Quick Delicious Noodles
1. Add 5ml olive or vegetable oil and 5g salt to the water.
2. According to the thickness of the noodles, adjust the boiling time – e.g.
around 1 minute for thin noodles or 3 minutes for thick noodles.
3. After boiling, rinse and cool with running water.
The Benets of Home Made Noodles
1. Make according to personal preference
2. No additives, natural and healthy
3. Fresh ingredients of your choice
The Flour Knowledge
Flour is the powder made from wheat. According
to the protein content, it can be divided into Bread
Flour, All-Purpose Flour and Cake Flour.
• Bread Flour has a protein content above 11.5% - it is usually used to
make noodles and bread due to its high gluten content.
• All-Purpose Flour has a protein content between 9% and 11%
- it is usually used to make noodles and pastries.
• Cake Flour has a protein content of less than 9% - it is
usually used to make cakes and biscuits.
ENGLISH

14
The Six Nozzles
With the available nozzles you can create cookies, breads and desserts.
• Flat thin nozzle can create udon, pad thai, linguini, at noodles
• Zigzag nozzle can produce pastries, ravioli and even cookies
• Flat broad nozzle can make egg noodles and fettuccini
• Small cylindrical nozzle can create your rice noodles and vermicelli
• Hollow/Macaroni nozzle can make macaroni and penne
• Cylindrical/Pasta nozzle can produce your typical spaghetti and ramen
Ordinary Noodles
Ingredients
• Bread Flour or All-Purpose Flour 160g
• Water 70ml
• Oil 5ml
• Salt 5g
Procedure
1. Add the our into the Kneading Chamber. Lock the Top Cover with the Safety Bracket.
2. Press the“ON/OFF” button, indicator lights up. Press
“Knead Dough”button to make the dough.
3. Pour the mixture of water, oil and salt through the hole of the Top Cover.
4. When the dough is nished, press“Extrusion” button
and take out the Slat to make noodles.
5. Boil noodles for 1 minute and serve.
Sauté Noodles
Ingredients
• Bread Flour or All-Purpose Flour 160g
• Egg 60ml
• Water 10ml
• Oil 5ml
ENGLISH

15
• Carrot
• Onion
Procedure
1. Add the our into the Kneading Chamber. Lock the Top Cover with the Safety Bracket.
2. Put the mixture of egg, water, oil and salt to the Water Measuring Cup.
3. Press“ON/OFF” button, indicator lights up. Press “Knead
Dough”button to make the dough.
4. Pour the egg mixture through the hole of the Top Cover.
5. When the dough is nished, press“Extrusion” button
and take out the Slat to make noodles.
6. Boil for 1 minute, rinse and cool with running water then sauté
with carrots, onions and other ingredients of your choice.
Macaroni
Ingredients
• Bread Flour or All-Purpose Flour 160g
• Water 70ml
• Oil 5ml
• Salt 5g
Procedure
1. Add the our into the Kneading Chamber. Lock the
Top Cover with the Safety Bracket.
2. Press“ON/OFF” button, indicator lights up. Press
“Knead Dough”button to make the dough.
3. Pour the mixture of water, oil and salt through the hole of the Top Cover.
4. When the dough is nished, press“Extrusion” button and
take out the Slat to make macaroni / rigatoni.
5. Cut the macaroni / rigatoni* to short length and
cook them, serving with some garnish.
*Note: Cutting is ideally done after drying.
ENGLISH

16
Beef Sliced Noodles
Ingredients
• Bread Flour or All-Purpose Flour 160g
• Water 70ml
• Oil 5ml
• Salt 5g
Procedure
1. Add the our into the Kneading Chamber. Lock the Top Cover with the Safety Bracket.
2. Press“ON/OFF” button, indicator lights up. Press “Knead
Dough”button to make the dough.
3. Pour the mixture of water, oil and salt through the hole of the Top Cover.
4. When the dough is nished, press“Extrusion” button
and take out the Slat to make noodles.
5. Boil the noodles for around 3 minutes and serve with sliced
beef and other ingredients of your preference.
Spinach Noodles
Ingredients
• Bread Flour or All-Purpose Flour 160g
• Spinach Juice 70ml
• Oil 5ml
• Salt 5g
Procedure
1. Blend Spinach and Water with a food processor or blender.
2. Add the our into the Kneading Chamber. Lock the Top Cover with the Safety Bracket.
3. Press“ON/OFF” button, indicator lights up. Press “Knead
Dough”button to make the dough.
4. Pour the mixture of Spinach juice, oil and salt through the hole of the Top Cover.
5. When the dough is nished, press“Extrusion” button
and take out the Slat to make noodles.
6. Boil the noodles for 1 minute and serve.
ENGLISH

17
Bamboo Charcoal or
Colour Noodles
Ingredients
• Bread Flour or All-Purpose Flour 160g
• Bamboo Charcoal Powder 5g *
• Egg 60ml
• Water 10ml
• Oil 5ml
• Salt 5g
Procedure
1. Add the our and Bamboo Charcoal Powder (or colouring) into the
Kneading Chamber. Lock the Top Cover with the Safety Bracket.
2. Press“ON/OFF” button, indicator lights up. Press “Knead
Dough”button to make the dough.
3. Pour the mixture of egg, water, oil and salt through the hole of the Top Cover.
4. When the dough is nished, press“Extrusion” button
and take out the Slat to make noodles.
5. Boil noodles for 1 minute and serve.
*(Also works with food colouring or natural sources) Black Pasta (Pasta Nera)
can be coloured with squid ink Green Pasta (Pasta Verde) can be coloured
with spinach Purple Pasta (Pasta Viola) can be coloured with tomatoes
or beets Red Pasta (Pasta Rossa) can be coloured with carrots Orange
Pasta (Pasta Arancione) can be coloured with squash and pumpkin
Cookies
Ingredients
• Cake Flour 160g
• Sugar Powder 5g
• Butter 20g
• Egg 60ml
Procedure
1. Add the our and sugar powder* into the Kneading Chamber.
Lock the Top Cover with the Safety Bracket.
2. Melt the butter and place the mixture of butter and egg to the Water Measuring Cup.
ENGLISH

18
1. Press“ON/OFF” button, indicator lights up. Press “Knead Dough” button to make the dough.
2. Pour the mixture of butter and egg through the hole of the Top Cover.
3. When the dough is nished, press“Extrusion” button
and take out the Slat to make the cookies.
4. Cut the cookies to any length according to preference.
5. Toast/Bake the cookies.
* Flour and sugar should be sieved
* Adjust amount of sugar according to personal preference
Baguettes
Ingredients
• I Bread Flour 320g
• Yeast 5g
• Water 160ml
• Salt 5g
Procedure
1. Add the Bread Flour, Yeast and Salt into the Kneading Chamber.
2. Press“ON/OFF” button, indicator lights up. Press “Knead Dough” button to make the dough.
3. Pour the water through the hole of the Top Cover.
4. When the dough is nished, take it out and ferment for the rst time for 10 to 15 minutes.
5. Squeeze the dough by hand and split into 2 sections then
roll into strips for secondary fermentation.
6. When the dough has fermented, make diagonal slashes across the
loaf and sprinkle a little water on the surface of the dough or brush
with egg yolk mixed with one table spoon of water.
7. Sprinkle water to the inner wall of the oven after heating then insert the dough.
8. Bake for around 20 minutes then serve.
Basic Egg Pasta Dough Recipe
Ingredients
• 200g '00' our
• 2 eggs (one egg for every 100g our)
ENGLISH

19
• Pinch of salt
• 1 tablespoon extra-virgin olive oil
Produce
1. Add the our and the salt into the kneading chamber.
2. Mix for few seconds.
3. Add lightly beaten egg and Olive oil through the whole in the top cover.
4. Continue mixing until combined and dough is silky, smooth and elastic.
5. Press“Extrusion” button now to extrude the shape required.
More Pasta Recipes & Tips
CORN PASTA
Replace 1/4 of your our mixture with finely ground corn meal or corn our.
MIX before adding the liquid ingredients. Use egg, oil and water for pasta. Use
one of the large dies like fettuccine or rigatoni for extruding your pasta.
GLUTEN-FREE PASTA
Making Gluten-Free Pasta is easy. Simply use a gluten free all purpose our
instead of regular our. Add your egg and oil. Mix and extrude as directed.
PASTA PRIMAVERA
• 8 tbsp olive oil
• 2 cups vegetables - diced, chopped, sliced
• 1 tbsp garlic finely chopped
• 2 tbsp italian seasoning Prepare the pasta for this dish.
If you use frozen or dehydrated vegetables, add them to your boiling pasta
water. As soon as it returns to a boil, add your fresh pasta and cook quickly.
Sauté garlic in olive oil and add herbs. Drain pasta and add olive
oil, garlic and herb mixture with pasta. Gently mix with vegetables
and serve with Parmesan cheese, salt and pepper to taste.
MARINARA SAUCE
• 1 large onion - diced
• 2 cloves garlic - pressed 2 tbsp Italian seasoning
• 3 cups tomatoes - diced (or 2-16oz cans of tomato sauce)
• 1 cup mushrooms - sautéed (optional)
ENGLISH

20
• 4 tbsp olive oil
Sauté onion and garlic in olive oil. Add Italian seasoning and
tomato mixture and simmer until hot. Pour over fresh
GARLIC PASTA
Add 2 cloves of garlic (crushed or pureed) to the liquid in a full
load of pasta. Cook and serve with sauce and cheese.
TWO-MINUTES CLAM SAUCE FOR LINGUINE
• Pasta: Linguine or Spaghetti
• 3 tbsp olive oil
• 2 tbsp garlic - finely chopped
• 1 can clams with juice
• 3 tbsp oregano
• 1/2 cup white wine (optional)
• 1/2 cup prepared pasta sauce (optional)
• Fresh ground pepper (to taste) Crushed red pepper
Sauté garlic and clams in olive oil. Add oregano, pepper and crushed
red pepper to taste. If desired, add white wine and/or prepared
pasta sauce. Pour over pasta, garnish with minced parsley.
FETTUCCINI & CHICKEN
• Pasta: Fettuccini (with 2 tbsp olive oil or butter)
• 4 large or 6 small pieces of boned chicken cut in chunks
• 2 tbsp garlic - finely chopped
• 2 tbsp Italian seasoning
• 2 tbsp parsley
• Olive oil
• Salt & pepper
Bake or sauté chicken in olive oil with garlic and seasoning until done.
Place chicken on freshly cooked fettuccini and serve hot. For variety, add
sautéed mushrooms and/or bell pepper. Add Parmesan cheese
ENGLISH

21
ENGLISH
Specications are subject to change without prior notice. If there is any inconsistency or ambiguity
between the English version and the Chinese version, the English version shall prevail.
Refer to www.smartworldwidefun.com for the most up-to-date version of the User Manual.
Technical Specications
SMART CONVERSION TABLE
1 cup our = 125g our
1 cup butter = 225g butter
1 cup brown sugar = 170g brown sugar
1 cup granulated sugar = 170g granulated sugar
1 cup icing sugar = 100g icing sugar
1 cup uncooked rice = 170g rice
1 cup chopped nuts = 100g chopped nuts
1 cup fresh breadcrumbs = 150g fresh breadcrumbs
1 cup sultanas = 140g sultanas
1 shot = 11/2 ounces (45 ml)
1 cup = 5.33 shots (239 ml)
10 ounces = 0.625 pounds
1 Quart = 0.95 Litres
Model No. SPM4000-SS
Voltage 220-240V
Frequency 50 - 60 Hz
Power 180W
Dimensions (H) 360mm (W) 150mm (D) 300mm
Netweight 4.2kg
Standards GB4706.1-2005, GB4706. 30-2008
Table of contents


