SMARTBOT HOBOT-198 User manual

1
Instrucciones de seguridad
Antes de utilizar este robot, lee atentamente todas las instrucciones.
AVISO
1.Sujeta la cuerda de seguridad a algún lugar seguro y fijo dentro del hogar antes de utilizar el robot.
2.Comprueba el estado de la cuerda de seguridad, así como el estado del nudo de agarre antes de ponerlo en
marcha.
3.Para un funcionamiento adecuado, utiliza el cable de alimentación específico del robot HOBOT-198.
4.En ventanas sin balcón, señaliza con una indicación de advertencia el área a pie de calle por debajo de ellas,
para evitar que la gente se aproxime.
5.La batería de alimentación tiene que estar totalmente cargada (luz VERDE ENCENDIDA) antes de utilizar el
robot.
6.No utilices el robot en días con lluvia o con alto grado de humedad.
7.Pon en funcionamiento el robot antes de colocarlo en el cristal.
8.Comprueba que el robot se queda pegado al cristal antes de soltarlo.
9.Retira el robot del cristal antes de apagarlo.
10. No utilices el robot en cristales sin marco.
11. Comprueba que el anillo de limpieza esté correctamente instalado en la rueda de limpieza del robot para
evitar una fuga de aire.
12. No viertas ni rocíes agua en el robot.
13. Evita que los niños utilicen el robot.
14. No utilices el robot en cristales con grietas. Cualquier resto que encuentre el robot en su desplazamiento
podría rayar la superficie de los cristales reflectantes o con revestimiento.
15. Mantén el pelo, la ropa holgada, los dedos y otras partes del cuerpo apartados de las aberturas y otras partes
en movimiento del robot.
16. No utilices el robot en zonas donde haya líquidos combustibles o gases.
Descripción
El HOBOT-198 es un robot limpiacristales que incorpora un motor de vacío que le permite adherirse a superficies
de cristal. Está provisto de un sistema de alimentación ininterrumpida (UPS) que evita que el robot se caiga al suelo
incluso en el caso de que se produzca un corte de corriente.
El robot se mueve libremente por la superficie de las ventanas, e incluso de las paredes, mediante dos ruedas de
limpieza especialmente diseñadas para ello. En ambas ruedas, se emplean paños antipelusa fácilmente extraíbles.
El paño de limpieza de microfibra se utiliza para conseguir una óptima limpieza de los cristales.
Este robot limpiacristales ha sido diseñado con tecnología IA (inteligencia artificial) que le permite calcular el
camino, detectar los límites y limpiar toda la superficie de las ventanas de forma automática. También incorpora un
modo de limpieza manual.
CASTELLANO

2
Especificaciones
Dimensiones del robot
295 mm x 148 mm x 120 mm (largo x ancho x alto)
Peso del robot
940 g
Dimensiones de la caja
320 mm x 230 mm x 136 mm (largo x ancho x alto)
Peso total (robot+caja)
2.1 kg
Voltaje de entrada:
100~240 VAC, 50~60 Hz
Salida del adaptador
24 V/3.75 A
Consumo eléctrico
90 W
Longitud del cable AC
1,0 m
Longitud del cable DC
4,0 m
Longitud de la cuerda de seguridad
4,5 m
Batería
Li-Po, 14.8 V
Duración de la batería
20 minutos
Vida útil de la batería
2 años
Velocidad de limpieza:
4 min/m2.
(doble pasada por el área total de limpieza)
Umbral de ruido
65,5 dB
Área de limpieza máxima soportada
Alto: 6 m
Ancho: 5 m
Contenido de la caja
Robot limpiacristales x 1
Mando de control remoto x 1
Adaptador de corriente (100~240 V,50~60 Hz) x 1
Cable de corriente AC x 1
Extensión de cable de corriente DC (4 m) x 1
Paños de limpieza x 14
Anillos de limpieza x 4
Manual del usuario x 1
CASTELLANO

3
Características del robot
Compatible con cristales de cualquier espesor
Tecnología IA V2.1
Velocidad de rotación: 70 rpm
Velocidad de limpieza: 4 min/m2
3 modos de funcionamiento automático para limpiar la superficie completa del cristal
Parada automática al finalizar la tarea de limpieza
Sistema de alimentación ininterrumpida (UPS)
Algoritmo de control anti caída.
Detección automática de los límites de la ventana
Sensor de presión de alta sensibilidad
Paños de limpieza de micro fibra
Cuerda de seguridad altamente resistente (150 kgf) y pieza de sujeción
Control remoto
Control remoto vía Smartphone (Smartphone no incluido)
Modo de limpieza de mesas
Consumo eléctrico:90 W
Voltaje de entrada: 100~240 VAC, 50~60 Hz
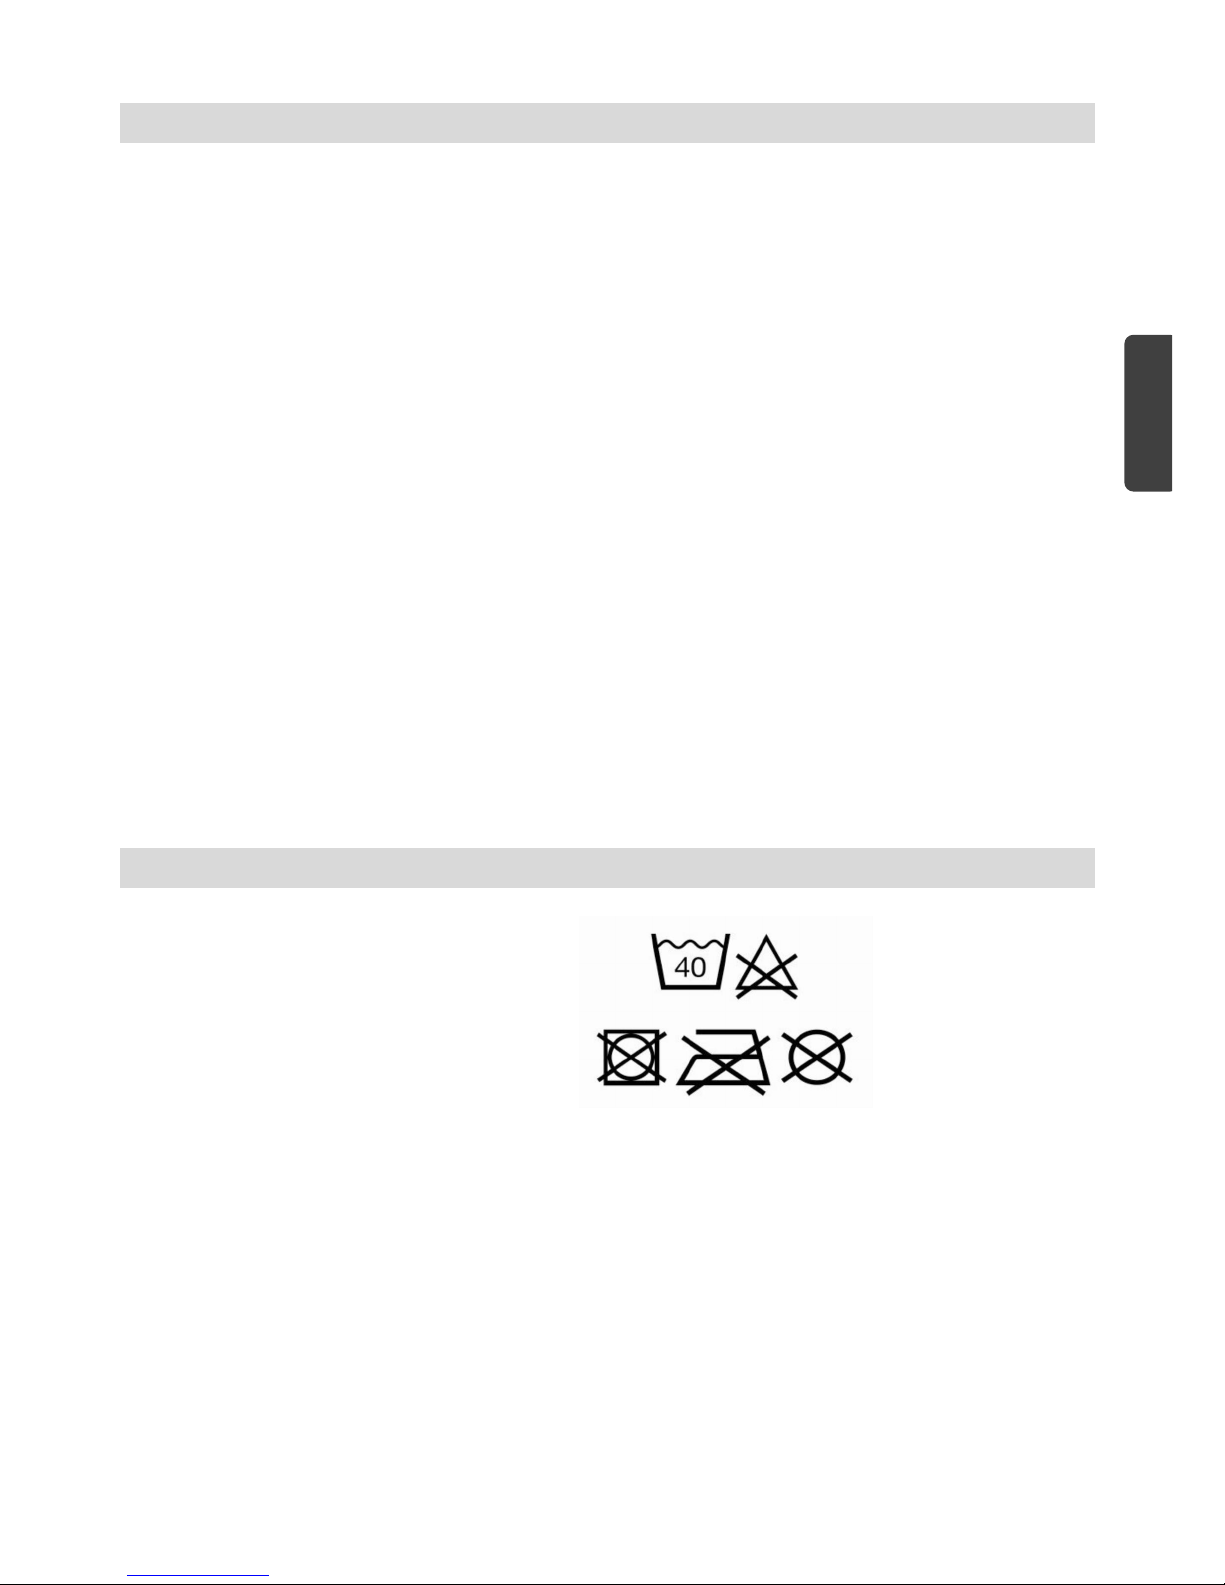
Cuidados y lavado delospañosdelimpieza
Temperatura máxima de lavado 40ºC.
No lavar con lejía
No usar secadora
No planchar
No lavar en seco
CASTELLANO

4
Partes del robot
Cuerdadeseguridadypiezadesujeción
Altavoz
Ventanaderecepcióndecontrolremoto
LuzROJA:Estadoanómalo(fallo)
LuzAZUL:Estadonormal
LuzVERDE:carga100%
LuzNARANJA:cargando
ConectorDC
Ventilador
Interruptor
ON/OFF
Etiquetadeprecaución
LuzROJA
LuzAZUL
Ventanade
recepciónde
controlremoto
Agujeroparacuerdade
seguridad
Agujeroparacuerdade
seguridad
CASTELLANO

5
Funcionamiento
Paso 1: indicaciones previas.
(1) No utilices el robot en días lluviosos o húmedos, quedarán bandas blancas.
(2) En ventanas sin balcón, señaliza con una indicación de advertencia el área a pie de calle por debajo de
ellas, para evitar que la gente se aproxime.
(3) Comprueba el estado de la cuerda de seguridad, así como el estado del nudo de agarre antes de poner en
marcha el robot.
(4) Asegura la cuerda de seguridad a algún objeto pesado y fijo dentro del hogar antes de utilizar el robot.
(5) No utilices el robot en cristales sin marco.
Paso 2: conexión.
(1) Ensambla al adaptador de corriente los cables de conexión AC y DC.
(2) Introduce la clavija en "L" del cable DC en la hembrilla DC del robot.
(3) Enchufa el cable de conexión AC a la toma de corriente.
Paso 3: carga de la batería.
(1) Asegúrate de que aparece la señal luminosa que indica carga 100% (luz VERDE) antes de utilizar el
robot.
(2) Si no es así, apaga el robot y conecta el cargador. Se encenderá la señal luminosa de batería en carga
(luz NARANJA).
Paso 4: colocación de anillos y paños de limpieza. (ver ilustración más abajo, en § Anillos y paños de limpieza)
(1) Asegúrate de que el paño de limpieza cubra debidamente el anillo e instala este correctamente para evitar
una fuga de aire.
Paso 5: encendido y fijación del robot al cristal.
(1) Enciende el robot. Comprueba que el ventilador de succión funciona.
(2) Coloca el robot sobre el cristal, a unos 10 cm del marco del mismo.
(3) Comprueba que el robot se pega al cristal antes de soltarlo.
Paso 6: funcionamiento (automático y manual).
(1) Selecciona , o , y el robot limpiará de forma automática toda la ventana.
(2) Pulsa para detener el deslizamiento del robot.
(3) Pulsa para controlar manualmente la marcha del robot.
Paso 7: retirada del robot de la superficie del cristal y apagado.
(1) Con el robot en marcha, sujeta la cuerda de seguridad con una mano, y con la otra sepáralo del cristal.
(2) Lleva el robot a una zona segura, y apágalo.
Función UPS (sistema de alimentación ininterrumpida):
(1) La función UPS se activará automáticamente cuando no haya suministro de corriente eléctrica. La duración
de la batería en esas condiciones será de 20 minutos aproximadamente (según estado de la batería).
CASTELLANO
6
(2) Ante la falta de suministro eléctrico, el robot se detendrá de forma automática, emitirá un pitido y la señal
luminosa ROJA parpadeará. Deberás retirar el robot del cristal cuanto antes.
(3) Para separarlo, puede utilizar la cuerda de seguridad. Tira de ella con suavidad, agarrándola desde una
distancia cercana al cristal para prevenir la caída del robot.
Anillos y paños de limpieza
(1) Cubre el anillo de limpieza con el paño.
(2) Sitúa el anillo correctamente sobre la rueda de limpieza (deben quedar ajustadas las 6 pestañas) para evitar
una fuga de aire.
Control del robot vía dispositivo inteligente:
App. de HOBOT
(1)Escanea el código QR o busca "HOBOT" en App. Store o Google Play con tu tableta o teléfono móvil.
(2)Conecta el Bluetooth y haz clic en laApp. HOBOT.
(3)Enciende el robot y espera a que la App. indique «Conectado»
Para poder utilizar tu dispositivo de sistema operativo Android o IOS con el robot, asegúrate de que ambos están
encendidos.
CASTELLANO

7
Adaptador/cables alargadores de alimentación
Limpieza de cristales
(1) «Limpieza en seco»
Utiliza un paño de limpieza limpio y seco para quitar el polvo y la suciedad del cristal.
Si el paño o el cristal tienen agua o detergente, se mezclarán con la suciedad y no se obtendrá una
limpieza adecuada.
Para conseguir una limpieza óptima, se recomienda utilizar el robot en días soleados y con bajo
nivel de humedad.
Si se usa en días lluviosos o húmedos, quedarán bandas blancas. Esas bandas se producen por los
restos de agua. Sucedería lo mismo al limpiar a mano con un paño.
(2) Utiliza un paño de limpieza limpio y seco. Colócalo en la parte superior de rueda de limpieza. Aplica un poco
de detergente (pulsa 1-2 veces el pulverizador) en la parte inferior del paño de limpieza de la rueda, pero no
demasiado (si queda demasiado húmedo, el aparato no se desplazará bien), y limpia de nuevo el cristal.
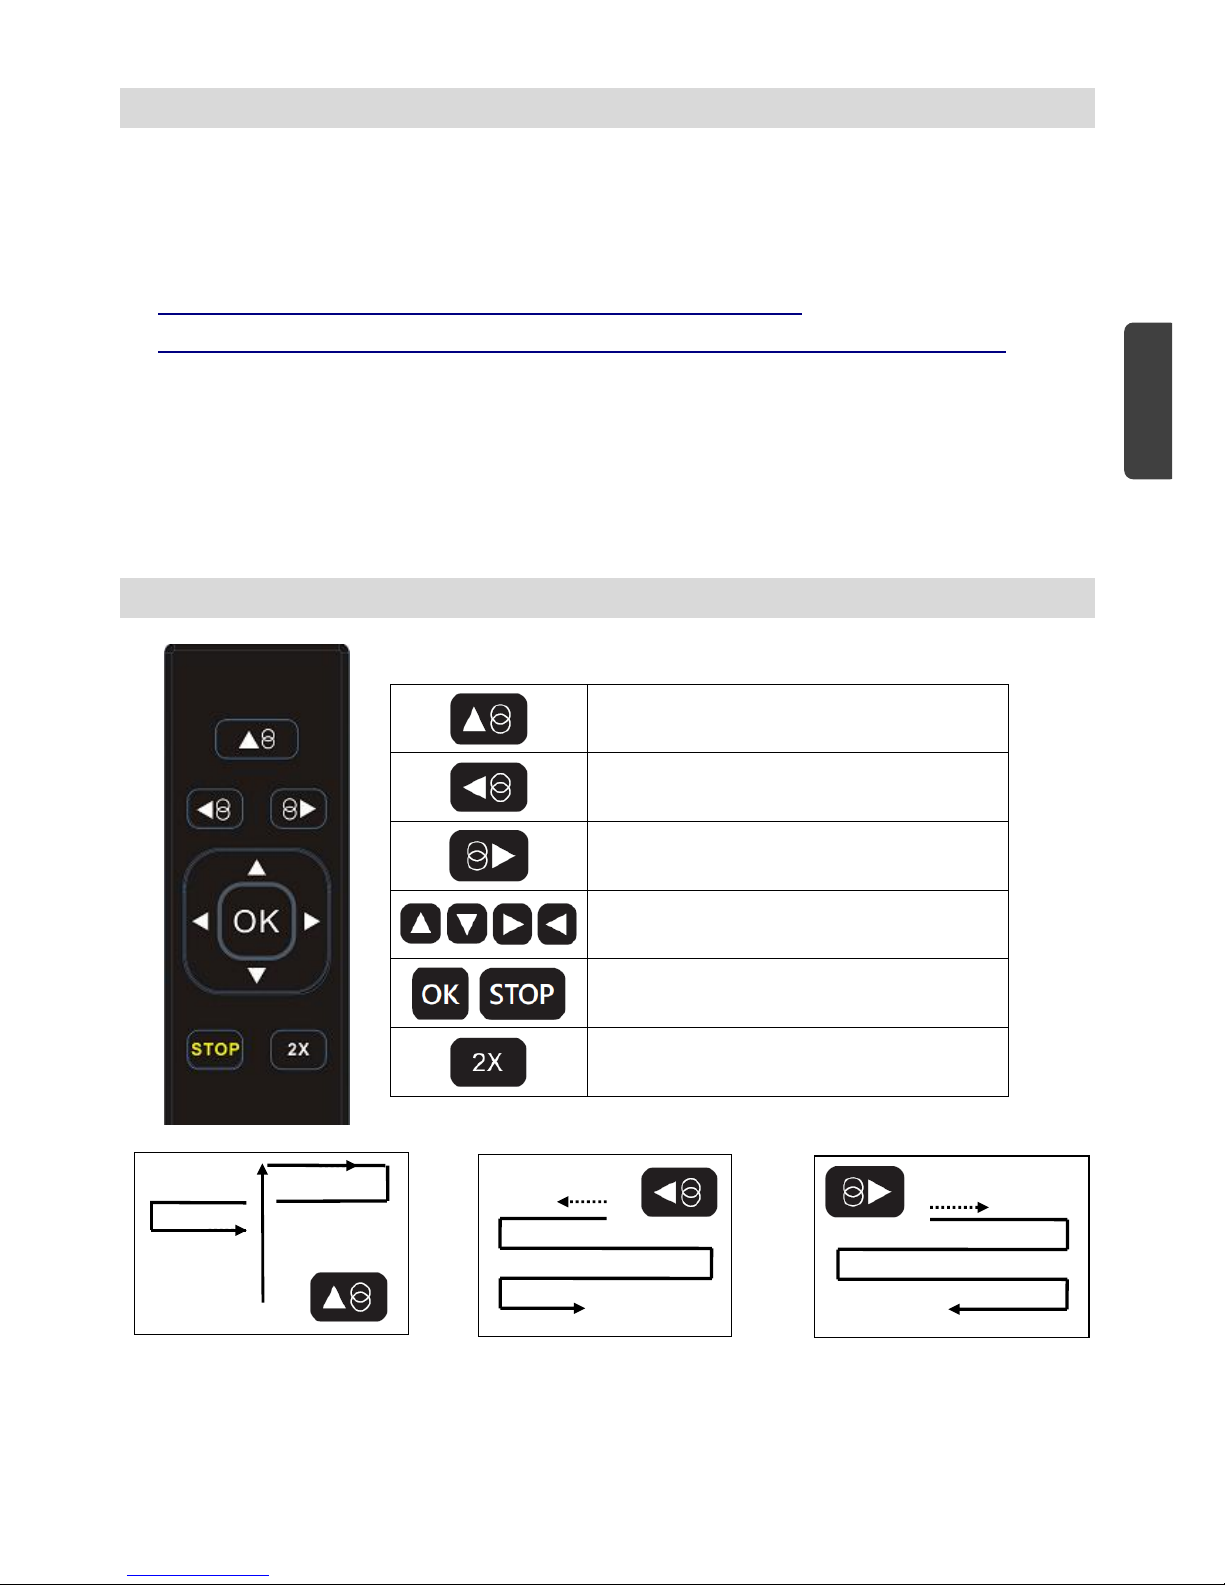
Control remoto
El robot puede manejarse por control remoto desde ambos lados del cristal.
Movimiento automático hacia arriba, y descenso siguiendo
el dibujo que indica la flecha.
Movimiento automático hacia la izquierda, y descenso
siguiendo el dibujo que indica la flecha.
Movimiento automático hacia la derecha, y descenso
siguiendo el dibujo que indica la flecha.
Control manual:
movimiento ARRIBA、ABAJO、DERECHA、IZQUIERDA
Parada
Doble pasada de limpieza
CASTELLANO

8
Arriba/descenso Izquierda/descenso Derecha/descenso
(1) Para cambiar la batería, tira hacia abajo de la tapa.
Señales luminosas
Estado
Señales luminosas
1. Batería en carga
Luz NARANJAencendida
2. Carga de batería 100%
Luz VERDE encendida
3. Sin corriente eléctrica
Luz ROJA encendida
Varios pitidos
4. Error del equipo
Luz ROJA parpadeante
Luz AZUL parpadeante y mensaje «error» seguido del nº de error.
5. Fallo en el nivel de presión al
iniciar la limpieza
Luz ROJA que parpadea una vez y emite un pitido
6. Nivel de succión demasiado bajo
Luz ROJA que parpadea una vez y emite un pitido
7. Fuga de aire mientras el robot está
en marcha
Luz ROJA que parpadea una vez y emite un pitido
Preguntas frecuentes
P1: Al encender el robot, el MOTOR DE VACÍO no funciona y no suena ningún pitido.
S1:
Caso
Señal
LUMINOSA/ACÚSTICA
Estado
1
Azul: parpadea
Naranja: encendida
Roja: apagada
- No suenan pitidos
Carga de la batería demasiado baja. Necesitas cargar la batería al 100% (se
encenderá la luz verde). Si después de 8 horas de carga no se puede utilizar el
aparato, la batería debe ser reemplazada.
2
Azul: parpadea
Roja: parpadea
- No suenan pitidos
Error del equipo.
Contacta con un vendedor o un distribuidor local autorizado para reparar el robot.
P2: El HOBOT-198 no inicia la limpieza, y emite un pitido al comenzar el autodiagnóstico. Nivel de fricción
inadecuado, demasiada o muy poca.
Posibles causas:
El paño de limpieza está demasiado sucio o húmedo.
Presencia de pegatinas o vinilos en los cristales.
CASTELLANO
9
Tras varias pasadas, la superficie resulta demasiado resbaladiza.
El ambiente está muy seco (por ejemplo, en una habitación con aire acondicionado).
Al comenzar el deslizamiento (al seleccionar ,o ), el robot se encuentra a menos de
10 cm del marco de la ventana y hace un cálculo incorrecto.
El tornillo de la rueda de limpieza podría haberse soltado.
S2: Opciones.
(1) Sustituye el paño de limpieza por uno limpio.
(2) Utiliza el robot solo en determinadas áreas de la ventana.
(3) Aprieta el tornillo de la rueda de limpieza.
P3: En la posición de movimiento automático «Arriba/descenso» ( ), el robot se escurre y no puede detectar el
marco superior de la ventana.
S3: Pulsa y elije otro de los modos de funcionamiento automáticos, o .
P4: El robot no termina la limpieza completa de la ventana y se detiene en mitad de la superficie.
S4: Elije otro de los modos de funcionamiento automático, o para continuar la limpieza.
P5: El robot se desliza y no puede alcanzar el marco de la ventana.
S5: Consulta S2.
P6: El robot no se mueve con suavidad o lo hace de forma irregular.
S6: Consulta S2.
P7: Después de limpiar, queda una marca circular en el cristal.
S7: El paño de limpieza está demasiado sucio. Sustituye el paño de limpieza por uno limpio.
P8: El robot se para por un corte de corriente.
S8:
(1) Mueve el robot hacia una zona segura con el control remoto o con la cuerda de seguridad. Separa el robot
del cristal con la cuerda de seguridad. Tira de ella con suavidad, agarrándola desde una distancia cercana al
cristal para prevenir la caída del robot.
(2) Mueve el interruptor a la posición de apagado.
(3) Comprueba si la conexión es buena o si el cable es defectuoso.
P9: El robot se para inesperadamente, la luz roja parpadea y no hay ninguna señal acústica.
S9: Opciones
(1)Consulta S8, (1) y (2).
(2)Comprueba si hay una pérdida de succión debido a una grieta o a un marco de ventana desnivelado.
P10: Tras la limpieza, se ven marcas circulares si miras el cristal a contraluz.
S10: Pasos.
(1) Utiliza un paño de limpieza limpio y seco para quitar el polvo y la suciedad del cristal.
CASTELLANO

10
(2) Sustituye el paño de limpieza por uno nuevo o limpio y colócalo en la parte superior de rueda de limpieza. Aplica
un poco de detergente o alcohol (pulsa 1-2 veces el pulverizador) en la parte inferior del paño de limpieza de
la rueda, pero no demasiado (si queda demasiado húmedo, el aparato no se desplazará bien), y limpia de
nuevo el cristal para eliminar las marcas circulares.
P11: El robot no se detiene de forma automática al alcanzar la zona inferior de la ventana cuando termina de limpiar.
S11: Pulsa para detener el aparato.
P12: El smartphone no se puede conectar al robot.
S12: Asegúrate de tener el Bluetooth ENCENDIDO y reinicia la App. de HOBOT.
P13: No se puede controlar el robot con el Smartphone.
S13: Asegúrate de que la App. de HOBOT está activada o reiníciala.
Información de seguridad: adaptador y la batería
Utiliza solo el adaptador de corriente que acompaña a este robot. El uso de cualquier otro tipo de adaptador
puede dar lugar a un mal funcionamiento del aparato o incluso provocar un daño mayor.
Enchufa el aparato a una salida eléctrica adecuada y asegúrate de que no haya objetos pesados sobre el
adaptador o el cable.
Cuando el robot esté en funcionamiento, permite que haya una ventilación adecuada alrededor del adaptador
de corriente. No cubras el adaptador con objetos que dificulten su ventilación y refrigeración.
No utilices el adaptador en un entorno de excesiva humedad. No manipules el adaptador de corriente con las
manos húmedas.
Conecta el adaptador a una toma de corriente adecuada. Los requisitos de voltaje figuran en la etiqueta del
adaptador.
No utilices un adaptador con el cable o la clavija defectuosos.
No intentes reparar por ti mismo el adaptador. No se incluyen piezas de reparación. Reemplázalo si está dañado
o si ha estado expuesto a una humedad excesiva. Para resolver cualquier duda que tengas o para llevar a cabo
el mantenimiento del robot, ponte en contacto con nosotros: posventa@smarttek.es.
No intentes desarmar la batería, y ten cuidado de no cortocircuitar los contactos. Tampoco la calientes por
encima de los 60℃(140℉) o incineres. Podrías sufrir quemaduras de cierta consideración.
Si quieres deshacerte de un equipo obsoleto, ponte en contacto con el centro de reciclaje de tu localidad y sigue
las recomendaciones que te indiquen.
CASTELLANO

11
Important Safety Precautions
Read all instructions before operating this device.
WARNING
1.Fasten the safety rope and tie to an indoor fixture before operating the device.
2.Check if the safety rope is broken or the knot is loose before operating the device.
3.Apower cord must be used for the HOBOT-188 to function properly.
4.For windows with no balcony, a warning area must be established on the ground below to prevent people from
coming near it.
5.The battery must be fully charged (green light ON) before using.
6.Do not use on rainy or humid days.
7.Turn power on before putting device onto glass.
8.When placing the appliance onto glass, make sure it sticks to the surface before removing the supporting hand.
9.Remove the device before turning the power off.
10. Do not use on frameless glass.
11. Make sure to put the cleaning ring onto the cleaning wheel correctly to avoid leakage.
12. Do not spray or pour water onto the appliance.
13. Prohibit children from using this device.
14. Remove any obstructions on the glass. Do not use on cracked glass. Reflective or coated glass may be
scratched during operation by dirt on the glass.
15. Keep hair, loose clothing, fingers, and all body parts away from the openings and moving parts.
16. Do not use in areas containing flammable or combustible liquids or gases.
Product Description
HOBOT-198 is a glass-cleaning robot with a vacuum motor inside that uses suction to stick to glass surfaces. An
embedded UPS (Uninterrupted Power System) can prevent the robot from falling off the window even when the power
is off.
HOBOT has two specially-design cleaning wheels that can freely move window surfaces, and even walls. The
easily-replaceable lint-free cloth is used on both cleaning wheels. Micro-fiber cloth is used to attain superior glass
cleaning.
HOBOT has AI Technology that can calculate paths, auto-detect window edges, and auto-clean entire windows. It
also features a mode for manual operation.
ENGLISH
12
Specifications
Product size
295mm x 148mm x 120mm (LWH)
Product weight
940g
Gift box size
320mm x 230mm x 136mm (LWH)
Gift box total weight
2.1Kg
Input Voltage
100~240VAC, 50Hz~60Hz
Adapter output
24V/3.75A
Power consumption
90W
AC power cord length
1.0m
DC power cord length
4.0m
Safety rope length
4.5m
Battery
Li-Po, 14.8V
Battery working time
20 minutes
Battery life
2 years
Cleaning speed
4 min/square meter
(Cleaning the entire area twice)
Noise
65.5 dB
Maximum cleaning area
Height: 6 meters
Width: 5 meters
Product and accessories
Device x 1
Remote controller x 1
Adapter (100~240VAC, 50~60Hz) x 1
AC power cord x 1
DC power extension cord (4 meters) x 1
Cleaning cloths x 14
Cleaning rings x 4
User manual x 1
ENGLISH
13
Product features
Designed for any thickness glass
AI Technology V2.1
Rotating speed: 70RPM
Cleaning speed: 4 min/m2.
3 kinds of automatic operation modes for cleaning the entire window
Stops automatically upon completion of cleaning.
Embedded UPS (Uninterrupted Power System)
Anti-falling control algorithm
Auto-detects edges of window
High sensitivity pressure sensor
Micro-fiber cloth
High-strength safety rope (tensile strength 150Kgf) and buckle
Remote control
Smartphone control (smartphone not included)
Table cleaning mode
Power consumption:90W
Input voltage: 100~240VAC, 50~60Hz
Cleaning cloth laundry instructions
Washing under 40℃
Do not bleach.
Do not tumble-dry.
Do not iron.
Do not dry clean.
ENGLISH

14
Getting to know the device
Safety rope & buckle
Upper hanging hole
Buzzer
Remote receiving window
Red light: Indicates
Abnormal status
Blue light: Indicates
Normal status
Green light: full-charged
Orange light: charging
DC power jack
Vent
Lower hanging hole
Power switch
Caution label
Red light
Blue light
Remote receiving
window
ENGLISH
15
Step 1. Preparing
(1) Don't use the device on rainy or high humidity days, otherwise it will produce white streaks.
(2) For windows with no balcony, a warning area must be established on the ground below to prevent people
from coming near it.
(3) Check if the safety rope is broken or the knot is loose before operating the device.
(4) Fasten the safety rope and tie to an indoor fixture before operating the device.
(5) Do not use on frameless glass.
Step2. Assemble adaptor, DC power cord, AC power cord before plugging L-shape connector into DC power jack on
the device and then pluggingAC power cord into the socket.
Step 3. Make sure the battery is fully charged (green light ON) before use:
(1) Turn off the power switch on the device and then plug it into a power source. Orange light ON means
charging.
(2) Green light ON means the battery is fully charged.
Step 4. Refer to the illustrations below. Make sure cleaning ring is perfectly covered by cleaning cloth and put the
cleaning ring onto the cleaning wheel correctly to avoid leakage.
Step 5. How to put the device onto glass.
(1) Turn power switch on. Make sure fan is running.
(2) Put the device onto glass and keep 10cm away from the frame of window.
(3) Check if the device is sticking to the glass before releasing it.
Step 6. Auto mode and Manual mode operation.
(1) Press or or , the device automatically cleans whole window.
(2) Press to stop the device running.
(3) Press to manually control the device moving.
Step 7. Finish and remove the device from glass.
(1) While the device is running, hold the safety rope with one hand and take the device down from glass with
the other hand.
(2) Remove the device to a safe area, then turn it off.
UPS (Uninterrupted Power System) function:
(1) The UPS function will be enabled automatically when no electric power is supplied. The backup time of this
UPS is 20 minutes approximately (depending on the battery status).
(2) If no electric power is supplied, the device will stop automatically, sound an alert, and flash a red light. The
user should take the device down from the glass as soon as possible.
(3) The safety rope can be used to pull the device back. Gently pull the safety rope at an angle close to the
glass to prevent it from falling.
ENGLISH

16
Using the cleaning ring and the cleaning cloth
(1) Cover cleaning ring with cleaning cloth.
(2) Put cleaning ring onto cleaning wheel correctly (snap the 6 latches) to avoid leakage.
Setting up the device with the HOBOT App.
Step 1: Scan QR code or search “HOBOT”on the App Store or Google Play to download HOBOT app on your smart
phone or tablet.
Step2. Turn on Bluetooth and click HOBOTApp.
Step3. Turn on the device and wait for “Connected”shown on HOBOTApp.
Make sure both HOBOTApp and the device are on, so you can use your iOS or Android smart device to operate the
device.
Power adapter/DC extension cable
ENGLISH
17
How to clean the glass
Step I: “Dry Clean”first
Use a clean and dry cleaning cloth to clean dust and dirt from the glass.
(1)If there is water or detergent on the cloth or glass, the water or detergent will mix together with the dust or
dirt to become mud, making cleaning results bad.
(2) Using HOBOT on sunny days or days with low humidity for best results.
(3) Don't use HOBOT on rainy or high humidity days, otherwise it will produce white streaks. The white
streaks are water molecules. This is the same thing that can happen when manually cleaning with a cloth.
Step II: Use a clean and dry cleaning cloth. Keep the cleaning cloth on the upper wheel clean and dry. Spray a little
detergent (1~2 sprays) on the lower wheel’s cleaning cloth, but not too much (if too wet, the machine can’t
move well), then clean the glass again.
Remote controller
The device can be remote controlled from the front and back sides.
Auto up then down Auto left then down Auto right then down
Automatically move up then down
Automatically move left then down
Automatically move right then down
Manually move UP、DOWN、RIGHT、LEFT
Stop
Clean twice
ENGLISH
18
(1) If you have to replace the battery, just pull down the battery cover.
LED indication
Situation
LED indication
1. Battery charging
Orange LED is ON
2. Battery charged
Green LED is ON
3. No electrical power
Red LED flashing
Repeated beeping sound
4. Hardware error
Red-LED flashing
Blue-LED flashing with “error number”
5. Friction factor check error at start-up.
Red-LED flashes once, Beep
6. Vacuum pressure too low
Red-LED flashes once, Beep
7. Air leakage while operating
Red-LED flashes once, Beep
Frequently asked questions (FAQ)
Q1: When the power switch is turned on, the VACUUM MOTOR does not rotate, and no alarm sounds.
Case
LED signal
Situation
1
Blue: flash
Orange: on
Red: off
No alarm
It means battery charge is too low. Wait for battery to fully charge (green light is
lit). If machine still can’t be used after charging for 8 hours, the battery should be
changed.
2
Blue: flash
Red: flash
No alarm
Machine hardware failure.
Please contact a local retailer or local authorized dealer for repairs.
Q2: HOBOT can’t start up and it sounds an alert at the beginning of the self-test.
Ans: It means that there is too much or too little friction. Pease check:
(6) Whether the cleaning cloth is too dirty.
(7) Glass stickers and window film have a friction factor that is too low.
(8) If the window is cleaned many times, the glass surface will become very slippery.
(9) The glass surface will become slippery if cleaned several times in a low humidity environment such as in
air-conditioned room.
(10) When starting up the device (pressing ,or or ), keep it 10cm or more away from the
window frame to prevent the device from making an incorrect assessment.
Q3: The HOBOT slips and cannot detect the upper frame of window in “Auto Up then Down”( ) mode.
Ans: Press key and switch to or auto mode.
ENGLISH

19
Q4: HOBOT cannot finish cleaning the whole window and stops in the middle area.
Ans: Press or auto mode to continue cleaning.
Q5: HOBOT slips and can not climb up to the window frame.
Ans: (1) The friction factor is too low and may be caused by glass stickers or window film on the glass.
(2) The cleaning cloth might be too wet.
(3) If the window is cleaned many times, the glass surface will become very slippery.
(4) The glass surface will become slippery if cleaned several times in a low humidity environment such as in
air-conditioned room.
(5) When starting up (press ,or or ), keep the device 10cm or more away from the
window frame to prevent it from making an incorrect assessment.
Q6: HOBOT does not move smoothly, or it moves irregularly.
Ans: (1) Cleaning cloth is too dirty. Please change out the cleaning cloth for a clean one.
(2) Glass surface has different friction factor areas due to glass stickers, window film, and so on. Please limit
use the HOBOT to certain areas of the window.
(3) The screw of the cleaning wheel might have become loose. Just tighten it.
Q7: After cleaning, a circular mark is left on the glass.
Ans: Cleaning cloth is too dirty. Please change out the cleaning cloth out for a clean one and clean again.
Q8: What to do if HOBOT stops due to a power outage?
Ans: (1) User can pull HOBOT back with safety rope. Gently pull the safety rope at an angle close to the glass to
prevent it from falling off the glass.
(2) Switch the power switch to “off”.
(3) Check whether there is a poor connection or broken cord.
Q9: What to do if HOBOT unexpectedly stops and the red light is flashing, with no alarm sounding?
Ans:(1) User can move HOBOT to safe area by remote control, or pull HOBOT back with safety rope. Gently pull the
safety rope at an angle close to the glass to prevent it from falling off the glass.
(2) Switch the power switch to “off”.
(3) Check whether there is air leakage caused by a gap or uneven window frame.
Q10: What to do if circular marks are still left on cleaned glass when the lights are on in the evening?
Ans: Step I: use a clean and dry cleaning cloth to clean dust and dirt from the glass.
Setp 2: Change cleaning cloth from used to new or clean.
Keep the cleaning cloth on the upper wheel clean and dry. Spray a little detergent or alcohol (1~2
sprays) on the lower wheel’s cleaning cloth, but not too much (if too wet, the machine can’t move
well), then clean the glass again to wipe circular marks.
Q11: If HOBOT can’t auto-stop at bottom of window when it finishes cleaning.
Ans: Press key to stop machine.
ENGLISH
Table of contents
Languages:
Other SMARTBOT Vacuum Cleaner manuals


Popular Vacuum Cleaner manuals by other brands


Ocean
Ocean VAC 2 FUN Operating instruction

LG
LG VC23 Series owner's manual

ARDESTO
ARDESTO CVC-X0621WB instruction manual

cecotec
cecotec POWERBAG 2000 COMPACT instruction manual

Truvox International
Truvox International VTVe Original instructions

Miele
Miele Compact C1 Young Style PowerLine operating instructions