SMARTfit Mini User manual
SMARTfit Mini User Manual
Version 5.3
www.smartfitinc.com

1
Table of Contents
Maintenance .................................................................................................................................................. 3
Battery Operations ......................................................................................................................................... 4
Getting Started ............................................................................................................................................... 5
What’s in the Box ........................................................................................................................................... 6
Assembly Instructions .................................................................................................................................... 7
SMARTfit Mini 9 Operating Instructions ........................................................................................................ 7
Powering On Your SMARTfit Mini System ..................................................................................................... 8
Wheel Kit Operation ...................................................................................................................................... 9
Strike Target Options ................................................................................................................................... 10
The SMARTfit App ........................................................................................................................................ 11
Controller Settings .................................................................................................................................................. 12
Downloading the SMARTfit App ............................................................................................................................. 14
Start a Game ........................................................................................................................................................... 20
Standard Settings .................................................................................................................................................... 21
Open and Closed Platforms .................................................................................................................................... 25
Play a Free Activity .................................................................................................................................................. 28
Play a Free Program ................................................................................................................................................ 32
Create an Activity .................................................................................................................................................... 36
Create a Program .................................................................................................................................................... 41
Search and Export Data .......................................................................................................................................... 50
EU Declaration of Conformity ...................................................................................................................... 57

2
IMPORTANT SAFETY INSTRUCTIONS
(READ ALL INSTRUCTIONS)
CAUTIONS, WARNINGS and DANGERS
• This is not a toy and is intended for use by or under the supervision of adults.!
• To reduce the risk of fire, replace only with a fuse of the same type and electrical rating.!
• No user serviceable parts with the exception of the fuse.!
• Please note the yellow CAUTION and WARNING labels on the device.!
• Note all pinch points on the device before using.!
• If an extension cord is used pay close attention to the current requirement and routing to
eliminate tripping hazards.!
• Pay close attention to the pinch points pointed out in yellow CAUTION labels.!
• Do not climb on the device.!
• Weights in the back of the unit are required for safety.!
• This appliance is not intended for use by persons (including children) with reduced physical,
sensory or mental capabilities, or lack of experience and knowledge, unless they have been
given supervision or instruction concerning use of the appliance by a person responsible for
their safety.!
• Children should be supervised to ensure that they do not play with the appliance.!
• PLEASE SAVE THESE INSTRUCTIONS!

3
Maintenance
• Clean all surfaces with a water-based disinfectant, such as Windex Disinfectant.!
• Check all bolts and ensure they are tightened.!
• Check all mechanical parts for wear.!
• Check wiring for wear and fraying.!

4
Battery Operations
Power Banks are found in certain configurations of SMARTfit systems. This section only applies to such
systems.
• Only a power bank from SMARTfit shall be used.!
• Power banks shall be removed from the system prior to charging the pack.!
• Exhausted power banks shall be disposed of in a proper manor in accordance to your local laws.!
• If the system is to be dormant for an extensive period remove all power banks.!

5
Getting Started
Welcome to your new SMARTfit Mini!
The SMARTfit Mini System Includes the Following:
• Software License including downloadable iOS/Android mobile application and data
gathering/reporting module.
• CPU controller, timeclock, score display, sound system with 4 tracks of voice /tones/music.
• LED Targets multicolored high resolution, super bright, 16 x 16 dot matrix. Allows for images,
symbols, numbers up to 999 and three letter words.
• The system offers 37 categories consisting of hundreds of options that can be scaled to the
ability level of players regardless of capability.
• Adjustable touch sensitivity to suit the light touch of a hand or the weight of a medicine ball.
• 18-month warranty (extended warranty available) and SMARTfit’s exclusive Platinum Service
Plan.
What’s in this Document?
This manual will get you familiar with your SMARTfit Mini and guide you to quickly set it up. Setup
instructions include system components, On-Wall and On-Frame assembly and integration with
SMARTfit Strike Targets. The remainder of the manual walks you through the setup of the SMARTfit
app for iOS and Android including setup of open and closed platforms, playing and creating activities
and programming and searching and exporting data. Additional resources for setup and installation can
be found at www.smartfit.rocks
Customer Service
If you need assistance, feel free to give our Customer Service a call at 1-800-900-8542 x 116, between
the hours of 9:00 a.m. and 4:30 p.m. PST, Monday thru Friday or watch our easy to follow instruction
video on our website at https://www.smartfit.rocks/Customer-Resources/SMARTfit-Mini-videos

6
What’s in the Box
Power Requirements for the Mini System: 100-240VAC/50-60HZ/3Amp, receptacle
SMARTfit Mini On-Frame
1. One Interactive 46’’x 46’’ Station
2. 9 Multi-Functional Targets
3. AC CPU controller
4. Six 22 lb. Rubber Coated Weights
5. Adjustable height system (range
from floor to 6’)
SMARTfit Mini On-Wall
1. One Interactive 46’’x 46’’ Station
2. 9 Multi-Functional Targets
3. AC CPU controller
SMARTfit Mini On-Frame Portable
1. One Interactive 46’’x 46’’
Station
2. 9 Multi-Functional Targets
3. AC CPU controller
4. Six 22 lb. Rubber Coated
Weights
5. Adjustable height system
(range from floor to 6’)
6. Pneumatic lift kit for
portability.

7
Assembly Instructions
Visit the following links for detailed assembly instructions. If you have any questions or need assistance
give our Customer Service a call at 1-800-900-8542 x 116, between the hours of 9:00 a.m. and 4:30
p.m. PST, Monday thru Friday
Mini On-Wall Assembly Instructions: https://www.youtube.com/watch?v=DskOyKvhqzY
Mini On-Frame Assembly Instructions:
https://smartfitinc.com/wp-content/uploads/2018/02/Min-On-Frame-Installation.pdf
On-Frame Portable Assembly Instructions: https://www.youtube.com/watch?v=DskOyKvhqzY
SMARTfit Mini 9 Operating Instructions
ADJUSTING THE PANEL HEIGHT (On-Frame and On-Frame Portable Systems)
The brake system is located on the left post behind the panel. (See photo below)
To adjust the panel height, pull the brake knob and move the panel to the desired height.
Release the knob to engage the brake and lock it into desired position.

8
Powering On Your SMARTfit Mini System
1. Locate the Power and Target Ports on
the CPU.
2. Plug in the Target Wire as shown in the
picture. Use the top target wire port on
the CPU.
3. Plug in the Power Cord as shown in the
picture.
4. Turn the toggle switch to the On
position.
5. Your CPU is now ready for play!
9
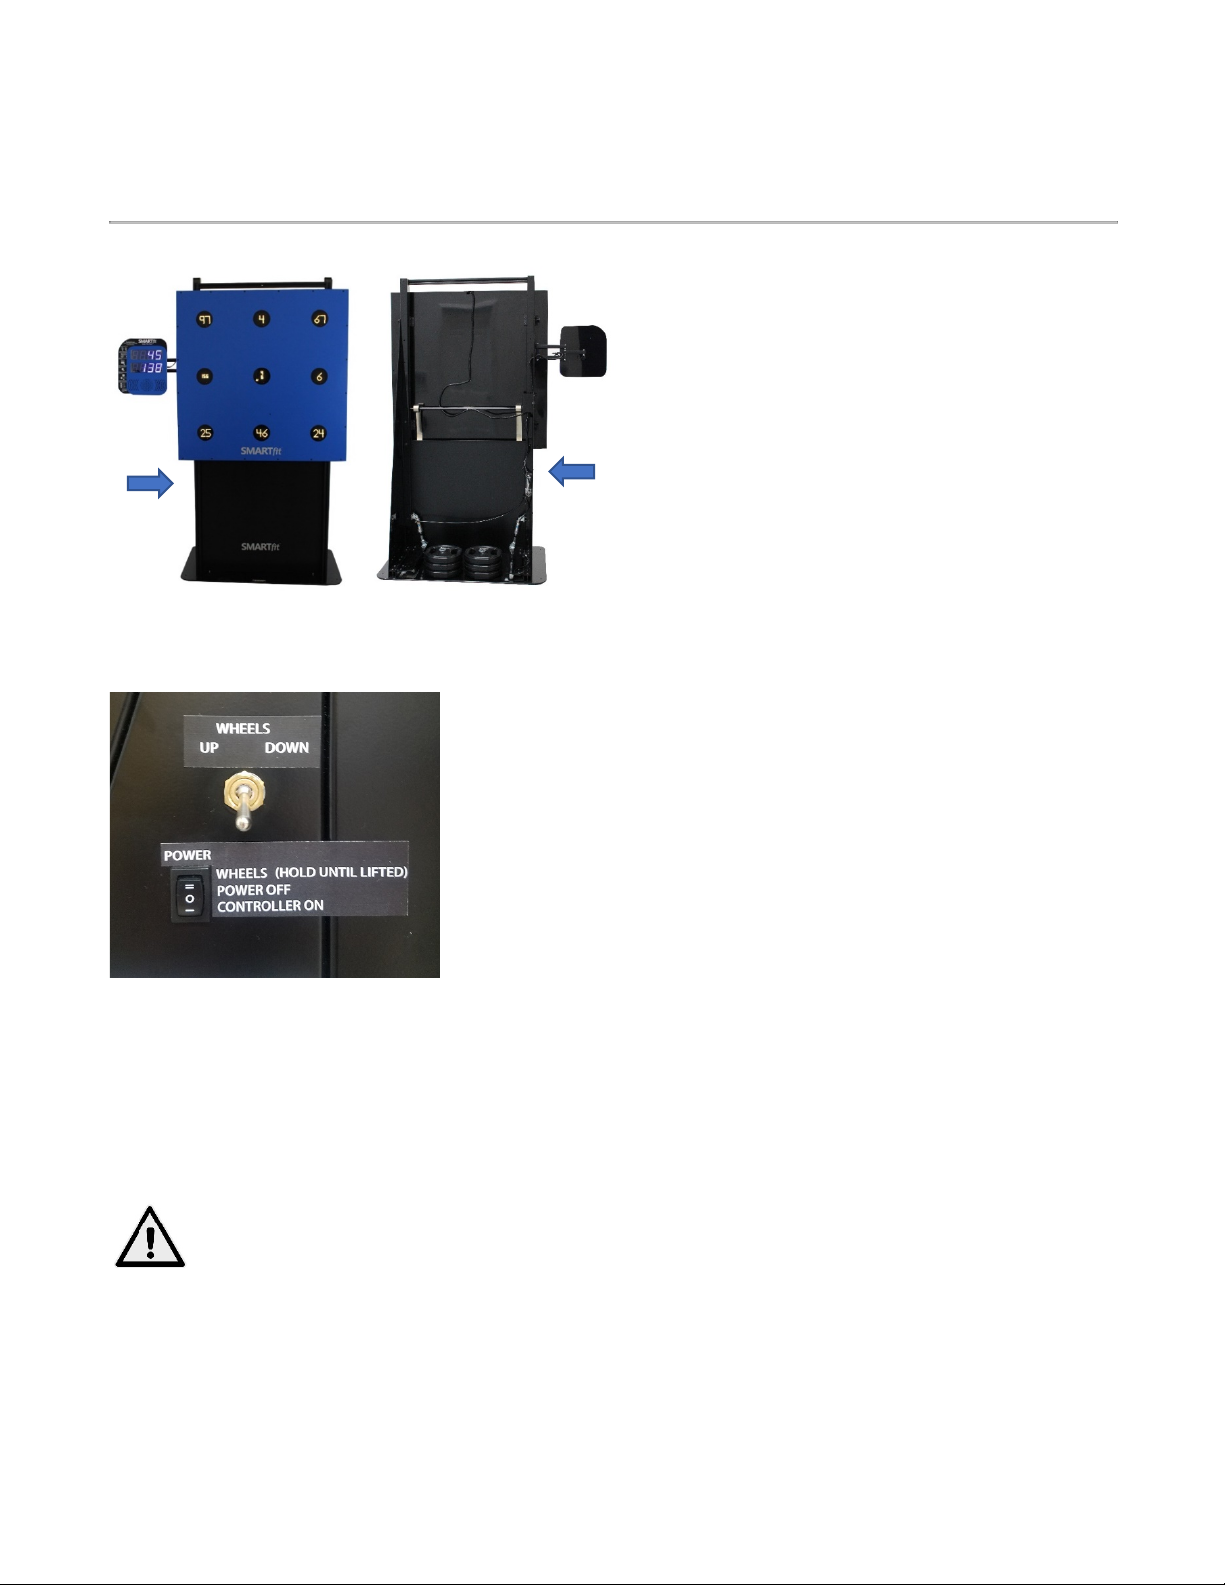
Wheel Kit Operation
The Mini On-Frame Portable comes with a
pneumatic lift kit and wheels built into the frame
for easy portability.
Locate the single rocker switch that is labeled
Controller On. Set the switch to the center
position (Off). Plug the power cord into an outlet.
Note: The power supply will adjust to any voltage
between 100 and 240 VAC/50-60Hz. All electrical
devices are low voltage DC devices and are powered by the single power supply.
To power the system on, push the rocker switch down so that it is
in the Controller On position.
To power the system off, push the rocker switch to the center
position in the Power Off position.
To use the wheel kit, flip the Wheels Up/Down toggle switch to Up.
Now press and hold the top of the Power switch in the “Wheels”
position for approximately 15 seconds. When you release the
switch, the compressor will stop.
Now unplug the power cord and the system can be easily be moved to another location.
When the system is in the desired location, plug the power cord into an outlet. Flip the Wheels toggle
switch to the down position and the wheels with retract.
Caution! Ensure nothing is underneath the base plate when you’re lowering
the system. Failure to do so could cause serious injury.

10
Strike Target Options
Add SMARTfit Strike Pods to your Mini System to create a 360-degree playing environment. The
SMARTfit Controller can run up to 15 wireless targets at a time. We recommend adding 3 to 5 Strike
Pods to a Mini System. Optional Strike Pod Stands recommended.
1. SMARTfit Strike Pods: Available
colors are Black, Red, Blue, Orange,
and Yellow.
Note: Each Pod comes with a Power
Bank, Mounting Plate & Rack Strap
2. SMARTfit Power Bank Charging
Station. Charges up to 6 power banks
at a time.
3. Optional Extra Power Banks
4. SMARTfit 68’’ Strike Pod Stand.
Includes two 22-lb rubber coated
weights. Provides a pod location
range from floor to 68ʺ.
5. SMARTfit 48’’ Portable Strike Pod
Stand.
Includes an 18-lb removable base.

11
The SMARTfit App
CONTROL OF DATA OPTIONS:
It is important to know whether you need an “Open Platform” or a “Closed Platform”.
Open Platform: This option allows any user open access to the SMARTfit Controller
when signed into their user profile.
Closed Platform: This option does not allow users to connect to the SMARTfit
Controller from their user profile, unless given permission from the Admin Settings.
An “Open Platform” is recommended, unless your system is being used in a hospital or
there is a need for patient/user confidentiality.
*Please see the end of this document or our website for an explanation of Closed and
Open Platforms (Pg. 25).
The following steps will take you through the downloading procedures of SMARTfit
app and choosing the right activities and programs for you.
** Please see the end of this document or our website for an explanation of our
activities (Pg. 28 & 36) and programs (Pg. 32 & 41).

12
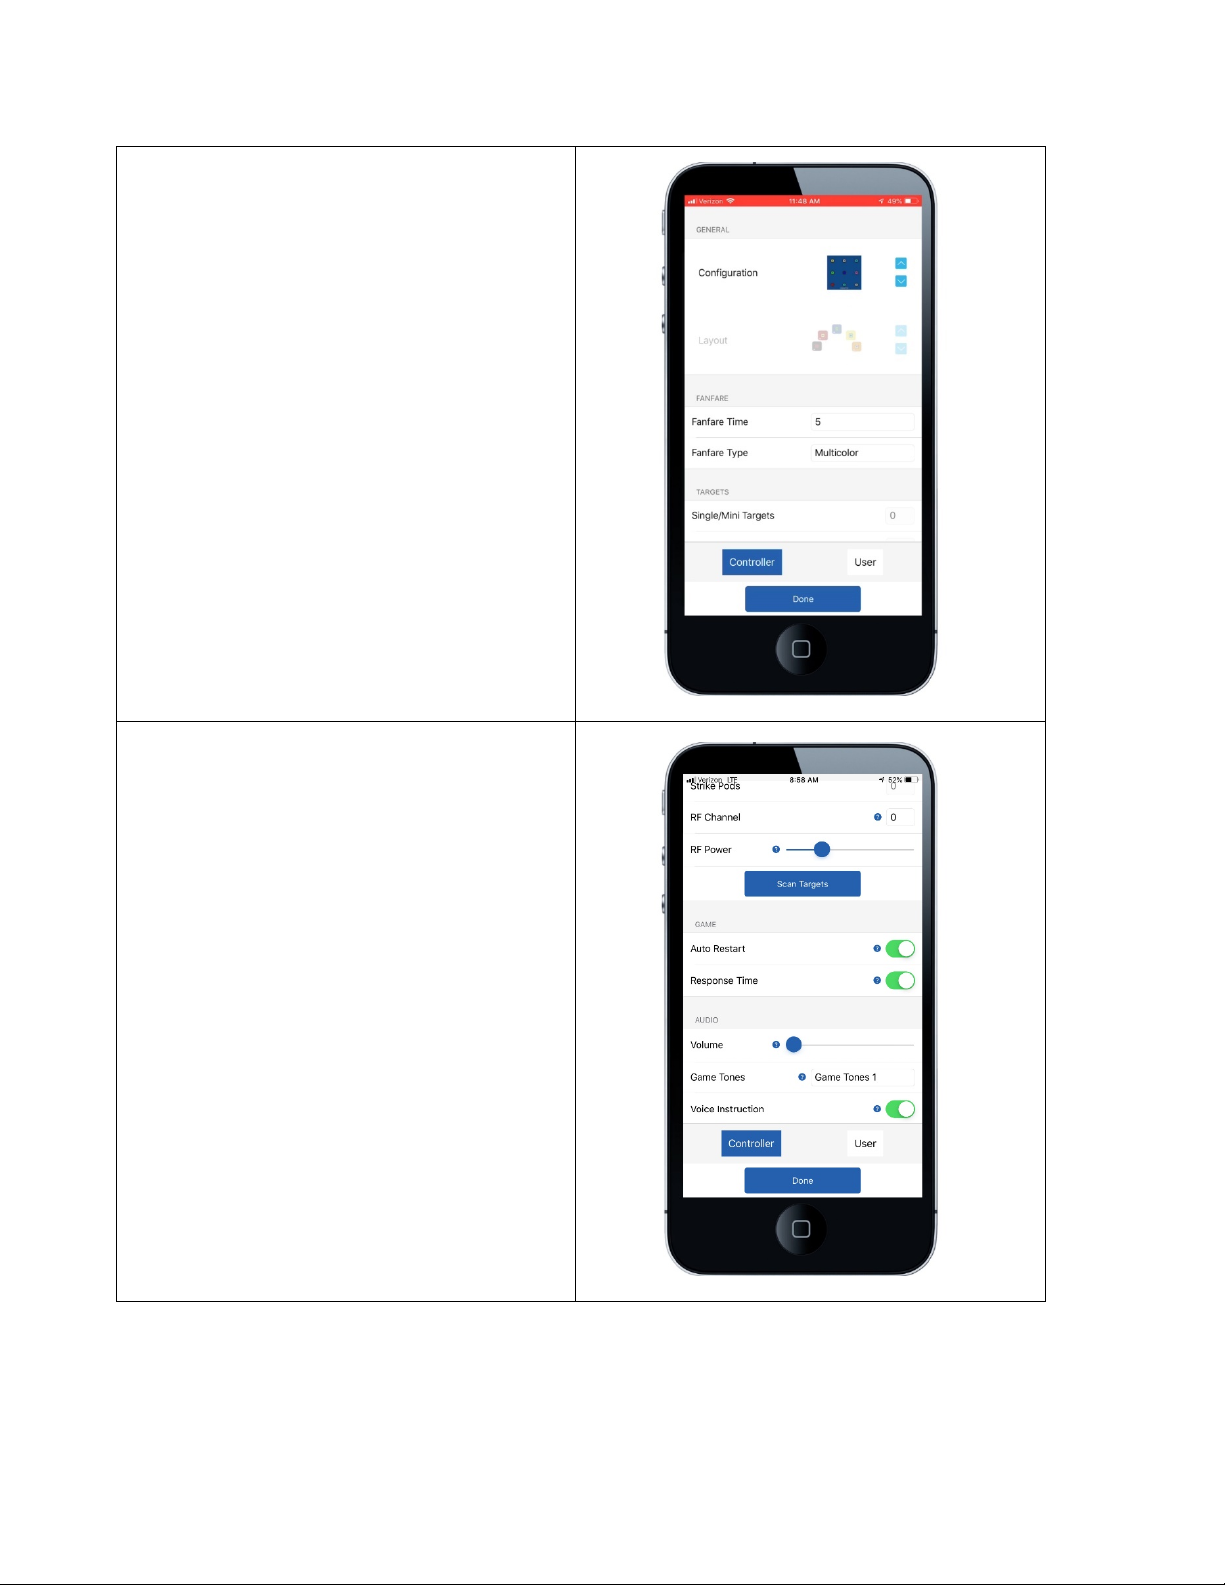
Controller Settings
The Controller Settings menu item allows you to make choices about what components
of the system will be used for the session. Below is the list of controller settings and
their functions.
General
Configuration: Cycle through Configurations such as Strike Pods, Single, Mini, Single & Strike Pods, and
Mini & Strike Pods.
Strike Target Layout: When a Configuration includes an image of Strike Pods, this option will appear.
Cycle through the Strike Pod Layouts for ideas and data tracking purposes. This Layout will display
when accessing the Free Activities Section under the “Play” tab.
Time
Fanfare Time: Select the amount of time between the finished game and the next game.
Targets
Single/Mini Targets: This will display the number of wired targets found by the CPU. This setting is
locked and predetermined based off the system being used.
Strike Pods: This will display the number of wireless targets (strike Pods) found by the CPU. This setting
is locked and predetermined based off the system being used.
RF Channel: Select the RF radio band that drives the wireless pods (only change if conflicting with
another RF system nearby). Changing the channel means the Strike Pods will need to be changed as
well.
RF Power: Increase or decrease the RF radio band strength that connects the Strike Pods and CPU.
Game
Auto Restart: With Auto Restart on, the game will display scores and then ready itself for another
game to start. With Auto Restart off, the system will remain idle displaying the score of the last game
and only start a new game when the menu button is pressed.

13
Audio
Volume: Increase or decrease the volume of the instructions (start the game, end of game). Game
tones are adjusted within the Game settings.
Game Tones: Select which set of game tones will be played to register hits and misses.
Voice Instructions: Turn voice instructions on or off.
Visual
Show Blue: Choose to turn on or off each target’s ability to display the color blue.
Attract
Music: Select the music played while attract mode is active and the system is not in use (only used in
entertainment zones).
Message: The message displayed here is the message that is displayed on the targets during the
Attract mode.

14
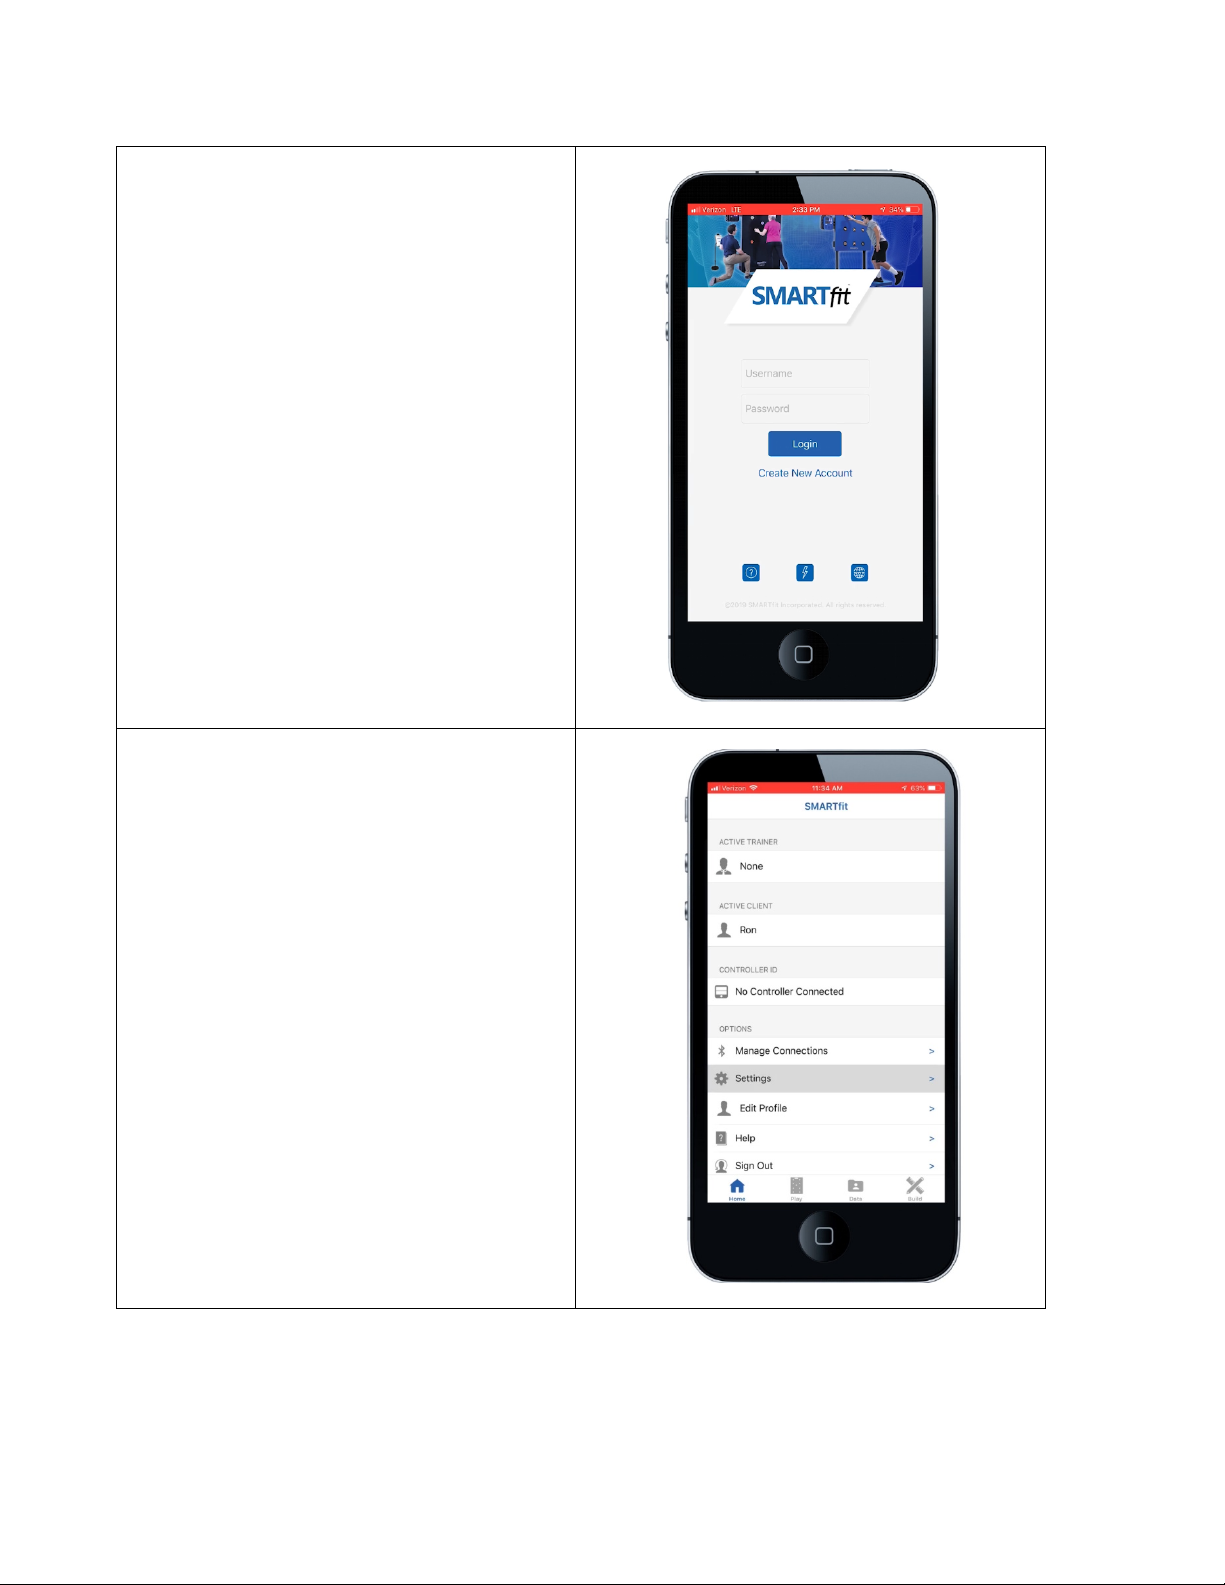
Downloading the SMARTfit App
iOS or Android smartphone or tablet
1. Follow the instructions located on the
CPU Back Plate.
2. Select the app store on your iOS or
Android device and Search “SMARTfit
– Seize the Now.” Download it to your
device, then open the SMARTfit app.
(The iOS view is shown. The Android
view differs slightly.)
15
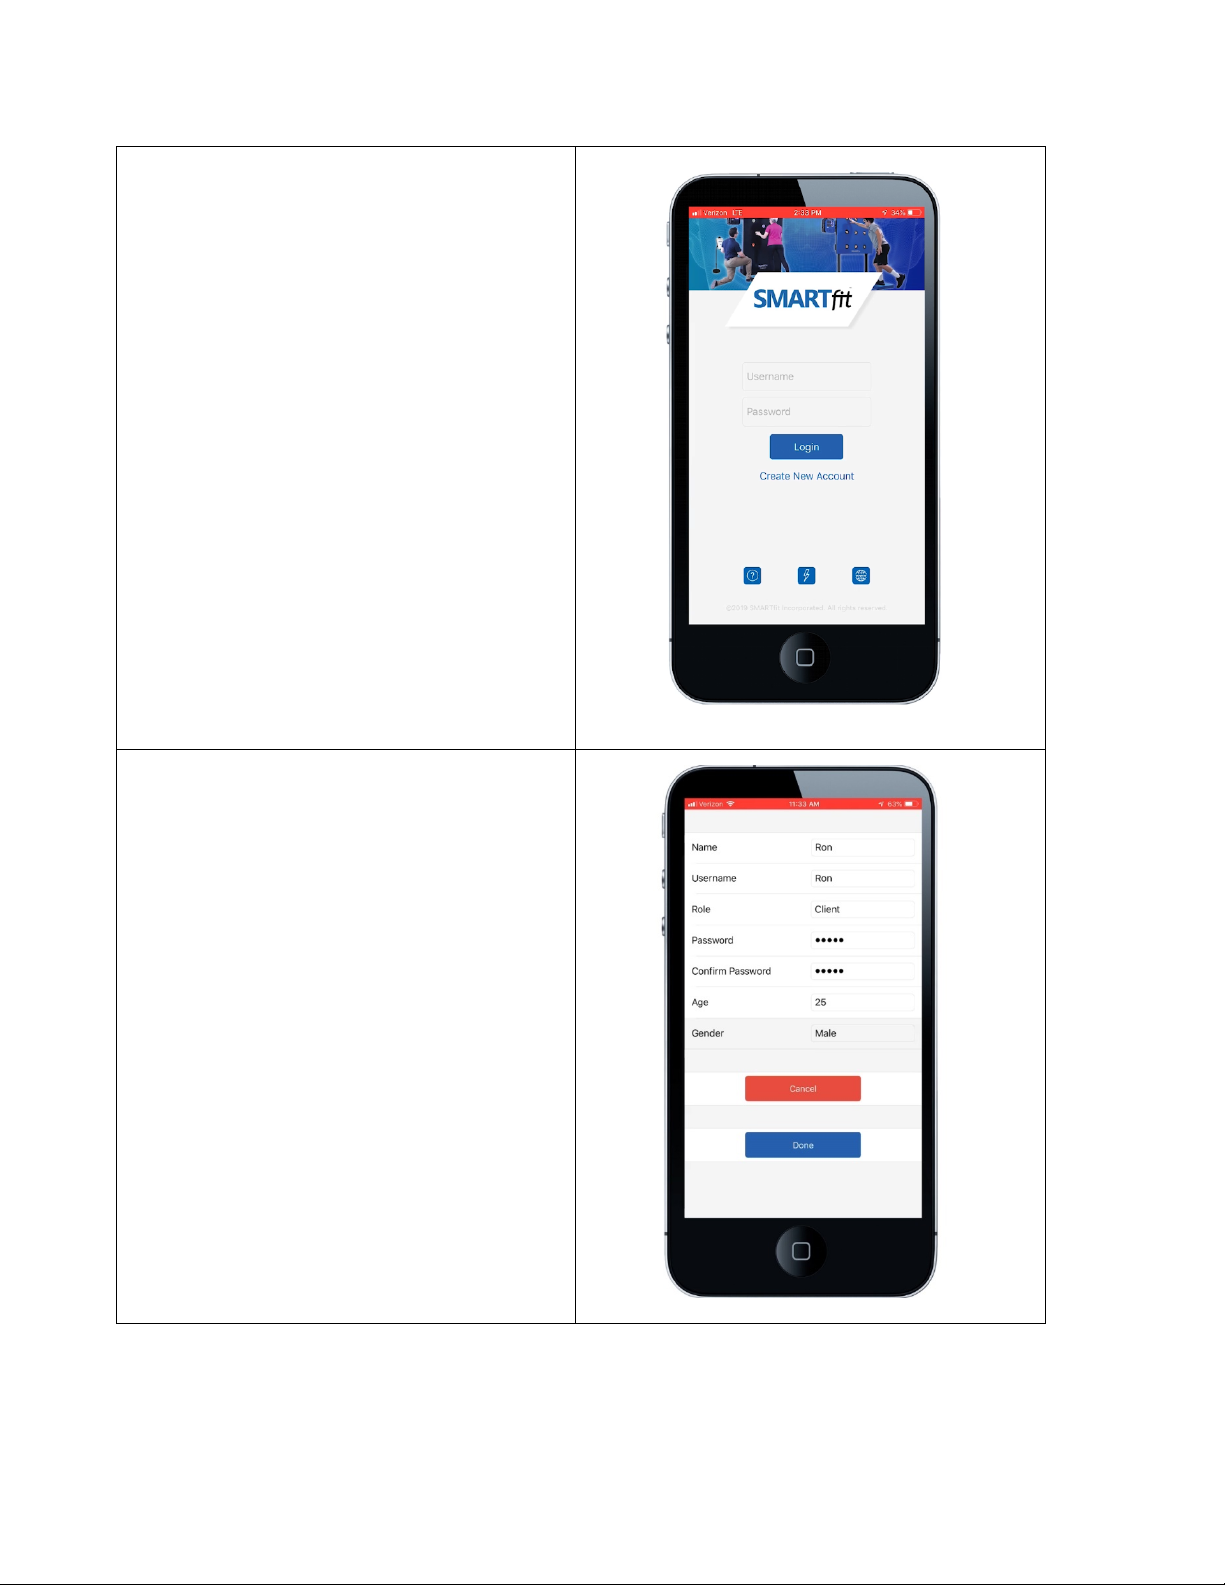
3. Select “Create New Account” located
under the login button.
4. This option gives the user the ability
to create a tier one or tier two user. A
tier one user is a trainer, therapist,
teacher, coach, doctor, or owner.
These users can create/manager tier
two users to track data on each
account. A tier two user is a client,
patient, student, athlete, or member.
These users cannot create/manage
additional users under this account
but can perform every other function
of the SMARTfit App.
5. Create login credentials by entering a
name, username, password, age, and
gender.
6. The role option allows you to select a
tier 1 or 2 user. If this is your system,
then we recommend that you create a
tier 1 user.
7. Select the blue “Done” button to
continue.
16
8. Enter the username and password of
the profile you just created.
9. Select the “Settings” menu item.
17
10. Change the configuration, so that
your system matches the
photograph.
11. Turn on the setting labeled,
“Response Time.” This setting will
enable target data collection
including response time and
accuracy.
12. Select the blue “Done” button
when you are finished.

18
13. Select the “Manage Connections”
menu item.
14. Select the Bluetooth symbol at the
top right of the screen.

19
15. Select the 8-digit ID number
displayed on your CPU.
16. Wait 5 - 10 seconds, while
Bluetooth connects the CPU and
SMARTfit App.
17. NOTE: You will not be able to
connect to the SMARTfit system if
you are connected to any other
Bluetooth device. For example, you
must disconnect from Apple
watches, wireless speakers,
headphones, etc.
18. If you are still unable to connect,
then please call our customer
service line at 800-900-8542 x 112.
Other manuals for Mini
1
Table of contents
Other SMARTfit Medical Equipment manuals

Popular Medical Equipment manuals by other brands

PRC-Saltillo
PRC-Saltillo NovaChat 5 4th Generation user guide

Respironics
Respironics REMstar Pro Service manual

B medical systems
B medical systems MT 25 / RCB 25 user manual

Seluxit
Seluxit SLX Heartbeat installation guide

Verathon
Verathon GlideScope Titanium Reusable Operation & maintenance manual

DJO
DJO PROCARE NEXTEP CONTOUR W/AIR manual


MIL'S
MIL'S MVX 2 General Installation and Maintenance Instructions

laerdal
laerdal 78 00 10 Directions for use

Sedona Wellness
Sedona Wellness SEDONA Pro user guide

Symmetry Surgical
Symmetry Surgical VersaGrip Instructions for use

Kowa
Kowa AP-7000 Service manual

DeVilbiss Healthcare
DeVilbiss Healthcare Drive 1025 Series Instruction guide