SMARTZO KJ180F-E02 User manual
E02 Air Purifier User manual


2
Welcome
Dear Customer,
Congratulations on your purchase of the Smartzo E02 Air Purifier.
This product is meticulously designed with high-quality materials and
components.
Please read the user manual carefully to familiarize yourself with the unique
features and functions of the air purifier. Please store this manual in a safe
place for future reference.
Welkom
Beste klant,
Gefeliciteerd met de aankoop van de Smartzo E02 Luchtreiniger.
Dit product is ontworpen en gemaakt met hoge kwaliteitsmaterialen en
onderdelen.
Lees de gebruikershandleiding aandachtig door om vertrouwd te raken met
de speciale kenmerken en functies van de luchtreiniger. Bewaar de
gebruikshandleing op een veilige plaats voor toekomstig gebruik.

3
English
Key Features
•High airflow rate: 180m3per hour.
•Very low noise:
oMin. 25dB.
oMax. 56dB
•Fashion statement: elegant and cosy, creating a favourable environment
for your bedroom and office.
•Effective and cleaner: excellent air flow rate and HEPA filter make your
room free from dust and odour.
•Energy-efficient and sage: Brushless DC motor, low-voltage DC, Max
power consumption < 22W
Caution
•Use only the original power adapter; in case the adapter or wire is
damaged, please get in touch with the Smartzo customer care at
•Do not touch the electrical plug with wet hands.
•Disconnect the power supply before replacing the filter or if the product
is not used for an extended period.
•Ensure the power supply is as per the voltage indicated on the adapter,
i.e. 220V/50Hz.
•Do not put any object inside the air purifier either from the inlet or
outlet.
•Do not block the inlet or the outlet of the air purifier.
•Do not attempt to repair or dismantle the air purifier; this needs to be
done only by authorized service personnel.
•Keep the air purifier away from water, heat and fire.
•Do not run the air purifier without the filter. The suction of dust may
cause problems in the equipment and its components.

4
Components
Control panel
Air outlet
Air inlet (360°)
Air quality indicator light
PM2.5 Sensor cover
Power switch
Power input

5
Rotate to open
Components
HEPA Filter
UV Lamp
Getting started
1. Turn upside down the equipment after unpacking it.
2. Rotate the base cover to take out the filter by the guide arrow.
3. Replace the filter after removing the packing. Take care to rotate the
base cover in the reverse direction described in step 2.
4. Attach the power adapter to the power input.
5. Keep the air purifier on a dry, stable and firm surface in a straight
position.
6. Insert the power adapter of the air purifier into the main power supply.
7. Press the [POWER] button. The air purifier turns on now.

6
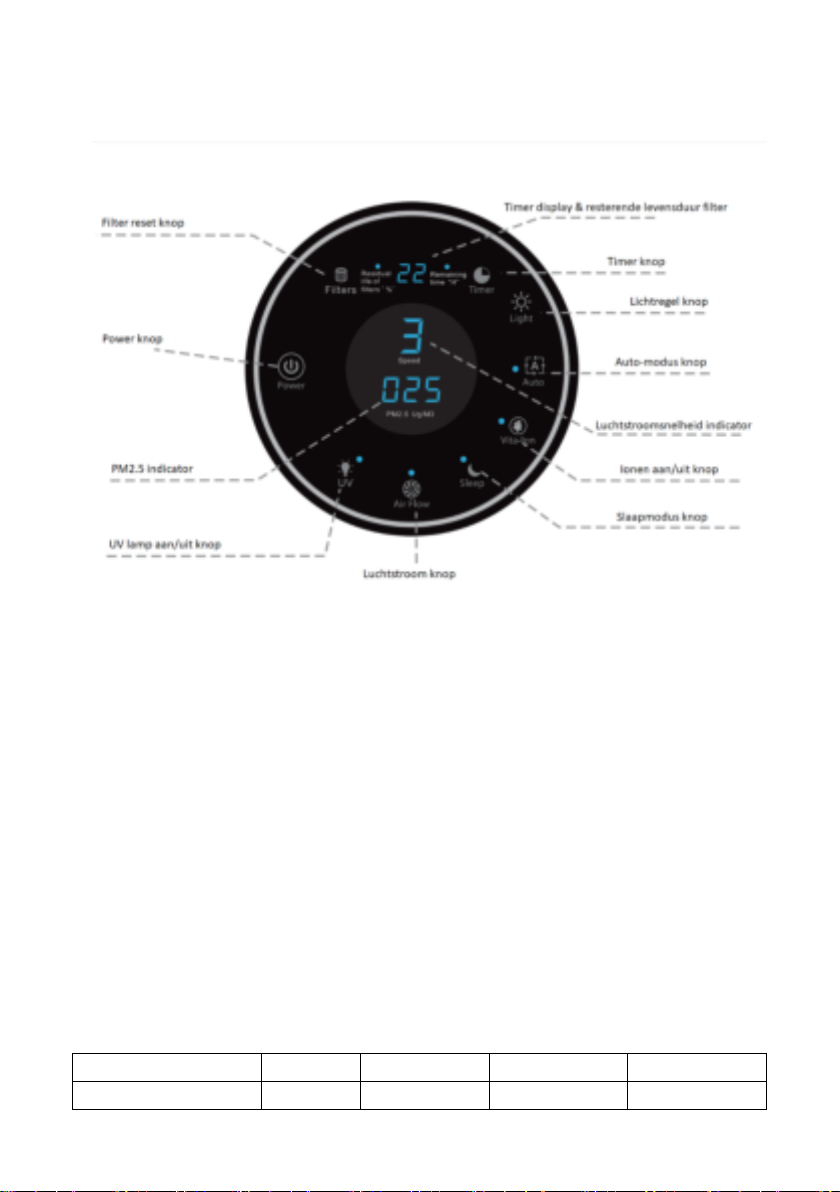
Control Panel
How to use
Start:
After the main power is switched on, press the [POWER] button. The air
quality indicator lamp will light up. It will run in AUTO mode.
Auto mode:
Press the [AUTO] button when the air purifier is in another mode to set the
air purifier in the auto mode.
The auto indicator will glow in the auto mode, and the air purifier
automatically adjusts the airflow depending on the indoor air quality. The air
quality indicator lamp will glow to the corresponding level of air quality.
Colour of the Ring
Blue
Amber
Purple
Red
Air quality
Good
Moderate
Polluted
Bad

7
Sleep mode:
Press the [SLEEP] button after the start or in the other mode, and it will go
into sleep mode. The sleep indicator will light in the sleep mode, and the air
purifier will run at speed 1 or 2.
Manual mode:
Press the [AIR FLOW] button after the start or in the other mode, and it will
go into the manual mode. The corresponding speed indicator will light in the
manual mode, and the air purifier will run at the selected speed. You can
change the speed by pressing the airflow selector button.
Timer function:
Press the [TIMER] button after the start or in the other mode, and it will go
into the timer mode.
In the timer mode, it is possible to set the specific time between 0.5-24hrs to
switch off the air purifier automatically. The set time will be indicated on
display.
Light control function:
Press the [LIGHT] button to switch ON/OFF the air quality light and airflow
indicator. This function can be used during the night when you do not want
any light to disturb your sleep.
Ions function:
Press the [IONS] button after startup or in other modes. The indicator will
light while the anion generator releases anions.
Press the [IONS] button again to stop releasing anions. Also, the light turns
off.
UV Lamp function:
Press the [UV] button after startup or while in other modes to turn the UV
LED light on. Press the [UV] button again to stop the function and turn the UV
LED light off.

8
Stop function:
If you want to switch off the air purifier completely, press the [Power]
button, the air purifier will switch off, and all lights will be off.
PM2.5 Indicator function:
After starting up, the PM2.5 indication will flow twinkle. Thirty (30) seconds
later, the air purifier will show the detected value of PM2.5 by the sensor.
Notice: This function is for home use and is not used as a professional
instrument.
Filter reset button function:
Press this button when starting up, the button lamp light and display will
show the residual life of the filter in percentages (“%”). After three seconds,
it will the filter life percentage will disappear.
When the filter needs to be replaced, the light at the top of the button lights
up. After the filter is replaced, please press this button for 5 seconds to reset
it.
Maintenance
Before attempting to perform any maintenance on the air purifier,
disconnect the power adapter.
Filter
Suggested time of changing the filter: about once a year.
•It depends on the location the air purifier is placed. For example, the
filter life is shortened in contaminated zones or smoking areas, etc.
•Change the filter if the purification effect is not good.
Cleanup routines: biweekly
•Use a soft brush or dry cotton cloth to clean the filter surface only.
•Do not use water to wash the filter.
•Do not force press or pull because the filter can be broken or deformed
easily. Change the filter before using, if it is damaged.

9
Sensor Cleaning
Notice
1. Keep the surface of the sensor clean, or sensitivity is affected and could
even fail to work.
2. Recommended cleaning cycle is less than 1 month for regularly used.
3. Clean the sensor with a cotton swab, as shown in the picture below.
Do not use detergent or any liquid in the cleaning process.
Cylinder inner surface cleaning
External surface
Use a soft dry fabric to wipe the surface, inlets and outlets.
•Do not use any chemical cleaning products.
During long unuse
•Unplug the unit from the power socket.
•Clean the surface and filter.
•Store at a dry and cool place and cover it with a plastic bag.

10
Trouble Shooting
Problem
Reason & Solution
Smell
•The filter is too dirty because it has not been
replaced for a long time —Replace the filter.
•Using the air purifier in moist conditions or water
entered in the filter —Replace the filter.
•Using an unclean filter for a long time or wholly
choked filter —Clean the filter; replace the filter if
the problem is not resolved.
•Burning smell —Stop the air purifier immediately
and cut off the power; contact Smartzo to repair it.
No Air Flow
•Air purifier being operated in sleep mode —Change
the mode.
•The air purifier is malfunctioning —Check the power
supply; if the problem exists, contact Smartzo.
Ineffectiveness
•The filter is choked, and no longer is effective —
Replace the filter.
•Being used at inappropriate places, such as oversized
places —Use the air purifier at smaller places.
Specifications
Model
KJ180F-E02
Adapter Power Supply
Input –220V AC / Output –DC 24V
Unit Power Supply
24V DC, 1A
CADR
180m3/h
Noise level
Max: 56dBa Min: <25dBa
Dimension in mm
220x220x338
Net weight
1.8KG

11
Nederlands
Belangrijkste kenmerken:
•Hoog luchtdebiet: 180m3per uur.
•Zeer laag geluidsniveau:
oMin. 25dB.
oMax. 56dB
•Elegant en gezellig, een gunstige omgeving voor uw slaapkamer en
kantoor.
•Effectief en schoner: de uitstekende luchtstroom en HEPA-filter maken
uw kamer stof- en geurvrij.
•Energiezuinig en slim: borstelloze gelijkstroommotor,
laagspanningsgelijkstroom, max. stroomverbruik < 22W
Waarschuwing
•Gebruik alleen de originele voedingsadapter; neem bij beschadiging van
de adapter of draad contact op met de Smartzo klantenservice via
•Raak de stekker niet aan met natte handen.
•Koppel de voeding los voordat u het filter vervangt of als het product
gedurende langere tijd niet wordt gebruikt.
•Zorg ervoor dat de voeding overeenkomt met de spanning die op de
adapter staat aangegeven, d.w.z. 220V/50Hz.
•Steek geen voorwerpen in de luchtreiniger, noch via de inlaat of uitlaat.
•Blokkeer de inlaat of uitlaat van de luchtreiniger niet.
•Probeer de luchtreiniger niet te repareren of te demonteren; dit mag
alleen worden gedaan door bevoegd onderhoudspersoneel.
•Houd de luchtreiniger uit de buurt van water, extreme hitte en vuur.
•Gebruik de luchtreiniger niet zonder filter. Het aanzuigen van stof zonder
filter kan problemen veroorzaken in de apparatuur en zijn componenten.

12
Componenten
Controlepaneel
Luchtuitlaat
Luchtinlaat (360°)
Indicatielampje luchtkwaliteit
PM2.5 sensorafdekking
Aan/uit-schakelaar
Voedingsingang

13
Draai om te openen
Componenten
HEPA filter
UV lamp
Opstartinstructies
1. Draai het apparaat ondersteboven nadat u het hebt uitgepakt.
2. Draai de onderplaat om het filter te verwijderen (zie de pijlen).
3. Vervang het filter na het verwijderen van de verpakking. Zorg ervoor dat
u de onderplaat in de omgekeerde richting draait zoals beschreven in
stap 2.
4. Sluit de voedingsadapter aan op de voedingsingang.
5. Plaats de luchtreiniger op een droge, stabiele en stevige ondergrond in
een rechte positie.
6. Steek de voedingsadapter van de luchtreiniger in het stopcontact.
7. Druk op de [POWER]-knop. De luchtreiniger gaat nu aan.
14
Controlepaneel
Hoe te gebruiken
Begin:
Nadat de stroom is ingeschakeld, drukt u op de [POWER]-knop. Het
indicatielampje voor de luchtkwaliteit gaat branden. De luchtreiniger start in
de automatische modus.
Automatische modus:
Druk op de [AUTO]-knop als de luchtreiniger in een andere modus staat om
de luchtreiniger in de automatische modus te zetten.
De auto-indicator zal oplichten in de automatische modus, en de
luchtreiniger past automatisch de luchtstroom aan, afhankelijk van de
kwaliteit van de binnenlucht. Het indicatielampje voor de luchtkwaliteit gaat
brand in de overeenkomstige niveau van luchtkwaliteit.
Kleur van de ring
Blauw
Amber
Paars
Rood
Luchtkwaliteit
Goed
Matig
Vervuild
Slecht

15
Slaapstand:
Druk na de start of in de andere modus op de [SLEEP]-knop en hij gaat in de
slaapmodus. De slaapindicator licht op in de slaapmodus en de luchtreiniger
werkt op snelheid 1 of 2.
Handmatige modus:
Druk na de start of in de andere modus op de [AIR FLOW]-knop en hij gaat
naar de handmatige modus. De bijbehorende snelheidsindicator licht op in de
handmatige modus en de luchtreiniger werkt op de geselecteerde snelheid. U
kunt de snelheid wijzigen door opnieuw op de luchtstroomkeuzeknop te
drukken.
Timerfunctie:
Druk na de start of in de andere modus op de [TIMER]-knop en hij gaat naar
de timermodus.
In de timermodus is het mogelijk om de specifieke tijd in te stellen tussen
0,5-24 uur om de luchtreiniger automatisch uit te schakelen. De ingestelde
tijd wordt op het display weergegeven.
Lichtregelfunctie:
Druk op de [LIGHT]-knop om het luchtkwaliteitslampje en de
luchtstroomindicator AAN/UIT te zetten. Deze functie kan 's nachts worden
gebruikt wanneer u niet wilt dat licht uw slaap verstoort.
Ionen functie:
Druk op de [IONS]-knop na het opstarten of in een andere modus. De
indicator licht op terwijl de aniongenerator anionen afgeeft.
Druk nogmaals op de [IONS]-knop om te stoppen met het vrijgeven van
anionen. Ook gaat het licht van de knop uit.
UV-lamp functie:
Druk na het opstarten of in een andere modus op de [UV]-knop om de UV-
LED-lamp in te schakelen. Druk nogmaals op de [UV]-knop om de functie te
stoppen en de UV-LED-lamp uit te schakelen.

16
Stopfunctie:
Als u de luchtreiniger volledig wilt uitschakelen, drukt u op de [Power]-knop,
de luchtreiniger schakelt uit en alle lampjes gaan uit.
PM2.5 Indicatorfunctie:
Na het opstarten zal de PM2.5 indicatie branden. Dertig (30) seconden later
toont de luchtreiniger de door de sensor gedetecteerde PM2,5-waarde.
Opmerking: deze functie is voor thuisgebruik en wordt niet als professioneel
instrument gebruikt.
Functie filter resetknop:
Druk tijdens het opstarten op deze knop, het knoplampje gaat branden en
het display toont de resterende levensduur van het filter in procenten (“%”).
Na drie seconden zal het percentage filterlevensduur verdwijnen.
Wanneer het filter vervangen moet worden, gaat het lampje bovenaan de
knop branden. Nadat het filter is vervangen, drukt u 5 seconden op deze
knop om het te resetten.
Onderhoud
Voordat u onderhoud aan de luchtreiniger probeert uit te voeren, moet u de
voedingsadapter loskoppelen.
Filter
Voorgestelde tijd voor het vervangen van het filter: ongeveer een 1x per jaar.
•Het hangt af van de locatie van de luchtreiniger. Zo wordt de levensduur
van het filter verkort in vervuilde zones of rookruimtes, enz.
•Vervang het filter als het zuiveringseffect niet goed is.
•Onderhoudsfrequentie: 1x per twee weken.
•Gebruik alleen een zachte borstel of een droge katoenen doek om het
filteroppervlak te reinigen.
•Gebruik geen water om het filter te wassen.
•Forceer of trek niet omdat het filter gemakkelijk kan breken of
vervormen. Vervang het filter voor gebruik, als het beschadigd is.

17
Sensorreiniging
Kennisgeving
1. Houd het oppervlak van de sensor schoon, anders wordt de gevoeligheid
aangetast en kan het zelfs niet werken.
2. Aanbevolen reinigingscyclus is minder dan 1 maand bij regelmatig
gebruik.
3. Reinig de sensor met een wattenstaafje, zoals weergegeven in de
onderstaande afbeelding.
Gebruik geen wasmiddel of een andere vloeistof in het reinigingsproces.
Reiniging van het oppervlak van de cilinder
Extern oppervlak
Gebruik een zachte, droge doek om het oppervlak, de in- en uitlaten schoon
te vegen.
Gebruik geen chemische schoonmaakmiddelen.
Tijdens lange ongebruik
•Trek de stekker uit het stopcontact.
•Reinig het oppervlak en de filter.
•Bewaar de luchtreiniger op een droge en koele plek afgedekt met een
plastic zak.

18
Probleemoplossingen
Probleem
Reden & Oplossing
Geur
•Het filter is te vuil omdat het lange tijd niet is
vervangen —Vervang het filter.
•Gebruik van de luchtreiniger in vochtige
omstandigheden of water dat in het filter is
binnengedrongen —Vervang het filter.
•Langdurig gebruik van een vieze filter of een volledig
verstopte filter —Reinig het filter; vervang het filter
als het probleem niet is opgelost.
•Brandlucht —Stop de luchtreiniger onmiddellijk en
ontkoppel de stroom; neem contact op met Smartzo
om het te repareren.
Geen
luchtstroom
•Luchtreiniger die in de slaapstand staat —Wijzig de
stand.
•De luchtreiniger werkt niet goed —Controleer de
voeding; als het probleem aanhoud, neem dan
contact op met Smartzo.
Ineffectiviteit
•Het filter is verstopt en werkt niet meer —Vervang
het filter.
•Gebruik op ongepaste plaatsen, zoals grote plaatsen
—Gebruik de luchtreiniger op kleinere plaatsen.
Specificaties
Model
KJ180F-E02
Voedingsadapter
In –220V AC / Uit –DC 24V
Stroomvoeding
24V DC, 1A
CADR
180m3/h
Geluidsniveau
Max: 56dBa Min: <25dBa
Afmetingen in mm
220x220x338
Netto gewicht
1.8KG

19
Table of contents
Languages:
Popular Air Cleaner manuals by other brands


Fanmaster
Fanmaster Masterfilter ASP-500-MF2 instruction manual

HENGST FILTRATION
HENGST FILTRATION Blue.care+ Original operating manual

RGF
RGF 17879 Assembly instructions

Dyson
Dyson Pure Cool operating instructions

Heaven Fresh
Heaven Fresh HF 310A instruction manual

Lennox
Lennox EAC-14-2 installation instructions