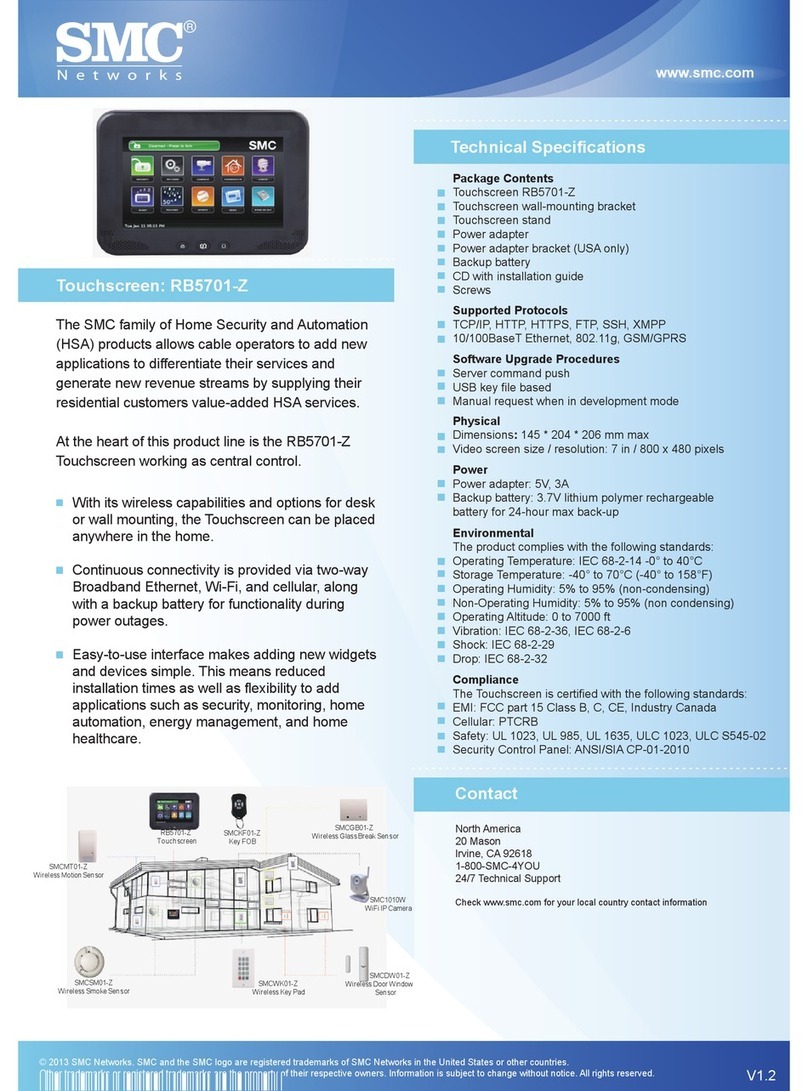
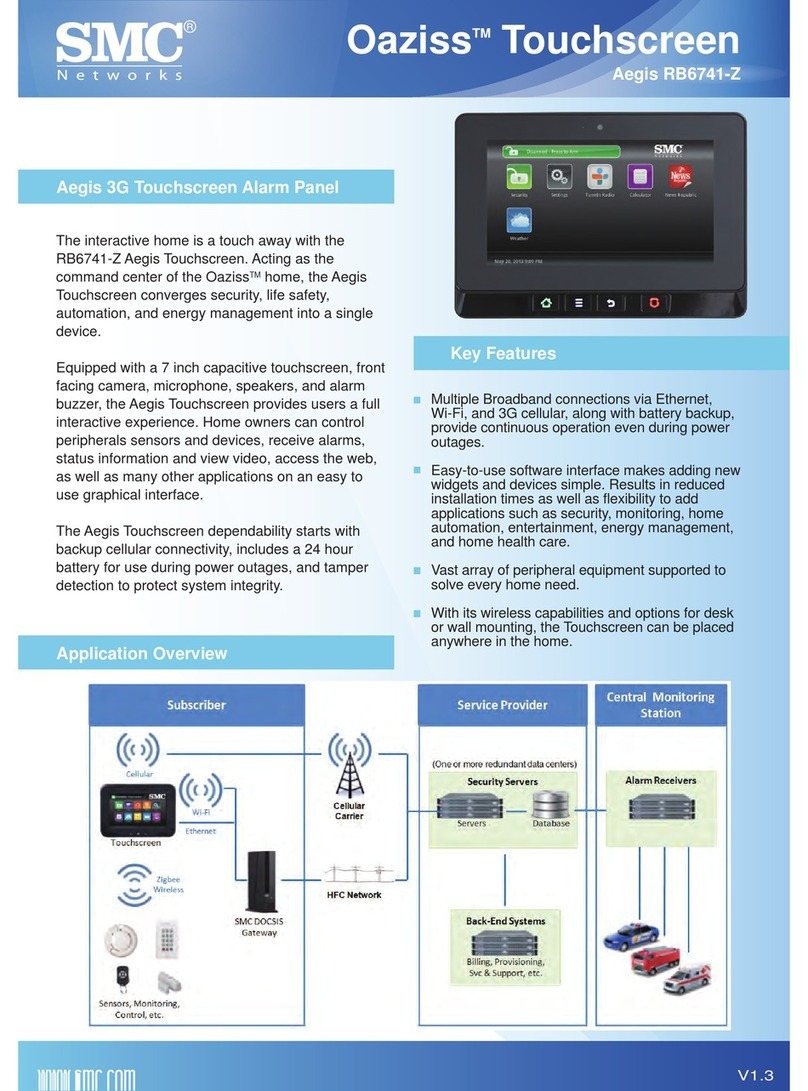
SMC Networks Oaziss Aegis RB6741-Z User manual

Installation Manual
RB6741-Z Touchscreen Security System
FastFind Links
Introduction
Installing the Security System
Maintaining the Touchscreen
Technician Operations
Troubleshooting

SMC Networks
20 Mason
Irvine, CA. 92618
U.S.A.
Copyright © 2013 SMC Networks
All Rights Reserved
Information furnished by SMC Networks, Inc. (SMC) is believed to be accurate and reliable. However,
no responsibility is assumed by SMC for its use, or for any infringements of patents or other rights of
third parties which may result from its use. No license is granted by implication or otherwise under
any patent or patent rights of SMC. SMC reserves the right to change specifications at any time
without notice
No part of this publication may be reproduced or transmitted in any form or by any means, electronic
or mechanical, including photocopying and recording, or stored in a database or retrieval system for
any purpose without the express written permission of SMC.
Microsoft and Windows are registered trademarks of Microsoft Corporation. Apple and Macintosh are
registered trademarks of Apple, Inc. All other brands, product names, trademarks, or service marks
are property of their respective owners.
This product (Model: RB6741-Z) includes software code developed by third parties, including software
code subject to the GNU General Public License (“GPL”) or GNU Lesser General Public License
(LGPL”). As applicable, the terms of the GPL and LGPL, and information on obtaining access to the
GPL code and LGPL used in this product, are available to you at http://gpl.smc.com/. The GPL code
and LGPL code used in this product is distributed WITHOUT ANY WARRANTY and is subject to the
copyrights of one or more authors. For details, see the GPL Code and LGPL Code for this product
and the terms of the GPL and LGPL.
RB6741-Z Touchscreen Security System Installation Manual
Document Number: IM.752.9733NA, Issued: February 6, 2013

iii
RB6741-Z Touchscreen Security System Installation Manual
Contents
Preface.................................................................................................................... vii
Document Organization.......................................................................................... viii
Changes to this Revision........................................................................................ viii
Document Conventions ............................................................................................ix
Safety and Warnings ................................................................................................ix
Typographic Conventions.........................................................................................ix
Safety Requirements................................................................................................ix
Risk of Explosion............................................................................................x
Risk of Equipment Damage............................................................................x
Additional Safety Guidelines ..........................................................................x
Compliance...............................................................................................................xi
1 Introduction......................................................................................................... 14
Overview .................................................................................................................15
Recommended Tools for Installation........................................................................16
2 Installing the Security System........................................................................... 17
Setting Up the Router or Gateway...........................................................................18
Installing the Touchscreen.......................................................................................18
Confirming the Touchscreen Configuration Information .....................................21
Activating the System ........................................................................................22
Configuring for Wireless Touchscreen Connectivity...........................................24
Configuring for Cabled Touch Screen-to-Router Connectivity............................26
Adding Sensors to the Security System...................................................................33
Adding Takeover Boards to the Security System.....................................................38
Adding Cameras to the Security System..................................................................41
Adding Lighting Devices to the Security System......................................................48
Adding a Thermostat to the Security System...........................................................50
Adding Key Fobs to the Security System.................................................................52
Adding Key Pads to the Security System.................................................................54
Adding Sirens to the Security System......................................................................57
Testing the Alarm Functionality of the Security System ...........................................60
Setting and Validating the Security Information........................................................63
Mounting the Sensors..............................................................................................66
Configuring the Touchscreen...................................................................................67
Activating the Subscriber Portal...............................................................................70

Contents
iv
RB6741-Z Touchscreen Security System Installation Manual
3 Maintaining the Touchscreen............................................................................ 71
Configuring Screen Brightness and Dimming...........................................................72
Placing the Touchscreen in Night Mode.............................................................72
Configuring the Screen Brightness Settings.......................................................72
Configuring Automatic Screen Dimming.............................................................72
Configuring Night Mode Dimming ......................................................................73
Configuring the Screensaver ...................................................................................75
Configuring Tones and Volume Levels ....................................................................76
Cleaning the Touchscreen Screen...........................................................................77
Rebooting a Touchscreen........................................................................................78
Viewing Touchscreen Technical Specifications........................................................78
Replacement Parts..................................................................................................79
Replacing the Battery ..............................................................................................79
4 Technician Operations....................................................................................... 82
Getting Started ........................................................................................................83
Testing Your Alarms After Activation........................................................................85
Configuring Entry/Exit Delay Periods.......................................................................88
Configuring the Alarm Transmission Delay..............................................................90
Configuring the Swinger Shutdown Feature.............................................................91
Resetting the Touchscreen to Factory Defaults .......................................................92
Checking for New Firmware Updates for the Touchscreen......................................93
Installing a Firmware Upgrade from a USB Drive.....................................................94
Enabling Fire Alarm Verification...............................................................................95
Managing Sensors and Zones.................................................................................96
Modifying Details for a Sensor or Zone..............................................................97
Adding a Sensor ................................................................................................98
Deleting a Sensor ............................................................................................100
Viewing Sensor Details and Diagnostic Information.........................................101
Resetting Sensors to Factory Default Settings.......................................................102
Force-Defaulting a Door/Window Sensor.........................................................102
Force-Defaulting a Glass Break Detector.........................................................104
Force-Defaulting a Motion Detector .................................................................105
Force-Defaulting a Smoke Detector.................................................................106
Managing Cross-Zone Associations ......................................................................107
Creating a Cross-Zone Association..................................................................107
Deleting a Cross-Zone Association..................................................................109
Managing Sirens....................................................................................................110
Modifying Sirens ..............................................................................................110
Adding Sirens ..................................................................................................111
Removing Sirens..............................................................................................113
Managing Cameras ...............................................................................................114

Contents
v
RB6741-Z Touchscreen Security System Installation Manual
Adding a Camera to the Security System.........................................................115
Modifying the Details of a Camera...................................................................119
Replacing Cameras .........................................................................................120
Deleting a Camera...........................................................................................121
Resetting a Camera to the Factory Default ......................................................121
Deleting a Camera...........................................................................................122
Managing Thermostats..........................................................................................123
Adding a Thermostat to the Security System ...................................................124
Modifying the Details of a Thermostat..............................................................127
Deleting a Thermostat......................................................................................128
Managing Lights....................................................................................................130
Adding a Lighting Device to the Security System.............................................131
Modifying the Details of a Lighting Device........................................................133
Deleting a Lighting Device ...............................................................................135
Managing Key Fobs...............................................................................................136
Adding a Key Fob ............................................................................................136
Changing the Name of a Key Fob....................................................................138
Resetting a Key Fob to Factory Default Settings..............................................141
Deleting a Key Fob ..........................................................................................141
Managing Key Pads...............................................................................................143
Adding a Key Pad............................................................................................143
Changing the Name of a Key Pad....................................................................146
Resetting a Key Pad to Factory Default Settings..............................................147
Deleting a Key Pad..........................................................................................147
Managing Takeover Boards...................................................................................149
Adding a Takeover Board ................................................................................149
Deleting a Takeover Board ..............................................................................153
Managing Wi-Fi Repeaters....................................................................................155
Deleting a Security Wi-Fi Repeater..................................................................156
Replacing a Touchscreen......................................................................................157
For Wireless Connectivity......................................................................................160
For Wired Connectivity ..........................................................................................161
Swapping the Security Network Router..................................................................164
5 Troubleshooting ............................................................................................... 168
General Troubleshooting .......................................................................................169
Camera Troubleshooting .......................................................................................169
Firmware Troubleshooting.....................................................................................170
Appendix A - General Concepts of the Security System ................................. 171
Arming and Exiting a Premises..............................................................................171
Disarming and Entering a Premises.......................................................................171

Contents
vi
RB6741-Z Touchscreen Security System Installation Manual
The Duress Code...................................................................................................172
Appendix B - Touchscreen Placement Options................................................ 173
Positioning the Touchscreen..................................................................................173
Mounting the Touchscreen on the Wall Mount.......................................................177
Appendix C - Sensor Placement Guidelines ..................................................... 180
Door/Window Sensors and Glass Break Detectors................................................180
Glass Break Detectors...........................................................................................180
Motion Detectors ...................................................................................................180
Smoke Detector Installation Recommendations.....................................................181
Camera Installation Recommendations .................................................................182
Appendix D - Key Pad Installation...................................................................... 183
Checking System Status........................................................................................183
Arming the System ................................................................................................184
Arm Away Mode...............................................................................................184
Arm Stay..........................................................................................................184
Disarming the System............................................................................................184
Sending an Emergency Police Alarm.....................................................................184
Mounting the Key Pad ...........................................................................................185
Changing Key Pad Batteries..................................................................................186
Resetting the Key Pad to Factory Default ..............................................................186
Appendix E - Using the Key Fob ........................................................................ 187
Checking System Status........................................................................................187
Arming the System ................................................................................................188
Arm Away Mode...............................................................................................188
Arm Stay..........................................................................................................188
Disarming the System............................................................................................188
Sending an Emergency Police Alarm.....................................................................188
Changing the Batteries in the Key Fob...................................................................189
Resetting the Key Fob to Factory Default ..............................................................189
Appendix F - Installer Quick Reference............................................................. 191
Appendix G - Emergency and Evacuation Plans.............................................. 193
System Limitations.................................................................................................193
Index..................................................................................................................... 195

vii
RB6741-Z Touchscreen Security System Installation Manual
Preface
Congratulations on your purchase of the RB6741-Z Security, Monitoring, and Automation
system. This installation manual contains all the information you need to install and
configure the security system.
By reading this document, you learn how to:
Install the security system
Arm and disarm your security system
View system status and arm/disarm the system
Manage passcodes
Manage security zones
Manage emergency dispatch contact information
Manage alerts
Manage contacts
View history logs
View account information

Preface
viii
RB6741-Z Touchscreen Security System Installation Manual
Document Organization
This document consists of the following chapters and appendixes.
Chapter 1-provides an overview of the security system and the tools recommended to
install it.
Chapter 2 -describes how to install the security system.
Chapter 3 –describes how to maintain the Touchscreen.
Chapter 4 - describes technician operations for managing the physical devices in the
home.
Chapter 5 - contains troubleshooting information.
Appendix A - explains general concepts about the security system.
Appendix B - describes Touchscreen placement options.
Appendix C - describes sensor placement guidelines.
Appendix D - describes key pad installation instructions.
Appendix E - describes key fob installation instructions.
Appendix F - contains installer quick-reference information.
Appendix G - contains information about emergency and evacuation plans.
Changes to this Revision
Version 1.0 Initial Release

Preface
ix
RB6741-Z Touchscreen Security System Installation Manual
Document Conventions
This document uses the following conventions to draw your attention to certain information.
Safety and Warnings
This document uses the following symbols to draw your attention to certain information.
Symbol
Meaning
Description
Note
Notes emphasize or supplement important points of the main text.
Tip
Tips provide helpful information, guidelines, or suggestions for performing tasks more
effectively.
Warning
Warnings indicate that failure to take a specified action could result in damage to the
device.
Electric Shock Hazard
This symbol warns users of electric shock hazard. Failure to take appropriate
precautions or touching hazardous areas of the equipment could result in injury or
death.
Typographic Conventions
This document also uses the following typographic conventions.
Convention
Description
Bold
Indicates text on a window, other than the window title, including menus, menu options, buttons, fields, and labels.
Italic
Indicates a variable, which is a placeholder for actual text provided by the user or system. Angled brackets (< >)
are also used to indicate variables.
screen/code
Indicates text that is displayed on screen or entered by the user.
< > angled
brackets
Indicates a variable, which is a placeholder for actual text provided by the user or system. Italic font is also used to
indicate variables.
[ ] square
brackets
Indicates optional values.
{ } braces
Indicates required or expected values.
| vertical bar
Indicates that you have a choice between two or more options or arguments.
Safety Requirements
Observe the following safety requirements.

Preface
x
RB6741-Z Touchscreen Security System Installation Manual
Risk of Explosion
Failure to follow these requirements can cause the product to fail and cause possible risk of
fire or battery explosion.
WARNING:
Do not replace the battery with an incorrect type.
Do not expose the battery to temperatures that exceed 75C.
Do not incinerate the battery.
Do not disassemble the battery
Do not short circuit battery terminals
Risk of Equipment Damage
WARNING: Improperly inserting the battery into the Touchscreen can damage the
battery connector in the device. To avoid damage, follow the instructions in this
document carefully.
Additional Safety Guidelines
In addition to the safety guidelines above, observe the following additional safety guidelines:
Keep the battery away from children.
Follow all appropriate local ordinances when disposing of or recycling used batteries.
To avoid the risk of electrocution, keep the product away from water, including wet
basements, bathtubs, sinks, and swimming pools.
Never expose the Touchscreen to spray cleaners and aerosols.
Clean the product using only a lint-free cloth. Never use solvents or cleaning agents.
Keep the equipment at least 6 feet (1.9 m) from a flame or ignition source, such as heat
registers, space heaters, and fireplaces.
Use only the supplied power supply and power cord to power the equipment.
Install the equipment near an easily accessible power outlet. Avoid power outlets
controlled by a wall switch.
Additional surge protection may be required when using the equipment in areas prone to
high surge spikes, poor grounding, and lightning strikes.
If you use an Ethernet cable to connect the Touchscreen to the security router, ensure
the router has sufficient surge protection.
Ensure proper ventilation. Position the Touchscreen so that the air ventilation holes on
the unit are not blocked.

Preface
xi
RB6741-Z Touchscreen Security System Installation Manual
Compliance
FCC Notice
FCC ID: JI5-RB6741
FCC IDs are visible on labels located on battery door and inside battery compartment
Federal Communication Commission Interference Statement
This equipment has been tested and found to comply with the limits for a Class B digital
device, pursuant to Part 15 of the FCC Rules. These limits are designed to provide
reasonable protection against harmful interference in a residential installation. This
equipment generates, uses and can radiate radio frequency energy and, if not installed and
used in accordance with the instructions, may cause harmful interference to radio
communications. However, there is no guarantee that interference will not occur in a
particular installation. If this equipment does cause harmful interference to radio or television
reception, which can be determined by turning the equipment off and on, the user is
encouraged to try to correct the interference by one of the following measures:
Reorient or relocate the receiving antenna.
Increase the separation between the equipment and receiver.
Connect the equipment into an outlet on a circuit different from that to which the
receiver is connected.
Consult the dealer or an experienced radio/TV technician for help.
FCC Caution
Changes or modifications not expressly approved by the party responsible for compliance
could void the user's authority to operate the equipment.
This device complies with FCC Rules Part 15. Operation is subject to the following two
conditions: (1) This device may not cause harmful interference, and (2) this device must
accept any interference, including interference that may cause undesired operation of the
device
This device and its antenna(s) must not be co-located or operation in conjunction with any
other antenna or transmitter.
IMPORTANT NOTE:
FCC Radiation Exposure Statement:
This equipment complies with FCC radiation exposure limits set forth for an uncontrolled
environment. This equipment should be installed and operated with minimum distance 20cm
between the radiator & your body.

Preface
xii
RB6741-Z Touchscreen Security System Installation Manual
IC Notice / Avis IC
IC: 4137A-RB6741
Industry Canada Statement
This Class B digital apparatus complies with Canadian ICES-003
This device complies with Industry Canada license-exempt RSS standard(s). Operation is
subject to the following two conditions: (1) this device may not cause interference, and (2)
this device must accept any interference, including interference that may cause undesired
operation of the device.
This device and its antenna(s) must not be co-located or operation in conjunction with any
other antenna or transmitter.
The term "IC" before the equipment certification number only signifies that the Industry
Canada technical specifications were met.
Déclaration d'Industrie Canada
Cet appareil numérique de la classe B est conforme à la norme NMB-003 du Canada.
Le présent appareil est conforme aux CNR d'Industrie Canada applicables aux appareils
radio exempts de licence. L'exploitation est autorisée aux deux conditions suivantes : (1)
l'appareil ne doit pas produire de brouillage, et (2) l'utilisateur de l'appareil doit accepter tout
brouillage radioélectrique subi, même si le brouillage est susceptible d'en compromettre le
fonctionnement.
Cet appareil et son antenne (s) ne doit pas être co-localisés ou fonctionnement en
association avec une autre antenne ou transmetteur.
Le terme « IC » avant le numéro d'homologation ne signifie seulement que les normes
d'Industrie Canada ont été respectées.
IMPORTANT NOTE:
IC Radiation Exposure Statement:
This devise is only authorized for use in a mobile or fixed application. At least 20cm (8
inches) of separation distance between the touchscreen and the user’s body must be
maintained at all times to ensure compliance with the Industry Canada RF Exposure
Requirements.
Informations d'Exposition aux RF
Cet appareil est uniquement pour une utilisation dans une application mobile ou fixe. Au
moins 20 centimètres de distance de séparation entre l’écran tactile et le corps de
l’utilisateur doit être maintenue en tout temps pour assurer la conformité avec les exigences
de la Industrie Canada, l’ exposition.

Preface
xiii
RB6741-Z Touchscreen Security System Installation Manual
Device Purpose
Fire/Alarm Central Panel
UL and ULC Notices
This device complies with UL 985, UL1023, UL1635, ULC S545, ULC C1023.
Limitations of Security Products
Security products and alarm systems do not offer guaranteed protection against burglary,
fire, or other emergencies. They may fail to warn for diverse reasons, including (but not
limited to): power failure, dead batteries, improper installation, coverage, coverage areas
overlooked during installation, defeat by technically sophisticated intruders, component
failure, or inadequate maintenance. Alarm systems should be checked weekly to ensure that
all devices are working properly.
AN ALARM SYSTEM IS NOT A SUBSTITUTE FOR INSURANCE.
Conditions Resulting In False Alarms
Any installation of the RB6741-Z not in accordance to this manual may result in the
occurrence of false alarms.
Conditions Resulting In Impaired Operation
Any installation of the RB6741-Z not in accordance to the National Electric Code (NFPA70)
may result in improper operation as described in this manual.
Protective Features
The stand, RB6741-BT, included with the RB6741-Z Touchscreen protects against
unwanted tampering of the device. Only operate the RB6741-Z Touchscreen with the
protective stand attached.
US Version Only: Use the RB6741-Z power adapter with restraining bracket to secure the
plug in adapter to the receptacle. Only use the RB6741-Z with the power adapter and
restraining bracket properly installed.
See “Installing the Touchscreen” on page 18 for installation instructions.

14
RB6741-Z Touchscreen Security System Installation Manual
1Introduction
Before you install the RB6741-Z security system, become familiar with the components,
review the system requirements, and familiarize yourself with the installation steps.
The topics covered in this chapter are:
Overview (page 15)
Recommended Tools for Installation (page 16)

Introduction
15
RB6741-Z Touchscreen Security System Installation Manual
Overview
To set up the security system in a customer premises:
1. Complete a Home Security Survey (HSS) for the customer.
2. Review the Evacuation Plan with the customer. See Appendix G - Emergency and
Evacuation Plans.
3. Be sure the customer premise has access to the Internet.
4. Activate the Touchscreen (see “Installing the Security System” on page 17).
The Touchscreen can connect to the managed router/gateway either wirelessly or by
Ethernet cable. The Touchscreen communicates with sensors wirelessly. Optional cameras
communicate with the managed router/gateway either wirelessly or by Ethernet Cable. The
Touchscreen maintains communication with the network servers through the Internet or by
Cellular.
The security network router/gateway MUST be installed “in front” of all other home networks
relative to the Internet. Connect the customer’s home network to the Internet through the
security network route/gateway by Ethernet cable, as described on page 26. The customer
can install a retail router behind the security network router/gateway and access the Internet.
The customer can choose to expose his retail router to the Internet through the DMZ of the
security network router/gateway, as described in the RB6741-Z Touchscreen Security
System User Manual.

Introduction
16
RB6741-Z Touchscreen Security System Installation Manual
Recommended Tools for Installation
To complete your installation, you will need the tools in Table 1-1.
Table 1-1. Recommended Tools for Installation
Tools
Digital multi-meter
Double-sided sticky tape
Rubbing alcohol with container to dilute with water
Alternative double-sided sticky tape
Paper towels
Tape measure
Drop cloth for work area
Pocket level
Six-foot ladder
Multi-purpose scissors
Compressed air and soft-bristled
Flashlight
Assorted screwdrivers
Shoe Covers
Equipment for testing glass break sensor
Ethernet cable(s) of sufficient length
Aerosol smoke tester

17
RB6741-Z Touchscreen Security System Installation Manual
2Installing the Security System
This chapter describes the steps required to install the security system in the customer’s
home.
The topics covered in this chapter are:
Setting Up the Router or Gateway (page 18)
Installing the Touchscreen (page 18)
Adding Sensors to the Security System (page 33)
Adding Takeover Boards to the Security System (page 38)
Adding Cameras to the Security System (page 41)
Adding Lighting Devices to the Security System (page 48)
Adding a Thermostat to the Security System (page 50)
Adding Key Fobs to the Security System (page 52)
Adding Key Pads to the Security System (page 54)
Adding Sirens to the Security System (page 57)
Testing the Alarm Functionality of the Security System (page 60)
Setting and Validating the Security Information (page 63)
Mounting the Sensors (page 66)
Configuring the Touchscreen (page 67)
Activating the Subscriber Portal (page 70)

Installing the Security System
18
RB6741-Z Touchscreen Security System Installation Manual
Setting Up the Router or Gateway
1. Use the following procedure to set up a router or gateway at the customer premises. Install
the router or gateway using the manufacturer’s instructions.
2. Be sure the customer premise has access to the Internet.
3. Reset the home network router/gateway.
Note: Perform these steps if you are restarting the installation process after having
established the connection between the Touchscreen and the router.
Installing the Touchscreen
Note: The RB6741-Z is not intended to be used as a mobile device. The unit should be
mounted on a desk or wall for proper operation.
To install the Touchscreen:
1.
Remove the Touchscreen from its packaging.
2.
Detach the stand/wall mount by gently
pushing the stand/wall mound bracket into
the Touchscreen and then sliding the
stand/wall mount off in a vertical direction.
A P1 Phillips screwdriver can be used to
remove a screw for attaching the
stand/wall mount bracket to the
Touchscreen.

Installing the Security System
19
RB6741-Z Touchscreen Security System Installation Manual
3.
Detach the batter cover. A P1 Phillips
screwdriver can be used remove or add a
screw to the battery cover of the
Touchscreen.
The RB6741-Z comes with a battery for
power back up. Locate this Lithium
polymer battery in the packaging of the
Touchscreen.
4.
Align and connect the battery’s pins to the
battery connector so that the wire order is
(left-to-right) black, yellow, and red. Then
place the Touchscreen battery into the
carrier of the Touchscreen.
5.
Snap the battery cover back into place.
Add one screw.
6.
Connect the A/C adapter cable to the
round D/C input port on the back of the
Touchscreen.

Installing the Security System
20
RB6741-Z Touchscreen Security System Installation Manual
7.
Re-attach the wall-mount bracket/stand to the Touchscreen and fasten the screw back in.
8.
Position the Touchscreen near an un-switched wall outlet (not controlled by a light switch).
9.
If the installation plan requires a wired network connection, connect an Ethernet cable
between the LAN ports of the Touchscreen of the router/gateway. The Touchscreen LAN
port is located next to the D/C input port of the Touchscreen. (See step 6 above)
10.
Insert the A/C adapter into the bracket.
Table 2-1. A/C Power Supply Ratings
Rating
Value
Voltage
90-264 VAC (115V nominal)
Current
0.5A rms max
Power
10W typical, 16W max
Frequency
47-63 Hz
11.
Remove the center screw from the wall
outlet.
12.
Plug the Touchscreen’s A/C adapter into
the bottom plug of the wall outlet, and
replace the center screw through the
bracket hole.
The Home , Menu , Back , and Emergency LEDs are lit when the
Touchscreen has A/C power. After a few seconds, the Installation Welcome screen appears
on the Touchscreen.
Other manuals for Oaziss Aegis RB6741-Z
3
Table of contents
Other SMC Networks Security System manuals
Popular Security System manuals by other brands

ClearCube
ClearCube TEMPEST CD7724T-L2 Bundle Zero Client quick start guide

Nortek
Nortek 2GIG eSeries GC2e Installation and programming guide

Yale
Yale SDA16 installation instructions

AKO
AKO AKO-55624 quick guide

Chamberlain
Chamberlain WIRELESS ALERT CWV1000 user manual

Nortel
Nortel CallPilot NN44200-700 Troubleshooting

Safelincs
Safelincs UltraFire UBCO1D user manual

Risco
Risco ProSYS Plus Quick installer's guide

SECO-LARM
SECO-LARM Enforcer SS-075CQ manual

Hellmertz
Hellmertz Radiolink GSM-A2 quick start

Edwards
Edwards 2010-2-PAK-RM Registration Guide

Honeywell
Honeywell Gamewell-FCI E3 Series Installation & operation manual