Smith SPS8 Gas User manual

SPS8 Gas
Multi-Use Surface Preparator
User Manual
(954) 941-9744
www.SMITHMFG.com
MANUFACTURING
Cutters / Removers / Parts / Support
1-800-653-9311
www.SmithMfg.com
3KRQH)D[
1p1800 422 992
Wwww.allprep.com.au
E sales@allprep.com.au
A1/40 rivergate place, murarrie

SMITH Manufacturing 1-954-941-9744 www.SmithMfg.com
SPS8
VERSION 10/2016
Gas
SMITH Manufacturing 1-954-941-9744 www.SmithMfg.com
INTRODUCTION
2
Congratulations on purchasing
the SPS8™ Surface Preparator from
SMITH Mfg. Company.
Your machine will:
&OHDQVXUIDFHVLPSDFWHGE\JUHDVHRLO
SODVWLFVWDUVUHVLQVWLOHDGKHVLYHVLFHDQG
more
3ODQHRUPLOODVSKDOWDQGFRQFUHWHVXUIDFHV
5HPRYHKLJKVSRWVLQFXUEVDQGJXWWHUV
(OLPLQDWHWULSKD]DUGVRQFRQFUHWHVLGHZDONV
0LOODUHDVIRUUXPEOHVWULSV
&OHDQRXWFUDFNVDQGMRLQWV
&UHDWHDQWLVOLSSDWWHUQVLQZDONZD\VDQGEDUQV
3UHSDUHVXUIDFHVIRUQHZFRDWLQJDSSOLFDWLRQV
3HUPDQHQWO\UHPRYHDOOURDGDQGVXUIDFH
FRDWLQJVWRLQFOXGH
HSR[\XUHWKDQHWKHUPRSODVWLFSDLQW
JOXHEDFNHGWDSHVDQGPRUH
*URRYHLQOD\DVSKDOWIRUVWULSLQJ
BEFORE START-UP,
READ THIS..
3OHDVHUHDGDOORSHUDWLQJLQVWUXFWLRQVLQFOXGLQJ
WKHSURYLGHGHQJLQHPDQXDODQGEHFRPSOHWHO\
IDPLOLDUZLWK\RXUHTXLSPHQWEHIRUHRSHUDWLQJ
:KHQLQGRXEWSOHDVHFRQWDFW60,7+
0DQXIDFWXULQJ&XVWRPHU6HUYLFHIRURSHUDWLRQDO
GHWDLOV7KLV2ZQHU¶V0DQXDOZLOOJXLGH\RX
WKURXJKWKHUHPRYDOSURFHVVIURPVWDUWWR¿QLVK
DQGVKRZ\RXKRZWRFDUHIRU\RXUPDFKLQH
3DJH &RQWHQWV
2,QGH[,QWURGXFWLRQ
36DIHW\*XLGHOLQHV
4<RXU6366XUIDFH3UHSDUDWRU
50DFKLQH6WDUW8S
66XEVWUDWH5HPRYDO
76WRUDJH2UGHULQJDQG:DUUDQW\&ODLPV
7URXEOHVKRRWLQJ
90DLQWHQDQFH&KHFN/LVW
10 'UXP5HSODFHPHQW
11-13 %HOW5HSODFHPHQWDQG$OLJQPHQW
14-15 %HDULQJ5HSODFHPHQW
16-21 2SWLRQDO(TXLSPHQW
22-23 0DLQWHQDQFH/RJ
24 /LPLWHG(TXLSPHQW:DUUDQW\
25 :DUUDQW\$FWLYDWLRQ
INDEX
2p1800 422 992
Wwww.allprep.com.au
E sales@allprep.com.au
A1/40 rivergate place, murarrie

SMITH Manufacturing 1-954-941-9744 www.SmithMfg.com
SMITH Manufacturing 1-954-941-9744 www.SmithMfg.com
VERSION 10/2016
SPS8
Gas
3
UNCRATING EQUIPMENT
:KHQ\RXXQFUDWH\RXUHTXLSPHQWPDNHFHUWDLQ
WKDWWKHPDFKLQHKDVQRWEHHQGDPDJHGDQG
WKDWDOOIDVWHQHUVDQGJXDUGVDUHSURSHUO\
WLJKWHQHG
<RXUPDFKLQHPD\QRWKDYHEHHQVKLSSHG
DVVHPEOHGZLWKFXWWHUVDQGRWKHUDFFHVVRULHV
$VVHPEO\PD\EHUHTXLUHG
REMEMBER:2QO\DXWKRUL]HGH[SHULHQFHGDQG
SURSHUO\WUDLQHGSHUVRQQHOVKRXOGRSHUDWHWKLV
HTXLSPHQW2SHUDWLQJSHUVRQQHOVKRXOG
SUDFWLFHVDIHW\DWDOOWLPHVDQGZHDUSURWHFWLYH
JHDUJORYHVJRJJOHVVDIHW\YHVWVHDUSOXJV
VWHHOWRHVKRHVHWF
$OZD\VZHDUSURWHFWLYHHTXLSPHQWLQFOXGLQJ
HDUSURWHFWLRQDQGJRJJOHV
1HYHUZHDUEDJJ\RUORRVH¿WWLQJFORWKLQJWKDW
FDQEHFDXJKWRQFRQWUROVRUPRYLQJSDUWV
7KHVXUIDFHSUHSDUDWRUFDQHPLWÀ\LQJ
SDUWLFOHVDQGGHEULVGXULQJRSHUDWLRQ1HYHU
RSHUDWHWKHPDFKLQHQHDUE\VWDQGHUVDQLPDOV
RUFKLOGUHQ
&KHFNÀXLGOHYHOVDQGJHWDFTXDLQWHGZLWK
WKHFRQWUROVHQJLQHNLOOVZLWFKDQGRWKHUVDIHW\
FRQWUROV
'RQRWRSHUDWHWKHPDFKLQHLQDQH[SORVLYH
DWPRVSKHUHQHDUFRPEXVWLEOHPDWHULDOVRU
ZKHQJDVIXPHVPD\QRWEHSURSHUO\GLVSHUVHG
5HSDLUDQ\IXHOOHDNVLPPHGLDWHO\DQGUHPRYH
DFFXPXODWHGGXVWIUHTXHQWO\IURPWKHDLU¿OWHU
V\VWHP
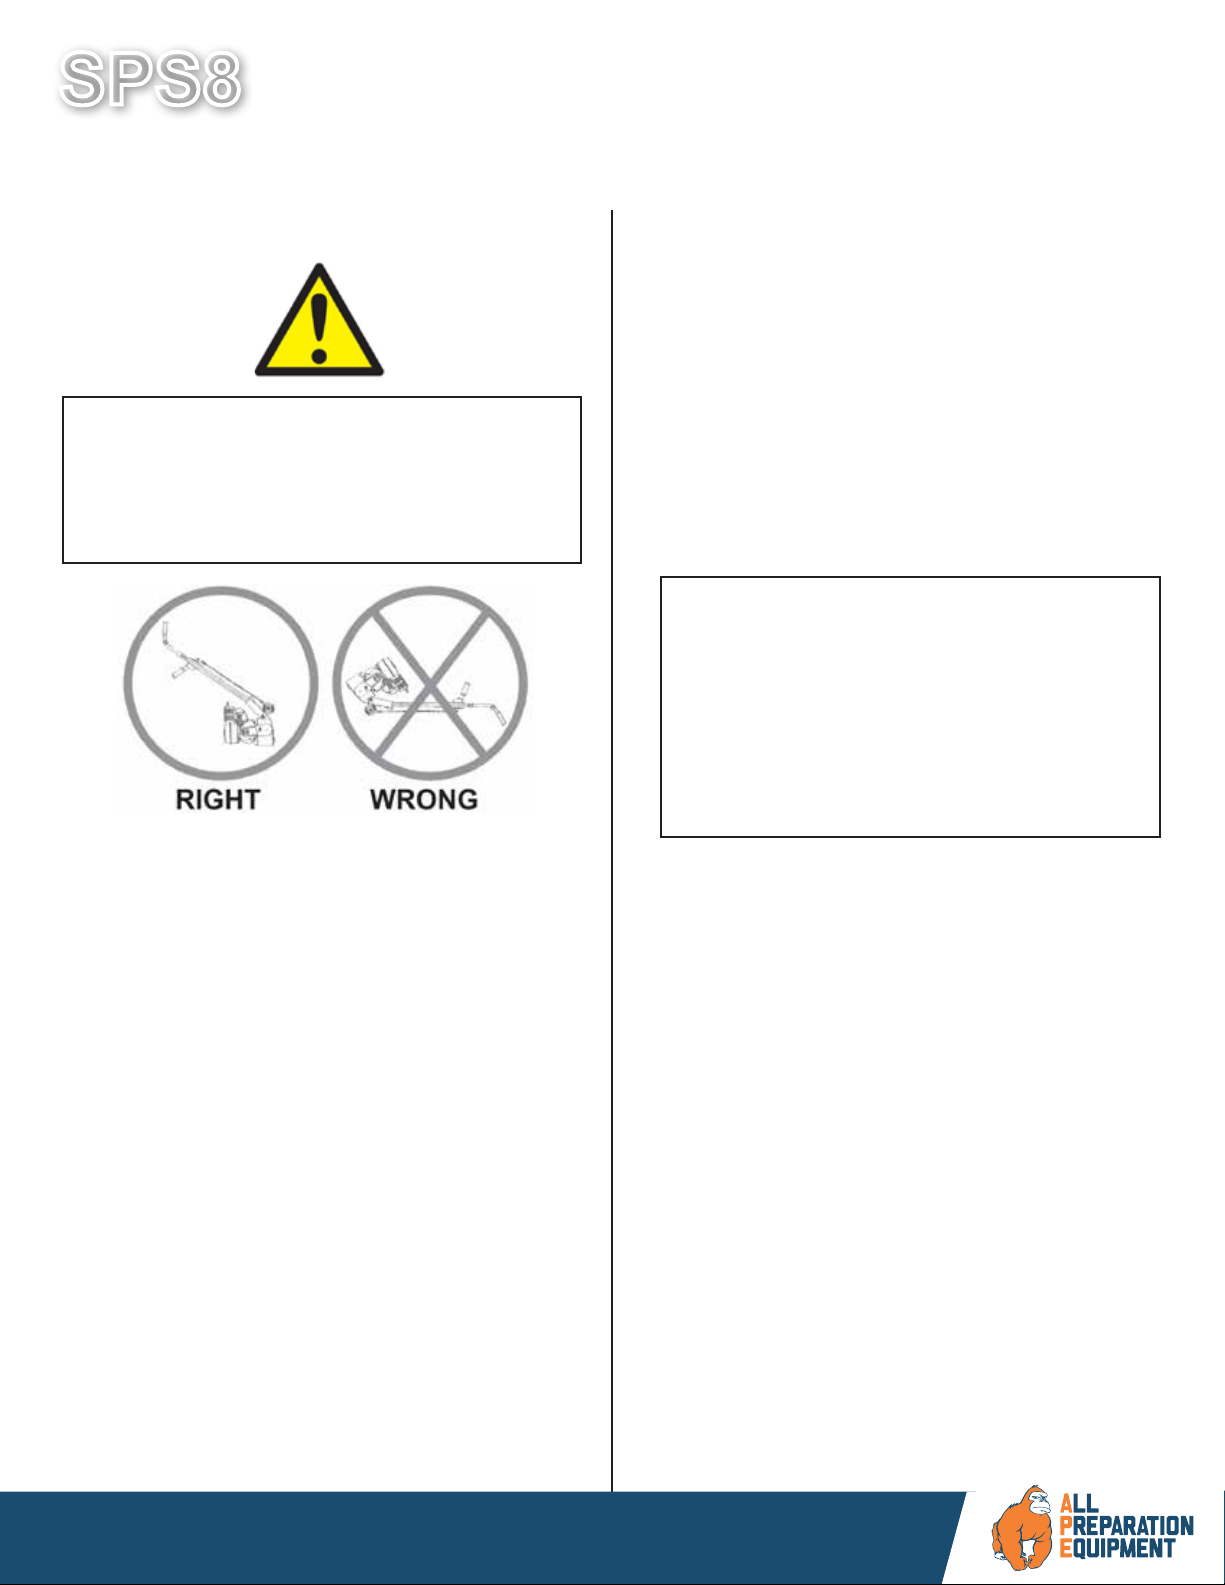
1HYHUOHDYHWKHPDFKLQHXQDWWHQGHGZKHQ
UXQQLQJDQG\RXPXVWKROGRQWRWKHKDQGOHZLWK
WZRKDQGVZKHQWKHFXWWHUGUXPLVHQJDJHG
$YRLGFRQWDFWZLWKWKHPXIÀHUZKHQWKHHQJLQH
LVKRWDVLWPD\FDXVHVHYHUHEXUQV
:KHQXVLQJDYDFXXPV\VWHPDYRLGKRVH
FRQWDFWZLWKWKHPXIÀHU
(QVXUHWKDWDOOJXDUGVDUHLQSODFHEHIRUHWKH
PDFKLQHLVRSHUDWHGVLQFHURWDWLQJDQGPRYLQJ
SDUWVZLOOFDXVHLQMXU\XSRQFRQWDFW
0DNHVXUHWKDWWKHHQJLQHLVVKXWGRZQDQG
WKHVSDUNSOXJLVGLVFRQQHFWHG
EHIRUHVHUYLFLQJ
Incorrect use of the surface preparator can
result in property damage, personal injury,
or death. Be sure to read and follow all
directions and precautions as outlined in
this manual.
SAFETY GUIDELINES
3p1800 422 992
Wwww.allprep.com.au
E sales@allprep.com.au
A1/40 rivergate place, murarrie

SMITH Manufacturing 1-954-941-9744 www.SmithMfg.com
SPS8
VERSION 10/2016
Gas
SMITH Manufacturing 1-954-941-9744 www.SmithMfg.com
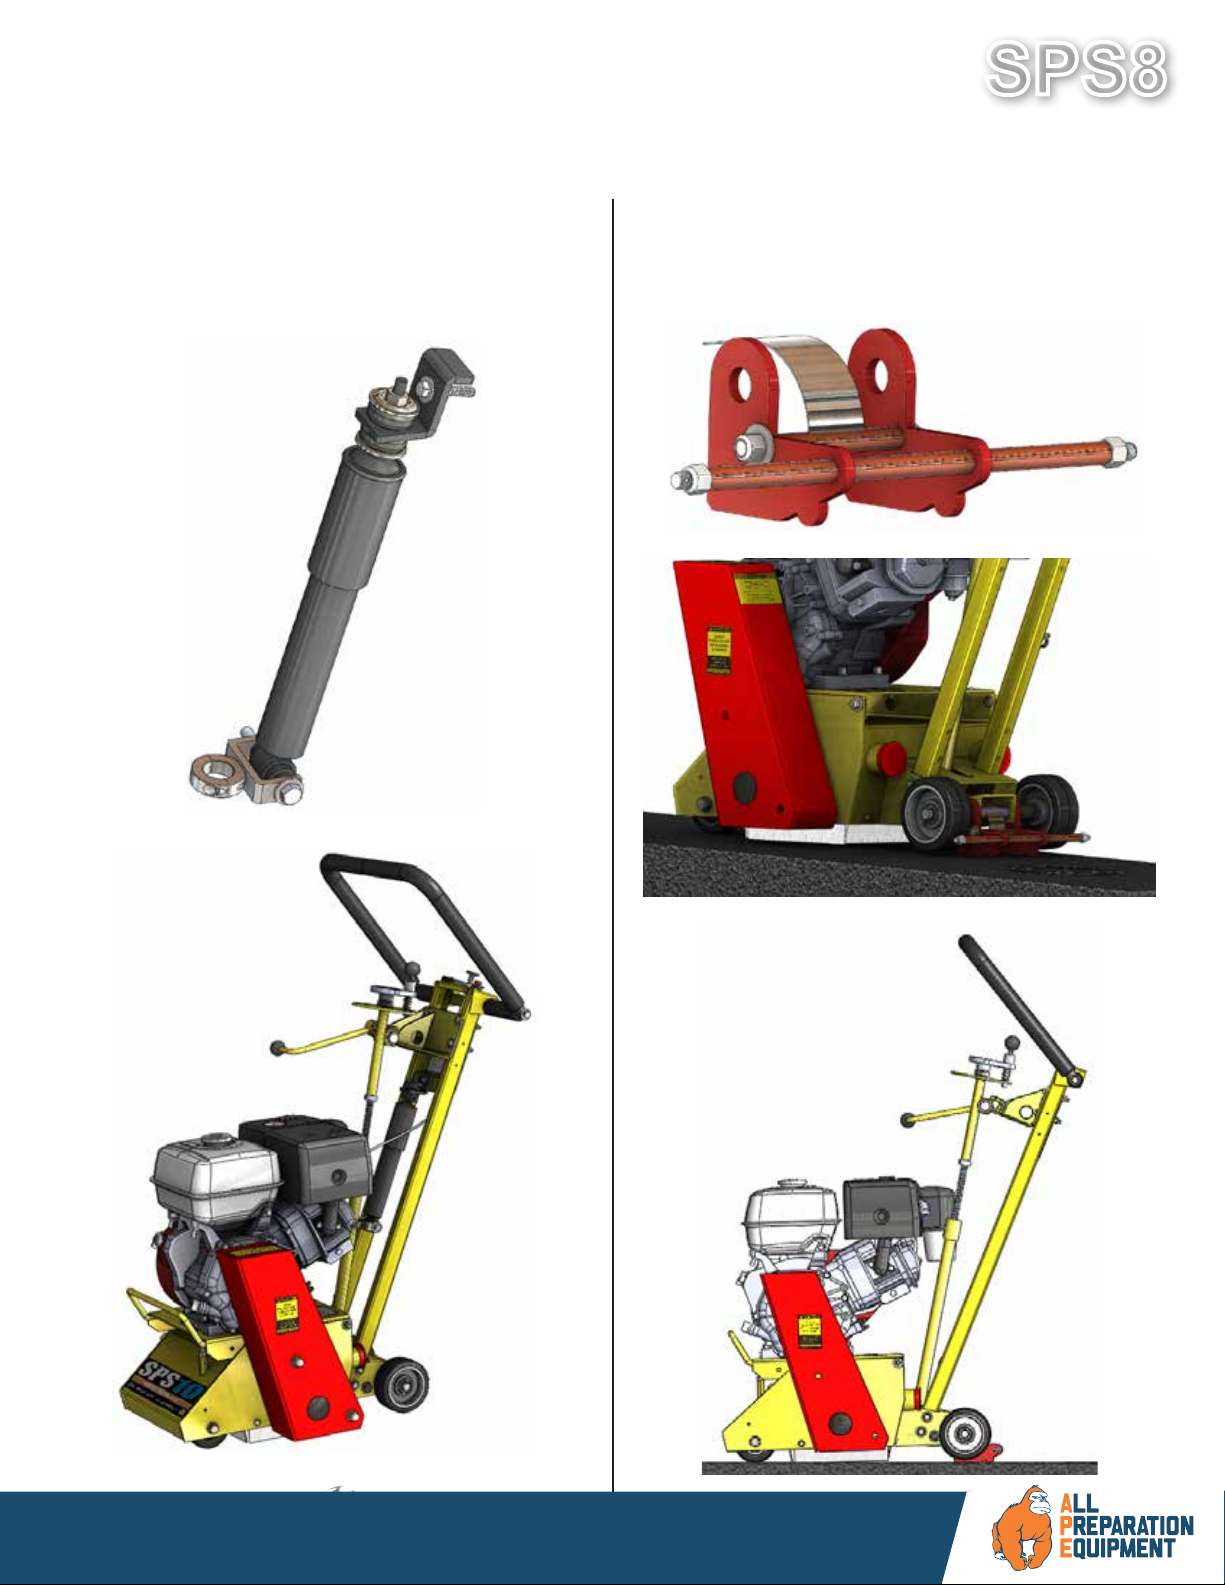
YOUR SPS8TM SURFACE PREPARATOR
3OHDVHWDNHWLPHWRIDPLOLDUL]H\RXUVHOIZLWKWKH636¶V
FRQWUROVDVZHOODVVRPHRIWKHIHDWXUHVRI\RXUQHZPDFKLQH
5HDGWKHHQJLQHPDQXDOEHIRUHSUHSDULQJWKHHQJLQHIRUVWDUWLQJ
2SWLRQDO(QJLQH0HWHU Throttle
&RUGHG³(QJLQH.LOO´%XWWRQ
)LQH$GMXVWPHQW+DQG:KHHO
&DP/HYHU
2LO'LSVWLFN
(QJLQH6KXW2II
*DV7DQN
5HPRYDEOH6LGH3ODWH
&KRNH
)XHO6XSSO\/HYHU
4
4p1800 422 992
Wwww.allprep.com.au
E sales@allprep.com.au
A1/40 rivergate place, murarrie

SMITH Manufacturing 1-954-941-9744 www.SmithMfg.com
SMITH Manufacturing 1-954-941-9744 www.SmithMfg.com
VERSION 10/2016
SPS8
Gas
MACHINE START-UP
Do not start machine while drum is in
contact with the ground. Doing so can
cause the operator to lose control of the
machine, resulting in property damage
and/or personal injury.
NOTE: 'RQRWDWWHPSWWRUDLVHRUORZHUWKHFDP
OHYHUE\IRUFH,ILWGRHVQRWPRYHHIIRUWOHVVO\
UDLVHRUORZHUWKHKDQGZKHHOXQWLOWKHFDPOHYHU
FDQEHDGMXVWHG2SHQWKHIXHOFRFNRQWKH
FDUEXUHWRUDQGWKHQSODFHWKHWKURWWOHOHYHUDWWKH
³)DVW,GOH´SRVLWLRQ6WDUWWKHHQJLQHRSHQFKRNH
VOLJKWO\WRSUHYHQWÀRRGLQJ0RYHWKURWWOHFRQWURO
WRRSHQRUUXQSRVLWLRQZKHQHQJLQHLVZDUPHG
XS,QFUHDVHWKURWWOHWRPD[LPXPRSHUDWLQJ
SRVLWLRQDSSUR[530DQGFORVHFKRNH
%HIRUHVXEVWUDWHUHPRYDOWHVWUXQWKHGUXP
ZLWKFXWWHUVQRWWRXFKLQJWKHVXUIDFH,IWKHUHLV
H[FHVVLYHYLEUDWLRQ\RXQHHGWRUHEDODQFHWKH
FXWWHUVHWXSFKHFNEHDULQJFRQGLWLRQDQGRU
PDNHVXUHWKDWWKHGULYHVKDIWLVVHFXUHG
Corded “Engine Kill” Button (not available
on electric motor): ,QWKHHYHQWRID
PDOIXQFWLRQRUDQDFFLGHQWVXFKDVWKH
PDFKLQHRSHUDWRUIDOOLQJRUORVLQJIRRWLQJWKH
636LVHTXLSSHGZLWKDFRUGHG³(QJLQH.LOO´
%XWWRQ$WWDFKWKHHQGRIWKHFRUGWRWKH
RSHUDWRU¶VEHOWRUZULVWDQGVQDSWKHFOLSLQWR
SODFHRQWKHVWRSVZLWFKE\UDLVLQJWKHWRSRI
WKH(QJLQH.LOO%XWWRQDQGLQVHUWLQJWKHFOLSLQWR
WKHJDS,IWKHRSHUDWRUEHFRPHVGLVWDQFHGWRR
IDUIURPWKHPDFKLQHWKHFRUGZLOOGHWDFKIURP
WKHVWRSVZLWFKDQGWKHPDFKLQHZLOOVWRS
running.
$WWDFKWR
RSHUDWRU
*NOTE: the Engine will not start without the
Corded Engine Kill’s clip securely in place.
CAUTION: The machine will still move with
the engine off.
IF THE ENGINE DOES NOT
START
&KHFN(QJLQHIRUSURSHUJDVDQGRLOOHYHOV
UHIHUWR(QJLQHPDQXDO
&KHFNVSDUNSOXJ0DNHVXUHWKHVRFNHW
DUHDVDUHFOHDQDQGFOHDURIGHEULVDQGWKDW
WKHSURSHUJDSLVVHW5HSODFHLIQHHGHG
&KHFN%URZQ(OHFWULFDOFOLSKDQJLQJRQWKH
IURQWRIWKHHQJLQHDQGHQVXUHWKDWWKH
HOHFWULFDOZLUHVDUHPDNLQJFRQWDFWZLWKLQWKH
FOLS
7XUQWKH2Q2IIVZLWFKRQWKHIURQWRIWKH
(QJLQHWR³2Q´
&KHFN&RUGHG(QJLQH.LOO%XWWRQ¶V
&RQQHFWLRQV
D0DNHVXUHWKH&RUGHG6DIHW\6WRS³&´
&RQQHFWRULVFOLSSHGSURSHUO\
E7U\VZLWFKLQJWKHFRQQHFWLRQWRWKHRSS
RVLWHSRVW)URPOHWWHU³&´WROHWWHU³0´IRU
H[DPSOH
(QJLQHPD\KDYHWLOWHGEDFNZDUGV,IVR
DOORZRLOWRGUDLQDIWHUUHPRYLQJVSDUNSOXJDQG
SXOOLQJVWDUWHUFRUGVHYHUDOWLPHV
*Engine repair and engine warranty
issues are handled directly
by your local engine service center.
5
5p1800 422 992
Wwww.allprep.com.au
E sales@allprep.com.au
A1/40 rivergate place, murarrie
SMITH Manufacturing 1-954-941-9744 www.SmithMfg.com
SPS8
VERSION 10/2016
Gas
SMITH Manufacturing 1-954-941-9744 www.SmithMfg.com
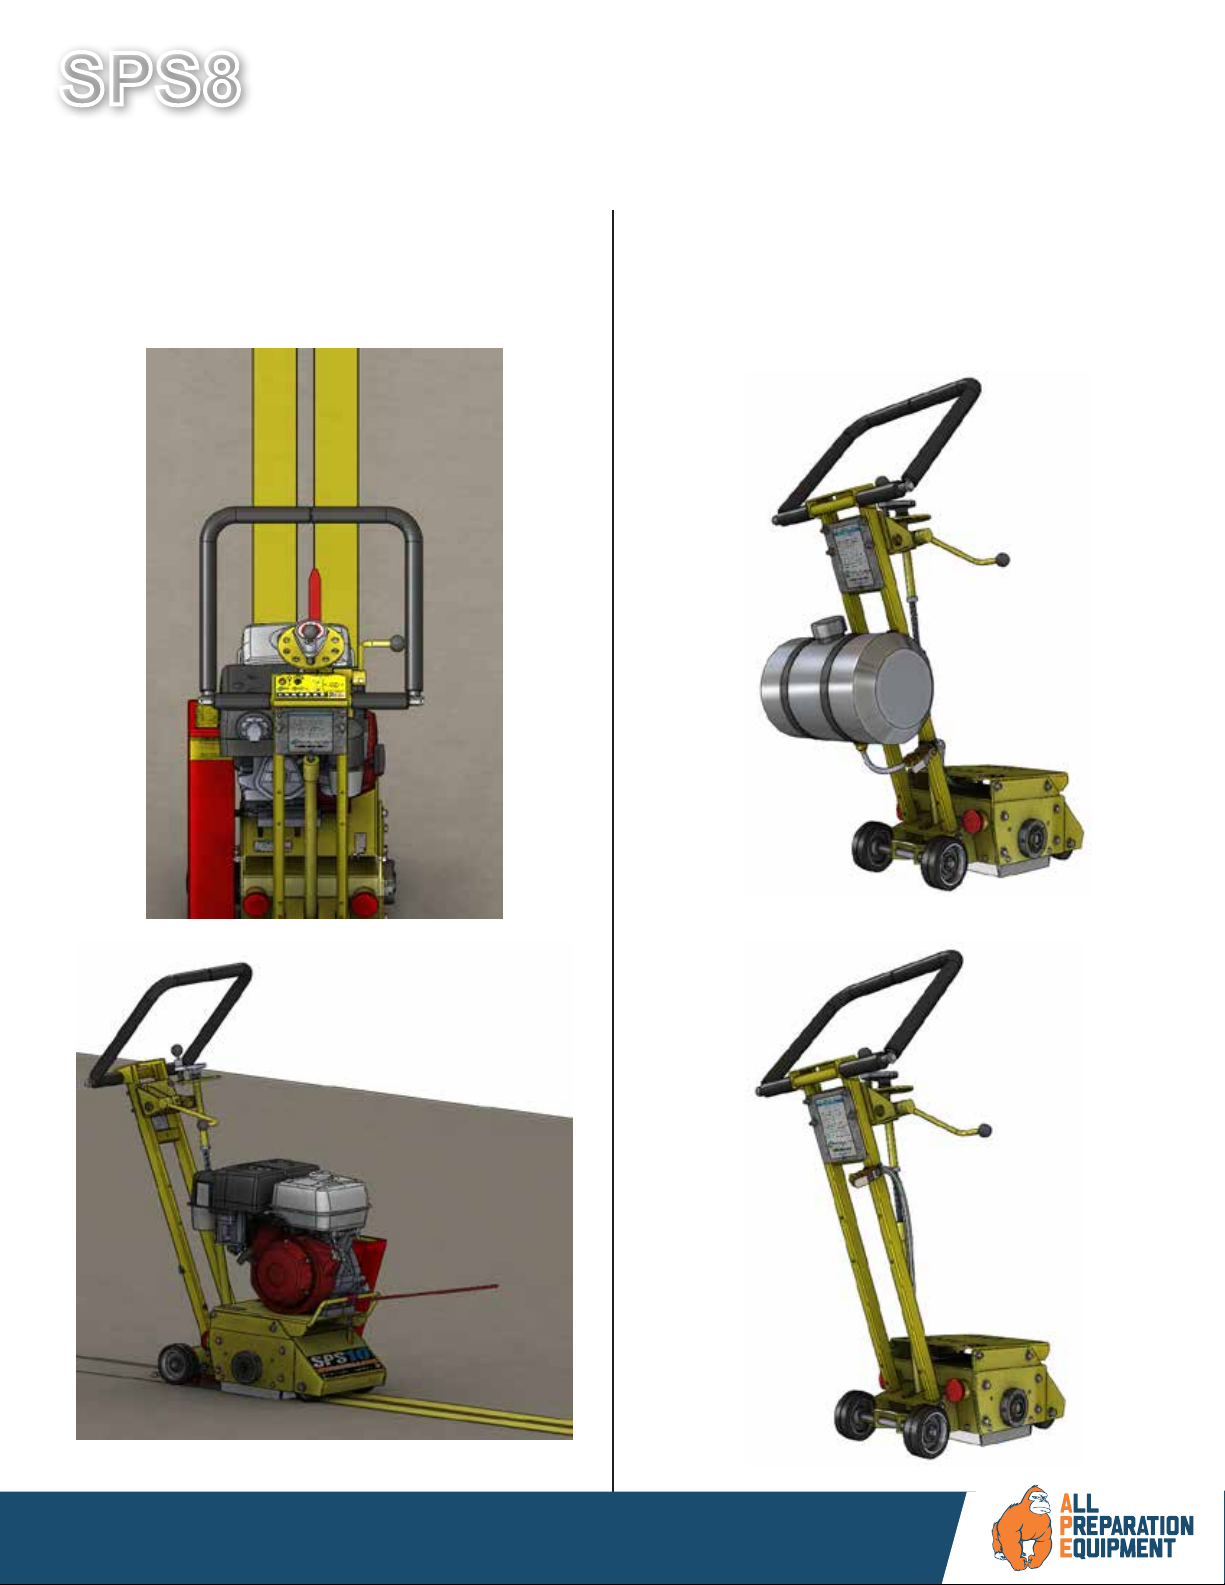
SUBSTRATE REMOVAL
Warning: Should you desire to tilt the
machine, always tilt forward. Tilting the
PDFKLQHEDFNZDUGVDWDQ\WLPHZLOOÀRRG
the spark plug with oil and may cause
damage to your engine!
$GMXVWWKHKHLJKWRIWKHFXWWHUGUXPZLWK
WKH+DQG:KHHODQG&DP/HYHU7XUQWKH
KDQGZKHHOWRUDLVHWKHFXWWHUGUXPRIIRIWKH
VXEVWUDWH/RZHURUUDLVHWKHFDPOHYHUWR
HQJDJHRUGLVHQJDJHWKHGUXPDIWHUVHWWLQJ
WKHSURSHUFXWWHUGHSWK
6HWWKHGHSWKRIFXWWRDOORZWKHFXWWHUVWRJR
WKURXJKRQO\WKHPDWHULDOVWREHUHPRYHG
0DNHFHUWDLQWKDWWKHGUXPLVSRVLWLRQHGWR
ZKHUHRQO\WKHFXWWHUVVWULNHWKHVXUIDFH
DQGWKDWWKHGUXPDVVHPEO\QHYHUFRPHV
LQWRFRQWDFWZLWKWKHVXEVWUDWHThe cutter
tips alone should strike the surface´
WR´PD[LPXPGHSWKSHUUHPRYDOSDVVRQ
QHZFXWWHUV
7KHGUXPZLOOQRWZLWKVWDQGVXEVWUDWH
contact. Contacting the removal surface
too deeply will cause premature wear to
cutters, shafts, drum and other
components!
7RRPXFKGRZQZDUGSUHVVXUHRQO\KDV
QHJDWLYHUHVXOWV7U\WRUHPRYHPDWHULDOVLQ
VHYHUDOSDVVHVUDWKHUWKDQRQHGHHSSDVV
6HYHUDOWHVWVZLOOVKRZWKHEHVWPRVW
DSSURSULDWHFXWWHULPSDFW8VHDIRUZDUG
EDFNZDUGDQGRUFLUFXODUSDWWHUQWRDFKLHYH
\RXUGHVLUHG¿QLVK
NOTE: 2QO\XVHDIRUZDUGPRWLRQZKHQWKH
&0RU&0FDUELGHPLOOLQJFXWWHUV
DUHXVHG
TIP: 3RVLWLRQLQJWKHPDFKLQHRYHUWKH
VXUIDFHLQPDQ\GLUHFWLRQVDVZHOODV
GLDOLQJWKHKDQGZKHHOXSRUGRZQFDQKHOS
FUHDWHGHVLUDEOHVXUIDFHSDWWHUQV
$IWHUVHYHUDOKRXUVRISUDFWLFHWKHRSHUDWRU
ZLOOEHFRPHFRPIRUWDEOHDQGVKRXOGEHDEOH
WRUHPRYHPDWHULDOVIDVWHUZLWKHQKDQFHG
UHVXOWV
:KHQWKHMRELVFRPSOHWHGRUWKHRSHUDWRU
ZDQWVWRFHDVHZRUNVWRSWKHHQJLQHE\¿UVW
OLIWLQJWKHGUXPDERYHWKHVXEVWUDWHXVLQJWKH
KDQGZKHHODQGRUWKHFDPOHYHU6WRSWKH
PDFKLQHRQO\DWWKHHQJLQH7KHQFORVHWKH
IXHOFRFNWRVKXWRIIWKHIXHOVXSSO\
7KHGUXPDVVHPEO\PXVWEHUHPRYHGGDLO\
DQGLQVSHFWHGIRUGUXPZHDUKROH
HORQJDWLRQDQGSRVVLEOHZHOGVHSDUDWLRQ
5HSODFHWKHFXWWHUVKDIWVDQGGUXPEXVKLQJV
HYHU\KRXUVRUSULRUWRDQ\GUXPZHDU,I
WKHGUXP¶VFHQWHUKROHVDUHHORQJDWHGRUGHU
DQRWKHU60,7+FXWWHUGUXP
6
6p1800 422 992
Wwww.allprep.com.au
E sales@allprep.com.au
A1/40 rivergate place, murarrie

SMITH Manufacturing 1-954-941-9744 www.SmithMfg.com
SMITH Manufacturing 1-954-941-9744 www.SmithMfg.com
VERSION 10/2016
SPS8
Gas
STORAGE
6KXWRIIIXHOYDOYHDQGUHPRYHDOOIXHORU
DGGIXHOVWDELOL]HU6WDUWHQJLQHDQGUXQXQWLO
LWVWDOOV5HPRYHVSDUNSOXJDQGSRXUWZR
RXQFHVRIPRWRURLOLQWRF\OLQGHUDQGVORZO\
FUDQNWKHHQJLQHE\KDQGWRGLVWULEXWHRLOWR
SUHYHQWUXVWGXULQJVWRUDJH5HSODFHVSDUN
SOXJDQGVWRUHPDFKLQHXSULJKWLQDFRROGU\
DQGZHOOYHQWLODWHGDUHD
ORDERING
To ensure product safety and reliability,
and to maintain your warranty, always use
genuine replacement cutters and parts
from SMITH when making repairs to the
equipment.
:KHQRUGHULQJSOHDVHVSHFLI\WKHPRGHODQG
VHULDOQXPEHURIWKHPDFKLQH,QDGGLWLRQJLYH
DSDUWQXPEHUGHVFULSWLRQDQGTXDQWLW\DV
OLVWHGRQ\RXUSDUWVOLVW
,I\RXKDYHDQ\TXHVWLRQVDERXWWKHRSHUDWLRQ
RI\RXUPDFKLQHRUZRXOGOLNHWRRUGHU
UHSODFHPHQWSDUWVFRQWDFW\RXU60,7+
0DQXIDFWXULQJUHSUHVHQWDWLYHGLUHFWO\
&RQWDFW
for information.
9LVLWRXUZHEVLWHDW
www.smithmfg.com
WARRANTY CLAIMS
7KHPDQXIDFWXUHUUHVHUYHVWKHULJKWWR
FKDQJHRULPSURYHWKHPDFKLQHGHVLJQZLWK-
RXWDVVXPLQJDQ\REOLJDWLRQWRXSGDWHDQ\
SURGXFWVSUHYLRXVO\PDQXIDFWXUHGEHIRUH
WKLVPDQXDO,WLVWKHFXVWRPHU¶VUHVSRQVLELO-
LW\WRFRPSOHWHWKHZDUUDQW\FDUGDQGPDLOLW
WRWKHVHOOHUZLWKLQGD\VIURPGDWHRISXU-
FKDVH,IDIDLOXUHRFFXUVGXULQJWKHZDUUDQW\
SHULRGWKHFXVWRPHUPXVWFRQWDFWWKHVHOOHU
WRGHWHUPLQHWKHDSSURSULDWHDFWLRQ
Any and all transportation charges are to
be borne by the purchaser.
7
7p1800 422 992
Wwww.allprep.com.au
E sales@allprep.com.au
A1/40 rivergate place, murarrie

SMITH Manufacturing 1-954-941-9744 www.SmithMfg.com
SPS8
VERSION 10/2016
Gas
SMITH Manufacturing 1-954-941-9744 www.SmithMfg.com
TROUBLESHOOTING
PROBLEM
Possible Reason(s)/Solution(s)
CUTTERS WEARING
UNEVENLY/PREMATURELY
Drum is too low
Incorrect set-up
Material Build-up
Cutters too tightly loaded
Wrong cutters for
application
CUTTERS SHAFT BREAKAGE
UNEVENLY/PREMATURELY
Drum is too low
End plates or bushings worn
Shafts worn
Wrong cutter set-up
Over 40 hours service-life
DRUM WEARING
PREMATURELY OR CRACKING
Drum hitting ground
Shafts and bushings not replaced
within 40 hours
EXCESS VIBRATION
Bearing worn
Hex bushing worn
Drive shaft worn
Improper cutter set-up
Drum contacting ground
Wheels worn out
MACHINE JUMPS
ERRATICALLY
Drum hitting ground
RPM is too low
Surface is severely uneven
DRIVE BELT WEARING
PREMATURELY
Pulley is misaligned
Wrong belt
Drum is contacting
the surface
CAM LEVER WILL NOT
RAISE/LOWER
Raise or lower hand-wheel
HAND-WHEEL WON’T
TURN
Clean & grease threads
Linkage may be bent
Hand-wheel may be
out of position
*Engine repair and engine warranty
issues are handled directly
by your local engine service center.
)RUDQ\RWKHUSUREOHPVRUTXHVWLRQV
SOHDVHFRQWDFW\RXUORFDOUHSUHVHQWDWLYH
or
60,7+0IJWRGD\DW
or
8p1800 422 992
Wwww.allprep.com.au
E sales@allprep.com.au
A1/40 rivergate place, murarrie

SMITH Manufacturing 1-954-941-9744 www.SmithMfg.com
SMITH Manufacturing 1-954-941-9744 www.SmithMfg.com
VERSION 10/2016
SPS8
Gas
MAINTENANCE CHECK LIST
Note: 0DNHVXUHWKHLJQLWLRQLVLQWKHOFF
SRVLWLRQDQGWKHVSDUNSOXJLVGLVFRQQHFWHG
EHIRUHVHUYLFLQJ
0DLQWDLQ SURSHU HQJLQH RLO DQG FUDQNFDVH
OHYHOV
&KDQJHHYHU\KRXUV
VHH+RQGDPDQXDO
&OHDQ VSDUN SOXJV UHJXODUO\ DQG VHW WKH
SURSHUJDS
:DVKWKHDLUFOHDQHUHOHPHQWLQDQRQ
RLOEDVHGVROYHQWWKHQVTXHH]HRXWUHVLGXH
$OORZ¿OWHUWRGU\EHIRUHUHLQVWDOOLQJLQFOHDQHU
.HHSDFRDWLQJRIJUHDVHRQWKHGULYHVKDIW
DQGWKUHDGVIRUHDV\LQVWDOODWLRQRUUHPRYDO
DQGIRUORQJHUKH[EXVKLQJOLIH
*UHDVH WKH WLOW OHYHU ORZHU OLQNDJH &OHDQ
GLUWRIIRI¿WWLQJVEHIRUHJUHDVLQJ
&KHFNDOOIDVWHQHUVDQGUHWLJKWHQVLQFHWKH
PDFKLQHZLOOYLEUDWHWKHIDVWHQHUVORRVHLIWKH\
DUHQRWVHFXUHG8VHORFNWLJKW
7KLVLQFOXGHV
$%RWKVHWVFUHZV31DOLJQHGRQ
KH[VKDIW31DUHWRUTXHGWLJKW
% $OO WKUHH KH[ %ROWV 31 RQ
GUXPUHWDLQLQJSODWH310XVWEH
DOLJQHGDQGWLJKW
&KHFN WKH 'ULYH EHOW IRU ZHDU DQG DGMXVW
WLJKWHQRUUHSODFHDVUHTXLUHG
&KHFNWKDWWKHSXOOH\VDUHDOLJQHGSURSHUO\
WRHQVXUHWKH'ULYHEHOWLVUXQQLQJWUXH
&KHFNZKHHOIRUZHDUDQGWKDWWKH\DUH
URWDWLQJ SURSHUO\ UHSODFH LI ZRUQ &OHDQ
ZKHHOVRIPDWHULDOEXLOGXS
7KHLQVLGHKRXVLQJPXVWEHFOHDQDQG
UHPRYHDQ\EXLOGXSIURPLQVLGHWKHFDJHVR
FXWWHUVDQGGUXPURWDWHIUHHO\
,QVSHFW DQG FKDQJH GUXP EXVKLQJV DQG
VKDIWVHYHU\KRXUVRUZKHQZRUQ
9
9p1800 422 992
Wwww.allprep.com.au
E sales@allprep.com.au
A1/40 rivergate place, murarrie

SMITH Manufacturing 1-954-941-9744 www.SmithMfg.com
SPS8
VERSION 10/2016
Gas
SMITH Manufacturing 1-954-941-9744 www.SmithMfg.com
DRUM REPLACEMENT
Normal use will require periodic drum in-
spection and may necessitate drum replace-
ment.
Time of replacement will vary according to
usage and load factors.
Replacement is easy and requires a few hand
tools.
1. 3/4” socket or wrench
2. 1” open-end wrench
3. 1” socket or second 1” wrench
4. Rubber mallet
Before beginning servicing on any
gasoline-powered unit,
DISCONNECT SPARK PLUG WIRE!
$ *TIP: SMITH recommends owning an extra
drum loaded with cutters for rapid job-sight
replacements, and to ensure that the 6 cut-
ter shafts and 12 drum bushings are replaced
every 40 hours, or prior to bushing wear, to
increase the life of the drum.
10
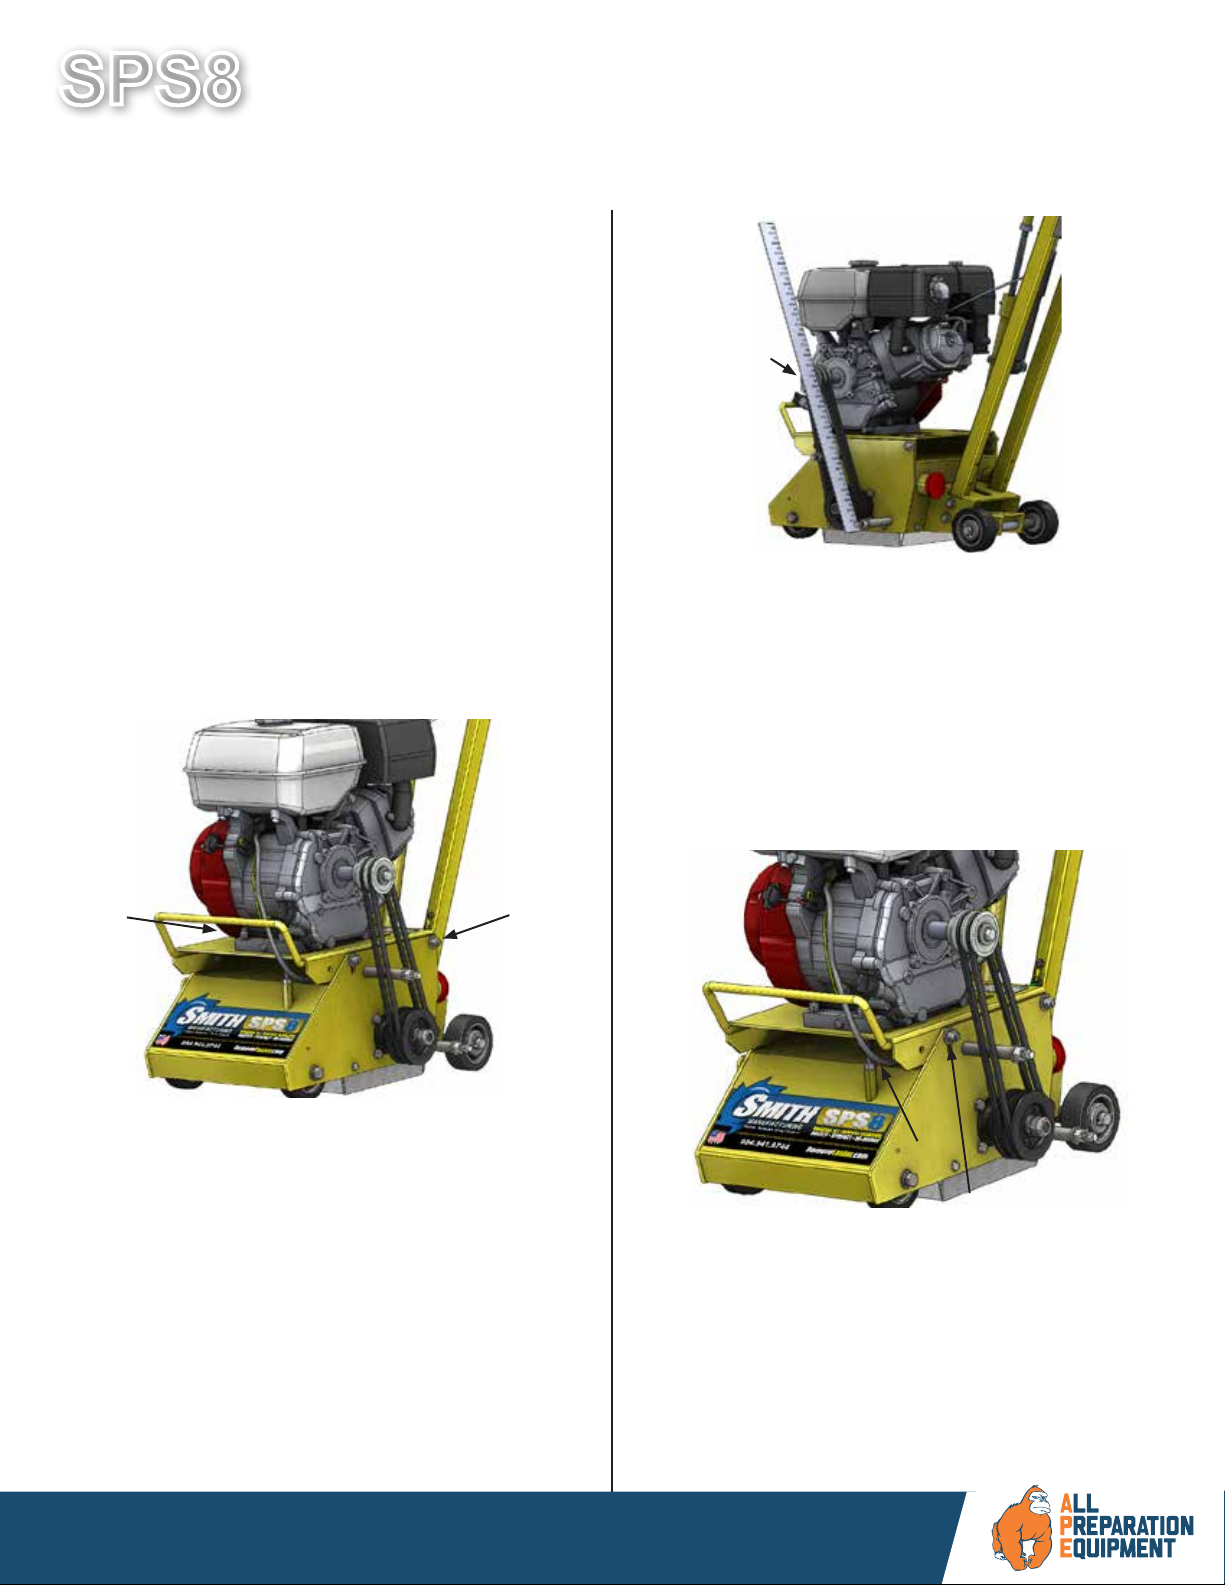
1. Tip the machine over towards the FRONT
as shown below. Remove the belt guard
using the 3/4” socket or wrench (A) and
place the 1” wrench over the hex shaft to
prevent it from rotating (B).
%
2. With the shaft rotation locked, remove
the 2 hex nuts locking it in place using a 1”
socket or a second wrench.
***NOTE: Hex nuts are LEFT HANDED
THREAD meaning they loosen in the
clockwise direction ***
2QFH WKH KH[ QXWV DUH RII ¿UVW VXSSRUW
the drum and then remove the shaft by slid-
ing it out towards the sideplate side of the
machine. (use precaution as it is HEAVY)
10 p1800 422 992
Wwww.allprep.com.au
E sales@allprep.com.au
A1/40 rivergate place, murarrie

SMITH Manufacturing 1-954-941-9744 www.SmithMfg.com
SMITH Manufacturing 1-954-941-9744 www.SmithMfg.com
VERSION 10/2016
SPS8
Gas
BELT REPLACEMENT
Normal wear may necessitate belt
tensioning or replacement.
Time of replacement will vary according to
usage and belt load factors.
Replacement is easy and requires a few
hand tools.
1. Two 9/16” wrenches
2. 3/4” wrench
3. 3/8” open-end wrench
4. Carpenters square or a straightedge
5. WD40
6. Spark plug wrench
Before beginning servicing on any
gasoline-powered unit,
DISCONNECT SPARK PLUG WIRE!
1. Make sure the removable side cover is
installed. This ensures the drive ends are in
the proper position for servicing.
2. Disconnect the spark plug.
3. Clean the machine exterior so you can
locate all the appropriate parts.
4. Using a 3/4” wrench, remove the two
acorn nuts attaching the belt cover to the
side of the machine. Remove the cover and
set it aside.
5. Lubricate the motor plate (belt
tensioning) jackscrew with WD40 on the
front left of the machine.
6. Use a 9/16” wrench to loosen the jack-
screw jam nut.
7. Using the 3/8” open-end wrench, begin to
screw the motor plate jackscrew back into
the long hex nut below it. Continue to screw
it in until resistance is felt.
11
11 p1800 422 992
Wwww.allprep.com.au
E sales@allprep.com.au
A1/40 rivergate place, murarrie
SMITH Manufacturing 1-954-941-9744 www.SmithMfg.com
SPS8
VERSION 10/2016
Gas
SMITH Manufacturing 1-954-941-9744 www.SmithMfg.com
BELT REPLACEMENT
(CONTINUED)
8. Loosen (do not remove) the four bolts (2
per side) that secure the motor mount plate
to the main machine frame.
9. Loosen the four bolts attaching the
PRWRUWRWKHPRWRUSODWH$IWHUVXI¿FLHQWO\
loosening all four, slide the motor back all
the way to the rear. This will loosen the belt
VXI¿FLHQWO\WRUHPRYHLW
10. Either cut or roll off the belt from the
pulleys. If you roll it off, move it over one
groove at a time on the upper and lower
pulleys to completely remove it
11. Roll the new belt on one groove at a
time (two or single multi-groove belt) on
both the top and bottom pulleys.
12. Using the straight edge, lay it across the
lower pulley outer face and against the
upper pulley. They must be directly over
top of each other to ensure optimum belt
life. If adjustment is required, align before
tensioning the belt.
13. After installation, use the 3/8” open-end
wrench to screw out the belt tensioning
jackscrew under the motor plate to tension
the belts to your desired tension. Do not
over-tension the belt.
14. After the correct tension is reached,
tighten the front motor plate securing screw
on the belt side with the 9/16” box end
wrench.
15. Now from the front of the machine
observe the motor plate to machine
alignment. Tightening the belts with the
jackscrew tends to cause the right side of
the motor plate to lift higher than the left
side. By pushing down on the right front
side you can level the plate and then
tighten the front right screw to secure in a
level position.
12
12 p1800 422 992
Wwww.allprep.com.au
E sales@allprep.com.au
A1/40 rivergate place, murarrie

SMITH Manufacturing 1-954-941-9744 www.SmithMfg.com
SMITH Manufacturing 1-954-941-9744 www.SmithMfg.com
VERSION 10/2016
SPS8
Gas
BELT REPLACEMENT
(CONTINUED)
18. Replace the belt cover using the 3/4“
box wrench.
19. Replace the spark plug and the spark
plug wire.
16. Now tighten the rear securing bolts with
the two 9/16” wrenches.
17. Tighten the motor plate jackscrew re-
taining nut with a 9/16” wrench to prevent it
from turning.
BELT ALIGNMENT
If the unit has premature belt wear, breakage
or pulley problems, the issue may be
incorrect alignment or excessive belt
tensioning. All pulleys must be aligned
directly above each other to ensure belt
integrity. This includes possible timing belts
used on newer models. Incorrect alignment
wears the sides of the belts excessively and
will cause slippage.
1. Use a long straight edge (carpenters
square) to check alignment during belt
tensioning or belt replacement time.
2. By laying the straight edge against the
outer face of the lower pulley, the square will
extend up and rest against the outer face of
the upper (engine pulley). If not, move the
motor pulley in or out to obtain alignment.
3. If replacing pulleys (top or bottom) be sure
to place the pulley on the same plane as the
original one to ensure alignment.
13
13 p1800 422 992
Wwww.allprep.com.au
E sales@allprep.com.au
A1/40 rivergate place, murarrie

SMITH Manufacturing 1-954-941-9744 www.SmithMfg.com
SPS8
VERSION 10/2016
Gas
SMITH Manufacturing 1-954-941-9744 www.SmithMfg.com
BEARING REPLACEMENT
Before reading ahead go back and follow
the instructions on how to remove the belt
from the machine. Bearing replacement is
easy and requires a few additional hand
tools.
1. 7/16” socket or wrench
2. 1/2” socket or wrench
3. 1” open-end wrench
4. 1” socket or second 1” wrench
4. C-clip removal pliers
5. 5/32” Hex Key
Before beginning servicing on any
gasoline-powered unit,
DISCONNECT SPARK PLUG WIRE!
1. Once the belt is removed from the ma-
chine, tip the machine over towards the
FRONT and place the 1” wrench over the
hex shaft to prevent it from rotating.
2. With the shaft rotation locked, remove
the 2 hex nuts locking it in place using a 1”
socket or a second wrench.
***NOTE: Hex nuts are LEFT HANDED
THREAD meaning they loosen in the clock-
wise direction ***
Once the hex nuts are off, you can remove
the shaft by sliding it out towards the side-
plate side of the machine.
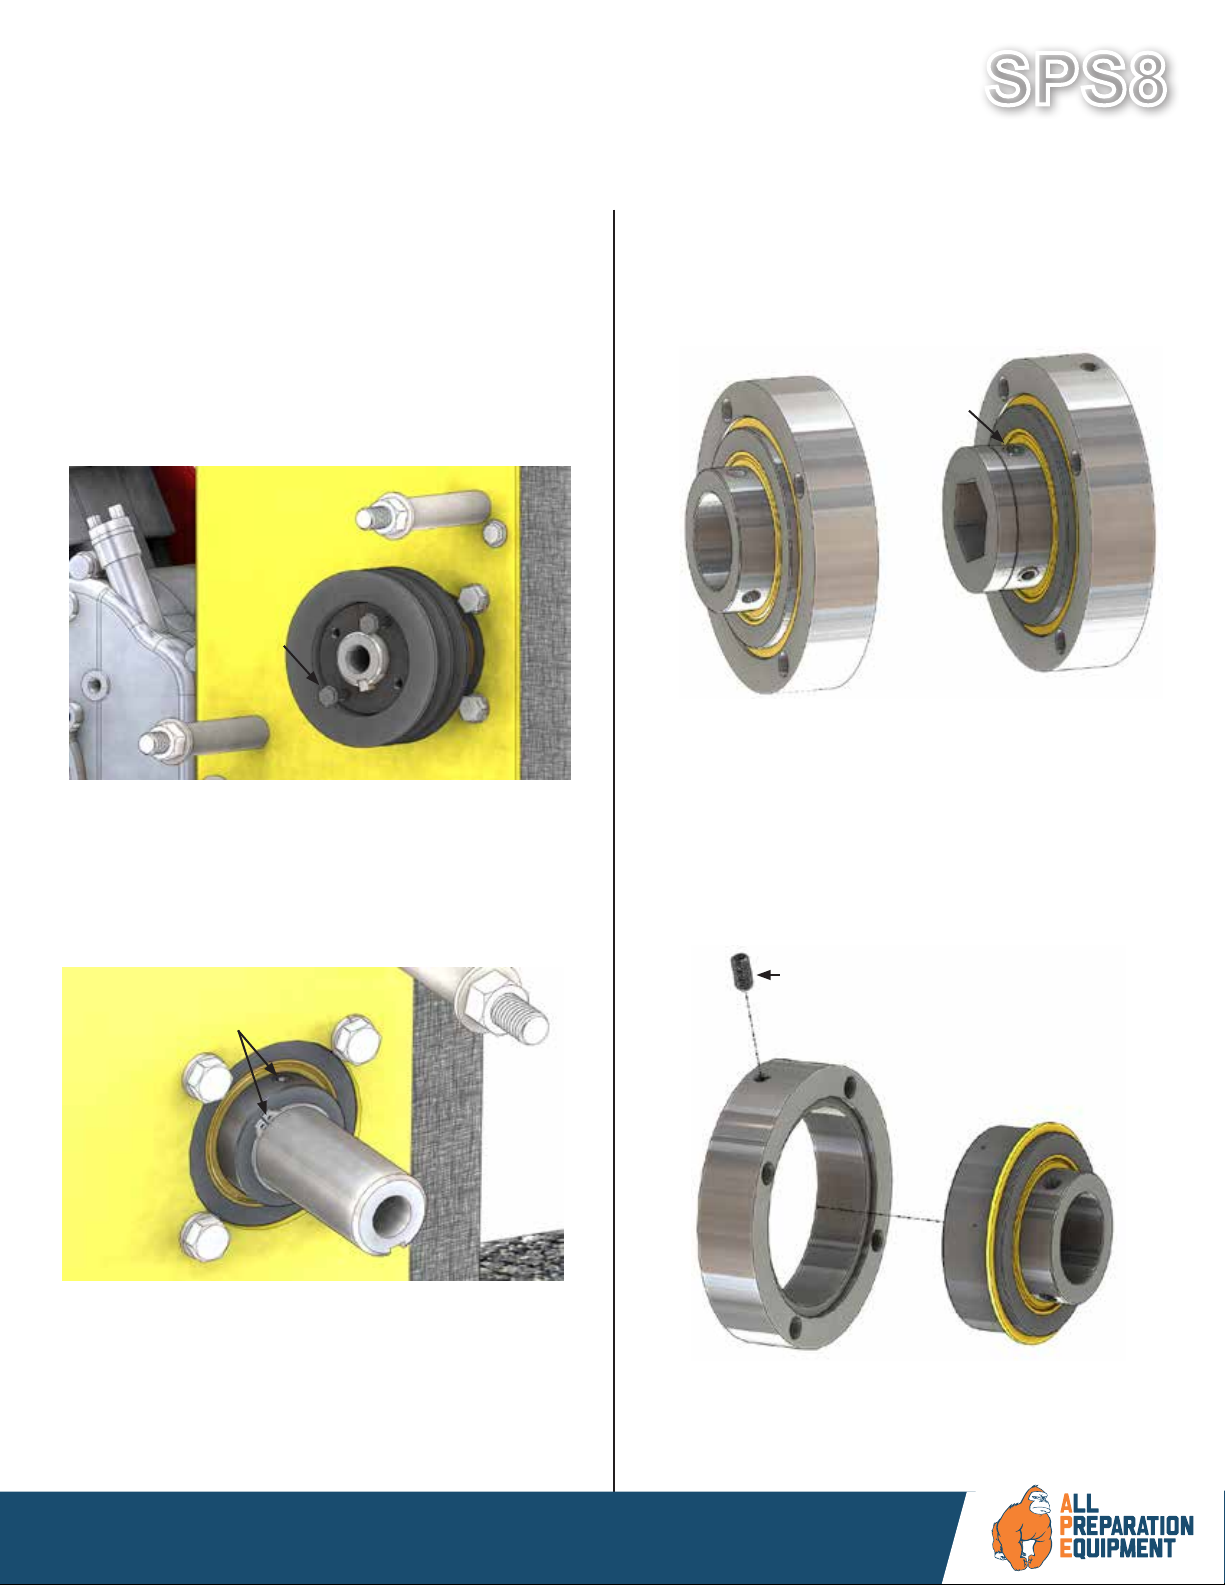
3A. Remove the 2 screws in the pulley bush-
ing using the 7/16” socket and insert them
by hand into the 2 threaded holes as shown
¿JXUH%
$
14
14 p1800 422 992
Wwww.allprep.com.au
E sales@allprep.com.au
A1/40 rivergate place, murarrie
SMITH Manufacturing 1-954-941-9744 www.SmithMfg.com
SMITH Manufacturing 1-954-941-9744 www.SmithMfg.com
VERSION 10/2016
SPS8
Gas
BEARING REPLACEMENT
(CONTINUED)
6. At this point remove the hex bushings
from the side plate side bearing assembly
by removing the set screws using the 5/32”
hex key.
%(/76,'(
7. With the hex bushings out, the both the
bearings and housings are the same. To
remove the bearing from the housing use
the 1/8” hex key to remove the set screw on
the housing and then tap out the bearing us-
ing a mallet.
8. Reverse the process and apply thread
ORFNLQJÀXLGORFWLWHWRWKHVHWVFUHZV
3B. Once both screws are in, begin to turn
them using a socket and do so EVENLY
in order to allow the bushing to back out
smoothly. Once the bushing is out, remove
the pulley and key.
%
4. At this point the shaft driver must be
removed by using the C-clip removal pliers
for the retaining ring and a 5/32” hex key for
the 2 set screws.
5. Remove the bearing assemblies on both
sides on the machine using the 9/16” socket
15
15 p1800 422 992
Wwww.allprep.com.au
E sales@allprep.com.au
A1/40 rivergate place, murarrie
SMITH Manufacturing 1-954-941-9744 www.SmithMfg.com
SPS8
VERSION 10/2016
Gas
SMITH Manufacturing 1-954-941-9744 www.SmithMfg.com
OPTIONAL EQUIPMENT
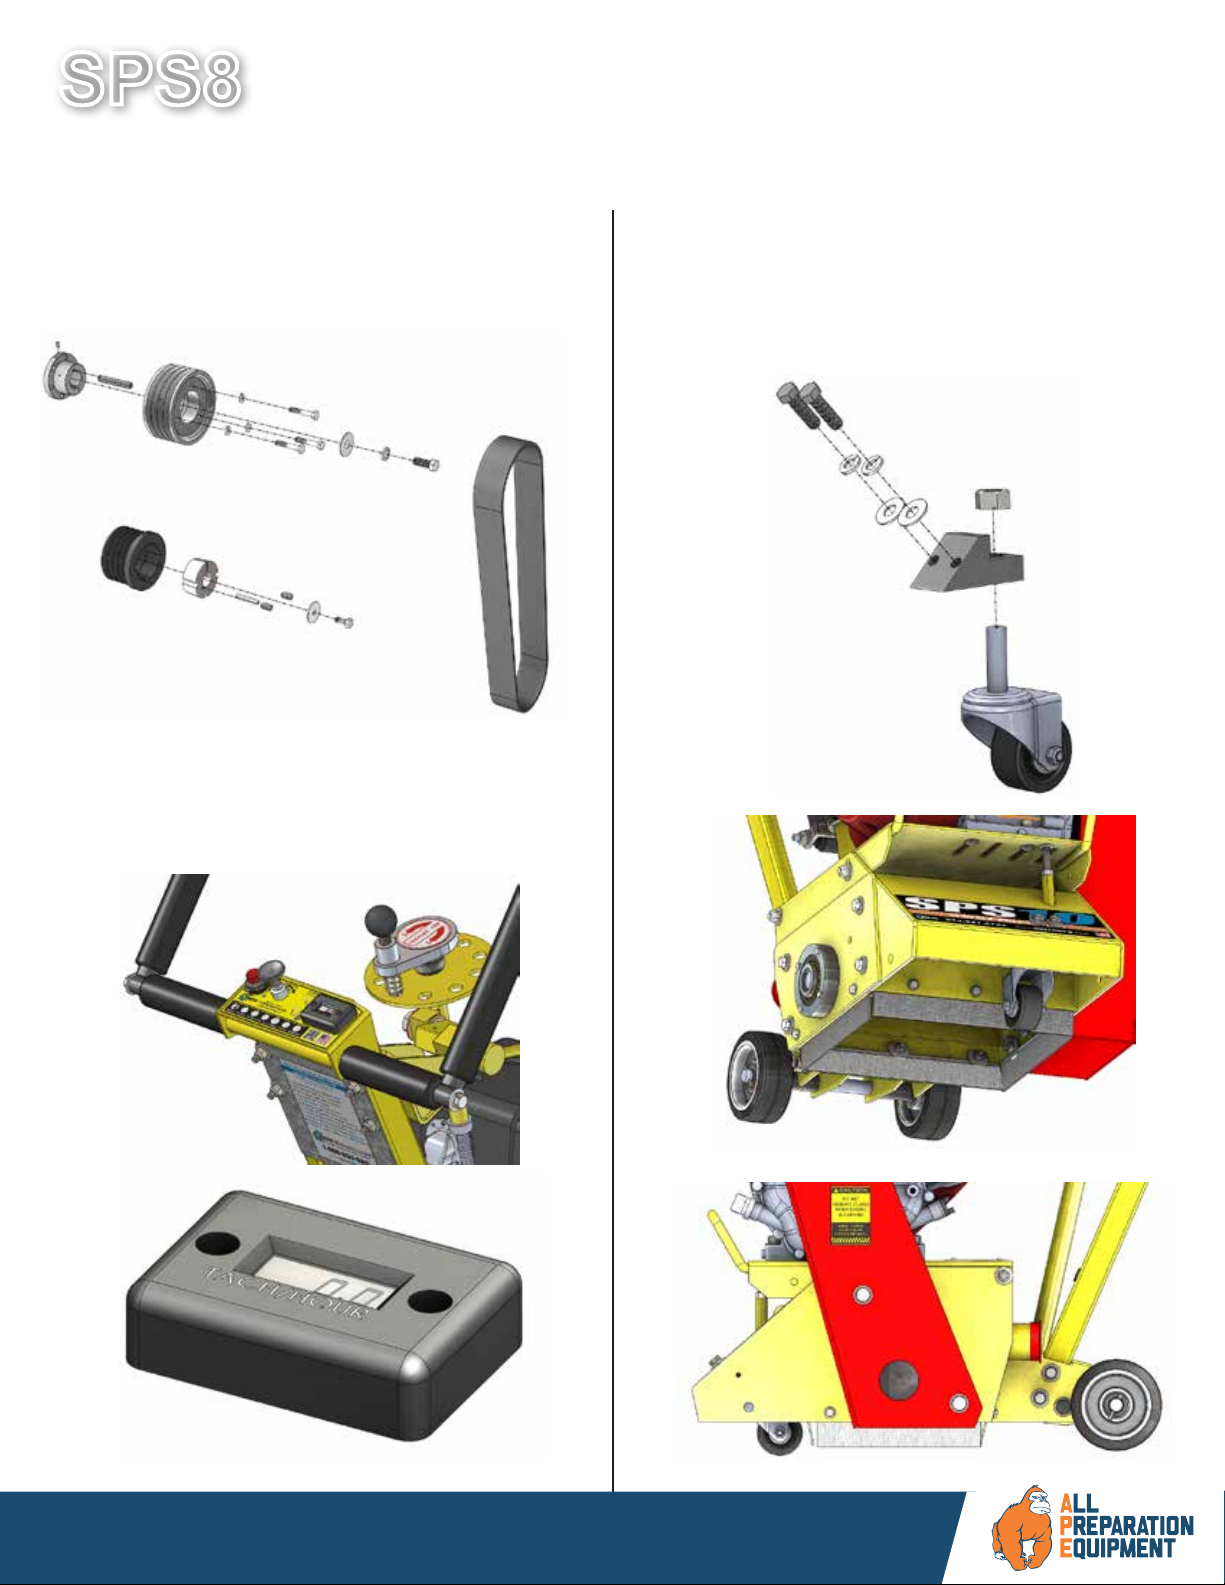
t HIGH SPEED KIT
7KHKLJKVSHHGNLWLVXVHGZLWKWKH'LDPRQG
6KDYHLW'UXP$VVHPEO\21/<
t TACH/HOUR METER
0DLQWHQDQFHPHWHUIRUVHUYLFHDQGXVH
control
t SWIVEL WHEEL
7KH VZLYHO ZKHHO DOORZV \RX WR PRYH WKH
PDFKLQH QRW RQO\ IRUZDUG DQG EDFNZDUG LQ
DVWUDLJKWOLQHEXWDOVRIURPside to side to
eliminate grooves!
SHOWN ON SPS10, SPS8 COMPATIBLE
16
16 p1800 422 992
Wwww.allprep.com.au
E sales@allprep.com.au
A1/40 rivergate place, murarrie
SMITH Manufacturing 1-954-941-9744 www.SmithMfg.com
SMITH Manufacturing 1-954-941-9744 www.SmithMfg.com
VERSION 10/2016
SPS8
Gas
OPTIONAL EQUIPMENT
t SPS CRADLE
&DP5HOHDVH$GMXVWPHQW'DPSHQHU/LIH
([WHQGHU VKRFN DVVHPEO\ SUHYHQWV KDUG
GUXPGURSV
t CENTER STAND BRAKE KIT
7KH &HQWHU 6WDQG %UDNH .LW DOORZV IRU VDIH
³SDUNLQJ´RIWKH636RQLQFOLQHGVXUIDFHV
SHOWN ON SPS10, SPS8 COMPATIBLE
17
17 p1800 422 992
Wwww.allprep.com.au
E sales@allprep.com.au
A1/40 rivergate place, murarrie
SMITH Manufacturing 1-954-941-9744 www.SmithMfg.com
SPS8
VERSION 10/2016
Gas
SMITH Manufacturing 1-954-941-9744 www.SmithMfg.com
OPTIONAL EQUIPMENT
t POINTER/DIRECTIONAL
SIGHT GUIDE SYSTEM
$OORZVRSHUDWRUWRPDNHVWUDLJKWSDVVHV
HDVLHU
t WATER CONTROLS
8VHGWRH[WHQGOLIHRQ'LDPRQGGUXP
DSSOLFDWLRQVDQGIRUGXVWFRQWURORQDOORWKHUV
$YDLODEOHZLWKRUZLWKRXWJDOORQWDQN
SHOWN ON SPS10, SPS8 COMPATIBLE
18 p1800 422 992
Wwww.allprep.com.au
E sales@allprep.com.au
A1/40 rivergate place, murarrie
SMITH Manufacturing 1-954-941-9744 www.SmithMfg.com
SMITH Manufacturing 1-954-941-9744 www.SmithMfg.com
VERSION 10/2016
SPS8
Gas
OPTIONAL EQUIPMENT
t BALL MOUNT HITCH
$OORZVDWWDFKPHQWWRRWKHUFRPSRQHQWV
t EDGER DRUM ASSEMBLY
$YDLODEOHIRU'LDPRQGEODGHVDQGFXWWHU
DSSOLFDWLRQV
SHOWN ON SPS10, SPS8 COMPATIBLE
19
19 p1800 422 992
Wwww.allprep.com.au
E sales@allprep.com.au
A1/40 rivergate place, murarrie

SMITH Manufacturing 1-954-941-9744 www.SmithMfg.com
SPS8
VERSION 10/2016
Gas
SMITH Manufacturing 1-954-941-9744 www.SmithMfg.com
OPTIONAL EQUIPMENT
t UP-CUT CART
,QFUHDVHVUHPRYDOVSHHGXSWR;IDVWHUWKDQ
SXVKLQJ
t SR-25 DRIVER
+\GURVWDWLF 5LGHRQ JDV SRZHUHG 'ULYHU IRU
TXLFNDQGHDV\DWWDFKPHQW%DOO0RXQW+LWFK
UHTXLUHG
SHOWN ON SPS10, SPS8 COMPATIBLE
20
20 p1800 422 992
Wwww.allprep.com.au
E sales@allprep.com.au
A1/40 rivergate place, murarrie
Table of contents
Other Smith Lawn And Garden Equipment manuals


Popular Lawn And Garden Equipment manuals by other brands


Bartell
Bartell CONTEC CT320 Owner's manual and parts book

Peco
Peco PRO 3 BAGGER Operator's manual

Volpi
Volpi Giulivo Operation and maintenance manual

Buhler
Buhler Landscape Rake FK349 Operator's & parts manual

Poulan Pro
Poulan Pro 917GWN42A installation instructions

Lil Gro
Lil Gro Veg Wedge Assembly manual


