SNAIGE R 13SM User manual

Refrigerator with a freezer compartment
R 13SM
Instructions for Use

1
DEAR CUSTOMER!
Some provisions in this user manual are unified for refrigerating products of different types
(for a refrigerator, refrigerator-freezer or freezer). CAREFULLY READ THE INSTRUCTION
MANUAL.
The Manufacturer shall not be held liable for damage arising from the failure to observe
the instructions contained in this manual.
Keep this manual for future reference, or to pass it over to the next user.
General information:
The appliance consists of a household refrigerator with a freezer compartment. Fresh food
products can be stored for a short while in the refrigerator compartment, and food
products can be frozen and stored for longer periods in the freezer compartment.
a refrigerator with a freezer compartment intended for household use.
GUIDELINES CONCERNING THE SAFETY OF USE
General safety requirements:
–WARNING: Keep ventilation openings, in the appliance enclosure or in the built-in
structure, clear of obstruction.
–WARNING: Do not use mechanical devices or other means to accelerate the
defrosting process, other than those recommended by the manufacturer.
–WARNING: Do not use electrical appliances inside the food storage
compartments of the appliance, unless they are of the type recommended by the
manufacturer.
–WARNING: When positioning the appliance, ensure the supply cord is not
trapped or damaged.
–WARNING: Do not locate multiple portable socket-outlets or portable power
supplies at the rear of the appliance.
–WARNING: Disposal of the appliance should be according to national rules.
WARNING: Do not damage the appliance refrigeration system. It contains
the refrigerant gas R600a. If the refrigeration system is damaged:
•Do not use any open flame.
•Avoid sparks-do not turn on any electrical appliances or lighting fixtures.
•Immediately ventilate the room: air the room in which the appliance is placed for a
few minutes (the size of the room for a product containing isobuthane / R600a
must be at least 4 m3) to avoid damage to the cooling system.
C-Pentane is used as blowing agent in theinsulation foam and it is a
flammable gas.

2
–This appliance is not designed for the storage of explosive substances such as
aerosol cans with a flammable propellant.
–It is prohibited to store petrol and other flammable liquids near the appliance.
–The appliance should be used only for storing foodstuffs.
Children and vulnerable people safety:
–Do not allow children to play with the appliance or to plug it in or unplug from the
electricity supply socket. Do not allow children to play with the packaging material
from the appliance.
–This appliance can be used by children aged from 8 years and above and persons
with reduced physical, sensory or mental capabilities or lack of experience and
knowledge if they have been given supervision or instruction concerning use of the
appliance in a safe way and understand the hazards involved.
–Cleaning and user maintenance shall not be made by children without
supervision.
–Children aged from 3 to 8 years are allowed to load and unload refrigerating
appliances.
Requirements for the connection to the mains:
–The appliance should only be connected to an earthed socket installed in
accordance with the regulations. Make sure that the supply voltage corresponds
with the voltage marked on the rating label. This product complies with all binding
CE labelling directives. The earthed electrical socket by which the appliance is
connected to the mains should be in an accessible place. It is a legal requirement
that the appliance is properly earthed. The manufacturer will not be held liable for
any damage or injury which may result from the failure to fulfil this requirement.
–To avoid the exposure to danger, always have faulty cable be replaced only by
the manufacturer, by our customer service or by qualified person and with a cable
of the same type.
–It is forbidden to readjust or modify any parts of the unit. It is crucial not to
damage the capillary tube visible in the compressor recess. The tube may not be
bent, straightened or wound. If the capillary tube is damaged by the user the
guarantee will be void.
–Do not use adapters, multiple sockets and two-wire extension leads. If it is
necessary to use the extension lead, it must be equipped with a protection ring
and a single socket and must have a VDE/GS safety certificate. If an extension
lead is used (with a protection ring and safety certificate), its socket must be
located at a safe distance, away from the sinks, and must not be in a place where
it could be flooded by water or waste water.

3
–The frequency and power of the electricity supply in your house must conform to
the general data parameters of the appliance as it is shown in the product label.
–When positioning the appliance, be careful that the electrical cord isn’t squeezed
in order to avoid its damage. Do not store heavy objects such as cooling devices
or other devices next the appliance in such a way that they could squeeze and
damage the electrical cord. This can cause a short circuit and a fire.
–Make sure that the plug of the electrical cord is not squeezed by the back wall of
the appliance or otherwise damaged. A damaged plug can be the cause of a fire!
Do not try repair the appliance on your own. Always contact an authorized
technician. To avoid the exposure to danger, always have faulty cable be
replaced only by the manufacturer, by our customer service or by qualified
person whit a cable of same type.
Requirements for safe use:
–It is forbidden to use a technically damaged appliance.
–If the appliance is unplugged (for cleaning, moving to another place, etc.), it may
be repeatedly switched on after 15 min.
–When performing activities, such as cleaning, maintenance or moving, the
appliance must be completely disconnected from power supply (by pulling the plug
out from the socket). Do not pull on the cord, but hold the body of the plug
instead.
–Do not place any switched on electrical devices on top of the appliance because
this may cause ignition of plastic parts. Do not place any dishes with liquids on
top of the appliance and do not keep flowers in vases or other liquid-filled vessels
on the appliance.
–Do not climb on or sit on the appliance, do not lean on or hang on the appliance
doors and do not allow children to do this.
–Do not remove or touch items from the freezer compartment if your hands are wet
or damp.
–Do not use water spray and steam to clean the appliance.
The appliance should be transported in the vertical position. The
manufacturer will not be responsible for any damage of the appliance that
results from non-compliance with the instructions for transportation.
The manufacturer guarantees reliable operation of the refrigerator when
the relative air humidity not greater than 70 per cent and the ambient
temperature is:
+16 TO +32 DEGREES CELSIUS (Climate class N)
+16 TO +38 DEGREES CELSIUS (Climate class ST)
+16 TO +43 DEGREES CELSIUS (Climate class T).

4
INSTALLATION AND OPERATING CONDITIONS
Positioning:
•This appliance can be installed in a dry, well ventilated indoor where the ambient
temperature corresponds to the climate class indicated on the rating plate of the
appliance.
Do not install this appliance in areas that are too humid or too colds, such as the
construction appendices, garages or wine cellars. Place the appliance away
from heat sources such as kitchen stove/oven, radiators, or direct sunlight. The
appliance must not touch any pipes for heating, gas or water supply, or any
other electrical devices.
Minimum distances from the heat sources:
- from the electric gas and other ovens - 30 mm,
- from oil or coal fired ovens - 300 mm,
- from built-in ovens - 50 mm
If there is no possibility of ensuring the above- mentioned distances, provide an
appropriate insulation board
•Do not cover the ventilation holes at the top of the appliances –it
must be a good air circulation around the appliance. There should
be a gap of at least 10 cm between the top of the appliance body
and any furniture that may be above it. If this requirement is not
followed, the appliance consumes more
electrical energy and its compressor may
overheat.
•The appliance must stand on a level surface
and must not touch the wall. If necessary,
regulate the height of the appliance by
adjusting the levelling feet: by turning them
clockwise –the front of the appliance rises, by turning them
counter clockwise –it comes down. If the appliance is tilted
slightly backward –the doors will close by themselves.
•If you are positioning the refrigerator in a corner, leave a gap of
at least 1 cm between the wall and the body of the appliance so
that the refrigerator door opens enough to enable the fruit and
vegetable tray to be pulled out.
Preparing for operation:
•It is recommended to prepare the appliance for operation
with a helper.
•Remove package. Lift the appliance away from foamed
polystyrene base. Tear off adhesive tapes. Remove all red-
coloured parts from the shelves (fig. 2.). When placing,
moving, lifting the appliance, do not hold the door
handles, do not pull the condenser at the rear part
of the refrigerator and do not touch the compressor
unit.

5
The appliance should not be connected to the mains until all packing and
transport materials aren’t removed. Suitably dispose the packaging material.
First use:
•Before using the appliance for the first time, the interior and all internal accessories
should be washed with lukewarm water and some neutral soap to remove the typical
smell of a brandnew product, then dried thoroughly.
Wait at least 4 hours before connecting the appliance to the
power supply. This is to allow the oil to flow back in the compressor.
•When first starting-up or after a period out of use, before putting the products in the
compartment let the appliance run at least 2 hours.
ATTENTION! To prevent frost from forming too quickly on the freezer compartment
evaporator and doorframe, make sure the freezer compartment door is shut properly.
DESCRIPTION OF THE APPLIANCE, BASIC PARTS
1
Freezer compartment
7
Door tray (s)
2
Interior light bulb cover
8
Egg tray
3
Thermostat knob
9
Melt water channel cleaner
4
Height-adjustable shelf
10
Condenser
5
Glass shelf
11
Compressor
6
Fruit and vegetable tray
12
Thaw water drip tray

6
TEMPERATURE REGULATION
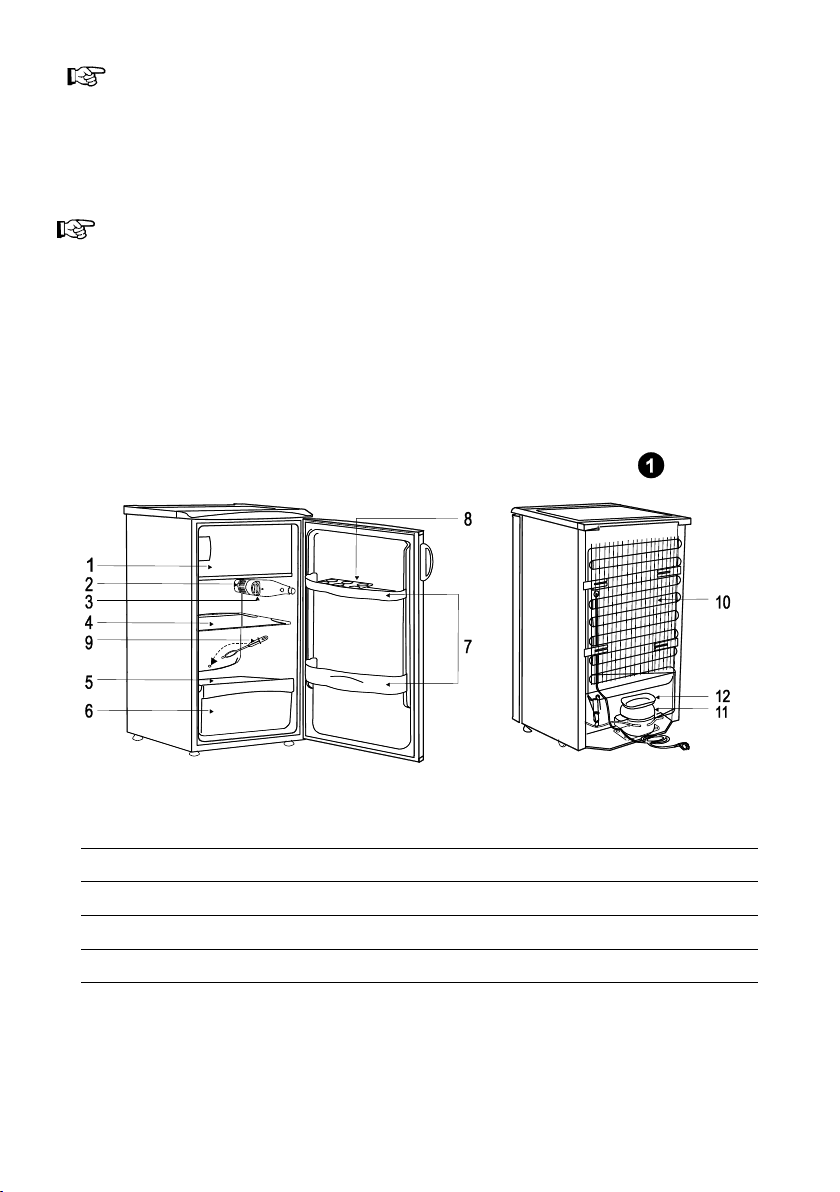
The temperature in the refrigerator compartment is controlled using the thermostat knob 3
(fig. 1) by turning it to one side or the other. The temperature indication in digits is shown
beside the thermostat knob 3.
The temperature is regulated on a scale of seven digits.
0= Compressor is switched off. WARNING! Electric current is not switched off.
1= highest temperature (lowest cooling)
7= lowest temperature (highest cooling)
The temperature in the refrigerator compartment can vary due to the ambient
temperature, the amount of food, and the frequent opening of the refrigerator door.
If the room is cool, the appliance cools less. The temperature in the appliance may
therefore rise. Use the thermostat wheel to set a lower temperature.
FOOD STORAGE
Storage zones in the refrigerator compartment:
Due to the natural circulation of the air in the appliance, there are different temperature
zones in the refrigerator chamber. The most appropriate compartments of the appliance
where specific types of food are to be stored, taking into account different temperature
distribution in different compartments in the appliance, are as follows:
1) Upper area of the refrigerator compartment & door - temperature zone: Store tropical
fruit, cans, drinks, eggs, sauces, pickles, butter, jam.
2) Middle area of the refrigerator compartment -cool zone: Store cheese, milk, dairy food,
deli food, yoghurt.
3) Lower area of the refrigerator compartment- coldest zone: Store cold cuts, desserts,
meat and fish, cheesecake, fresh pasta, sour cream, pesto/salsa, home-cooked food,
pastry cream, pudding and cream cheese.
4) Fruit & vegetable drawer at the bottom of the refrigerator compartment: Store
vegetables and fruits (excluding tropical fruits).
To avoid contamination of food, please respect the following instructions:
Opening the door for long periods can cause a significant increase of the temperature in
the compartments of the appliance.
-Clean regularly surfaces that can come in contact with food and accessible drainage
systems.
-Store raw meat and fish in suitable containers in the refrigerator, so that it is not in
contact with or drip onto other food.
-If the refrigerating appliance is left empty for long periods, switch off, defrost, clean, dry,
and leave the door open to prevent mould developing within the appliance.
Freezing of foodstuffs:
Food to be frozen should first be allowed to cool off to room temperature and then should
be placed in one row at the bottom of the freezer compartment.
Set the thermostat knob to setting number 7. When the products are frozen after 24
hours, re-set the thermostat knob to its initial position.
DO NOT EXCEED THE MAXIMUM AMOUNT OF FROZEN FOOD –2 kg.
Do not place unwrapped foodstuffs in the freezer sections.

7
Fresh food for freezing should not touch already frozen foodstuffs.
Do not freeze foodstuffs that are warmer than the room
temperature
WARNING! Do not freeze liquid foodstuffs in glass vessels or
bottles.
Strictly observe the frozen foodstuffs validity dates indicated by
the manufacturer on the product packaging.
WE RECOMMEND THAT FROZEN FISH AND SAUSAGE SHOULD
BE STORED IN THE FREEZER COMPARTMENT NOT LONGER
THAN 6 MONTHS; CHEESE, POULTRY, PORK, LAMB –NOT
MORE THAN 8 MONTHS; BEEF, FRUIT AND VEGETABLES –
NOT LONGER THAN 12 MONTHS.
ATTENTION! To prevent frost from forming too quickly
on the freezer compartment evaporator and doorframe,
make sure the freezer compartment door is shut properly.
DEFROSTING, CLEANING AND CARE
THE REFRIGERATOR COMPARTMENT DEFROSTS AUTOMATICALLY. Drops of ice that form
on the back wall of the refrigerator compartment thaw during the time the compressor is
not working and the thaw water runs down the thaw water runoff channel to the tray on
top of the compressor, where it evaporates.
FREEZER COMPARTMENT should be thawed not less than twice a year or when a layer of
ice thicker than 4 mm forms in it. Do the actions below in the order they are listed:
WARNING! Turn the appliance off and pull the plug out of the electrical socket.
•Remove foodstuffs from freezer compartment.
•Leave door of appliance open. Leave freezer compartment door partly open.
•When the ice melts, clean and wipe dry the surfaces and fixtures of the refrigerator and
freezer compartments.
Close the freezer compartment door and appliance doors. Turn on the appliance.
REGULARLY CLEAN THE APPLIANCE.
Remember that before defrosting the appliance and cleaning the back
part of the appliance body you must disconnect the appliance from the
electrical energy supply socket by pulling the plug out of the electricity
outlet.
Protect the appliance inner surfaces and plastic parts from fats, acids
and sauces. In case of accidental spills –immediately clean with warm
soapy water or dishwashing detergent. Wipe dry.
Regularly clean the hermetic gaskets of the doors. Wipe dry.
Regularly clean the thaw water channel space in the refrigerator with
a special cleaner for that purpose (see fig.).
At least once a year clean dust away from the back part of the
appliance body and the compressor. A soft brush, electrostatic cloth or
vacuum cleaner may be used for cleaning.
DO NOT use detergents containing abrasive particles, acid, alcohol or benzene for
cleaning the appliance inner and outer surfaces. DO NOT use for cleaning cloths or
sponges that have coarse surfaces intended for scrubbing.

8
CHANGING THE INTERIOR LIGHT BULB
When changing the interior light bulb (fig.
6), do the actions below in the order they
are listed:
Unplug the appliance from the mains
by pulling the plug out of the
electricity supply socket.
Press the latch on the interior light bulb
cover with a flat-blade screwdriver and pull
it with your other hand.
Replace the bulb of the same type 15W
with E14 screw base. After replacing the
bulb, insert the bulb cover, click - the
cover will lock. Plug the refrigerator into
an electrical outlet.
CHANGING THE OPENING DIRECTION OF THE DOORS
It is recommended that changing the opening direction of the doors should be done with a
helper. You will need two spanners No. 8 and No. 10 and a head screwdriver.
When changing the opening direction of the doors YOU CAN NOT lay the refrigerator
horizontally!
Do the actions below in the order they are listed:
WARNING!
Turn off the appliance and pull the plug out of the electricity supply
socket.
1. Remove the bracket (5) and
its washers from the axle.
2. Unscrew the axle together
with its washers from the
bracket (5) and screw it into
the second aperture of the
bracket (5).
3. Remove the refrigerator
door (6).
4. Change the opening
direction of the freezer
compartment door: open
the door (7), undo the
screw (8), and remove the
plate (9).
5. Undo the screw (10) and remove the bracket (11).
6. Pull the door (7) downward and remove it.
7. In the places indicated on the other side of the refrigerator compartment, drill two 2.3-
mm-wide holes and attach the plate (9) on the right-hand side.
8. Turn the door upside-down (180 º) and place the upper axle of the door in the gap on
the left-hand side of the refrigerator compartment and hang the bracket (11) on the
bottom axle of the door. Attach the bracket (11) in the newly drilled hole.
9. Check that the door latch catches on the hook of the plate (9).

9
10. Take the cap (12) off the refrigerator door and press it into position on the opposite
side.
11. Remove the bracket (13) and its washers from the axle. Unscrew the axle by twisting
it counter-clockwise. Turn the bracket upside-down (180 º) and screw in the axle.
Attach the bracket on the opposite side.
12. Attach the refrigerator door on the axle of the bracket (13).
13. Attach the bracket (5) together with the washers on the axle.
14. Attach the pull-out shelf and fasten screws (2) and (3). Place the support (1) in the
grooves at the top back part of the appliance.
15. Remove bolt covers (a) and caps (b). Unscrew the bolts holding the handles in place.
Move the handles to the other side. Screw them on. Press caps into the remaining
apertures in the door and cover the bolts with the bolt covers (a).

10
OPERATION PROBLEMS AND THEIR SOLUTIONS
(TROUBLESHOOTING). What if…
•The appliance is plugged in to the mains but it does not work and. Check that
your house electricity supply installations are in order. Check that the plug is correctly
inserted into the electricity supply socket.
•The noise has become louder. Check that the appliance is standing stable on a level
place. To make it level, regulate the front feet. Check if the appliance is not touching
any furniture and that no part of the refrigeration system at the back part of the
appliance body is touching the wall. Pull the appliance away from any furniture or walls.
Check that the cause of increased noise isn’t due to bottles, cans or dishes in the
appliance that might be touching each other.
•Water has appeared at the bottom of the refrigerator compartment. Check
whether a thaw water channel space isn’t blocked. Clean the thaw water channel space
with a cleaner intended for that purpose.
•Water has appeared on the tempered glass shelves. Food items or dishes in the
refrigerator compartment are touching the back wall of the compartment. Do not let
food items or dishes touch the back wall.
•Moisture dripping from under the glass shelves. If you placed many containers
with liquids on the shelf, moisture can condense and drip onto the shelf below. Move
some containers with liquids onto other shelves.
•Water has appeared under the appliance. The thaw water collection tray has
slipped off the compressor. Place the tray on top of the compressor.
•When the appliance door is opened, the rubber sealing gasket pulls out. The
gasket is smeared with sticky foodstuffs (fat, syrup). Clean the sealing gasket and the
groove for it with warm water containing soap or dishwashing detergent and wipe dry.
Put the rubber sealing gasket back into the place.
•High temperature in appliance, the compressor operation pauses are short.
Ascertain whether the appliance doors are shutting tightly, whether the door wasn’t kept
open longer than necessary when taking out or putting in foodstuffs or whether a large
amount of warm food was placed in the appliance.
•The top of the appliance has condensation on it. The ambient relative air humidity
is above 70 %. Ventilate the room where the appliance stands and if possible remove the
cause of the humidity.
R em a r ks o n t h e a pp l i an c e o p e ra t i ng n o is e . As the appliance
operates and goes through the freezing cycle, various noises will be emitted. This is
normal and is not a sign of any malfunction.
As the refrigerant circulates around the refrigeration system, it causes sounds like
murmuring, bubbling, or rustling. Louder sounds like popping or clicking may be heard
for a short time as the refrigerator’s compressor switches on.

11
ENVIRONMENTAL PROTECTION INFORMATION
This appliance is marked according to the European directive 2002/96/EC on
Waste Electrical and Electronic Equipment (WEEE). By ensuring this product is
disposed of correctly, you will help prevent potential negative consequences for
the environment and human health, which could otherwise be caused by
inappropriate waste handling of this product.
This symbol indicates that once the appliance is no longer needed, it cannot be
disposed together with other miscellaneous municipal waste. Disposal must be carried out
in accordance with local environmental regulations for waste disposal. For more detailed
information about treatment, recovery and recycling of this product, please contact your
local authority, your household waste disposal service or the retailer where you purchased
the product.
If you decided to scrap the appliance, make it impossible to use in order to prevent
possible misadventure. Pull out the electric plug from the electricity supply socket and then
cut off the cord. Tear off the gasket. Break the door lock if any.
Do not dismantle the appliance yourself. Pass it on to recycling companies.
N G B R S N
Other manuals for R 13SM
1
Table of contents
Other SNAIGE Refrigerator manuals

SNAIGE
SNAIGE WD35SM User manual

SNAIGE
SNAIGE C 14SM User manual

SNAIGE
SNAIGE R 130 User manual

SNAIGE
SNAIGE CD290-1004 User manual

SNAIGE
SNAIGE MD40DD User manual

SNAIGE
SNAIGE RF27SM User manual

SNAIGE
SNAIGE RF53SG User manual

SNAIGE
SNAIGE FR27SM User manual

SNAIGE
SNAIGE CC70MF User manual

SNAIGE
SNAIGE C 29SM User manual

SNAIGE
SNAIGE R 13SM User manual

SNAIGE
SNAIGE RF62FB-TNCBNE0 User manual

SNAIGE
SNAIGE SGM020P2AA Series Manual

SNAIGE
SNAIGE FR240 User manual

SNAIGE
SNAIGE MD14DC User manual

SNAIGE
SNAIGE MD40DC User manual

SNAIGE
SNAIGE RF31SM User manual

SNAIGE
SNAIGE CD40DM User manual

SNAIGE
SNAIGE CD48DM-S300BD User manual

SNAIGE
SNAIGE CD29DM User manual