Snapkis Steps 1-11 User manual

Steps 1-11
USER MANUAL
Group I,II,III
Suitable from 9kg to 36kg
(approx. 9 mths to 12 yrs)
Approved to ECE R44-04 standard
(Please read this instruction manual carefully before installation)
88018
601 Sims Drive, Pan-I Complex
Singapore 387382
www.snapkis.com
!
1. Applicability
2. Notice
For your child’s safety, please follow below instructions:
1. This is a “Universal” child restraint. It is approved to ECE R44-04, for general
use in vehicles and it will fit most, but not all vehicles.
2. A correct fit is likely if the vehicle is capable of accepting a “Universal child
restraint for this age group.
3. If in doubt, please contact manufacturer or retailer.
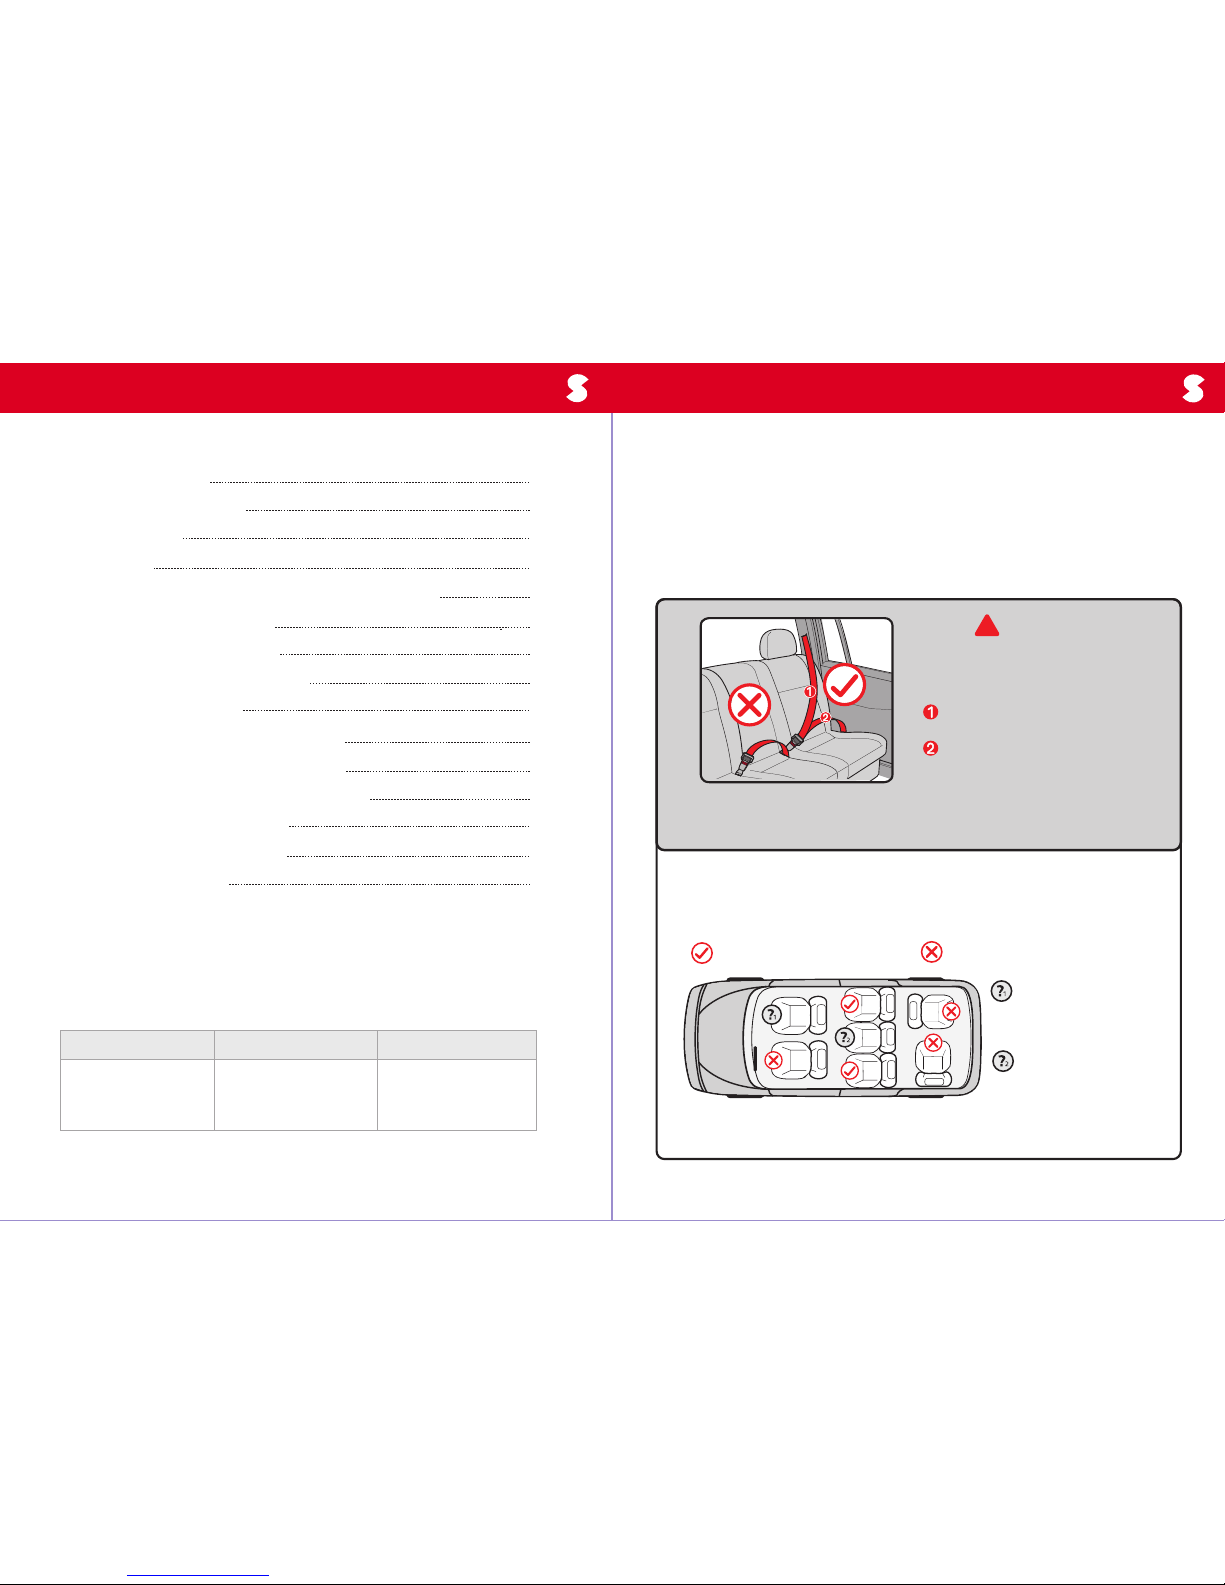
WARNING
This car seat can only be installed
using a 3-point seat belt.
Vehicle seat belt – shoulder belt
Vehicle seat belt – lap belt
This car seat is suitable for all vehicles equipped with a 3-point seat
belt, approved to ECE R16 regulation.
This car seat only can be installed on a forward facing passenger
seat. Do not install the child car seat at the lateral and rear facing
passenger seat.
Child with a body weight
between 15-25kg (approx. 3
to 7 years
Child with a body weight
between 15-36kg (approx. 4
to 12 years)
Forward facing installation
(Group II)
Forward facing installation
(Group II, III)
12
Forward facing installation
(Group I)
Child with a body weight
between 9-18kg (approx. 9
months to 4 years)
Suitable to install car seat at
this position
Do not install car seat at
this position
Do not install the car
seat at the front
passenger seat with
an active airbag
The car seat can be
used if this passenger
seat has a 3-point seat
belt
Note: Above illustration is based on a left hand drive car
Contents
1. Application of Car Seat
2. Understanding Your Vehicle
3. Safety information
4. Car seat parts
5. How to ensure the shoulder belts are at the correct height
6. How to adjust the shoulder belts
7. How to fasten the harness buckle
8. How to adjust and secure the harness
9. How to adjust the headrest
10. How to install car seat for Group I (9-18kg)
11. How to install car seat for Group II (15-25kg)
12. How to install car seat for Group II,III (15-36kg)
13. How to re-fit the car seat backrest
14. How to remove the car seat cover
15. Cleaning & Maintenance
1
2
3
5
6
6
7
7
8
9
11
13
14
15
16

!
3. Safety Information
WARNING
For your child’s safety, please read this
user manual carefully.
1) This car seat should only be installed by an adult and is suitable for children from
9 to 36 kg.
2) This car seat can only be installed using a vehicle 3-point seat belt. This car seat
only can be installed in the forward facing position.
3) Never place the car seat on a vehicle seat with an active airbag.
4) Please follow the installation diagrams on the car seat or user manual when
installing the car seat in your vehicle.
5) The car seat should be properly secured so that your child is well protected in the
event of an accident.
6) Always keep the car seat secured in the vehicle even when it is unoccupied.
7) For your child’s safety, do not use a damaged or second-hand car seat. This car
seat should be changed timely when it has been subject to violent stress in an
accident.
8) Never use the car seat without a cover.
9) Do not put your child at risk by using other replacement cover which could
prevent the car seat from protecting your child as it should.
10) Please cover the car seat properly when the vehicle is parked under direct
sunlight. The parts of the car seat that are not provided with a textile cover should
be kept away from the sunlight, otherwise it may be too hot for your child’s skin.
11) The harness buckle cannot be in semi-locked state. Always ensure the car seat
is secured before using. In case of emergency, your child can be taken out quickly.
12) Keep the car seat away from corrosive fluids.
13) Please keep the child car seat in a safe place when not in use. Do not place
heavy objects on the car seat.
14) Please follow the installation instructions closely. Do not allow the car seat to
be jammed in the vehicle door, seat runners, etc.
15) Do not make any additions or changes to the car seat. Do not use other
installation methods except for the instructions provided in the user manual.
16) Do not use any load bearing contact points other than those described in the
instructions and marked on the car seat.
17) Any luggage or other objects liable to cause injuries in the event of collision
should be properly secured.
18) Do not install car seat on an unlocked foldable vehicle seat as it may lead to
the car seat losing its effectiveness in an emergency brake situation.
19) Do not put any padding under the car seat to increase height because it may
cause the car seat to lose its effectiveness in the event of an accident.
20 )Do not leave your child on the car seat unattended.
21) Please stop your vehicle in a safe area when your child accidentally unfasten
the seat belt. Secure the seat belt properly before continuing the journey.
22) Any straps holding the car seat to the vehicle should be tight. Any straps
restraining the child should be adjusted according to the child’s body and not be
twisted.
23) The lap section of the harness should be worn as low as possible, over your
child’s hips.
24) The user manual should be retained for the life span of the car seat.
34

A
B
C
4. Car Seat Parts 5. How to ensure the shoulder belts are at the
correct height
6. How to adjust the shoulder belts
Headrest
Small head
cushion
Shoulder belt
Backrest
Inner cushion
Shoulder pad
Buckle pad
56
Lap belt route
slot
Car seat base
Harness adjuster strap
Quick adjuster button
5-point harness
system
Crotch strap
Seat belt route for
Group 2
Shoulder belt
route slot
Yoke connect plate
Height adjuster
Seat belt perforation
for Group 1
For your child’s safety, always check
that the height of the shoulder belts
are adjusted according to the
size/height of your child. The
shoulder belt should be at the same
level as your child’s shoulder or
slightly higher (as shown in the
diagram).
If the height of the shoulder belt is not suitable for your child, adjust it
according to the following steps:
Step 1: From the back of
the car seat, remove
both shoulder belts from
the yoke connect plate.
Step 2: Pull both
shoulder belts out from
the shoulder belt route
slot.
Step 3: Insert the
shoulder belts into the
appropriate shoulder
belt route slot.
Step 4: Fit the shoulder belts into
the yoke connect plate.
Important: Make sure both
shoulder belts are of the same
height, not twisted and fitted
properly into the yoke connect
plate.

!
7. How to fasten the harness buckle
8. How to adjust and secure the harness
9. How to adjust the headrest
87
Loosening the harness
Press the quick adjuster button and pull the
shoulder belts towards yourself to loosen the
harness.
Follow the method shown in the diagrams above:
Step 1: Put the right and left tongues of the buckle together. Ensure the buckle
tongues are firmly together.
Step 2: Insert the joined buckles tongues into the harness buckle until you hear a
“click” sound. Make sure the harness buckle is secure by pulling the shoulder belt
upwards.
Step 3: To release the harness, press the red button on the harness buckle. The red
button passed the safety test and meets the safety standard. It is dicult for a
child to unfasten the harness buckle on his own.
click
Step 1 Step 2 Step 3
Tightening the harness
Place your child in the car seat. Insert the joined
buckles tongues into the harness buckle. Adjust the
position of the lap and shoulder belts. Pull the
harness adjuster strap until the harness is tight.
Important: Tighten the harness as far as
possible, while ensuring your child is
comfortable.
Make sure the height of the headrest is adjusted according to the size/height of
your child. Ensure your child’s head rests comfortably in the middle of the
headrest
To adjust the height of the headrest, turn the car
seat to the back and pull the height adjuster of
the headrest to an appropriate position until you
hear a “click” sound.
Too Low Too High Correct
Tighten the
harness

!
10. How to install car seat for Group I (9-18kg,
approx. 9mths to 4 years)
9 10
Step 1: Place the car seat forward
facing on the vehicle seat. Make
sure it is resting firmly against the
vehicle seat backrest.
Step 2: Pull out the vehicle
3-point seat belt.
Step 3: Pass the vehicle seat belt through the lap belt guide slot
under the armrest.
Step 4: Pass the vehicle shoulder belt through the slot under the headrest.
Step 5: Pass the vehicle seat belt through the seat belt perforation to the back
of the car seat. Pass the seat belt through the seat belt perforation on the other
side to the front of the car seat.
Step 6: The vehicle seat belt should go through the lap belt route
slot under the armrest on the other side of the car seat.
Step 7: Fasten the seat belt into
the buckle. Tighten the seat belt
and remove any slack.
Step 8: Place your child into the
car seat and secure him with the
5-point harness.
Important: Do not use any load bearing contact points other than those
described in the instructions and marked on the child restraint.
!
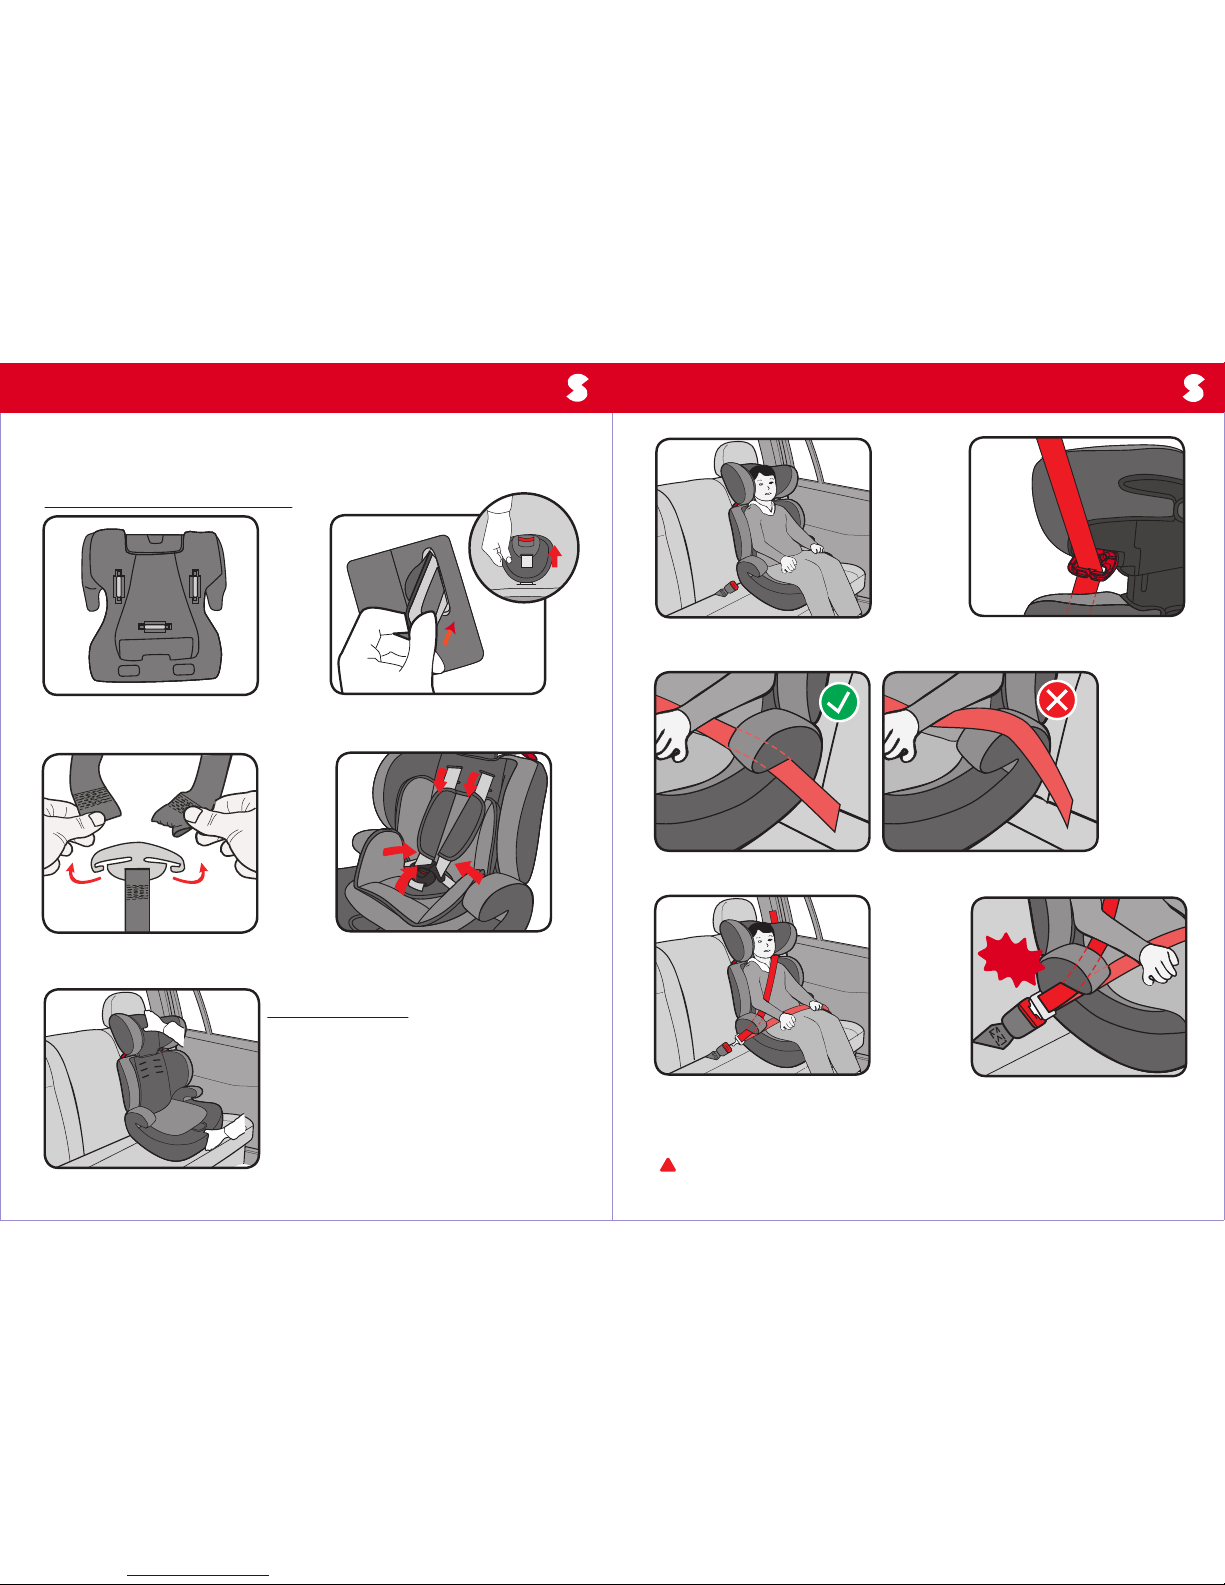
11. How to install car seat for Group II (15-25kg,
approx. 3 to 7 years)
11 12
Removing the 5-point harness system
Step 1: Turn to the bottom of the
car seat
Step 2: Take the buckle metal plate
out from the crotch belt hole.
Step 3: From the back of the car
seat, remove both shoulder belts
Step 4: Pull out the 5-point harness
system from the front of the car
seat.
Installing the car seat
Step 1: Place the car seat in the forward facing
position on the vehicle seat. Make sure it is
resting firmly against the vehicle seat
backrest.
Step 2: Place your child on the car
seat.
Step 3: Pass the vehicle shoulder
belt through the seat belt route
under headrest.
Step 4: Pass the vehicle lap belt through the lap belt guide slot
under the armrest.
Step 5: Pass the vehicle seat belt over
your child and it should go through the
lap belt route slot under the armrest on
the other side of the car seat.
Step 6: Fasten the seat belt into the
buckle properly until you hear a “click”
sound. Tighten the seat belt and
remove any slack.
Important: Do not use any load bearing contact points other than those
described in the instructions and marked on the child restraint.
click

!
12. How to install car seat for Group II, III (15-36kg,
approx. 4 to 7 years)
13. How to re-fit the car seat backrest
13 14
Important: Do not use any load bearing contact points other than those described in
the instructions and marked on the child restraint.
click
Step 1: Remove the 5-point harness system
and inner cushion. Hold onto the car seat
base and push the backrest down.
Step 2: Detach the backrest from
the car seat base.
Step 3: Place the booster seat in the
forward facing position on the vehicle seat.
Step 4: Place your child on the
booster seat.
Step 5: Pass the vehicle lap belt through the lap belt route slot
under the armrest.
Step 6: Place the vehicle seat belt over your
child. It should go through the lap belt route
slot under the armrest on the other side of
the car seat. Make sure the vehicle lap is worn
as low as possible, over your child’s hips.
Step 7: Fasten the seat belt into
the buckle properly until you hear
a “click” sound. Tighten the seat
belt and remove any slack.
To re-fit the car seat backrest, attach the backrest to the car seat base as shown.
Engage the two pegs and press down firmly on the backrest so that the two pegs
engage securely. Lift the backrest upwards. Make sure the backrest is secured.
12
34

14. How to remove the car seat cover
15. Cleaning & Maintenance
15 16
Step 1: Remove the inner headrest. Press
the red button on the harness buckle to
release the 5-point harness system.
Step 2: Turn the car seat to the
back, remove both shoulder belts
from the yoke connect plate.
Step 3: From the front of the car seat,
pull both shoulder belts out from the
shoulder belt route slots.
Step 4: Turn to the bottom of the
car seat.
Step 5: Remove the buckle metal plate
from the crotch belt hole.
Step 6: The 5-point harness system,
inner cushion and other equipment can
be removed from the front of the car
seat easily. Please keep the equipment
properly for future use.
Step 7: Turn the car seat to the back,
unfasten the buttons on the car seat
cover.
Step 8: Remove the car seat cover.
To re-fit the car seat cover, please follow the
above method in the reverse order.
Periodically check the car seat for damage or worn parts. Do not use this car
seat if any part is damaged or worn.
5-point harness buckle
A5-point harness buckle is a safety feature. Please use warm water to clean the
5-point harness buckle as food, drink and other residues may easily accumulate
in the buckle. If the buckle is jammed, please contact manufacturer or retailer.
5-point harness belts and plastic components
Wipe the 5-point harness belts and plastic components with warm water and
mild soap.
Car seat cover
Never use this car seat without the cover.
The car seat cover is washable. We do not recommend removing the car seat
cover frequently. Please refit the car seat cover after washing and make sure all
components are refitted properly.
Machine/Hand wash the car seat cover in warm water below 30˚C with mild
soap. Do not use any solvent, cleaning chemicals and lubricant on the car seat.

17
Do not remove or make any additions to the car seat cover and 5-point harness
system.
Flat dry. Avoid drying the seat cover in direct sunlight.
Do not dry clean.
Machine/
Hand wash,
below 30˚C
Do not bleach Do not
tumble
Do not ironDo not wring
Table of contents
Other Snapkis Car Seat manuals


