so Pure Air KTIII User manual

USER MANUAL
KTIII
MEDICAL GRADE
DUALTECHNOLOGY MOBILE
AIR STERILISATION SYSTEM
*r:
•
Fast Air
Sterilisation
Cross Infection
Reduction
Kills 99.97% of Airborne
Pathogens and Viruses
�Ii
I
- -o
Dual Technology
Filters
" •
�
Quiet Certified

2| KTIII USER MANUAL |MEDICAL GRADE DUAL TECHNOLOGY MOBILE AIR STERILISATION SYSTEM
UPGRADE YOUR WARRANTY
Every So Pure KTlIl is supplied with a 2 year warranty
against manufacturing defects. You can also obtain a
free upgrade to a 5 year warranty by registering the
product with So Pure.
To obtain the 5 year warranty simply:
• Email sales@sopureair.co.uk with the following details
• Company name
• Company address, including postcode
• Contact name
• Main contact telephone number and email address
• Location of machine (address if dierent to above and
oor/room details if applicable)
• Serial number of machine (located on a label on the rear
of the machine)
• Date of purchase/lease
Please register your product within 30 days of receipt.
Registering your product also ensures that we will contact
you after 12 months as a reminder to book your rst free of
charge annual maintenance service.
This does not aect your statutory rights

MEDICAL GRADE DUAL TECHNOLOGY MOBILE AIR STERILISATION SYSTEM |USER MANUAL KTIII |3
Product Introduction
The KTlll Air Steriliser is capable of eliminating PM2.5, dust, dust
mites, pollen, bacteria, viruses, methanal, unpleasant odours,
smoke and other pollutants eectively.
It is equipped with four layers of lters: preliminary air lter, HEPA high
eciency lter, activated carbon lter and photocatalytic lter.
These are combined with ultraviolet UV-C lamps that eliminate viruses and
bacteria, delivering a total of 5 levels of high eciency air sterilisation. The
unit is also equipped with a plasma generator capable of activating over
5x10⁶ions/cm3, further purifying and improving air quality.
The machine has 4 operational modes: auto mode, manual mode, fast
sterilisation mode and night mode. It also has a 4 speed fan and safety
conscious child lock function.
Product Functions
• Purify gaseous pollutants such as smog, dust particles and methanal, etc.
• Eectively eliminate air viruses and bacteria through use of HEPA and
photocatalytic lters
• Activate large quantity of negative ions to improve air quality and the
environment
• Achieve sterilisation and air purication for oces, indoor commercial
and public spaces, restaurants, pubs and entertainment venues
Product Features
• Multi-colour LED ambient indicator lights that display air quality
• Four layers of air lters and ve levels of air sterilisation
• Built in high precision particle and organic compound sensors to conduct
real-time air quality checks
• Remote control, manual control and night mode
• Four sterilisation modes: Manual, Auto, Fast Sterilisation and Night, with
4 level fan speed
• Warning indicators to remind you when the lters and UV-C lamps need
changing
Security protection function
• Auto power shut o when the unit tilt angle is greater than 25 degrees
• Auto power shut o if air lters are not installed
• Auto UV-C lamp power shut o if photocatalytic lter is not installed
4| KTIII USER MANUAL |MEDICAL GRADE DUAL TECHNOLOGY MOBILE AIR STERILISATION SYSTEM
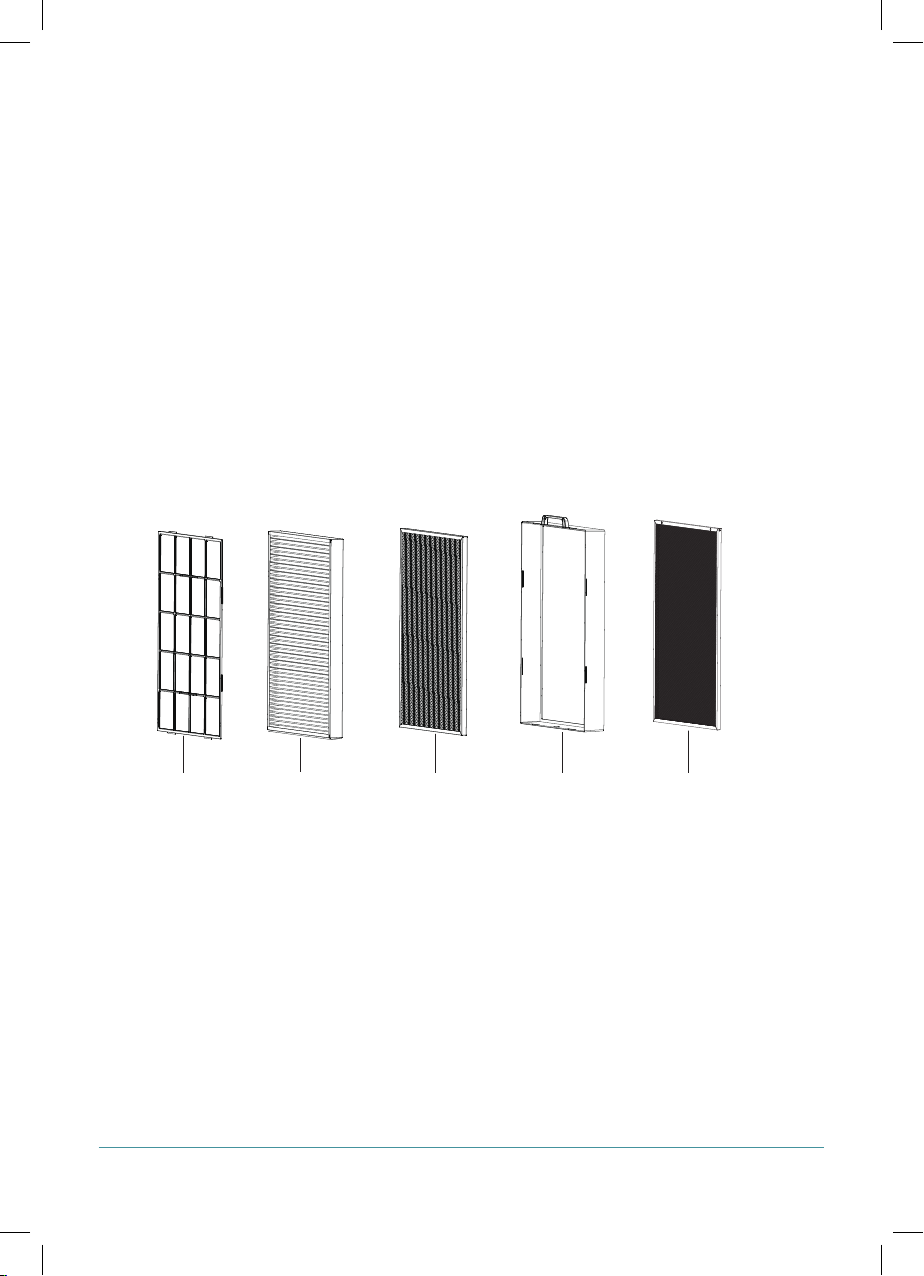
Filters Characteristics
I. Preliminary air lter: Filters out larger particles such as
hair, dirt etc.
II. HEPA high eciency lter: Filters out dust, pollen,
allergens, viruses, bacteria, pollutants and ne particles
larger than 0.3µm.
III. Activated carbon lter: Filters out hazardous gases such
as volatile organic compounds, smoke and unpleasant
odours.
IV. Photocatalytic lter: Produce photocatalytic action in
combination with ultraviolet UV-C lamps, eliminating
hazardous bacteria and viruses in the air eectively.
Preliminary
Preliminary
Filter
Filter
HEPA High
HEPA High
Eciency Filter
Eciency Filter
Activated Carbon
Activated Carbon
Filter
Filter
Photocatalytic
Photocatalytic
Filter
Filter
Assembly
Assembly
Box
Box
MEDICAL GRADE DUAL TECHNOLOGY MOBILE AIR STERILISATION SYSTEM |USER MANUAL KTIII |5
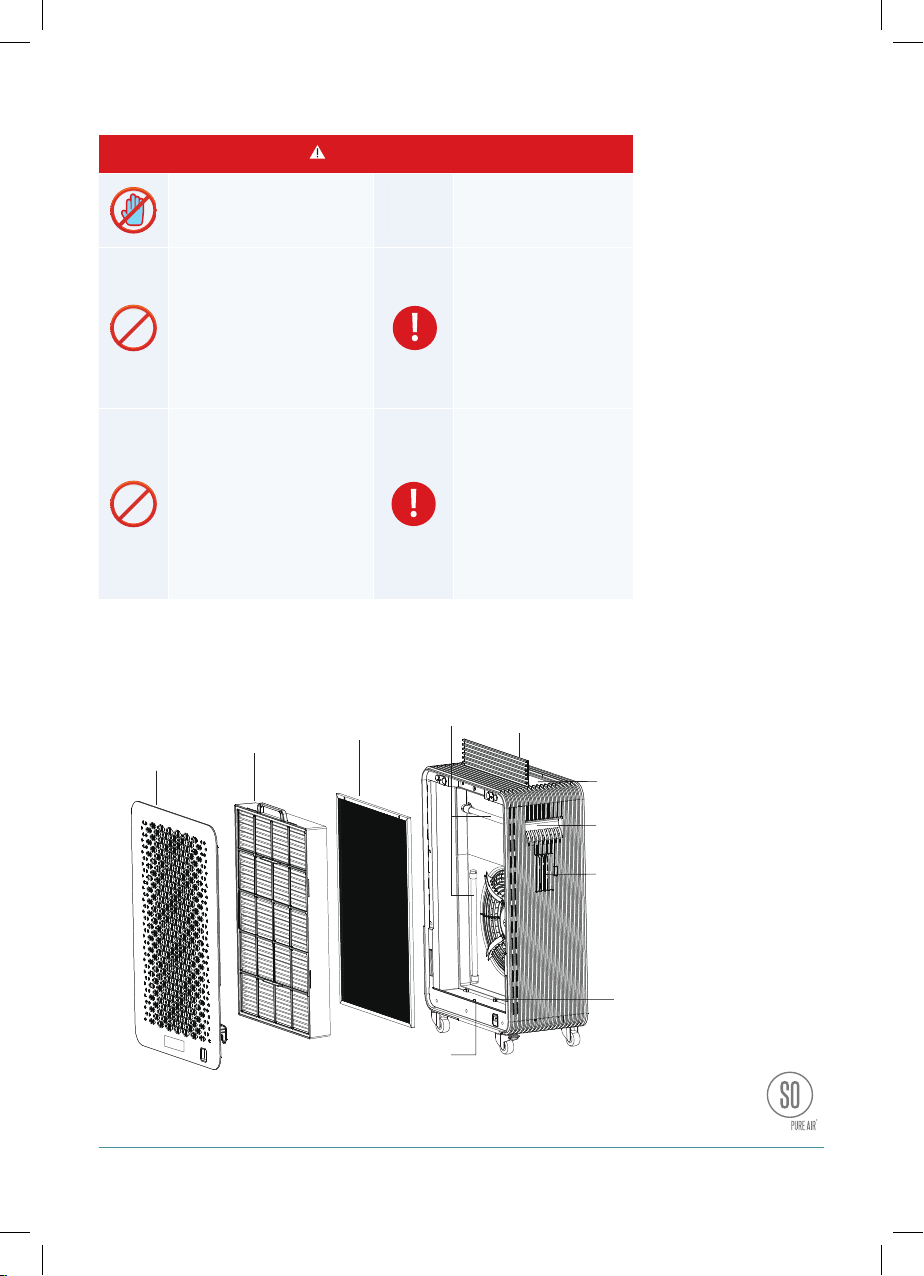
Precautions
Product Structure
WARNING
Do not touch unit or plug/power
supply cable with wet hands
Make sure the power is
disconnected before cleaning.
Only use the power supply cable
supplied and connect only to a 230V
AC mains supply. The user must not
open the unit’s casing and attempt
to carry out any repairs. The unit
must be repaired by an approved
professional engineer. Do not
pour water, liquids or ammable
products into the unit as this may
damage the product and lead to risk
of electric shock or re.
When operating, the unit must
be placed a distance of at least
20cm from the back and 30cm
from either side to any other
surface. The unit must only be
used in a dry environment and
on a stable, at surface, away
from any sources of heat or
moisture.
Do not use solvent or other chemical
products to clean the machine body.
Do not place hands or any other
objects into the air outlet. Do not
disconnect the power by pulling on
the power supply cable. Isolate the
power and unplug the unit correctly.
Do not place any object into either
the air inlet or outlet, as this will
reduce the airow and reduce the
purication eciency.
Unplug the unit from the
power supply when it will
not be used for an extended
period. Do not let children
touch or operate the unit.
Maintain a smooth airow by
not allowing the air inlet to
become blocked by dust, litter,
hair or other substance.
Rear cover Filter module
Photocatalytic
Filter
UV-C
lamps
Air
outlet
cover
Air outlet
Handle
Air sensor window
UV-C lamp
micro switch
Filter module
micro switch

6| KTIII USER MANUAL |MEDICAL GRADE DUAL TECHNOLOGY MOBILE AIR STERILISATION SYSTEM
Product Structure
Display Panel
Tilt protection device
Power
Power
connection
connection
point
point
Fast sterilise
Fast sterilise
mode symbol
mode symbol
UV-C lamp change indicator
UV-C lamp change indicator
Fast sterilise Mode
Fast sterilise Mode
Manual Mode
Manual Mode
Auto Mode
Auto Mode
Standby/On
Standby/On
HEPA lter change indicator
HEPA lter change indicator
Activated carbon lter change indicator
Activated carbon lter change indicator
Child lock indicator
Child lock indicator
Night mode indicator
Night mode indicator
Four level fan speed indicator
Four level fan speed indicator
Auto mode symbol
Auto mode symbol
UV-C lamp symbol
UV-C lamp symbol
WiFi (Tuya App) symbol
WiFi (Tuya App) symbol

MEDICAL GRADE DUAL TECHNOLOGY MOBILE AIR STERILISATION SYSTEM |USER MANUAL KTIII |7
Explanation of Display Panel
The display panel is divided into power button, function
button, consumables status display and working status
display.
1. Power button and function button display:
2. Consumables status display
The KTlll automatically advises when the lters and UV-C
lamps need replacing. Indicators on the display panel ash
to warn the user when replacement is required. This facility
is based on operational hours, to ensure that the eciency
of the unit is maintained. When the lters or UV-C lamps
are approaching the end of life, the indicators ash to
remind the user to organise a service. The indicators stay
on permanently when the lters or lamps need replacing
immediately.
STANDBY ON
Power button
FUNCTION BUTTON
Auto Mode No display
Manual Mode No display
Fast Sterilise Mode No display
NORMAL ABOUT TO
EXPIRE EXPIRED
UV-C Lamps No display
Flash
Flash
Constant on
Constant on
HEPA lter No display
Flash
Flash
Constant on
Constant on
Activated carbon
lter No display
Flash
Flash
Constant on
Constant on
Standby On
8| KTIII USER MANUAL |MEDICAL GRADE DUAL TECHNOLOGY MOBILE AIR STERILISATION SYSTEM
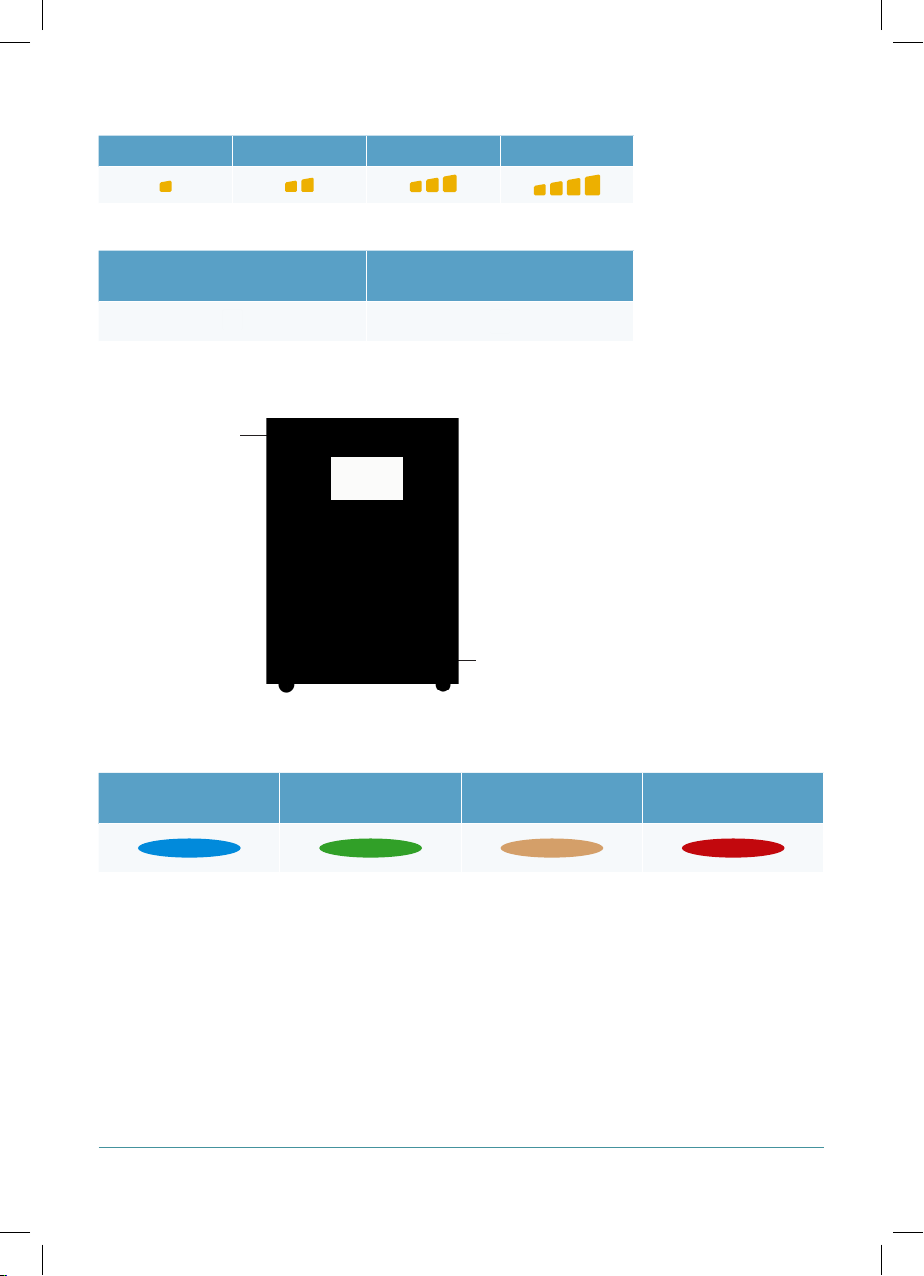
3. Manual mode status
4. Fast sterilise mode status
1. PM2.5 indicator display status
Air Quality Status Indication
LEVEL 1 LEVEL 2 LEVEL 3 LEVEL 4
FAST STERILISE MODE
BUTTON
PANEL DISPLAY
(BLUE) GOOD (GREEN)
AVERAGE (ORANGE) BAD (RED) DIRTY
2. TVOC air quality indicator display status
PM2.5 Air Quality
PM2.5 Air Quality
Indicator
Indicator
(PM2.5 = particulate
(PM2.5 = particulate
matter of diameter
matter of diameter
<2.5µm)
<2.5µm)
TVOC Air
TVOC Air
Quality Indicator
Quality Indicator
(TVOC = Total
(TVOC = Total
Volatile Organic
Volatile Organic
Compounds)
Compounds)
MEDICAL GRADE DUAL TECHNOLOGY MOBILE AIR STERILISATION SYSTEM |USER MANUAL KTIII |9
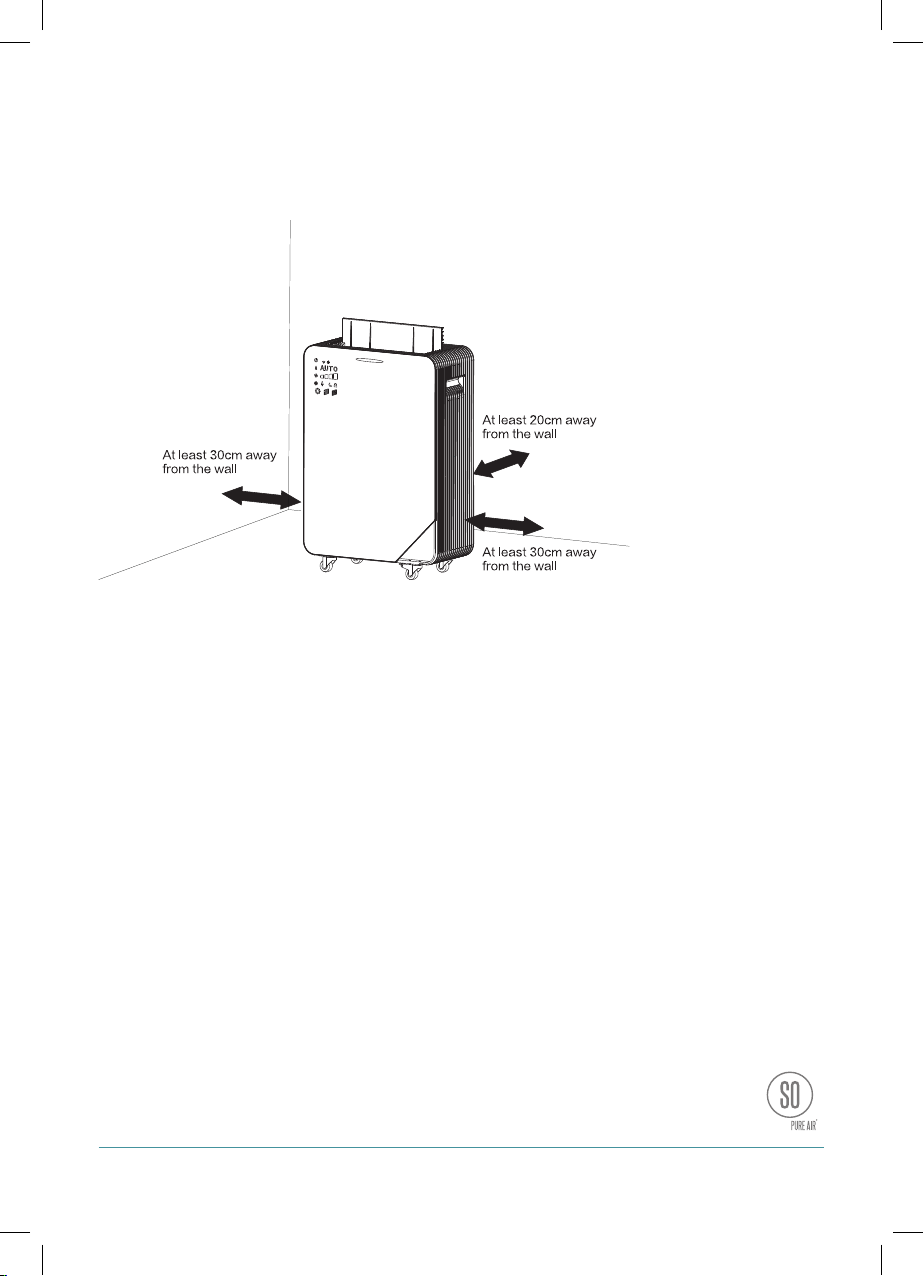
Product Placement Requirements
When deciding where to place the unit in a room, ensure
that at least 20cm clearance is provided at the back of the
unit and 30cm clearance at either side, away from walls or
other objects.
Usage
1. Connecting to the power supply:
When using the unit for the rst time, remove the power
supply cable provided from the packaging. Plug the
moulded end into the power socket on the rear of the unit
and the 3 pin plug into the mains supply socket. The power
button on the display panel will illuminate red.

10 | KTIII USER MANUAL |MEDICAL GRADE DUAL TECHNOLOGY MOBILE AIR STERILISATION SYSTEM
Touch lightly, the unit will turn on and you will hear a
conrmatory ringtone. The power button will turn green
and the air outlet cover will open 90 degrees.
The unit will default into auto mode. The front panel will
display the following symbols: (Auto), (Manual),
(Fast Sterilise). The PM2.5 and TVOC air quality indicators
will display their colour status according to the current
inspected air quality. The UV-C lamps are on whenever
the unit is powered on. The UV-C lamps activate the
photocatalytic process
3. Manual Mode: In manual mode, fan speed is indicated as
one of 4 levels, with the indicator conrming the level.
2. Auto Mode: In auto mode, the air quality sensors will
automatically adjust the fan speed according to the current
air quality grade. The PM 2.5 and TVOC air quality indicators
will display dierent colours accordingly as air quality
changes. The sequence from good to dirty is: blue – green –
orange - red.
MEDICAL GRADE DUAL TECHNOLOGY MOBILE AIR STERILISATION SYSTEM |USER MANUAL KTIII |11
4. Fast Sterilise: In fast sterilise mode, the unit circulates
and sterilises the largest air volume. If the unit is left in Fast
Sterilise mode for 80 minutes, it will automatically exit this
mode and return to Auto mode.
Tip: Under normal circumstances the unit only needs to be
operated in Fast Sterilise mode for up to 10 minutes at a
time, to work eectively.
5. Night Mode: If the unit is switched on in Auto mode
and the area in which it is located becomes dark for 10
seconds or more, the unit automatically switches to Night
mode. Only the power and night mode symbols remain
illuminated. The unit will operate at the lowest fan speed
and the air outlet cover will close to 45 degrees. The air
quality sensors will continue to function and should the
air quality become poor the unit will increase fan speed to
level 2 maximum. When light levels increase again, for a
minimum of 10 seconds, the unit will return to Auto mode.
6. Remote: The remote control
works at a distance of up to 10m
from the front of the unit and at
an angle of up to 45 degrees to
either side. The remote operates
all the functions above, but also
controls the child lock.
Child Lock Button
Child Lock Button
Button not in use
Button not in use
Auto Mode Button
Auto Mode Button
Fast Sterilise Mode Button
Fast Sterilise Mode Button
Manual Mode Button
Manual Mode Button
Power Button
Power Button
12 | KTIII USER MANUAL |MEDICAL GRADE DUAL TECHNOLOGY MOBILE AIR STERILISATION SYSTEM
7. Child Lock: Press the child lock button on the remote and
the child lock symbol on the panel will illuminate. All other
buttons on the remote and all those on the unit will be
disabled. Button operation is restored when the child lock
button is pressed again to remove the lock.
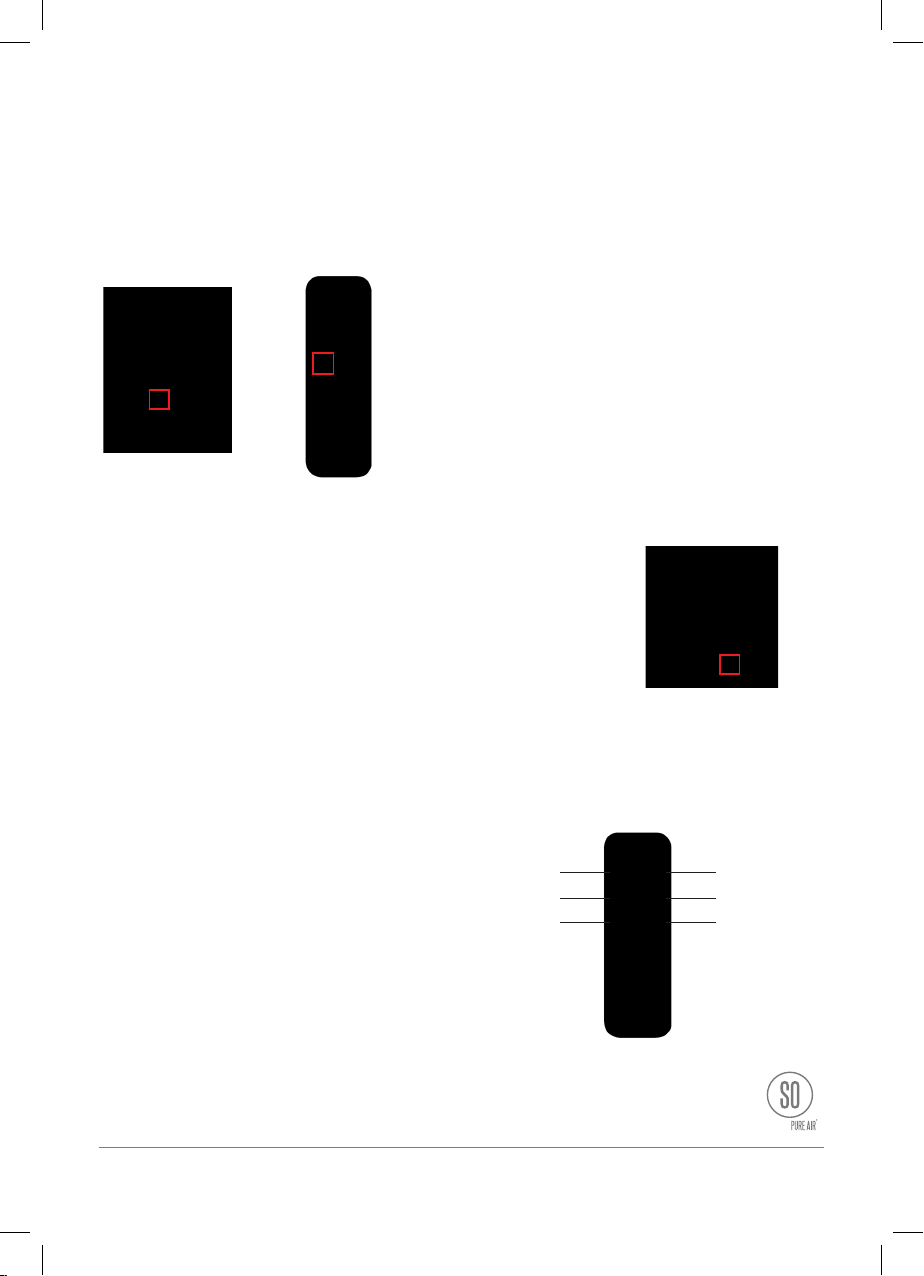
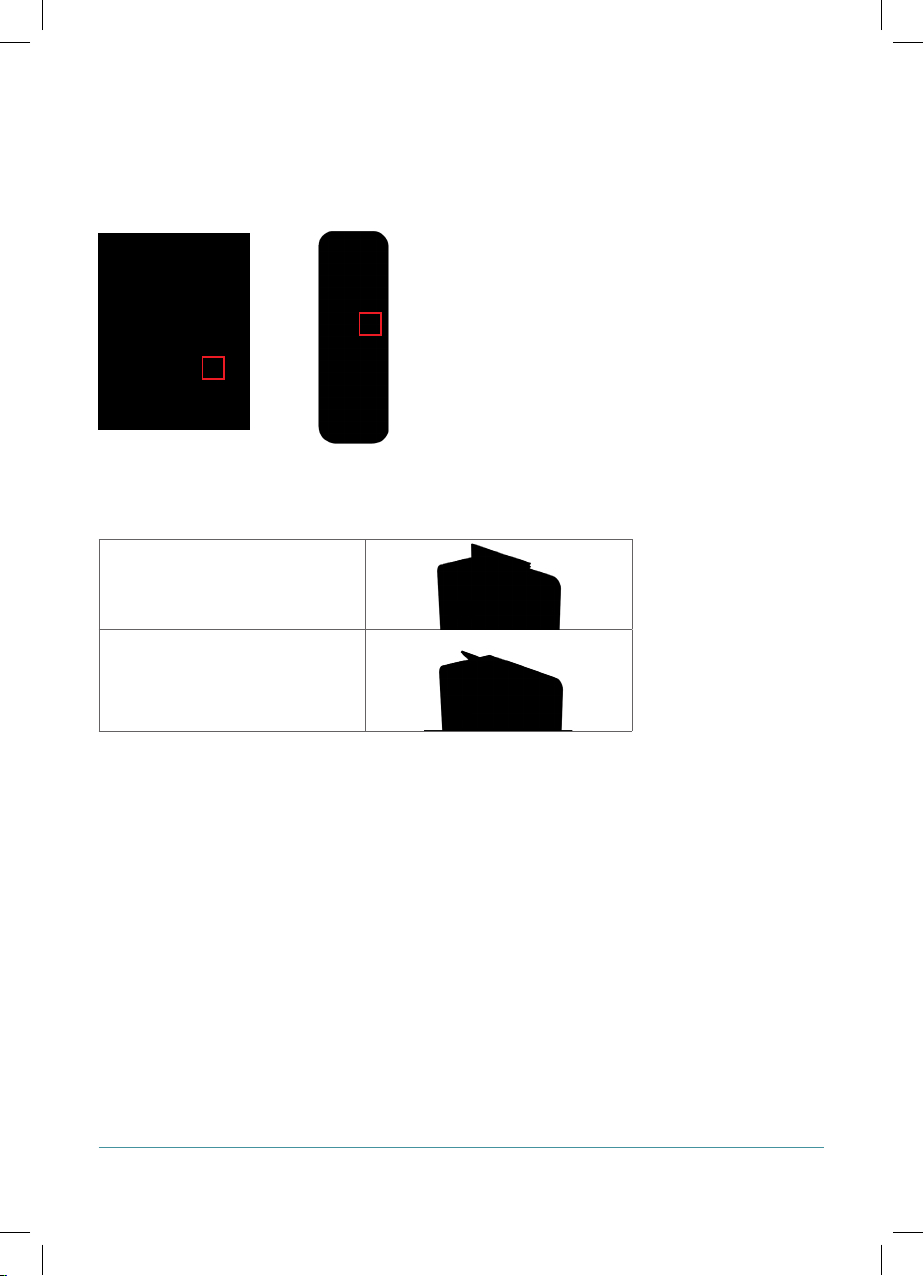
8. Air Outlet:
Safety Precautions
1. If interior humidity is high, water may condense on the
air quality sensor. When this occurs and the unit is in Auto
mode the air quality status lights may display bad air quality
even if the air quality is good. If this occurs, select Manual
mode under these conditions.
2. If the unit is unplugged and has not been used for a
long period of time, then switched on in Auto mode, the
air quality status lights may display bad air quality even
if the air quality is good. This may be due to pollutants on
the surface of the sensor. If this occurs, clean the sensor as
instructed on page 20.
The air outlet cover opens to
90 degrees in auto, manual and
fast sterilise modes.
The air outlet cover opens to 45
degree when the unit is in night
mode.

Tuya App
Set Up and Operating
Instructions
MEDICAL GRADE DUAL TECHNOLOGY MOBILE AIR STERILISATION SYSTEM |USER MANUAL KTIII |13

Plug in the device, click power on
“ “, then press“ “ on the panel for
5 seconds until the“ ”symbol ashes
(repeat it if“ ”symbol does not ash).
Then click Add Device.
3
This device can also be controlled remotely using the
TUYA APP. Follow the set up instructions below.
Scan the QR code to download or search
TuyaSmart to download and install the APP.
1 2 Launch Tuya Smart and click Log In (click
Sign Up rst if you don’t have a TUYA
account) or Try now (some APP features
may not be available without login).
Click Auto Scan, launch Location
Services, WLAN (Ensure your phone and
the device use the same network) and
Bluetooth, and then click Auto Scan to
search for the nearby devices available.
4
14 | KTIII USER MANUAL |MEDICAL GRADE DUAL TECHNOLOGY MOBILE AIR STERILISATION SYSTEM

Input the account and password of the
WLAN for the device (Ensure the device uses
the same network as your phone with the
same correct password. ) and click Conrm.
Note: This APP only works on 2.4GHz networks.
6
The APP control interface will now
appear. Click Icons to remote control
the device. Congratulations! now you
can control this device by Tuya.
8
Click Next when the APP has located
the available devices.
5
7APP will be automatically connected
with the device, this process may
take 1-3 minutes.Click“Done”after
“Add Successfully”. If you click the
device name you can re-name it, for
example:“Air Purier”.
MEDICAL GRADE DUAL TECHNOLOGY MOBILE AIR STERILISATION SYSTEM |USER MANUAL KTIII |15

Click Share Device for device sharing.
2
Click Add Sharing to input the other
user’s account name.
3With Add Successfully the other user
can control the device simultaneously.
4
Sharing APP control of the device with other users.
Click the “ ” by the side of the device
name in the Settings interface.
1
Add Sharing Add Sharing
16 | KTIII USER MANUAL |MEDICAL GRADE DUAL TECHNOLOGY MOBILE AIR STERILISATION SYSTEM

MEDICAL GRADE DUAL TECHNOLOGY MOBILE AIR STERILISATION SYSTEM |USER MANUAL KTIII |17
Repair and Maintenance
1. Preliminary lter: The cleaning frequency of this lter is
determined by the operating speeds of the fan, the level
of air pollution and total unit operational time. Under
normal circumstances it should be cleaned every 12 months
minimum, but where operational hours are high or in dirty
atmospheres, it may need to be cleaned every 3-6 months.
Air sterilisation eciency is reduced if the lter is not
cleaned regularly.
2. HEPA & activated carbon lters: The average service life
of the these lters is approximately 12 months. This may
be reduced in environments with higher than average air
pollution or where the unit is used for longer than normal
operational hours. The lters should be replaced every 12
months minimum, or sooner if the lter icons on the display
panel ashes. When the icons turn constant red, the lters
must be replaced immediately to retain the unit’s sterilising
eciency.
3. Cleaning of preliminary lter:
1) Turn o and unplug the unit.
2) Pull the top edge of the rear cover away from the unit and
then lift the cover up to remove it.
3) Rotate the two retaining sliders at the top of the unit 90
degrees in the direction of the arrows and lift out the lter
assembly, using the handle.

18 | KTIII USER MANUAL |MEDICAL GRADE DUAL TECHNOLOGY MOBILE AIR STERILISATION SYSTEM
4) To prevent raising any accumulated dust from the lter,
grasp the two pullers on the preliminary lter and pull
out lightly. Gently loosen the tabs from the sockets on the
assembly frame on both sides and bottom rst, then rotate
the lter upwards to remove top tabs from the frame.
5) Method of cleaning: gently use a brush or a vacuum
cleaner with hand held nozzle to remove the dust. If the
lter is excessively dirty, it may be cleaned with water and
detergent. Ensure that the lter is fully dried before re-
installing it into the assembly and air purier. Take care not
to bend the lter during cleaning, to avoid damage.
6) Reinstallation method:
Reverse the removal
instructions Firstly insert top
tabs into sockets at top of the
frame, rotate lter downwards
and relocate side and bottom
tabs into corresponding
sockets. The lter pullers must
be facing outwards.
Gently vacuum using
Gently vacuum using
hand held nozzle
hand held nozzle
Clean with running water
Clean with running water

MEDICAL GRADE DUAL TECHNOLOGY MOBILE AIR STERILISATION SYSTEM |USER MANUAL KTIII |19
7) Install the lter assembly back into the unit. Rotate the
retaining sliders back into the vertical position. Insert the
location tags at the bottom of the cover into the corresponding
slots on the unit, push down and push top of cover back into
position until magnetic catches are fully engaged.
4. Replacement of HEPA and activated carbon lters:
When the HEPA or activated carbon lters need replacing,
the lter change indicators on the front panel of the
unit ash. If the icons turn constant red, the lters need
replacing immediately
If the unit is covered by a maintenance agreement, please
email sales@sopureair.co.uk to arrange maintenance.
If you have purchased the unit, please consult the seperate
maintenance instructions for full details on replacement.
HEPA lter change indicator
HEPA lter change indicator
Activated carbon lter change indicator
Activated carbon lter change indicator

20 | KTIII USER MANUAL |MEDICAL GRADE DUAL TECHNOLOGY MOBILE AIR STERILISATION SYSTEM
5. Cleaning of air sensor face plate and laser head of
particulate sensor
6. Replacement of UV-C lamps:
When the UV-C lamps need replacing, the UV-C lamp change
indicator on the front panel of the unit ashes. If the icon
turns constant red, the lamps need replacing immediately.
If the unit is covered by a maintenance agreement, please
email sales@sopureair.co.uk to arrange maintenance.
If you have purchased the unit, please consult the separate
maintenance instructions for full details on replacement.
Gently clean the air sensor
face plate using a brush or
vacuum cleaner head
Lightly clean the sensor
lens with a cotton bud, after
removing face plate
UV-C lamp change indicator
UV-C lamp change indicator
Table of contents
Popular Laboratory Equipment manuals by other brands

Bruker
Bruker 700'54 Ascend user manual

Sartorius
Sartorius Vivaspin 500 Instructions for use

Thermo Scientific
Thermo Scientific MEGA-PURE 680 D440046 Series Operation manual and parts list

Gilson
Gilson PIPETMAX 268 Setup guide

SYSMEX
SYSMEX XE-5000 quick guide

SIGNALCORE
SIGNALCORE SC5511A Operating & programming manual


