Sol-Expert 76631 User manual

Firmenanschrift aufbewahren -
Keep the address of the company -
Veuillez conserver l'adresse -
Adres bewaren -
Nicht geeignet für Kinder unter 3 Jahren! - Verschluckbare
Kleinteile! Not suitable for children under 3 years! -
Contains small parts! Ne convient pas pour les enfants de moins
de trois ans! - Contient de petites pièces pouvant être absorbées! Niet
geschikt voor kinderen beneden 3 jaar! - Kleine onderdelen Kunnen worden ingeslikt!
Tel.: +49 (0)7502 - 94115-0 - Fax: +49 (0)7502 - 94115-99
[email protected] - www.sol-expert-group.de
SOL-EXPERT group, C.Repky - Mehlisstrasse 19 - D-88255 Baindt SOL-EXPERT
group
group
10+ No. 76631
Water Tube Torch
Solar-powered, kit
We recommend:
4 0 3 7 3 7 3 7 6 6 3 1 4
You will need:
Soldering iron
Small screwdriver
Side cutters
Solder
Tweezers
The water tube torch kit
How the solar-powered water tube torch works
Safety Notes
Parts List
Qty. Component Value / Description
1 Board Fitted with SI2301
1 Resistor 8.2 Ohm
1 Resistor 20 kOhm
3 Resistor 100 kOhm
1 Water Tube 10 cm
1 Transistor BC337
1 Diode 1N4148
2 Battery Mount Size AA
1 LiFePO4 Storage Battery 400 mAh, 3.2 V
1 Solar Module 50 mA / 4 Volt
Beech 4 mm
1 Wooden Parts Kit
2 Cable 1x red and 1x black
1
2
1
2
1
1
1
LED with cable
Nut
Switch with Cable
Screw
Wood Glue
Sandpaper
Paper Clip
White
M2
Commutator
M2 x 10
in Tube
Fine (DT) Eine ausführliche Anleitung in deutscher Sprache liegt der
Verpackung bei. Die Anleitungen in den Sprachen Englisch, Französisch
und Niederländisch können kostenlos in unserem Shop heruntergeladen
werden. (EN) Instructions in German are enclosed in the packaging.
The instructions in English, French or Dutch can be downloaded in
our shop for free. (FR) Des instructions en allemand sont fournies avec
l'emballage. Les instructions en anglais, français, et néerlandais sont
à télécharger gratuitement dans notre boutique. (NL) De Duitse
handleiding is bij de verpakking inbegrepen. De handleidingen voor de
talen Engels, Frans en Nederlands kunnen gratis in onze shop
worden gedownload.
HINWEIS NOTE REMARQUE - - - LET OP!
www.sol-expert-group.de
Adult supervision during
assembly and soldering!
General: This soldering kit is intended as a simple introduction to the basics of soldering.
It is ideal for guided soldering courses in school and workshops. The water tube torch can further be used in holiday programmes,
school camps and other events related to soldering.
After soldering and installing the board inside the water tube it can be used as a solar-powered torch for near range applications.
The solar panel collects the required energy, which is then stored in the storage battery. So simply place in the sun to charge the
storage battery.
Keep these instructions in a safe place for future reference! They contain important information.
If the storage battery is defective, only replace it with a new storage battery with the same specifications. (400 mAh / 3.2 V)
This kit is only intended for battery operation.
The soldering iron, the solder and the components being soldered become very hot during soldering. Be very careful!
Always use a soldering base when soldering! This will prevent the components and the board from slipping.
We recommend a soldering iron stand to hold the soldering iron safely during assembly.
Never connect the kit to 230 V mains voltage! Acute danger to life!

100 kOhm 100 kOhm
trim leads with side cutter
with side cutters
Transistor
Diode
C
A
Fit and solder 5 resistors, Fit and solder transistor BC337 (note
D E
Soldering the solar cell
1
The small SMD component (SI2301) is already soldered on!
Fit and solder diode 1N4148 (note
B
Soldering the board
2
Environmental Warnings
Assembly Instructions:
1N4148
BC337
20 kOhm
100 kOhm 8,2 Ohm
Solder cable (red and black 15 cm)
Red cable to "+", black cable to "-"
3
1
2
Tin-plate contacts
(apply solder)
polarity!), trim leads with side cutters
correct installation position), trim leads
Resistor
100 kOhm3x
brown
brown
black
black
orange
20 kOhm
red
brown
black
black
red
8,2 Ohm
grey
brown
red
black
silver
Soldering point
1x
1x
General: Please return the board to a certified disposal company at the end of its useful life. They will ensure the
board is disposed of in accordance with the law. This is environmentally friendly and actively contributes to the
protection of the environment.
Battery ordinance: Dear customer, you have purchased a battery-operated product from us. Although the storage
battery has a very long life, it will eventually need to be disposed of. Used batteries must not be discarded in the
household waste. Consumers are legally obligated to return batteries to a suitable collection site. Used batteries
contain valuable raw materials which are recyclable. You may also send your batteries to: SOL-EXPERT group,
Mehlisstrasse 19, 88225 Baindt.
ATTENTION:
The end user of this
product is required
by law to recycle the
storage battery in
this product!
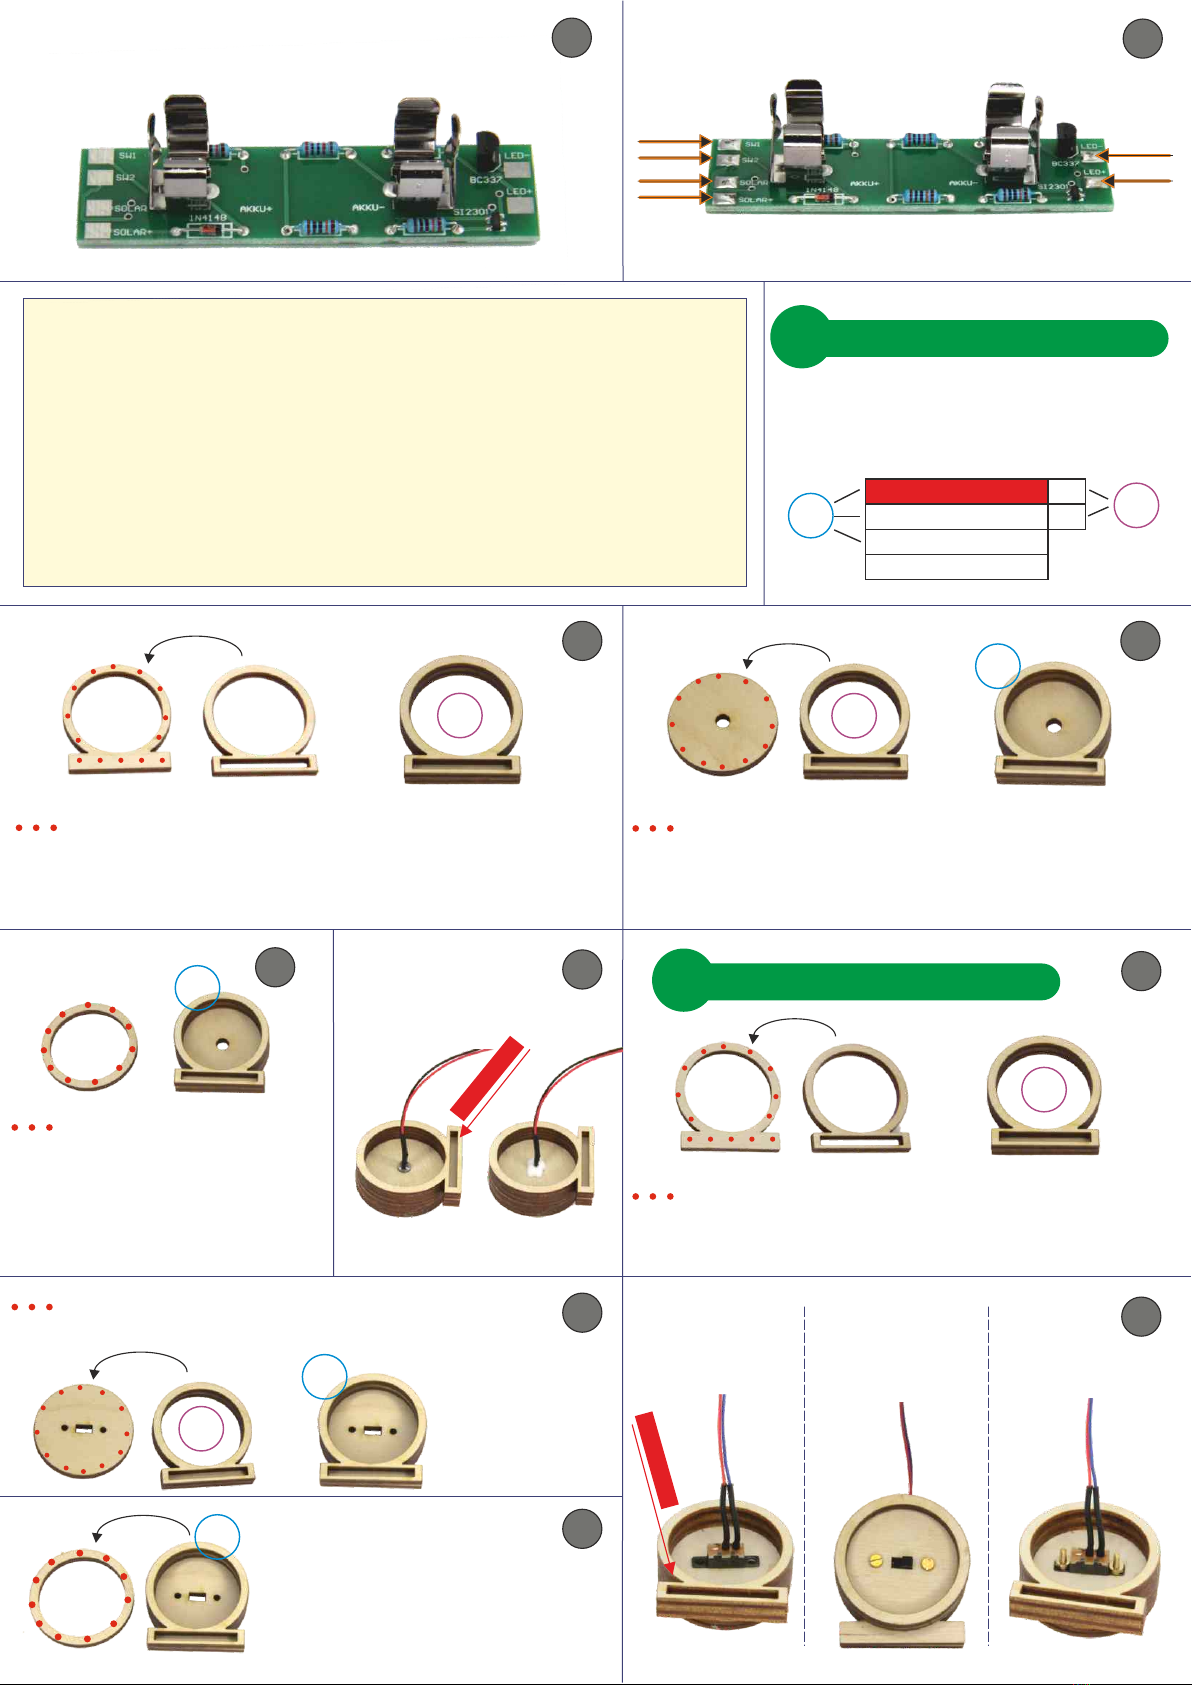
3
4
H
K
M
N
I
JL
O
Assembling the LED cover
Assembling the switch over
Tin-plate solder contacts (apply solder): 6x G
Solder on battery mount!
Apply small glue dots to part 3 Glue part X
onto part 3 – the parts must be glued
together flush!
Use very little glue
Apply small glue dots to part 3
Glue part X to part 3
Part 1
Part 1
Part 2
Part 2
Part 3
Part 3
Apply small glue dots to part 1 Glue part 2
onto part 1 – the parts must be glued together flush!
Use very little glue
Apply small glue dots to part 1. Glue part 2 onto
part 1 – the parts must be glued together flush!
Use very little glue
Plug in
switch
Less is more! – this frequently also applies to gluing. The kit includes a paper clip to ensure you do
not apply too much glue. Simply bend it open. It helps with dispensing the glue. Squeeze a few
drops of glue from the tube onto a suitable surface (e.g. paper, scrap piece of wood from the kit)
and dip in the tip of the paper clip.
You can now use the glue on the paper clip to apply the dots of glue. If glue dries on the paper clip,
simply remove the glue with a tissue and add more to the tip.
F
If necessary, use a larger soldering tip!
Gluing TIP:
Insert LED (from
the correct side)
and glue in place
Push through
M2 x 10
screw
and
secure
with the nut.
X =
X =
X =
X =
X =
Y =
Y =
Y =
Y =
Part 2
Part 1
Part 3
Part 4
Parts assembly order for the
LED cover and switch cover
=
=
=
=
Y =
Apply small glue dots to
part 4. Glue part Y onto
part 4 – the parts must
be glued together flush!
Use very little glue
Apply small glue dots to
part 4. Glue part Y onto
part 4 – the parts must be
glued together flush!
Use very little glue
ATTENTION:
All parts must be glued in place flush or the cover will not fit onto the
water tube!
Part 4
Part 4
Part 2, oben
Part 2, oben
Subject to change and corrections
©
April 2017 / Christian Repky
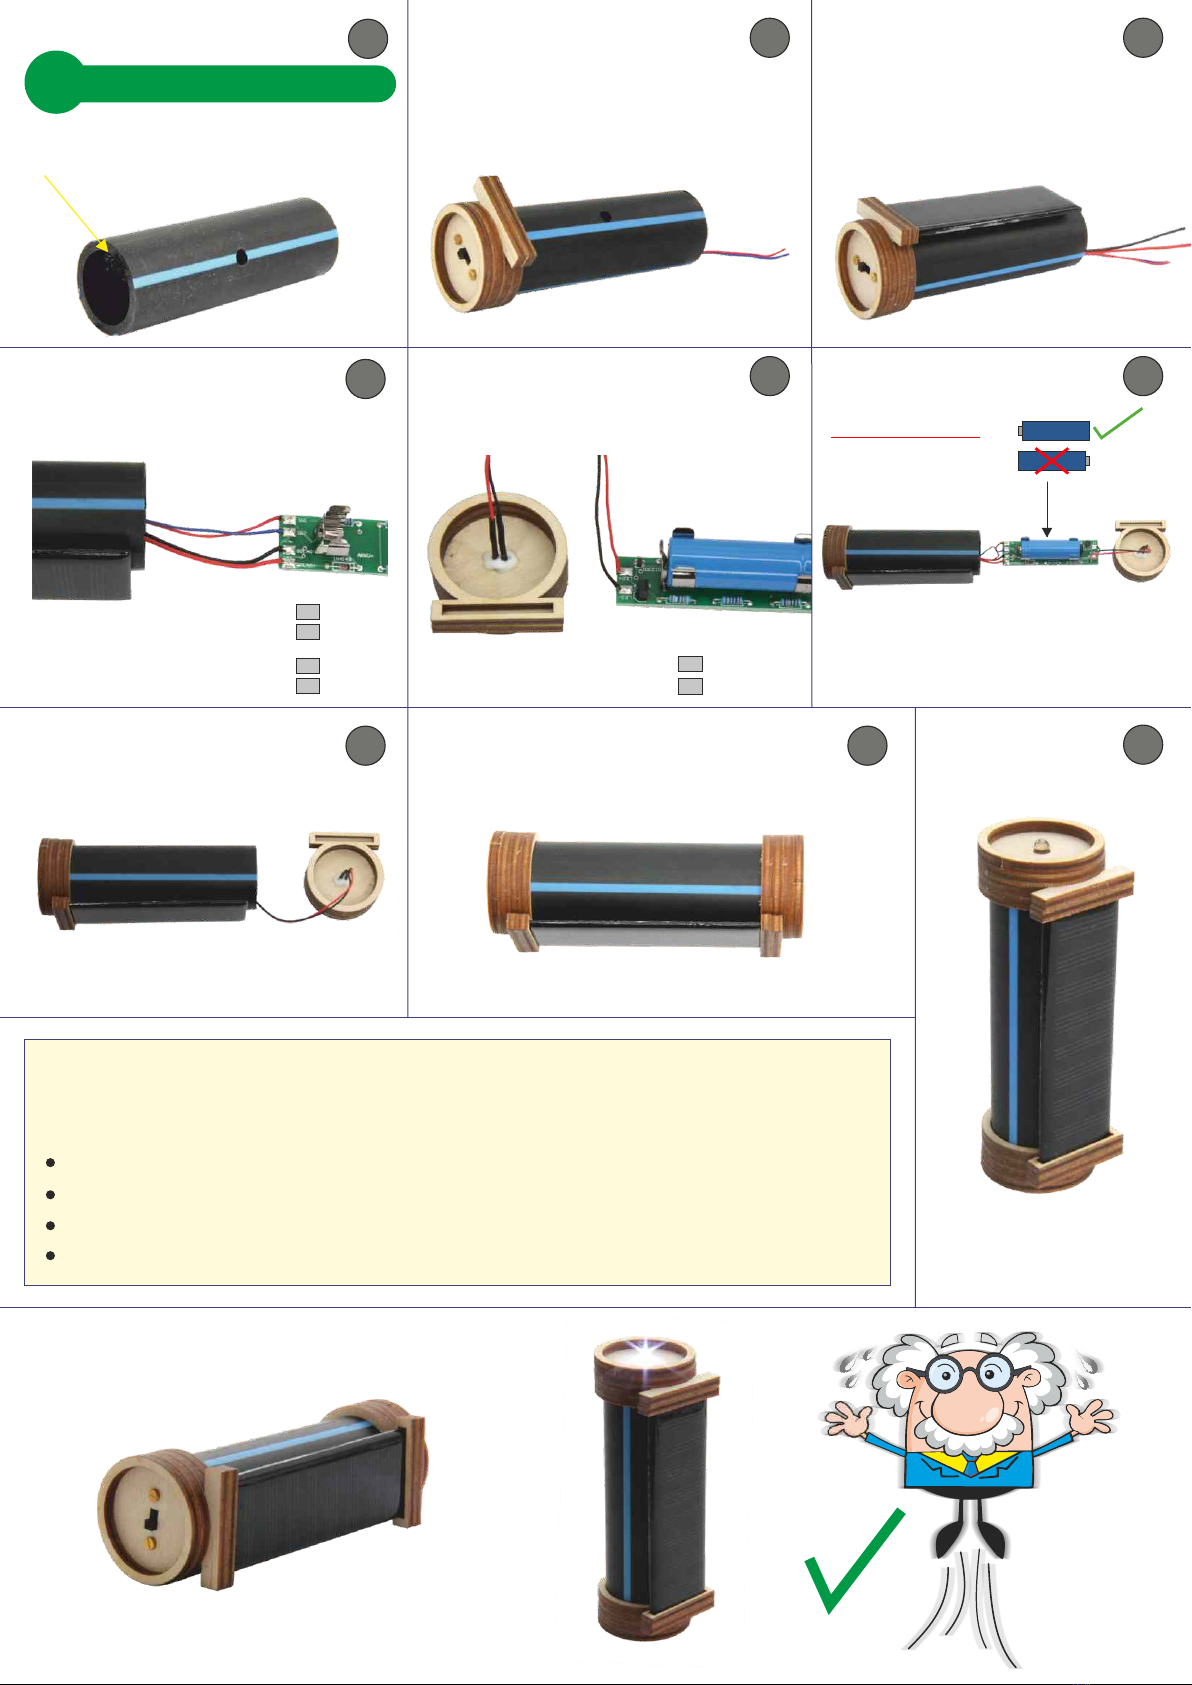
When you slide the switch, the LED should light up.
Use the sandpaper to remove
any fibre from the edges of the tube
Solder the switch leads
and solar cell.
Note the lead colour!
Slide the board into the tube
Solder the LED leads.
Insert battery
Note the lead colours and polarity!
Twist and slide on the LED cover Finished!
Twist and slide on the switch cover Feed the solar cell leads through
the hole and insert the solar
cell into the recess
Red switch lead
Red LED lead
Blue switch lead
Black LED lead
Black solar cell lead
Red solar cell lead
LED+
SW1
SOLAR -
SOLAR +
SW2
LED-
If the LED does not light up:
Check the components on the board
Check the soldering
Check the battery polarity
Charge the storage battery in the sun for a few hours
Note the polarity!
5
Soldering and final assembly
PR
X
U
Q
W
T
TEST:
V
S
Other Sol-Expert Lantern manuals


Popular Lantern manuals by other brands


Flair
Flair 6746179 Assembly instructions

Coopers of Stortford
Coopers of Stortford Hope & Glory Hurricane Lantern L505 Instructions for use

LEDIT & YAKI
LEDIT & YAKI CiTik Solar Slim manual

Sunjoy
Sunjoy S-CH671PST-A owner's manual

Ecom Instruments
Ecom Instruments SHL 300-Ex operating instructions

GRAH Lighting
GRAH Lighting AEROLITE LSL S Mounting & operation instructions

North Light
North Light HJ-8445 instruction manual

HAMPTON BAY
HAMPTON BAY SOUTHBOURNE DSHD19522Z Use and care guide

LIVARNO LUX
LIVARNO LUX 284725 Operation and safety notes

LIVARNO LUX
LIVARNO LUX 10603A Assembly, operating and safety instructions
 manual")
Inlite
Inlite ACE DOWN (DARK) manual

Inlite
Inlite ACE DOWN Series Installation