manuals.online logo
Brands
  1. Home
  2. •
  3. Brands
  4. •
  5. Solar
  6. •
  7. Batteries Charger
  8. •
  9. Solar CC1005 User manual

Solar CC1005 User manual

Solar Technology International Ltd
We are manufacturers of some of the world’s most
advanced solar energy products including; solar
panels, solar lighting kits, solar power stations, solar
garden lights, solar toys and we additionally provide
comprehensive solar training courses. To find out more
please visit www.solartechnology.co.uk
If you have any questions about this product
or regarding these instructions please contact the
Solar Technology International Technical HelpLine
on
+44 (0) 1684 774000
or email us at
support@solartechnology.co.uk
or alternatively please write to:
Support, Solar Technology International Ltd,
Unit 4, Station Drive, Bredon, Nr. Tewkesbury,
Glos. GL20 7HH, United Kingdom
Solar Technology International Ltd.
Unit 4, Station Drive, Bredon, Nr. Tewkesbury, Glos. GL20 7HH, United Kingdom
Telephone: 01684 774000 Fax: 01684 773974 E-mail: support@solartechnology.co.uk
TECHNOLOGY INTERNATIONAL
Solar
CamCaddy
is a unique cradle that accepts
CamCaddy is a unique cradle that accepts CamCaddy
virtually every type of block style camera
battery, whether digital, SLR or camcorder.
To charge your camera battery just
connect
to
a
power source!
User Manual
Frequently Asked Questions
1. If I have connected the battery incorrectly i.e.
got the + and – the wrong way round (reverse
polarity), will CamCaddy damage my battery?
• No this will not damage the battery, but CamCaddy
will not deliver a charge in this position.
2. My battery has slots for the Battery Terminals will
CamCaddy be able to charge it?
• No, sorry, CamCaddy cannot charge battery’s
of this type yet unless the Power Tips are able to
connect to the battery’s terminals.
3. Can CamCaddy be powered when there is no
mains or car power available?
• Yes, the Freeloader range (available separately)
provides a solar power source to provide
energy to CamCaddy. For more information
see www.solartchnology.co.uk
4. Will CamCaddy be able to charge my laptop
battery?
• No. CamCaddy will not be able to charger a
laptop battery.
5. LED 4 (fi g 6) is on and it is Red - what does this
mean?
• This means one of two things: either a power
supply is connected to CamCaddy without a
battery inserted; or that the camera battery, if
inserted, is fully charged.
6. How long will it take to charge my camera
battery?
• This will depend on the size of the battery but
somewhere between 40 minutes and 2 hours.
7.
Can I charge CamCaddy from a PC or laptop
•
Yes but because a PC USB only delivers 5.5v
you will only be able to charge lower voltage
batteries up to 5.5v. In most cases this will mean
SLR and Camcorder batteries will not be charged
if connected via this method.
IMPORTANT: PLEASE READ BEFORE FIRST USE
Model: CC1005
CamCaddy In Car and Mains Plugs
CamCaddy requires a constant voltage of 9.5v input to
operate efficiently. Therefore the USB mains plug and in
car plug have been modified for the higher voltage.
i. Once the charging is complete:
(i) Disconnect the cable from the power supply;
(ii) Disconnect the cable from CamCaddy;
(iii) Remove the battery from CamCaddy.
Warning
1. Keep CamCaddy away from fi re, water and any
form of moisture to ensure damage and injury do
not result.
2. Any severe shock or impact may result in damage
and will invalidate the warranty.
3. It is forbidden to dismantle CamCaddy except by
Solar Technology personnel or agents appointed by
Solar Technology. Any sign of tampering will result
in the warranty being invalidated.
Warranty
CamCaddy is supplied with a 12 month warranty.
Should a failure occur during this time Solar Technology
International Ltd will repair or replace any faulty part/s,
at its discretion upon a copy of the proof of purchase
being provided. Solar Technology International Ltd does
not accept liability for any 3rd party damage how so
ever caused or any costs associated with the return of
faulty products.
To make a warranty claim please telephone
Solar Technology International Ltd on
+44 (0) 1684 774000
or email
support@solartechnology.co.uk
These warranty conditions in no way affect your
statutory rights.
A full set of Solar Technology International Ltd terms
and conditions are available on request.
IN NO CIRCUMSTANCES USE CAMCADDY’S
SPECIAL MAINS OR IN CAR PLUG WITH ANY
OTHER DEVICE OTHER THAN CAMCADDY AS
DAMAGE TO THAT DEVICE WILL RESULT.
1 Using CamCaddy
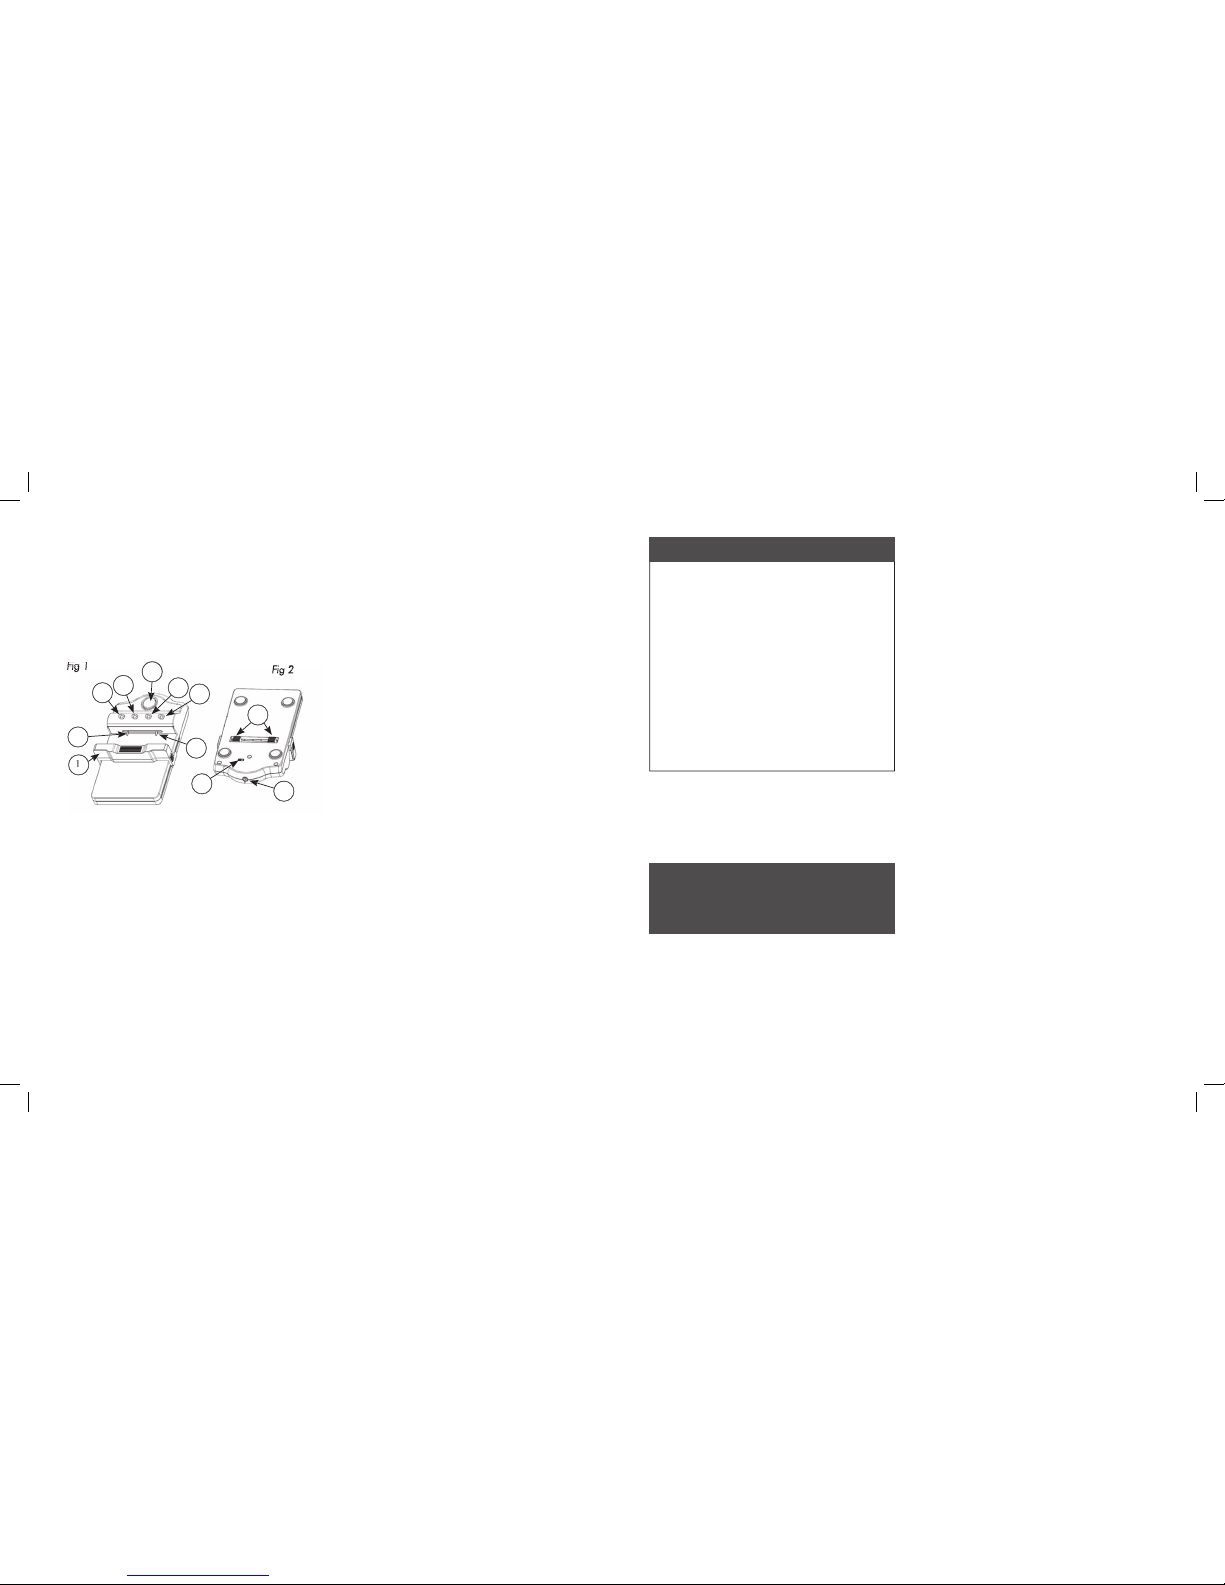
a. Slide the bar (1, fi g 1) back beyond the size needed
to place the battery into the CamCaddy and rest the
battery on the black rubber edge of the bar making
sure the batteries terminals are not touching the
power pins (2, fi g 1).
b. Align the two power pins by using the sliders (3, fi g 2)
on the rear of CamCaddy - adjust the distance
between them so they align with the positive and
negative terminals of the battery you wish to charge.
It is very important to correctly locate the battery
into CamCaddy
before connecting CamCaddy
to a power source (e.g. in car plug, mains
plug, PC, Lap top or even a solar charger
such as Freeloader or Freeloader Pro)
. If
CamCaddy is connected to a power source without
a battery the warning LED (4, fi g 1) will glow RED
and CamCaddy should be immediately disconnected
from the power supply.
1
2
3
4
5
6
7
8
2
9
Fig 1
Fig 1
Fig 2
Fig 2
10
1 x CamCaddy
1 x Power / USB Cable
1 x UK Mains Plug
c. Gently allow the bar to rise ensuring the power pins
only make contact with the batteries positive and
negative terminals (these will always be marked on
the battery).
d. If LED 7 (fi g 1) is glowing RED it indicates that the
positive and negative terminals on the battery are the
wrong way around for the polarity of the power pins
(reverse polarity). Please correct this by moving the
switch 8 (fi g 2). The LED 7 will now turn off indicating
that the correct polarity has been observed.
e. Before connecting CamCaddy to a power source
you can test how much power is in the camera
battery by pressing central button 9 (fi g 1).
LED’s 4,5,6,7 may glow GREEN. If the battery is
completely fl at then none of the LED’s will glow.
SEE THE SPECIAL NOTE RIGHT
f. CamCaddy is now ready to connect to a power
source. Insert the pin end of the power cable
into CamCaddy. You can now insert the USB end
of the power cable directly into a PC or lap top
(for charging batteries less than 5v only) or into
the car or mains plug as required. CamCaddy has
an in built voltage adjuster that will automatically
deliver the correct voltage to whatever camera
battery is attached.
g. The LED’s – 4,5,6,7 (fi g 6) will now glow green
according to what stage the battery charging cycle is
at (each LED roughly represents a 25% charge).
Note –
If connecting CamCaddy to a PC or lap top via
the USB / power cable, you will only be able to power
batteries 5v or less – most typically used in compact
digital cameras and mobile phones.
h. CamCaddy will indicate the battery is charged from
76% to 99% when all four LED’s 4,5,6 and 7 (fi g 1)
are GREEN. When the battery is 100% charged LED
4 will glow RED.
Components
Included
1 x European Mains Adaptor
1 x US Mains Adaptor
If the battery to be charged is completely flat
and no LED’s 4, 5, 6 or 7 (fig 1) are glowing
when the central button 9 (fig 1) is pressed it is
possible to insert the battery into CamCaddy in
a reverse polarity position (see step d) without
realising it. In this circumstance you should
connect CamCaddy to a power source as
previously described. Within 5 minutes you will
either see LED 4 glow GREEN which will indicate
that you have correct polarity and charging
is commencing normally, or no LEDs glowing
at all – in which case you should change the
position of switch 8 to reverse the polarity and
commence charging.
SPECIAL NOTE

This manual suits for next models

1

Other Solar Batteries Charger manuals

Solar N00CX User manual

Solar

Solar N00CX User manual

Solar Charge IT 4501 User manual

Solar

Solar Charge IT 4501 User manual

Solar Octane OS6110 User manual

Solar

Solar Octane OS6110 User manual

Solar 2001 User manual

Solar

Solar 2001 User manual

Solar Charge IT! 4745 User manual

Solar

Solar Charge IT! 4745 User manual

Solar Pro-Logix PL2208 User manual

Solar

Solar Pro-Logix PL2208 User manual

Solar Battery Charger User manual

Solar

Solar Battery Charger User manual

Solar BA5 User manual

Solar

Solar BA5 User manual

Solar 1002 User manual

Solar

Solar 1002 User manual

Popular Batteries Charger manuals by other brands

SNOWJOE SUNJOE 24VCHRG-HS-DPC quick guide

SNOWJOE

SNOWJOE SUNJOE 24VCHRG-HS-DPC quick guide

Ripmax P-FBC100/EUR manual

Ripmax

Ripmax P-FBC100/EUR manual

Otto OTHD21WE instruction manual

Otto

Otto OTHD21WE instruction manual

Power Innovations EVQC0 M B Series Installation and operation manual

Power Innovations

Power Innovations EVQC0 M B Series Installation and operation manual

PowerBase C-733 user manual

PowerBase

PowerBase C-733 user manual

MOB MO9821 user manual

MOB

MOB MO9821 user manual

ADTRAN 6-Amp Power Installation and maintenance practice

ADTRAN

ADTRAN 6-Amp Power Installation and maintenance practice

William Sound CHG 408 installation instructions

William Sound

William Sound CHG 408 installation instructions

Black & Decker 98060 instruction manual

Black & Decker

Black & Decker 98060 instruction manual

ARJO HUNTLEIGH NDA8200 Instructions for use

ARJO HUNTLEIGH

ARJO HUNTLEIGH NDA8200 Instructions for use

Jefferson JEFBATCHG15-12 user manual

Jefferson

Jefferson JEFBATCHG15-12 user manual

LEGRAND 0 590 05 manual

LEGRAND

LEGRAND 0 590 05 manual

VAPEX TECH VTE8000 Product Instruction

VAPEX TECH

VAPEX TECH VTE8000 Product Instruction

Heyner AkkuEnergy 930600 Instruction

Heyner

Heyner AkkuEnergy 930600 Instruction

Flyzone Aero Cruiser/Speed Pilot user manual

Flyzone

Flyzone Aero Cruiser/Speed Pilot user manual

Intermec AC18 instructions

Intermec

Intermec AC18 instructions

Dynex DX-DA100501 user guide

Dynex

Dynex DX-DA100501 user guide

GridSense LineIQ user manual

GridSense

GridSense LineIQ user manual

manuals.online logo
manuals.online logoBrands
  • About & Mission
  • Contact us
  • Privacy Policy
  • Terms and Conditions

Copyright 2025 Manuals.Online. All Rights Reserved.