solarcentre Everbright Solar Lights User manual
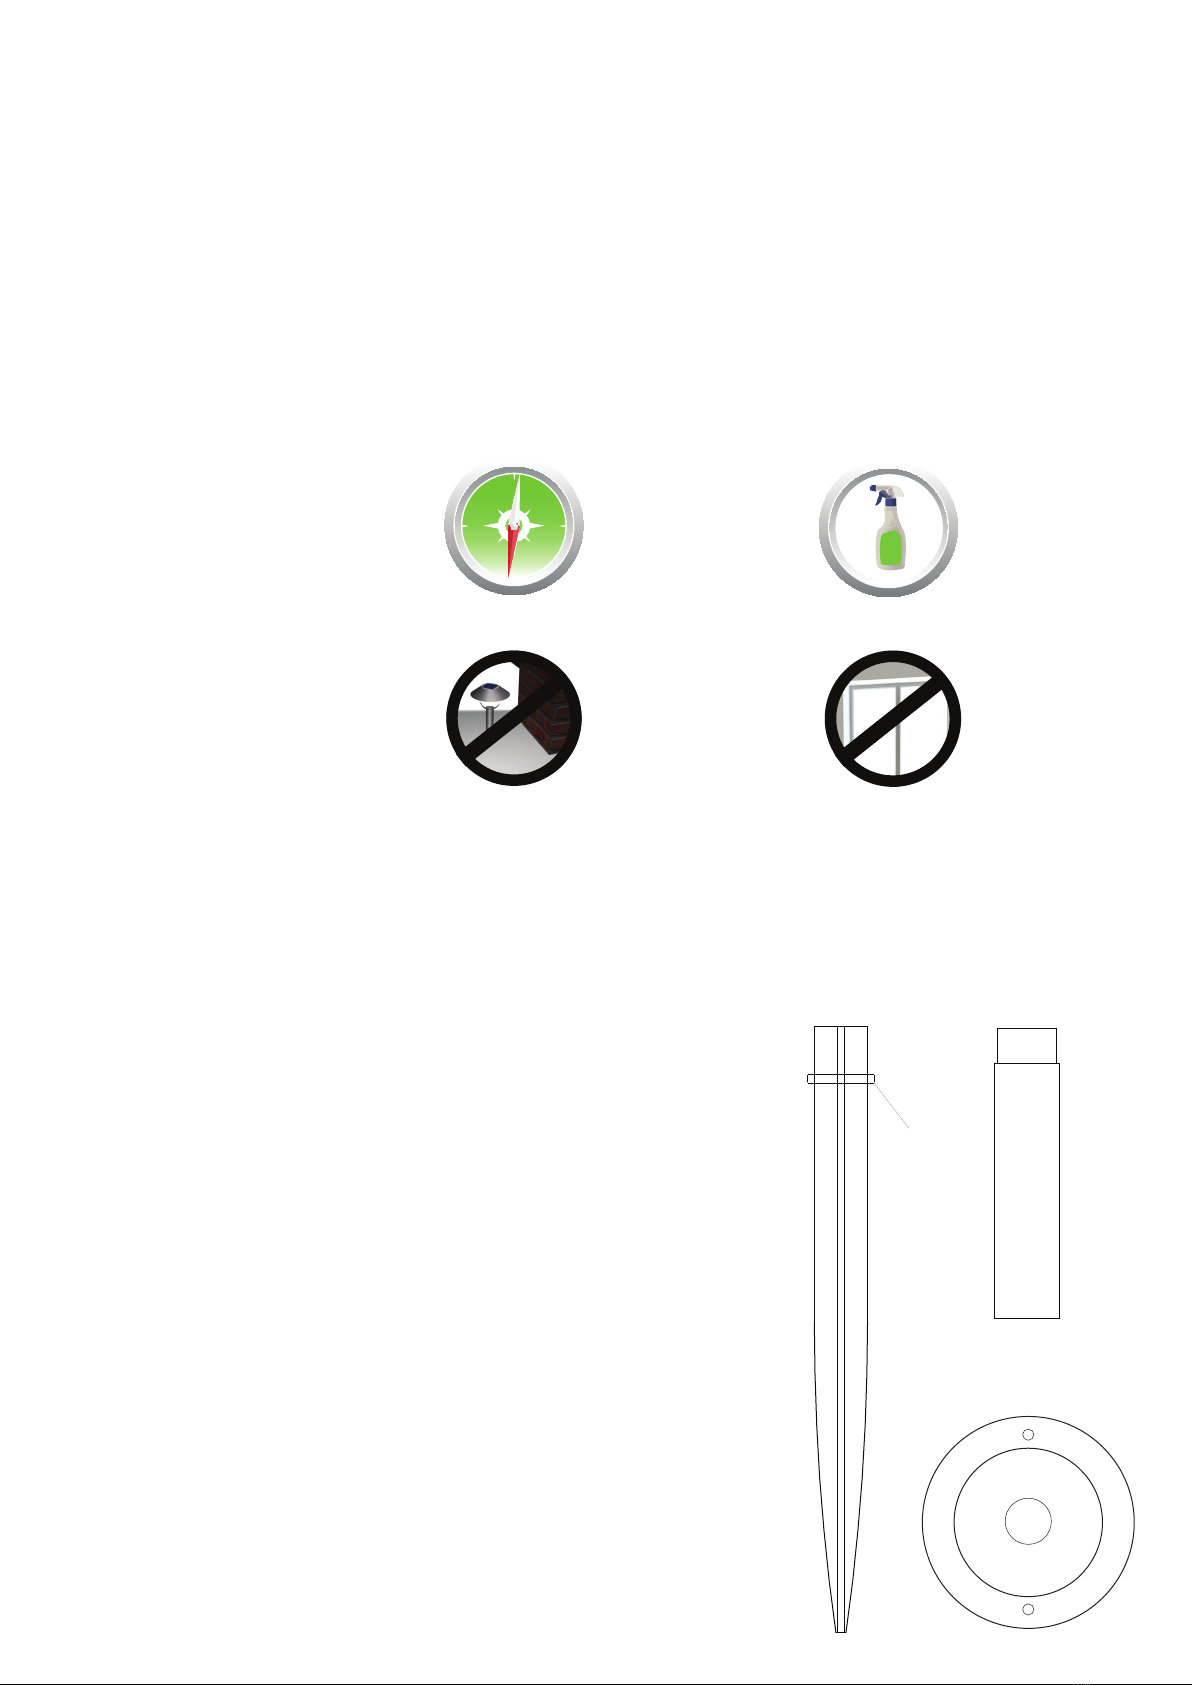
Stake Mounting
Before attempting to push the stake into the ground, please check that the
ground is not too hard as any damage caused to your solar panel module as a
result of driving them into hard ground is not covered by your warranty. If the
ground is too hard, pour water on the desired area to soften the ground and make
a hole using a strong metal object before driving your stake into the hole. Almost
all of the stake needs to be under ground with only the piece above the ridge being
above ground (see right). Now your stake is in place, locate the extension shaft
and twist it onto the stake mount. The extension shaft is designed to keep the
solar panel module off the ground to prevent water ingress.
Multimount for wall, fence and deck mounting
Attach the multimount to your wall, fence or decking using the supplied screws
and Rawl plugs. Now your wall mount is in place, locate your solar panel module and
gently push it onto the wall mount until it is fully inserted and secure. Please do
NOT use the extension shaft in conjunction with the multimount as this setup
will not be secure and may cause injury or damage in high winds or other
scenarios. The extension shaft is for use with the stake mount only.
Operating Instructions
The Everbright Solar Lights are fully automatic so once turned on they will come on
automatically at night and turn off automatically at dawn unless you turn them off at
the switch. To turn your Solar Lights on simply press the power button on the
underside of the solar panel.
Lighting Modes:
There are 8 modes available on your Everbright Solar Lights and 2 modes on your
Everbright Solar Party, Rattan, Hessian and Chinese Lights. To change modes simply
press the Mode button on the underside of the solar panel.
Choosing your location:
Before setting up your Everbright Solar
Lights you’ll need to think about the
location of the solar panel module. Your
solar panel module needs to be in an
unshaded location where light is not obstructed by buildings, walls, fences, trees, bushes or the shadows that these create. You will
need to rethink your location if your solar panel module can’t reach a bright and unobstructed location. If you are in any doubt
please check before installing your lights. Once you are happy with your solar panel module location, install it by following the guide
below. Once your solar panel module is installed, you can unravel your lights and place them where you like.
EVERBRIGHT
solar lightsTM
User Guide
Thank you for choosing our Everbright Solar Lights, Solar Rattan Lights, Solar Hessian Lights, Solar Party Lights or Solar Chinese
Lights. Please read these instructions carefully before using them.
Box Contents:
Solar panel module, LED Light string, stake mount, extension shaft, multimount, USB charging cable, extension cable, screw and
Rawl plug pack
Setting up your lights
Always take care when setting up your
Everbright Solar Lights especially when
you are situating them in high places. In
the interest of safety, we strongly advise
setting up your solar lights during the
day while it is still light. Children should
only set up the lights with the
assistance and careful supervision of a
responsible adult.
Do:
Don’t:
Do NOT charge
behind glass
Do NOT place your
solar panel shaded
areas.
N
E
W
S
Ensure your solar
panel is South facing
or as near as possible
Clean your solar
panel from time
to time
Solar Charging Tips
Ridge
1: Stake Mount
3: Multimount
2: Extension shaft
Charging your solar panel module via USB:
Everbright Solar Lights can be charged via USB as well as by the sun. USB enables you to use the lights inside where they can not charge
from the sun. USB charging also enables you to fully charge your lights in the run up to a party or special occasion if the weather has let
you down. Please note that you do not need to take your lights down to charge them via USB. Simply unplug the light string from the solar
panel module and take the solar panel module inside. Before you begin, lift back the rubber cover that protects the USB port (marked D
below) and make sure it is dry. Please note that failure to ensure the solar panel module is dry prior to charging via USB may damage
your solar panel module, USB device or cause injury. Plug the USB end of the cable into your USB device and plug the round adaptor tip
into the solar panel module (under the cover marked D in the illustration below). Once the solar panel module is connected to a USB
device the red LED light next to the charging port on the solar panel module will light up to let you know that the batteries are charging.
USB Charging Times:
50 LED Lights, Party, Hessian, Rattan and Chinese Lights: 3 hours
100 LED Lights: 5 hours
300 LED Lights: 10 hours
Trouble Shooting
My lights are on but it isn’t dark:
Your Everbright Solar Lights have a sensor in the solar panel that tells them when it is dark enough to turn on. If your lights are coming on
during the day by themselves then this suggests that the panel thinks it is dark when it isn’t. This can happen in unusually dark weather
conditions, but usually it is a sign that the solar panel is positioned in a heavily shaded location. Please rethink your solar panel module
location or remove objects obstructing light from reaching the solar panel.
My lights have worked for the first few nights and then stopped working:
Usually the Everbright Solar Lights come partially charged so they will work for a few nights without receiving a fresh charge. If the lights
stop working after a few nights then it is likely that they have not received a fresh charge during the first few days. Please check the
location of your solar panel before switching the lights off by using the switch on the underside of the solar panel pack. Leave your lights
switched off for a minimum of 3 days to allow the batteries to fully charge them via USB.
I can not get my lights to turn on and they never have:
Usually our Everbright Solar Lights come partially charged, but this isn’t always the case. Please check the location of your solar panel
module before switching the lights off by using the switch on the underside of the solar panel pack. Leave your lights switched off for a
minimum of 3 days to allow the batteries to fully charge or charge them via USB.
RoHS
Made in China to Solar Centre Specification
For customer support please contact:
The Solar Centre Ltd
Unit 5 Dencora Centre
Campfield Road T: 0845 094 1250
St Albans W: www.thesolarcentre.co.uk
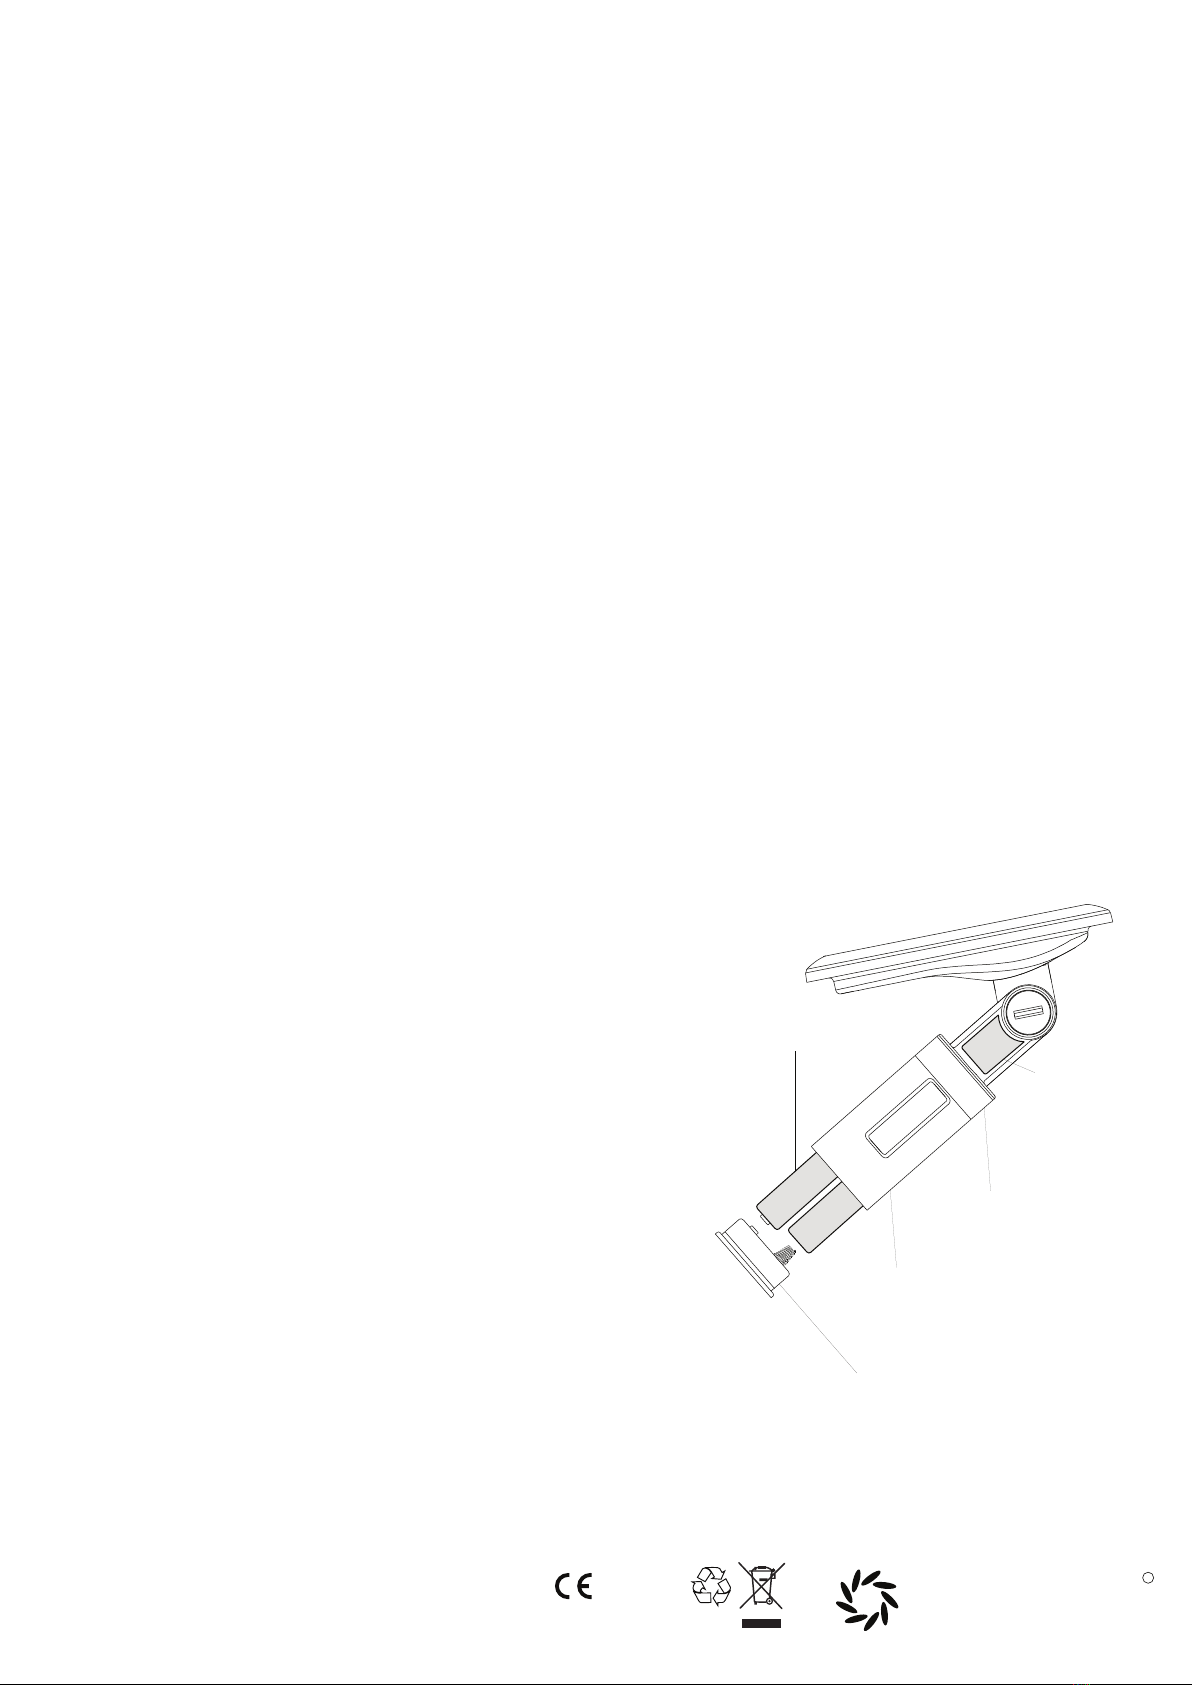
Replacing the AA rechargeable batteries:
After several years use you may need to replace your batteries if you notice
that your lights aren’t performing as well as they used to. You can replace your
batteries by removing the battery compartment bung (part A). To remove the
bung firmly grip part Bwith one hand and wiggle out the bung (part A) with the
other hand. Please do not grip any other part of the solar panel module
(other than part B) when removing the bung as this may damage the
module and invalidate your warranty.
Please replace your batteries with the AA rechargeable batteries
recommended below. When inserting new batteries it is important to ensure
that the new batteries are put in the correct way and that the bung is put back
in the correct way round. To be sure look into the battery compartment and
locate the side that has the spring and place a battery in that side so that the
flat end of the battery goes in first against the spring. Place the other battery in
the opposite way up. Ensure the bung is inserted the correct way by making
sure the spring on the bung goes on top of the battery that has its flat end
showing. Please note that AA rechargeable batteries are available from most
shops including supermarkets, newsagents and petrol stations. Please
recycle your old batteries!
Required AA Batteries
Everbright Solar Lights - 50 LED Bulbs: 2 x AA 600mAh NiMH rechargeable batteries
Everbright Solar Lights - 100 LED Bulbs: 2 x AA 1000mAh NiMH rechargeable batteries
Everbright Solar Lights - 300 LED Bulbs: 2 x AA 2000mAh NiMH rechargeable batteries
Everbright Solar Party/Hessian/Rattan/Chinese Lights: 2 x AA 600mAh NiMH rechargeable batteries
solarcentreR
making solar that works
E
AA Rechargeable batteries
C
Please DO NOT grip this part
when removing the bung.
A
Battery compartment
bung
D
USB charging port
with rubber cover
B
Grip this part with one hand while removing
the bung with your other hand
CHARGE
Everbright Solar Panel Module
This manual suits for next models
4
Table of contents
Other solarcentre Lantern manuals

Popular Lantern manuals by other brands


Panlux
Panlux PN12300001 instructions

Reggiani
Reggiani SPLYT Series installation guide

Forest lighting
Forest lighting FL-ALC-90WXXK-YYZZ Installation instructions manual

Larson Electronics
Larson Electronics RUL-10 instruction manual

Seto
Seto ALDEBARAN GLADIUS 2K LED operating instructions

Solio
Solio CLIP-MINI How to use