Solight TE76 User manual
EN Solight TE76 METEOROLOGICAL STATION
Instructions for use
Instructions for use
Dear customer, thank you for buying our product. If you would like to use it safely and get the most out of it then please read through these instructions carefully
and follow them. That way you will avoid incorrect use or damage. Prevent unauthorised use of this device and always respect all rules related to handling
electronic devices. Keep the instructions for use in case you need them later. The main unit should stand as close to a window as possible.
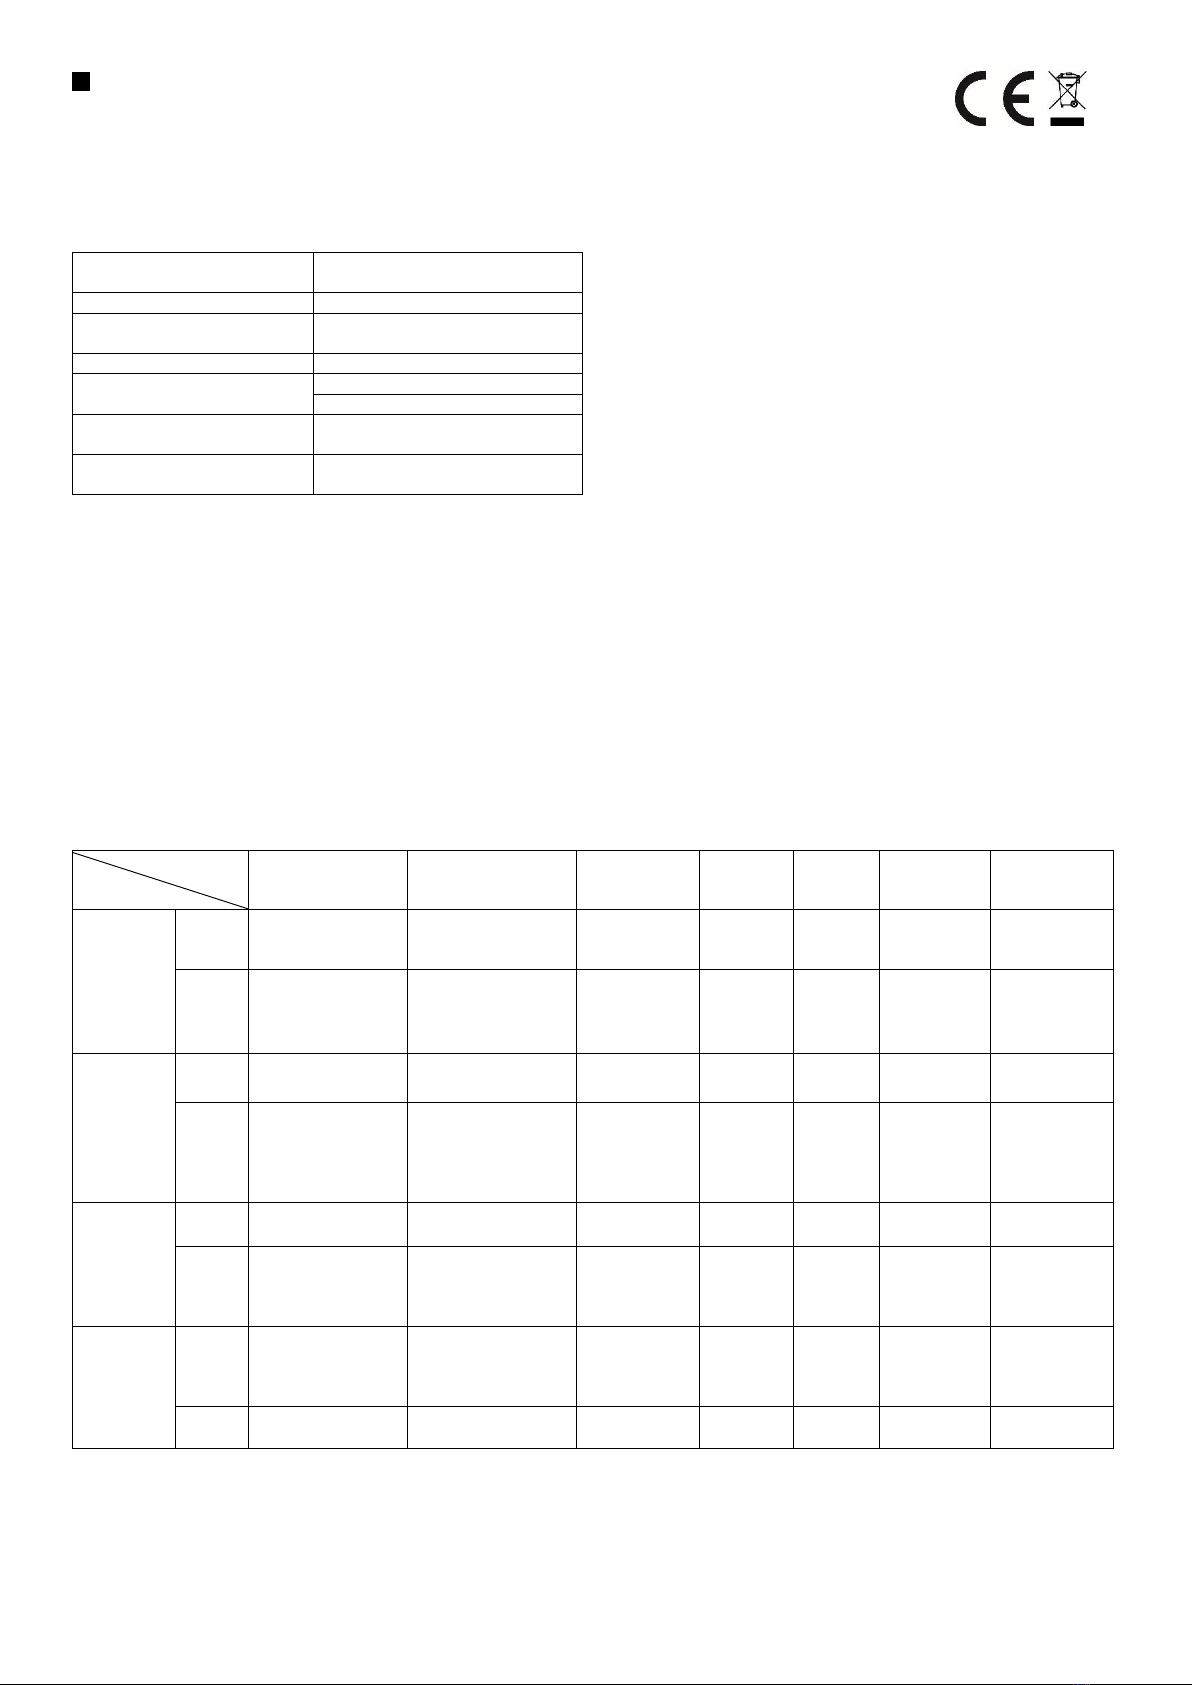
TECHNICAL INFORMATION
Main unit
In the case of charging using batteries open the battery cover and insert three AAA alkaline batteries. Observe the marked polarities. When switching on all
segments the LCD display will light up for a moment and the device will beep. Then it will go into standard mode of measuring temperature and humidity.
In the case of charging using a AC/DC adapter connect the charging connector to the input socket at the meteorological station and then connect to an electrical
socket.
Reset the equipment by removing the batteries or disconnecting the adapter for at least five seconds. That will return the settings to their defaults and will delete
the memory. In the case of charging using batteries the display lights up and stays lit for eight seconds each time. In the case of charging using an adapter it is lit
constantly.
You can only pair up the main unit with three sensors. Each sensor is charged by two AAA alkaline batteries.
Initial settings: 24-hour time format shows 00:00, pressure is in hPa units, and temperature is in °C
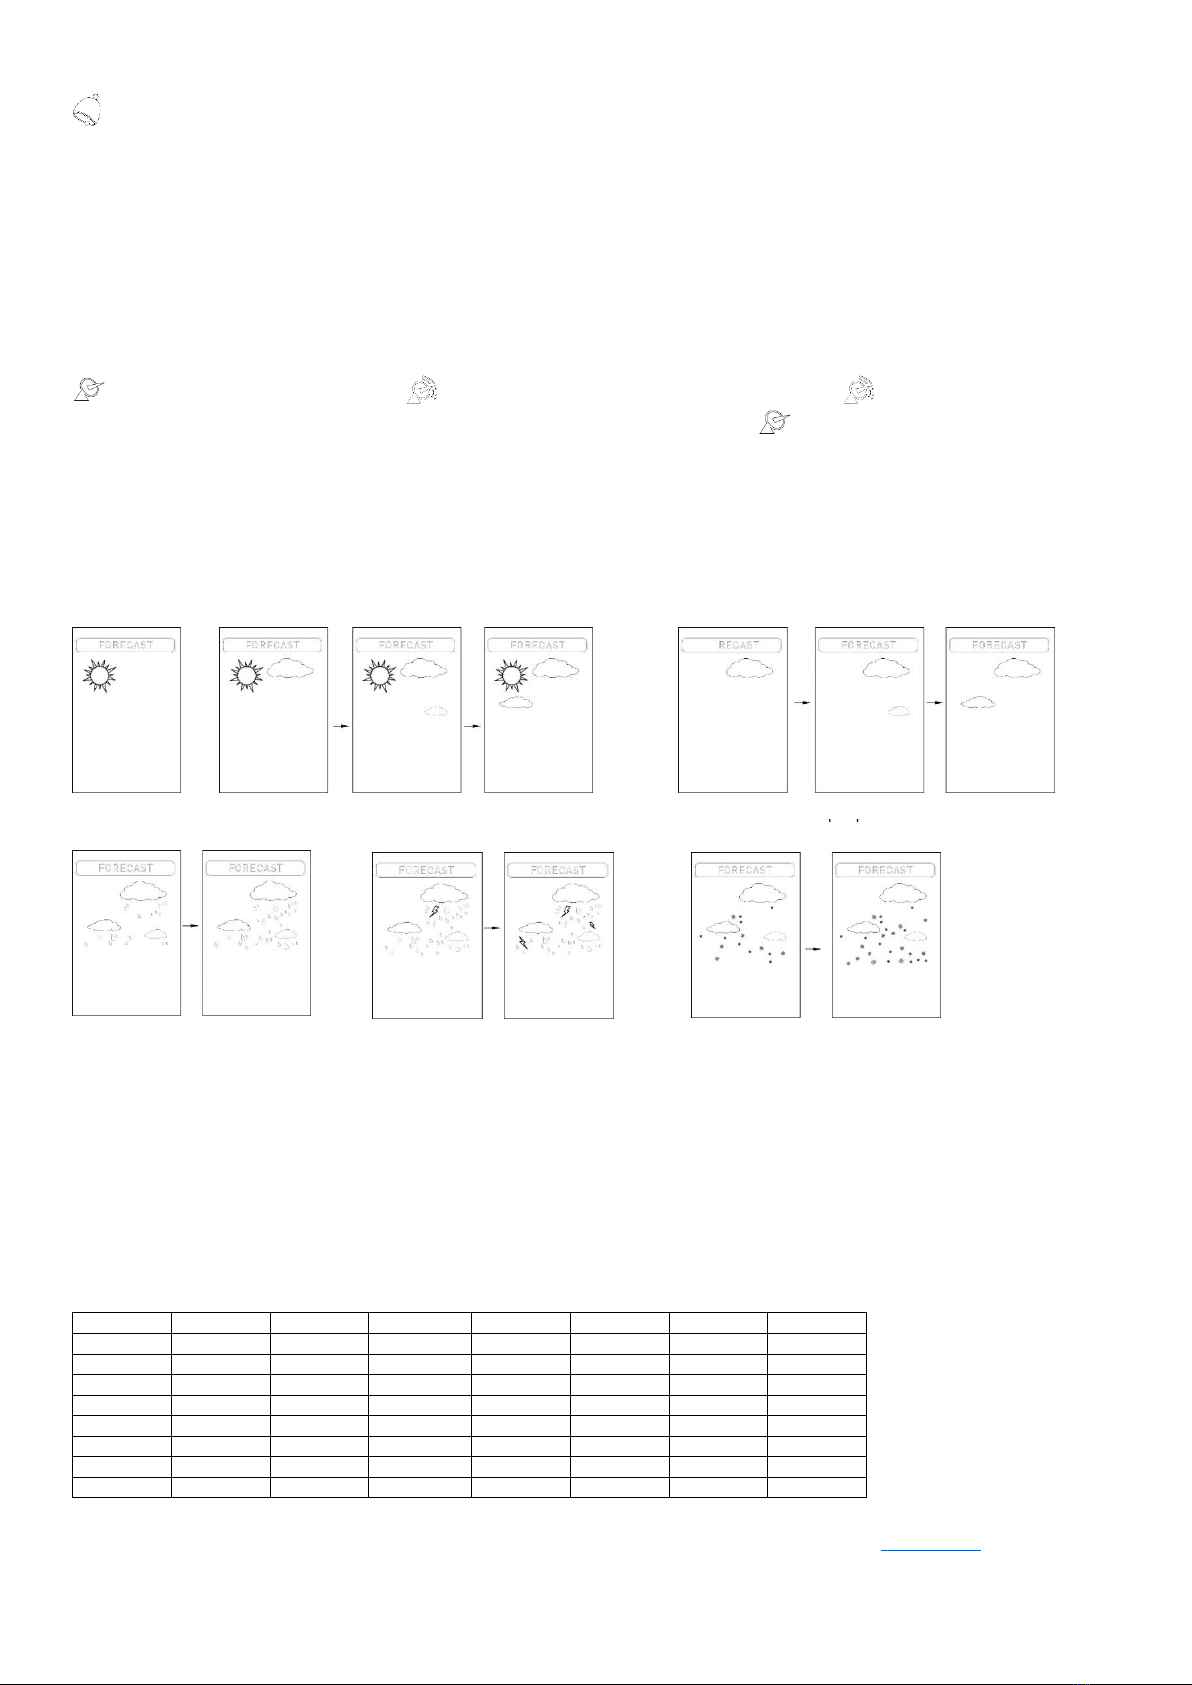
1. FUNCTIONS OF BUTTONS
2. MAIN FUNCTIONS
Date and time (days of the week in seven languages –English, German, French, Italian, Dutch, Spanish and Danish
12-hour or 24-hour time format
Two alarms
Alarm with SNOOZE function (interval adjustable from 3 to 20 minutes, default setting 5 minutes)
RCC signal reception mode: DCC
Measurement of temperature in °C or °F
Measurement of room temperature –range from 0°C - +50°C, accuracy of measurement +/- 1°C, scope of display (0°C to +50°C)
Room temperature
measurement
0°C to +50°
Room humidity measurement
25% to 95%
Outdoor temperature
measurement
-30°C to +60°C
Outdoor humidity measurement
25% to 95%
Power supply
3x AAA 1.5V alkaline battery
AC/DC adapter 5V/1,200mA
Temperature measurement
accuracy
1°C
Humidity measurement
accuracy
5%
Function
Control
MODE
ALARM
ALERTS
UP
DOWN
CHANNEL
SNOOZE/LIGHT
Standard
mode
Short
press
Switch between display
of time and alarms (AL)
Switch alarm on and off
Switch between
max/min
Switch
between
°C/°F
Switch
between
12h/24h
Switch between
CH 1, 2, 3
Switch between
under-lighting
modes
Long
press
Enter into time and
date setup mode
Delete information about
maximum/minimum
temperature/humidity
Enter into
temperature
alarm setup
function
Switch
barometer
HPa/inHg
Activate RCC
signal
reception
Pair transmitter
with receiver on
current channel
Enter into snooze
setup mode
Time setting
Short
press
Switch/Confirm setting
-----
-----
One step
forwards
One step
back
-----
-----
Long
press
-----
-----
-----
Forwards at a
speed of 8
steps per
second
Back at a
speed of 8
steps per
second
-----
-----
Alarm setting
Short
press
Switch/confirm setting
-----
-----
One step
forwards
One step
back
-----
-----
Long
press
-----
-----
-----
Forwards at a
speed of 8
steps per
second
Back at a
speed of 8
steps per
second
-----
-----
Set up
temperature
alarm
Short
press
-----
-----
Switch/confirm
setting
Switch
temperature
alarm on and
off
Switch
temperature
alarm on
and off
-----
-----
Long
press
-----
-----
-----
One step
forwards
One step
back
-----
-----
We recommend using alkaline batteries with a rated voltage of 1.5V for
the LCD display to be the correct luminescence. Rechargeable NiMH
batteries usually have a 1.2V rated voltage and the luminescence of the
LCD display is therefore worse.

Measurement of room humidity –scope of measurement 25% - 95%, accuracy of measurement +/- 5%, scope of display (20% - 99%)
Measurement of outdoor temperature –scope of measurement -30°C - +60°C, accuracy of measurement +/- 1°C, scope of display (-40°C - +70°C)
Measurement of outdoor humidity –scope of measurement 25%-95%, accuracy of measurement +/- 5%, scope of display (20% - 99%)
Measurement of pressure
Moon phases
Temperature alarm (warning when a certain temperature is reached)
Six levels of weather forecasting: sunny, partly cloudy, cloudy, showers, thunderstorms, snow
Option of pairing up three wireless sensors
Indication of discharge of the battery of the main unit and the wireless sensor
Comfort indicator
Adjustable under-lighting of display (high, medium, off)
Display switching on activated by sound (e.g. by clapping) or by knock on the meteorological station (only during charging using batteries)
3. FUNCTIONS AND WORKING OF DEVICE
3.1. Time setting
In the real time mode press and hold the MODE button for more than three seconds. That gets you into time setup mode. The active segment starts flashing. The
order of setup is time zone –hours –minutes –years –months –days –language - exit. Pressing the UP button moves one step forwards; pressing the button for
longer than two seconds moves forwards at a speed of eight steps per second. Pressing the DOWN button moves one step back; by pressing the button for longer
than two seconds you can move backwards at a speed of eight steps per second. Pressing the MODE button confirms the settings. If you don't press any button
for ten seconds then the values get stored the way that you set them up.
3.2. Alarm setup
In standard mode pressing the MODE button switches between real time, alarm 1 and alarm 2. Default setting: alarm 1 is at 06:00 and alarm 2 is at 00:00.
In Alarm 1 setup mode (AL1) press the MODE button and hold it for more than two seconds. That way you enter Alarm 1 setup mode. The active segment begins
to flash. Order of setup: hour → minute → exit. Press the UP button to proceed one step forwards; holding it down for longer moves through the steps faster.
Pressing the DOWN button moves one step back; holding it down for long moves through the steps faster. Pressing the MODE button confirms the setting. If you
don't press any button for ten seconds then the values get stored the way that you set them up. To set up alarm 2 (AL2) proceed in the same way.
3.3. Wake-up function
In real time mode press the ALARM button to switch the alarm on and off in the following order: Switch on Alarm 1 (AL1) –Switch on Alarm 2 (AL2) –Alarm 1
(AL1) and Alarm 2 (AL2) switched on - Alarm 1 (AL1) and Alarm 2 (AL2) switched off. When the alarm starts to ring, the symbol appears on the display and
starts flashing together with the AL alarm symbol. Pressing SNOOZE/LIGHT postpones the alarm. Pressing any other button switches the alarm off. The alarm
switches itself off automatically after two minutes. When the alarm sounds no RCC signal is received, it gets renewed after the alarm is switched off. If the same
time is set for both alarms then AL1 flashes on the display. The alarm can be postponed for a discretionary time. Alarm sound is in the following order: a) 0-10
seconds: one beep per second, b) 10 –20 seconds two beeps per second, c) after 20 seconds –four beeps per second.
3.4. Snooze setup
In standard mode pressing the SNOOZE/LIGHT button for more than three seconds switches on the snooze setting (interval set up to you from three to twenty
minutes, the default setting is five minutes). The active segment starts flashing. Pressing the UP button moves one step forwards; holding it down for longer moves
faster. Pressing the DOWN button moves one step back; holding it down longer moves faster. Pressing the MODE button confirms the setting. If you haven't
pressed any button for ten seconds, the values will be stored the way that you set them up.
3.5. Sensor switching function
In real time mode pressing the CHANNEL button switches between channels (CH1, CH2, CH3 or cyclical repetition of all three channels). During cyclical repetition
the symbol appears on the display. In cyclical repetition display of three channels mode the values change by themselves. If less than three outdoor sensors
are connected then random data are displayed during cyclical repetition on channels that are not connected.
3.6. Sensor pairing function
First you have to set up different channels on individual sensors. Open the battery cover and use the positionable switch to set channel number 1, 2 or 3. Then
insert the batteries and close the cover. When switching the meteorological station on the first time the sensors will automatically get paired. However, if you
want to change the pairing then switch channel using the CHANNEL button and then hold it for more than two seconds. The pairing takes about three minutes. If
the pairing is unsuccessful then the meteorological station is apparently beyond reach of signal.
3.7. Temperature alarm setup function
In real time mode pressing the ALERTS button switches between a warning of the highest and lowest room and outdoor temperatures in the following order:
highest outdoor temperature –lowest outdoor temperature - highest room temperature –lowest room temperature.
Display with highest
outdoor temperature
Display with highest room
temperature
Display with lowest outdoor
temperature
Display with lowest room
temperature
In the maximum or minimum temperature display mode use the UP and DOWN buttons to switch the temperature alarm on and off. If the alarm is on then the
symbol appears on the display. In real time mode pressing and holding the ALERTS button for three seconds enters into the mode of setting a warning for
highest and lowest room and outdoor temperatures in the following order: highest outdoor temperature –lowest outdoor temperature - highest room
temperature –lowest room temperature - exit. Range of display: outdoor temperature -40°C to +70°C and room temperature 0°C to +50°C. The active segment
starts flashing. Pressing the UP button moves one step forwards; holding it down longer moves faster. Pressing the DOWN button moves one step back; holding
it down longer moves faster. Pressing the ALERTS button confirms the setting. If you don't press any button for ten seconds then the values get stored the way
that you set them up.
3.8. Reception of RCC control signal
Reception of RCC signal starts automatically after the device is switched on or reset. Forced reception of RCC signal: press the DOWN button for more than two
seconds. The signal is received automatically every day. Automatic reception takes place at the following times of day: 1:00, 2:00 and 3:00. In the event of an error,
there are more attempts to receive a signal at 4:00 and 5:00. If reception is unsuccessful, it gets repeated the next day at 1:00. If a signal is successfully received
at 4:00 then reception for the given day is not repeated. If reception of signal at 4:00 is unsuccessful then it is repeated at 5:00. In RCC signal reception mode the
icon flashes. If RCC signal is received then the icon flashes. If an RCC signal is successfully received then the icon lights up and reception of signal
ends. If the signal is weak or if the device is unable to distinguish what the correct signal is then only the symbol flashes. Pressing the DOWN button during
RCC signal reception ends its reception. Pressing the SNOOZE/LIGHT button switches on the under-lighting of the display and reception of RCC signal will not be
interrupted. If the alarm is activated in RCC signal reception mode, the device switches from reception mode into wake-up mode. After reset the RCC symbols go
away.
3.9. Weather forecast function
Six levels of weather forecast: sunny, partly cloudy, cloudy, showers, thunderstorms, snow. The values on the barometer change every hour. The display constantly
shows 'LEARNING PRESSURE', meaning that it is continuously reading values of barometric pressure. Dynamic display of weather forecast.
3.10. Lighting of display and overview of abbreviations for days in calendar
If the meteorological station is powered by batteries, then by pressing any key the display lights up for eight seconds. If the under-lighting of the display is weak
then replace the batteries. If powering using an adapter, when the alarm is switched on the display lights up and then when it finishes it turns off. The display has
a sound sensor and it can be lit up by a sound signal, for example a clap, whistle or similar –that applies only for charging using batteries.
Days of the week
The product is CE (Declaration of Conformity) certified, in accordance with current regulations. On request, at the producer: [email protected], or for download at
shop.solight.cz. Producer: Solight Holding, s.r.o., Na Brně 1972, Hradec Králové 500 06, Czech Republic.
Anglicky
Německy
Francouzsky
Italsky
Holandsky
Španělsky
Dánsky
ENG
GER
FRE
ITA
DUT
SPA
DAN
Mondey
MON
MON
LUN
LUN
MAA
LUN
MAN
Tuesday
TUE
DIE
MAR
MSR
DIN
MAR
TIR
Wednesday
WED
MIT
MER
MER
WOE
MIE
ONS
Thursday
THU
DON
JEU
GIO
DON
JUE
TOR
Friday
FRI
FRE
VEN
VEN
VRI
VIE
FRE
Saturday
SAT
SAM
SAM
SAD
ZAT
SAD
LOR
Sunday
SUN
SON
DIM
DOM
ZON
DOM
SON
The weather symbols represent the estimated weather for the next 24 hours. The estimate is done based on a calculation using the temperature data and
the humidity data. The estimate serves only as a guideline. If the equipment is operated in a room that has air conditioning, the estimate will not be
accurate.
Clear
Almost clear
Slightly cloudy
Partly
cloudy
Cloudy
Almost fully
cloudy
Cloudy
Drizzle
Rain
Occasional
thunderstorms
Thunderst
orms
Snow flurries
Snow
Other Solight Weather Station manuals

Solight
Solight TE81WiFi User manual

Solight
Solight TE85 User manual

Solight
Solight TE86 User manual

Solight
Solight TE90 User manual

Solight
Solight TE81W User manual

Solight
Solight TE84 User manual

Solight
Solight TE81 User manual

Solight
Solight TE81BK User manual

Solight
Solight TE80 User manual

Solight
Solight TE81XL User manual


