GARNI GARNI610 Precise User manual

INSTRUCTION MANUAL FOR WEATHER STATION
MODEL Precise
Precise
2
PACKAGE CONTENTS
Main unit (receiver)
Wireless sensor GARNI 060H
Power adaptor (adaptor plus cable)
2 screws
2 dowels
Part for suspension of the main unit
Manual
DESCRIPTION
- for high measurement accuracy top sensors SENSIRION are used (main unit and AMS (wireless sensor)
- measurement of indoor and outdoor temperature and relative humidity
- measurement of indoor and outdoor temperature (°C or °F)
- possibility to connect up to 3 wireless sensors for measurement of temperature and relative humidity at
different spots
- alarm on upper and lower limits of indoor and outdoor temperature
- weather forecast icons based on monitoring of changes in barometric pressure
- option to set a default weather forecast icon
- absolute/relative barometric pressure display
- display of outdoor heat Index and dew point
- memory for maximum and minimum measured values of temperature and rel. humidity
- memory for measured values of temperature, rel. humidity and barometric pressure for the last 24 hours
- time and date controlled by DCF-77 radio signal with manual setting option
- 12 or 24-hour time display format
- date
- alarm clock
- 5 minute snooze function
- permanent display backlight option
- the main unit and the wireless sensor can be suspended or stand
- the wireless sensor is included in the delivery
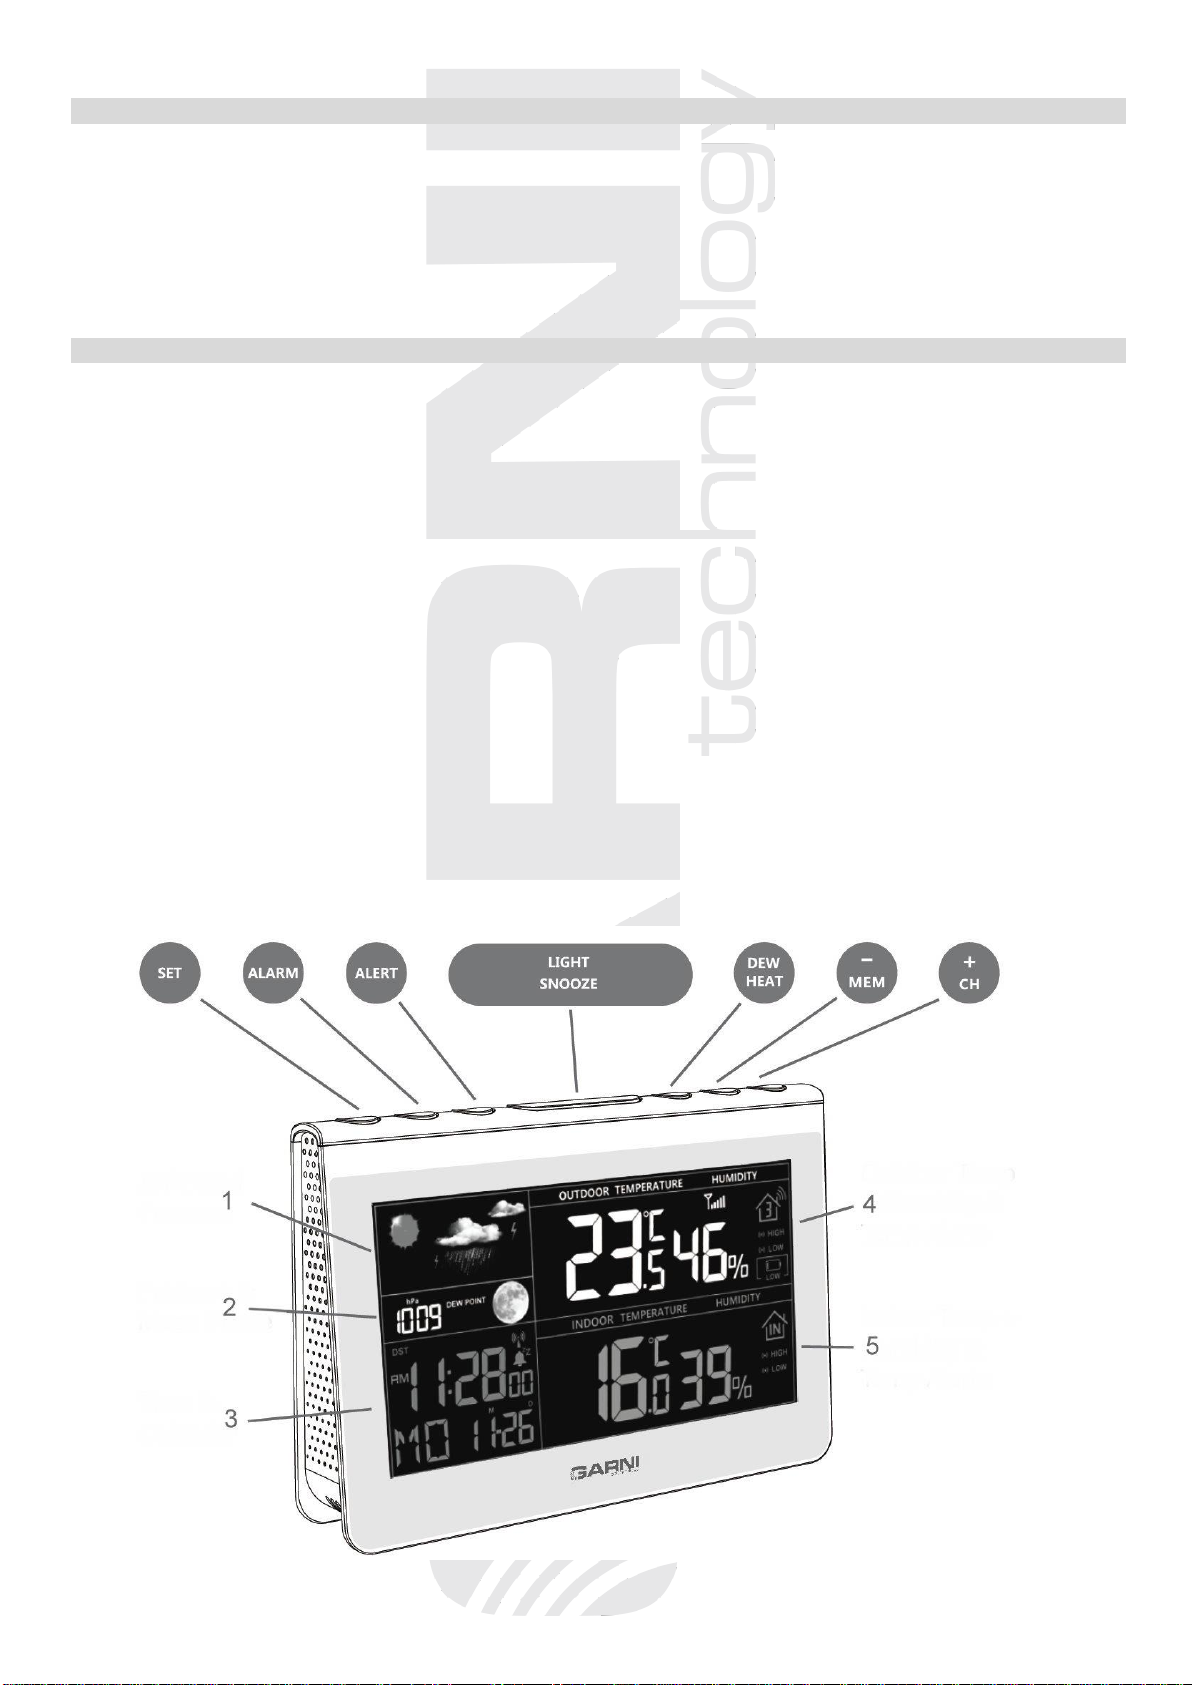
Main unit
3
1) Weather forecast icons
2) Barometric pressure, Moon phase
3) Time, date
4) Outdoor temperature and relative humidity,
alarm upper and lower limits of the outdoor temperature
5) Indoor temperature and relative humidity,
alarm upper and lower limits of the indoor temperature
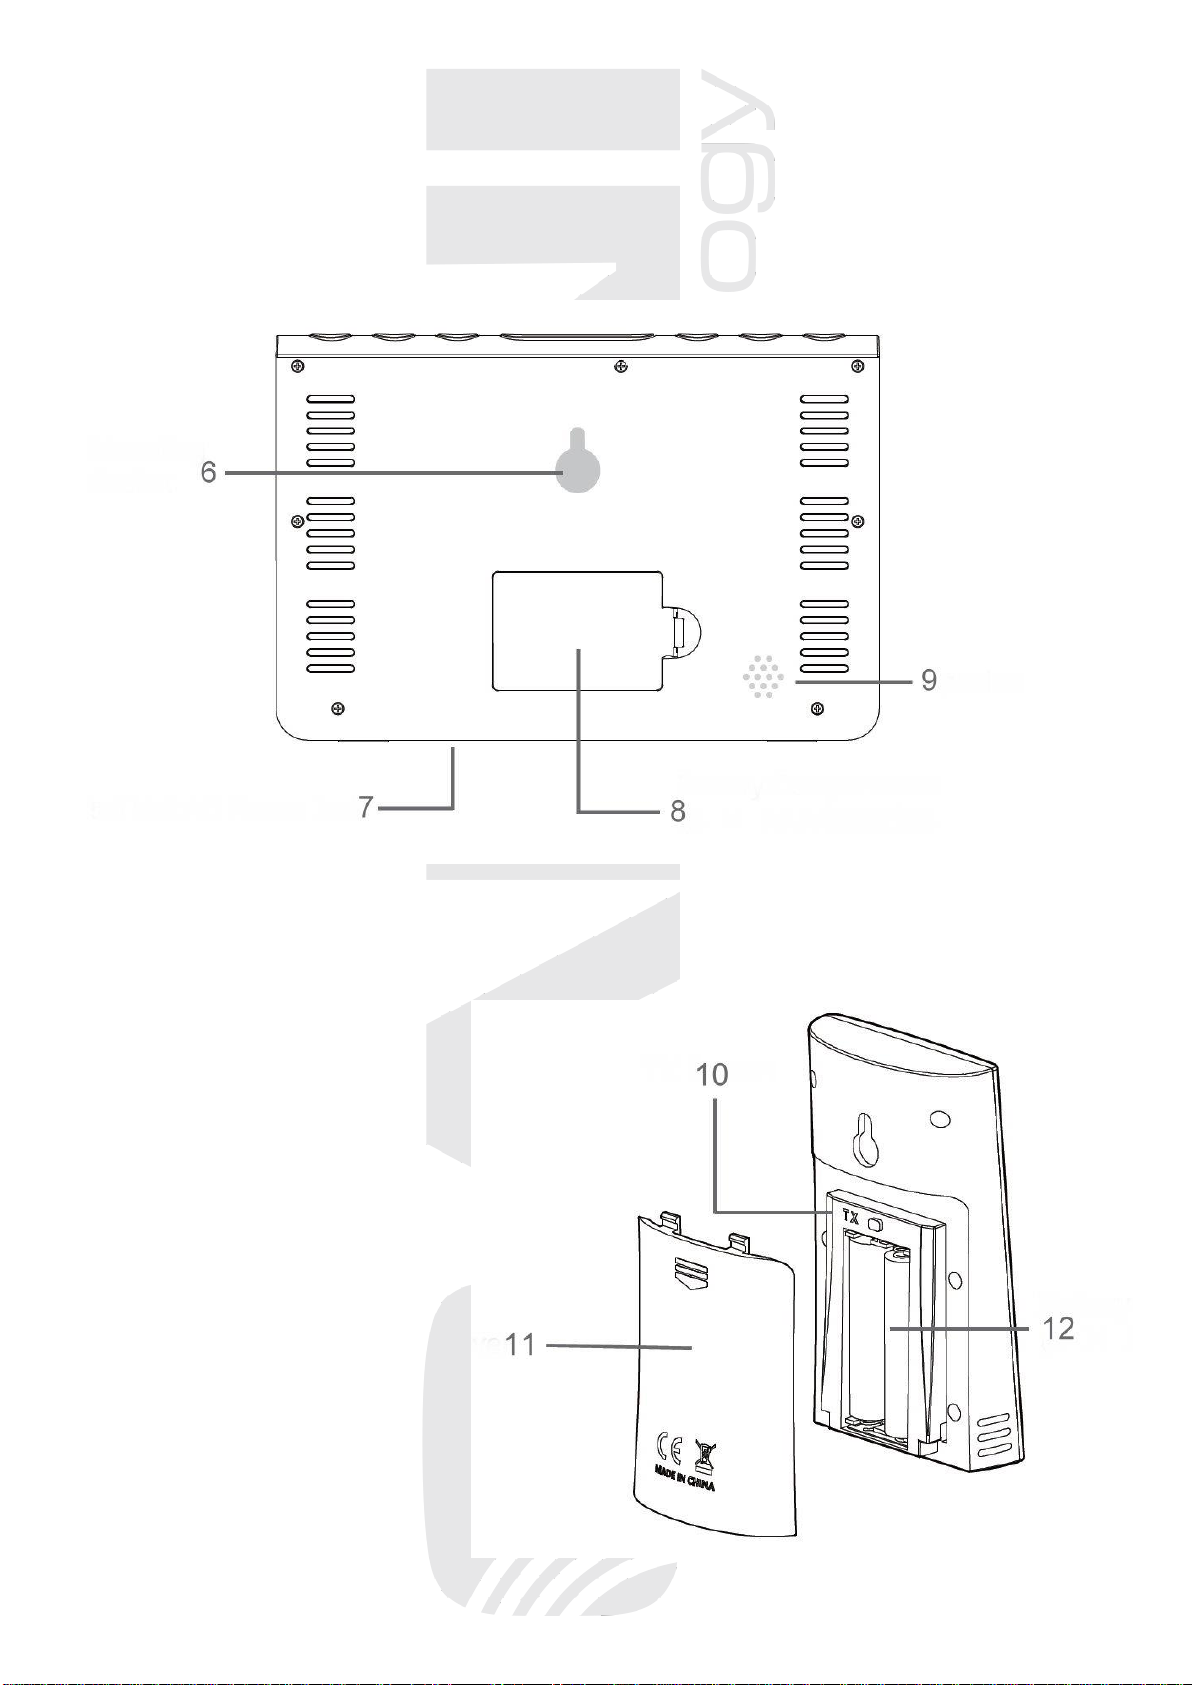
Rear side of the main unit
6) Mounting hole
7) Power adapter socket
8) Battery compartment cover
9) Acoustic alarm opening
Wireless sensor GARNI 060H
10) TX button
11) Battery compartment cover
12) Battery compartment

4
COMMISSIONING
Main unit
1) The main unit can be powered by batteries (short-time display backlight for 7 seconds)
or by an AC adapter (permanent display backlight possible).
2) Remove the battery compartment cover on the rear side of the main unit and insert 3 pcs of AAA
batteries (micro). Observe the correct battery polarity. The display lights up and all display segments
are briefly displayed.
3) Close the battery compartment
The main unit can also be powered by the AC adapter even with the batteries inserted.
Connect the power cable connector to the socket on the bottom of the main unit, plug the USB end
of the power cable into the AC adapter, and insert the power adapter plug into a mains socket.
Note: observe the correct battery polarity to prevent damage to the weather station. Use only high quality
alkaline batteries for the main unit
SETUP OF THE WEATHER STATION
To enter the settings mode press and hold the SET button in the main screen mode for
3 seconds. For settings, use - / MEM and + / CH buttons. To save, press the SET button once.
1) Press the SET button and hold for 3 seconds. A beep will sound and 24Hr will flash. Use the
- / MEM or + / CH button to select 24 Hr or 12 Hr time display format and confirm by pressing SET
2) Timezone will flash. Use the - / MEM and + / CH buttons to set the timezone. E.g., for the Czech and
Slovak Republic leave 01. Press SET to confirm
3) Hour will flash. Use the - / MEM and + / CH buttons to set the current hour and confirm with SET
4) Minutes will flash. Use the - / MEM and + / CH buttons to set the current minute and confirm with SET
5) Seconds will flash. Use the - / MEM and + / CH buttons to set the current second and confirm with
the SET button
6) Year will flash. Use the - / MEM and + / CH buttons to set the current year and confirm with SET
7) Month will flash. Use the - / MEM and + / CH buttons to set the current month and confirm with SET
8) Day will flash. Use the - / MEM and + / CH buttons to set the current day and confirm with SET
9) The day name shortcut will flash. Use the - / MEM and + / CH buttons to set the required language
(CZ –Czech, EN - English, DE - German, IT - Italian, ES –Spanish) and confirm with SET
10) Date will flash. Use the - / MEM and + / CH buttons to set the data display format day-month,
or month-day and confirm with SET
11) ON (or OF) will flash. Use the - / MEM and + / CH buttons to turn the automatic reception of the DCF-77
signal on (ON, the icon shows), or off (OF, no icon) and confirm with SET
12) ON (or OF) will flash together with DST (daylight savings time). Use the - / MEM and + / CH buttons to
set the daylight savings time on (ON), or off (OF) and confirm with SET
13) °C (or °F) will flash. Use the - / MEM and + / CH buttons to display the temperature in °C or °F
and confirm with SET
14) hPa (or inHg) will flash. Use the - / MEM and + / CH buttons to display the barometric pressure in hPa
or inHg and confirm with SET
15) The barometric pressure will flash. Press the SNOOZE / LIGHT button and press for 3 seconds to se
the barometric pressure to the absolute value. Use the - / MEM and + / CH buttons to set the relative
value which you can determine for the given area for example on the Internet or a nearby airport.
Confirm the setting with SET. A beep will sound and the setting is complete.
16) The weather forecast icon will flash. Use the - / MEM and + / CH buttons to set the icon according to the
current weather to accelerate the display of the weather forecast and confirm with SET
Note: hold the - / MEM or + / CH button when setting the value to increase or decrease this value faster.
If no button is pressed for 15 seconds, the last set value is saved and the setting mode exits.
5
Day name abbreviations
Monday
Tuesday
Wednesday
Thursday
Friday
Saturday
Sunday
CZ
PO
UT
ST
CT
PA
SO
NE
EN
MO
TU
WE
TH
FR
SA
SU
DE
MO
DI
MI
DO
FR
SA
SO
IT
LU
MA
ME
GI
VE
SA
DO
ES
LU
MA
MI
JU
VI
SA
DO
Wireless sensor
1) Remove the battery compartment cover on the rear side of the wireless sensor.
2) Insert 2 pcs AAA batteries –observe the correct battery polarity
3) Press the TX button in the battery compartment
4) Close the battery compartment. Signal transmission is indicated by LED that flashes once every
60 seconds.
When the signal is received successfully, the measured values are shown on the display on channel 1.
Note: for the wireless sensor the lithium batteries are recommended due to their better resistance to frost.
Do not use rechargeable batteries.
If the wireless sensor signal is lost, hold down the LIGHT / SNOOZE button on the main unit for 3 seconds.
The main unit will re-commence searching for the wireless sensor signal.
Using multiple wireless sensors
If you want to use multiple wireless sensors or register a wireless sensor to another channel, then press the
+ / CH button to select the channel and press the + / CH button again for 3 seconds. A beep will sound and
the signal strength indicator on the display of the main unit will flash. Now press the TX button in the
battery compartment of the wireless sensor. Select a different channel for each wireless sensor.
Once the connection of the main unit to the wireless sensor is established, the icon will be displayed
permanently. Place the main unit and the wireless sensor in the desired location within the range of the
wireless sensor signal.
The connection establishment process must be repeated after each battery replacement.
Switching between wireless sensor channels
If there are multiple wireless sensors paired with the main unit, press the - / CH button to display the
measured temperature and relative humidity readings of each wireless sensor. For automatic switching of
channels to which the wireless sensors are registered, press the SNOOZE / LIGHT button for 2 seconds,
until the beep sounds. To terminate the automatic switching, press the SNOOZE / LIGHT button again for
2 seconds, until the beep sounds.
Placement
Placement of the wireless sensor
Place the wireless sensor away from direct sunlight not to compromise the measurement. Placement
outdoors, at the northern wall is recommended. Obstacles such as walls, concrete, metal structures and
large objects reduce the signal range. Position the wireless sensor vertically for optimum signal
transmission.
The signal range may be affected by obstacles (walls, trees) and other electrical devices (TVs, monitors,
etc.).
You may suspend the wireless sensor from the mounting hole or stand it.

6
Placement of the main unit
Select the location of the main unit that is free from direct sunlight. Test the connection to the wireless
sensor before final installation. If there is a problem with the signal reception, select another location. There
is a mounting hole for suspension on the rear of the main unit. Use the part to suspend the main unit You
may also put the main unit on a flat surface.
TIME AND DATE CONTROLED BY THE DCF-77 RADIO SIGNAL
The wireless sensor is equipped with a DCF-77 signal receiver for time and date adjustment, so it is
suitable to place the wireless sensor outdoors for better reception. The DCF-77 is broadcast by a
transmitter from Frankfurt am Main, Germany, with a range of about 1500 km. The time and date is
adjusted every day. In case of poor reception conditions time and date can be adjusted manually.
After time and date have been adjusted manually, they will be readjusted upon reception of the DCF-77
signal.
When the batteries are inserted into the main unit and the wireless sensor and the connection is
established, the wireless sensor will start to receive the DCF-77 signal. If the signal is not received, the
DCF-77 signal reception icon will not be shown on the display. Upon successful reception the reception
icon will be displayed on the display, if the signal is not received, the icon will be displayed
The DCF-77 signal is automatically scanned for every day between 10pm and 5pm, when the interference
is at the lowest.
Note: The DCF-77 signal receiver for time and date adjustment is integrated into the wireless sensor,
so the wireless sensor should be positioned to ensure good reception of the DCF-77 signal,
that is outdoors, away from potential sources of interference. Receiving and adjusting time can
take up to 10 minutes.
MEMORY FOR MAX AND MIN MEASURED VALUES
The main unit is equipped with memory for maximum and minimum measured values. Press the - / MEM
button repeatedly to display the maximum and minimum measured values of the indoor and outdoor
temperature and relative humidity. MAX or MIN is displayed above the time. Press and hold the - / MEM
button for 3 seconds; a beep will sound and the memory will be erased.
MEMORY OF MEASURED VALUES FOR THE LAST 24 HOURS
Press and hold the DEW / HEAT button for 3 seconds to display the measured values of the indoor and
outdoor temperature and relative humidity. A beep will sound and hour will be displayed at the time spot.
Use the - / MEM and + / CH buttons to display the values stored for every hour.
HEAT INDEX / DEW POINT
Press the DEW / HEAT button repeatedly to display the outdoor heat Index –subjective temperature
(HEAT INDEX) and the outdoor dew point (DEW POINT), which is indicated by labels next to the display of
the barometric pressure. The temperature index value (HEAT INDEX) is displayed from 26°C outdoor
temperature and 40% outdoor relative humidity. For lower readings, the temperature index value is
irrelevant and “Lo” is displayed.
ALARM CLOCK
Setting of alarm time
The weather station allows setting of the wake-up time. In the basic display mode, press and hold the
ALARM button for 3 seconds. A beep will sound. The alarm time will be displayed at the time spot and the
hour will flash. Use the - / MEM and + / CH buttons to set the required wake-up hour and press ALARM
shortly. Minutes will flash. Use the - / MEM and + / CH buttons to set the required wake-up minute. After
another press, a beep will sound and the setting will be saved.
7
Enabling the alarm clock
In the basic display mode, press and hold the ALARM button. One press enables the alarm clock, two
presses disable it. The display indicates the enabled alarm clock with the icon
Turning off alarm signal, Snooze
As soon as the alarm signal goes off at the preset time, you can activate the Snooze function by pressing
SNOOZE / LIGHT. The icon will flash one the display. The alarm signal will be reactivated
after 5 minutes.
If you do not want the Snooze function, press the ALARM button to disable the alarm signal.
If no button is pressed, the alarm signal will be turned off automatically after 2 minutes.
SETTING OF ALARM FOR THE UPPER AND LOWER TEMPERATURE LIMIT
The weather station allows setting the alarm of the upper and lower limits of indoor and outdoor
temperature. In the basic display mode, press and hold the ALERT button.
1 x press
displays the upper limit (HIGH) of the indoor temperature (INDOOR TEMPERATURE)
2 x press
displays the lower limit (LOW) of the indoor temperature (INDOOR TEMPERATURE)
3 x press
displays the upper limit (HIGH) of the outdoor temperature (OUTDOOR TEMPERATURE)
4 x press
displays the lower limit (LOW) of the outdoor temperature (OUTDOOR TEMPERATURE)
5 x press
basic display mode
Choose which value to set and press and hold the ALERT button for 3 seconds. A beep will sound and the
temperature will flash. Use the - / MEM and + / CH buttons to set the required temperature.
The temperature alarm is enabled (or disabled) by pressing the ALARM button. The activation of the alarm
is indicated on the display by the icon .
The upper limit alarm for the indoor temperature can be set from -9° C to + 60° C, the lower limit from -10°
C to + 59° C
The upper limit alarm for the outdoor temperature can be set from -9° C to + 70° C, the lower limit from -40°
C to + 59° C
Activating the alarm for the upper and lower temperature limit
Exceeding the set temperature limit will be indicated by an acoustic signal at regular intervals, the
corresponding HIGH or LOW icon will flash on the display.
To disable the alarm perform the same procedure as for its setting, deactivate the alarm by pressing
ALARM, the icon will not be displayed.
Note: if multiple wireless sensors are used, the upper and lower temperature limit alarm can be se for
each sensor separately. Select the sensor with the + / CH button
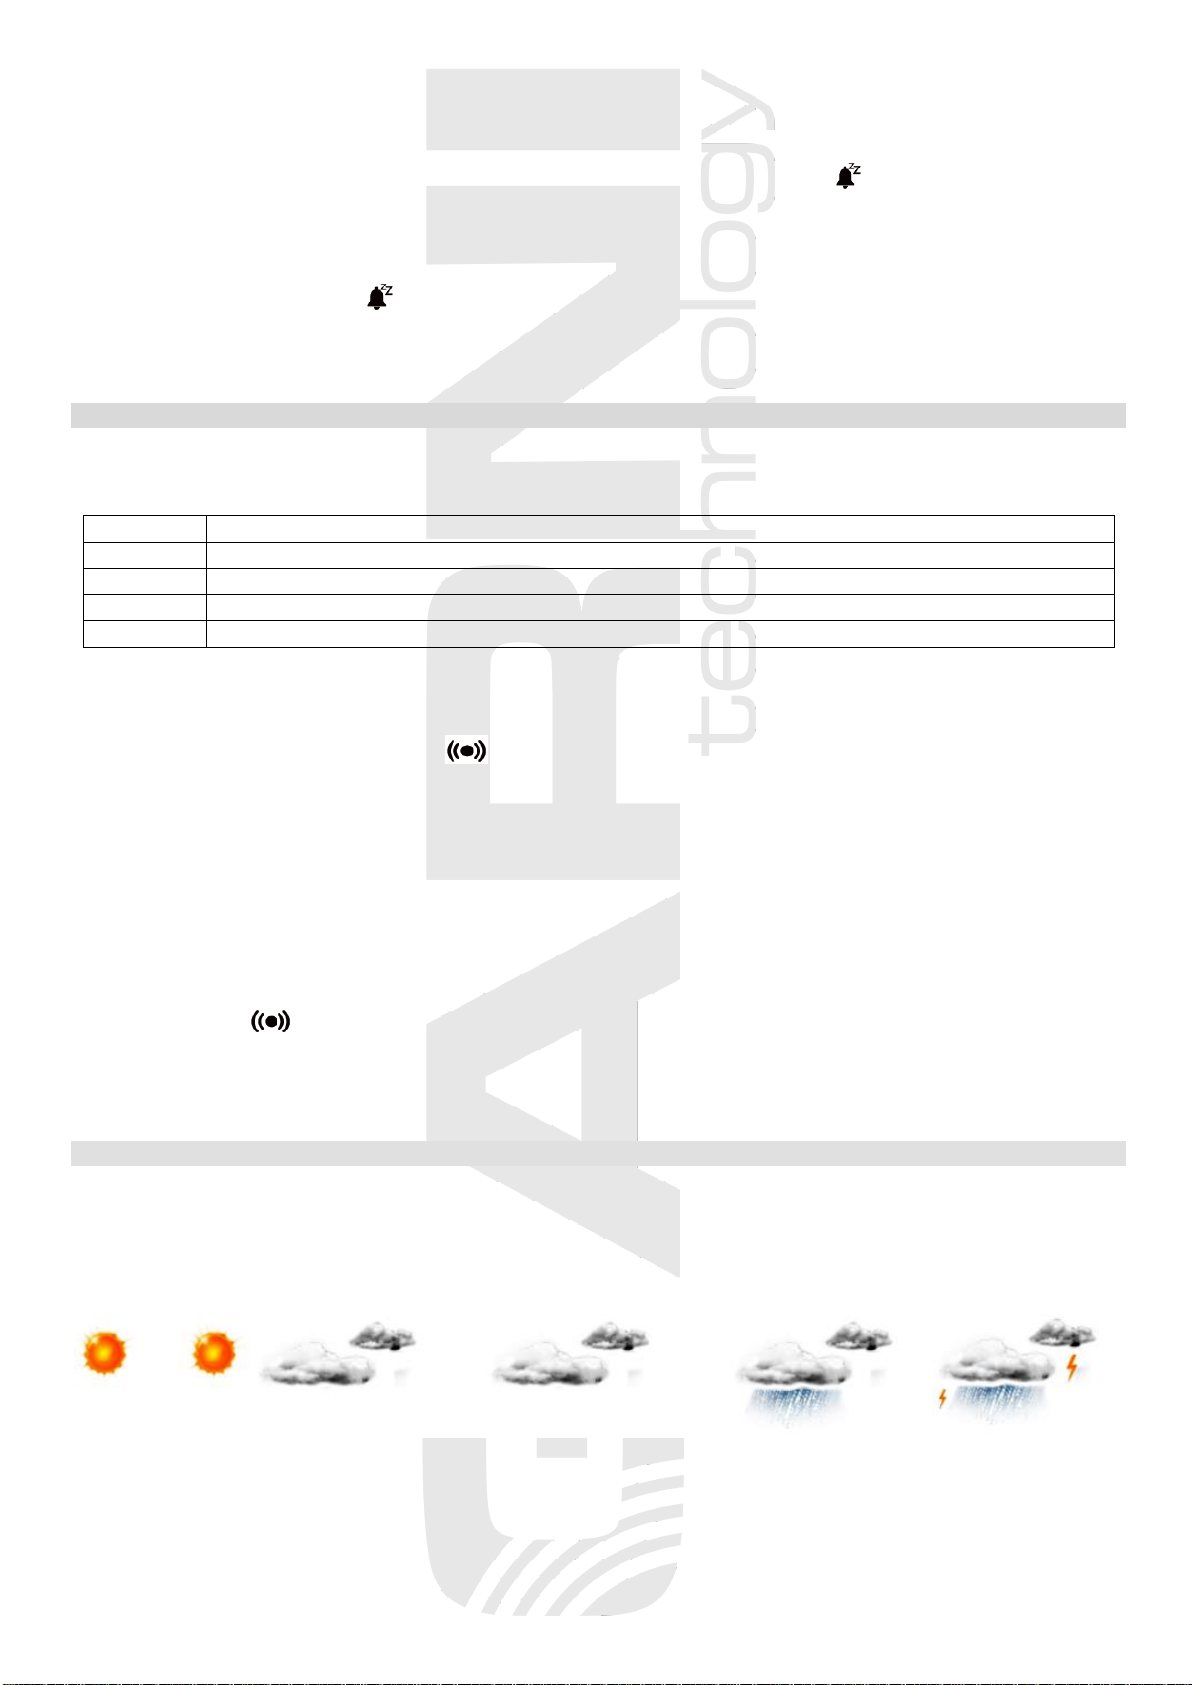
WEATHER FORECAST
The forecast is based on the change in barometric pressure, generally speaking when the barometric
pressure rises, the weather improves and vice versa. The weather forecast is valid for the next 12 to 24
hours within 30 to 50 km with the probability of 70 to 75%.
The weather forecast is displayed using 5 icons
clear somewhat cloudy cloudy precipitation stormy
After switching on the station, it is necessary to wait for at least 24 hours to display the correct
weather forecast. To speed up the process, the default weather forecast icon can be set according
to the current situation.

8
MOON PHASES
8 Moon phases are displayed. If the phase icon is not displayed, it is the new moon.
waning crescent last quarter waning gibbous full Moon waxing gibbous first quarter waxing crescent
DISPLAY BACKLIGHT
Press the SNOOZE / LIGHT button repeatedly if the main unit is powered with the AC Adapter. The
backlight has two brightness levels and the possibility of switching off.
On battery power only, the backlight is turned on for 7 s when the SNOOZE / LIGHT is pressed.
WEAK BATTERIES ICON
If the icon appears next to the outdoor values, the batteries of the wireless sensor are low and need
to be replaced. Every time you replace the batteries, you must repeat the connection process with the main
unit.
TROUBLESHOOTING
problem
possible cause
solution
time is not adjusted by the
DCF-77 signal, time is adjusted
incorrectly
incorrectly set timezone
DCF-77 signal reception not on
the main unit did not establish a
connection with the wireless sensor
DCF-77 signal interference
setting the correct timezone
turning the DCF-77 signal reception
on
establish connection
place the main unit and wireless
sensor away from other electrical
equipment
the main unit keeps displaying
the outdoor temperature and rel.
humidity
even after the wireless sensor is
disconnected
the main unit displays the last measured
data for 30 minutes after disconnection
of the wireless sensor
/
the temperature and rel. humidity
are different when the main unit
and the wireless sensor are placed
next to each other
measurement is affected by ambient
conditions
the measurement is not stable
/
wait for stable measurement
the outdoor temperature and rel.
humidity are not displayed
the connection between the main unit
and the wireless sensor is not
established
dead batteries in the wireless sensor
place the wireless sensor closer to
the main unit
replace the batteries
the measured outdoor temperature
and rel. humidity are not accurate
wireless sensor measurement is
affected by ambient conditions
do not expose the wireless sensor
to direct sunlight
place the wireless sensor in shade
at a dry place
the batteries of the wireless sensor
have short lifespan
low-quality batteries
the outdoor temperature is below -20°C
use only fresh, high-quality batteries
use lithium batteries
the time has changed automatically
the time has been adjusted by the DCF-
77 signal with incorrectly set timezone
set correct timezone

9
SAFETY PRECAUTIONS
• Do not expose the device to excessive force, shocks, dust, temperature and humidity
• Do not cover the ventilation holes with any objects like newspapers, curtains, etc.
• Never immerse the device in water. If you spill liquid on it, dry it immediately with a soft, lint-free cloth
• Do not clean the device with abrasive or corrosive substances
• Do not handle the internal components of the device, as this will void your warranty
• Use only fresh batteries. Never mix fresh and old batteries
• Do not recharge the batteries. Place the station and its parts outside the reach of children
• Do not throw old batteries to unsorted municipal waste, but use the designated areas
• Dispose of this product in accordance with applicable regulations
•Use only accessories specified by the manufacturer
• Do not interfere with the internal circuits of the device, as this may void the warranty
• The technical specifications are subject to change without notice
SPECIFICATION
Main unit
Power supply: power adaptor 100-240 V, 50/60 Hz, 0.35 A / 5 V, 1000 mA,
3 pcs batteries type AAA 1.5 V (micro)
Temperature measurement range: -10°C to +60°C
Measurement accuracy: +/- 0.2°C (-10°C to +50°C)
Resolution: 0.1°C
Humidity measurement range: 1% to 99%
Accuracy of measurement: +/- 2% (20% to 80%)
+/- 4% ( 1% to 20%, 80% to 99%)
Resolution: 1%
Outdoor HEAT INDEX: from 26°C, from 40% relative humidity
Type of used sensors: SENSIRION SHTC3
Dimensions: 194.9 x 130.8 x 35.7 mm
Wireless sensor GARNI 060H
Power supply: 2 pcs batteries type AAA 1.5 V (micro)
Temperature measurement range: -40°C to +70°C
Accuracy of measurement: +/- 0,2°C (-10°C to +50°C)
+/- 0,4°C (-40°C to -10°C, +50°C to +70°C)
Resolution: 0.1°C
Humidity measurement range: 1% to 99%
Accuracy of measurement: +/- 2% (20% to 80%)
+/- 4% ( 1% to 20%, 80% to 99%)
Resolution: 1%
Type of used sensors: AMS ENS210
Transmission frequency: 433.92 MHz
Maximum RF output: 10 dBm (10 mW)
Data transmission interval: 60 s
Cover: IPX5
Range: up to 150 m in open space
Dimensions: 102.7 x 57.1 x 32.4 mm
GARNI technology a.s. hereby declares that the type of the radio equipment - weather station type GARNI 610
PRECISE - conforms to the Directive 2014/53/EU. The full EU Declaration of Conformity is available on the
following website: www.garni-meteo.cz
The manual was translated, adapted and processed for GARNI technology a.s. by Roman Gajda.
Reproduction of this manual or its parts is prohibited without the author's consent
Version 2
02G21
Table of contents
Other GARNI Weather Station manuals


Popular Weather Station manuals by other brands


La Crosse Technology
La Crosse Technology WS-3512 Operation manual

ECOWITT
ECOWITT HP3501 Operation manual

GEONAUTE
GEONAUTE WS900 manual

La Crosse Technology
La Crosse Technology WS-7090U instruction manual

Unit Connection Technology
Unit Connection Technology WS0300 user manual

Ambient Weather
Ambient Weather Fischer 4673-22 user manual