Solt GGSPPO4200B User manual

E S S E N T I A L S FOR LIFE
User
Manual
Portable Pizza Oven
MODEL
GGSPPO4200B
V 1.2 | 0922

2

Welcome Congratulations on purchasing
your new Portable Pizza Oven!
The Sôlt brand is proudly distributed
within Australia by Residentia
Group Pty Ltd.
Please refer to the warranty card at the rear of this manual
for information regarding your product’s parts and labour
warranty, or visit us online at www.residentia.group
At Residentia Group, we are customer obsessed and our
Support Team are there to ensure you get the most out
of your appliance. Should you want to learn more about
your Pizza Oven features, and importantly taking care
of your appliance when cleaning, our Support Team are
here to help.
You can use our online Support Centre at anytime by
visiting http://support.residentiagroup.com.au, or you can
contact us via calling us on 1300 11 HELP (4357).
It is important that you read through the following use and
care manual thoroughly to familiarise yourself with the
installation and operation requirements of your appliance
to ensure optimum performance.
Again, thank you for choosing an Sôlt appliance and we
look forward to being of service to you.
Kind Regards,
The Residentia Team
Residentia Group
—
Head Office.
165 Barkly Ave
Burnley
Victoria 3121
Australia
—
ACN.
600 546 656
—
Online.
residentia.group
Sôlt
—
Online.
www.solt.house
—
Instagram.
/solt.house
—
Facebook.
/solt.appliances

4
This page
is intentionally
left blank

Contents 3Welcome
6Safety Instructions
8Partial Enclosures
9Setting Up Your Oven
9Installation Guide
10 Gas Safety
12 First Use
12 Using Your Pizza Oven
13 Oven Exploded Diagram
14 Cleaning & Maintenance
15 Troubleshooting
15 Technical Specifications
17 Purchase Details
18 Warranty Information
Sôlt recommends the use of original spare parts. When contacting our customer service team, please ensure
that you have the following information at hand (which can be found on your appliances’ rating plate).
— Model Number
— Serial Number
T . 1300 11 4357 | E. support@residentiagroup.com.au
Customer Care

6
Safety Instructions
IMPORTANT SAFETY INFORMATION & WARNINGS
WARNING
• DO NOT SPRAY AEROSOLS IN THE VICINITY OF THIS
APPLIANCE WHILE IT IS IN OPERATION. DO NOT USE
OR STORE FLAMMABLE MATERIALS IN OR NEAR THIS
APPLIANCE.
• DO NOT PLACE ARTICLES ON OR AGAINST THIS
APPLIANCE.
• DO NOT MODIFY THIS APPLIANCE.
• FOR OUTDOOR USE ONLY.
IMPORTANT! Do not attempt to assemble and use
this pizza oven unless you have read this entire user
manual and have familiarised yourself with all steps and
requirements thoroughly. Please keep this manual in a
handy place as it has answers for questions that may arise
during your future use.
DO NOT INSTALL IN, OR CONNECT TO THE
CONSUMER PIPING OR GAS SUPPLY SYSTEM
OF A BOAT OR CARAVAN.
DANGER
If you smell gas:
• Shut gas off to the appliance.
• Extinguish any open flame.
• Ensure the appliance door remains open and with
clear ventilation.
• If odour continues, keep away from the appliance and
immediately call your fire department.
• Failure to follow these instructions could result in a
fire or explosion which could cause property damage,
personal injury or death.
DANGER
• This instruction manual contains important information
necessary for the proper assembly and safe use of the
appliance.
• Read and follow all warnings and instructions before
assembling and using the appliance.
• Follow all warnings and instructions when using the
appliance.
• Keep this manual for future reference.
• Never operate this appliance in enclosed areas.
• Never operate this appliance unattended.
• Never operate this appliance within 1m of any structure
or combustible material and at least 3m away from
objects that may spark or ignite gas (i.e. other gas
cylinders, live electrical appliances, pilot lights of gas
water heaters, etc).
• Never operate this appliance within 7.5m of any
flammable liquid.
• Do not fill cooking vessel beyond the limitation of the
door dimensions.
• Heated liquids remain at scalding temperatures long
after the cooking process has finished. Never touch the
cooking appliance until all elements have cooled to
45ºC or less.
• If a fire should occur, keep away from the appliance
and immediately call your fire department. Do not
attempt to extinguish an oil or a grease fire with water.
• Some parts of this appliance may have sharp edges-
wear suitable protective gloves if necessary for
handling.
• Never use the protective cover/carry bag unless the
appliance has completely cooled.
• Never move the appliance during use or once
operating.
• Accessible parts may be very hot during operation-
always keep children away during and after use.
• Always ensure that the gas supply is returned to the off
position at the gas cylinder after use.
• Do not modify the appliance or its connections in any
way- this may be dangerous.
• Ensure the surface you are operating the appliance on
is not flammable and suitably protected.
• This appliance is only intended to be used with LPG
gas. Do not use lava rocks, briquets, charcoal or other
fuel sources.
• Never light the burner with the appliance opening/
door covered. Non-ignited gas accumulated inside the
closed appliance may cause an explosion.
• Regularly check the appliance during operation to
ensure that the burner flames remain ignited.
• Always turn off the gas supply when the appliance is
not in use.
• Always turn of the gas supply at the gas cylinder and
detach from the appliance before moving. Never move
the appliance with the gas supply connected as this
can damage your appliance or connection.
RISK OF FIRE
Most fires are caused by a build up of grease, or an
improper gas connection. Ensure all people and pets are
kept as far away as possible.
If you are able, turn the gas off at the cylinder or the on/off
valve where applicable. Use a fire extinguisher if possible.
If water is the only fire retardant available, thoroughly
soak the area around the appliance. When spraying water
on the Pizza Oven itself, do not use a strong jet of water, as
this may cause splashing of burning grease, resulting in a
further spreading of the fire.
IMPORTANT! Regularly clean your appliance between uses
to ensure that residual food or grease won’t lead to a fire.
Damage to the appliance can occur where the appliance is
not cleaned regularly.

7
CAUTION! Do not use water to extinguish a grease fire as
it may cause an injury. Immediately turn the gas cylinder
to the off position as well as the appliance knob to the off
position, in the event of a grease fire.
CARBON MONOXIDE
Carbon Monoxide is a highly poisonous gas which can
be produced when the device isn’t receiving enough
ventilation. We therefore recommend using the gas pizza
oven in a well ventilated area away from direct wind and
to never cover the oven mouth.
It is difficult to know if your device is producing Carbon
Monoxide as it is an odourless and colourless gas. It can,
however cause these symptoms when you are exposed to
it:
• Tightness across the forehead Headache, Weakness,
Dizziness, Nausea, Vomiting, Coma, intermittent
convulsions, Depressed heart action, slowed
respiration.
IF THE EXPOSURE HAS BEEN SEVERE IT MAY
CAUSE DEATH.
WARNING! Contact your local municipality for any
building codes regulating the installation of outdoor
barbecue appliances. Outdoor installations must conform
to Australian Standards Code AS/NZS 5601 as well as the
requirements of any local council, gas electricity authority
or other statutory regulation.
Spanner tighten all gas fittings as per instructions. Do not
modify the appliance. Parts sealed by the manufacturer or
the company shall not be manipulated.
8
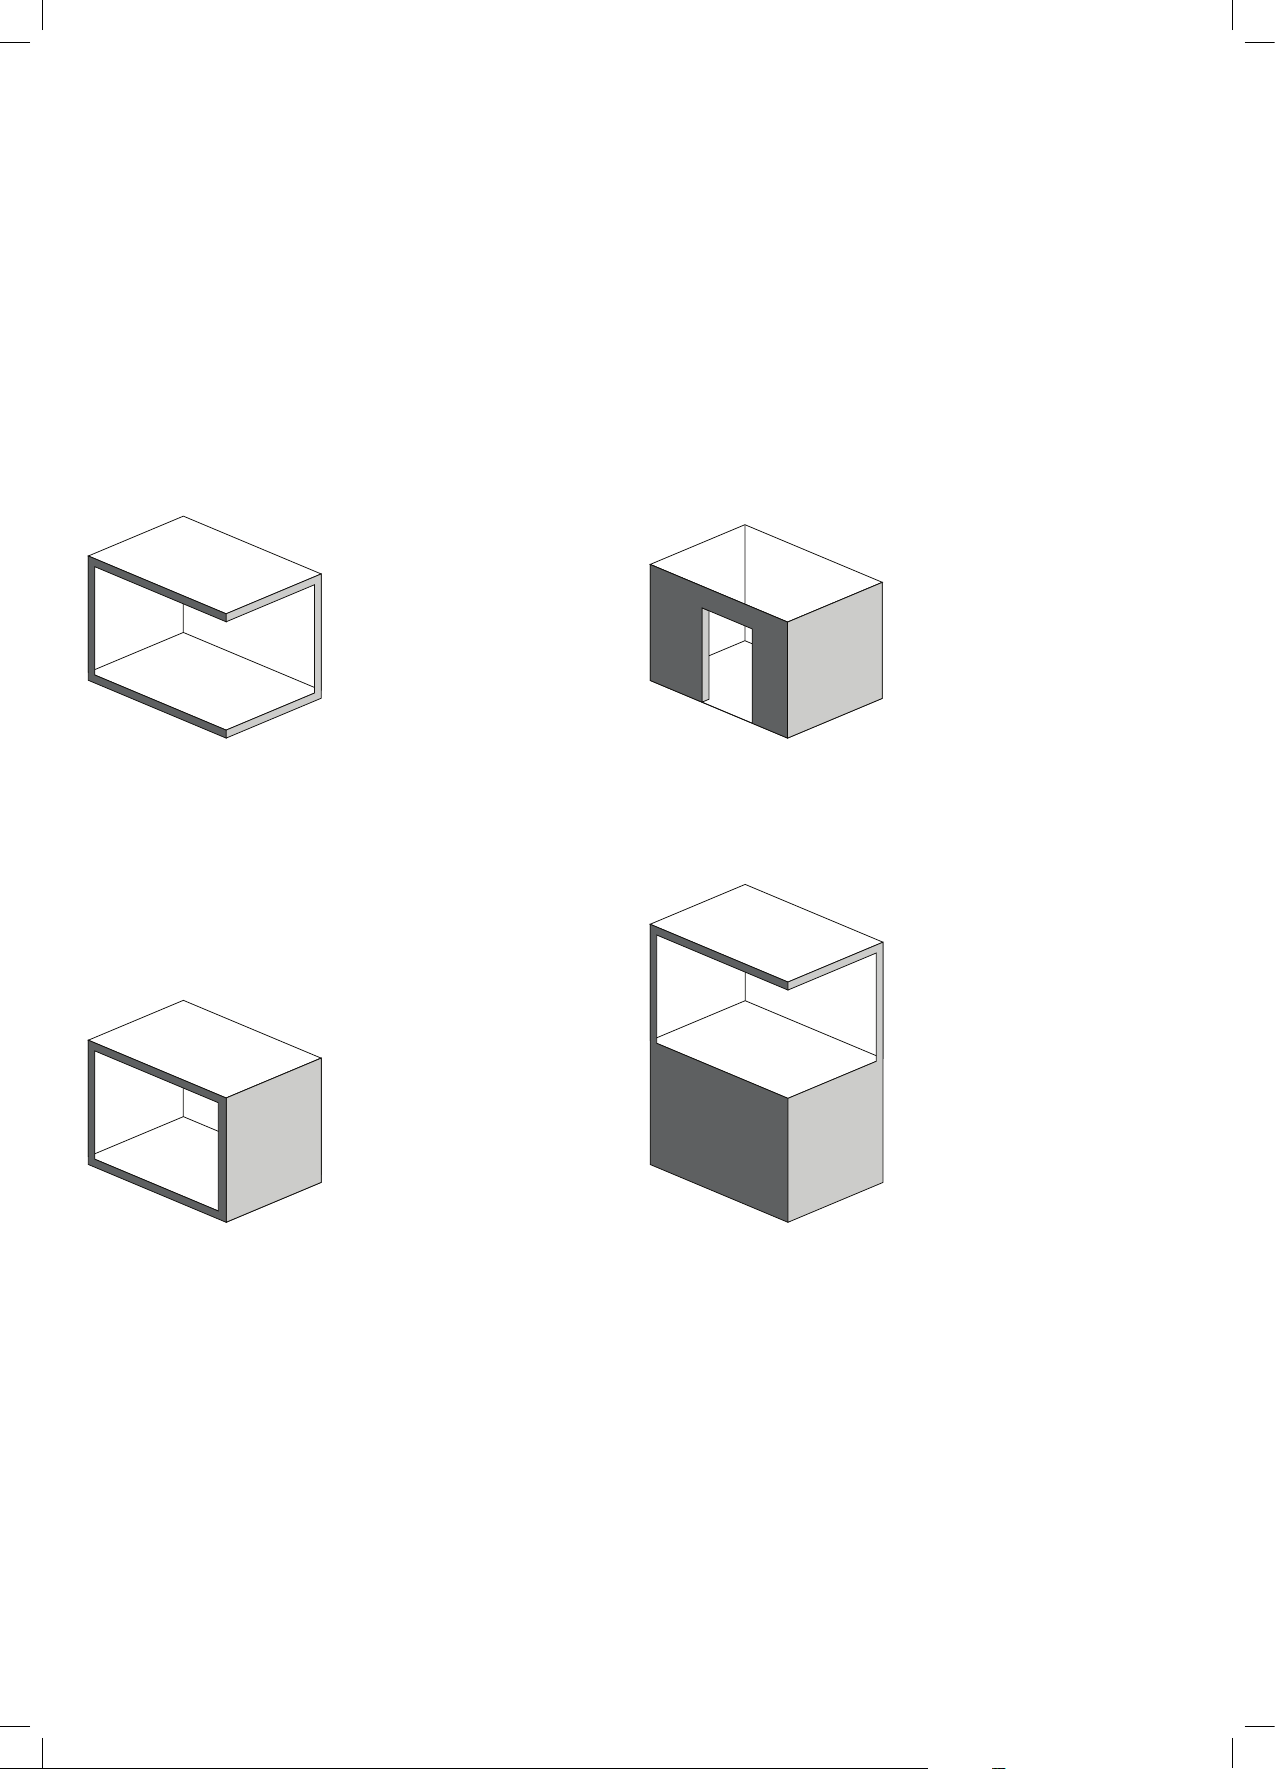
Partial Enclosures
INSTALLATION POSITIONING
The appliance shall only be used in an above ground, open air situation with natural ventilation, without stagnant areas,
where gas leakage and products of combustion are rapidly dispersed by wind and natural convection.
WARNING
• Do not use the gas pizza oven in enclosed or on small balconies.
• Any enclosure in which the appliance is used shall comply with one of the following:
Within a partial enclosure that includes an overhead cove
and no more than two walls. A common example is an
outdoor gazebo.
Any enclosure with walls on all sides but at least
one permanent opening at ground level and no
overhead cover.
The appliance may be within a partial enclosure that
includes an overhead cover and more than two walls, the
following shall apply:
• at least 25% of the total wall area is completely open;
and
• at least 30% of the remaining wall area is open and
unrestricted.
In the case of balconies, at least 20% of the total of the
side, back and front wall areas shall be and remain open
and unrestricted.

9
• TIP! Ask for the assistance of a friend. Setting up your
pizza oven is much easier with an extra set of hands.
• Place a soft matt or rug down to protect the exterior of
your pizza oven during the setup process.
• Remove all packaging elements.
• Place your pizza oven with the mouth facing
downwards on to your matt/blanket. Whilst the pizza
oven is standing on its mouth, open the three folding
legs outwards.
• Stand the oven upright on its legs and remove the soft
matt/blanket as this is no longer required. Insert the
pizza stone into the appliance base as shown below
and push it into the holder.
• Unscrew the black electronic ignition and insert a
compatible battery (1 x AA) inside. Re-screw the cover
back on. This will be used to ignite your appliance.
Note: Regularly check your ignitor battery to ensure if
has charge and replace when required. The AA Battery
is not supplied with the appliance.
• This appliance shall only be used in an above ground
open-air situation with natural ventilation, without
stagnant areas, where gas leakage and products of
combustion are rapidly dispersed by wind and natural
convection. This appliance must not be used indoors.
Do not use your appliance in garages, porches, sheds
or other enclosed areas. The appliance is not intended
to be installed in or used on recreational vehicles (e.g.
boats, trucks and tents) and should not be placed close
to or under any surfaces that will burn or are sensitive
to heat. Do not block/ obstruct the flow of air and
combustion around the appliance housing while in use.
• A fairly protected location is desirable for pleasant and
efficient cooking. Try to keep the barbeque sheltered
from strong winds as this will drastically reduce cooking
efficiency. If this is unavoidable, position the appliance
to face away from the direction of the wind. Keep
the appliance level. Check frequently that the burner
remains alight when used in conditions of strong wind.
Make sure the minimum distances of the appliance to
any wall or combustible surface are met, and that the
supporting surface can withstand heat. When using
the appliance, take care that the appliance feet are
locked in their correct open position & the hose is not
touching any hot surface.
Setting Up Your Oven Installation
Guide
Unscrew this cover
to access the battery

10
Gas Safety
ONLY USE THE HOSE ASSEMBLY SPECIFIED BY THE
MANUFACTURER ON THIS APPLIANCE. REPLACEMENT
HOSE ASSEMBLIES MUST BE THOSE SPECIFIED BY THE
MANUFACTURER.
This is a limitative configured appliance for LPG gas.
Do not attempt to use other type gas supply unless
the grill has been reconfigured for other gas use.
The installation of this appliance must conform to
local codes.
Make sure that both gas cylinder and gas hose do not
come in contact with any high temperature parts.
WARNING
Prior to use, check the oven and burner and venturi for
blockages (eg, food residue or insect nests - Wasps, Bees
or Ants.) If an insect nest is found they can be dangerous
and must be cleaned out thoroughly. Please refer to the
cleaning and maintenance sections at the end of this
chapter for guidance on how to do this.
Should the appliance go out for any reason, turn off the
control knob and the cylinder gas valve. Wait 5 minutes
before attempting to relight the appliance.
Some foods produce flammable fats and juices. Attend to
an operating Pizza Oven at all times - it should never be
left unattended. Damage caused by fat and grease fires
is not covered by warranty. If a grease or fat fire should
occur, immediately turn off burner knob and the gas
cylinder valve until the fire is out. Remove all food from the
appliance.
A leak test must be carried out prior to using the appliance
for the first time and whenever the gas cylinder is refilled
or whenever the gas hose and regulator have been
disconnected from the gas cylinder or appliance. Apply
soapy water to the entire hose assembly, including the gas
bottle’s valve and regulator, using a spray bottle or sponge.
Pressurise the system without turning on your Pizza Oven
(i.e. slowly open the gas supply on your gas bottle). If you
see bubbles or smell rotten eggs, you have a leak.
Tip! Dishwashing liquid/soap is formulated to make lots
of bubbles and ideal for mixing with water to make your
soapy liquid for this leak test.
Please take a moment to review all of the safety
requirements before operating the appliance when
using gas.
• Do not disconnect any gas fittings while the appliance
is operating.
• Check all gas hose lines and connections for cuts,
cracks and other damage. Gas cylinders must not be
stored in enclosed areas.
• Keep the fuel supply hose away from heated surfaces
or direct sunlight. Do not use any additional flammable
substance whilst operating with gas.
• Do not touch! The Pizza Oven can get extremely hot
when in operation. Be sure to wear protective gloves.
• Keep the cylinder outdoors in it’s upright position.
• Do not connect multiple gas canisters to Pizza Oven or
store a spare within the same vicinity.
• Only use a regulator certified to AS 4621 and a hose
assembly certified to AS/NZS 1869, between the gas
cylinder and the pizza oven.
• Do not position the gas canister under the oven. Never
use a naked flame to check for gas leaks. Do not use
natural gas! It can damage the oven.
• Maximum length of hose cannot exceed 1.5m.
• National requirements state how often to replace the
hose.
• Never fill the cylinder beyond 80 percent full.
• Make sure the flexible tube is not twisting when the
appliance is in operation.
CONNECTING TO GAS
Step 1: Check that the gas you have is Propane LPG.
IMPORTANT! The gas cylinder used must have a safety
collar to protect the valve assembly. Do no use a cylinder
that is rusty, dented, has a damaged valve or has past any
expiry dates.
Note: Only certified gas regulators to AS 4621 and certified
hose assemblies to AS/NZS 1869, may be used.
Note: Your gas cylinder capacity should be a minimum 4kg
and maximum 9kg. The length of the gas supply hose must
not exceed 1.5m.
IMPORTANT! It is recommended that you replace the
hose every 5 years. Some countries may have different
requirements, therefore you must adhere to their specified
time period.
WARNING
If at any point you smell gas:
• Shut off the gas at the cylinder.
• Rotate the control knob on your Pizza oven to the off
position (clockwise), which should extinguish any open
flames.
• If odour continues, move away from the pizza oven
and gas supply, then contact your local fire brigade for
further assistance.

11
• Step 2: Connect the regulator to the gas cylinder,
following the instructions for your regulator
accordingly. Don’t force the regulator as this could
damage the gas cylinder or regulator fitting.
CONNECTING THE LIQUID PROPANE CYLINDER
To connect the Liquid Propane gas supply cylinder: The
cylinder valve should be in the “OFF” position. If not, turn
the valve clockwise until it stops. Make sure the cylinder
valve has the proper external male thread connector
fitting to Type 27 and cylinder certified with AS 2469. Make
sure the burner valves are in the “OFF” position. Inspect
the valve connections and regulator assembly to the valve,
use your hand to tighten the nut clockwise until it stops.
Use of a wrench could damage the quick coupling nut and
result in a hazardous situation. Open the cylinder valve
fully by turning the valve counter-clockwise. Before lighting
the burner, use a soap and water solution to check all the
connections for leaks. If a leak is found, turn the cylinder
valve “OFF” and retighten connection. If leak persists then
do not use the oven until a local Liquid Propane dealer can
make repairs.
Clockwise
WARNING!
1. Do not store a spare LP gas cylinder under or near this
appliance.
2. Never fill the cylinder beyond 80 percent full
3. If the information in item 1&2 is not followed exactly,
a fire causing death or serious injury may occur.
CAUTION: Place dust cap on cylinder valve outlet
whenever the cylinder is not in use. Only install the
type of dust cap on the cylinder valve outlet that is
provided with the cylinder valve. Other types of caps
or plugs may result in leakage of propane.
WARNING
DO NOT USE AN ADAPTOR AT THE CYLINDER
CONNECTION
DISCONNECTING THE GAS
After cooking, turn off the gas from the gas cylinder
before turning off your Pizza Oven. This will allow any
gas left within the burner and/or hose assembly to be
used up safely.
Once the flames are fully extinguished within the pizza
oven (upto 2 mins), you can rotate the Pizza Oven control
knob to the off position (clockwise).
It is now safe to disconnect the Regulator and hose
assembly from your gas cylinder.

12
To burn off any residual manufacturing oils, it’s important
to run your Pizza Oven for a period of time without
cooking.
IMPORTANT: Ensure hose and connections are leak tight
and before beginning the ignition process.
Igniting Your Pizza Oven
1. Turn on the gas supply at your gas cylinder.
2. Press and hold the control knob down and turn
anticlockwise to the Max heating position. You will
hear the ignitor ‘clicking’ and the burner should alight
within your appliance. Hold down the knob for 15
seconds to ensure the burner is alight.
IMPORTANT: keep your face away from the opening.
IMPORTANT: If the burner does not light, turn the knob
back to the OFF setting and wait 2 minutes for gas to
dispel before repeating.
3. Turn the control knob down to the Low setting and
run your appliance on this setting for 30 minutes.
4. Use your control knob to increase the power
to approximately ¾ high power level and run
for a further 15–20 minutes.
There is a lot of variability when it comes to cooking pizzas,
including the type of dough, thickness, types of toppings,
etc which will all vary your cooking time and optimum heat
settings. It may take some trial and error to begin with!
Our recommended setting through are as follows.
1. Heat up your pizza oven on high for at least 30
minutes before you are wanting to cook. This will allow
the pizza stone to achieve a suitable temperature for
cooking your pizzas.
Note: You can heat up the stone in as little as 10
minutes, however ensure that your base be very thin
for this to work.
2. Turn down your pizza oven to between 3/4 and 1/2
power level.
3. Using your pizza peel (paddle), slide your first pizza
into the oven.
Tip! Rolling your pizza base on some flour will help ensure
it slides from your pizza peel without sticking. Brushing
your pizza paddle with some flour can also assist.
Note: Your cooking time will vary depending on the
thickness of your pizza base, anywhere from 1 minutes
(for very thin) to 2–3 minutes for thicker bases.
4. Halfway through cooking (typically 60 seconds), use
your pizza paddle to remove your pizza. Rotate the
base on your pizza paddle and re-insert into the oven.
This will help to ensure your pizza cooks evenly.
5. Use your pizza peel to remove your cooked pizza from
the oven. Typically, 90 seconds to 120 seconds.
6. Enjoy your delicious pizza.
Tip! We like to grate some fresh parmesan cheese over our
freshly cooked pizza along with a pinch of salt and
any fresh herbs (i.e. basil). Refer to our Solt Pizza Oven
Recipe Guide for more tips, tricks and recipe ideas.
First Use Using Your Pizza Oven
Max setting
Min setting
OFF
13
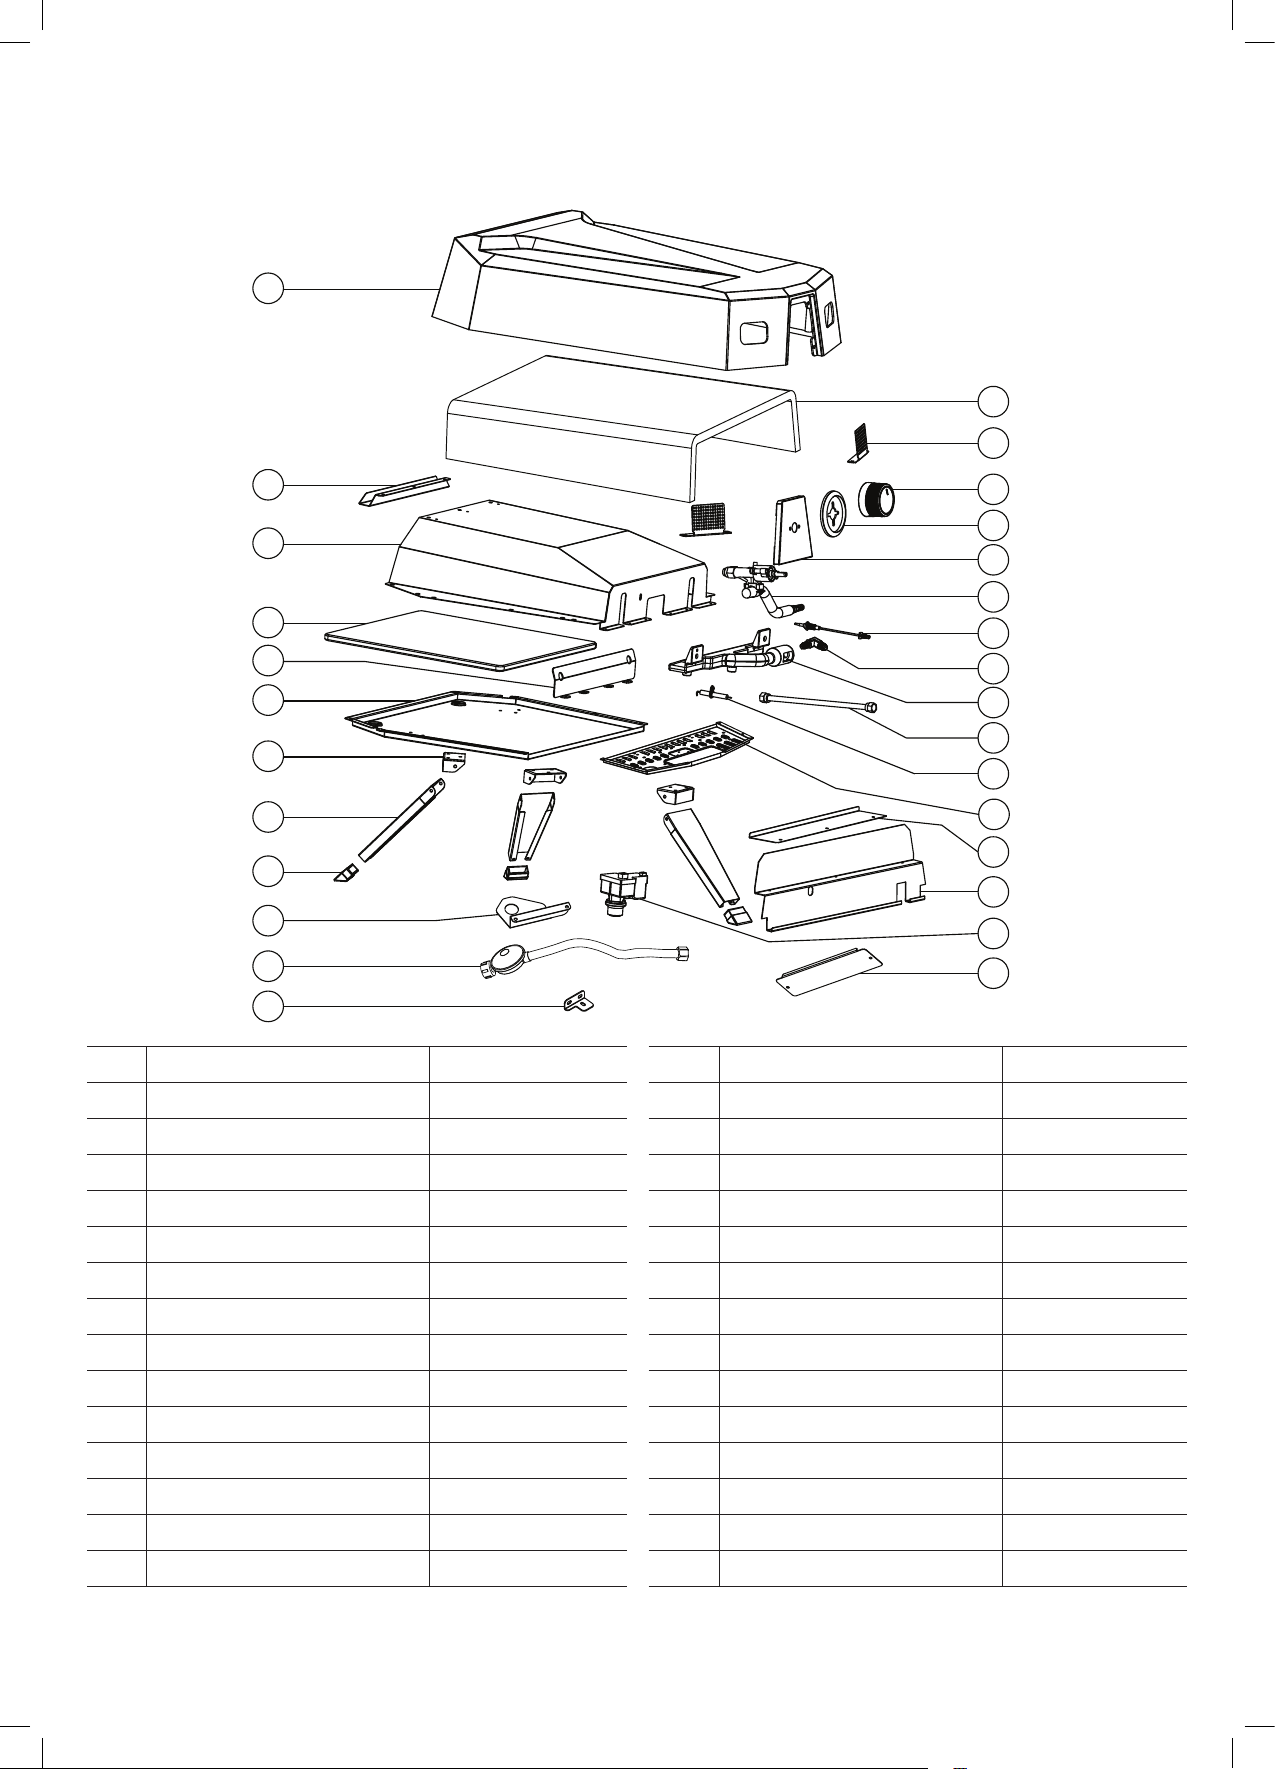
Oven Exploded Diagram
No. Description QTY No. Description QTY
1 Outer Cabinet 1 2 Tail Plate 1
3 Inner Cavity 1 4 Pizza Stone 1
5 Pizza Stone Baffle 1 6 Bottom Plate 1
7 Foot Mount 3 8 Foot 3
9 Foot Plug 3 10 Insulating Cotton 1
11 Net Board 2 12 Control Knob 1
13 Control Knob Base Plate 1 14 Control Panel 1
15 Valve Assembly 1 16 Thermocouple 1
17 Nozzle Assembly 1 18 Burner Assembly 1
19 Assembly 1 20 Ignition Needle 1
21 Front Floor 1 22 Heat Shield Stiffener 1
23 Heat Insulation Board 1 24 Pulse Igniter 1
25 Fixed pulse piece 1 26 Hose and Regulator 1
27 Valve tube retainer 1 28 Maintenance Plate 1
Please contact our after-sales service team for any
replacement part requirements. Only engage a qualified
technician for any replacement or repair works.
KZJ-100A爆炸图
1
2
3
4
6
7
8
9
5
11
12
13
14
15
16
17
20
22
21
23
10
24
18
19
25
26 28
27

14
Enamel Cleaning
Always use the mildest cleaning solution and soft cloth to
clean the appliance and enamelled parts.
DO NOT USE AN ACID DETERGENT AND/OR ANTI-RUST
CLEANER ON THE CONTROL PANEL. SUCH CLEANING
PRODUCT MAY DAMAGE THE APPLIANCE OR REMOVE
THE CONTROL PANEL PRINTING.
Cooking Area Cleaning (including pizza stone)
The easiest way to clean the grill is to clean immediately
after turning off the flame and once your cooking has
been completed.
WARNING
Keep in mind that your appliance will be hot after cooking!
Always wear long safety gloves designed for heat (such as
barbeque mitts) to protect your hands and arms from any
heat, steam and hot parts.
Dip a wire bristle barbeque brush in water with a mild
detergent and scrub the pizza stone. Dip the brush
frequently in fresh water. Steam, created as water contacts
the hot grill, assists the cleaning process by softening any
food particles. The food particles will lift from the stone. It
is completely normal for the stone to remain discoloured
though and won’t affect the product or future cooking.
Important! Never immerse a hot part in water.
Alternatively, allow your appliance to completely cool
and remove the pizza stone for cleaning. Again use a mild
detergent with some warm water and a barbecue brush to
scrub the stone.
Appliance Burner Cleaning
1. Be sure the gas cylinder valve is firmly in the off
position and that the appliance control knob is
also in the Off position. Make sure the appliance
is completely cool.
2. Clean the exterior of the burner with a wire brush.
Clear stubborn scale with a metal scraper. Clear any
clogged ports with a straightened paper clip. Never
use a wooden toothpick as it may break off and clog
the port.
3. Please note if insects or other obstructions are blocking
the flow of gas through the burner, you will need to
call our customer service line.
Cleaning &
Maintenance

15
Issue: Potential Cause: Solutions:
Weak flame • Empty or low gas cylinder
• Operation at high altitude
• Cold gas cylinder
• Try a different gas cylinder
• Check the gas regulator and hose
assembly
Noisy burner • Debris is blocking the burner outlets
• Debris in venturi
• Clean the burner: read the cleaning &
maintenance section of this user manual
for steps.
Slow heat up • Empty gas cylinder
• Cold weather
• Windy conditions
• Try a different gas cylinder
• Check the gas regulator and hose
assembly to ensure its not damaged or
kinked
• Sheltered location
Troubleshooting
Technical Specification
If you think you’ve got a problem with your Pizza Oven, follow the following troubleshooting steps to try and resolve it.
For replacement parts and servicing, contact our after sales service team on 1300 11 4357 or via email
support@residentiagroup.com.au.
It is recommended to replace the gas hose every 5 years. Replacement hose assemblies and regulators can be purchased
from your nearest hardware store.
TM

16
This page
is intentionally
left blank

17
For future reference, please record the following information which can be found
on the rating plate and the date of purchase which can be found on your sales invoice.
STORE DETAILS
STORE NAME
ADDRESS
TELEPHONE
PURCHASE DATE
PRODUCT DETAILS
MODEL NO.
SERIAL NO.*
Purchase Details

18
Warranty Information
WARRANTY TERMS & CONDITIONS
PIZZA OVEN
This document sets out the terms and conditions of the
product warranties for Residentia Group Appliances. It is
an important document. Please keep it with your proof of
purchase documents in a safe place for future reference
should you require service for your Appliance.
1. IN THIS WARRANTY
(a) ‘acceptable quality’ as referred to in clause 10 of this
warranty has the same meaning referred to in the
ACL;
(b) ‘ACL’ means Trade Practices Amendment (Australian
Consumer Law) Act (No.2) 2010;
(c) ‘Appliance’ means any Residentia Group product
purchased by you accompanied by this document;
(d) ‘ASR’ means Residentia Group authorised service
representative;
(e) ‘Residentia Group’ means Residentia Group Pty Ltd
of 165 Barkly Ave, Burnley VIC 3121, ACN 600 546 656
in respect of Appliances purchased in Australia;
(f ) ‘major failure’ as referred to in clause 10 of this
warranty has the same meaning referred to in the ACL
and includes a situation when an Appliance cannot
be repaired or it is uneconomic for Residentia Group,
at its discretion, to repair an Appliance during the
Warranty Period;
(g) ‘Warranty Period’ means:
(i) where the Appliance is used for personal,
domestic or household use (i.e. normal
single family use) as set out in the instruction
manual, the Appliance is warranted against
manufacturing defects for 24 months, following
the date of original purchase of the Appliance;
(h) ‘you’ means the purchaser of the Appliance not
having purchased the Appliance for re-sale, and
‘your’ has a corresponding meaning.
2. This warranty only applies to Appliances purchased
and used in Australia and is in addition to (and does
not exclude, restrict, or modify in any way) any
non-excludable statutory warranties in Australia.
3. During the Warranty Period Residentia Group or its
ASR will, at no extra charge if your Appliance is readily
accessible for service, without special equipment
and subject to these terms and conditions, repair or
replace any parts which it considers to be defective.
Residentia Group or its ASR may use remanufactured
parts to repair your Appliance. You agree that any
replaced Appliances or parts become the property
of Residentia Group. This warranty does not apply
to light globes, batteries, filters or similar perishable
parts.
4. Parts and Appliances not supplied by Residentia
Group are not covered by this warranty.

19
5. You will bear the cost of transportation, travel and
delivery of the Appliance to and from Residentia
Group or its ASR. If you reside outside of the service
area, you will bear the cost of:
(a) travel of an authorised representative;
(b) transportation and delivery of the Appliance to and
from Residentia Group or its ASR, in all instances,
unless the Appliance is transported by Residentia
Group or its ASR, the Appliance is transported at
the owner’s cost and risk while in transit to and from
Residentia Group or its ASR.
6. Proof of purchase is required before you can make a
claim under this warranty.
7. You may not make a claim under this warranty unless
the defect claimed is due to faulty or defective parts
or workmanship. Residentia Group is not liable in the
following situations (which are not exhaustive):
(a) the Appliance is damaged by:
(i) accident
(ii) misuse or abuse, including failure to properly
maintain or service
(iii) normal wear and tear
(iv) power surges, electrical storm damage or
incorrect power supply
(v) incomplete or improper installation
(vi) incorrect, improper or inappropriate operation
(vii) insect or vermin infestation
(viii) failure to comply with any additional
instructions supplied with the Appliance;
(b) the Appliance is modified without authority from
Residentia Group in writing;
(c) the Appliance’s serial number or warranty seal has
been removed or defaced;
(d) the Appliance was serviced or repaired by anyone
other than Residentia Group, an authorised repairer
or ASR.
8. This warranty, the contract to which it relates and the
relationship between you and Residentia Group are
governed by the law applicable where the Appliance
was purchased.
9. To the extent permitted by law, Residentia Group
excludes all warranties and liabilities (other than as
contained in this document) including liability for any
loss or damage whether direct or indirect arising from
your purchase, use or non use of the Appliance.
10. For Appliances and services provided by Residentia
Group in Australia, the Appliances come with a
guarantee by Residentia Group that cannot be
excluded under the Australian Consumer Law.
You are entitled to a replacement or refund for a
major failure and for compensation for any other
reasonably foreseeable loss or damage. You are also
entitled to have the Appliance repaired or replaced
if the Appliance fails to be of acceptable quality and
the failure does not amount to a major failure. The
benefits to you given by this warranty are in addition
to your other rights and remedies under a law in
relation to the Appliances or services to which the
warranty relates.
11. At all times during the Warranty Period, Residentia
Group shall, at its discretion, determine whether
repair, replacement or refund will apply if an
Appliance has a valid warranty claim applicable to it.
12. Missing parts are not covered by warranty.
Residentia Group reserves the right to assess each
request for missing parts in a case by case basis. Any
parts that are not reported missing in the first week
after purchase will not provide free of charge.
13. To enquire about claiming under this warranty, please
follow these steps:
(a) carefully check the operating instructions, user
manual and the terms of this warranty;
(b) have the model and serial number of the Appliance
available;
(c) have the proof of purchase (e.g. an invoice) available;
(d) telephone the numbers shown below.
14. You accept that if you make a warranty claim,
Residentia Group and its ASR may exchange
information in relation to you to enable Residentia
Group to meet its obligations under this warranty.
IMPORTANT
Before calling for service, please ensure that the steps in
point 13 have been followed.
Telephone contacts
► Service: Please call 1300 11 HELP (4357)
► Spare Parts: Please call 1300 11 SPARE (7727)
Our goods come with guarantees that cannot be excluded under the Australian Consumer Law. You are
entitled to a replacement or refund for a major failure and for compensation for any other reasonably
foreseeable loss or damage. You are also entitled to have the goods repaired or replaced if the goods
fail to be of acceptable quality and the failure does not amount to a major failure.
The Australian Consumer Law requires
the inclusion of the following statement
with this warranty:

T. 1300 11 4357
E. support@residentiagroup.com.au
E S S E N T I A L S FOR LIFE
An initiative by
Residentia Group
www.solt.house
Table of contents
Other Solt Kitchen Appliance manuals


Popular Kitchen Appliance manuals by other brands


Silvercrest
Silvercrest SDA 350 A2 operating instructions

RIGTIG
RIGTIG FOODIE Z00607-2 manual

Goldmedal
Goldmedal 2552 instruction manual

BLACK DECKER
BLACK DECKER BXMM1000E Original instructions

Goldmedal
Goldmedal 5020 instruction manual

Chef's Choice
Chef's Choice PizzellePro Express Bake 835 Instructions & recipes


