SOMNI AMD-3 User manual
ACCURATE MULTI-DELIVERY SYSTEM
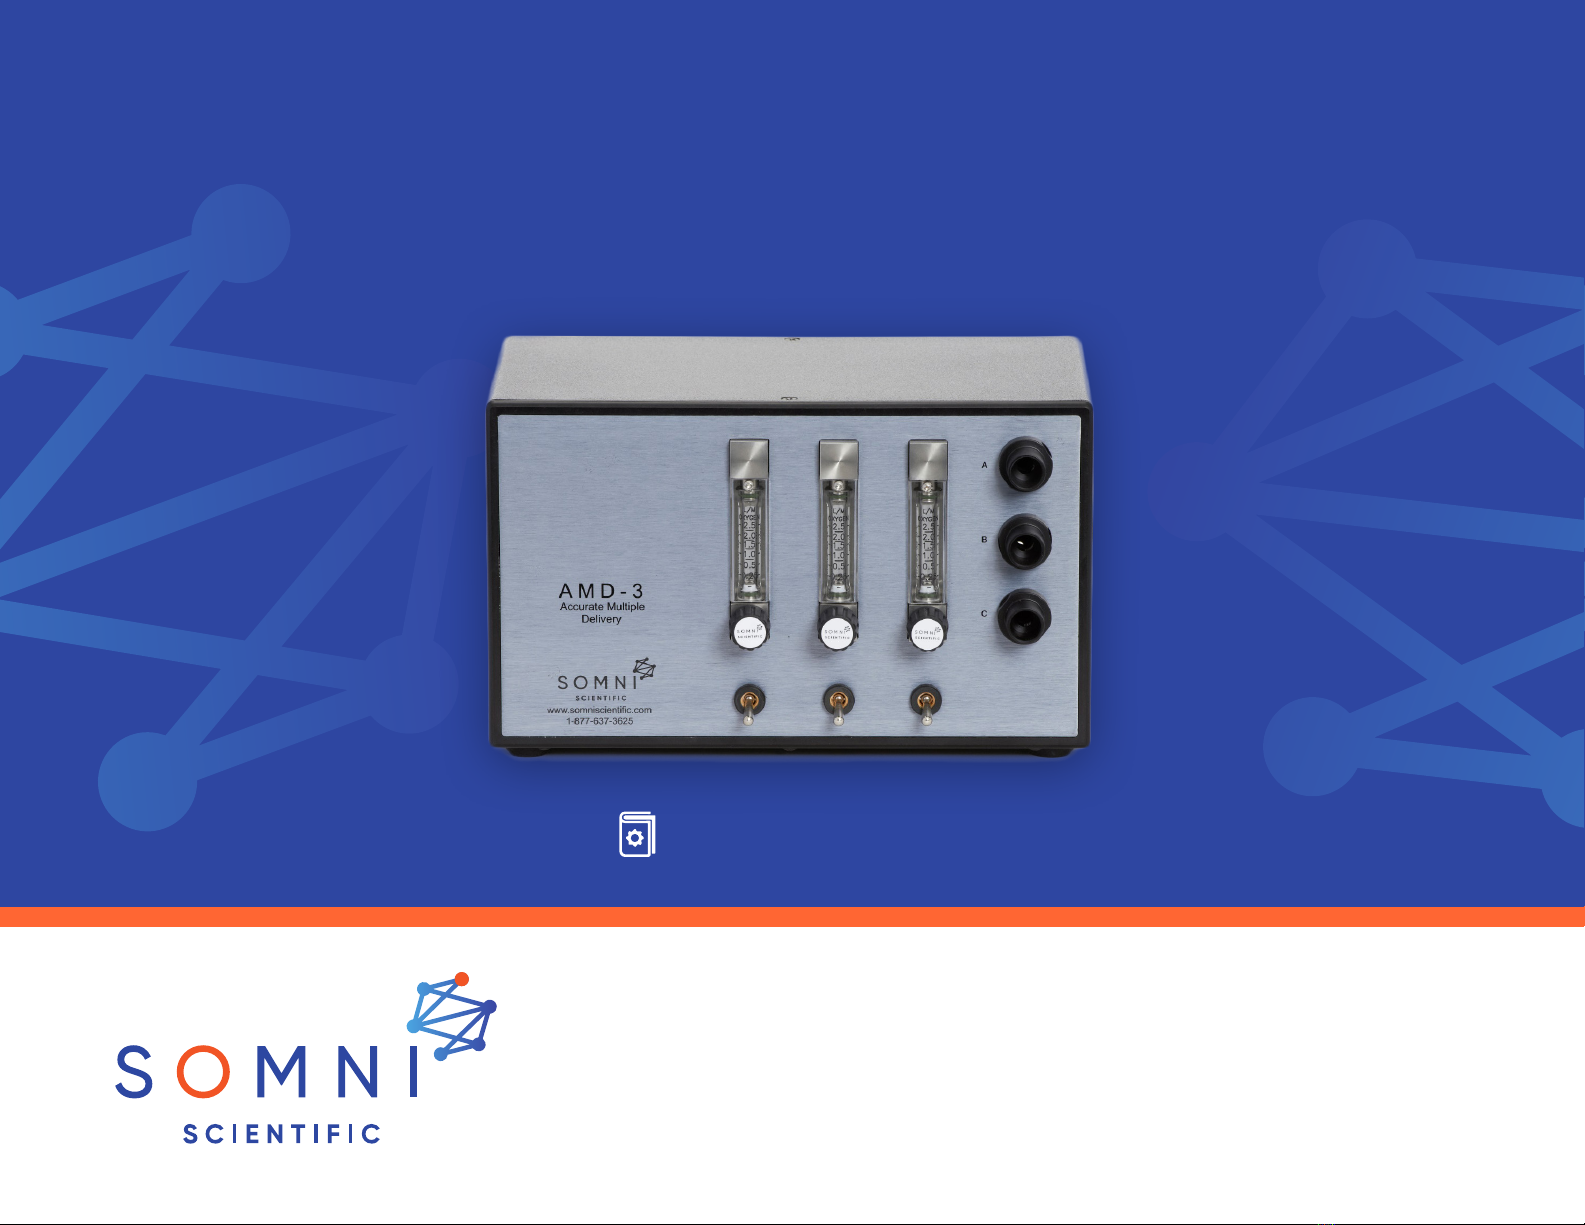
SOMNI AMD-3
SOMNI PRODUCT MANUAL
3 Station Flowmeter Controlled Diverter System
Model AMD-17004

TABLE OF CONTENTS
Intended Use 3
Introduction 4
Warnings, Definitions, About this Manual
Set Up 5
Product Operation 6
Routine Maintenance 9
Daily Testing
Cleaning
Troubleshooting 8
Warranty and Service Information 9
Supplies and Accessories 10
Specifications 10
SOMNI TT2 Anesthesia System and
SOMNI 3 Vaporizer* shown with AMD-3
*Not included
2

INTENDED USE
The SOMNI AMD-3 Accurate Multi-Delivery System is a flowmeter controlled
diverter system designed for Veterinary Use Only. The AMD-3 gives the user
the ability to deliver accurate flow rates to three stations simultaneously. The
SOMNI AMD-3 also includes a pressure relief valve to prevent pressure buildup
in the vaporizer*. The SOMNI AMD-3 can be used in conjunction with the
SOMNI TT-2 or any other non-pressurized, non-rebreathing anesthesia system.
*Vaporizer not included.
Unpacking/ included items
SOMNI AMD-3 System
1- Y connector with 6 inch silicone tubing and 10 inch silicone tubing
attached for anesthesia system with female vaporizer inlet endcap
1 - 8 inch silicone tubing for anesthesia system with male vaporizer outlet
endcap.
2 - color coded 6’ Fresh gas delivery lines with common outlet
1 - color coded 6’ Fresh gas delivery line with 15mm adapter
3

WARNINGS, NOTES AND DEFINITIONS
Warning! Only use accessories appropriate for use with nonrebreathing
anesthesia systems. Failure to use appropriate accessories can result in
animal injury, poor anesthetic delivery and waste gas exposure.
Warning! Operator must read entire manual prior to operation and be
trained in the use of inhalant anesthetic equipment. Failure to do so may
harm the animal.
Warning! Do not connect unregulated carrier gas to the anesthesia system.
Oxygen or another carrier gas should be supplied at 50 psi.
Warning! Always operate inhalant anesthetic equipment with waste gas
scavenging systems. Failure to control waste anesthetic gas may cause
harmful exposure to personnel.
Note! Only use non-rebreathing style circuits and accessories
Note! Anesthetic vaporizer, anesthesia system and carrier gas (oxygen)
accessories are not included. Please follow those products installation
guides.
INTRODUCTION
4

SET UP
Remove your current tubing from the top port of the
flowmeter if installing on existing system. If on a new
system connect black tubing from rear AMD top right
port (2) to top of flowmeter barb fitting(4).
Connect the silicone tubing from (1) port to vaporizer
inlet endcap Attach the inlet endcap onto the
vaporizer with a firm push and twist motion to secure
it.
1
2
3
4.
5.
1
2
3
Outlet Inlet
4
If existing system remove tubing from vaporizer outlet
endcap and discard tubing. If new system connect
silicone tubing from (3) port to outlet endcap of
vaporizer. Attach the outlet endcap onto the vaporizer
with a firm push and twist motion to secure it.
Connect oxygen (carrier gas) supply source to the DISS
Male fitting on the back of the flowmeter.
Attach the color coded fresh gas delivery lines into the
3 common gas outlets on the front of the AMD-3.
5

PRODUCT OPERATION
Continue >
Place the SOMNI AMD-3 on a flat, stable surface and ensure the flowmeter control knobs and switches are in the
“OFF” position.
Connect the fresh gas delivery lines supplied to each of the common outlets labelled A, B, or C. If one of the
lines is not needed, it is not necessary to disconnect it.
Connect optional breathing accessory or induction chamber utilizing the color coded fresh gas delivery lines.
Connect appropriate active or passive waste gas scavenging system.
Ensure vaporizer has been filled and is ready for use.
Ensure the oxygen (carrier gas) supply is connected to the anesthesia machine, turn it on. Next turn the main
anesthesia machine flowmeter on to the highest flowrate needed for each station/line. (Main flowmeter
supply is divided into each station’s flow)
6
Anesthetic Flow
Control Knobs
“A” “B” “C”
Common
Outlets
“A” “B” “C”
Flowmeter switch
“A” “B” “C”
1.
2.
3.
4.

PRODUCT OPERATION CONT.
7
Toggle each Flowmeter switch up to allow flow to begin. Adjust each flowmeter to the level of flow needed
for each gas delivery line and corresponding accessory. Confirm oxygen flow through each of the gas delivery
lines.
If all Flowmeters will not be utilized, it is not necessary to turn the Flowmeter o, only Toggle the switch down
to stop the flow.
NOTE: At least one flowmeter switch should be toggled up/on to allow flow during operation and to prevent
activation of the pressure relief valve.
To begin, place animal(s) into induction chamber and provide oxygen or other carrier gas flow. Verify the
chamber is closed and then turn on the vaporizer to the desired anesthetic percentage. Follow established
guidelines regarding flowrates and percent anesthetic concentration. Suggested fresh gas flow to any accessory
(except hooded style induction chamber) SHOULD NOT EXCEED 1 LPM. Recommended maximum fresh gas flow
rate for induction chamber is 2 LPM.
At procedure completion, turn the anesthetic vaporizer o and allow the anesthetic gas to be removed by the
scavenging system. Turn the anesthetic machine main flowmeter o and toggle each of the switches down.
5.
6.
7.
8.
For more information www.somniscientic.com or call to speak with one of our Clinical
Technicians at 877-637-3625

ROUTINE MAINTENANCE TROUBLESHOOTING
• Flowmeter will not turn o – Needle valve may be
worn
• Animals will not go to sleep/stay asleep – Inspect
system for leak
• tighten any loose connections (vaporizer
endcaps, tubing connections)
• verify flowmeter switch is on, flowmeter is
turned on
• confirm oxygen (carrier gas) supply is adequate
and on
• confirm anesthetic level in vaporizer is
adequate
• inspect breathing circuit/nosecone and/or
induction chamber for leak or loose connection
• check active waste gas system function/
attenuation
Call 877-637-3625 for assistance
Daily Testing
• Turn the flowmeter knob fully open and observe
the float ascends and descends freely and rests
completely at the bottom when knob is turned o.
• Open and close each switch, checking for gas flow
through delivery lines when open and verify loss of
flow when closed.
• Inspect lines, connectors and accessories for wear
prior to use.
Cleaning
• Use a damp cloth to clean, do not spray cleaning
agent directly onto AMD-3. Dilute Chlorhexidine or
similar cleaning and disinfecting agent can be used.
Do not use alcohol.
8

Limited Warranty
SOMNI Scientific (SOMNI) warrants to the original purchaser
that the products, not including accessories, shall be free
from defects in materials and workmanship under normal
use, if maintained in accordance with SOMNI’s guidelines
and used according to its labeling, for the period specified in
the manual.
Warranty period is 5 years from the invoiced date of
purchase.
THIS LIMITED WARRANTY, IS IN LIEU OF AND EXCLUDES ALL
OTHER WARRANTIES WHETHER EXPRESSED OR IMPLIED,
BY OPERATION OF LAW OR OTHERWISE, INCLUDING
BUT NOT LIMITED TO, ANY IMPLIED WARRANTIES OF
MERCHANTABILITY OR FITNESS FOR A PARTICULAR
PURPOSE.
This warranty is void if the product has been altered,
misused, damaged by neglect or accident, tampered with,
not properly maintained, not installed in strict compliance
with applicable codes and ordinances, or repaired by
persons not authorized by SOMNI. This warranty does
not cover normal wear and tear and maintenance items
and specifically excludes accessory items and any other
equipment used with the product.
WARRANTY AND SERVICE INFORMATION
Limitation of Remedies
SOMNI Scientific’s only obligation under this limited warranty is
the repair or replacement of the product. THIS IS THE EXCLUSIVE
REMEDY. SOMNI shall not be liable for and hereby disclaims any
direct, incidental, consequential or special damages or delays,
including but not limited to loss of use, downtime, lost business,
revenues and profits.
Warranty Procedure
To obtain warranty service, contact SOMNI Scientific
SOMNI Scientific
1900 Sleepy Hollow Road,
South Park, PA 15129
9

• TT-2 Table Top Anesthesia System PN: TT-17000
• SOMNI 3 Isoflurane Vaporizer, 250 ml PN: VS-6002 Weight 14 lbs. / 6.5 kg
Dimensions 12 in W x 8 in. D x 8 in. H
(30 cm W x 20 cm D x 20 cm H)
Flowmeters 0-2.5LPM
SUPPLIES AND ACCESSORIES SPECIFICATIONS
10
BELOW ACCESSORIES FOR
ACTIVE STYLE SYSTEM
• TT-2 Table Top Anesthesia System PN: TT-17000
• SOMNI 3 Isoflurane Vaporizer, 250 ml PN: VS-6002
• EPS-3 Exposure Prevention System, active PN: WG-
15001
• Large Induction Chamber, Active Vacuum Style (9 Liter)
PN: IA-3009
• InductFlow-LA, Large RED Active Induction Chamber ,
Hooded PN: IR-3010
• InductFlow-MA, Medium RED Active Induction Chamber ,
Hooded PN: IR-3011
• Equaflow Manifolds – multiple options available see
somniscientific.com
This manual suits for next models
1
Table of contents
Other SOMNI Medical Equipment manuals


Popular Medical Equipment manuals by other brands


Getinge
Getinge Arjohuntleigh Nimbus 3 Professional Instructions for use

Mettler Electronics
Mettler Electronics Sonicator 730 Maintenance manual

Pressalit Care
Pressalit Care R1100 Mounting instruction

Denas MS
Denas MS DENAS-T operating manual

bort medical
bort medical ActiveColor quick guide

AccuVein
AccuVein AV400 user manual


