SONIQ CSA51-AU User manual

MODEL:CSA51-AU
5.1 Computer Speaker
MD111122-01

CAUTION
!
!
RISK OF ELECTRIC SHOCK
DO NOT OPEN
THE LIGHTNING FLASH WITH ARROW HEAD SYMBOL,
WITHIN AN EQUILATERAL TRIANGLE, IS INTENDED
TO ALERT THE USER TO THE PRESENCE OF
UNINSULATED, "DANGEROUS VOLTAGE", WITH IN THE
PRODUCTS ENCLOSURE THAT MAY BE OF SUFFICIENT
MAGNITUDE TO CONSTITUTE A RISK OF ELECTRIC
SHOCK TO PERSONS.
THE EXCLAMATION POINT WITHIN AN EQUILATERAL
TRIANGLE IS INTENDED TO ALERT THE USER TO THE
PRESENCE OF IMPORTANT OPERATING AND MAINTE-
NANCE (SERVICING) INSTRUCTIONS IN THE LITERA-
TURE ACCOMPANYING THE APPLIANCE.
Safety Precautions
WARNING: TO PREVENT FIRE OR ELECTRIC SHOCK. DO NOT
EXPOSE THIS APPLIANCE TO RAIN OR MOISTURE.
Safety Information

Caution: Please read carefully all the following important safeguards
to ensure safe operation.
1. Read Instructions - All the safety and operating instructions should
be read before the appliance is operated.
2. Retain Instructions - The safety and operating instructions should
be retained for future reference.
3. Follow Instructions - All operating instructions should be followed.
4. Heed Warnings - All warnings on the appliance and in the
operating instructions should be adhered to.
5. Power Source - The appliance should be connected to a power
supply only of the type specified in the operating instructions or as
marked on the appliance.
6. Power-cord Protection - Power-supply cords should be routed so
that they are not likely to be walked on or pinched by items placed
upon or against them, pay particular attention to cords at plugs,
convenience receptacles, and the point where they exit from the
appliance.
7. Water and Moisture - The appliance should not be used near
water(for example, near a bathtub, washbowl, kitchen sink, laundry
tub, in a wet basement, or near a swimming pool, etc.)
8.Ventilation - The appliance should be situated so that its location or
position does not interfere with its proper ventilation. Do not use the
appliance on a bed, sofa, rug or similar surface that may block the
ventilation openings.
1.Power Supply................................................................. 240V~ 50Hz
2.Power output(RMS @10% THD)..............................................125W
3.Input Sensitivity (Subwoofer).......................................300mV±50mV
4.Input Sensitivity (Satellite)...........................................750mV±50mV
5.Speaker Impedance (Subwoofer)............................................8 Ohm
6.Speaker Impedance (Satellite).................................................8 Ohm
7.S/N (A Weight)...........................................................................75dB
8.Subwoofer Power Output ...........................................................50W
9.Front Speaker Power Output ..................................................15Wx2
10.Center Speaker Power Output .................................................15W
11.Rear Speaker Power Output .................................................15Wx2
12.THD (1kHz, 1W).......................................................................0.8%
14.Frequency Response........................................ 20Hz~20kHz±5dB
15.L/R Separation (1kHz)..............................................................30dB
16.L/R Balance (Stereo)...............................................................±2dB
Note: Specifications are subject to change for improvements.
Specifications
Important Safeguards
215

radiators, heat registers, stoves, or other appliances (including
amplifiers) that produce heat.
10. Non use Periods - The power cord of the appliance should be
unplugged from the outlet when left unused for a long period of time.
11. Damage requiring service - The appliance should be serviced by
qualifiedservice personnel when:
a/ The power-supply cord or the plug has been damaged; or
b/ Objects have fallen or liquid has been spilled into the appliance; or
c/ The appliance has been exposed to rain; or
d/ The appliance does not appear to operate normally or exhibits a
marked change in performance; or
e/ The appliance has been dropped, or the enclosure damaged.
12. Servicing - The user should not attempt to service the appliance
beyond that specified in the operating instructions. All other
servicing should be referred to qualified service personnel.
13. Clean only with dry cloth.
14. Do not defeat the safety purpose of the polarized or grounding
type plug. A polarized plug has two blades with one wider than the
other. A grounding type plug has two blades and a third grounding
prong. The wide blade or the third prong are provided for your
safety. If the provided plug does not fit into your outlet, consult and
electrician for replacement of the obsolete outlet.
15. Unplug this apparatus during lightning storms or when unused for
long periods of time.
9. Heat - Keep the appliance away from heat sources such as
1. NO OUTPUT
(1) Check whether the system is connected correctly.
(2) Check whether the Volume is set at minimum. Adjust it accordingly.
(3) Check whether the Audio Input is in PLAY mode.
2. NO SOUND FROM FRONT LEFT SPEAKER
(1) Check whether the system is connected correctly with the Front
Left speaker.
(2) Check whether the Balance function is switched off. Adjust it
accordingly.
(3) Check whether the system is connected correctly with the audio
source.
3. NO SOUND FROM FRONT RIGHT SPEAKER
(1) Check whether the system is connected correctly with the Front
Right speaker.
(2) Check whether the SW MODE is switched off. Adjust it accordingly.
(3) Check whether the system is connected correctly with the audio
source.
4. NO SOUND FROM CENTER SPEAKER
(1) Check whether the system is connected correctly with the Center
speaker.
(2) Check whether the system is connected correctly with the audio
source.
(3) Check whether 5.1CH is selected as audio output.
5. NO SOUND FROM REAR SPEAKER
(1) Check whether the system is connected correctly with the Rear
speaker.
(2) Check whether the system is connected correctly with the audio
source.
(3) Check whether 2.1CH is selected as audio output.
(4) Check whether 5.1CH is selected as audio output.
Trouble Shooting Important Safeguards
14 3

2. Power standby .Indicator
G. SURROUND(MODE) DECODER
1. Connect and place Center and Rear speakers properly.
2. Press the MODE button on the remote controller to select Surround
Decoder for Home Theater system effects.
1. Remote Sensor.
4. 5.1 Channel Input Indicator.
3. AUX .Input Indicator
1. Connect the system properly. 5.1(6CH) Channels audio output must
comply with 5.1 channels audio input.
2. Press INPUT button on the remote controller to shift the status from
audio input to 5.1CH(6CH) channels input.
3. Adjust all output settings including VOLUME, SW, FRONT,CEN,
SURR (if necessary) now to enjoy the wonderful and tremendous
Home Theater effects.
4. To change the options from 2.1 CH to 5.1CH, select INPUT button
as AUX(AU ON DISPLAY SCREEN) and then press MODE to
change accordingly.
I. MUTE
1. Press the MUTE button on the remote controller once to keep the
performance silent.
2. Press it again to resume the performance.
J. RESET
Press the RESET button on the remote controller and it will reset all
settings including SW Speaker output, Front Speaker output ,CENTER
Speaker output, Surround Speaker output to Factory Default settings.
H. 5.1 CHANNELS INPUT
INPU T
1
2
3
4
Front Panel - Controls And Functions Operating Instruction
413

D. FRONT SPEAKER
1. Press FRONT + button on the remote controller to maximize the
Front Speaker output.
2. Press FRONT - button on the remote controller to minimize the
Front Speaker output.
E. CENTER SPEAKER
1. Press CEN+ button on the remote controller to maximize the Center
Speaker output.
2. Press CEN - button on the remote controller to minimize the Center
Speaker output.
F. SURROUND SPEAKER
1. Press SURR + button on the remote controller to maximize the Surr-
ound Speaker output.
2. Press SURR - button on the remote controller to minimize the Surr-
ound Speaker output.
1 2 3 4 5 6 7 8 9
10 11
Operating Instruction Rear Panel - Controls And Functions
12 5
240V~ 50Hz

A. Switch On/Off the Product
1. Before turning on the system, please connect it according to the
System Connection Instruction.
2. Connect AC power supply with this product.
(Caution: Power source must be consistent with this product.)
B. VOLUME
1. Press the
sound output.
Volume is increased to maximum accordingly.
VOL + button on the remote controller to maximize the
2. Press the
sound output.
Volume is decreased to minimum accordingly.
VOL - button on the remote controller to minimize the
C. SUB WOOFER SPEAKER
1. Press SW + button on the remote controller to maximize the Sub
woofer Speaker output.
2. Press SW - button on the remote controller to minimize the Sub
woofer Speaker output.
1. 2CH Right Audio Input.
2. 2CH Left Audio Input.
3. 5.1CH Center Audio Input.
4. 5.1CH Subwoofer Audio Input.
5. 5.1CH Rear Right Audio Input.
6. 5.1CH Rear Left Audio Input.
7. 5.1CH Front Right Audio Input.
8. 5.1CH Front Left Audio Input.
9. Speaker Output.
SR: Rear Right Speaker Output.
SL: Rear Left Speaker Output.
CEN: Center Speaker Output.
FL: Front Left Speaker Output.
FR: Front Right Speaker Output.
10. Power On/Off Switch.
11. AC Power Cord.
Rear Panel - Controls And Functions Operating Instruction
611
Use the SPEAKER OUTPUT jacks on the rear panel of main unit to
connect the satellite speakers.
Note: Be sure to match the speaker cord to the appropriate jacks on
components: "White" to "Red", and "Black" to "Black".
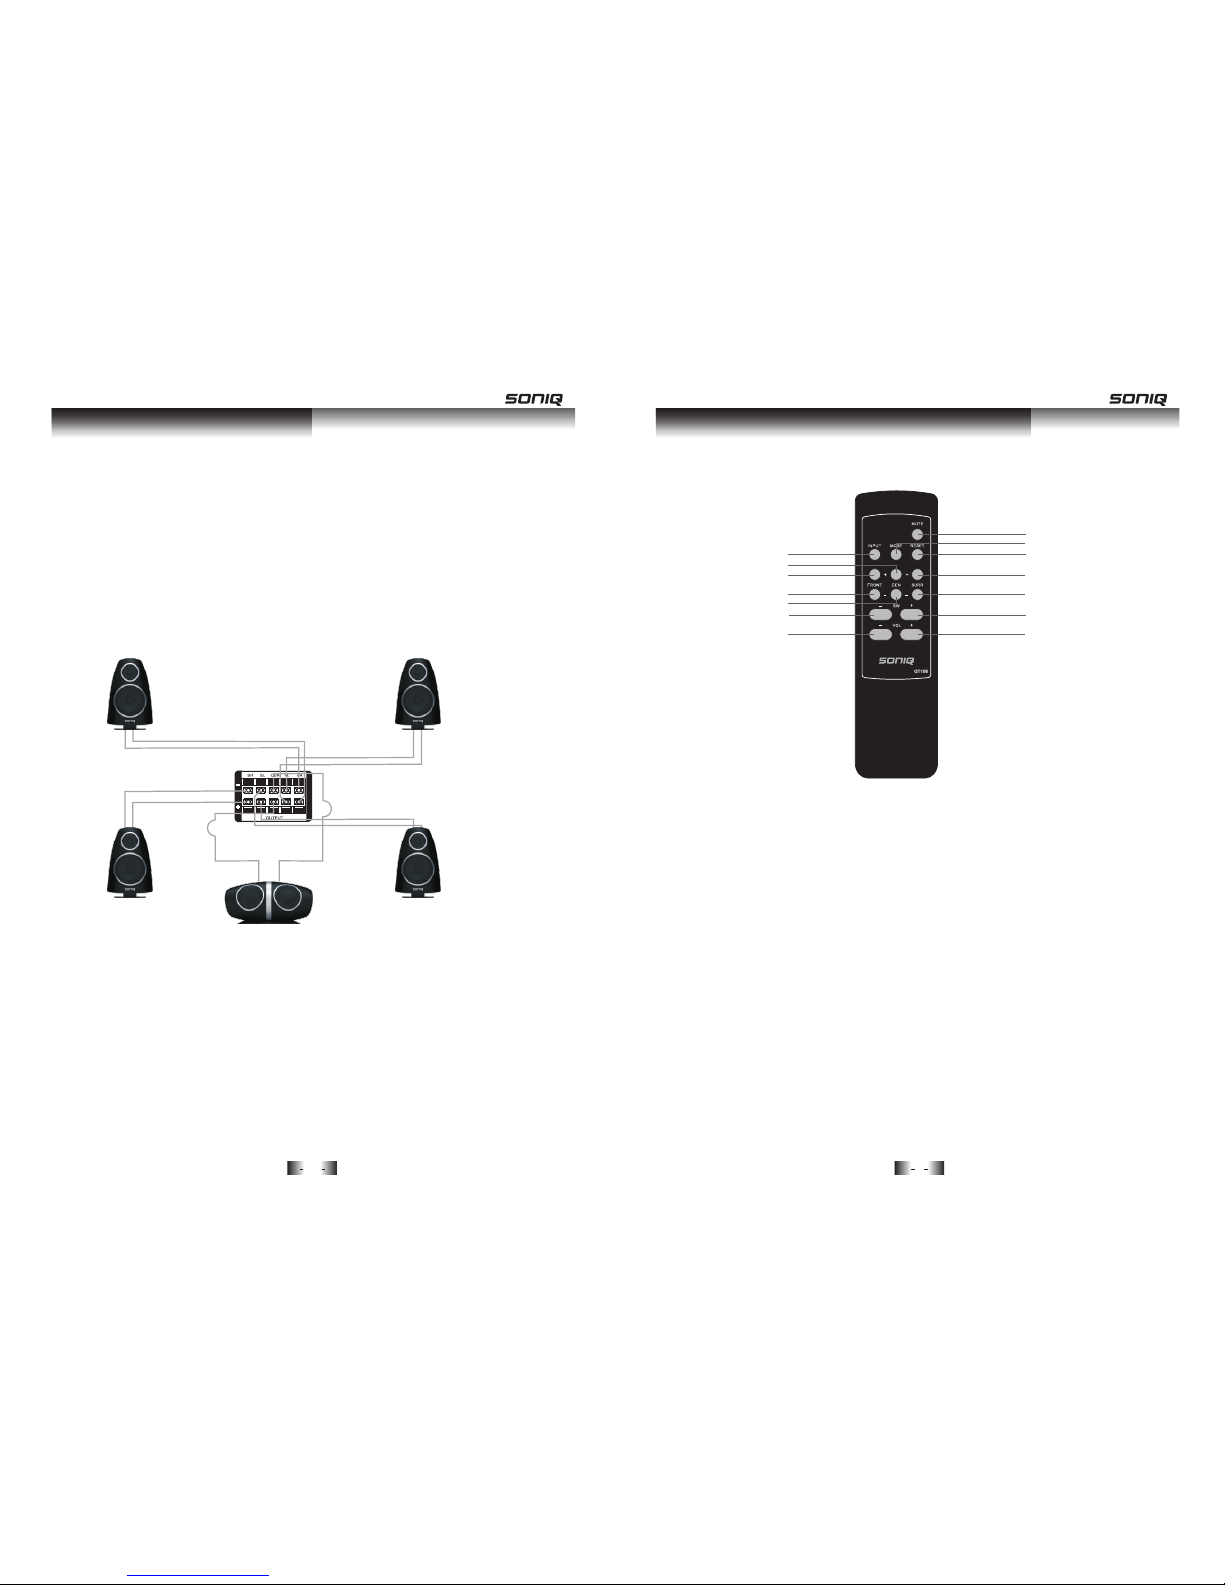
3. FRONT +: Rear Right Balance Output Up.
5. CEN -: Centre Output Down.
4. FRONT -: Rear Right Balance Output Down.
13. SW +: Sw Output Up.
14. VOLUME +: Main Volume Up.
6. SW -: Sw Output Down.
7. VOLUME -: Main Volume Down.
8. MUTE: mute button.
10. RESET: Location retrieval.
9. MODE: .mode button
1. INPUT: Input Switch.
12. SURR -: Surround Balance Output Down.
2. CEN +: Centre Output Up.
11. SURR +: Surround Balance Output Up.
FRONT RIGHT
SPEAKER
FRONT LEFT
SPEAKER
CENTER SPEAKER
REAR LEFT
SPEAKER
REAR RIGHT
SPEAKER
1
2
3
4
5
6
7
8
9
10
11
12
13
14
System Connection Instructions Operating Instruction - Controls And Functions
10 7

1. Before using the remote controller, please insert correct type of
batteries into the battery compartment.
2. The remote controller uses 2x1.5V/AAA batteries.
3. Please insert the batteries as indicated below.
a/ Remove the battery compartment cover.
b/ Insert 2 batteries as per the polarities marked inside the battery
compartment.
c/ Replace the battery cover.
4. If the remote controller is of no function, please check the batteries
or change new batteries before consulting technical personnel.
Subwoofer
TO Stereo Output
(Optional)
Woofer Rea r-L
Rear- R
Front -L
Front -R
Cente r
Optical
Audio Out
Rear-R
Center
Woofer Re ar-L Fron t-L
Coaxial F ront-R
Video Out
Scart out
Video S-V ideo UVY
Manufactured under license from Dolby Laboratories.
"Doldy","Dolby Digital", and the double-D symbol are
trademarks of Dolby Laboratories. Confidential
Unpublished Works.
@1992-1997 Dolby Laboratories, Inc.
All rights reserved.
Apparatus Claims of U.S. Patent Nos.
4,631,603;4,577,216;4,819,098 and 4,907,093
licensed for limited viewing uses only.
RISK OF ELECTRIC SHOCK
DO NOT OPE N
WARNI NG !
AC 100V~240V
50/60Hz
DVD Player
Video In
Video Out
TV
Operating Instruction - Controls And Functions System Connection Instructions
8 9
240V~ 50Hz
240V~ 50Hz
Table of contents
Other SONIQ Speakers manuals

SONIQ
SONIQ CSA50-AU User manual

SONIQ
SONIQ MB206K-AU User manual

SONIQ
SONIQ iQS Zeno User manual

SONIQ
SONIQ MB200-AU User manual

SONIQ
SONIQ CSA32-AU User manual

SONIQ
SONIQ MB412-AU User manual

SONIQ
SONIQ MB402-AU User manual

SONIQ
SONIQ i304-Au User manual

SONIQ
SONIQ MB101K User manual

SONIQ
SONIQ MB301-AU User manual


