Sonix 4 Ultrasonics SR236 User manual

1
FEATURES
Stainless steel construction
Industrial grade integrated circuit
0-80℃digital temperature control
1-99 minutes digital timer
Degassing function
28KHz or 40KHz industrial grade transducers
ULTRASONIC CLEANER
USER MANUAL
2
Thank you for purchasing this Sonix 4 ultrasonic cleaner. Please take some time to read these operating instructions
before use and keep for future reference. Failure to follow these instructions may lead to unnecssary damages to the
product.
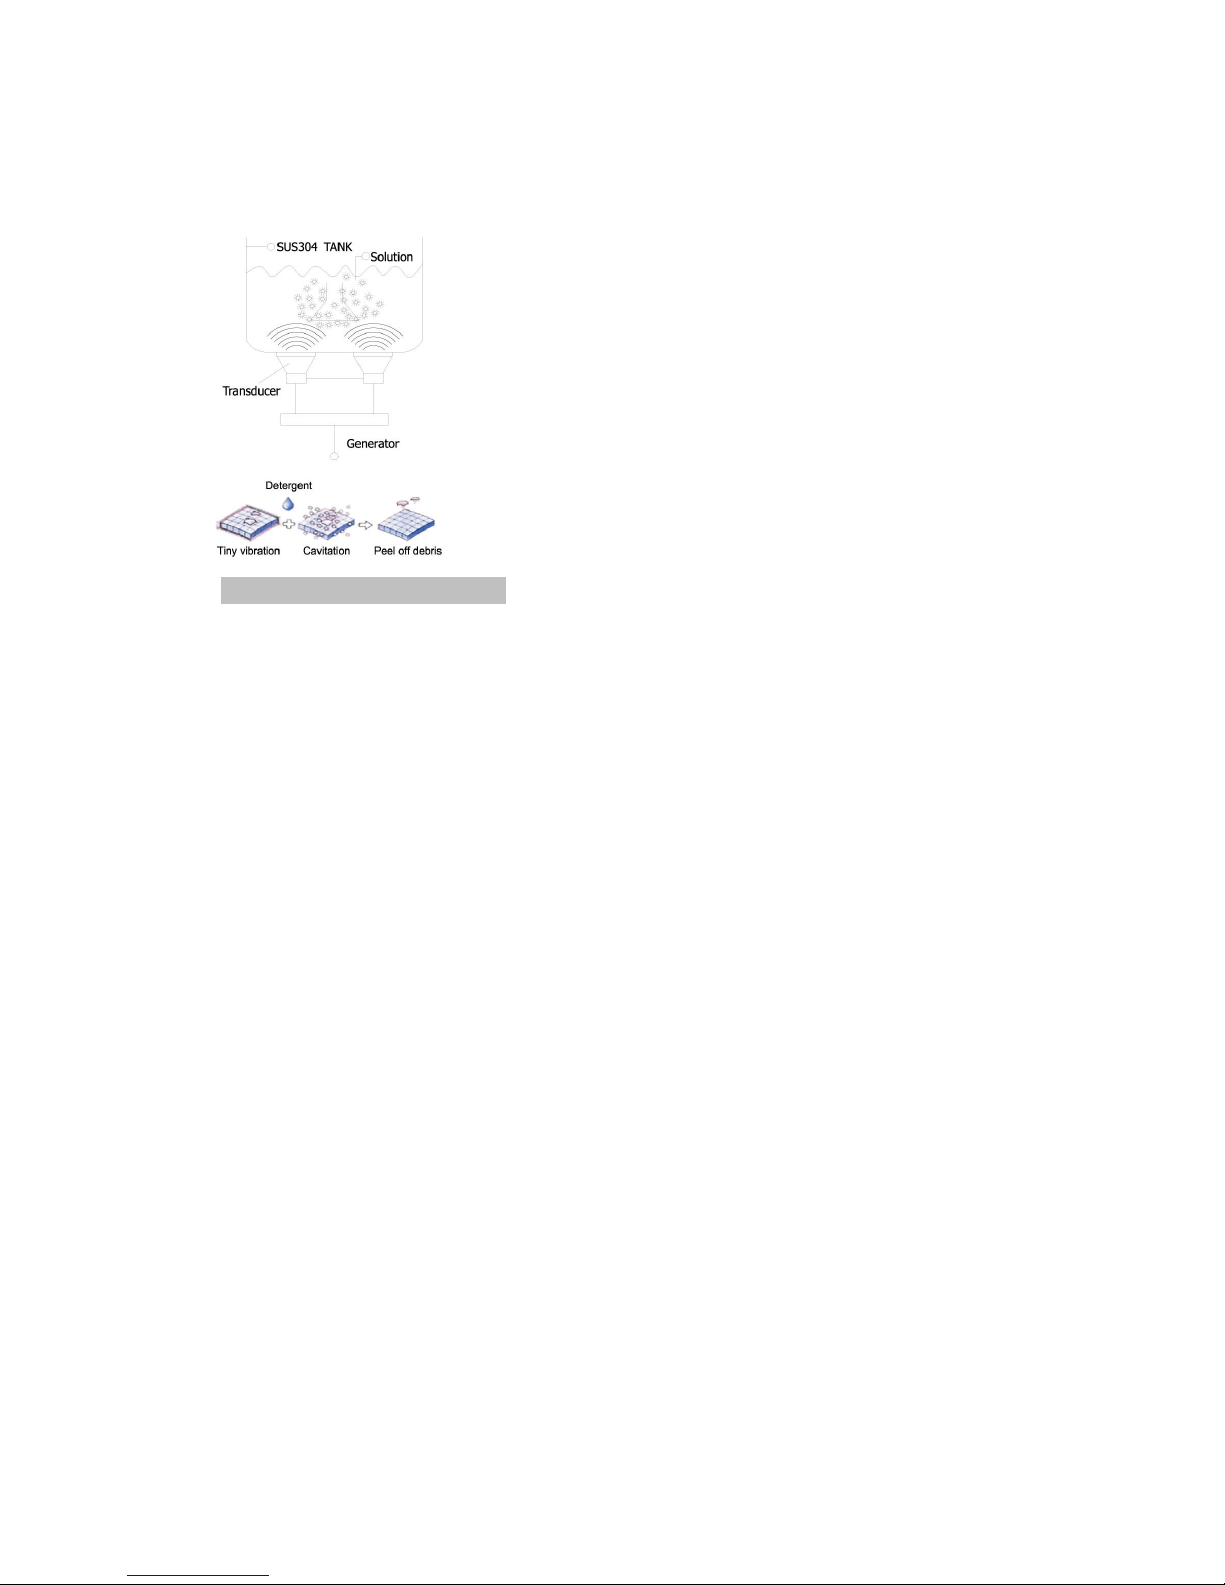
ULTRASONIC PRINCIPLE
BEFORE USE:
1. Carefully unpack the cleaner, remove all packing materials and check whether any
parts have become loose or damaged during transit.
Contents:
a: machine b: cover c: Power cord
d: drain screen (units with valves only) e: basket f: Manual
2. Place the cleaner on a flat, clean surface - ensure that the cooling fan will get
adequate ventilation and that all controls are set to off, and the drain valve is
closed.
3. Ensure that the power cord is securely plugged into the cleaner –bottom panel
Ultrasonic cleaning is achieved by the mechanical action of
cavitation - cavitation is a process that occurs in liquids when
bubbles violently collapse or implode. The entire process is
caused when pressure differentials, particularly due to a drop in
pressure, surround a vapor cavity within the liquid.
The cleaning activity of ultrasonic baths is a result of forces
created when the bubbles implode. These forces are caused
by phenomena that include the formation of a high-velocity
water jet during bubble collapse, as well as the “water hammer
effect.” Both processes generate pressures of up to 60,000 psi
and temperatures of 5,000 K, roughly the temperature on the
sun’s surface

3
connector.
4. Carefully fill at least 1/2 of the tank with water and/or a cleaning solution. Based on
cleaning requirements, we recommend using a small amount of our Eco4 cleaning
solution because this will help increase the cleaning performance. Press the side
panel power switch to “ON” – this will turn the cooling fan and control box on.
The cleaner is now ready for use.
SAFETY PRECAUTIONS
This device should not be used by individuals with limited physical knowledge, or those
lacking training or knowledge, such as children unless they are supervised by an
individual who can take charge of their safety or have received training in operating the
device.
1) DO NOT run the cleaner continuously for more than one hour at a time because it
can damage the internal components.
2) DO NOT operate the unit without fluid in the tank. Always ensure that the solution is
½ to 2/3 full.
3) DO NOT drop any item into the tank because it may damage the transducers.
Always place items gently into the tank and use the basket whenever possible.
4) The more items you place into the cleaning bath, the less cleaning efficient you can
get.
5) Do keep the lid on during use. This will prevent splashes and reduce evaporation
of the fluid.
6) Never immerse the machine or power cord in water or other liquid.
7) DO NOT touch the power plug with wet hands, especially when inserting or
removing the plug.
Keep away from children !
Please read the following items very carefully as failure to
comply with them may void the warranty
Attention
A) While the machine is working normally, the ultrasonic waves and tank give a
well-proportioned sound and sprays generated by the tiny bubbles. If there are
discontinuous surges, please add or reduce the solution in the tank to stop the surges, for
a better cleaning effect.
B) Please don’t operate for excessive cycle times (not more than 30 minutes suggested) as
long cycles will raise the temperature of the bath and electronics causing premature
failure. Also, long cycle times will accelerate tank erosion which also leads to failures.

4
8) DO NOT touch the unit if the machine has fallen into the water during operation.
Remove the power plug from the socket first.
9) DO NOT disassemble the machine if you are not professional.
10) UNPLUG the power source while filling or emptying the tank.
11) DO NOT spray water or liquid over the device and the control panel.
12) DO NOT operate the cleaner without proper grounding.
13) DO NOT place the device on a soft surface where the vents can be blocked.
14) Always turn the heater off after using - leaving it on will damage the internal
components.
15) Use caution when adding or removing items from the cleaning tank as the
splashed fluid is likely to be hot. Any splashed fluid must be dried immediately.
16) In case of emergency or failure to follow the aforementioned items, disconnect the
main supply by removing the plug from the main socket.
APPLICATIONS
The uses for ultrasonic cleaners is almost endless. Provided the product is non-porous
and can normally be immersed in water, they can be thoroughly sonicated. Here are
some examples:
•Jewelry especially gold, silver & platinum
•Watchstraps
•Coins and other collectibles
•Circuit boards
•Engine parts
•Toothbrushes & Dentures
•Electrical components
•Make-up brushes and cases
•Fuel injection nozzles
•Printer heads and toner cartridges
•Motorcycle parts
•Dairy equipment
•Golf clubs & golf balls
•Horse bits & stirrups
•Tattoo equipment
•Surgical instruments
•Turbochargers
•Bicycle parts
•Knives & bayonets
•Gun and ammonition
Ultrasonic cleaning is not recommended to be used to clean the following gemstones:

5
Opal, Pearl, Tanzanite, Malachite, Turquoise, Lapis, and Coral.
OPERATION
1. Fill the stainless steel tank with a cleaning solution; Plug the power cord into a
grounded outlet; After power-on, the temperature displays the actual
environmental temperature, LED displays 3 minutes (default ultrasonic time).
2. Time setting: Press the “TIME-/TIME+ ”quickly will increase/decrease time
1 minute a time, press and hold means time will increase/decrease 10 minutes at a
time. The cleaning stops when the timer counts down to 00:00. If
the cycle needs to be interrupted press “Ultrasonic”button.
NOTE: Do not run the cleaner continuously for more than one hour
3. Temperature setting: Press “temperature-/temperature+”quickly will
increase/decrease the temperature setting 1℃at a time, press and hold will
increase/decrease the setting by 10℃. Usually, the best cleaning temperature is
within 40℃to 60℃.
4. Press “Heat” or “Ultrasonic”button to start either or both functions. Press “Heat”
button again, the heating function will stop. The same for Ultrasonic function.
5. Degas mode: works intermittently,i.e., 6s “ON”+ 2s “OFF”working mode.
It can also be used to clean items effectively.
6. Drain: press the “drain”button to open or close the automatic valve. The
automatic valve will close after the default time (10 minutes)
7. Empty the tank and clean both the outside and inside of the cleaner with a clean and
dry cloth for next use.

6
NOTE: Do not empty or fill the tank with high-temperature differences as the hot or
cold can damage the machine.
DIFFERENT WAYS OF CLEANING
Gennral Cleaning—use only water to clean under the temperature of about 50℃;
Enhanced Cleaning—add few drops of standard cleaning solutions, liquid soap, or
detergent, or any other non-acidic cleaning agents.
Extensive Cleaning--removing tarnish, carbon & rust from non-plated metals, it is
recommended to use specific cleaning solution associated with ultrasonic cleaners.
The cleaning solution will deteriorate in effectiveness over time and use. It is important
to regularly change the fluid and carefully wash the inside of the cleaning tank in order
to preserve the effectiveness and longevity of the cleaner. Do not use corrosive or
abrasive cleaning tools to clean the tank which must be wiped down and dried before it
can be re-connected to the electrical supply.
NOTE: If the machine starts to spark, smoke, smell or displays any other fault the
operator must immediately stop the machine, and isolate it from the electrical supply
and contact the supplier.
WARNING : Strong acid or alkaline cleaning solution will cause corrosion, rust and
even puncture of tank or machine body. To solve this problem, please dilute the solution
to mild PH

7
Advantage
Ultrasonic is widely used throughout industries to remove difficult contaminants from
the parts during or after manufacturing process which might require a stage of
cleaning before the next process. In general, if an item can be cleaned with liquid, it
can be cleaned much faster and more thoroughly with an ultrasonic cleaner. Compared
with traditional solvent/scrubbing, our ultrasonic cleaners:
•Are more effective at removing contaminants;
•Are quicker to achieve good cleaning results;
•Save labor costs;
•Can heat the cleaning solution to a suitable cleaning temperature to enhance
the cleaning efficiency;
•Have a digital controller of high-precision and a long service life;
•Are of high performance;
•Eliminate harsh chemicals;
•Are environment-friendly.
Best Practices:
●Immerse parts completely into the water.
●Add a small amount of cleaning solution- Eco4 is recommended.
●Arrange parts efficiently within the tank. The more items you place in the tank,
the less efficient the process.
●Use a basket. Do not put parts directly onto the bottom of the tank.
●Choose a suitable temperature: Generally, the higher the temperature the better
the cleaning effect. However, when temperatures exceed 70℃~80℃cleaning
effectiveness is affected. Best temperatures are 40℃~60℃.
●Switch the MAIN POWER SWITCH to OFF at the end of the work day
8
SPECIFICATIONS
H: 0-80 ℃temperature range
T: 1-99 minutes working time
D: Digital display
Model No.
SR236
Quantity of transducers
6 pcs
Ultrasonic Power
360W
Ultrasonic Frequency
40KHz
Heating Power
400W
Control Mode
Digital control
Tank Capacity
15L
Tank Size(mm)
330*300*150(L*W*H)
Voltage
AC 100~120V, 60Hz
Drainage
Yes
Cleaning Basket
Yes
Time Range(Min)
1~99
Temperature Range(℃)
0~80
Table of contents


