Sonmol MFNI-05HL User manual

MFNI-05HL
ELECTRIC NASAL IRRIGATOR
USER MANUAL
Please read this instruction thoroughly before use.
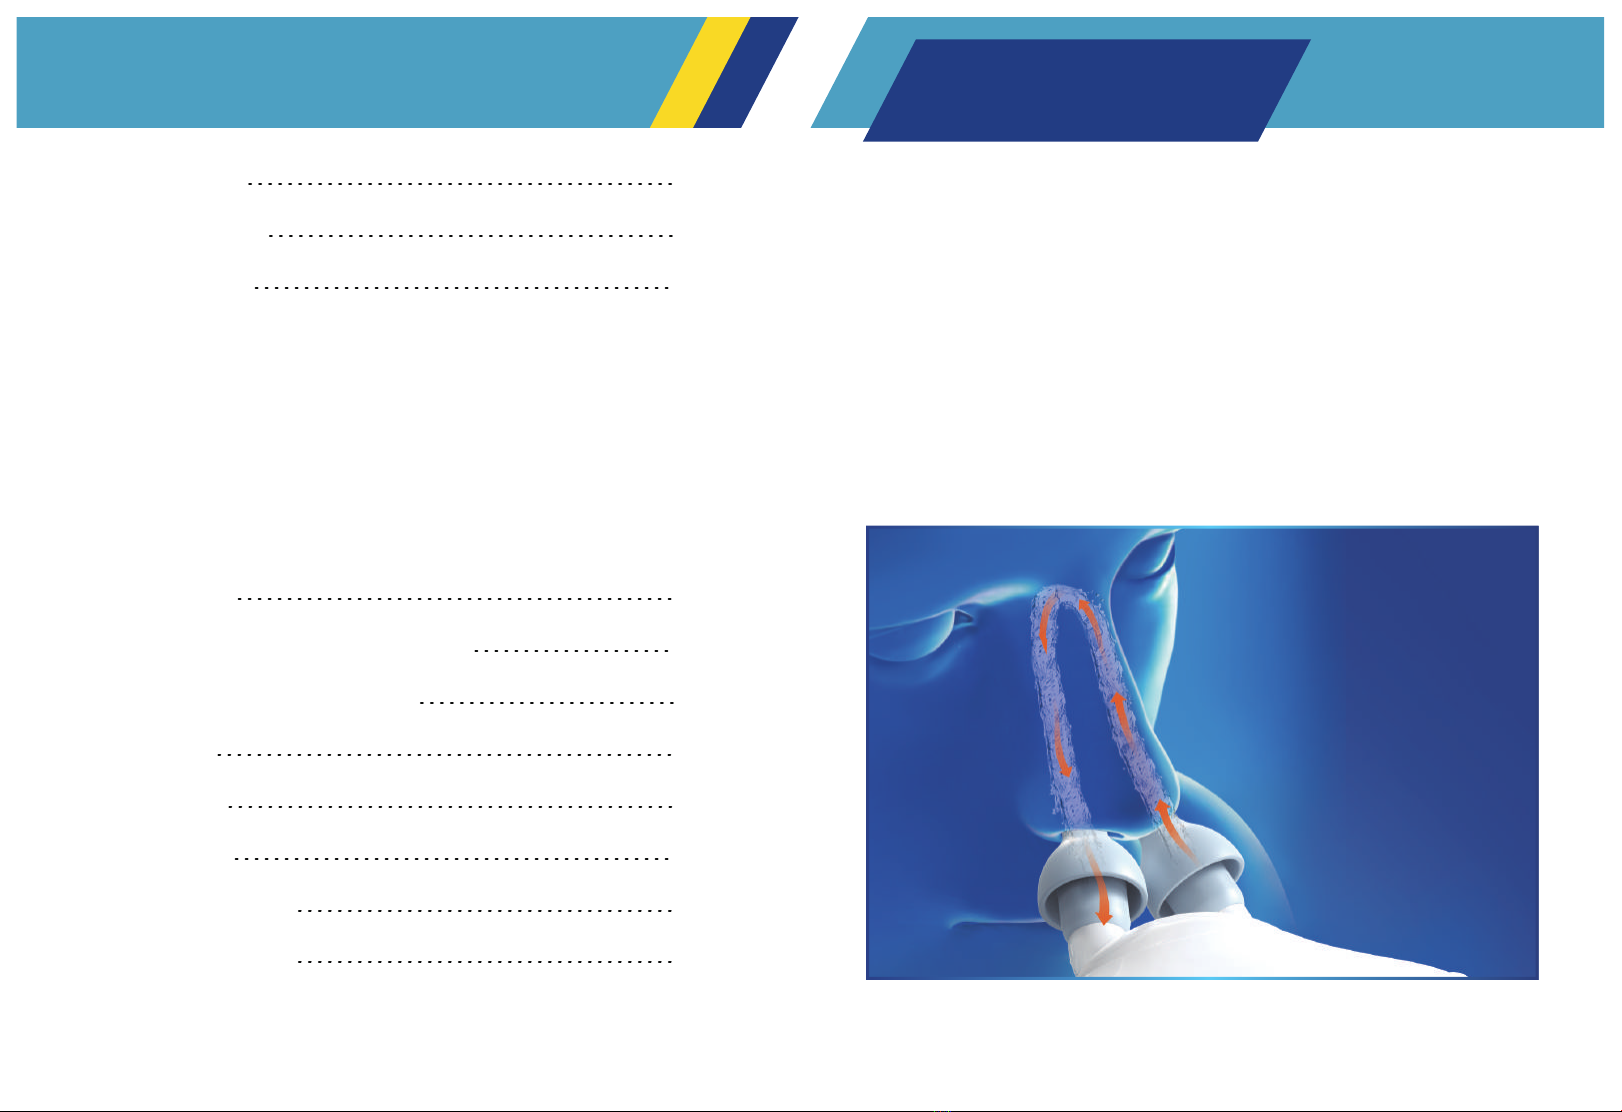
Sonmol Electric Nasal Irrigator is designed to clean the nasal cavities to
relieve nasal symptoms of rhinitis, hay fever, and others. Driven by the pow-
ered pressure provided, the saline from the clean liquid chamber flows into
one nostril at a very fast speed, goes around the back of your nose, then
out from the other nostril, and finally flows into the waste liquid chamber.
This powered rinse in the continuous circulation ensures convenient & deep
nose cleaning and helps to remove inflammatory factors so as to reduce
mucosa edema and improve nasal mucociliary function.
Our Vision
CONTENT
BETTER BREATHING
CHANGES YOUR LIFE
01
1. Our Vision
2. Components
3. Operations
3.1 How to Make Saline Solution
3.2 How to Assemble the Nasal Irrigator
3.3 How to Operate
3.4 When Your Nose Get Fully Congested
3.5 Time and Frequency
4. After Use
5. What to Do If You Leak Water
6. People Who Can Not Use
7. Caution
8. Cleaning
9. Battery
10. Warranty
11. Manufacturer
01
02
03
06
07
07
08
08
09
09
09
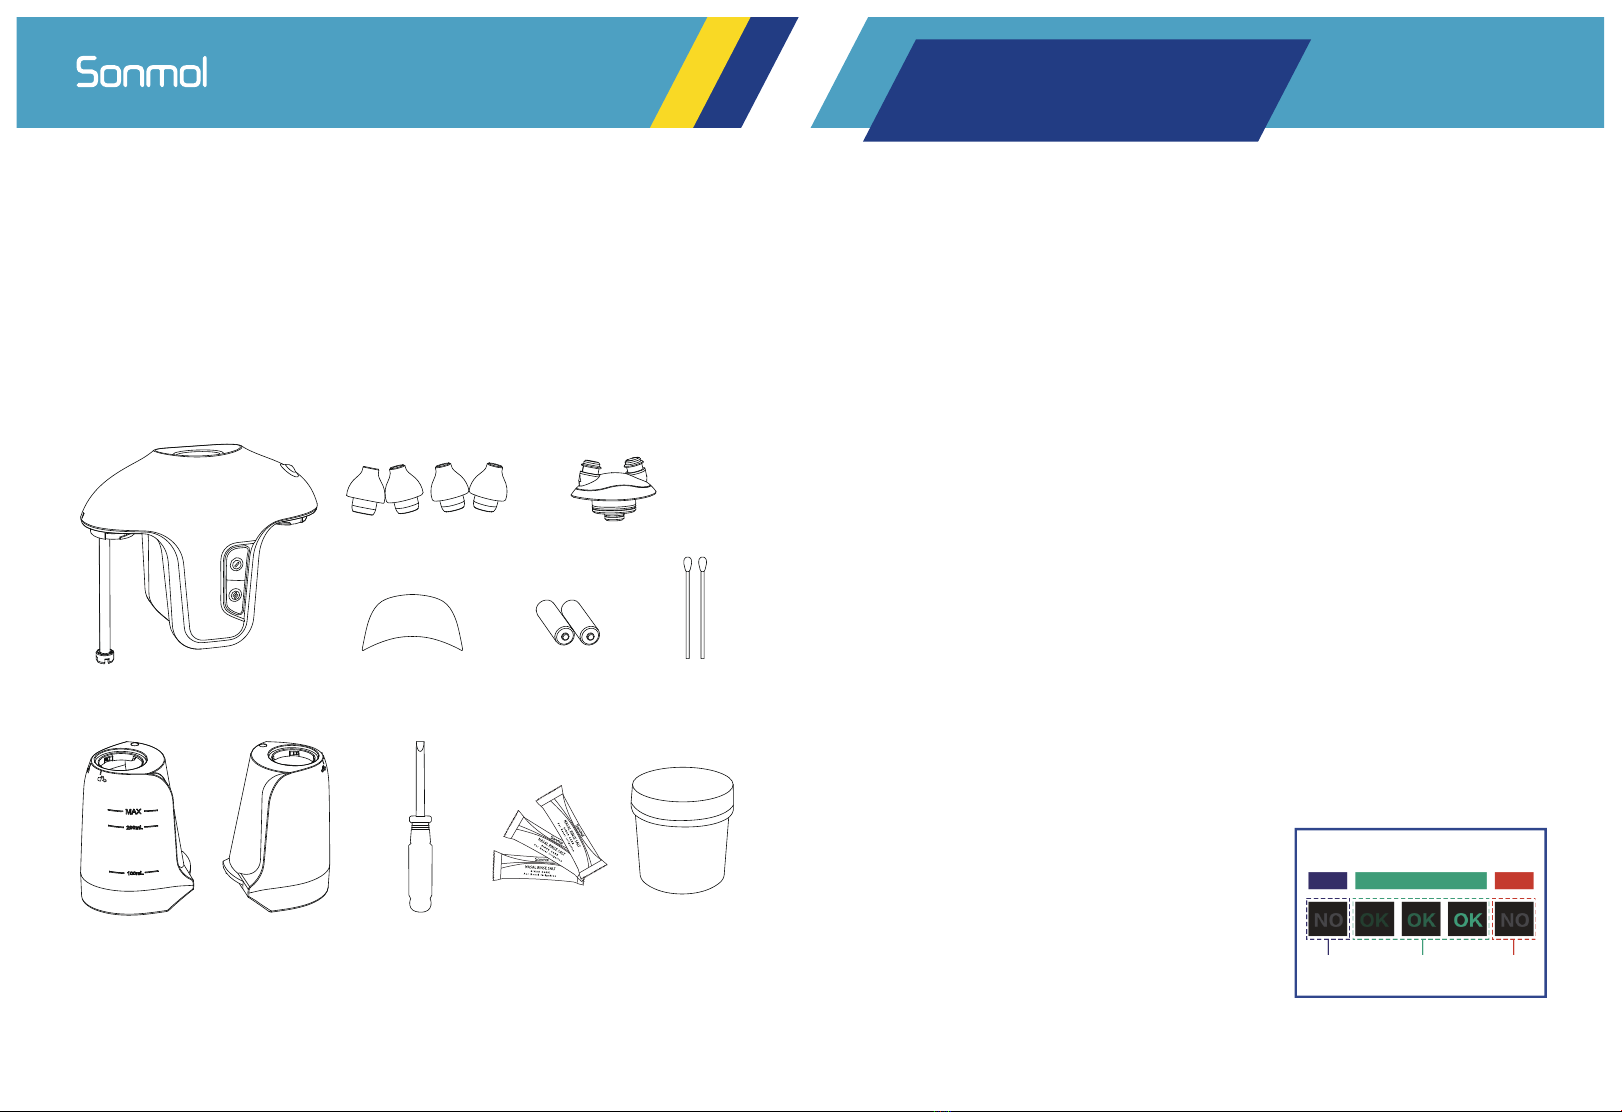
1. Nozzle Base
3. Waste Liquid Chamber
5. Measuring Cup
7. Two pairs of nozzles
9. Cleaning Cap
11. 2 x Swabs
2. Main Body
4. Saline Solution Chamber
6. 50 Salt packets
8. 2 x AA batteries installed
10. Screwdriver
Main Body
Saline Solution
Chamber
50 Salt
packets
2 x AA batteries
installed
Nozzle BaseTwo pairs of nozzles
Measuring Cup
Waste Liquid
Chamber
BETTER BREATHING
CHANGES YOUR LIFE
Components Operations
TOO COLD APPROPRIATE TOO HOT
3.1 How to Make Saline Solution
One salt packet per 200ml water gets the isotonic solution.
Two salt packets per 200ml water get the hypertonic solution.
The room-temperature saline solution is suitable for your rinse, but operating
with warm water always gives you a good washing experience.
① Unpack the salt packet to the measuring cup, and fill the cup with cool
preboiled water. Be mindful of scald if you use hot water. (Distilled water is
good too).
② Fasten the cup cover and shake the cup to get the salt fully dissolved. Watch
the temperature sticker on the measuring cup.
③ You can rinse when any of the three “OK” under the green section appears.
But rinsing when either the second or the third “OK” appears will bring you the
best washing experience. If the “NO” sign appears under the blue section, it
tells the liquid temperature is too low for rinsing. While the “NO” sign in the red
section directs the water is too hot.
Note: If the liquid temperature is lower
than 77℉ (25℃) or higher than 131℉ (50
℃), there won’t be any signs found on the
temperature sticker.
02 03
Cleaning Cap
Screwdriver
2 x Swabs
BETTER BREATHING
CHANGES YOUR LIFE
3.3 How to Operate
1. After making the saline and assembling the device, follow the next steps.
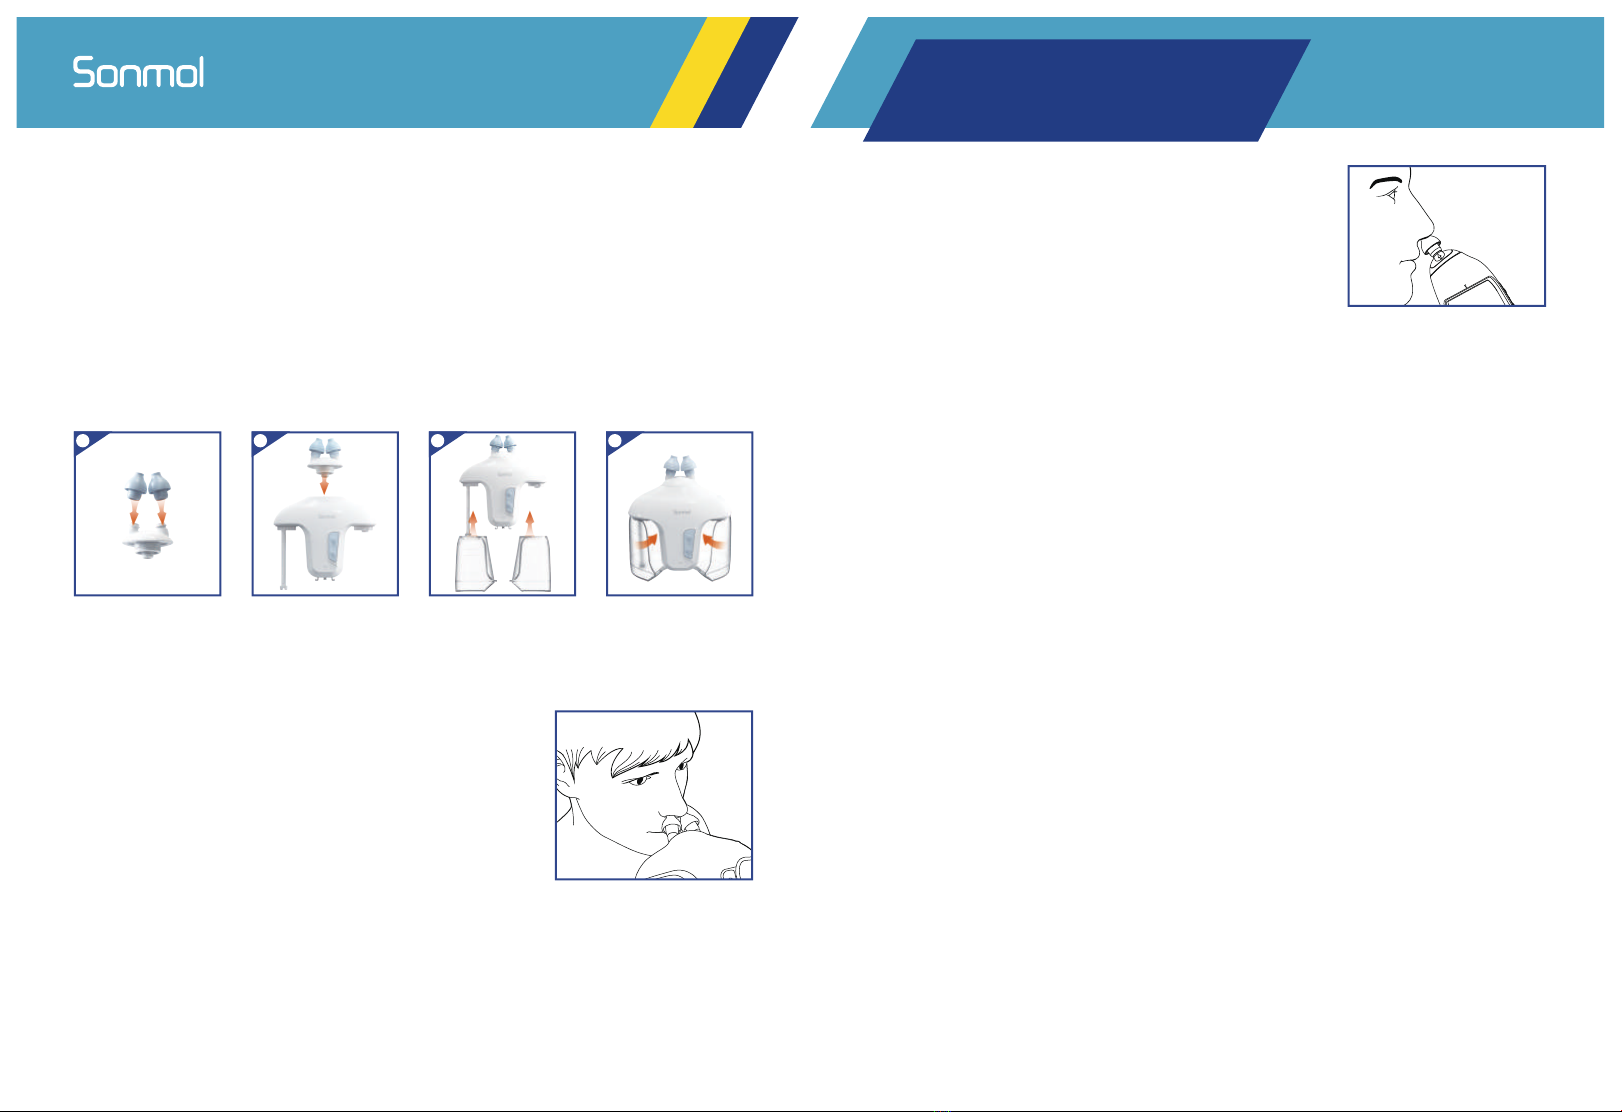
3.2 How to Assemble the Nasal Irrigator
1. Choose suitable nozzles for you and insert the nozzles into the base. Choose
a pair of nozzles suitable for your nostrils.
2. Insert the nozzle base into the main body.
3. Insert and rotate the chambers into the right place with a click sound,
following the arrows for the correct installation direction.
4. Rotate the chambers as the arrows show one by one. The arrows on each
chamber direct the right direction for installation.
6. Watch your breath, and firmly press the button to rinse. Release to stop or
complete your rinse. Usually 200ml saline is enough for a rinsing of 10 to 15
seconds, depending on your nasal condition.
Note: Please be assured that this machine is not harmful to your health. We
recommend that you try several times and find what gesture works best for
you, as each has its own slight physiological differences and physical sensa-
tions, especially if you experience leaks, blockages, water running down your
throat, nose or eye pressure.
Caution: Please stop rinsing once your feel discomfort in your ears or eyes and
consult your physician if the discomfort lasts.
3.4 When Your Nose Get Fully Congested
A 100% congested nose should be rinsed by several short and repeated oper-
ations. It should be the intermittent and gentle rinse from one nostril to the
other in shifts. Several short rinses of 10 seconds per nostril are appropriate.
Gradually, when the mucus and nasal discharge get loose while the path is
created for the irrigation, you will get your congestion entirely removed with
several repeated operations.
3. Watch your breathing. Breathing through mouth or holding your breath
is the right breathing way while rinsing.
2. Stand up or sit down straight, hold the
Nasal Irrigator with the button back towards
you, tilt your head slightly and insert the noz-
zles into your nasal passages. Make sure to
keep them parallel to the passages.
4. Lift your head slightly and aim the nozzle at
the centre of your nostrils, with a good seal and
no gaps. Coordinate your nozzles and channels
to create the perfect rinsing angle. When mucus
and debris get removed a little bit, the nasal
passage is ready for irrigation.
04 05
5. Choose a proper cleansing mode. Press the upper button for a slower rinse
speed and the lower button for a faster rinse speed.
2 3 41

BETTER BREATHING
CHANGES YOUR LIFE
If the amount of liquid in the waste chamber of your device is not the same
as the saline solution you used, this is normal. During the nose rinsing, some
saline solutions may stay in your nasal cavity and sinuses and will be
released gradually when you blow your nose. Allow some time for the
remaining liquid to come out.
After Use
The liquid may remain in your nasal cavity and flow out unexpectedly. It’s
common for all users. Following the upcoming steps will help remove the
remaining water after your rinse.
*Bend to bring your chin to your chest as much as you can; keep holding
this gesture for several seconds.
*Turn your head, making your eyes attempt to find your left shoulder for a
second.
*Turn your head to look over your right shoulder.
Then You will solve the leaked water problem.
What to Do If You Leak Water
Children under 12 years old, people who suffer nasal cavity injury or bleed-
ing and ear inflammation after surgery, and those who suffer psychosis,
mental retardation, epilepsy or infectious diseases, and blood diseases
should not do nasal irrigation.
People Who Can Not Use
3.5 Time and Frequency
The Electric Nasal Irrigator is gentler and more efficient than traditional
irrigation systems. It works naturally and is safe enough for your nose.
We recommend rinsing each nostril for no more than one minute. Do not
rinse each nostril more than three times within a minute.
And do the rinsing process twice per day - once in the morning and once
in the evening. If you would like to use it more frequently, please consult
your doctor.
06 07
Tilting your head forward helps the remaining fluid drain out of your nose.
You can blow your nose gently to remove the liquid from one of your nos-
trils. Blowing two nostrils simultaneously may cause the otitis media.
Note: *Disassembling both chambers should be carried on your table. Twist
the tank carefully by following UNLOCK signs on both of the tanks. Do it
stably and slowly to avoid waste liquid spilling out. Empty Waste Liquid
Chamber after each of your washing. Clean and sterilize them.
TIPS: Always try to start with the most congested
nostril in and out the other and the slower mode,
it will help you to successfully finish one cycle of
the rinse. This device is equipped with a PRES-
SURE SAFETY VALVE that keeps the pressure
constant, stable, and safe, its mission is to solve
the problems of incomplete cleaning and poten-
tial safety hazards in nose washing.
* If you feel uneasy with your ears while rinsing or you have eye and ears pain,
please stop rinsing and consult your physician.

BETTER BREATHING
CHANGES YOUR LIFE
Follow the instructions provided or consult your physician.
Do not use it if you have an ear infection or if your ears and eyes are blocked.
Ear popping and ear fullness are known as the side effects of nasal irrigation,
but they last for a short time. Stop rinsing if the condition still exists.
Using the product with illegal drugs, alcohol, or prescription drugs can damage
equipment, invalidate warranties, and potentially cause serious injury.
*Be sure that the left and right tank can't be washed in the dishwasher in case
it will cause damage to the seal O-ring to leak water.
*The main body can't be washed directly by any running water to avoid damage
to the machine.
*Please don't disassemble the main body to avoid possible upcoming damage.
Any damage out of careless disassembling will void the warranty.
Caution
Clean both the tanks, nozzle base & nozzles immediately after each rinse. The
diluted white vinegar to water (half to half), alcohol, dishwashing soap, and
sprays to kill bacteria can be used for cleaning. Leave them to stay 30 seconds
and then wash them away. Places that can't be washed and wiped can be
cleaned with swabs for sterilizing. Air dry all parts before storage.
Cleaning
We offer one year warranty after purchasing.
other helps.
Warranty
Chongqing Moffy Innovation Technology Co., Ltd.
Address: (C30 Dadi Corporate Park), No.50-5, No.292, Jingdongfang Road, Beibei District,
Chongqing City, 401147, China
https://nascool.com/
Manufacturer
CHANGE THE DIRECTION OF THE FLOW
You will need to do nothing but reverse the nasal
unit.
Rotate the nozzle base 180° to change in-out flow
when needed. The arrows indicate the direction of
flow.
P.S. Please use the swabs packed for cleaning the
corners that clothes are hard to wipe.
08 09
2 x AA batteries DC3V
Battery Life: Estimated five months if used 10
seconds each time and twice daily.
Remove the batteries if you do not intend to use
the unit for a long time. (Use the screwdriver
packed to lift the cap).
A red blinking in the main body indicates a low
battery and requires replacing the battery for
further use.
Battery
Device Self-Cleansing: Attach the cleaning cap
to the nozzle base and form a good seal. Fill the
chamber with saline to the Max line. Switch on
the device.
P.S. Please don't wash the main body directly.
Use a clean cloth to wipe it.
SCREW OUT
Table of contents
Popular Personal Care Product manuals by other brands

IMPRESSIONS
IMPRESSIONS Clarity instructions

Ofa Bamberg
Ofa Bamberg Dynamics Wrist Orthosis with Thumb Piece manual

Park House Healthcare
Park House Healthcare ECLIPSE PHS395 user manual

ConvaTec
ConvaTec ESTEEM+ Flex Convex How to use

Drive DeVilbiss Healthcare
Drive DeVilbiss Healthcare TS 130 operating instructions

Joovv
Joovv Half Max quick start guide

Electromed
Electromed SmartVest SV2100 instruction manual

Bodypoint
Bodypoint Aeromesh SP102S Installation and user instructions

Emco
Emco asis pure Mounting instruction

Permobil
Permobil ROHO DRY FLOATATION Mattress Overlay Operation manual

Symmetrikit
Symmetrikit Standing Chair User handbook

MedNovis
MedNovis L.E.D. Mini Daylight - VITALITY LED user manual


