Sonocaddie Golf GPS User manual

User’s Guide
This document is the property of Sonostar Inc. Any unauthorized reproduction is prohibited. Page 1
Sonocaddie AUTO PLAY
Golf GPS
User’s Guide
Sonostar Inc.
V.3.0.0.1_E

User’s Guide
This document is the property of Sonostar Inc. Any unauthorized reproduction is prohibited. Page 2
Contents
Welcome ........................................................................................................................4
Warnings................................................................................................................4
Cautions .................................................................................................................4
Chapter 1. Introduction ..................................................................................................5
1.1 Features............................................................................................................5
1.2 Display .............................................................................................................6
1.2.1 Symbol Description ..............................................................................7
1.2.2 Status Area............................................................................................7
1.2.3 Battery level..........................................................................................7
Chapter 2. Getting started ..............................................................................................8
2.1 Charging...........................................................................................................8
Chapter 3. Before starting a Game.................................................................................8
3.1 Power ON/OFF ................................................................................................8
3.2 Main Menu.......................................................................................................9
3.2.1 GPS : Provides the GPS reception status information..........................9
3.2.2 Settings..................................................................................................9
Chapter 4. Course Management...................................................................................10
4.1 Before Uploading Course Information ..........................................................10
4.1.1 Login or Join Free Sonocaddie Membership......................................10
4.1.2 Install “AUTO PLAY Software"in Your Computer .....................10
4.1.3 Connect AUTO PLAY and Computer................................................12
4.2 Update Course Data .......................................................................................12
4.2.1 Manage data in AUTO PLAY ............................................................14
Chapter 5. Starting a game...........................................................................................16
5.1 Start with Existing Courses............................................................................16
5.1.1 Course Auto Search ............................................................................16
5.1.2 Search Courses from COURSE LIST (Manual Search).....................17
5.1.3 Auto Hole............................................................................................17
5.2 Course Management for AUTO PLAY device..............................................18
5.2.1 Create a New Course ..........................................................................18
5.2.2 Delete a Course...................................................................................18
5.2.3 To Rename a Course...........................................................................19
5.3 Adding New Reference Points.......................................................................19
5.3.1 Mapping a hole ...................................................................................19
5.4 Reference Points next to Green......................................................................20
5.5 Reference Points on Green.............................................................................20
5.6 Editing Reference Points................................................................................20

User’s Guide
This document is the property of Sonostar Inc. Any unauthorized reproduction is prohibited. Page 3
5.7 Delete Reference Points.................................................................................21
5.8 Green Close-Up Function ..............................................................................21
5.8.1 Double Green......................................................................................21
5.9 Mark Function (Shot Measurement)..............................................................22
5.10 Scorecard Function (Optional Function) .....................................................23
5.10.1 Activate your scorecard function ......................................................23
5.10.2 NORMAL and PRO function ...........................................................23
5.10.3 Enter Scores ......................................................................................24
5.10.4 Review Scorecard and View Analysis..............................................24
Appendices...................................................................................................................25
A. Specification....................................................................................................25
B. System Requirement .......................................................................................26
C. Description Abbreviations...............................................................................27
D. FAQs ...............................................................................................................28
Regulatory Agency Compliance..................................................................................30

User’s Guide
This document is the property of Sonostar Inc. Any unauthorized reproduction is prohibited. Page 4
Welcome
Welcome to the Sonocaddie guide. This guide has been designed to provide you with
everything you need to know about operating your Sonocaddie. Please read the user
guide thoroughly in order to understand the features of the Sonocaddie.
Note that there are multiple ways to navigate and use the various Sonocaddie
functions. Sonocaddie is very intuitive to use, so feel free to use which ever way you
find to be the easiest.
Warnings
Please read the guidelines below, since failure to do so may result in mis-use of the
equipment and may be dangerous or illegal.
The Global Positioning System (GPS) is operated by the government of the
United States, which is solely responsible for its accuracy and maintenance. The
system is subject to changes which could affect the accuracy and performance of
all GPS equipment.
zOperating
¾Sonocaddie may take at least 10~15 minutes to receive satellite
signals the first time you turn it on. It may take longer to receive
signals if it has been off for 4 or more hours, or if you traveled more
than 100 miles away from the last location where you used your
Sonocaddie.
¾Sonocaddie performs best under clear sky. Furthermore, 6 satellite
signals should be sought, so it might be necessary to wait for these to
be registered.
¾Should you experience any problems with your Sonocaddie (e.g.
malfunction/damage) please contact Sonocaddie Customer Service at
www.Sonocaddie.com. Do not attempt any repairs on your own as this
may void the warranty.
¾The USB cable provided is solely for the use of Sonocaddie devices (see
the accessory list). Do not connect any other cable for data transfer as this
could damage the data port (I/O port).
¾A full battery charge may take 4 hours. We recommend not charging over
8 hours.
Cautions
zGolf course
¾Sonocaddie should not be used while driving any vehicle including golf
carts. Always place Sonocaddie in a secure place to avoid any impact
which could cause damage to it.
zGPS reception
¾Sonocaddie has a built-in GPS antenna. This antenna should face upward
to gain the best signals and should not be covered with anything as this
may affect the quality of reception. GPS reception might be affected by
the following environmental factors such as rain, dense clouds, fog,
solar flares, high voltage electricity, cellular phone towers, etc.
¾Coverage/reception levels may be adversely affected by forests and/or
buildings. Optimal usage will be gained in wide open areas.
User’s Guide
This document is the property of Sonostar Inc. Any unauthorized reproduction is prohibited. Page 5
Packing List
¾Sonocaddie AUTO PLAY
¾Mini USB Cable
¾Rechargeable Battery
¾User’s Guide
¾Belt Clip
¾AC Charger Adaptor
¾Carry Pouch
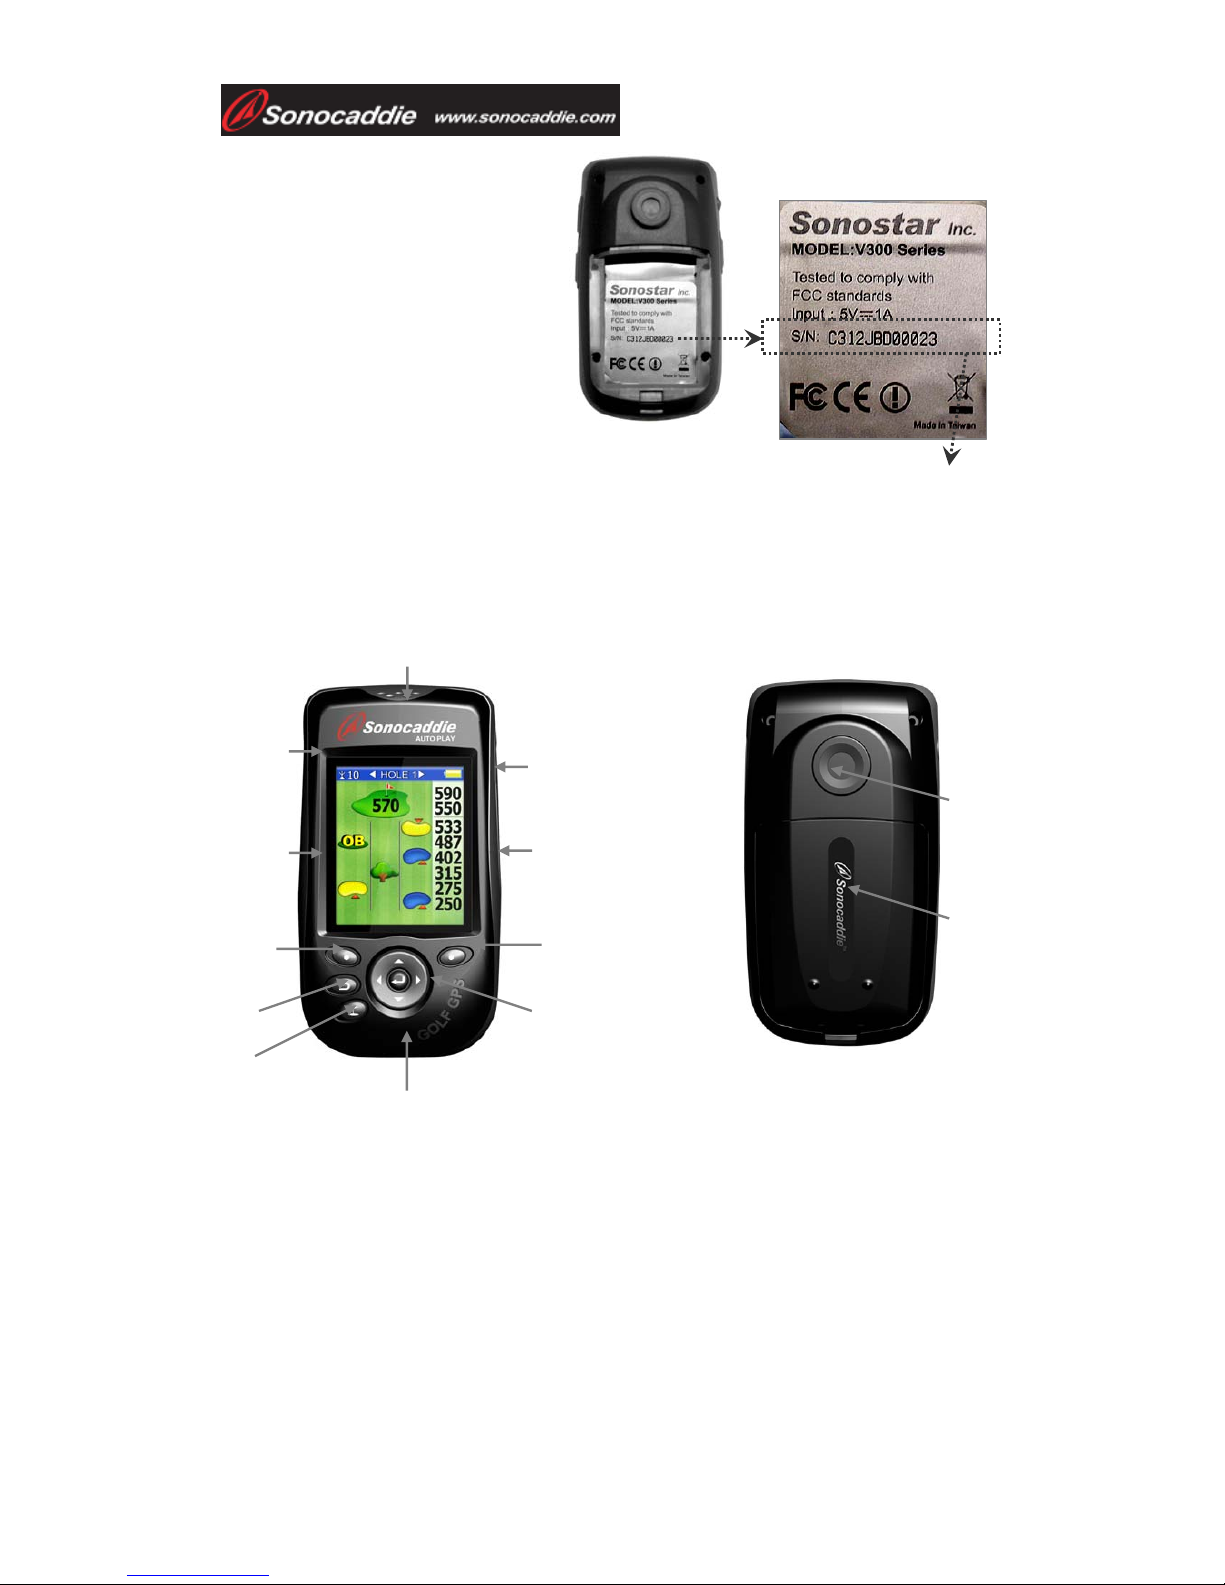
Chapter 1. Introduction
1.1 Features
Power button/
5-way key
Scorecard button
Green View
button
GPS antenna
Hook
Mark button
Ri
g
ht soft ke
y
Left soft ke
y
Esc
Hole selection
Mini-USB Cable & Charging Port
1. Left/-
2. Right/+
3. Up/+
4. Down/-
5. Select / Save
Battery cover
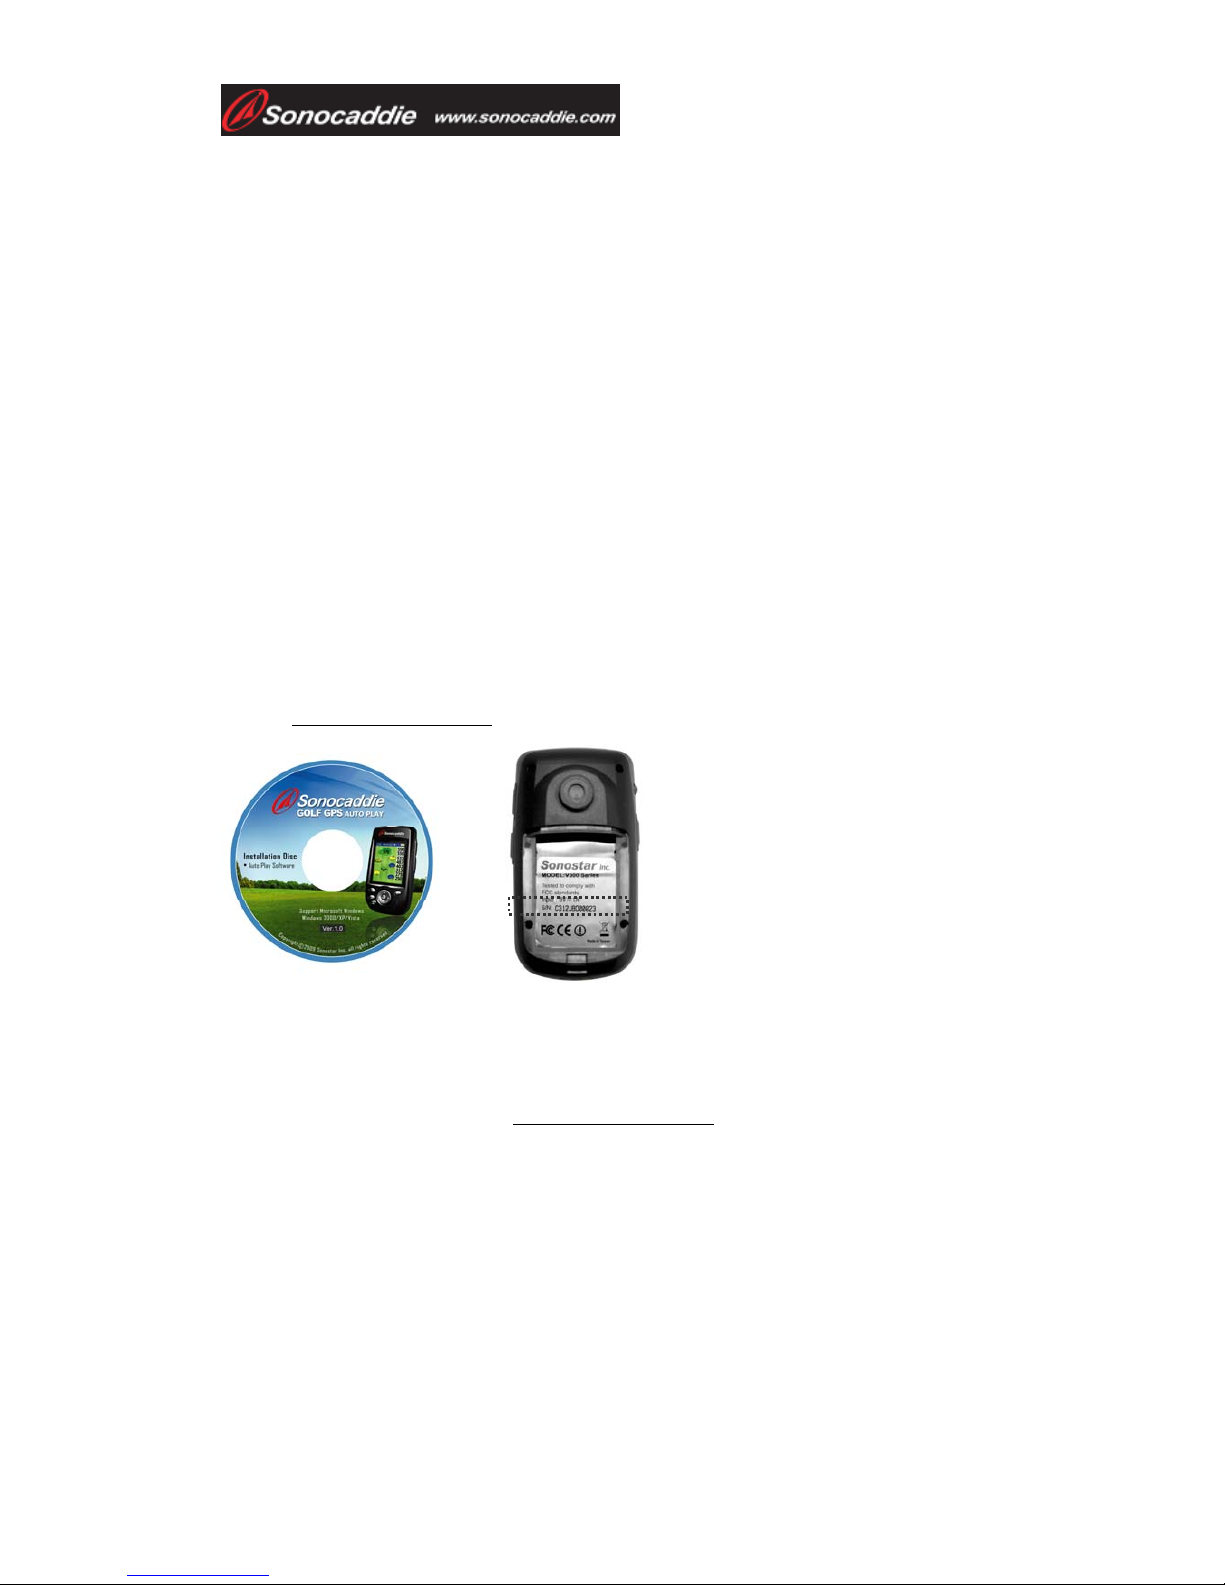
The Serial Number

User’s Guide
This document is the property of Sonostar Inc. Any unauthorized reproduction is prohibited. Page 6
1.2 Display
Rough/Fairway Right
Fairway
Rough/Fairway Left
Battery level
Side of Green
Distance for each
reference point
Distance from front
/ back of the green
Satellite signal
Reference
point on the
fairway
Distance unit
YD= Yard
M= Meter
ML= Mile
KM= Kilometer
Fig: Course info screen
Press “Mark” button or enter “Mark”
function from “Main” screen to enter
the shot distance screen.

User’s Guide
This document is the property of Sonostar Inc. Any unauthorized reproduction is prohibited. Page 7
1.2.1 Symbol Description
*Note: For some courses that have two greens on one hole these icons provide
distance for the extra green.
1.2.2 Status Area
¾Satellite signal
Satellite signal 0~2 3~5 5~6 6~8 8~10 >10
Accuracy None Poor Fair Good Very good Optimal
1.2.3 Battery level
Quickly confirm remaining battery level with the on-screen battery gauge.
Scale of power
Conditions Full Empty No battery *
*Note: This symbol indicates that: 1.The unit is without battery. 2. The battery is
inserted incorrectly. 3. The battery is defective (contact customer service).
Status explanation Symbol
Bunker Front/ Back
Water Front/ Back (includes major water hazards)
*2
nd Green Front/ 2nd Green Back
Creek (includes: river, ditch and stream)
Trap
Tree (includes: shrubbery and forest)
Hills or Mounds
Lay-up area
Out of Bounds (OB)
Dogleg Left/ Right
Rock
Delete
Important!
To achieve optimum accuracy it is advised that Sonocaddie performs
best under clear sky conditions. Furthermore, 6 satellite signals should be sought, so it
might be necessary to wait for these to be registered.
User’s Guide
This document is the property of Sonostar Inc. Any unauthorized reproduction is prohibited. Page 8
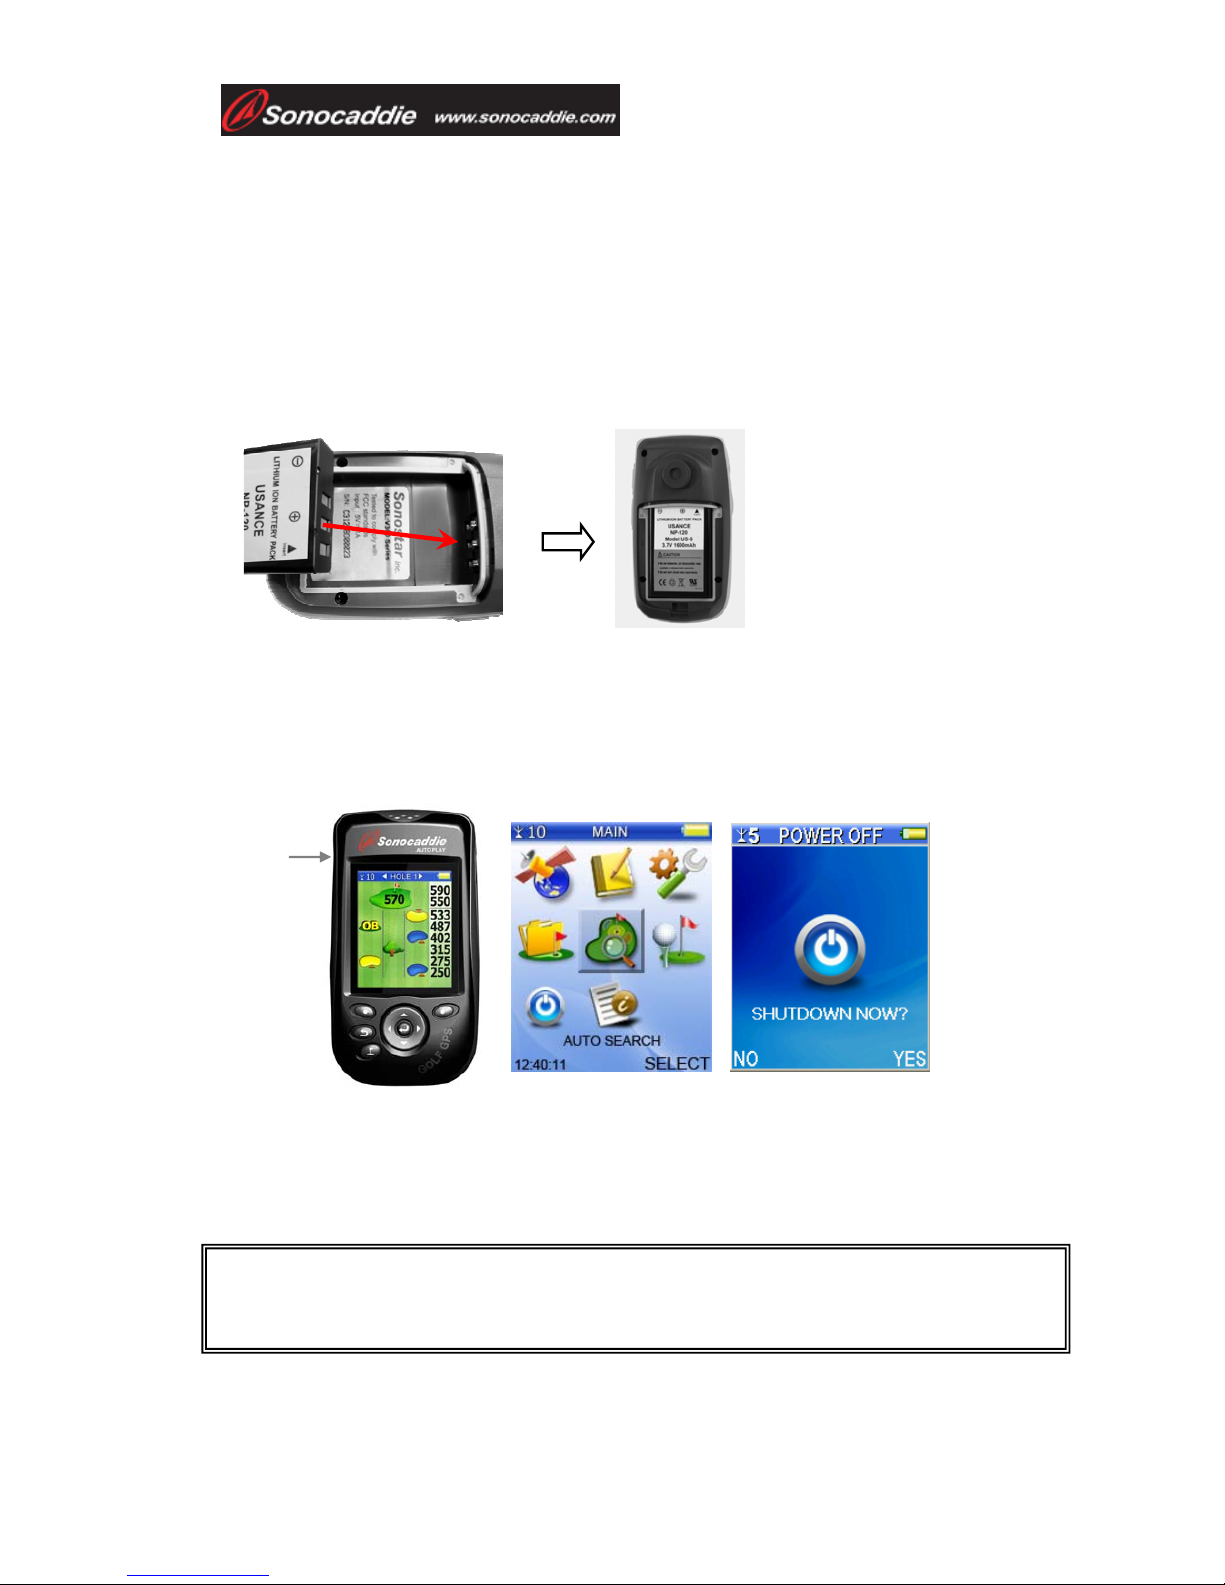
Chapter 2. Getting started
2.1 Charging
Please insert the supplied rechargeable battery correctly as below. A full battery
charge may take up to 4 hours and we recommend that you do not charge over 10
hours.
*Note:
1. Please charge the battery at least 8 hours for first time use.
2. Please remove the battery if you will not use the unit for a long period of time to
avoid the battery leaking and damaging the Sonocaddie.
Chapter 3. Before starting a Game
3.1 Power ON/OFF
Power ON: Press the “Power button” for at least 3 seconds to turn the Sonocaddie
on. The MAIN screen will appear.
Power OFF: To switch Sonocaddie off, simply press the “Power button” for at least
3 seconds or select “OFF” function from the “MAIN” menu and then press “YES”.
Important!
Please allow approximately 5~10 minutes when turning the Sonocaddie on to search for
GPS signals (make sure to be in an open-sky area).
Power
button

User’s Guide
This document is the property of Sonostar Inc. Any unauthorized reproduction is prohibited. Page 9
3.2 Main Menu
3.2.1 GPS : Provides the GPS reception status information.
Note: Lower DOP numbers provide better accuracy.
3.2.2 Settings
There are 9 selections in SETTINGS:
1. LANGUAGE: English/ French/ Deutsch/ Spanish/ Simplified Chinese/ Japanese/
Traditional Chinese
2. TIME ZONE: Please choose your correct time zone
3. DISTANCE UNIT: YARD / METER/ MILE/ KILOMETER
4. THEMES: BLUE / PURPLE/ GREEN/ ORANGE
Important !
To achieve optimum accuracy please be aware that Sonocaddie performs best under clear sky
conditions. Since at least 6 satellite signals should be sought, it might be necessary to wait for
these to be registered.
DOP = Dilution of Precision
Dilution of precision (DOP) is a measure of the
quality of the GPS data being received from the
satellites. DOP is a mathematical representation for
the quality of the GPS position solution. The main
factors affecting DOP are the number of satellites
being tracked and where these satellites are
positioned in the sky.
Number of Satellite being received
Dilution of Precision
Time/ Date Display
Each satellite signal strength
Latitude
Longitude
User’s Guide
This document is the property of Sonostar Inc. Any unauthorized reproduction is prohibited. Page 10
5. BRIGHTNESS: OFF/1/2/3/4/5
6. BACKLIGHT TIME: ALWAYS/ 15 SECONDS/ 30 SECONDS / 60 SECONDS/
ALWAYS
7. AUTO TRACK:ON /OFF
8. TRACK INTERVAL: 10 SECONDS/ 20 SECONDS/ 30 SECONDS
9. AUTO HOLE: ON/ OFF
10. SCORECARD: NORMAL/ PRO
※Please be sure to press “SAVE” after completing all settings.
Chapter 4. Course Management
All available courses are preloaded in your device. If you need to update the course
information, please read the instructions in chapter 4.
4.1 Before Uploading Course Information
4.1.1 Login or Join Free Sonocaddie Membership
A free membership account is required to update course data. Please link to
“Member” on AUTO PLAY Software or go to AUTO PLAY website, “Member”
page at www.sonocaddie.com to join the membership in advance.
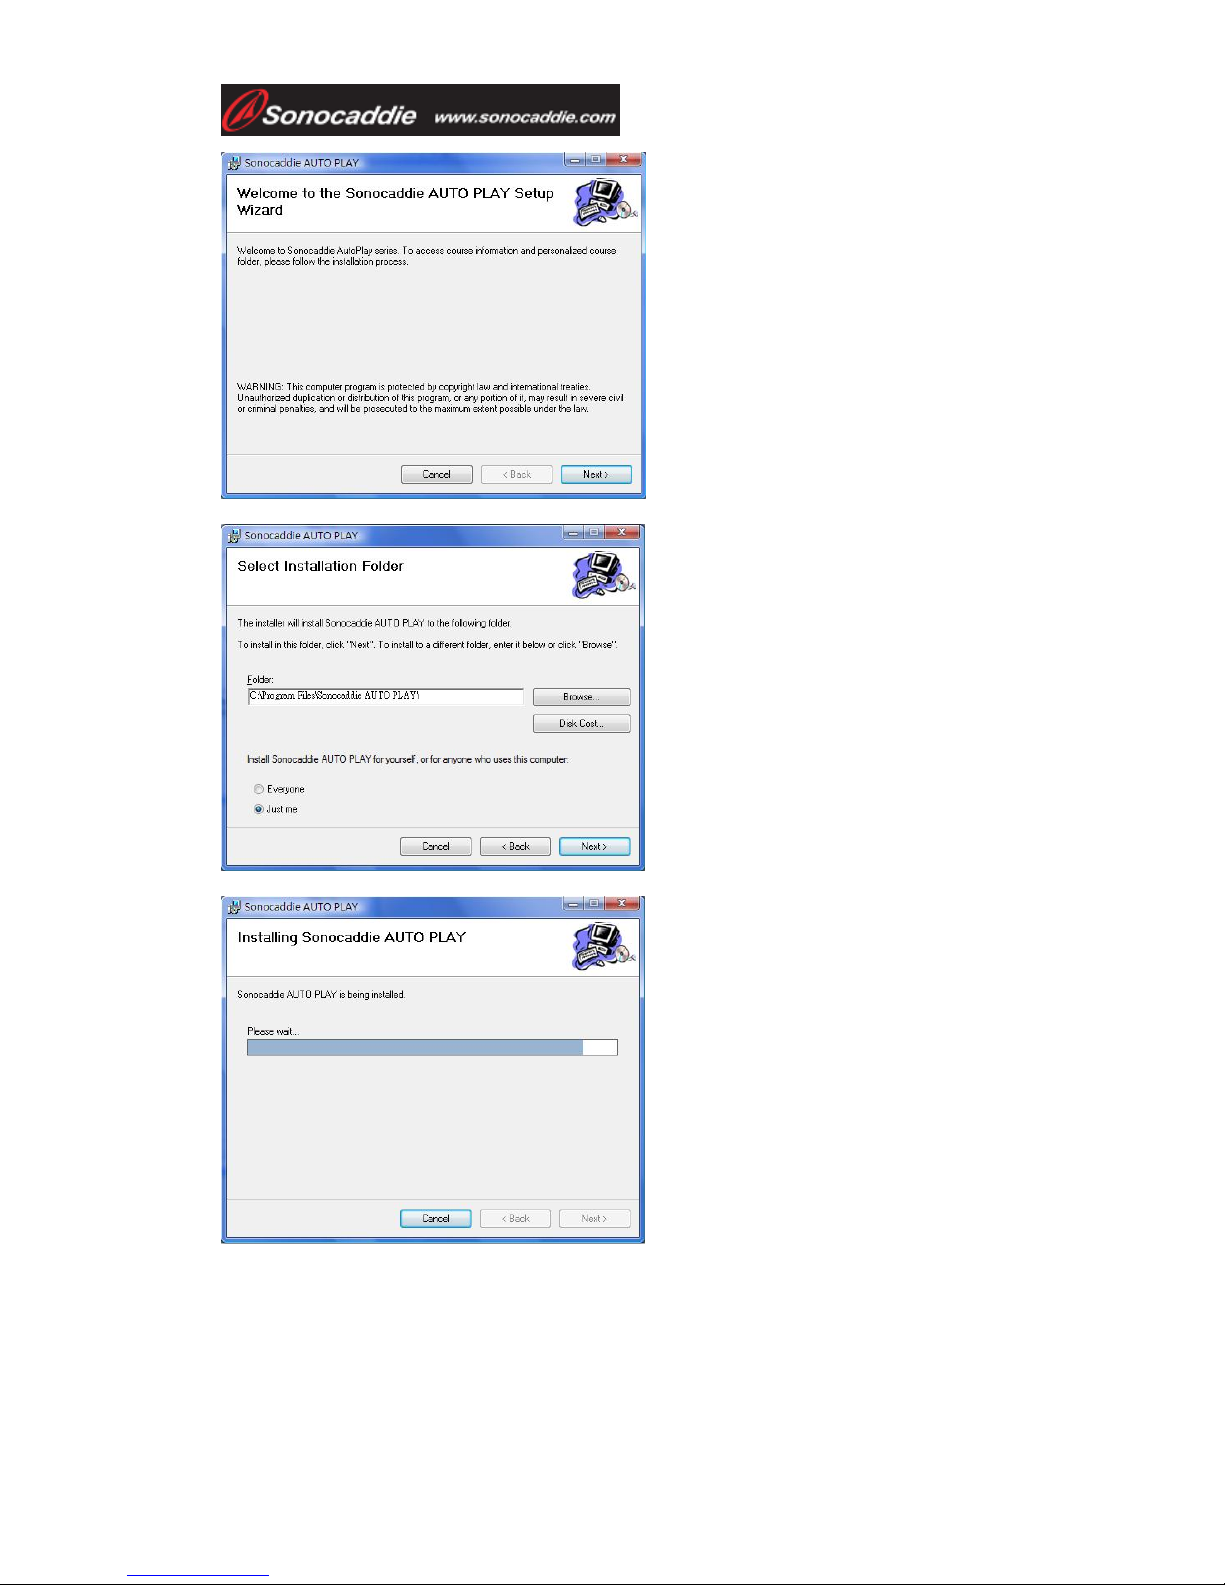
4.1.2 Install “AUTO PLAY Software"in Your Computer
This application software is used for you to access and download course information
and manage your AUTO PLAY personalized course folder. Please install it from
enclosed CD or from website at www.sonocaddie.com.
System Support: Microsoft Windows 2000/ XP/ Vista
1. Follow the instructions displayed on the screen to complete the installation.
Important!
Serial Number (S/N) is required to join
Sonocaddie AUTO PLAY membership.
User’s Guide
This document is the property of Sonostar Inc. Any unauthorized reproduction is prohibited. Page 11
2. After completing installation, please press “Close” to finish. A Sonocaddie shortcut
will appear on your desktop. Double clicking the Sonocaddie shortcut icon will start
“Sonocaddie AUTO PLAY” software.

User’s Guide
This document is the property of Sonostar Inc. Any unauthorized reproduction is prohibited. Page 12
4.1.3 Connect AUTO PLAY and Computer
Step 1. Turn on Sonocaddie AUTO PLAY.
Step 2. Connect the USB Cable between Sonocaddie AUTO PLAY and Computer.
On your Sonocaddie display you will see the message “USB cable connected. Enable
USB link now? ”. Press “YES” (right soft key) to link the unit with your computer.
4.2 Update Course Data
Step1. Open Sonocaddie AUTO PLAY Software and Log in.
Important!
Internet connection is required to log into
AUTO PLAY Software to update course data.
You must fill in your email and password to run
AUTO PLAY Software. This is the same email
address and password you used to create your
member account.
User’s Guide
This document is the property of Sonostar Inc. Any unauthorized reproduction is prohibited. Page 13
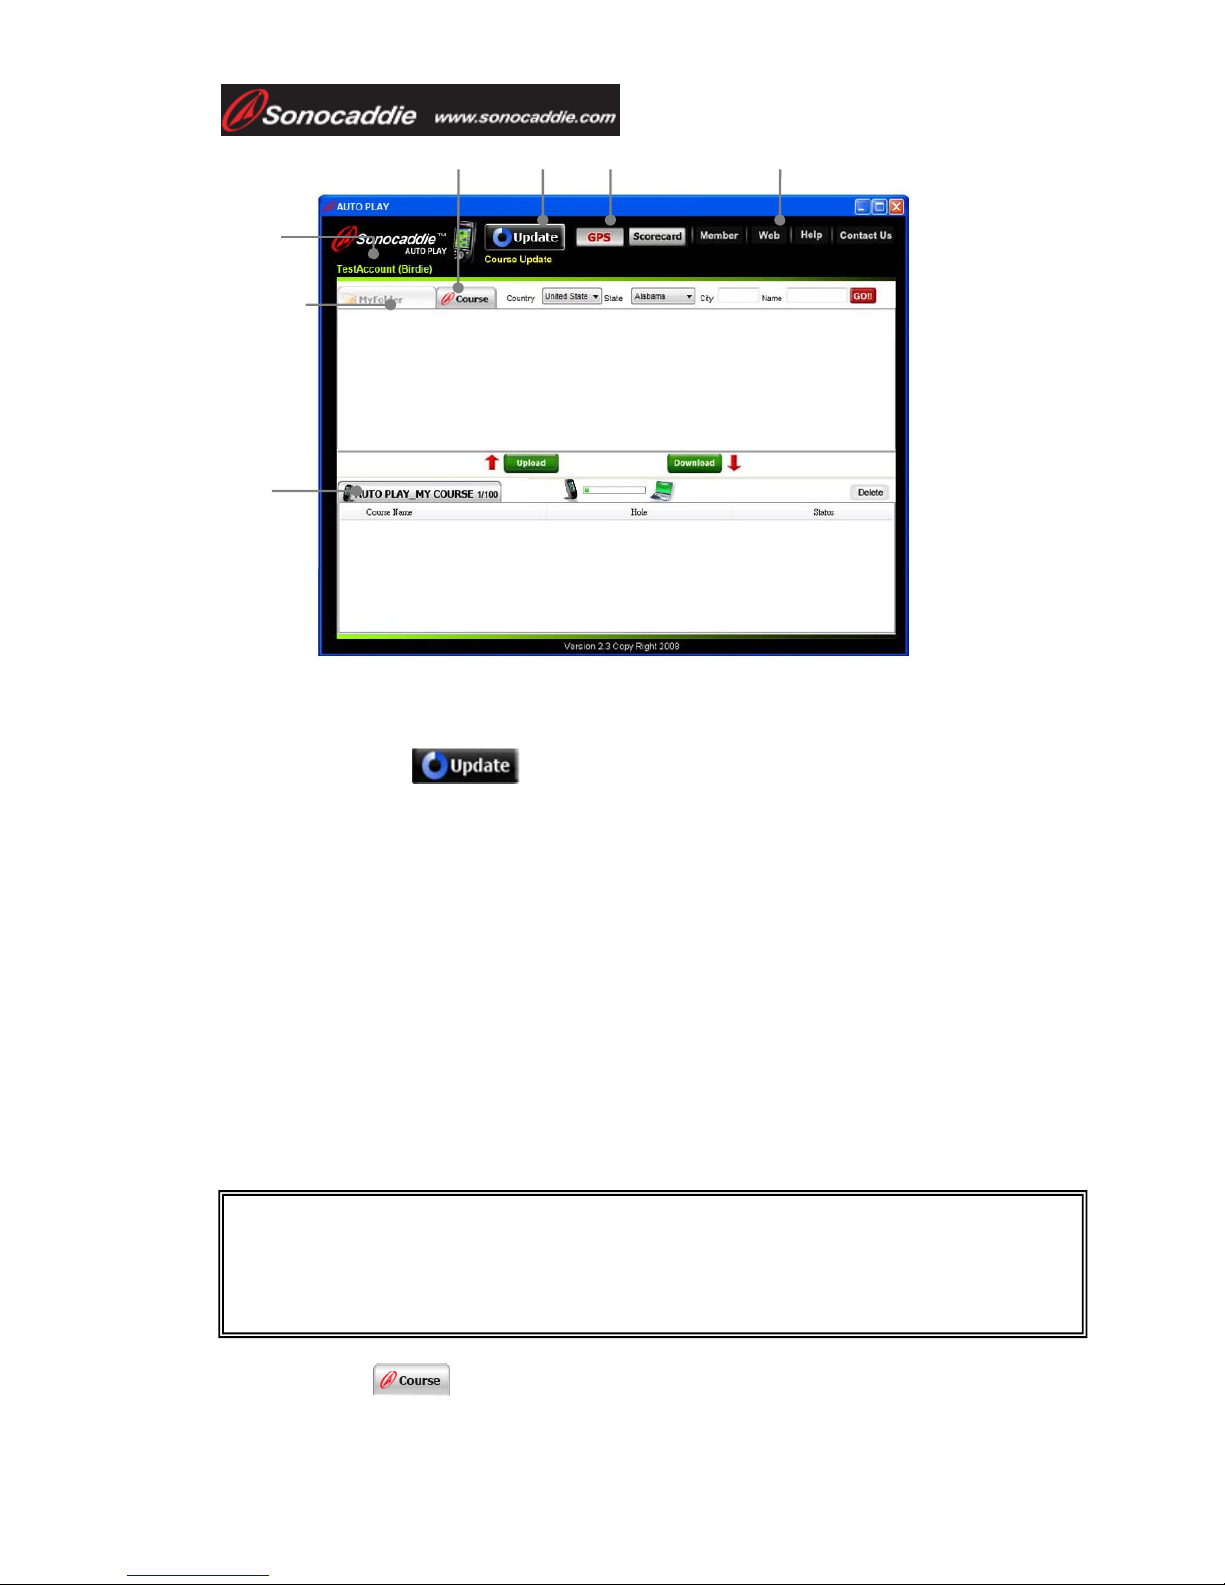
A. Information bar: User’s name/ Type of Membership Plan/ Membership Valid
Period/ Registered Country
B. Update button:
You can update your COURSE LIST by pressing “Update” button when there are
new updated courses available. The update button will only appear on the screen
when there are new courses available in our database.
Steps to update course data:
Step1. Press Update button on the screen. The update process on the computer will
take approximately 15~20 minutes to complete.
Step2. Disconnect the USB Cable between Sonocaddie AUTO PLAY and computer
after the updating process is finished on the software. The device will take few
minutes to update the course data.
Step3. Press “ESC” button after the updating process is finished in the device.
Sonocaddie AUTO PLAY will shutdown automatically.
Step4. Turn on the AUTO PLAY, and the course data will be the most up to date.
C. Course Tab
E.
A.
C.
D.
F. G.
Important!
Please do not disconnect the cable between AUTO PLAY device and computer when
updating.
B.
User’s Guide
This document is the property of Sonostar Inc. Any unauthorized reproduction is prohibited. Page 14
The Course Tab can only update the course information for individually selected
courses. Please see function B. for further information.
4.2.1 Manage data in AUTO PLAY
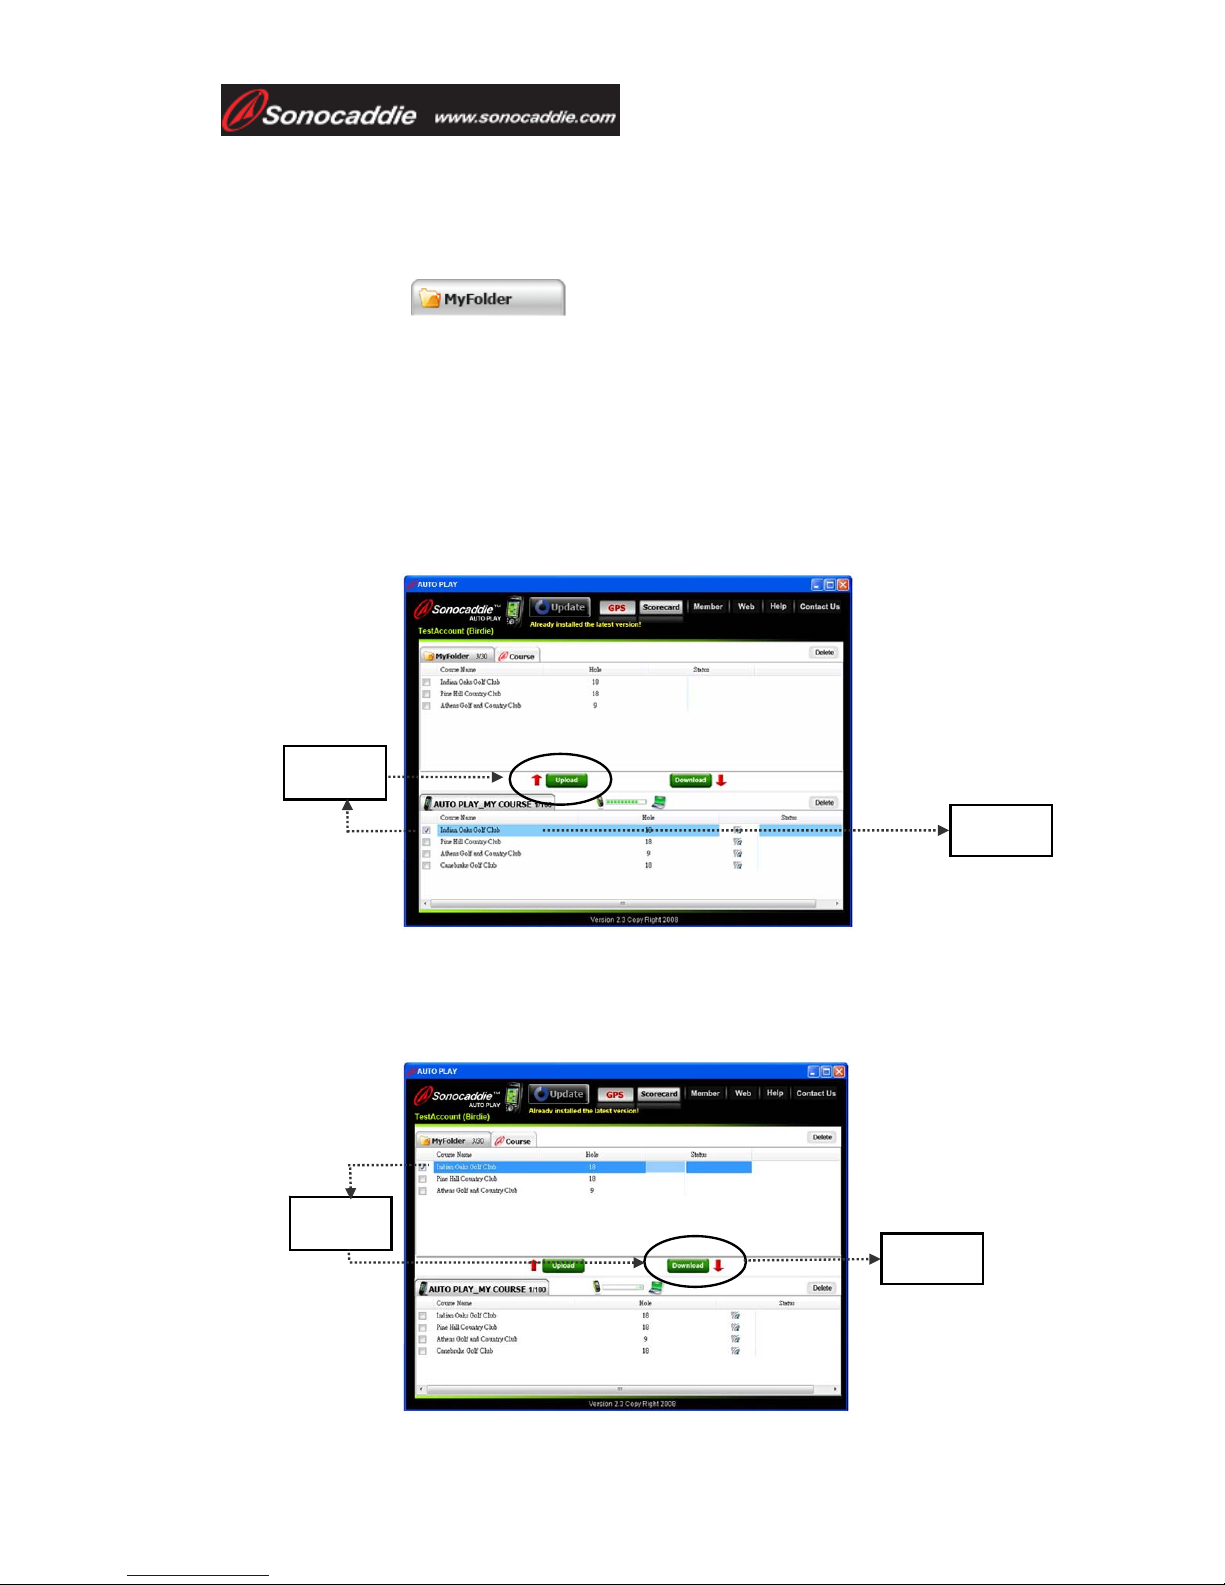
D. My Folder Tab: for uploading or downloading course data.
This is the personal folder to manage your data. You can upload or download GPS
data (30 courses) or Scorecard (100 records) between your AUTO PLAY unit and this
folder. (Par level member has NO access to “My Folder” unless the membership has
been upgraded.)
Steps to upload course data from Sonocaddie AUTO PLAY to MyFolder:
Step1. Select the specific course in your device.
Step2. Press “Upload” to upload course data to MyFolder.
Steps to download course data from MyFolder to Sonocaddie AUTO PLAY:
Step1. Select the specific course in MyFolder.
Step2. Press “Download” to download course data to Sonocaddie AUTO PLAY.
Step 1
Step 2
Step 2
Step 1

User’s Guide
This document is the property of Sonostar Inc. Any unauthorized reproduction is prohibited. Page 15
E. AUTO PLAY Tab:
When linking with AUTO PLAY device, the course data/ scorecard in “MY
COURSE” is ready to be uploaded, deleted, renamed and reviewed (scorecard record
only).
-Upload: You can upload the Scorecard (up to 100 records) data to “My Folder” tab.
-Delete: Check the box beside the course data/scorecard you wish to delete, and press
“Delete” button to remove the data.
-Rename: Double click the data name to rename.
-Review (scorecard only): Review scores and analysis of your round(s).
Note: Please do not disconnect the USB cable between AUTO PLAY device and
computer when transferring data.
F. GPS/ Scorecard buttons on the top of the display:
These buttons bring up the course data from your Sonocaddie AUTO PLAY unit. You
can switch to review GPS and Scorecard data simply by pressing the buttons.
To review scorecard record, please press
“Scorecard” button on the top of the
display, then check the record you want to
review. Press the “Review” button, and the
scores and analysis will show on the
display for you to review your game.
You can review the scorecard records both
in “AUTO PLAY” tab and “My Folder”
tab.
This picture indicates this specific golf course has scorecard information.
This picture indicates this specific golf course has GPS information.

User’s Guide
This document is the property of Sonostar Inc. Any unauthorized reproduction is prohibited. Page 16
Note: Please do not disconnect the cable between AUTO PLAY device and computer
when transferring.
G. More functions:
Pressing the function buttons at the top-right of the screen will link you to the
Sonocaddie AUTO PLAY website for further information and assistance.
Chapter 5. Starting a game
5.1 Start with Existing Courses
5.1.1 Course Auto Search
Select “AUTO SEARCH” from the “Main” menu to enter the searching function.
Select a range from 5 miles to 50 miles, and all courses within the area will be
displayed. The nearest course will be on top of the list. (NOTE: If a course is not
displayed it is not in your AUTO PLAY Unit. See Section 4.2.B to update your
us map this course for you.)Press “More” to select the course you want to play or
arrange the order of courses by distance or by course name.
Important !
If your membership has expired, access to AUTO PLAY Software will not be allowed
unless the membership is renewed. The Sonocaddie system will remind you by email
prior the expiration date. For further information or assistance, please go to
www.sonocaddie.com or email to [email protected] for help.
GPS
GPS
Important!
When you are in the “AUTO PLAY” tab and press the “GPS” button, the “My Folder”
tab will also switch to GPS data. When pressing the “Scorecard” button, both “AUTO
PLAY” and “My Folder” tab will also switch to scorecard data.
Important!
If you want to edit the selected course, by pressing “COPY”, the selected course
will be copied into MY COURSE for you to edit the reference points.

User’s Guide
This document is the property of Sonostar Inc. Any unauthorized reproduction is prohibited. Page 17
Note: This function can only be activated when there is GPS reception.
5.1.2 Search Courses from COURSE LIST (Manual Search)
Select “COURSE LIST” from “Main” menu to enter the searching function. There are
two methods for you to search your course from all available courses preloaded in the
device:
1. By Country: All the courses are listed by country. You can find your course
by selecting “Country”, “State” and “City”. Press “SEARCH” button after every
selection, then you will see all the available courses within the area.
2. By History: Previous play will automatically add to COURSE LIST sorted
by history. This function can memorize the last 30 courses.
5.1.3 Auto Hole
First, user must select the starting hole manually. After finishing a hole and entering
the next tee box, the Auto Hole function will advance to the next hole automatically.
Important!
You must select a course and a hole first. Then, SCORECARD function and reference
points function can be used.
Hole selection
button
Important!
If you want to edit the selected course, by pressing “COPY”, the selected course
will be copied into MY COURSE for you to edit the reference points.

User’s Guide
This document is the property of Sonostar Inc. Any unauthorized reproduction is prohibited. Page 18
5.2 Course Management forAUTO PLAY device
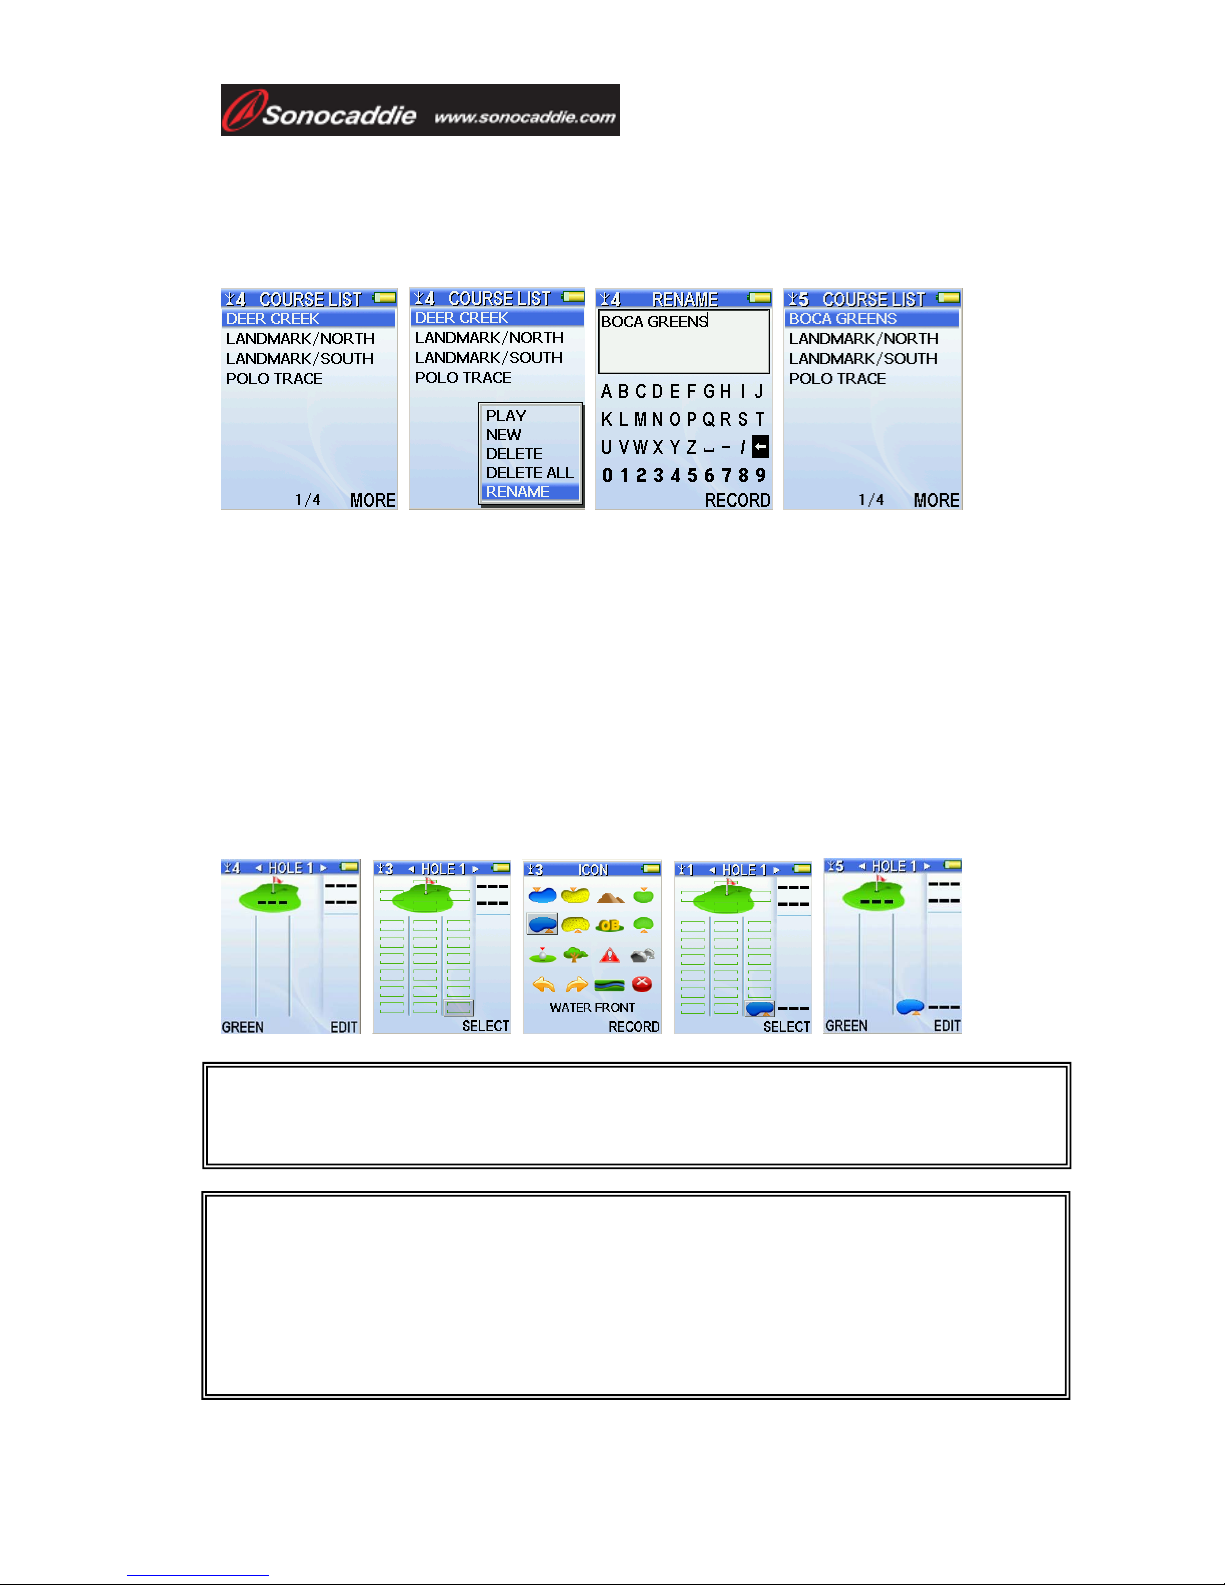
5.2.1 Create a New Course
5.2.2 Delete a Course
From the “COURSE LIST” screen, select a course name, and press “MORE”. Select
“DELETE/DELETE ALL” to delete the selected course or to delete all courses at
once. When the confirmation dialog box opens, press “YES” to confirm or “NO” to
go back. Once “YES” is selected, the course information and all reference points will
be deleted permanently.
Select “MY COURSE” from the “Main” menu and
press “MORE” to select “NEW” after you entered the
course list.
Key in the course name by using the 5-way key. Then
please press “Record” to save it. The new course you
created will show on the course list right away.
Important!
The user can choose to change holes manually at anytime using the” Hole
Selection” button, or by scrolling left or right through the holes using the “5 way”
key.
Auto Hole function can be turned on/off from “SETTINGS”.
User’s Guide
This document is the property of Sonostar Inc. Any unauthorized reproduction is prohibited. Page 19
5.2.3 To Rename a Course
From the “COURSE LIST” screen, select the course you wish to rename. Press
“MORE” and select “RENAME” from the pop-up list using the 5-way key. To
rename, use the 5-way key to edit the course name.
5.3 Adding New Reference Points
Users can record reference points on the course while playing.
5.3.1 Mapping a hole
Bring up the “Course info” screen. Standing at the reference points which you would
like to add, press “EDIT”, and navigate the cursor to the appropriate location on the
screen. Press “SELECT” to go to the “ICON” screen. Choose the correct icon for the
new reference point, and while standing still, press “RECORD”. Press “Esc” key to
complete the mapping and return to the Course Layout Screen.
Important!
Sonocaddie performs best under clear sky. Furthermore, 6 satellite signals should be
sought, it might be necessary to wait for these to be registered.
Important!
Each row only allows one reference point. Maximum of 10 reference points per
hole-(on/off fairway, Green Front/Back and next to Green) can be recorded. It is suggested
that each reference point should be recorded based on the order of course features for that
hole. All reference points’ distance will disappear when standing within 5 yards. To record
a reference point, the player must stand still for 5 seconds at the reference point before
pressing “Record”. The yardage will show “0” right away when you press record.
User’s Guide
This document is the property of Sonostar Inc. Any unauthorized reproduction is prohibited. Page 20
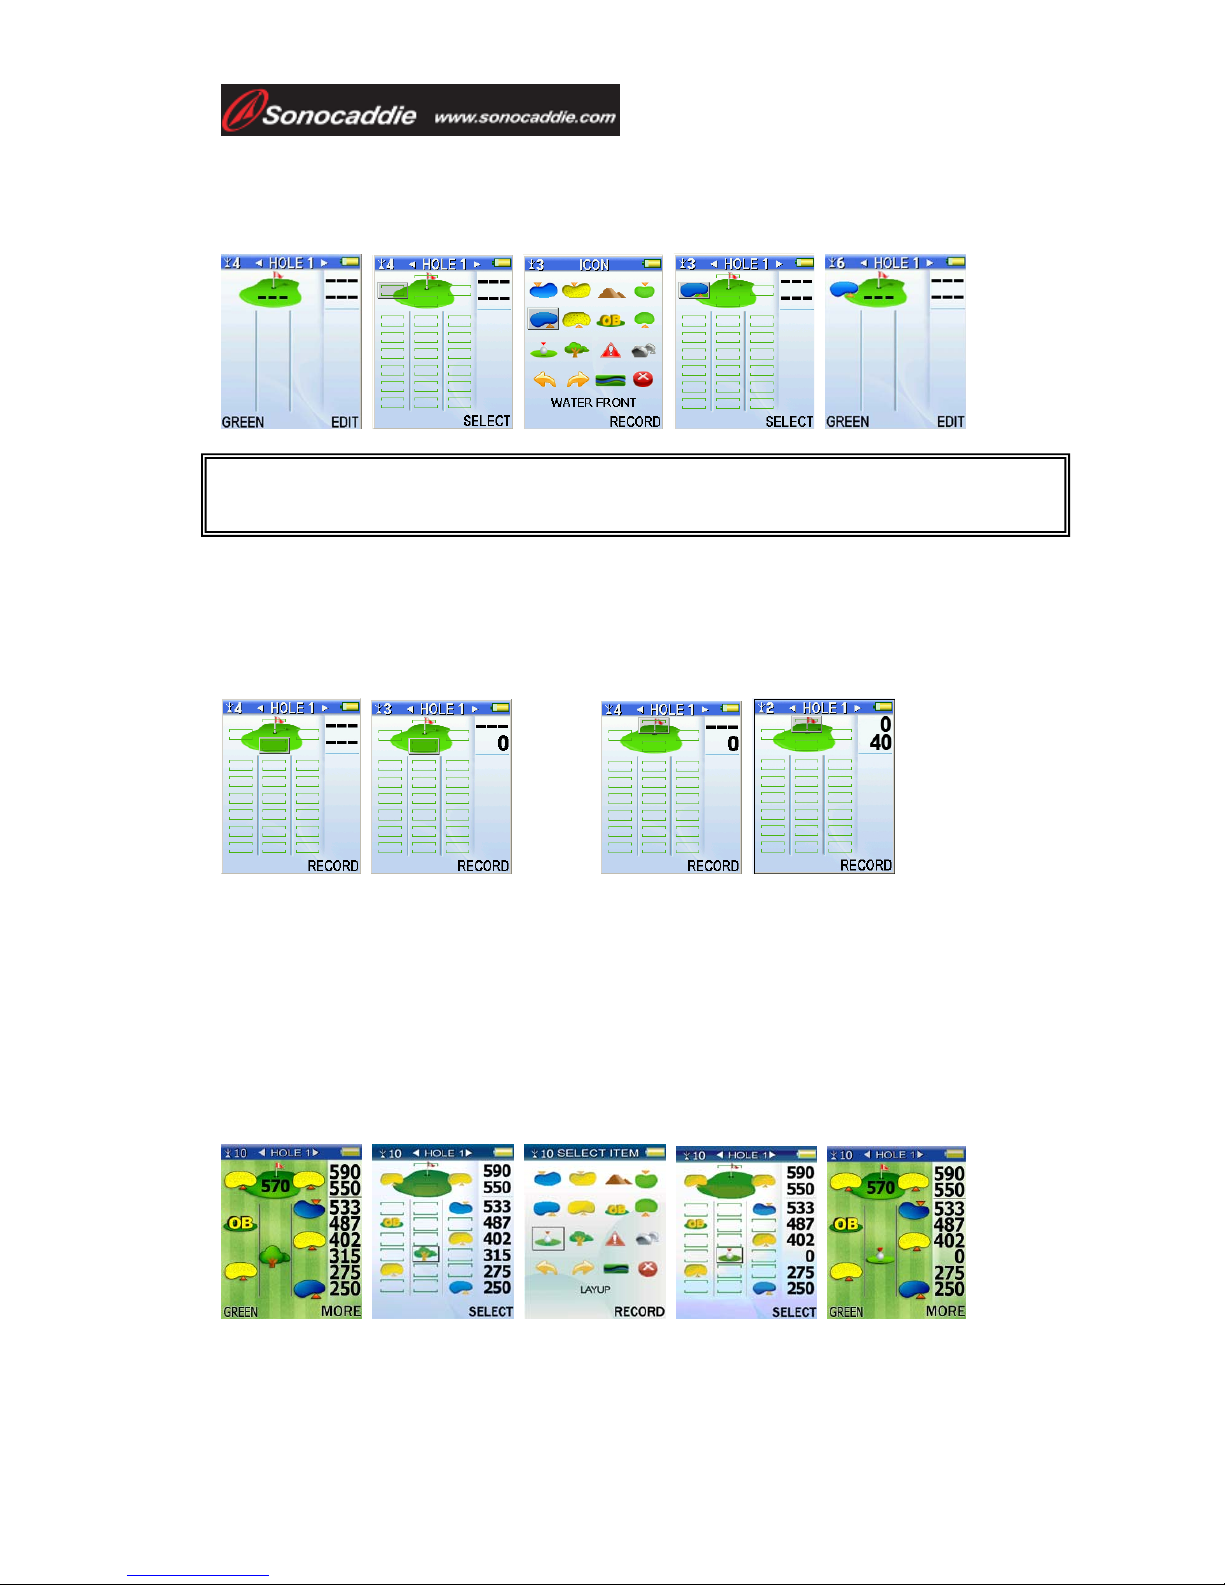
5.4 Reference Points next to Green
To add icons to the side of the green, (for example, add a water icon to the left of the
green) press “SELECT” (right soft key) and then choose from the icons.
5.5 Reference Points on Green
To add Green reference points, stand at the front or back of the green, select the Green
front or back icon and press “RECORD” to record the coordinates.
Add Green Front: Add Green Back:
5.6 Editing Reference Points
Users can edit existing reference points according to their preference while playing on
the course.
If the icon on the screen of the actual course is incorrect and needs to be changed,
stand at the reference point, press “EDIT” and choose the particular reference point
icon that requires editing. Then press “SELECT” and choose one icon from the icon
page. Press “RECORD” and the icon is now changed to the new icon.
If the Sonocaddie shows an incorrect distance to the course feature, users can update
the new coordinates by standing at the reference point, pressing “EDIT” and choosing
Important!
These two reference points do not provide any distance yardage.
This manual suits for next models
1
Table of contents
Other Sonocaddie GPS manuals

Sonocaddie
Sonocaddie V500 User manual

Sonocaddie
Sonocaddie V300 User manual

Sonocaddie
Sonocaddie XV2 User manual

Sonocaddie
Sonocaddie V5000 User manual

Sonocaddie
Sonocaddie V300 User manual

Sonocaddie
Sonocaddie V500 User manual

Sonocaddie
Sonocaddie V500 User manual

Sonocaddie
Sonocaddie AUTO PLAY User manual

Sonocaddie
Sonocaddie V350 Series User manual

Sonocaddie
Sonocaddie V300 User manual


