Sonocaddie V300 User manual

User’s Guide
This document is the property of Sonostar Inc. Any unauthorized reproduction is prohibited Page 1
Sonocaddie V300
Golf GPS
V3.A.0.6_E
User’s Guide
Sonostar Inc.

User’s Guide
This document is the property of Sonostar Inc. Any unauthorized reproduction is prohibited Page 2
Welcome
Congratulations on purchasing the Sonocaddie V300. It is the easiest and most advanced golf GPS
device available today with its intuitive and user-friendly design that includes many helpful
functions and multiple ways of navigating. This User’s Guide provides you with simple to
understand instructions for operating your new golf GPS. Please read the entire User’s Guide to
fully understand exactly how each feature operates. To learn more about Sonocaddie, please visit
www.sonocaddie.com.
The Sonocaddie V300 serves as your own personal golf caddie guiding you through each hole on
the course to get the precise distance information for you to play your best. Using sophisticated
GPS satellite technology, the V300 determines the distance from any point on the course to the
green and other strategic targets, even without a clear line of sight like all golf laser range-finders
require. All you have to do to get this valuable information at your fingertips is download a
particular golf course that you plan to play into the V300 from the Sonocaddie website using your
computer.
Accessories: You should have received the following items with your Sonocaddie package:
Sonocaddie V300, Mini USB Cable, Rechargeable Battery, User’s Guide, Belt Clip, AC Charger
Wall Adaptor, and Carry Pouch.
Important Notice: Please read and follow the guidelines below. Failure to do so may result in
misuse of the equipment and may be dangerous or illegal. Should you experience any problems
with your Sonocaddie (e.g. malfunction/damage), please contact Sonocaddie Customer Service at
www.Sonocaddie.com. Do not attempt any repairs on your own as this may void the warranty.
Warnings:
¾Sonocaddie performs best under a clear sky and with six satellite signals. Environmental
factors (such as rain, dense clouds, fog, solar flares, high voltage electricity, cellular phone
towers, etc.) may adversely affect the GPS reception. If the device is indicating less than six
satellite signals, the Sonocaddie performance may not be optimal until the conditions change
for better reception.
¾Sonocaddie should not be used while driving any vehicle including golf carts. Always place
Sonocaddie in a secure place to avoid any impact which could cause damage to it.
¾The USB cable provided is solely for the use of Sonocaddie devices (see the accessory list).
Do not connect any other cable for data transfer as this could damage the data port (I/O port)
on the V300.
¾A full battery charge may take up to four hours, however, you should NOT charge device over
8 hours.
¾If you do not plan to use the device for a long period of time, please remove the battery to
avoid the battery leaking and corroding the battery case.
Cautions:
¾The Sonocaddie may take at least 10-15 minutes to receive satellite signals after you turn it on.
This may take longer if the devise has been off for more than four hours, or if it is more than
100 miles away from where you last used the Sonocaddie.
¾The Global Positioning System (GPS) is operated by the government of the United States,
which is solely responsible for its accuracy and maintenance. The system is subject to changes
which could affect the accuracy and performance of all GPS equipment.
¾Sonocaddie has a built-in GPS antenna at the top of the device. This antenna should face

User’s Guide
This document is the property of Sonostar Inc. Any unauthorized reproduction is prohibited Page 3
upward to gain the best signals and should not be covered with anything as this may affect the
quality of reception and accuracy of the device.
¾Trees and/or buildings may adversely affect coverage/reception levels and accuracy. Optimal
performance will occur by staying in wide open areas.

User’s Guide
This document is the property of Sonostar Inc. Any unauthorized reproduction is prohibited Page 4
Table of Contents
Chapter 1 - Getting Started.................................................................................................................... 6
Chapter 2 – Introduction........................................................................................................................ 6
2.1 Sonocaddie Features................................................................................................................. 7
2.2 Navigation.................................................................................................................................. 8
2.3 Sonocaddie V300 Main Screen................................................................................................. 8
2.3.1 Menu Items (The applicable chapter sections are noted in parenthesis.)...................... 8
2.2.2 Screen Display Items...................................................................................................... 9
Chapter 3 - Before Starting a Game...................................................................................................... 9
3.1 Adjust the Sonocaddie V300 Settings...................................................................................... 9
3.2 Launch the Sonocaddie V300 Software on Your Computer................................................. 9
3.2.1 Obtain a Sonocaddie Membership............................................................................... 9
3.2.2 Install the Sonocaddie V300 Software and Login..................................................... 10
3.3 Download Courses into the Sonocaddie V300...................................................................... 11
3.3.1 Connect the Sonocaddie V300 to Your Computer.................................................... 11
3.3.2 View the Sonocaddie V300 Software for the First Time.......................................... 11
3.3.2 Download Courses You Plan to Play.......................................................................... 13
Chapter 4 – Starting a Game............................................................................................................... 13
4.1 Select a Course to Play ........................................................................................................... 14
4.2 Select the First Hole................................................................................................................ 14
4.3 Understanding the Hole-Layout and Hole-Info Screens..................................................... 14
4.4 Carrying the Sonocaddie V300.............................................................................................. 15
Chapter 5 – Using the Sonocaddie V300 during a Round................................................................. 16
5.1 View the Green Close-Up....................................................................................................... 16
5.2 Track Your Game Feature..................................................................................................... 16
5.2.1 Shot Track .................................................................................................................... 17
5.2.2 Auto Track.................................................................................................................... 17
5.3 Measure your Shot Distance.................................................................................................. 17
5.4 Use the Digital Scorecard....................................................................................................... 18
Chapter 6 – Editing an Existing Course............................................................................................. 19
6.1 Understanding the Edit Screen.............................................................................................. 19
6.2 Edit an Existing Target on a Hole......................................................................................... 20
6.3 Add a New Target to a Hole................................................................................................... 20
6.4 Delete a Target on a Hole....................................................................................................... 21
Chapter 7 – Managing Course Information on the Sonocaddie V300............................................. 21
7.1 Delete a Course........................................................................................................................ 21
7.2 Rename a Course .................................................................................................................... 21
7.3 Create a New Course .............................................................................................................. 22
7.3.1 Name the New Course ................................................................................................. 22
7.3.2 Map the Targets on the New Course.......................................................................... 22
Chapter 8 – Review Stored Information after the Round................................................................. 23
8.1 Use the Sonocaddie V300 to Review Information................................................................ 23
8.1.1 Review Prior Scorecards............................................................................................. 24
8.1.2 Review Prior Tracks.................................................................................................... 24
8.1.3 Delete Prior Scorecards and Tracks........................................................................... 24
8.2 Use the V300 Software to Review Information.................................................................... 24
8.2.1 Manage Course Information under the V300 Tab ................................................... 26
8.2.2 Manage Course Information under the MyFolder Tab........................................... 26

User’s Guide
This document is the property of Sonostar Inc. Any unauthorized reproduction is prohibited Page 5
Appendices............................................................................................................................................. 27
Frequently Asked Questions (FAQs)................................................................................................... 29
Regulatory Agency Compliance ............................................................................................................. 31
User’s Guide
This document is the property of Sonostar Inc. Any unauthorized reproduction is prohibited Page 6
Chapter 1 - Getting Started
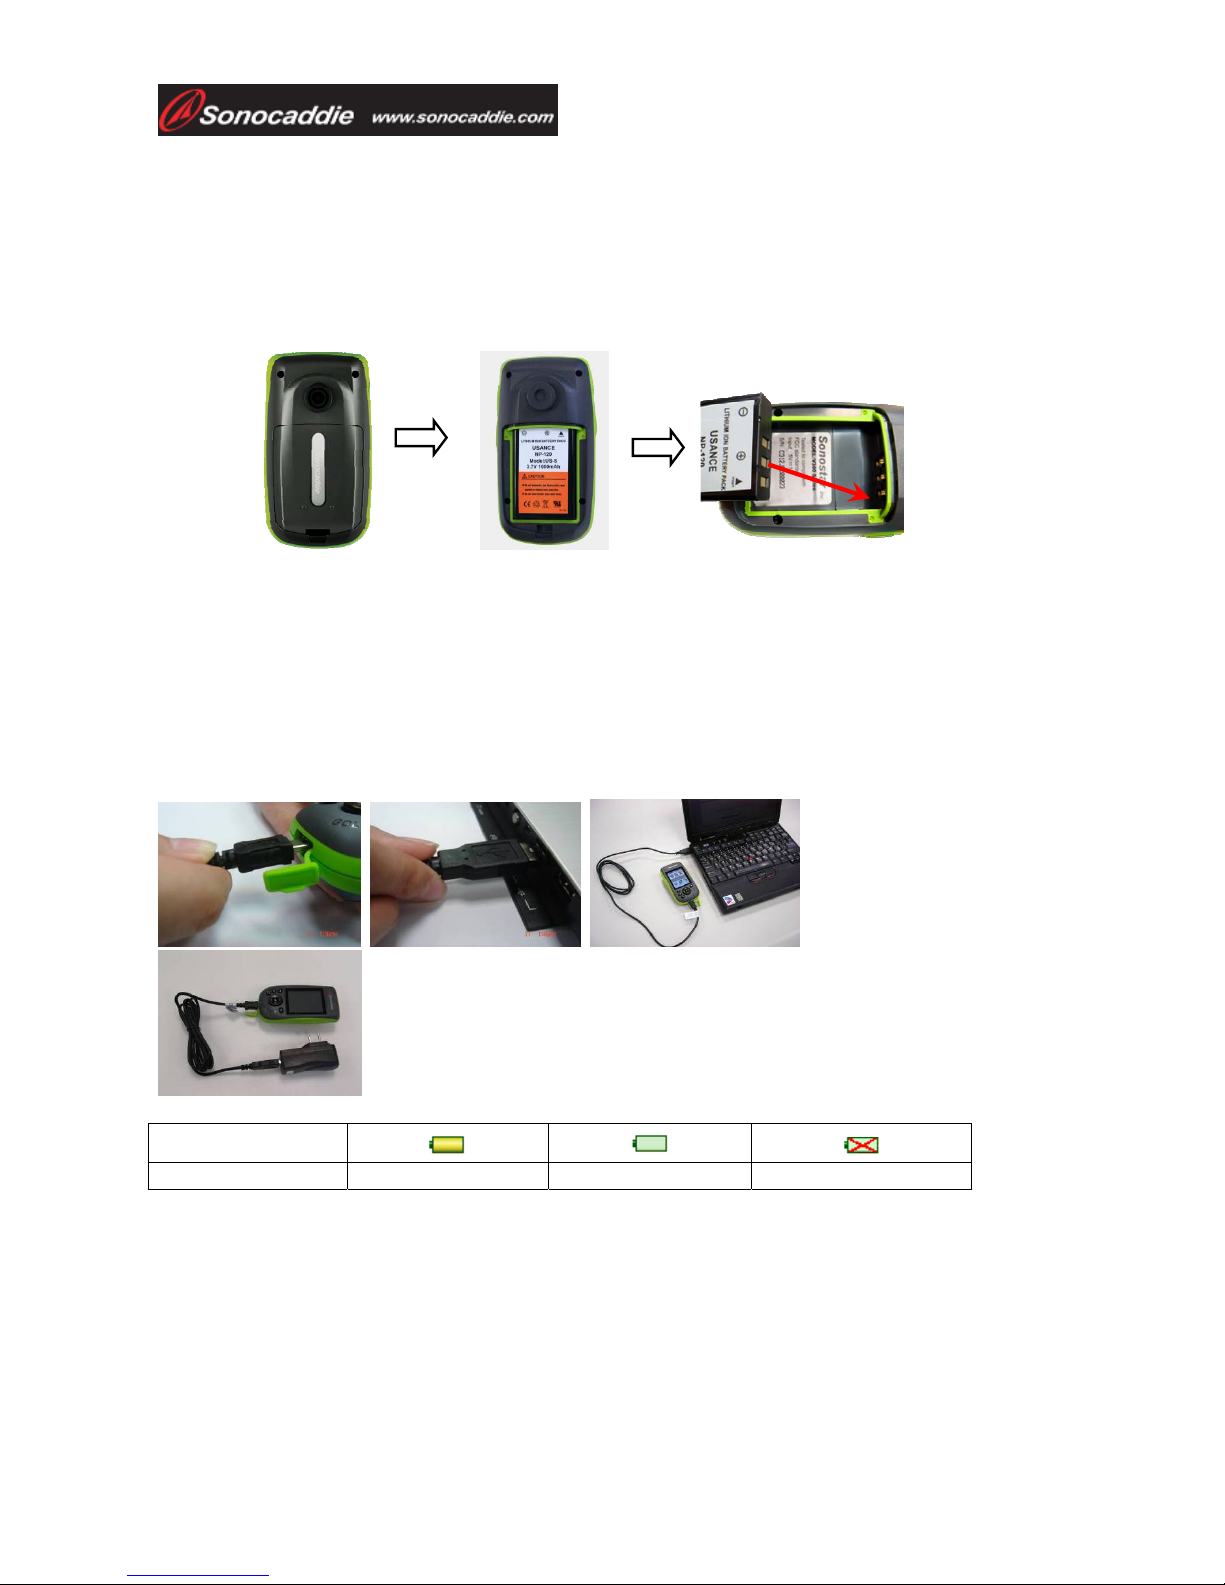
Before using the Sonocaddie V300 for the first time, charge the battery for at least 4 hours. Under
normal conditions, a full battery charge may take up to 4 hours if the device is turned off, and
longer if it is turned on for use. To charge the V300, remove the back cover and insert the supplied
rechargeable battery correctly as shown.
Warning: We recommend that you never charge the device over 8 hours.
Locate the charging/data port on the bottom of the V300, pull out the rubber cover, and carefully
insert the mini-end of the supplied USB cable into the port. Connect the other end of the cable to the
USB port on your computer. (Fig. 1, 2, 3)The screen indicates that the device is charging and also
when it has reached a full charge. You can also charge the device with the supplied AC Wall
Charger Adapter or an optional 12V Car Adapter (Fig. 4).
The battery should last approximately 12 hours under normal operation. Please note that using
longer “Backlight” durations in the Settings will drain the battery quicker. You can confirm the
remaining battery level with the V300 on-screen battery gauge.
(Fig. 1, 2, 3)
(Fig. 4)
Scale of power
Conditions Full Empty No battery *
* Indicates a problem: (1) No battery in the device. (2) Battery is not inserted correctly. (3) Battery is defective.
Chapter 2 – Introduction
The Sonocaddie V300 has many unique and useful features to help you earn your best scores ever
as shown below. The Course Layout is a patented 3-D color view of each hole that allows you to
see your exact position on every hole in real time and the precise distances to critical targets. The

User’s Guide
This document is the property of Sonostar Inc. Any unauthorized reproduction is prohibited Page 7
Green View displays a full green image with distances to the front, middle and back of the green.
The Edit and Map functions let you quickly customize or create a golf hole right on the spot. The
Mark function provides an easy way to quickly measure the distance of any shot. The Track Shot
function gives you the ability to record your shot locations from anywhere on the course for review
later. And the Scorecard feature provides a digital scorecard for each course and the “Pro”
Scorecard gives a full analysis of each round. The V300 has enough memory to store 30 different
golf courses, record 100 scorecards, and track the golf shot locations for up to 100 rounds.
2.1 Sonocaddie Features
Left-side View Right-side View
1. GPS Antenna
2. Power Button
3. Scorecard Button
4. Color LCD Screen
5. Left Soft Key
6. Escape Key
7. Hole Selection Key
8. USB Cable & Charging Port
9. Shot Track Button
10. Mark Button
11. Right Soft Key
12. 5-Way Key
13. Belt Clip Hook
14. Battery Cover

User’s Guide
This document is the property of Sonostar Inc. Any unauthorized reproduction is prohibited Page 8
2.2 Navigation
Navigating the Sonocaddie is simple. All functions are available from the main screen using the
front panel soft keys. In addition, the left and right side buttons provide a quick way to access
frequently used features.
z5-Way Key – use the 5-Way key (#4) to move the screen cursor and select menu
items. Press the up/down or left/right arrows to scroll the cursor around the screen
and press the center key to execute a highlighted selection.
zFront Panel Soft Keys – use the right soft key (#3) or use the left soft key (#7) to
select the action shown directly above those keys. Use the Escape key (#6) at any
time to return to the previous screen, or hold it down for three seconds to return to
the MAIN screen.
zSide Buttons – side buttons provide access to popular functions. Press the left
“Scorecard” button (#10) to instantly bring up a digital scorecard. Press the top right
“Shot Track” button (#11) to record your shot location on that hole. Press the lower
right “Mark” button (#12) to measure your shot length.
2.3 Sonocaddie V300 Main Screen
To turn on the Sonocaddie V300, press the top left-side Power button (#9) for at least 3 seconds.
After a few seconds, the “MAIN” screen below appears on the device. To turn off the Sonocaddie,
press the Power button again for 3 seconds, or select “OFF” from the “MAIN” screen. When the
“Shutdown Now?” screen appears, press “YES” with the right soft key.
2.3.1 Menu Items (The applicable chapter sections are noted in parenthesis.)
yGPS Status: Use this feature to get detailed information about satellite reception (Appendix).
yScorecard: Use this feature to get a digital scorecard and view an analysis of your round. (5.4)
ySettings: Use this feature to customize the Sonocaddie settings to your individual preferences.
(3.1)
yMap New: Use this feature to map a new course that’s not in the Sonocaddie database yet. (7.3)
yPlay: Use this feature to select a course to play from the list of courses you downloaded. (4.1)
yMark: Use this feature to measure the distance of any shot. (5.3)
yOff: Use this feature to turn off the Sonocaddie. (2.3)
yTrack Review: Use this feature to view all the shot locations by hole that you recorded during a
game. (8.1)
yInfo: Use this feature to review the software version number for the Sonocaddie.
Satellite Reception MAIN Battery Life
GPS STATUS SCORECARD SETTINGS
MAP NEW PLAY MARK
OFF TRACK REVIEW INFO
Time Display
Left Soft Key Action
MENU TEXT
Right Soft Key Action
User’s Guide
This document is the property of Sonostar Inc. Any unauthorized reproduction is prohibited Page 9
2.2.2 Screen Display Items
ySatellite Signal: Displays the current number of satellites the Sonocaddie is receiving.
yBattery Level: Displays the amount of battery life remaining.
yTime Display: Displays the current time on the Main Screen only.
ySoft Keys: Displays the action that is available by selecting the right or left soft key.
Chapter 3 - Before Starting a Game
3.1 Adjust the Sonocaddie V300 Settings
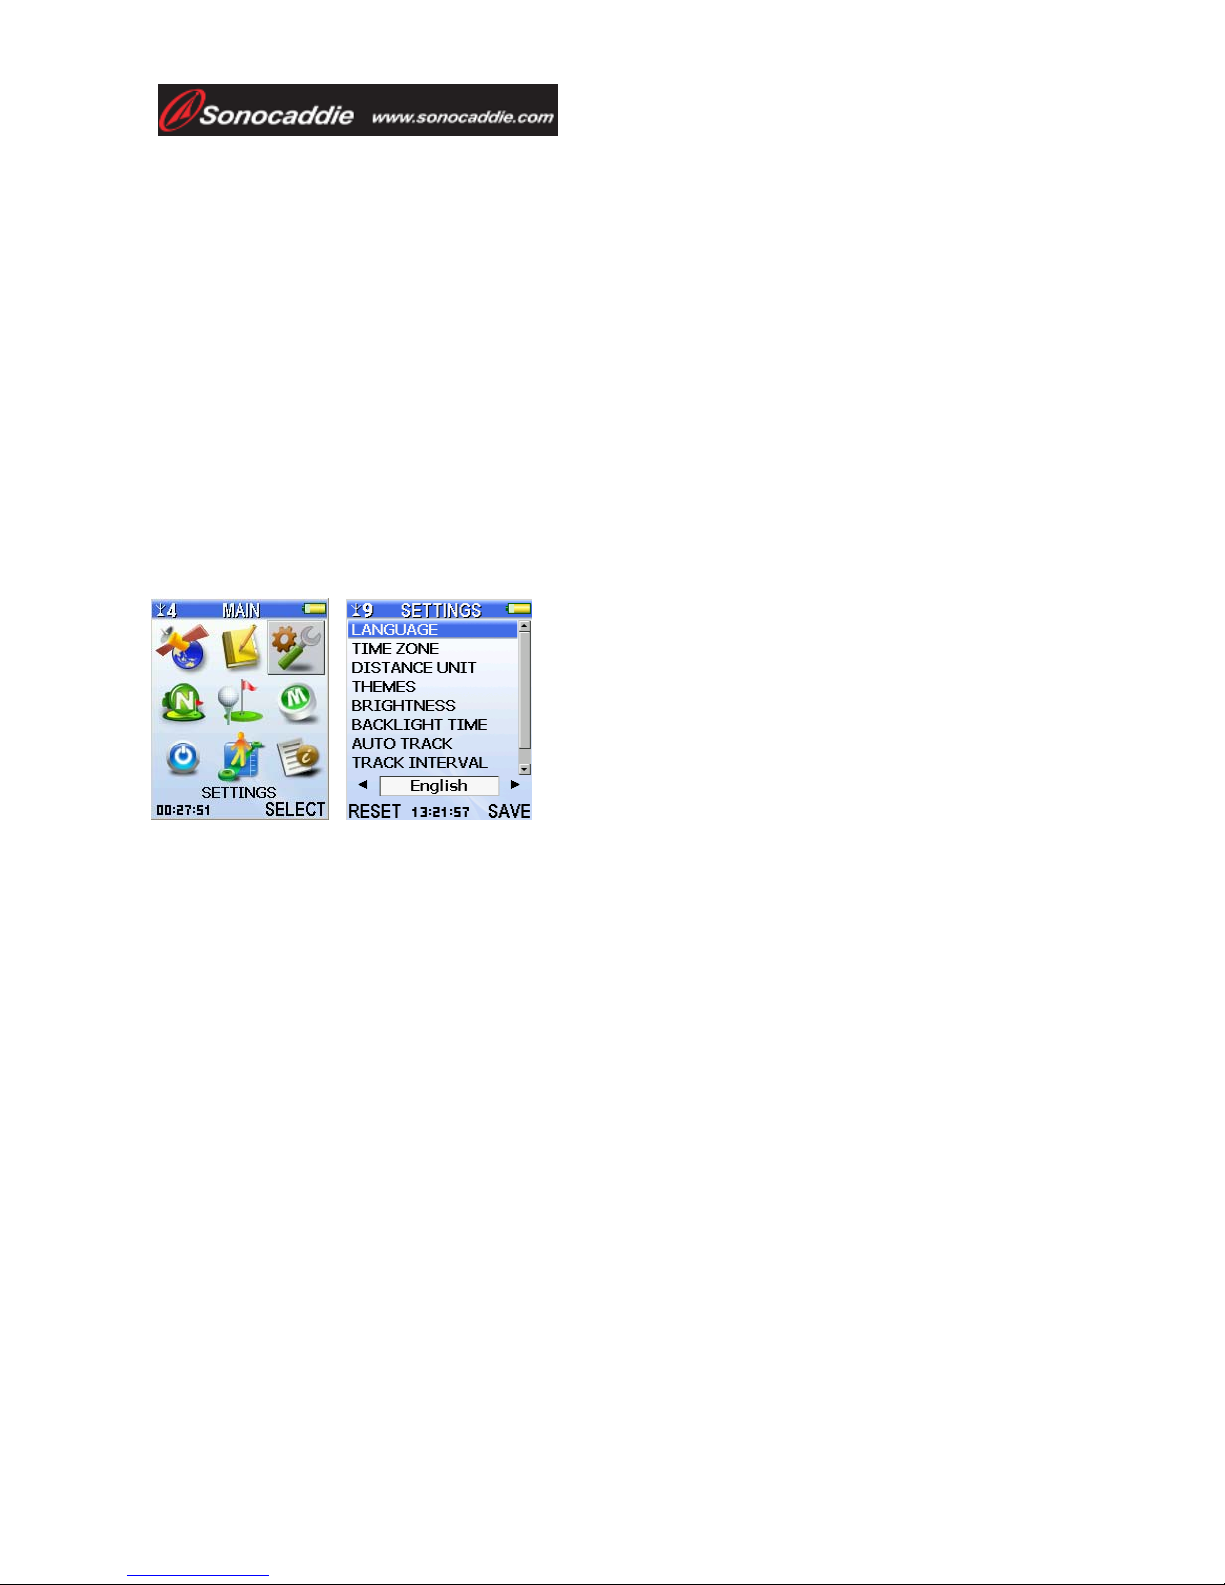
The Sonocaddie has ten settings to customize your device. Follow these steps to change the settings;
1) Select “SETTINGS” from the “MAIN” screen.
2) Press the up/down buttons on the 5-way key to scroll down through each setting.
3) Press the left/right buttons on the 5-way to scroll through the available options for that setting.
4) To exit the screen without changing the settings, press the “ESCAPE” key on the front key pad.
5) To save settings, press center key on the 5-way key, or select “SAVE” with the right soft key.
6) To return to the default factory settings, press “RESET” with the left soft key.
3.2 Launch the Sonocaddie V300 Software on Your Computer
The Sonocaddie V300 Software allows you to download specific course information into the device
and gives you complete access to all of the personalized course information stored in your V300.
Use the enclosed CD to install the software on your computer. You may also download the V300
software and User’s Guide from the Sonocaddie website at www.sonocaddie.com. The software
supports Microsoft Windows 2000, XP and Vista.
3.2.1 Obtain a Sonocaddie Membership
To download courses from the Sonocaddie database, you must have a Sonocaddie membership
account and internet access. Simply obtain a membership from Sonocaddie at
LANGUAGE:English/ French/ Deutsch/ Spanish/ Simplified Chinese/ Japanese/ Traditional Chinese
TIME ZONE: Set the correct time to your time zone.
DISTANCE UNIT: YARD / METER / MILE / KILOMETER
THEMES: BLUE / PURPLE / GREEN / ORANGE
BRIGHTNESS: OFF / 1 / 2 / 3 / 4 / 5
BACKLIGHT TIME: ALWAYS / 15sec / 30sec / 60sec
AUTO TRACK: ON / OFF (refer to Chapter 5.2.2)
TRACK INTERVAL: 10sec / 20sec / 30sec (refer to Chapter 5.2.2)
AUTO HOLE: ON / OFF (refer to Chapter 4.2)
SCORECARD: NORMAL / PRO (refer to Chapter 5.4)

User’s Guide
This document is the property of Sonostar Inc. Any unauthorized reproduction is prohibited Page 10
Step1.
Insert the supplied Installation Disc
into your computer. When the
Sonocaddie screen appears,
click the “Sonocaddie V300” button to
start the setup wizard
www.sonocaddie.com/v300/member and select “Registration.” Follow the on-screen instructions
and choose from one of the three available Sonocaddie Memberships (Par, Birdie or Eagle) that best
suits your needs.
Important: You will need the Serial Number (S/N) of your Sonocaddie V300 to obtain a
membership. It is located on the back of the Sonocaddie under the battery.
3.2.2 Install the Sonocaddie V300 Software and Login
.
Step2.
Click “Next” each time
you are prompted until
installation is complete.
Step3.
When the installation is
complete, click “Close” to
finish. A Sonocaddie
shortcut icon will appear on
your desktop. From your
desktop, double-click the
Sonocaddie icon for the
Login screen.
User’s Guide
This document is the property of Sonostar Inc. Any unauthorized reproduction is prohibited Page 11
3.3 Download Courses into the Sonocaddie V300
Downloading courses into the Sonocaddie V300 is a quick and easy process. You simply locate the
courses you plan to play in the Sonocaddie online database and transfer these into the Sonocaddie
V300. The V300 holds up to 30 courses. Note that you need an internet connection to access the
Sonocaddie website.
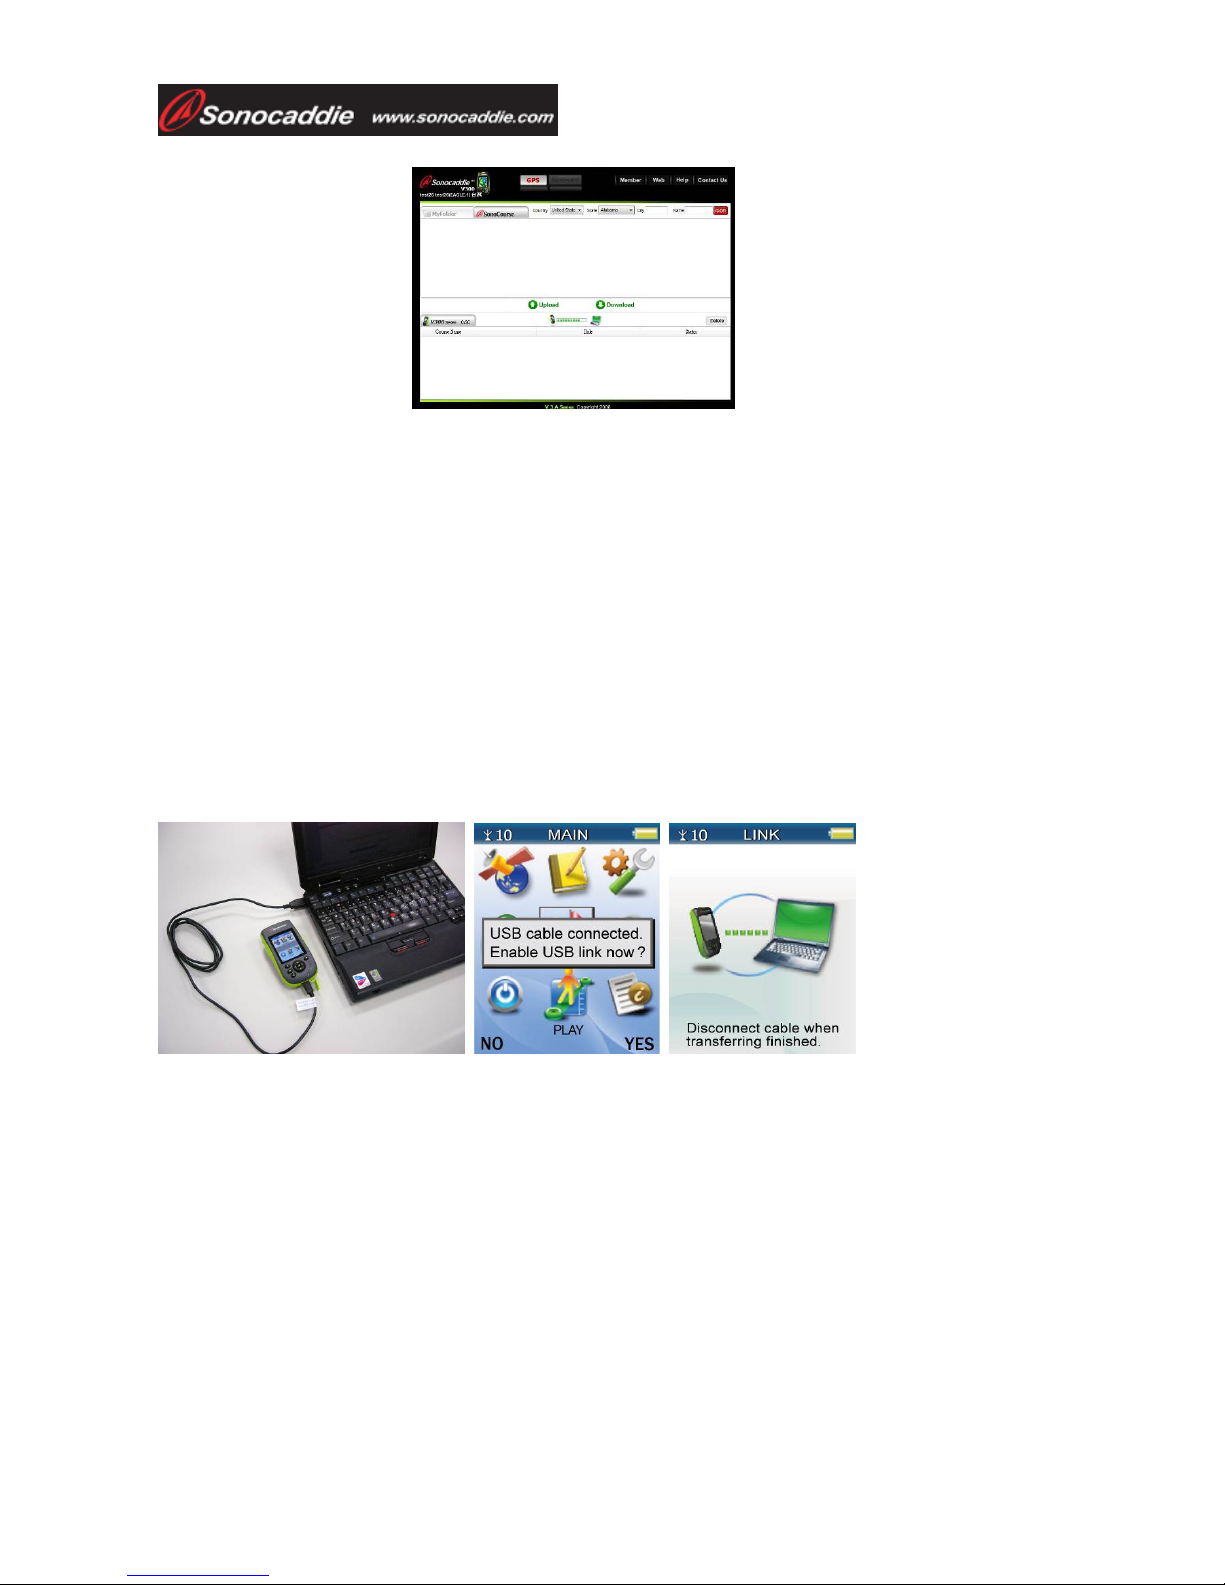
3.3.1 Connect the Sonocaddie V300 to Your Computer
Turn on the Sonocaddie V300 by pressing the power button for three seconds. Locate the
charging/data port on the bottom of the V300, pull out the rubber cover, and carefully insert the
mini-end of the supplied USB cable into the port. Connect the other end of the cable to the USB
port on your computer. When the link message (“USB cable connected - Enable USB link now? “)
appears on the Sonocaddie screen, select “YES” with the right soft key to connect the device with
your computer.
3.3.2 View the Sonocaddie V300 Software for the First Time
Log into the Sonocaddie V300 Software (Step 4 above) and the V300 Software Main Display below
This user-friendly screen provides all the functions you need to access and manage your
personalized data. It has three tabs for accessing different types of information; the “SonoCourse”
tab, “V300” “MyFolder” tab. Please take a few minutes to become familiar with these and the other
parts of Also every time you use the Sonocaddie V300 on a course, it stores personalized course
data that you and upload from this software (refer to Chapter 8 – Reviewing Store Information after
the Round).
Step4.
From the Login screen,
enter your email address
on the first line and
password on the second
line, which is what you
used to register for your
Sonocaddie membership.
This brings up the V300
Software Main Dis
p
la
y
.

User’s Guide
This document is the property of Sonostar Inc. Any unauthorized reproduction is prohibited Page 12
A. INFORMATION BAR: Displays the User’s Name, Type of Membership Plan, Membership
Period and Registered Country.
B. MYFOLDER TAB: Click this tab to access the personalized course information you transferred
from your Sonocaddie V300. This tab stores information you uploaded for review anytime, even
without the device. This tab stores up to 60 courses*, 100 scorecards, and 100 rounds of shot
tracks, which is separate information from the V300 tab. From the MyFolder tab, you can
rename or delete courses, and view your personalized course information. (*Note about
Memberships: “Par” has NO access to MyFolder unless upgraded, “Birdie” stores 30
courses ,and “Eagle” stores 60 courses.)
C. SONOCOURSE TAB: Click this tab to access the Sonocaddie database to search for courses
(by Country, State, City, and Name) that you want to download into your V300 device.
D. V300 TAB: Whenever your V300 device is connected to the computer, this tab displays the
courses that are stored in your device and the personalized course information you recorded
during your rounds. The V300 device can store up to 30 courses, 100 scorecards, and 100
rounds of shot tracks. From this tab, you can rename or delete courses stored in the device, view
your personalized course information, and upload information from your device into your
personal MyFolder tab.
E. GPS / SCORECARD BUTTONS: Click the GPS button to see the courses stored under the
MyFolder Tab and V300 Tab. Click the Scorecard button to see a list of the Scorecards (by date)
stored under the MyFolder Tab and V300 Tab.
F. MORE FUNCTIONS: Click any of these buttons to connect to the Sonocaddie V300 website
and get further information or request assistance.
G. UPLOAD BUTTON: After you select the desired courses or personalized course information
from the V300 tab, click this button to transfer the information from the V300 device to
MyFolder. The uploaded information immediately appears in the V300 Tab when the transfer is
complete.
H. DOWNLOAD BUTTON: After you find and select the desired courses from the search results
in the SonoCourse Tab, click this button to transfer those courses directly into your V300 device.

User’s Guide
This document is the property of Sonostar Inc. Any unauthorized reproduction is prohibited Page 13
These courses immediately appear under the V300 Tab when the downloading process is
complete.
I. V300 CONNECTION: This picture indicates that the Sonocaddie V300 is properly connected to
the computer by a moving green bar. If a red “X” appears, the device is not connected and you
will NOT be able to access the information stored in the device.
3.3.2 Download Courses You Plan to Play
Downloading courses into your Sonocaddie V300 is a simple two step process:
Step 1: Click the SonoCourse Tab (A) to search for courses. Select a Country and State from the
drop-down lists, enter a city and/or course name, and click “GO.” The software quickly searches the
Sonocaddie database and returns all results that match your criteria. The “Status” column in the
results list indicates what type of course data is available (Scorecard, GPS, or Color Layout) for
each course as noted below. Check the box next to each course that you want to download into your
Sonocaddie V300.
Tip: If a desired course is not in our Sonocaddie database, or if no GPS or Color Layout data is
available for it, please notify us at the “Contact Us” link and we will make every effort to quickly
add it.
Step 2: Make sure your Sonocaddie
V300 is properly connected to your computer (as indicated by an oscillating green bar), and then
click the “Download” button (E) to transfer the selected courses to the device. When the download
is complete, the selected courses are now stored in your Sonocaddie and appear under the V300 Tab.
You are now ready to use your Sonocaddie 300!
Important: Do not disconnect the cable between V300 device and computer when downloading.
Also, the more courses you select to download at one time, the longer the process will take which
may create problems on slower internet connections.
Chapter 4 – Starting a Game
Before you leave for the course, make sure the Sonocaddie V3000 is fully charged. When you
arrive at the course, immediately turn the device on because acquiring satellites can take up to 15
minutes. The Sonocaddie V300 performs best under clear skies so the better the satellite reception,
This picture indicates this specific golf course
has GPS information.
This picture indicates this specific golf course
has scorecard information.
This picture indicates this specific golf
course has color layout.

User’s Guide
This document is the property of Sonostar Inc. Any unauthorized reproduction is prohibited Page 14
the better the device performs as the chart below shows.
Satellite signal 0~2 3~5 5~6 6~8 8~10 >10
Accuracy None Poor Fair Good Very good Optimal
Tip: Selecting “SATELLITE” from the “MAIN’ screen displays a screen with detailed satellite
reception information. Refer to the Appendix at the end of this guide for an explanation of this
screen.
4.1 Select a Course to Play
From the “MAIN” screen of the Sonocaddie V300, select “PLAY” to see the courses stored in the
device. Scroll up/down through the list with the 5-way key and select a course using the center key,
or press “MORE” with the right soft key for a pop-up menu and press “PLAY.” The “Select Hole”
screen below appears.
4.2 Select the First Hole
First you must select the starting hole manually. The “Auto-Hole” feature then automatically
advances the device to the next hole when you finish a hole and enter the next tee box. Note that
Auto-Hole can be set to off from the Settings screen (see Chapter 3.1).
4.3 Understanding the Hole-Layout and Hole-Info Screens
After selecting the first hole, the “HOLE-LAYOUT” screen below appears displaying distances to
targets on a full-color, 3-D graphical view of the actual hole. The distances constantly change as
you move and a “Walking Golfer” symbol also moves to show your actual location on the hole. In
addition, a second “HOLE-INFO” screen is available with the same distance information except it
shows the targets on the hole without the layout view. To access the “Hole-Info” screen, select
“MORE” with the right soft key and “INFO.” There are 15 different icons (or targets) available for
this screen. Note that the green-side icons on the Hole-Info screen are visual markers only and
provide no distance reading. To return to the Hole-Layout screen, select “MORE and “LAYOUT”
with the right soft key. Also selecting “GREEN” with the left soft key displays the full green.
Important: If a Color Layout for a specific course is not yet available from Sonocaddie, the
device displays the “Hole-Info” screen by default.

User’s Guide
This document is the property of Sonostar Inc. Any unauthorized reproduction is prohibited Page 15
4.4 Carrying the Sonocaddie V300
Conveniently attach the belt clip to your belt or clothing. Slide the hook on the back of the
Sonocaddie V300 into the clip until you hear a “click” sound. To remove the Sonocaddie, press the
button on top of the clip down and slide Sonocaddie upward out of the clip. You can also attach the
clip to different things, such as a golf bag. The Sonocaddie V300 may also be mounted to a golf cart
with optional golf cart mounts (visit Sonocaddie website for product information).
Important: Please make sure the belt clip or mount is securely fastened and the Sonocaddie is
firmly attached for maximum security.
Status explanation Symbol
Bunker Front/ Back
Water Front/ Back (includes major water hazards)
*2
nd Green Front/ 2nd Green Back
Creek (includes: river, ditch and stream)
Trap
Tree (includes: shrubbery and forest)
Hills
Lay-up area
Out of Bounds (OB)
Dogleg Left/ Right
Rock
Delete

User’s Guide
This document is the property of Sonostar Inc. Any unauthorized reproduction is prohibited Page 16
OR
Chapter 5 – Using the Sonocaddie V300 during a Round
The Sonocaddie V300 has many useful features to help you with your golf game. Now that you
have set up your device, loaded it with the desired courses, and selected a course to play, you are
ready to start using all these features. When you are playing a hole and you need the distance to the
green or other target (such as sand trap, dog-leg, etc.) simply pull out your Sonocaddie V300 to see
all the distances you need on its color screen.
Tip: Hitting any key on the devise turns on the screen backlight feature on for easier viewing.
5.1 View the Green Close-Up
The Green Close-up view displays a full putting green and provides five
distance readings for each green. It shows the distance to the front, center and
back of the green. In addition, the center reading automatically changes to
show an approximate distance to a short and long pin location. To access this
screen, select “GREEN” with the left soft key. To return, press “FULL” with
the left soft key or the “Escape” key.
Tip: To stop the auto-scrolling feature, press the up or down button on the 5-way key. Then press
either key again to scroll the ball manually to find your ideal spot.
5.2 Track Your Game Feature
The Sonocaddie V300 has two features to track your game; “Shot Track” records your specific shot
locations and “Auto Track” automatically tracks your route around the course. You can then go
Distance from back of the green
Far landing zone
Center landing zone
Near landing zone
Distance from front of the green
590
580
570
560
550
Near Center Far

User’s Guide
This document is the property of Sonostar Inc. Any unauthorized reproduction is prohibited Page 17
back at a later time and review your stored Tracks from your Sonocaddie V300 or from the V300
Software on the full-color graphical display of the hole as shown below (See Chapter 8 – Reviewing
Store Information after the Round). This way you can compare your performance from game to
game at your favorite course, analyze your play like the pros, and learn your strengths and
weaknesses so you can adjust your strategy for practicing and playing a course.
Important: Shot Track and Auto Track only work if the course has a “Color Layout” and you are
located on a particular hole on that course with the Walking Golfer symbol visible on the screen.
5.2.1 Shot Track
Shot Track remembers all the ball locations that you enter on each hole on the Hole-Layouts.
Simply stand near the position of your shot and press “SHOT TRACK” with the top button on the
right side of the Sonocaddie V300. Shot Track internally records this exact ball location on the
Hole-Layout screen for that hole so you can review at a later time. Each time you want to record a
new shot location, press the “SHOT TRACK” button. The device stores the shots for up to 100
rounds, however, it can only store one round per day.
5.2.2 Auto Track
When set on, Auto Track automatically records your actual route around on the course on the
Hole-Layouts as you play. Auto Track can be very useful when used with Shot Track above. To
turn Auto Track on, go to the “SETTINGS” screen, scroll down to “AUTO TRACK”, and choose
“ON” with the left-right 5-way key. To set the interval period for recording your position, scroll
down to “TRACK INTERVAL”, choose the desired interval, and then press “SAVE” with the right
soft key to save these settings. Once you select a course to play and Sonocaddie begins to receive
satellite signals, Auto Track immediately starts recording your route on the Hole-Layouts. The
device stores up to 100 rounds, however, it can only store one round per day.
Important: Selecting different intervals for Auto Track will affect the recording time for a round.
TRACK INTERVAL 10 SECONDS 20 SECONDS 30 SECOND
Recording Period 5 hours 11 hours 16 hours
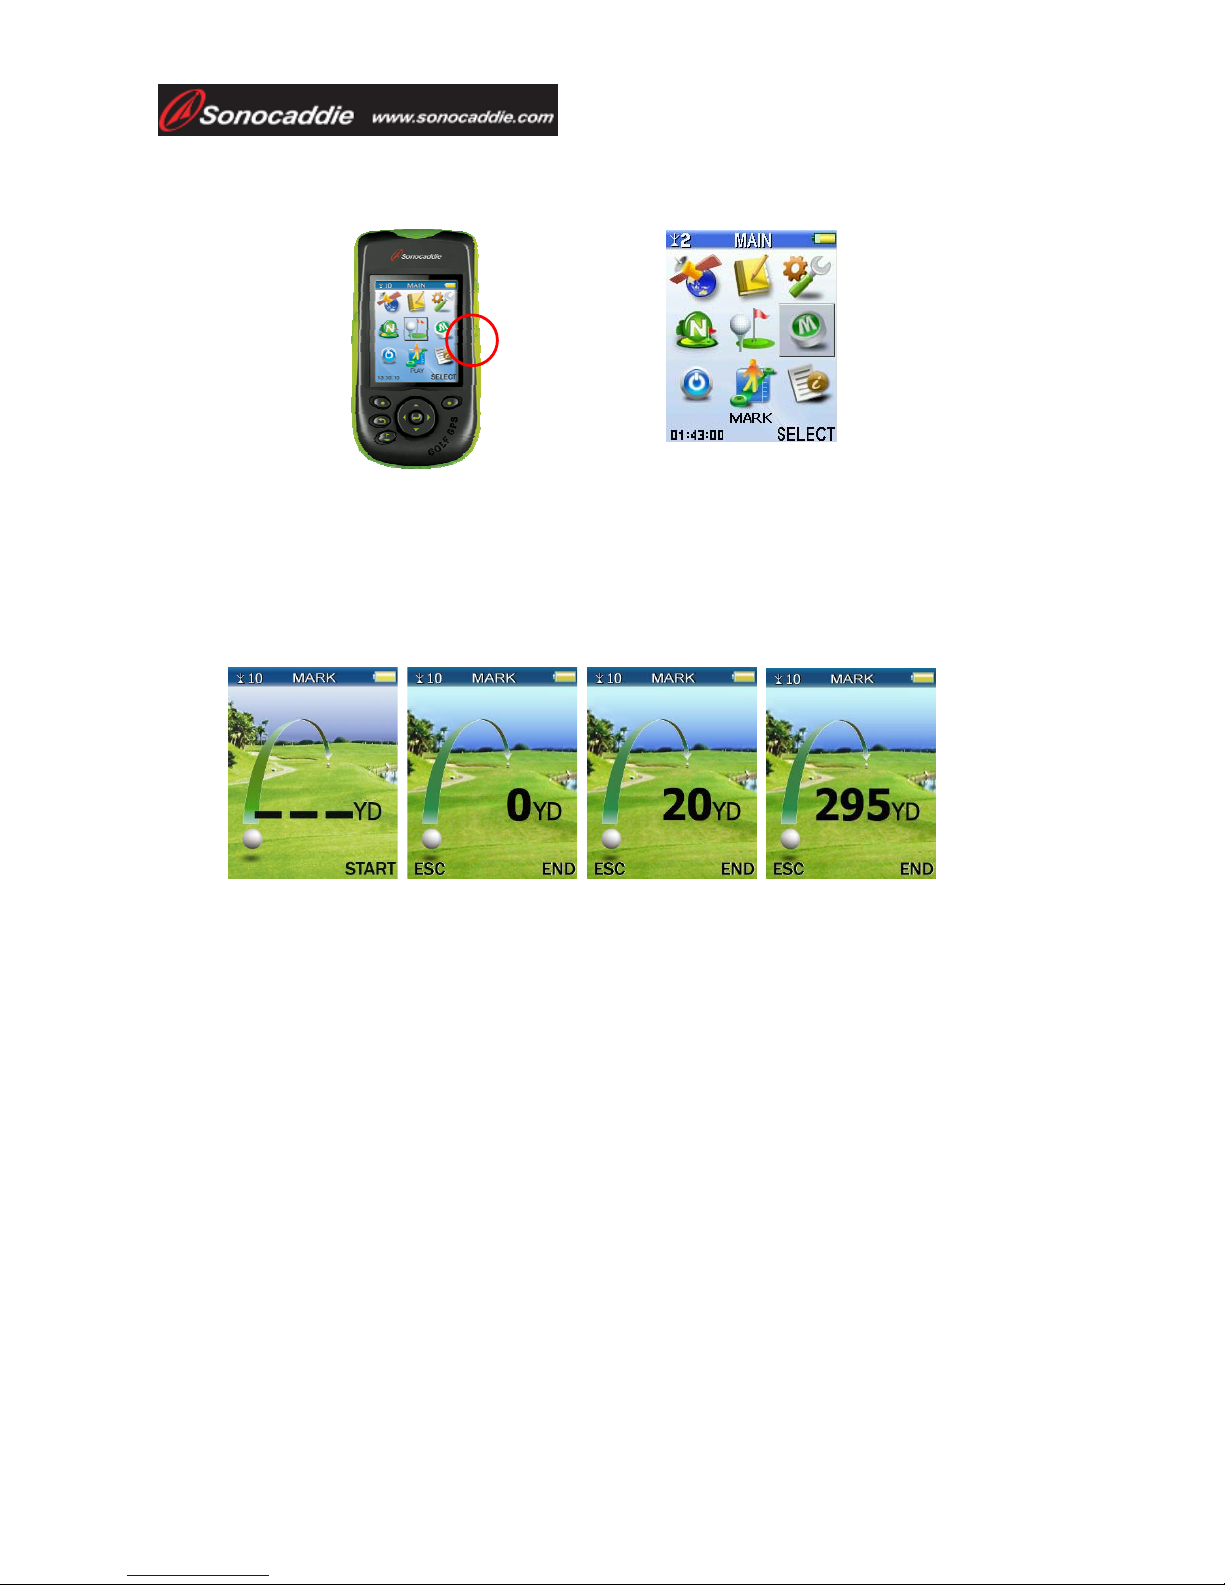
5.3 Measure your Shot Distance
The “Mark” feature provides a simple way to quickly measure the length of any shot you make by
measuring the distance between the start and end positions of the shot. It is available anytime,
except when you are on the Green Close-up screen. There are two ways to access this feature. The
quickest way is to press “MARK” with the bottom button on the right side of the Sonocaddie V300,
or select “MARK” from the “MAIN” screen.
Shot Track Onl
y
Auto Track Only Auto Track & Shot Track
User’s Guide
This document is the property of Sonostar Inc. Any unauthorized reproduction is prohibited Page 18
Important: To use “Mark”, you must be on the course and the Sonocaddie must have satellite
reception.
To measure your shot, stand near where you hit your ball and press the “MARK” button to and the
Mark screen below appears. Press “START” with the right soft key and proceed to your ball. The
distance displays “0” and changes as you move. You do not have to travel in a straight line to the
ball since the device always measures the distance from the starting position to your current
location in straight line. When you reach the ball, press “END” to lock the number and see the
actual distance of the shot. To measure another shot, press “START” again. Press the left soft key
or the Escape key to return to the previous screen.
5.4 Use the Digital Scorecard
The Sonocaddie V300 provides a digital scorecard to score your personal round and can display an
analysis of your round. Two types of scorecards are available. The “NORMAL” scorecard records
your strokes only by hole and provides a total for the front nine (out), back nine (in) and 18-hole
round. The “PRO” scorecard records your strokes, putts, fairways hit, and sand saves by hole. The
Pro Scorecard also gives you a full analysis of your round. Both scorecards automatically display
the “Par” (P) for whatever hole you are playing.
The Normal scorecard is the default. Press the “SCORECARD” button on the left side of the
Sonocaddie V300 and the Normal scorecard below appears. Scroll across to the “Strokes” column
(S) with the left-right 5-way key and use the up/down key to enter your strokes. Press the “Escape”
key to go back and Sonocaddie automatically saves your scores, even if you turn it off.
To make the Pro scorecard your default, go to the “MAIN” screen, select “SETTINGS”, scroll
down the list to “SCORECARD”, choose “PRO” with the left-right 5-way key, and press “SAVE”
with the right soft key.
To record your score on the Pro Scorecard, press the “SCORECARD” button on the left side of the
Sonocaddie V300 and the Pro scorecard below appears. Scroll across each column one by one and
use the up/down key to enter your Score (S), number of Putts (Pt), and either Yes (Y) or No (N) for
Mark bottom

User’s Guide
This document is the property of Sonostar Inc. Any unauthorized reproduction is prohibited Page 19
both the “Fairway Hit” (Fw) and “Sand Save” (Sd) column. To view an analysis of your round,
press “ANALYSIS” with the right soft key.
Important: For the Sonocaddie to accurately calculate Greens in Regulation (GIR), you must
enter the Strokes (S) and Putts (Pt) for every hole. Fairway and Sand Save percentages
automatically calculate according to your scores and the Yes/No response you entered on each
hole.
Chapter 6 – Editing an Existing Course
With the Sonocaddie V300, you can also make instant changes to the given course information right
on the spot. Courses are constantly changing and sometimes a target may have moved since the
GPS setting was recorded. Or maybe you have specific targets you like to use when you play certain
courses or you notice that a distance reading is slightly off. With the Sonocaddie V300, you can
change the course information on the go to suit your own preferences so you will always be playing
with the most accurate and up-to-date distances.
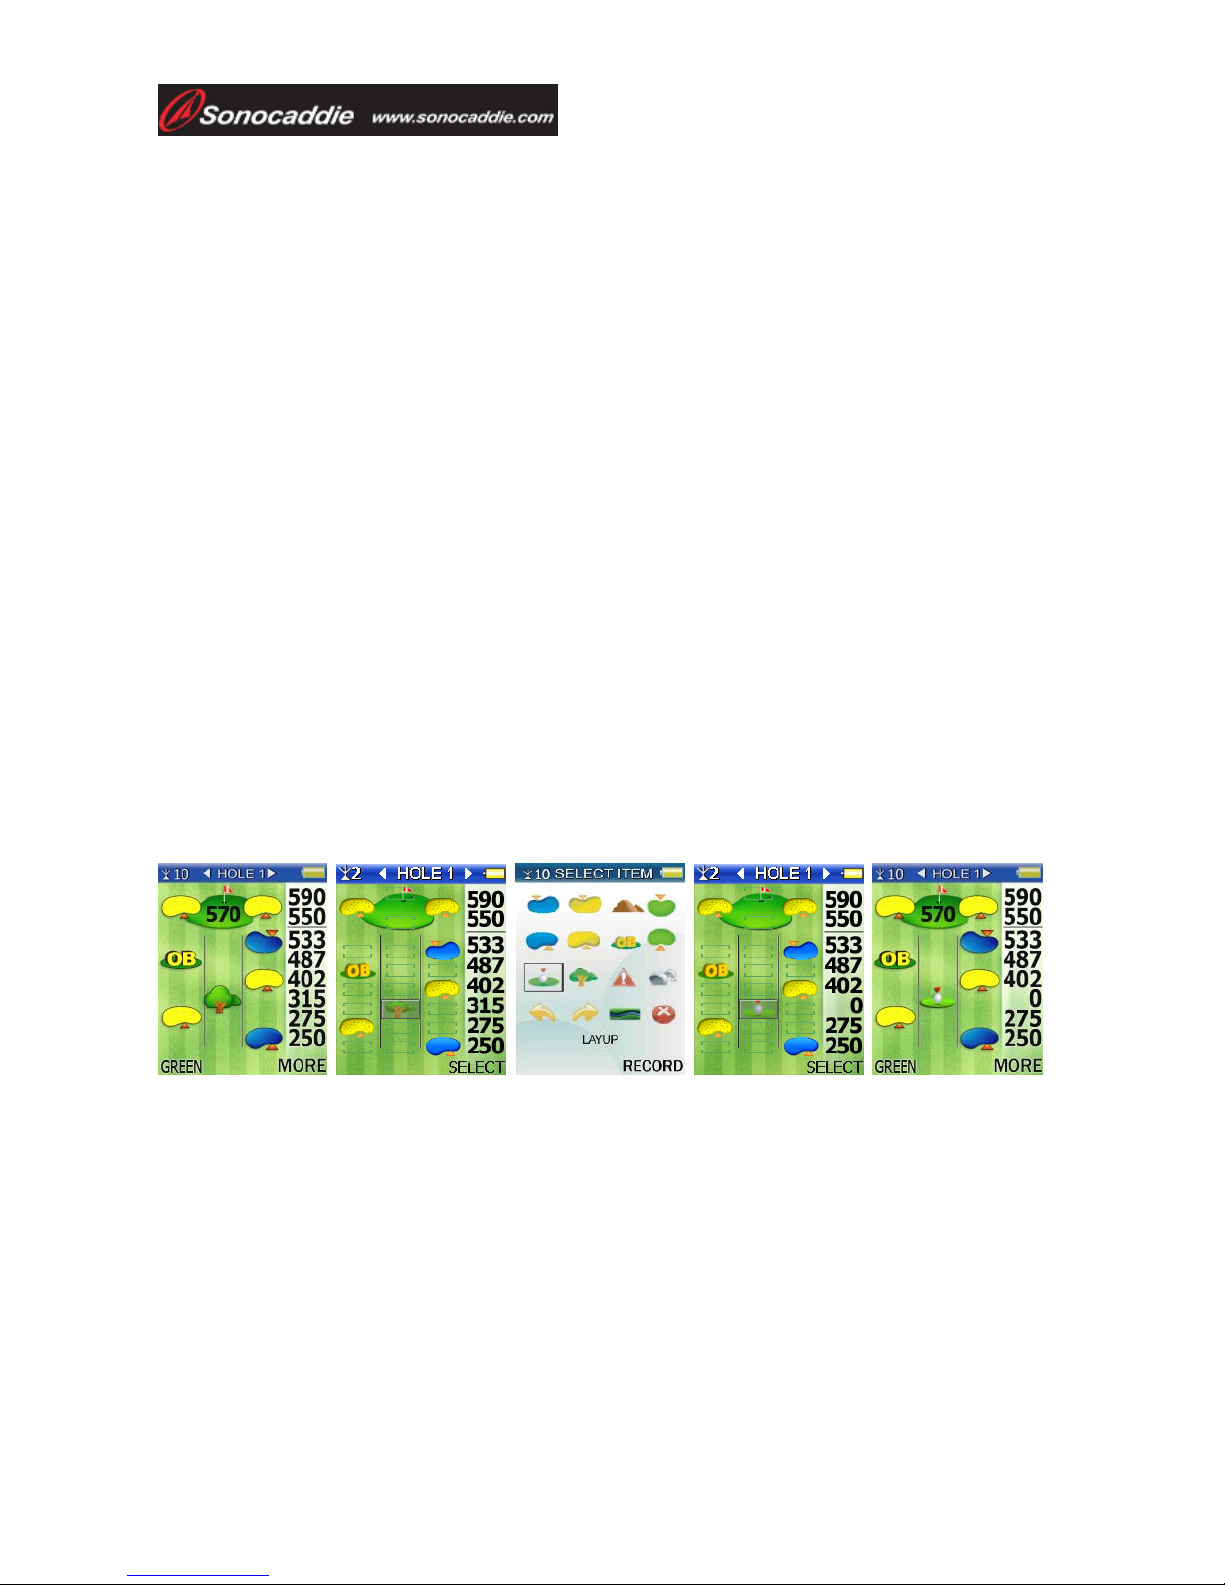
6.1 Understanding the Edit Screen
The information on each “Hole-Layout” screen or “Hole-Info” screen originates from an “EDIT”
screen where specific GPS reference points (or targets) have been recorded for that hole. To view
the Edit Screen, select “MORE” with the right soft key and “EDIT.” Each target shown on a hole
was recorded on a blank Edit Screen. The Edit Screen has eight available rows to locate GPS targets
for distance readings; six for on/off fairway targets and two for the front and back green targets.
Each row has three GPS locations to record a target (left side, fairway, and right side) and there can
only be one target per row. There is one GPS target location for the front of the green and one for
the back. Note that the green center is actually calculated by Sonocaddie based on the recorded
front and back points. Each green has two additional green-side targets to display a visual marker.
These do not give a distance reading, nor do they appear on the Hole-Layout screen since this view
already provides a full-color, graphical view of the hole.
Legend
Hole (H)
Par (P)
Score (S)
Putt (Pt)
Fairway (Fw)
Sand (S)
Normal Scorecard Pro Scorecard Pro Scorecard Analysis
Hole-Layout Screen Hole-Layout Screen Hole-Layout Screen Hole-Layout Screen
User’s Guide
This document is the property of Sonostar Inc. Any unauthorized reproduction is prohibited Page 20
6.2 Edit an Existing Target on a Hole
The Edit feature is available any time you are playing a hole from the “Hole-Layout” screen or
“Hole-Info” screen. If you need to correct a distance reading or want to change a given target on the
hole while playing, simply follow the edit process below. Repeat the process anytime you need to
change or update a target.
Important: To use the Edit feature, you must be on the course and the Sonocaddie should have
good satellite reception (six or more satellites).
Step 1: Select “MORE” with the right soft key and then select “EDIT” to view the Edit Screen.
Step 2: Stand at the target on the course that you want to correct or update. Using the 5-way key,
scroll to and highlight the specific target icon on the Edit Screen that you are correcting or updating.
Note the target distance reading may disappear when you are standing within 5 yards of the target.
Step 3: Press “SELECT” with the right soft key to access the “Target Icon” screen. Scroll to the
icon you want to record for that hole (refer back to Chapter 4.3 for icon definitions). If you are
correcting a distance reading, select the same icon that you selected previously on the Edit Screen.
If you are changing the target, select a new icon which is more appropriate.
Important: Before pressing “Record”, be sure you stand still for five seconds at the target
location so the Sonocaddie can pin-point that position. After you select record, the distance
reading changes to “0” to indicate an accurate location.
Step 4: Press “RECORD” with the right soft key to insert the icon on the Edit Screen and update
this position permanently in your Sonocaddie V300. The distance immediately changes to a “0”
reading. If it does not, stand still and press “Record” again from the same position.
6.3 Add a New Target to a Hole
The Sonocaddie V300 lets you customize any hole when you want more information while playing,
such as knowing where to layup or determining the distance to a certain tree, dog-leg, etc. To add a
new target, follow the editing steps above, except in Step 2 stand at the new target on the hole and
scroll to one of the three available locations in an empty row. Then follow Steps 3 & 4 to select and
record a new target on the hole.
Tip: To make reading distances on Hole-Layout or Hole-Info screens easier, be sure to record
targets on the Edit Screen in the same order they appear on the hole. Also if you add a new target
to a row that already has one, the old target will disappear from the screen and the new one will
appear instead.
Other manuals for V300
2
Table of contents
Other Sonocaddie GPS manuals

Sonocaddie
Sonocaddie V300 User manual

Sonocaddie
Sonocaddie V500 User manual

Sonocaddie
Sonocaddie XV2 User manual

Sonocaddie
Sonocaddie V300 User manual

Sonocaddie
Sonocaddie V500 User manual

Sonocaddie
Sonocaddie V500 User manual

Sonocaddie
Sonocaddie AUTO PLAY User manual

Sonocaddie
Sonocaddie V350 Series User manual

Sonocaddie
Sonocaddie Golf GPS User manual

Sonocaddie
Sonocaddie V5000 User manual


