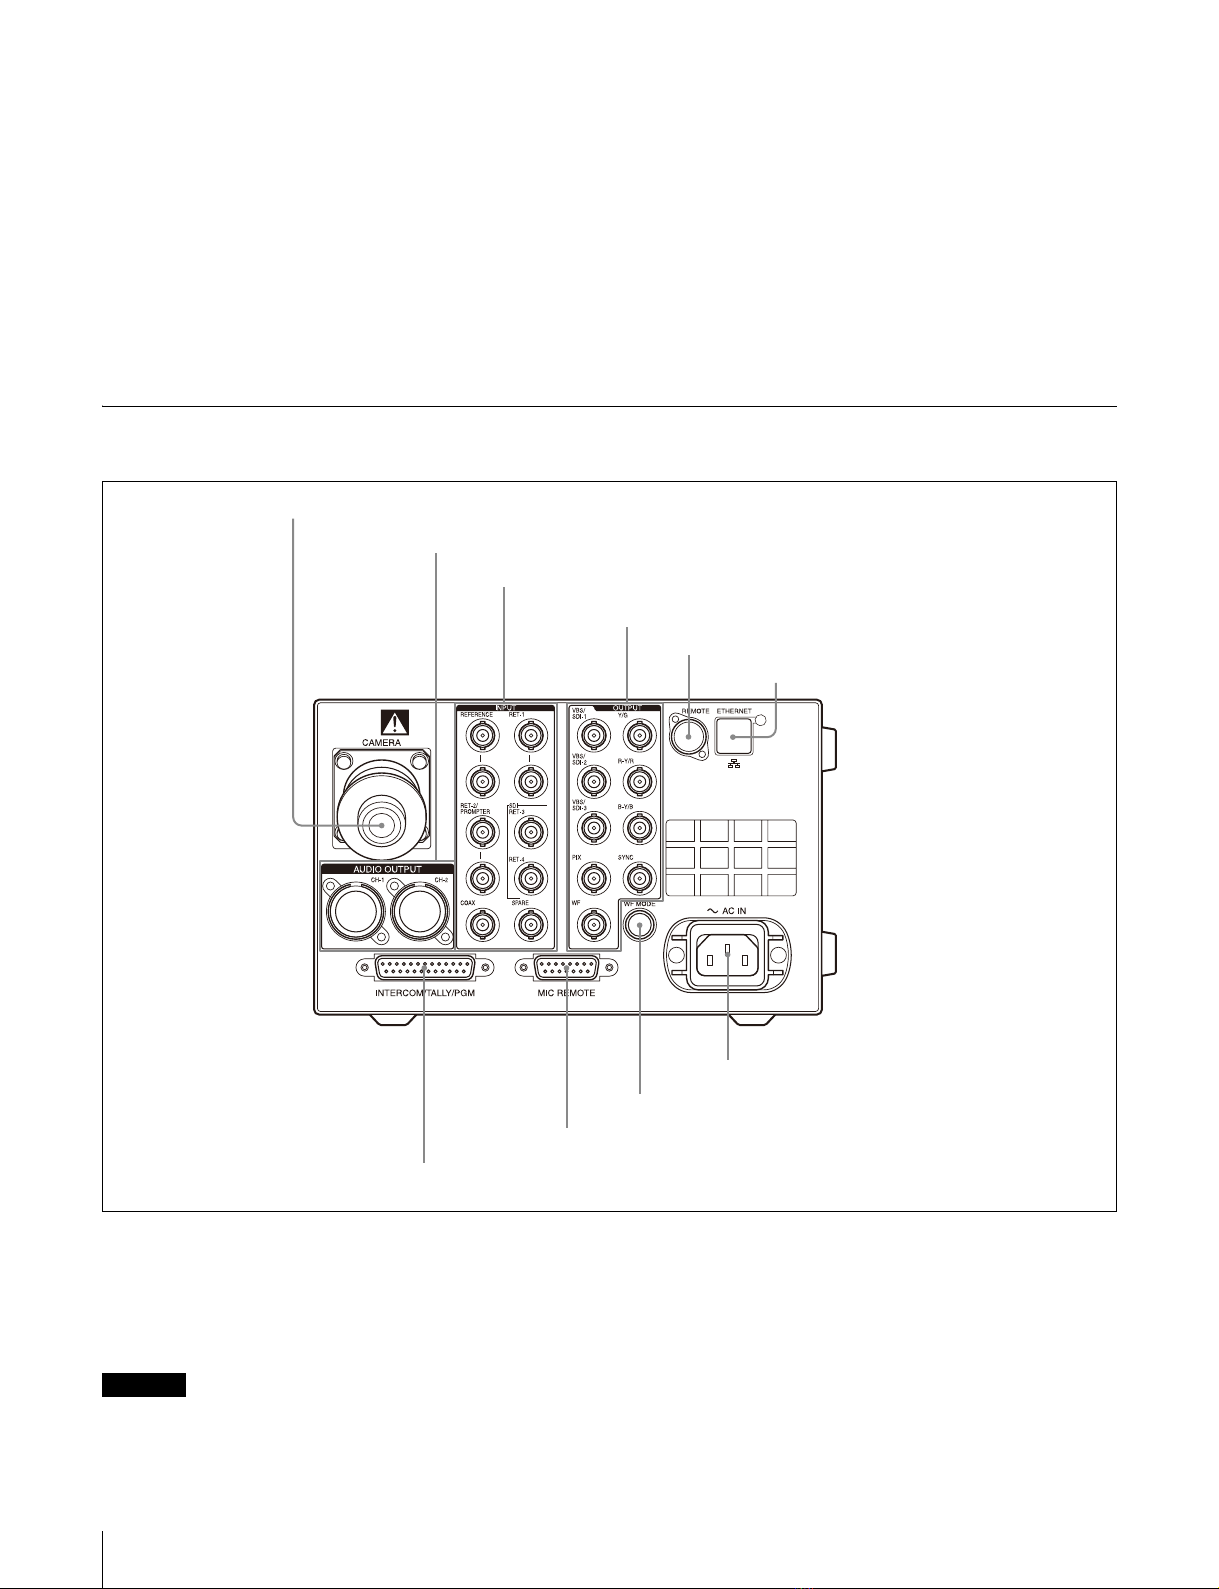
Sony CCU-590 User manual

CAMERA CONTROL UNIT
CCU-590/590P
OPERATION MANUAL [English]
1st Edition (Revised 1)

2
To reduce the risk of fire or electric shock,
do not expose this apparatus to rain or
moisture.
To avoid electrical shock, do not open the
cabinet. Refer servicing to qualified
personnel only.
THIS APPARATUS MUST BE EARTHED.
WARNING:
Using this unit at a voltage other than 120 V may require the
use of a different line cord or attachment plug, or both. To
reduce the risk of fire or electric shock, refer servicing to
qualified service personnel.
Attention-when the product is installed in Rack:
1.Prevention against overloading of branch
circuit
When this product is installed in a rack and is supplied
power from an outlet on the rack, please make sure that the
rack does not overload the supply circuit.
2.Providing protective earth
When this product is installed in a rack and is supplied
power from an outlet on the rack, please confirm that the
outlet is provided with a suitable protective earth
connection.
3.Internal air ambient temperature of the rack
When this product is installed in a rack, please make sure
that the internal air ambient temperature of the rack is
within the specified limit of this product.
4.Prevention against achieving hazardous
condition due to uneven mechanical loading
When this product is installed in a rack, please make sure
that the rack does not achieve hazardous condition due to
uneven mechanical loading.
5.Install the equipment while taking the operating
temperature of the equipment into
consideration
For the operating temperature of the equipment, refer to the
specifications of the Operation Manual.
6.When performing the installation, keep the
following space away from walls in order to
obtain proper exhaust and radiation of heat.
Right, Left : 4 cm (1.6 inches) or more
Rear : 10 cm (4 inches) or more
For the customers in the U.S.A. (for CCU-590)
This equipment has been tested and found to comply with the
limits for a Class A digital device, pursuant to Part 15 of the
FCC Rules. These limits are designed to provide reasonable
protection against harmful interference when the equipment
is operated in a commercial environment. This equipment
generates, uses, and can radiate radio frequency energy and,
if not installed and used in accordance with the instruction
manual, may cause harmful interference to radio
communications. Operation of this equipment in a residential
area is likely to cause harmful interference in which case the
user will be required to correct the interference at his own
expense.
You are cautioned that any changes or modifications not
expressly approved in this manual could void your authority
to operate this equipment.
All interface cables used to connect peripherals must be
shielded in order to comply with the limits for a digital device
pursuant to Subpart B of Part 15 of FCC Rules.
For the State of California, USA only
Perchlorate Material - special handling may apply, See
www.dtsc.ca.gov/hazardouswaste/perchlorate
Perchlorate Material : Lithium battery contains perchlorate.
For the customers in Europe (for CCU-590P)
This product with the CE marking complies with both the
EMC Directive and the Low Voltage Directive issued by the
Commission of the European Community.
Compliance with these directives implies conformity to the
following European standards:
•EN60950-1 : Product Safety
•EN55103-1 : Electromagnetic Interference (Emission)
•EN55103-2 : Electromagnetic Susceptibility (Immunity)
This product is intended for use in the following
Electromagnetic Environments:
E1 (residential), E2 (commercial and light industrial), E3
(urban outdoors), E4 (controlled EMC environment, ex. TV
studio)
For the customers in Europe (for CCU-590P)
The manufacturer of this product is Sony Corporation, 1-7-1
Konan, Minato-ku, Tokyo, Japan.
The Authorized Representative for EMC and product safety is
Sony Deutschland GmbH, Hedelfinger Strasse 61, 70327
Stuttgart, Germany. For any service or guarantee matters
please refer to the addresses given in separate service or
guarantee documents.
For kundene i Norge
Dette utstyret kan kobles til et IT-strømfordelingssystem.
For the customers in Taiwan only
This symbol is intended to alert the user to
the presence of important operating and
maintenance (servicing) instructions in the
literature accompanying the appliance.
WARNING

3
Table of Contents
Table of Contents
Overview ............................................................................... 4
Function and Location of Parts and Controls ................... 5
Front panel ................................................................................ 5
Rear panel ................................................................................. 6
Internal Switches and Internal Boards ............................... 9
Internal switches ........................................................................9
Internal boards ...........................................................................9
Connecting the CCU-590/590P to the Video Camera ......10
Notes on connections.............................................................. 10
Self-Diagnostics ................................................................. 11
Settings of the camera..............................................................11
Status display of the camera system ........................................11
Self-diagnostics of the camera system.....................................11
Settings of the network ............................................................12
Self-diagnostics results of the CCU-590/590P internal
boards .............................................................................13
Self-diagnostics results of the camera internal boards ............14
ROM version indication ..........................................................15
Exiting the Self-diagnostic mode.............................................15
When an error occurs...............................................................15
Specifications ..................................................................... 15
General..................................................................................... 15
Input signals.............................................................................15
Output signals ..........................................................................15
Camera input/output signals .................................................... 16
Supplied accessories ................................................................16
Optional accessories ................................................................16

Overview
4
Overview
The CCU-590/590P Camera Control Unit provides a
variety of remote control and adjustment functions for the
processing of signals from a BVP-E10/E10P/E10WS/
E10WSP/E30/E30P/E30WS/E30WSP CCD Color Video
Camera, and can be used in Electronic Field Production
(EFP) or studio work.
The CCU-590/590P has the following features:
Wide variety of system configurations
•The optional CA-905K/F/T large-lens adaptor allows a
large lens to be fitted onto the portable video camera and
used in conjunction with the BVF-77/77CE 7-inch B/W
Viewfinder.
•3 output lines (composite video or SDI can be selected as
the output signal) are provided.
•When equipped with the optional RM-B750 Remote
Control Unit, the RM-B750 can be used to control the
video camera directly, without the use of a RCP-750/
751/920/921 Remote Control Panel.
When the CCU-590/590P is connected to the CNU-700
Camera Network Unit and the RM-B750 is attached to the
front panel of the CCU-590/590P, control on the camera
system from the RM-B750 cannot be carried out.
•The CCU-590/590P supports communications between
the video camera and the CCU-590/590P over either a
triax cable or coaxial cable. (Power, however, is not
supplied to the video camera in the case of coaxial
cable.)
10-MHz, wideband triax transmission
•Wideband triax transmission with Y signal at 10 MHz,
R-Y and B-Y signals at 6 MHz is used for inputting
video signals from the video camera. The triax cable
length can be extended from 50 to 700 m (with Fujikura
φ8.5 mm cables), 75 to 1,050 m (with BELDEN 9232
φ13.2 mm cables), or 100 to 1,400 m (with Fujikura
φ14.5 mm cables).
•The CCU-590/590P supports teleprompter signal
transmission. Teleprompter signals can be transferred
over distances of 50 to 500 m (with Fujikura φ8.5 mm
cables), 75 to 750 m (with BELDEN 9232 φ13.2 mm
cables), or 100 to 1,000 m (with Fujikura φ14.5 mm
cables).
Rack mountable
Two CCU-590/590Ps can be mounted side by side in a
standard 19-inch EIA rack when using an optional RMM-
301 Rack Mount Adaptor.
Production of some of the peripherals and related devices
described in this manual has been discontinued. For advice
about choosing devices, please contact your Sony dealer or
a Sony sales representative.
Note
Note

Function and Location of Parts and Controls 5
Function and Location of Parts and Controls
Front panel
aCamera number sheet/tally indicator
Lights red when the red tally signal is input (e.g. when the
video signal from the video camera connected to the CCU-
590/590P goes on air). When the CALL button on the
video camera, MSU-900/950, RCP-750/751/920/921
series remote control panel, or an optional RM-B750 is
pressed, the indicator lights if it is not lit, and goes off if it
is lit.
The indicator lights green when the green tally signal is
input (e.g. when the video signal from the camera
connected to the CCU-590/590P goes off air).
Attach the supplied number sheet here to indicate the
camera number.
bPOWER switch/CAM (camera) and MAIN
indicators
The POWER switch turns on or off the power supply to the
entire camera system, including the CCU-590/590P, the
video camera, and the remote control unit connected to the
REMOTE connector on the CCU-590/590P.
The MAIN and CAM indicators light when the POWER
switch is turned on.
The CAM indicator goes off when the power is turned off
by the CAM PW button on the remote control panel or the
master setup unit, or CAM POWER switch on the internal
AT b o a r d .
If the fan in the CCU-590/590P stops, the MAIN indicator
will flash to warn you of the abnormal condition. If this
occurs, turn the POWER switch off immediately and
contact Sony service personnel.
cCABLE ALARM indicators
OPEN: Lights when no triax cable is connected to the
CAMERA connector on the rear panel of the CCU-
590/590P, or when the load current is extremely low
even when a camera cable is connected.
SHORT: Lights when there is a current overflow in the
triax cable.
dINCOM audio input/output/setting section
INCOM (intercom) connector (XLR, 5-pin)
Connects a headset.
INCOM level control
Adjusts the input level of the intercom.
"
1
CAM
ON PROD
PGM PGM
MIC –
OFF PRIV
OPEN
SHORT
MAIN
bPOWER switch/CAM and MAIN indicators
aCamera number sheet/tally indicator
cCABLE ALARM indicators
dINCOM audio input/output/setting section
Note

Function and Location of Parts and Controls
6
MIC/PGM (program audio) switch
ON: Turns on the headset microphone.
OFF: Turns off the headset microphone.
PGM: Outputs the program audio when the one ear
headset is used. When this position is selected, the
INCOM level control adjusts input level of the
program audio. The level of the PGM1 and PGM2 can
be adjusted by using the VR located on the panel side
of the internal AU board.
INCOM (intercom) selector
Selects the pathway of intercom signals output/input
through the INCOM/TALLY/PGM connector.
PROD: Producer line.
PRIV: Producer line and engineer line are cut off and
communication is possible only between the CCU-
590/590P and the camera connected to the rear panel
of the CCU-590/590P.
ENG: Engineer line. The settings regarding the output
intercom signals can be performed on the internal AU
board. For details, consult your Sony service
personnel.
Rear panel
aCAMERA connector (triax connector)
Connects to the CA-570/570P/590/590P/905K/F/T
Camera Adaptor attached to the BVP-E10/E10P/E10WS/
E10WSP/E30/E30P/E30WS/E30WSP Color Video
Camera using a triax cable.
Do not use a defective triaxial cable.
The inner sheath of a triaxial cable is used for power
supply and the outer sheath for safety ground.
For your safety, do not use a triaxial cable whose inner and
outer sheaths are short-circuited. Use of such a cable will
cause electric shock.
bAUDIO OUTPUT connectors (XLR, 3-pin)
Supply audio signals from the video camera.
aCAMERA connector
bAUDIO OUTPUT connectors
cINPUT connectors
dOUTPUT connectors
eREMOTE connector
fETHERNET connector
gINTERCOM/TALLY/PGM connector
hMIC REMOTE connector
iWF MODE connector
jAC IN connector
Caution

Function and Location of Parts and Controls 7
cINPUT connectors
The REFERENCE INPUT connectors, RET-1 connectors,
and the RET-2/PROMPTER connectors are loop-through
connectors.
AREFERENCE INPUT connectors (BNC type)
The upper connector accepts reference signals (black burst
signal) for external synchronization. The input signal is
output from the lower connector. The reference input
signal can be terminated at 75 ohms internally. To
terminate the signal, input the reference signal to the upper
connector.
BRET-1 (return video signal 1) connectors (BNC
type)
The upper connector accepts return video signal. The input
signal is output from the lower connector.
For details on the selection of RET-1, refer to Operation
Manual that came with the camera or camera adaptor.
CRET-2 (return video signal 2)/PROMPTER
connectors (BNC type)
The upper connector accepts return video signal or
teleprompter signal. The input signal is output from the
lower connector. The signal is split and output to the RET-
2 and PROMPTER signal lines.
For details on the selection of RET-2, refer to Operation
Manual that came with the camera or camera adaptor.
Use the switch on the internal board to output the prompter
signal.
For details on the internal boards, consult your Sony
service personnel.
DSDI (serial digital interface) RET-3/4 (return video
signal 3/4) connectors (BNC type)
Accept SDI return video signal. (These connectors are not
loop-through connectors.)
For details on the selection of RET-3 or RET-4, refer to
Operation Manual that came with the camera or camera
adaptor.
ECOAX (coaxial) connector (BNC type)
Accepts and supplies signal from/to the video camera
using a coaxial cable. Power is not supplied to the camera
or a camera adaptor through this connector.
To use this connector, it is required to change the setting of
the internal board. For details, consult your Sony service
personnel.
FSPARE connector (BNC type)
Not used.
dOUTPUT connectors
AVBS (composite video signal)/SDI (serial digital
interface)-1, VBS/SDI-2, VBS/SDI-3 connectors
(BNC type)
Supply the signal from the video camera in composite or
SDI format.
Use the switch on the internal board to select the composite
video signal or SDI signal.
For details on the internal boards, consult your Sony
service personnel.
BY/G, R-Y/R, B-Y/B (component video signal/RGB
output) connectors (BNC type)
Supply the component signals or the R, G, and B signals
for the chroma keyer from each connector.
Use the switch on the internal board to select the signals to
be output.
For details on the internal boards, consult your Sony
service personnel.
CPIX (picture monitor output) connector (BNC type)
Supplies a video signal or video and character signals
together to a picture monitor.
AREFERENCE INPUT connectors
BRET-1 connectors
CRET-2/PROMPTER connectors
DSDI RET-3/RET-4 connectors
ECOAX connector
FSPARE connector
AVBS/SDI-1, VBS/SDI-2, VBS/SDI-3
connectors
BY/G, R-Y/R, B-Y/B connectors
CPIX connector
DSYNC connector
EWF connector

Function and Location of Parts and Controls
8
Use the WF/PIX Select menu (in MSU-950, RCP-750/
751, or RM-B750) or the PICTURE MONITOR button (on
MSU-900) to select the signal output from the PIX
connector. When the output signal is changed on the RCP-
750/751 or the RM-B750, the waveform output on the
waveform monitor also changes.
DSYNC connector
Connect to the synchronous signal input connector on a
waveform monitor or picture monitor.
EWF (waveform monitor output) connector (BNC
type)
Supplies a video signal to a waveform monitor.
Use the WF/PIX Select menu (in MSU-950, RCP-750/
751, or RM-B750) or the WAVEFORM MONITOR button
(on MSU-900) to select the signal output from the WF
connector. When the output signal is changed on the RCP-
750/751 or the RM-B750, the picture on the picture
monitor also changes.
eREMOTE (remote control) connector (8-pin)
Connects to the MSU-900/950 Master Setup Unit, RCP-
750/751/920/921 Series Remote Control Panel or RM-
B750 Remote Control Unit with an optional CCA-5-xx
connecting cable to transmit/receive control signals.
fETHERNET connector
Through this connector, the Ethernet system can be built
with the devices conforming to 700 Protocol Over TCP/IP,
such as the MSU-900/950 or RCP-920/9211), etc. In order
to build the Ethernet system, the internal switch setting and
the network-related settings must be made.
For details, consult your Sony service personnel.
1) Power must be supplied to the RCP-920/921 through the Ethernet
connection.
For safety, do not connect the connector for peripheral
device wiring that might have excessive voltage to this
port. Follow the instructions for this port.
gINTERCOM/TALLY/PGM (program audio)
connector (D-sub, 25-pin)
Inputs/outputs intercom, tally, or program audio signals.
Connects to an intercom, tally, or program audio connector
of an intercom system.
hMIC REMOTE (microphone remote control)
connector (D-sub, 15-pin)
Connects to an external control unit such as an audio
mixer. With the connected unit, you can set the
microphone input level of the video camera to –60, –50, –
40, –30, or –20 dB.
iWF MODE (waveform monitor mode) connector
(4-pin)
Connects to the corresponding connector on a waveform
monitor to allow the sequential monitoring of signals.
jAC IN (AC power input) connector
Connects to an AC power source using the supplied AC
power cord. Secure the power cord to the CCU-590/590P
using the supplied plug holder.
CAUTION

Internal Switches and Internal Boards 9
Internal Switches and
Internal Boards
To reduce the risk of electric shock, fire or injury, do not
open the cabinet. To adjust the internal settings, refer to
qualified service personnel.
Internal switches
The following switches are located inside the unit, behind
the front panel.
aHeadset microphone switch 1 (S5)
Set the switch according to the type of microphone of the
headset connected to the INCOM connector on the front
panel of this unit.
CARBON: Carbon microphone (power supply, 20 dB
gain)
ECM: Electret condenser microphone (power supply, 40
dB gain)
DYNAMIC: Dynamic microphone (no power supply, 60
dB gain) (factory-setting)
bHeadset microphone switch 2 (S6)
When the headset microphone switch 1 (S5) is set to
DYNAMIC, set this switch according to the type of output
of the headset microphone.
GND: Unbalanced type (factory-setting)
OPEN: Balanced type
cInternal main power switch
When an abnormality has occurred and power cannot be
cut off with the POWER switch on the front panel, you
may turn off the unit using the internal main power switch.
When the switch is set to off, pressing the POWER switch
on the front panel does not turn on the unit.
Internal boards
The internal boards are located inside the unit, behind the
front panel.
For details on the internal boards, consult your Sony
service personnel.
Note
ON
cInternal main power switch
bHeadset microphone switch 2 (S6)
aHeadset microphone switch 1 (S5)
AT EN IV AU DMTR
ON
Internal boards

Connecting the CCU-590/590P to the Video Camera
10
Connecting the CCU-590/590P to the Video Camera
When connecting a CCU-590/590P to a BVP-E10/E10P/
E10WS/E10WSP/E30/E30P/E30WS/E30WSP Color
Video Camera, you must first attach the CA-570/570P/
590/590P Camera Adaptor to the video camera.
A large lens and the BVF-77/77CE 7-inch Viewfinder are
connected to the CCU-590/590P through the CA-905K/F/
T series large-lens adaptor and the BKP-9057 Viewfinder
Saddle, as shown in the illustration below.
Notes on connections
Triax cable
The triax cable should never be connected to or
disconnected from the CCU-590/590P when the power is
turned on. Always turn the unit off first.
Video camera
Some switches or controls on the video camera may not
work when the camera is connected to the CCU-590/590P.
For details, refer to Operation Manuals of the video
camera and the camera adaptor.
• The maximum power output from the CAMERA connector of
the CCU-590/590P is 110 watts (including a cable loss of 10
watts). Do not connect any equipment which consumes more
than 110 watts of power.
• The BVF-7700/7700P Color Viewfinder cannot be used
because of the power output rating mentioned above.
Notes
CA-570/570P/590/590P
BVP-E10/E10P/E10WS/E10WSP/
E30/E30P/E30WS/E30WSP
Triax cable
When a large lens is used
BVF-77/77CE
CA-570/570P/590/590P
BVP-E10/E10P/E10WS/E10WSP/
E30/E30P/E30WS/E30WSP
BKP-9057
CA-905K/F/T
CCU-590/590P
To an AC power source

Self-Diagnostics 11
Self-Diagnostics
The CCU-590/590P is equipped with the self-diagnostic
function and you can display the self-diagnostics results of
the system and the internal boards of the CCU-590/590P
on the following monitors.
•A picture monitor connected to the PIX connector
•An SDI monitor connected to the VBS/SDI-3
connector1)
•The LCD/touch panel on the RM-B750 Control Panel2)
1)To select the SDI signal, switch setting on the internal board is
necessary.
For details on the setting, consult your Sony service personnel.
2)Press to light the MONITOR button on the RM-B750 to view the
self-diagnostic results on the LCD/touch panel.
In all cases above, be sure to press to light the
CHARACTER button on the RCP-750/751/920/921
Remote Control Panel.
To display the self-diagnostics pages
While the CHARACTER button on the remote control
panel is turned off, press to light the button. The “Settings
of the camera” page appears.
To display the next page of the self-
diagnostics pages
Press the CHARACTER button on the remote control
panel or the RM-B750.
Each press of the button advances the page.
When you press the CHARACTER button while the
“ROM version indication” page appears, a screen with no
characters (character OFF screen) appears.
When you keep pressing the CHARACTER button, pages
are automatically turned to the character OFF screen.
In this manual, self-diagnostics pages are shown in order
of appearance.
The following illustrations of the self-diagnostics pages
may differ from the actual indications depending on the
settings and connections.
Settings of the camera
At the top of the screen, the following items are displayed
from left to right: MASTER GAIN, CROP, EVS,
SHUTTER, and SHUTTER ON/OFF.
At the bottom of the screen, the following items are
displayed from left to right: ND FILTER, IRIS,
EXTENDER, and CC FILTER.
For the meanings of each item, refer to Operation Manuals
of the video camera.
Status display of the camera system
BVP (the first column): Model name and format of the
connected camera
CCU (the second column): Model name and format of the
connected camera control unit
GenLock: The status of the external reference signal
Prompter: Transmission direction of the teleprompter
signal
D-sub15pin: Microphone input level setting performed
through the MIC REMOTE connector
Return-1 to 4: The settings of the RET-1, RET-2/
PROMPTER, SDI RET-3/RET-4 connectors
Self-diagnostics of the camera
system
The results of a self-diagnosis of the camera system are
displayed in 3 pages.
Note

Self-Diagnostics
12
Page 1
TRIAX Type: Type of Triaxial circuit
TRIAX Cable: Triax cable connection status (connected/
disconnected)
TRIAX Comp.: Cable compensation of a triax cable
(automatic/manual)
TRIAX Step: Compensation step of the triax cable (step
indication in the circuit) (The cable length may not be
displayed correctly.)
Fan Power: Fan status in the CCU power block
Timer: Power up time to devices connected
CCU Power: Status of the CCU power supply
SerialNo: Serial number of the CCU
Page 2
CAMERA Cable: Camera cable connection status
(connected/short-circuited)
CAMERA Data: Camera data transmission status
CAMERA Power: Power supply status of the camera
CAMERA Tone: Camera ID tone status
RCP/CNU Cable: Connection status of the REMOTE
connector (connected/short-circuited)
RCP/CNU Data: Data transmission status of the
REMOTE connector
RCP/CNU Power: Power supply status of the REMOTE
connector
The following items are displayed only when the F panel
is connected.
F-PANEL Cable: F-panel cable connection status
(connected/short-circuited)
F-PANEL data: F-panel data transmission status
F-PANEL Power: Power supply status of the F-panel
Page 3
Intercom CCU: CCU intercom selection
Intercom CAMERA CH1: Status of intercom 1 of the
camera (producer line/engineer line)
Intercom CAMERA CH2: Status of intercom 2 of the
camera (producer line/engineer line)
CHU MIC Gain: Gain and control status of the
microphone circuit
Settings of the network
The following pages appear only when the CCU-590/590P
is set so that it connects to the system through the Ethernet.
In order for the CCU-590/590P to establish connection via
Ethernet, internal settings must be made.
For details on the internal settings, consult your Sony
service personnel.
The network settings are displayed in 3 pages.
Page 1
MacAddress: Mac address of the CCU-590/590P
Auto Negotiation: Auto-negotiation setting
Auto Mdix: Auto-MDIX setting
Connect Speed: Connection speed setting
Duplex Mode: Duplex mode setting
MDI/MDIX Select: MDI/MDIX setting
Link Status: Ethernet connection status

Self-Diagnostics 13
Page 2
NS Mode: Setting for the ETHERNET connection mode
LEGACY: Connection mode for the REMOTE
connector (factory-setting)
BRIDGE: ETHERNET connection mode
MCS: ETHERNET connection mode
MCS Mode: Setting of master or client for the Ethernet
connection of the multi-camera system
CLIENT: Client mode (This unit is placed under
control of the master device.)
CCU No.: CCU number setting
Master IP Address: IP address of the master device
Page 3
IP Addr: IP address
NetMask: Net mask
Def GW: Default gateway
Self-diagnostics results of the CCU-
590/590P internal boards
For details on the internal boards, refer to the System
Manual.
DM board
CAM Video: Status of the Y, R-Y, and B-Y signals of the
triax signal
Skin Gate: Reception status of the Skin gate signal from
the camera
TRIAX Comp.: Cable compensation of a triax cable
TRIAX Step: Compensation step of the triax cable (step
indication in the circuit) (The cable length may not be
displayed correctly.)
Power: DM board power supply status
TR board
Prompter: Setting status of the prompter line
Tone: Tone signal status
Incom: Demodulating status of the intercom line
CHU Data: Data reception status from the camera
Power: TR board power supply status
BoardID: ID number of the TR board
AT board
Reference: Operation mode of the phase adjustment

Self-Diagnostics
14
Gen Lock: Locking status
CCU Power: CCU power supply type (AC/DC) and power
supply status
BATT Volt: Voltage of the coin battery supplied with the
AT board
PLL Volt: Status of the PLL circuit of the AT board
CCU Mode: Operation mode of the CCU
PLD: Status of the PLD mounted on the AT board and
program version of the PLD
Board ID: ID number of the AT board
AU board
MIC: Audio embedding for the main SDI video signal.
FRONT-INCOM: Settings of the front intercom
INCOM: Channel setting for the intercom made on the
video camera
PGM: Program audio setting
AudioPLL: PLL status of the audio signal
Power: AU board power supply status
CN: CN board power supply status
PLD: Status of the PLD mounted on the AU board and
program version of the PLD
Board ID: ID number of the AU board
IV board
RETURN: Input settings for the return channels 1 to 4
MIX-Y: Setting for camera signal to be mixed with the
return signal
Power: IV board power supply status
DIF: Power status of the DIF board connected to the rear
of the IV board
PLD: Status of the PLD mounted on the IV board and
program version of the PLD
BoardID: ID number of the IV board
EN board
Component: Setting status of the component output signal
from the OUTPUT connector and status of the sync
signal added to the component Y/G output signal from
the OUTPUT connector
Composite: Setting status of the composite output signal
from the OUTPUT connector
Power: EN board power supply status
VDA: Power supply status of the VDA board on the rear
SC-REF: Lock status to the subcarrier of the external
reference signal
PLD: Status of the PLD mounted on the EN board and
program version of the PLD
BoardID: ID number of the EN board
Self-diagnostics results of the
camera internal boards

Specifications 15
ROM version indication
Exiting the Self-diagnostic mode
Press the CHARACTER button on the RCP-750/751/920/
921 remote control panel or the RM-B750 repeatedly to
display the ROM version indication page, then press the
CHARACTER button again.
When an error occurs
The error message is displayed on the monitor. In such a
case, the self-diagnostics page corresponding to the board
where the error has occurred appears by pressing the
CHARACTER button.
When you keep pressing the CHARACTER button, pages
are automatically turned to a screen with no characters
(character OFF screen).
Specifications
General
Power consumption
100 - 240 V AC, 50/60 Hz, maximum
1.8 A
Peak inrush current
(1) Power ON, current probe method:
50 A (240 V)
(2) Hot switching inrush current,
measured in accordance with European
standard EN55103-1: 10 A (230 V)
Cable length1) 50 to 700 m (Fujikura φ8.5 mm)
75 to 1,050 m (BELDEN 9232
φ13.2 mm)
100 to 1,400 m (Fujikura φ14.5 mm)
Operating temperature
–10°Cto+40°C(14°Fto104°F)
Dimensions 200 × 124 × 365 mm (8 × 5 × 143/8in.)
(w / h / d) not including projecting
parts
Mass Approx. 5.5 kg (12 lb 2 oz)
1) Teleprompter signals are only compatible with the following cable
lengths.
• 50 to 500 m (Fujikura φ8.5 mm)
• 75 to 750 m (BELDEN 9232 φ13.2 mm)
• 100 to 1,000 m (Fujikura φ14.5 mm)
Input signals
REFERENCE BNC type (loopthrough)
VBS/BS, 1.0 Vp-p, 75 ohms
RET 1/22) BNC type (1 each, loopthrough)
VBS, 1.0 Vp-p, 75 ohms
PROMPTER2) BNC type (loopthrough)
1.0 Vp-p, 75 ohms
SDI RET 3/43) BNC type (1 each)
VBS, 1.0 Vp-p, 75 ohms (terminated
internally)
SDI format, 270 Mbps, SMPTE 259M
2) The same signal is input to the RET-2 connectors and the
PROMPTER connector.
3) The signal selection (SDI or VBS) input to the SDI-RET 3/4
connectors is switchable.
Output signals
VBS/SDI 1/2/34) BNC type (1 each)
VBS, 1.0 Vp-p, 75 ohms
SDI format, 270 Mbps, SMPTE 259M

Specifications
16
Y/R-Y/B-Y video5)
BNC type (1 each)
Y: 1.0 Vp-p, 75 ohms
R-Y/B-Y:
U.S.A. and Canada: 700 mVp-p, 75
ohms
Europe: 525 mVp-p, 75 ohms
R/G/B video5) BNC type (1 each)
700 mVp-p, 75 ohms
PIX BNC type (1)
1.0 Vp-p, 75 ohms
WF BNC type (1)
NTSC: 714 mVp-p, 75 ohms
PAL: 700 mVp-p, 75 ohms
Encoded output: 1.0 Vp-p, 75 ohms
WF MODE 4-pin (1)
AUDIO OUTPUT
XLR, 3-pin
0 dBu/–20 dBu, balanced, 2 channels
SYNC BNC type (1)
0.3 Vp-p, 75 ohms
4) The signal selection (VBS or SDI) output from the VBS/SDI 1/2/
3 connectors is switchable.
5) R/G/B and Y/R-Y/B-Y are switchable.
Camera input/output signals
CAMERA Triax (Kings type for the U.S.A. and
Canada, Fischer type for Europe)
COAX BNC type (1), 75 ohms
REMOTE 8-pin, multiconnector
ETHERNET IEEE 802.3 10BASE-T, IEEE 802.3u
100BASE-TX
INTERCOM/TALLY/PGM
D-sub, 25-pin (1)
4W/RTS
TALLY: 24 V DC, TTL level or contact
selectable
MIC REMOTE D-sub, 15-pin (1)
INCOM (on the front panel)
XLR, 5-pin (1)
Supplied accessories
AC power cord (1)
AC power plug holder (1)
4-pin connector (1)
Number plate (1 set)
Operation Manual (1)
CD-ROM (1)
Optional accessories
Extension board (service parts)
Remote Control Unit RM-B750
Rack Mount Adaptor RMM-301
Design and specifications are subject to change without
notice.
Note
Always verify that the unit is operating properly before
use. SONY WILL NOT BE LIABLE FOR DAMAGES
OF ANY KIND INCLUDING, BUT NOT LIMITED
TO, COMPENSATION OR REIMBURSEMENT ON
ACCOUNT OF THE LOSS OF PRESENT OR
PROSPECTIVE PROFITS DUE TO FAILURE OF
THIS UNIT, EITHER DURING THE WARRANTY
PERIOD OR AFTER EXPIRATION OF THE
WARRANTY, OR FOR ANY OTHER REASON
WHATSOEVER.

The material contained in this manual consists of information
that is the property of Sony Corporation and is intended solely
for use by the purchasers of the equipment described in this
manual.
Sony Corporation expressly prohibits the duplication of any
portion of this manual or the use thereof for any purpose other
than the operation or maintenance of the equipment described
in this manual without the express written permission of Sony
Corporation.
Trademark
Ethernet is a registered trademark of Xerox Corporation.

CCU-590/590P
(UC/CE)
3-869-638-02 (1) © 2007
Sony Corporation
Other manuals for CCU-590
2
This manual suits for next models
1
Table of contents
Other Sony Camera Accessories manuals