12
43
65
75-300mm F4.5-5.6:
24-105mm F3.5-4.5: 50mm F1.4:
75-300mm F4.5-5.6, 50mm F1.4: 24-105mm F3.5-4.5:
17 2
4
3
685
6 8 7
4
3
9
–1
(1) (2)
–2
Français
Ce manuel est destiné à être utilisé pour plusieurs objectifs différents.
Cet objectif est conçu pour les appareils photo Sony.
AVERTISSEMENT
Pour réduire les risques d’incendie ou d’électrocution, tenir cet appareil à
l’abri de la pluie et de l’humidité.
Ne regardez pas directement le soleil à travers le convertisseur.
Ceci peut causer des lésions visuelles ou entraîner la perte de la vue.
Gardez l’objectif hors de portée des enfants en bas âge.
Il peut présenter des risques d’accident ou de blessure.
Traitement des appareils électriques et électroniques
en fin de vie (Applicable dans les pays de l’Union
Européenne et aux autres pays européens disposant de
systèmes de collecte sélective)
Ce symbole, apposé sur le produit ou sur son emballage, indique
que ce produit ne doit pas être traité avec les déchets ménagers. Il
doit être remis à un point de collecte approprié pour le recyclage des
équipements électriques et électroniques. En s’assurant que ce produit est bien mis
au rebut de manière appropriée, vous aiderez à prévenir les conséquences négatives
potentielles pour l’environnement et la santé humaine. Le recyclage des matériaux
aidera à préserver les ressources naturelles. Pour toute information supplémentaire
au sujet du recyclage de ce produit, vous pouvez contacter votre municipalité, votre
déchetterie ou le magasin où vous avez acheté le produit.
Pour les clients au Canada
Cet appareil numérique de la classe B est conforme à la norme NMB-003 du
Canada.
Remarques sur l’utilisation
• Ne laissez pas l’objectif en plein soleil. Si la lumière du soleil est réfléchie sur un
objet situé à proximité, ceci risque de provoquer un incendie. Si toutefois vous
devez laisser l’objectif en plein soleil, veillez à fixer le capuchon sur l’objectif.
• Veillez à ne pas soumettre l’objectif à un choc mécanique lorsque vous le fixez.
• Placez toujours le capuchon sur l’objectif avant de le ranger.
• Ne laissez pas l’objectif dans un endroit très humide pendant une période
prolongée afin d’éviter la formation de moisissure.
• Ne tenez pas l’appareil photo par la partie de l’objectif déployée pour la mise au
point, etc.
• Ne touchez pas les contacts de l’objectif. Si de la saleté, etc., se trouve sur
les contacts de l’objectif, cela risque de poser un problème ou d’empêcher la
réception et l’envoi de signaux entre l’objectif et l’appareil photo, provoquant
ainsi un dysfonctionnement.
Précaution concernant l’utilisation du flash
Dans le cas de certaines combinaisons objectif/flash, l’objectif peut
partiellement bloquer la lumière du flash, ce qui génère une ombre en bas de
l’image. Lorsque vous utilisez un flash intégré, veillez à retirer le pare-soleil
et à prendre la photo à une distance d’au moins 1 m (3,3 pieds) du sujet.
Vignetage
•
Lorsque vous utilisez l’objectif, les coins de l’écran peuvent s’assombrir par rapport
au centre. Pour réduire ce phénomène (appelé vignetage), l’ouverture doit être réglée
à une valeur comprise entre 1 et 2 par rapport à la position de fermeture complète.
• Avec certaines combinaisons objectif/filtre, la monture du filtre risque de
bloquer les rayonnements incidents, réduisant ainsi considérablement l’intensité
lumineuse. Effectuez des essais de photos avec différents réglages du diaphragme
pour obtenir des résultats optimums. (24-105mm F3.5-4.5 uniquement)
Condensation
Si votre objectif est déplacé directement d’un endroit froid à un endroit
chaud, de la condensation risque de se former sur l’objectif. Pour éviter ce
phénomène, placez l’objectif dans un sac plastique ou autre. Sortez
l’objectif du sac lorsque la température de l’air à l’intérieur du sac a atteint la
température ambiante.
Nettoyage de l’objectif
• Ne touchez pas directement la surface de l’objectif.
•
Si l’objectif est sale, éliminez la poussière avec une soufflette et essuyez-le avec un
chiffon doux et propre (le chiffon de nettoyage KK-CA (en option) est recommandé).
• N’utilisez aucun solvant organique, tel qu’un diluant ou de l’essence pour
nettoyer l’objectif ou le cône de l’appareil.
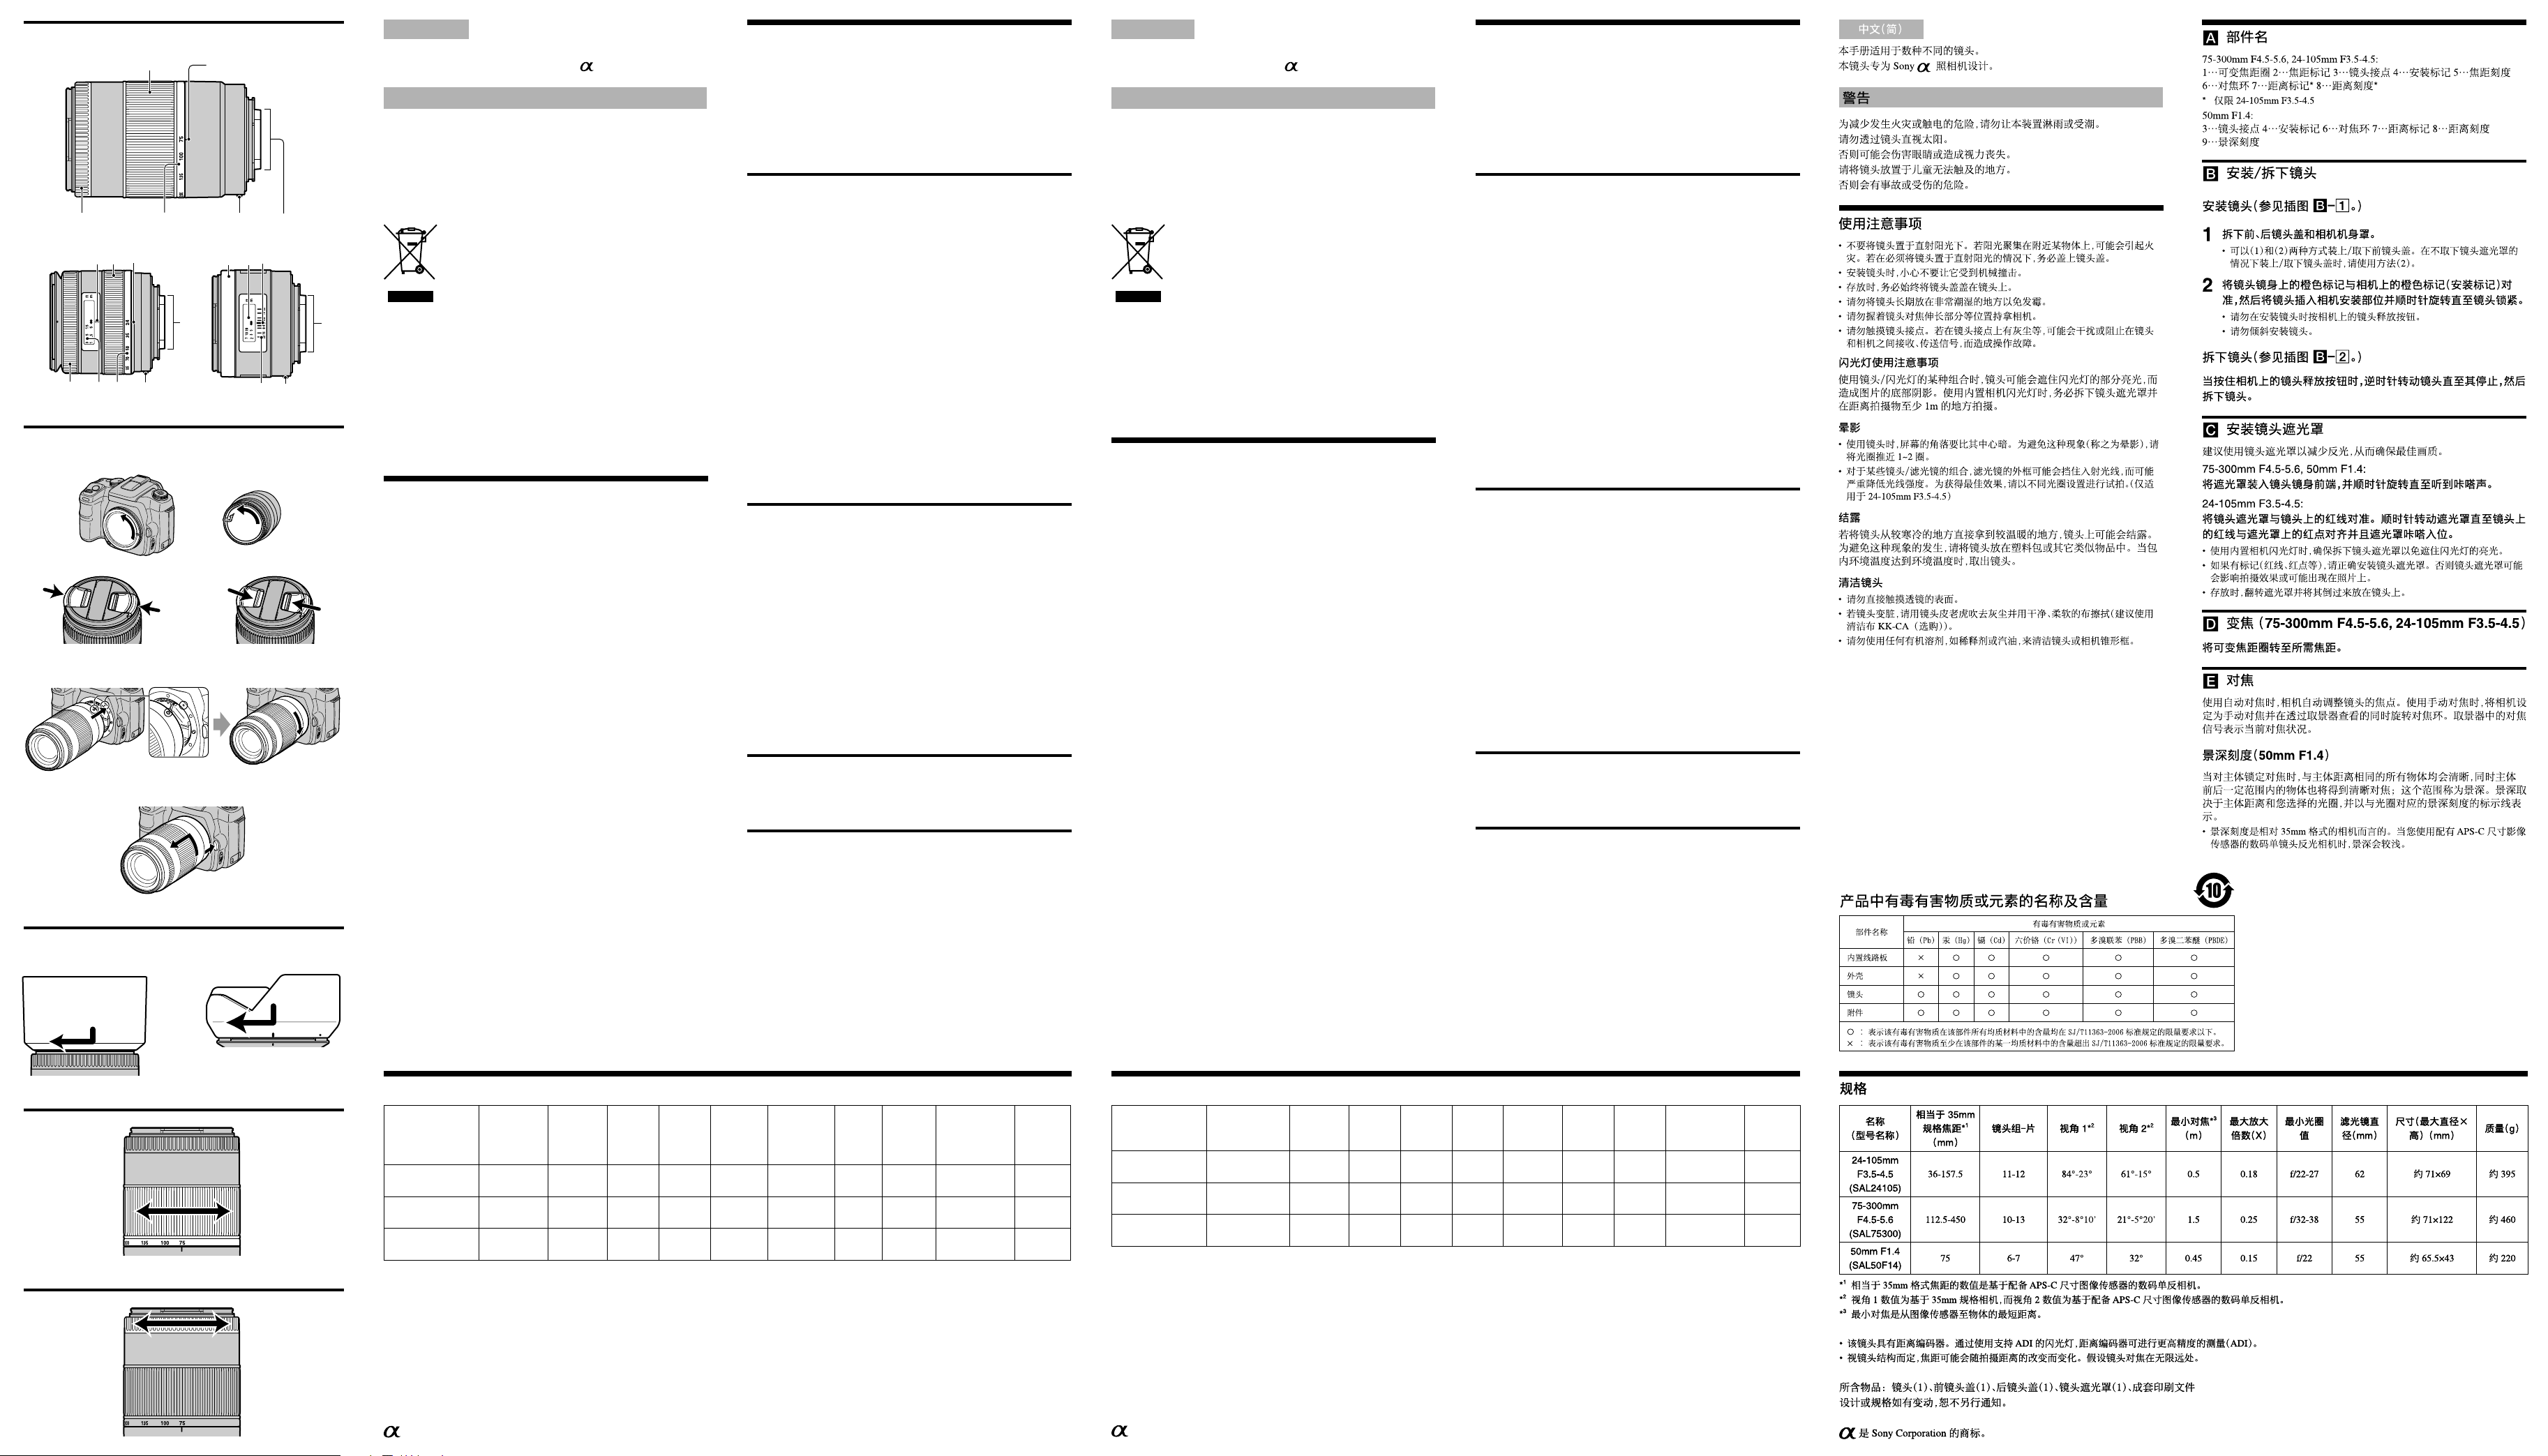
Noms des pièces
75-300mm F4.5-5.6, 24-105mm F3.5-4.5:
1···Bague du zoom 2···Repère de la longueur focale 3···Contacts de l’objectif
4···Repère de montage 5···Echelle de longueur focale 6···Bague de mise au point
7···Index de distance
*
8···Echelle de mise au point
*
*Pour 24-105mm F3.5-4.5 uniquement
50mm F1.4:
3···Contacts de l’objectif 4···Repère de montage 6···Bague de mise au point 7···Index de
distance 8···Echelle de mise au point 9···Echelle de profondeur de champ
Fixation/retrait de l’objectif
Fixation de l’objectif (Voir l’illustration –.)
1Retirez les capuchons d’objectif situés à l’avant et l’arrière,
ainsi que le capuchon de l’appareil photo.
•
Vous pouvez fixer/détacher le capuchon avant de deux façons, (1) et (2). Lorsque vous fixez/
détachez le capuchon d’objectif alors que le pare-soleil est en place, utilisez la méthode (2).
2Alignez le repère orange situé sur la monture de l’objectif
sur le repère orange de l’appareil (repère de montage), puis
insérez l’objectif dans la monture de l’appareil et tournez-le
dans le sens horaire jusqu’à ce qu’il se bloque.
• N’appuyez pas sur le bouton de déblocage de l’objectif de l’appareil
lorsque vous fixez l’objectif.
• Ne fixez pas l’objectif de travers.
Retrait de l’objectif (Voir l’illustration –.)
Tout en appuyant et en maintenant enfoncé le bouton de
déblocage de l’objectif sur l’appareil, tournez l’objectif dans le
sens anti-horaire jusqu’à la butée, puis détachez l’objectif.
Fixation du pare-soleil
Il est recommandé d’utiliser un pare-soleil afin de réduire la lumière parasite
et d’assurer une qualité d’image maximale.
75-300mm F4.5-5.6, 50mm F1.4:
Insérez le pare-soleil dans la monture située à l’extrémité de
l’objectif et tournez-le dans le sens horaire jusqu’au déclic.
24-105mm F3.5-4.5:
Alignez les lignes rouges situées sur le pare-soleil et l’objectif.Tournez le pare-
soleil dans le sens horaire jusqu’à ce que la ligne rouge de l’objectif se trouve sur
le point rouge du pare-soleil et que celui-ci émette un déclic de mise en place.
• Lorsque vous utilisez un flash intégré, veillez à retirer le pare-soleil afin d’éviter
que la lumière du flash ne soit bloquée.
•
Si un marquage (ligne rouge, point rouge, etc.) est présent, fixez le pare-soleil correctement.
Sinon, le pare-soleil risque de perturber l’effet souhaité ou d’apparaître sur les images.
•
Lorsque vous le rangez, retournez le pare-soleil et placez-le sur l’objectif à l’arrière.
Utilisation du zoom (75-300mm F4.5-5.6,
24-105mm F3.5-4.5)
Tournez la bague du zoom pour obtenir la longueur focale de votre choix.
Mise au point
Lorsque vous utilisez la mise au point automatique, l’appareil photo fait la
mise au point automatiquement au niveau de l’objectif.
Pour effectuer une mise au point manuelle, réglez votre appareil en mode de mise au point
manuelle et tournez la bague de mise au point tout en regardant dans le viseur. Le signal de
mise au point dans le viseur indique les conditions actuelles de mise au point.
Echelle de profondeur de champ (50mm F1.4)
La profondeur de champ est la zone de netteté située devant et derrière le sujet sur lequel
est réglée la mise au point de l’appareil, ainsi que la zone située à la même distance que le
sujet. La profondeur de champ dépend de la distance à laquelle se trouve le sujet, ainsi que
de l’ouverture du diaphragme choisie. Elle est indiquée par les lignes situées sur l’échelle
de profondeur de champ qui correspondent à l’ouverture du diaphragme.
• La profondeur de champ est définie pour les appareils photos au format 35 mm.
Elle est réduite lorsque vous utilisez des appareils photos reflex numériques à un
objectif avec un capteur d’image au format APS-C.
Español
Este manual es aplicable a distintos objetivos.
Este objetivo está diseñado para cámaras de Sony.
ADVERTENCIA
Para reducir el riesgo de incendio o descarga eléctrica, no exponga la unidad
a la lluvia ni a la humedad.
No mire directamente el sol a través de este objetivo.
De lo contrario, podría dañar sus ojos o causar una pérdida de su vista.
Mantenga el objetivo fuera del alcance de los niños.
Existe riesgo de sufrir daños o un accidente.
Tratamiento de los equipos eléctricos y electrónicos
al final de su vida útil (aplicable en la Unión Europea
y en países europeos con sistemas de recogida
selectiva de residuos)
Este símbolo en el equipo o el embalaje indica que el presente
producto no puede ser tratado como residuos domésticos
normales, sino que debe entregarse en el correspondiente
punto de recogida de equipos eléctricos y electrónicos. Al asegurarse de
que este producto se desecha correctamente, Ud. ayuda a prevenir las
consecuencias negativas para el medio ambiente y la salud humana que
podrían derivarse de la incorrecta manipulación en el momento de deshacerse
de este producto. El reciclaje de materiales ayuda a conservar los recursos
naturales. Para recibir información detallada sobre el reciclaje de este
producto, póngase en contacto con el ayuntamiento, el punto de recogida más
cercano o el establecimiento donde ha adquirido el producto.
Notas sobre el uso
• No exponga el objetivo a la luz solar directa. Si enfoca la luz solar directa a un
objeto cercano, puede provocar incendios. Si las circunstancias exigen dejar el
objetivo expuesto a la luz solar directa, asegúrese de colocar la tapa del objetivo.
• Procure no exponer el objetivo a golpes mientras lo coloca.
• Coloque siempre las tapas del objetivo en el mismo en el momento de guardarlo.
• No guarde el objetivo en un lugar muy húmedo durante un largo período de
tiempo para evitar la aparición de moho.
• No sujete la cámara por la pieza que se extiende al enfocar, etc.
• No toque los contactos del objetivo. Si éstos se ensucian, es posible que ello
interfiera o impida el envío y la recepción de señales entre el objetivo y la
cámara, lo que podría ocasionar un fallo en el funcionamiento.
Precaución en el uso del flash
Con algunas combinaciones de objetivo y flash, el objetivo puede bloquear
parcialmente la luz del flash, lo que podría provocar una sombra en la parte
inferior de la imagen. Al usar una cámara con flash incorporado, asegúrese de
extraer el parasol y tomar fotografías desde como mínimo 1 m de distancia
desde el motivo.
Viñeteado
• Si utiliza el objetivo, las esquinas de la pantalla se vuelven más oscuras que el
centro. Para reducir este fenómeno (llamado viñeteado), cierre la abertura de 1 a
2 puntos.
• Con algunas combinaciones de objetivo o de filtro, el marco del filtro puede
bloquear la radiación accidental, lo que reducirá considerablemente la intensidad
de la luz. Para obtener mejores resultados, haga fotografías de prueba con
aberturas diferentes. (solamente 24-105mm F3.5-4.5)
Condensación
Si el objetivo se traslada directamente de un lugar frío a uno cálido, es
posible que aparezca condensación en el mismo. Para evitarlo, coloque el
objetivo en una bolsa de plástico o similar. Cuando la temperatura del interior
de la bolsa alcance la temperatura ambiente, extraiga el objetivo.
Limpieza del objetivo
• No toque la superficie del objetivo directamente.
• Si el objetivo se ensucia, utilice un soplador para eliminar el polvo del objetivo y
límpielo con un paño suave y limpio (se recomienda el paño de limpieza KK-CA
opcional).
• No utilice disolventes orgánicos como diluyentes o bencina para limpiar el
objetivo o el cono de la cámara.
Nombres de las piezas
75-300mm F4.5-5.6, 24-105mm F3.5-4.5:
1···Anillo de zoom 2···Índice de distancia focal 3···Contactos del objetivo
4···Índice de montaje 5···Escala de distancia focal 6···Anillo de enfoque
7···Índice de distancia*8···Escala de distancia*
*Sólo en el modelo 24-105mm F3.5-4.5
50mm F1.4:
3···Contactos del objetivo 4···Índice de montaje 6···Anillo de enfoque 7···Índice de
distancia 8···Escala de distancia 9···Escala de profundidad de campo
Colocación/extracción del objetivo
Para colocar el objetivo (consulte la ilustración
–
.)
1Extraiga las tapas frontal y posterior del objetivo y la tapa del
cuerpo de la cámara.
• Puede colocar o extraer la tapa frontal del objetivo de dos modos, (1) y (2).
Cuando coloque o extraiga la tapa del objetivo con el parasol colocado,
utilice el método (2).
2Alinee el índice naranja del tambor del objetivo con el índice
naranja de la cámara (índice de montaje) y, a continuación,
inserte el objetivo en la montura de la cámara y gírelo hacia
la derecha hasta que quede encajado.
•
No pulse el botón de liberación del objetivo de la cámara cuando monte el objetivo.
• No monte el objetivo inclinado.
Para extraer el objetivo (consulte la ilustración –.)
Gire el objetivo hacia la izquierda hasta que se detenga mientras mantiene el
botón de liberación del objetivo pulsado y, a continuación, extráigalo.
Colocación del parasol
Es recomendable utilizar un parasol para reducir los reflejos y garantizar la
máxima calidad de imagen.
75-300mm F4.5-5.6, 50mm F1.4:
Inserte el parasol en la montura del extremo del tambor del
objetivo y gire el parasol hacia la derecha hasta que haga clic.
24-105mm F3.5-4.5:
Alinee las líneas rojas de la cubierta del objetivo con el objetivo.
Gire la cubierta hacia la derecha hasta que la línea roja del
objetivo se ajuste en el punto rojo de la cubierta.
• Cuando utilice una cámara con flash incorporado, asegúrese de extraer el parasol
para evitar el bloqueo de la luz del flash.
• Si existe una marca (línea roja, punto rojo, etc.), fije la cubierta del objetivo
correctamente. Si no, es posible que la cubierta impida el efecto deseado o puede
que aparezca en las fotografías.
• Cuando la guarde, gire el parasol y colóquelo al revés en el objetivo.
Utilización del zoom (75-300mm F4.5-5.6,
24-105mm F3.5-4.5)
Gire el anillo de zoom hasta la distancia focal que desee.
Enfoque
Cuando utilice el enfoque automático, la cámara enfocará el objetivo
automáticamente.
Cuando enfoque manualmente, ajuste la cámara en el modo de enfoque
manual y gire el anillo de enfoque mientras mira a través del visor. La señal
de enfoque del visor indica el estado actual del enfoque.
Escala de profundidad de campo (50mm F1.4)
Cuando se ajusta el enfoque a un motivo, todo lo que se encuentre a la misma distancia
aparecerá nítido y lo que esté dentro de un rango anterior o posterior al motivo también
aparecerá enfocado. Este efecto se denomina profundidad de campo. La profundidad de
campo depende de la distancia del motivo y la abertura seleccionadas y se indica con las
líneas de la escala de profundidad de campo correspondientes a la abertura.
• La escala de profundidad de campo es para cámaras de formato de 35 mm. La
profundidad de campo es menor si utiliza cámaras réflex digitales de objetivo
único equipadas con un sensor de imágenes de tamaño APS-C.
Spécifications
Nom (Désignation
du modèle)
Longueur focale
équivalente au
format 35 mm
*1
(mm)
Elément en
groupes de
l’objectif
Angle de
vue 1*2
Angle de
vue 2*2
Mise au
point
minimale*3
(m (pieds))
Agrandissement
maximum (X)
Valeur f
minimale
Diamètre
du filtre
(mm (po))
Dimensions
(diamètre
maximum ×
hauteur) (mm (po))
Poids
(g (on.))
24-105mm F3.5-4.5
(SAL24105) 36-157,5 11-12 84°-23° 61°-15° 0,5 (1,6) 0,18 f/22-27 62 Environ 71×69
(2 13/16×2 11/16)
Environ 395
(13 15/16)
75-300mm F4.5-5.6
(SAL75300) 112,5-450 10-13 32°-8°10’ 21°-5°20’ 1,5 (4,9) 0,25 f/32-38 55 Environ 71×122
(2 13/16×4 13/16)
Environ 460
(16 1/4)
50mm F1.4
(SAL50F14) 75 6-7 47° 32° 0,45 (1,5) 0,15 f/22 55 Environ 65,5×43
(2 9/16×1 11/16)
Environ 220
(7 3/4)
*1
Les valeur pour une longueur focale équivalente au format 35 mm sont basée sur des appareils photos reflex numériques à un objectif équipés d’un capteur d’image au format APS-C.
*2La valeur pour un angle de vue 1 est basée sur des appareils photos au format 35 mm et celle de l’angle de vue 2 est basée sur des appareils photos reflex numériques à un
objectif équipés d’un capteur d’image au format APS-C.
*3La mise au point minimale est la distance la plus courte entre le capteur d’image et le sujet.
• Cet objectif dispose d’un encodeur de distance. L’encodeur de distance permet d’effectuer des mesures plus précises (ADI) en utilisant un flash pour l’ADI.
• Selon le mécanisme d’objectif, la longueur focale peut varier en fonction de la distance de prise de vue. La longueur focale suppose que l’objectif est réglé sur l’infini.
Articles inclus: Objectif (1), Capuchon d’objectif avant (1), Capuchon d’objectif arrière (1), Pare-soleil (1), Jeu de documents imprimés
La conception et les spécifications peuvent être modifiées sans préavis.
est une marque commerciale de Sony Corporation.
Especificaciones
Nombre (Nombre
del modelo)
Distancia focal
*1
(mm) equivalente al
formato de 35 mm
Elementos
y grupos
del objetivo
Ángulo de
visión 1*2
Ángulo de
visión 2*2
Enfoque
mínimo*3
(m)
Ampliación
máxima (X)
F-stop
mínimo
Diámetro
del filtro
(mm)
Dimensiones
(diámetro máximo
× altura) (mm)
Peso (g)
24-105mm F3.5-4.5
(SAL24105) 36-157,5 11-12 84°-23° 61°-15° 0,5 0,18 f/22-27 62 Aprox. 71×69 Aprox. 395
75-300mm F4.5-5.6
(SAL75300) 112,5-450 10-13 32°-8°10’ 21°-5°20’ 1,5 0,25 f/32-38 55 Aprox. 71×122 Aprox. 460
50mm F1.4
(SAL50F14) 75 6-7 47° 32° 0,45 0,15 f/22 55 Aprox. 65,5×43 Aprox. 220
*1
Los valor de la distancia focal equivalente al formato de 35 mm se basa en cámaras réflex digitales de un solo objetivo equipadas con un sensor de imágenes de tamaño APS-C.
*2El valor del ángulo de visión 1 se basa en las cámaras de formato de 35 mm y el del ángulo de visión 2, en las cámaras réflex digitales de objetivo único equipadas con
sensor de imágenes de tamaño APS-C.
*3El enfoque mínimo es la distancia más corta desde el sensor de imágenes al motivo.
• Este objetivo está equipado con un codificador de distancia El codificador de distancia permite una medición más exacta (ADI) a través de un flash para ADI.
• En función del mecanismo del objetivo, es posible que la distancia focal varíe si la distancia de toma de imagen también lo hace. La distancia focal asume que el objetivo está
enfocado al infinito.
Elementos incluidos: Objetivo (1), Tapa frontal del objetivo (1), Tapa posterior del objetivo (1), Parasol (1), Juego de documentación impresa
El diseño y las especificaciones están sujetos a cambio sin previo aviso.
es una marca comercial de Sony Corporation.


