manuals.online logo
Brands
  1. Home
  2. •
  3. Brands
  4. •
  5. Sony
  6. •
  7. Camera Lens
  8. •
  9. Sony SAL14TC - 1.4x Teleconverter Lens User manual

Sony SAL14TC - 1.4x Teleconverter Lens User manual

1
2
3
4
5
日本語
電気製品は、安全のための注意事項を守らないと、人身への
危害や火災などの財産への損害を与えることがあります。
この取扱説明書には、事故を防ぐための重要な注意事項と製品の取り扱いかたを
示しています。この取扱説明書をよくお読みの上、製品を安全にお使いください。
お読みになったあとは、いつでも見られる所に必ず保管してください。
この「取扱説明書」ではレンズごとの使いかたを説明していま
す。使用上のご注意など、レンズに共通したご注意や説明につ
いては別冊の「使用前のご注意」でご覧頂けます。
必ずご使用の前に、本書と合わせてよくお読みのうえでご使用
ください。
1.4X Teleconverter (SAL14TC)/2X Teleconverter (SAL20TC)
は、対応レンズとカメラの間に取り付けると、レンズの焦点距離を
それぞれ1.4倍(SAL14TC)、
2.0倍(SAL20TC)にするテレコンバー
ジョンレンズです。
本機はソニー製αカメラで使用できる、
Aマウント用レンズです。
使用上のご注意
レンズを取り付けてカメラを持ち運ぶときは、カメラとレンズの両方を
しっかり持ってください。
Eマウントカメラではお使いになれません。
使用可能なレンズと機能
本機は、表記載のレンズ専用です。その他のレンズと装着す
ると、レンズやテレコンバーターが破損する恐れがありますの
で、絶対に取り付けないでください。
表の読みかた
AF オートフォーカス(auto focus)が可能です。
MF 手動でピント合わせ(マニュアルフォーカス/manual
focus)が可能です。
* カメラのフォーカス表示は作動しません。ファインダーなどを見ながら
手動でピント合わせを行ってください。
各部のなまえ
1…レンズ信号接点* 2…マウント指標 3…レンズ交換レバー
4…マウント標点 5…Aマウント
* レンズ信号接点は、Aマウント(5)側にもあります。直接手で触れない
でください。
主な仕様
商品名
(型名)焦点距離倍率 絞り*1レンズ群-
枚
最短撮影
距離*2
最大撮影
倍率 被写界深度
外形寸法
(最大径×長さ)
(mm)
質量(g)
1.4X Teleconverter
(SAL14TC)
使用レンズの
1.4倍
使用レンズの
プラス1段4−5使用レンズと
同じ
使用レンズの
1.4倍
使用レンズの
約1/1.4倍約64×20 約170
2X Teleconverter
(SAL20TC)
使用レンズの
2.0倍
使用レンズの
プラス2段5−6使用レンズと
同じ
使用レンズの
2.0倍
使用レンズの
約1/2倍約64×43.5 約200
*1135mm F2.8 [T4.5] STF (SAL135F28)では、Tナンバー (T No.)に対してそれぞれプラス1段、2段変化します。
*2撮像素子面から被写体までの距離を表します。
同梱物:テレコンバーター (1)、ボディキャップ(前側キャップ)(1)、レンズリヤキャップ(後側キャップ)(1)、レンズケース(1)、印刷物一式
仕様および外観は、改良のため予告なく変更することがありますが、ご了承ください。
はソニー株式会社の商標です。
Specifications
Name
(Model name)
Effective focal
length f-stop*1
Lens
groups-
elements
Minimum
focus*2
Maximum
magnification Depth of field
Dimensions
(maximum diameter
× height) (mm (in.))
Mass
(g (oz.))
1.4X Teleconverter
(SAL14TC)
1.4X that of the
attached lens
1 f-stop higher
from that of the
attached lens
4–5 Same as that of
the attached lens
1.4X that of the
attached lens
Approx. 1/1.4 that
of the attached
lens
Approx. 64×20
(2 1/2×13/16)
Approx. 170
(6)
2X Teleconverter
(SAL20TC)
2.0X that of the
attached lens
2 f-stop higher
from that of the
attached lens
5–6 Same as that of
the attached lens
2.0X that of the
attached lens
Approx. 1/2 that of
the attached lens
Approx. 64×43.5
(2 1/2×1 11/16)
Approx. 200
(7 1/16)
*1When 135mm F2.8 [T4.5] STF (SAL135F28) is attached, a 1 or 2 stop increase of the T-number (T No.).
*2Minimum focus is the distance from the image sensor to the subject.
Included items: Teleconverter (1), Body cap (front side cap) (1), Lens rear cap (rear side cap) (1), Lens case (1), Set of printed documentation
Designs and specifications are subject to change without notice.
is a trademark of Sony Corporation.
取り付けかた/取りはずしかた
取り付けかた(イラスト–参照)
1テレコンバーターの前後キャップ、レンズのリヤキャッ
プ、カメラのボディキャップをそれぞれはずす。
テレコンバーターの前後キャップはそれぞれ反時計方向に回すとは
ずれます。
2レンズのオレンジの点(マウント標点)を、テレコンバー
ターのオレンジの点(マウント指標)に合わせてはめ込み、
レンズを軽くテレコンバーターに押し当てながら、時計方
向に「カチッ」とロックがかかるまでゆっくり回す。
レンズを取り付けるときに、テレコンバーターのレンズ交換レバー
を押さないで下さい。
レンズを斜めに差し込まないようにしてください。
3レンズを取り付けたテレコンバーターのオレンジの点(マ
ウント標点)を、カメラのオレンジの点(マウント指標)に合
わせてはめ込み、テレコンバーターを軽くカメラに押し当
てながら、時計方向に「カチッ」とロックがかかるまでゆっ
くり回す。
テレコンバーターを取り付けるときに、カメラのレンズ取りはずし
ボタンを押さないで下さい。
テレコンバーターを斜めに差し込まないようにしてください。
テレコンバーターをカメラに取り付けたあとに、レンズをテ
レコンバーターに装着すると、適正な露出・調光が得られな
い場合があります。正しい順番で取り付けてください。
テレコンバーターは必ず1個でご使用ください。複数個の使
用はできません。無理に取り付けると、テレコンバーターが
破損する恐れがあります。
取りはずしかた(イラスト–参照)
1カメラのレンズ取りはずしボタンを押したまま、レンズを
取り付けたテレコンバーターを反時計方向に回してから、
前方に引き出してはずす。
2テレコンバーターのレンズ交換レバーを押したまま、レン
ズを反時計方向に回してから、前方に引き出してはずす。
撮影上のご注意
テレコンバーターを装着すると焦点距離は長くなりますが、装着
したレンズの実効絞り値は暗くなります*。カメラのTTL測光シ
ステムにより実効絞りは自動的に補正されます。レンズ側面の距
離目盛はテレコンバーターを使用してもそのまま利用できます。
被写界深度は、テレコンバーターを装着していない場合に比べて
浅くなります*。
* 詳細は「主な仕様」をご覧ください。
テレコンバーターを装着すると、焦点距離が望遠になり、実効絞り値も暗
くなりますので、カメラぶれにご注意ください。三脚のご使用をおすす
めします。
テレコンバーター装着後、蛍光灯照明の比較的暗いところでは、AFでは
ピントが合いにくいことがあります。コントラストのはっきりしたもの
でピントを合わせるか、マニュアルフォーカスに切り替えてピント合わ
せをしてください。
English
You will find information on using each lens in this manual. Precautions
common to lenses, such as notes on use will be found in “Precautions
before using” on a separate sheet. Be sure to read both documents before
using the lens.
The 1.4X Teleconverter (SAL14TC)/2X Teleconverter (SAL20TC) functions
to increase the focal length of the attached lens by 1.4X (SAL14TC)/2.0X
(SAL20TC) when mounted between the camera and lens.
This lens is designed for A-mount, which can be used on Sony αcameras.
Notes on use
When you carry the camera with the lens attached, make sure to hold both the
camera and the lens steadily.
This lens can not be used on E-mount cameras.
Compatible Lenses and Functions
This teleconverter is designed exclusively for use with the lenses listed in
the table . Do not attach other lenses, otherwise the teleconverter or
lens may be damaged.
How to read the table
AF:
Auto focus
MF:
Manual focus
*The camera’s focus indicator does not work. Focus manually monitoring the
subject by the finder, etc.
Names of parts
1···Lens contacts*2···Lens mounting index 3···Lens release 4···Mounting
index for camera body 5···A-mount
*Do not touch the lens contacts on the front and rear mounts.
Attaching and removing
To attach the teleconverter (See illustration –.)
1Remove the camera body cap, lens rear cap, and teleconverter’s
front and rear lens caps.
To remove the teleconverter’s caps, turn the front and rear lens caps
counterclockwise.
2Align the mounting index on the lens barrel with the orange lens
mounting index on the teleconverter. Insert the lens into the
teleconverter mount and turn it clockwise until it locks into place.
Do not press the lens release on the teleconverter when mounting the lens.
The lens will not couple properly.
Do not insert the lens at an angle.
3Align the mounting index for camera body on the teleconverter
with the orange index on the camera. Insert the teleconverter
into the camera mount and turn it clockwise until it locks into
place.
Do not press the lens release button on the camera when mounting the
teleconverter. The teleconverter will not couple properly.
Do not insert the teleconverter at an angle.
SAL14TC/SAL20TC
1.4X Teleconverter
2X Teleconverter
取扱説明書
/
Operating Instructions/Mode d'emploi/Manual de
instrucciones/
交換レンズ
/
Interchangeable Lens/
Objectif interchangeable/
A-mount
4-271-846-03(1)
©2006 Sony Corporation
Printed in Japan
Always attach the lens to the teleconverter before attaching the
teleconverter to the camera. Attaching them in reverse order may
result in incorrect metering.
Do not use more than one teleconverter with a lens. Damage may
result.
To remove the teleconverter (See illustration –.)
1Hold down the lens release button on the camera body and turn
the teleconverter and lens counterclockwise until they stop.
Carefully lift the teleconverter out of the camera mount.
2Hold down the lens release on the teleconverter and turn the lens
counterclockwise until it stops. Carefully lift the lens out of the
teleconverter mount.
Notes on shooting
While the teleconverter increases the focal length of the attached lens,
it reduces the effective aperture of the attached lens.*The camera’s
TTL metering compensates for the effective aperture automatically.
The teleconverter does not affect the lens’ distance scale; it can be read
in the normal way. The lens’ depth of field is shallower when using the
teleconverter.*
*See the following specifications for further information.
Because of the increase in focal length and decrease in effective aperture, use a
tripod to reduce camera shake.
In low light conditions, such as with dim fluorescent light, the camera may not
be able to focus. Use focus lock on high contrast subject or manual focus.


–1
–2
–1
–2

1.4X
Teleconverter
2X
Teleconverter
70-200mm F2.8 G
(SAL70200G) AF MF AF MF
300mm F2.8 G
(SAL300F28G) AF MF AF MF
135mm F2.8 [T4.5] STF
(SAL135F28) MF*MF*
70-400mm F4-5.6 G SSM
(SAL70400G) MF*MF*
1
2
3
4
5


–1
–2
–1
–2

1.4X
Teleconverter
2X
Teleconverter
70-200mm F2.8 G
(SAL70200G) AF MF AF MF
300mm F2.8 G
(SAL300F28G) AF MF AF MF
135mm F2.8 [T4.5] STF
(SAL135F28) MF*MF*
70-400mm F4-5.6 G SSM
(SAL70400G) MF*MF*
Spécifications
Nom (Désignation
du modèle)
Longueur
focale réelle Valeur f *1
Elément en
groupes de
l’objectif
Mise au point
minimale*2
Grossissement
maximal
Profondeur de
champ
Dimensions
(diamètre maximum
× hauteur) (mm (po))
Poids
(g (on.))
1.4X Teleconverter
(SAL14TC)
1,4X celle de
l’objectif fixé
1 valeur f
supérieure à celle
de l’objectif fixé
4–5 Identique à celle
de l’objectif fixé
1,4X celui de
l’objectif fixé
Environ 1/1,4 fois
celle de l’objectif
fixé
Environ 64 × 20
(2 1/2×13/16)
Environ 170
(6)
2X Teleconverter
(SAL20TC)
2,0X celle de
l’objectif fixé
2 valeurs
supérieure à celle
de l’objectif fixé
5–6 Identique à celle
de l’objectif fixé
2,0X celui de
l’objectif fixé
Environ 1/2 fois
celle de l’objectif
fixé
Environ 64 × 43,5
(2 1/2×1 11/16)
Environ 200
(7 1/16)
*1Lorsque le 135mm F2.8 [T4.5] STF (SAL135F28) est fixé, augmentation d’1 ou 2 butées du nombre T (T No.).
*2La mise au point minimale est la distance la plus courte entre le capteur d’image et le sujet.
Articles inclus : Téléconvertisseur (1), Capuchon d’objectif avant (capuchon avant) (1), Capuchon d’objectif arrière (capuchon arrière) (1), Étui pour objectif (1),
Jeu de documents imprimés
La conception et les spécifications peuvent être modifiées sans préavis.
est une marque commerciale de Sony Corporation.
Français
Des informations relatives à l’utilisation de chaque objectif sont
disponibles dans ce manuel. La section « Précautions avant toute
utilisation », qui fait l’objet d’un document séparé, contient des
précautions relatives aux objectifs, telles que des remarques sur leur
utilisation. Veuillez lire attentivement ces deux documents avant
d’utiliser l’objectif.
Le téléconvertisseur 1.4X Teleconverter (SAL14TC)/téléconvertisseur 2X
Teleconverter (SAL20TC) augmente la longueur focale de l’objectif fixé de
1,4X (SAL14TC)/2,0X (SAL20TC) lorsqu’il est installé entre l’appareil photo
et l’objectif.
Cet objectif est conçu pour les montures A, à utiliser sur les appareils photo
αSony.
Remarques sur l’utilisation
Tenez fermement à la fois l’appareil photo et l’objectif lorsque vous transportez
l’appareil photo avec l’objectif fixé.
Cet objectif ne peut être utilisé sur des appareils photos à monture E.
Objectifs compatibles et fonctions
Ce téléconvertisseur est conçu exclusivement pour une utilisation avec les
objectifs indiqués dans le tableau . N’installez pas d’autres objectifs,
sinon le téléconvertisseur ou l’objectif pourrait être endommagé.
Comment lire le tableau
AF:
mise au point automatique
MF:
mise au point manuelle.
*L’indicateur de mise au point de l’appareil photo ne fonctionne pas. Effectuez la
mise au point manuellement sur le sujet, à l’aide du viseur, etc.
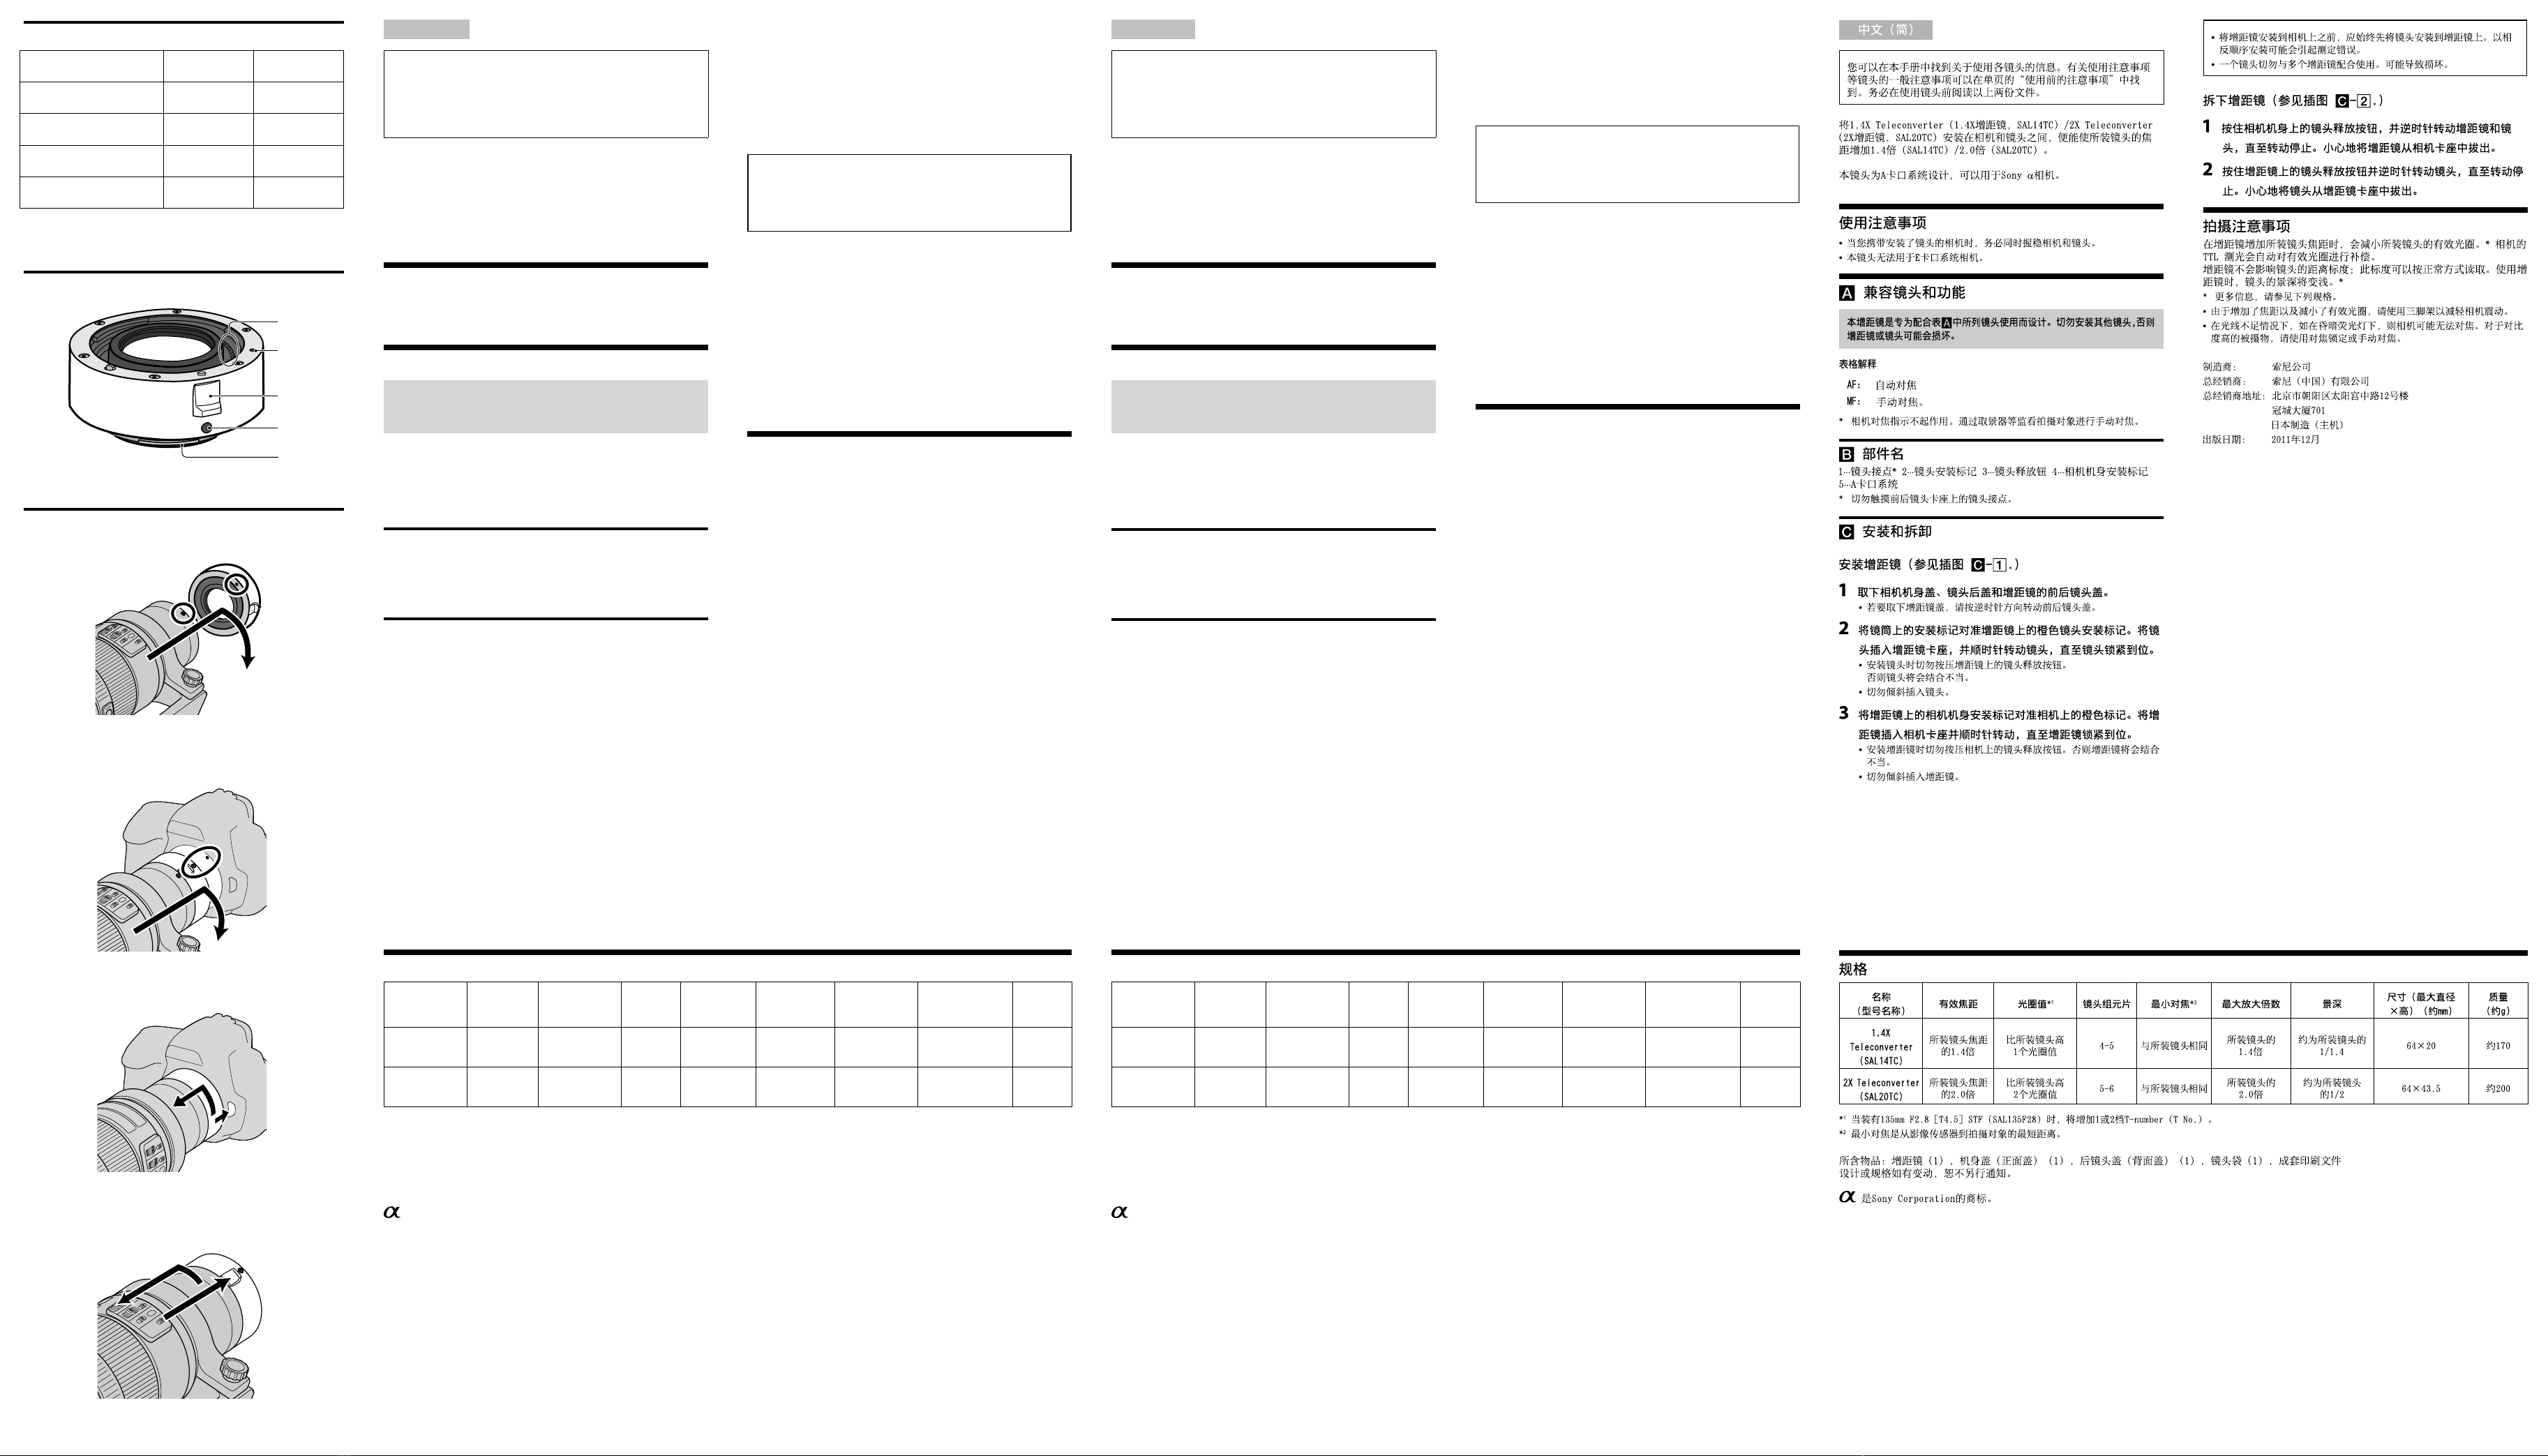
Noms des pièces
1···Contacts de l’objectif *2···Repère de montage de l’objectif 3···Bouton de
déblocage de l’objectif 4···Repère de montage sur le boîtier de l’appareil photo
5···Monture A
*Ne touchez pas les contacts de l’objectif sur les montures avant et arrière.
Fixation et retrait
Fixation du téléconvertisseur (Voir illustration –.)
1Retirez le capuchon de l’appareil photo, le capuchon arrière de
l’objectif, ainsi que les capuchons d’objectif avant et arrière du
téléconvertisseur.
Pour retirer les capuchons du téléconvertisseur, tournez les capuchons d’
objectif avant et arrière dans le sens anti-horaire.
2Alignez le repère de montage situé sur la monture de l’objectif sur
le repère de montage orange de l’objectif du téléconvertisseur.
Insérez l’objectif dans la monture du téléconvertisseur et tournez-
le dans le sens horaire, jusqu’à ce qu’il se bloque.
N’appuyez pas sur le bouton de déblocage du téléconvertisseur lorsque vous
fixez l’objectif. L’objectif ne sera pas inséré correctement.
N’insérez pas l’objectif de travers.
3Alignez le repère de montage pour le boîtier de l’appareil photo
situé sur le téléconvertisseur sur le repère orange de l’appareil
photo. Insérez le téléconvertisseur dans la monture de l’appareil
photo et tournez-le dans le sens horaire, jusqu’à ce qu’il se
bloque.
N’appuyez pas sur le bouton de déblocage de l’appareil photo lorsque
vous fixez le téléconvertisseur. Le téléconvertisseur ne sera pas inséré
correctement.
N’insérez pas le téléconvertisseur de travers.
Fixez toujours l’objectif sur le téléconvertisseur avant de fixer ce
dernier sur l’appareil photo. Si vous procédez dans un autre ordre, la
mesure risque d’être incorrecte.
N’utilisez pas plusieurs téléconvertisseurs avec un objectif. Vous
risqueriez de les endommager.
Retrait du téléconvertisseur (Voir illustration –.)
1Maintenez la touche de déblocage de l’objectif située sur le boîtier
de l’appareil photo enfoncée et tournez le téléconvertisseur ainsi
que l’objectif dans le sens anti-horaire, jusqu’à la butée. Détachez
le téléconvertisseur de la monture de l’appareil photo avec
précaution.
2Maintenez la touche de déblocage de l’objectif située sur le
téléconvertisseur enfoncée et tournez l’objectif dans le sens anti-
horaire, jusqu’à la butée. Détachez l’objectif de la monture du
téléconvertisseur avec précaution.
Remarques sur la prise de vue
Le téléconvertisseur augmente la longueur focale de l’objectif fixé mais
réduit l’ouverture réelle de ce dernier.*La mesure TTL de l’appareil photo
compense automatiquement l’ouverture réelle.
Le téléconvertisseur n’a aucune influence sur l’échelle de mise au point
de l’objectif qui peut être lue normalement. La profondeur de champ de
l’objectif est réduite lors de l’utilisation du téléconvertisseur.*
*Pour plus d’informations, reportez-vous aux spécifications suivantes.
Etant donné l’augmentation de la longueur focale et la diminution de l’ouverture
réelle, utilisez un trépied pour réduire les bougés de l’appareil photo.
Dans des conditions peu lumineuses, telles qu’un éclairage fluorescent tamisé, il
est possible que l’appareil ne puisse pas faire la mise au point. Utilisez le blocage
de la mise au point sur des sujets très contrastés ou en mise au point manuelle.
Especificaciones
Nombre (Nombre
del modelo)
Distancia focal
efectiva f-stop*1
Elementos y
grupos del
objetivo
Enfoque
mínimo*2
Ampliación
máxima
Profundidad de
campo
Dimensiones
(diámetro máximo ×
altura) (mm)
Peso (g)
1.4X Teleconverter
(SAL14TC)
1,4X del
objetivo
colocado
1 f-stop superior
al del objetivo
colocado
4–5
El mismo que
el del objetivo
colocado
1,4X del objetivo
colocado
Aprox. 1/1,4 del
objetivo colocado Aprox. 64×20 Aprox. 170
2X Teleconverter
(SAL20TC)
2,0X del
objetivo
colocado
2 f-stop superior
al del objetivo
colocado
5–6
El mismo que
el objetivo
colocado
2,0X del objetivo
colocado
Aprox. 1/2 del
objetivo colocado Aprox. 64×43,5 Aprox. 200
*1Cuando se coloca el objetivo de 135mm F2.8 [T4.5] STF (SAL135F28), aumenta en 1 o 2 puntos el número T (T No.).
*2El enfoque mínimo es la distancia más corta desde el sensor de imágenes hasta el motivo.
Elementos incluidos: Teleconversor (1), Tapa del cuerpo (tapa frontal) (1), Tapa posterior del objetivo (tapa posterior) (1), Estuche para objetivo (1), Juego de
documentación impresa
El diseño y las especificaciones están sujetos a cambios sin previo aviso.
es una marca comercial de Sony Corporation.
Español
En este manual encontrará información sobre la utilización de cada
objetivo. Las precauciones comunes que se aplican a los objetivos,
como por ejemplo las notas sobre la utilización, se encuentran en una
hoja separada con el título “Precauciones previas a la utilización del
producto”. Asegúrese de leer ambos documentos antes de utilizar el
objetivo.
Cuando se coloca el 1.4X Teleconverter (Teleconversor de 1.4X, SAL14TC)
o 2X Teleconverter (Teleconversor de 2X, SAL20TC) entre la cámara y el
objetivo, éste aumenta la distancia focal del objetivo colocado en 1,4X para
SAL14TC y 2,0X para SAL20TC.
Este objetivo está diseñado para las monturas A, que se pueden utilizar en las
cámaras Sony α.
Notas sobre el uso
Cuando transporte la cámara con el objetivo colocado, sujete firmemente tanto
la cámara como el objetivo.
Este objetivo no se puede utilizar en cámaras con Montura E.
Objetivos y funciones compatibles
Este teleconversor está diseñado para el uso exclusivo con los objetivos
que se indican en la tabla . No coloque otros objetivos, ya que de lo
contrario podría dañar el teleconversor o el objetivo.
Cómo leer la tabla
AF:
enfoque automático
MF:
enfoque manual.
*El indicador de enfoque de la cámara no funciona. Enfoque manualmente,
visualizando el motivo a través del visor, etc.
Nombres de las piezas
1···Contactos del objetivo*2···Índice de montaje del objetivo 3···Botón de
liberación del objetivo 4···Índice de montaje para el cuerpo de la cámara
5···Montura A
*No toque los contactos del objetivo de las monturas frontal y posterior.
Colocación y extracción
Para colocar el teleconversor (Consulte la ilustración
–.)
1Extraiga la tapa del cuerpo de la cámara, la tapa posterior del
objetivo y las tapas anterior y posterior del teleconversor.
Para extraer las tapas anterior y posterior del teleconversor, gírelas en el
sentido contrario a las agujas del reloj.
2Alinee el índice de montaje del tambor del objetivo con el índice
naranja de montaje del objetivo del teleconversor. Inserte el
objetivo en la montura del teleconversor y gírelo en el sentido de
las agujas del reloj hasta que encaje en su sitio.
No pulse el botón de liberación del teleconversor cuando monte el objetivo.
El objetivo no encajará correctamente.
No monte el objetivo inclinado.
3Alinee el índice de montaje para el cuerpo de la cámara del
teleconversor con el índice naranja de la cámara. Inserte el
teleconversor en la montura de la cámara y gírelo en el sentido
de las agujas del reloj hasta que encaje en su sitio.
No pulse el botón de liberación del objetivo de la cámara cuando monte el
teleconversor. El teleconversor no encajará correctamente.
No monte el teleconversor inclinado.
Monte siempre el objetivo en el teleconversor antes de montar el
teleconversor en la cámara. Si los coloca al revés, pueden producirse
mediciones incorrectas.
No utilice varios teleconversores con el mismo objetivo. Podría
provocar daños.
Para extraer el teleconversor (Consulte la ilustración
–.)
1Mantenga pulsado el botón de liberación del objetivo en el
cuerpo de la cámara y gire el teleconversor y el objetivo en el
sentido contrario al de las agujas del reloj hasta que se detengan.
Retire con cuidado el teleconversor de la montura de la cámara.
2Mantenga pulsado el botón de liberación del objetivo del
teleconversor y gire el objetivo en el sentido contrario al de
las agujas del reloj hasta que se detenga. Retire con cuidado el
objetivo de la montura del teleconversor.
Notas sobre la toma de imágenes
Aunque el teleconversor aumenta la distancia focal del objetivo colocado,
también reduce la apertura efectiva del mismo.*La medición TTL de la
cámara compensa la apertura efectiva de forma automática. El teleconversor
no afecta a la escala de distancias del objetivo; éstas se perciben de forma
normal. La profundidad de campo del objetivo es menor si se utiliza el
teleconversor.*
*Para obtener información adicional, consulte las especificaciones siguientes.
Debido al aumento de la distancia focal y la disminución de la apertura efectiva,
deberá utilizar un trípode para reducir el movimiento de la cámara.
Es posible que la cámara no pueda enfocar en condiciones de poca luz como, por
ejemplo, con la luz tenue de un fluorescente. Utilice el bloqueo de enfoque o el
enfoque manual para fotografiar motivos de alto contraste.
!
!
!
! !
! ! ! !
!
!
!
! !
! !

Other manuals for SAL14TC - 1.4x Teleconverter Lens

1

This manual suits for next models

1

Other Sony Camera Lens manuals

Sony VCL-HA06 User manual

Sony

Sony VCL-HA06 User manual

Sony SAL16F28 User manual

Sony

Sony SAL16F28 User manual

Sony SAL16105 - Zoom Lens - 16 mm User manual

Sony

Sony SAL16105 - Zoom Lens - 16 mm User manual

Sony E 3.5-5.6/PZ 16-50 OSS User manual

Sony

Sony E 3.5-5.6/PZ 16-50 OSS User manual

Sony SAL75300 - Telephoto Zoom Lens User manual

Sony

Sony SAL75300 - Telephoto Zoom Lens User manual

Sony SAL-35F14G - 35mm f/1.4 Aspherical G Series Standard Zoom... User manual

Sony

Sony SAL-35F14G - 35mm f/1.4 Aspherical G Series Standard Zoom... User manual

Sony SEL50F18F User manual

Sony

Sony SEL50F18F User manual

Sony VCL-ECF1 User manual

Sony

Sony VCL-ECF1 User manual

Sony SAL18200 - DT 18-200mm f/3.5-6.3 Aspherical ED High Magnification Zoom... User manual

Sony

Sony SAL18200 - DT 18-200mm f/3.5-6.3 Aspherical ED High Magnification Zoom... User manual

Sony VCL-HA07A User manual

Sony

Sony VCL-HA07A User manual

Sony SAL1870 - Zoom Lens - 18 mm User manual

Sony

Sony SAL1870 - Zoom Lens - 18 mm User manual

Sony FE 28-60mm F4-5.6 User manual

Sony

Sony FE 28-60mm F4-5.6 User manual

Sony NEX-3D - alpha; Nex-3 With Sel-16f28 User manual

Sony

Sony NEX-3D - alpha; Nex-3 With Sel-16f28 User manual

Sony SAL1855 - 18-55mm f/3.5-5.6 SAM DT Standard Zoom... Installation instructions manual

Sony

Sony SAL1855 - 18-55mm f/3.5-5.6 SAM DT Standard Zoom... Installation instructions manual

Sony SAL-35F18 User manual

Sony

Sony SAL-35F18 User manual

Sony G MASTER FE 50mm F1.4 GM User manual

Sony

Sony G MASTER FE 50mm F1.4 GM User manual

Sony DH1730 User manual

Sony

Sony DH1730 User manual

Sony VCL-ES20A User manual

Sony

Sony VCL-ES20A User manual

Sony SAL-300F28G User manual

Sony

Sony SAL-300F28G User manual

Sony VCL-HG0737C User manual

Sony

Sony VCL-HG0737C User manual

Sony SEL70300G User manual

Sony

Sony SEL70300G User manual

Sony SAL1855 - 18-55mm f/3.5-5.6 SAM DT Standard Zoom... Installation instructions manual

Sony

Sony SAL1855 - 18-55mm f/3.5-5.6 SAM DT Standard Zoom... Installation instructions manual

Sony SAL55200-2 User manual

Sony

Sony SAL55200-2 User manual

Sony SAL50M28 - 50mm f/2.8 Macro Lens User manual

Sony

Sony SAL50M28 - 50mm f/2.8 Macro Lens User manual

Popular Camera Lens manuals by other brands

Nikon Fisheye-Nikkor 8mm f/2.8 instruction manual

Nikon

Nikon Fisheye-Nikkor 8mm f/2.8 instruction manual

Panasonic LUMIX H-X015K owner's manual

Panasonic

Panasonic LUMIX H-X015K owner's manual

Samsung SLA-3580DN Technical specifications

Samsung

Samsung SLA-3580DN Technical specifications

Pentax SMC 67 Soft 120mm f/3.5 Operating manual & parts list

Pentax

Pentax SMC 67 Soft 120mm f/3.5 Operating manual & parts list

American Dynamics LIRC0308CS owner's manual

American Dynamics

American Dynamics LIRC0308CS owner's manual

Panasonic LUMIX S PRO R1635 operating instructions

Panasonic

Panasonic LUMIX S PRO R1635 operating instructions

Olympus WCON-07C instructions

Olympus

Olympus WCON-07C instructions

Tamron A058 owner's manual

Tamron

Tamron A058 owner's manual

Panasonic 5025232898695 operating instructions

Panasonic

Panasonic 5025232898695 operating instructions

Nauticam Macro to Wideangle Lens 1 instruction manual

Nauticam

Nauticam Macro to Wideangle Lens 1 instruction manual

Nikon AF-S DX NIKKOR user manual

Nikon

Nikon AF-S DX NIKKOR user manual

Sigma 737 Instruction booklet

Sigma

Sigma 737 Instruction booklet

Nikon NIKKOR Z MC 50mm f/2.8 user manual

Nikon

Nikon NIKKOR Z MC 50mm f/2.8 user manual

Nikon NIKKOR user manual

Nikon

Nikon NIKKOR user manual

Nikon NIKKOR Z 800mm f/6.3 VR S reference guide

Nikon

Nikon NIKKOR Z 800mm f/6.3 VR S reference guide

Tamron A17 owner's manual

Tamron

Tamron A17 owner's manual

Panasonic H-FSA45200 user manual

Panasonic

Panasonic H-FSA45200 user manual

Canon EF35mm f/2 IS USM instruction manual

Canon

Canon EF35mm f/2 IS USM instruction manual

manuals.online logo
manuals.online logoBrands
  • About & Mission
  • Contact us
  • Privacy Policy
  • Terms and Conditions

Copyright 2025 Manuals.Online. All Rights Reserved.