Sony SA-ID5000 (GB) 4-184-858-11(3)
WARNING
To reduce the risk of fire or electric shock, do not expose this apparatus to dripping or splashing, and do not place
objects filled with liquids, such as vases, on the apparatus.
To reduce the risk of fire, do not cover the ventilation opening of the apparatus with newspapers, tablecloths,
curtains, etc. Do not place the naked flame sources such as lighted candles on the apparatus.
As the main plug is used to disconnect the unit from the mains, connect the unit to an easily accessible AC outlet.
Should you notice an abnormality in the unit, disconnect the main plug from the AC outlet immediately.
Do not install the appliance in a confined space, such as a bookcase or built-in cabinet.
Do not expose batteries or apparatus with battery-installed to excessive heat such as sunshine, fire or the like.
To prevent injury, this apparatus must be securely attached to the floor/wall in accordance with the installation
instructions.
The unit is not disconnected from the mains as long as it is connected to the mains, even if the unit itself has been
turned off.
Precautions
On safety
• Before operating the system, be sure that the operating
voltage of the system is identical with that of your local
power supply.
• Unplug the system from the mains if it is not to be used for
an extended period of time. To disconnect the mains lead,
pull the mains lead by grasping the plug. Never pull the
mains lead itself.
• Should any liquid or solid object fall into the system,
unplug the system’s mains lead and have the system
checked by qualified personnel before operating it any
further.
• Mains lead must be changed only at the qualified service
shop.
On operation
• Do not drive the speaker system with a continuous wattage
exceeding the maximum input power of the system.
• If the polarity of the speaker connections are not correct,
the bass tones will be weak and the position of the various
instruments obscure.
• Before connecting, turn off the amplifier (subwoofer) to
avoid damaging the speaker system.
• The speaker grille cannot be removed. Do not attempt
to remove the grille on the speaker system. If you try to
remove it, you may damage the speaker.
• The volume level should not be turned up to the point of
distortion.
On placement
• Do not set the speakers in an inclined position.
• Do not place the speakers in locations that are:
— Extremely hot or cold
— Dusty or dirty
— Very humid
— Subject to vibrations
— Subject to direct sunlight
• Use caution when placing the speaker on a specially
treated (waxed, oiled, polished, etc.) floor, as staining or
discoloration may result.
On cleaning
Clean the speaker cabinets with a soft cloth lightly moistened
with a mild detergent solution or water. Do not use any type
of abrasive pad, scouring powder or solvent such as alcohol
or benzine.
Specifications
Front/Centre speakers
Speaker system Full range, Bass reflex,
Magnetically shielded
Speaker units 70 mm cone type
Rated impedance 4 ohms
Dimensions (approx.) 80 mm × 179 mm × 80 mm
(w/h/d)
Mass (approx.) 0.4 kg
Rear speakers
Speaker system Full range, Bass reflex
Speaker units 70 mm cone type
Rated impedance 4 ohms
Dimensions (approx.) 80 mm × 179 mm × 80 mm
(w/h/d)
Mass (approx.) 0.3 kg
Subwoofer
Speaker system Active subwoofer, Bass
reflex
Speaker units 130 mm cone type
Rated impedance 3.5 ohms
Dimensions (approx.) 157 mm × 277 mm × 282
mm (w/h/d)
Mass (approx.) 3.8 kg
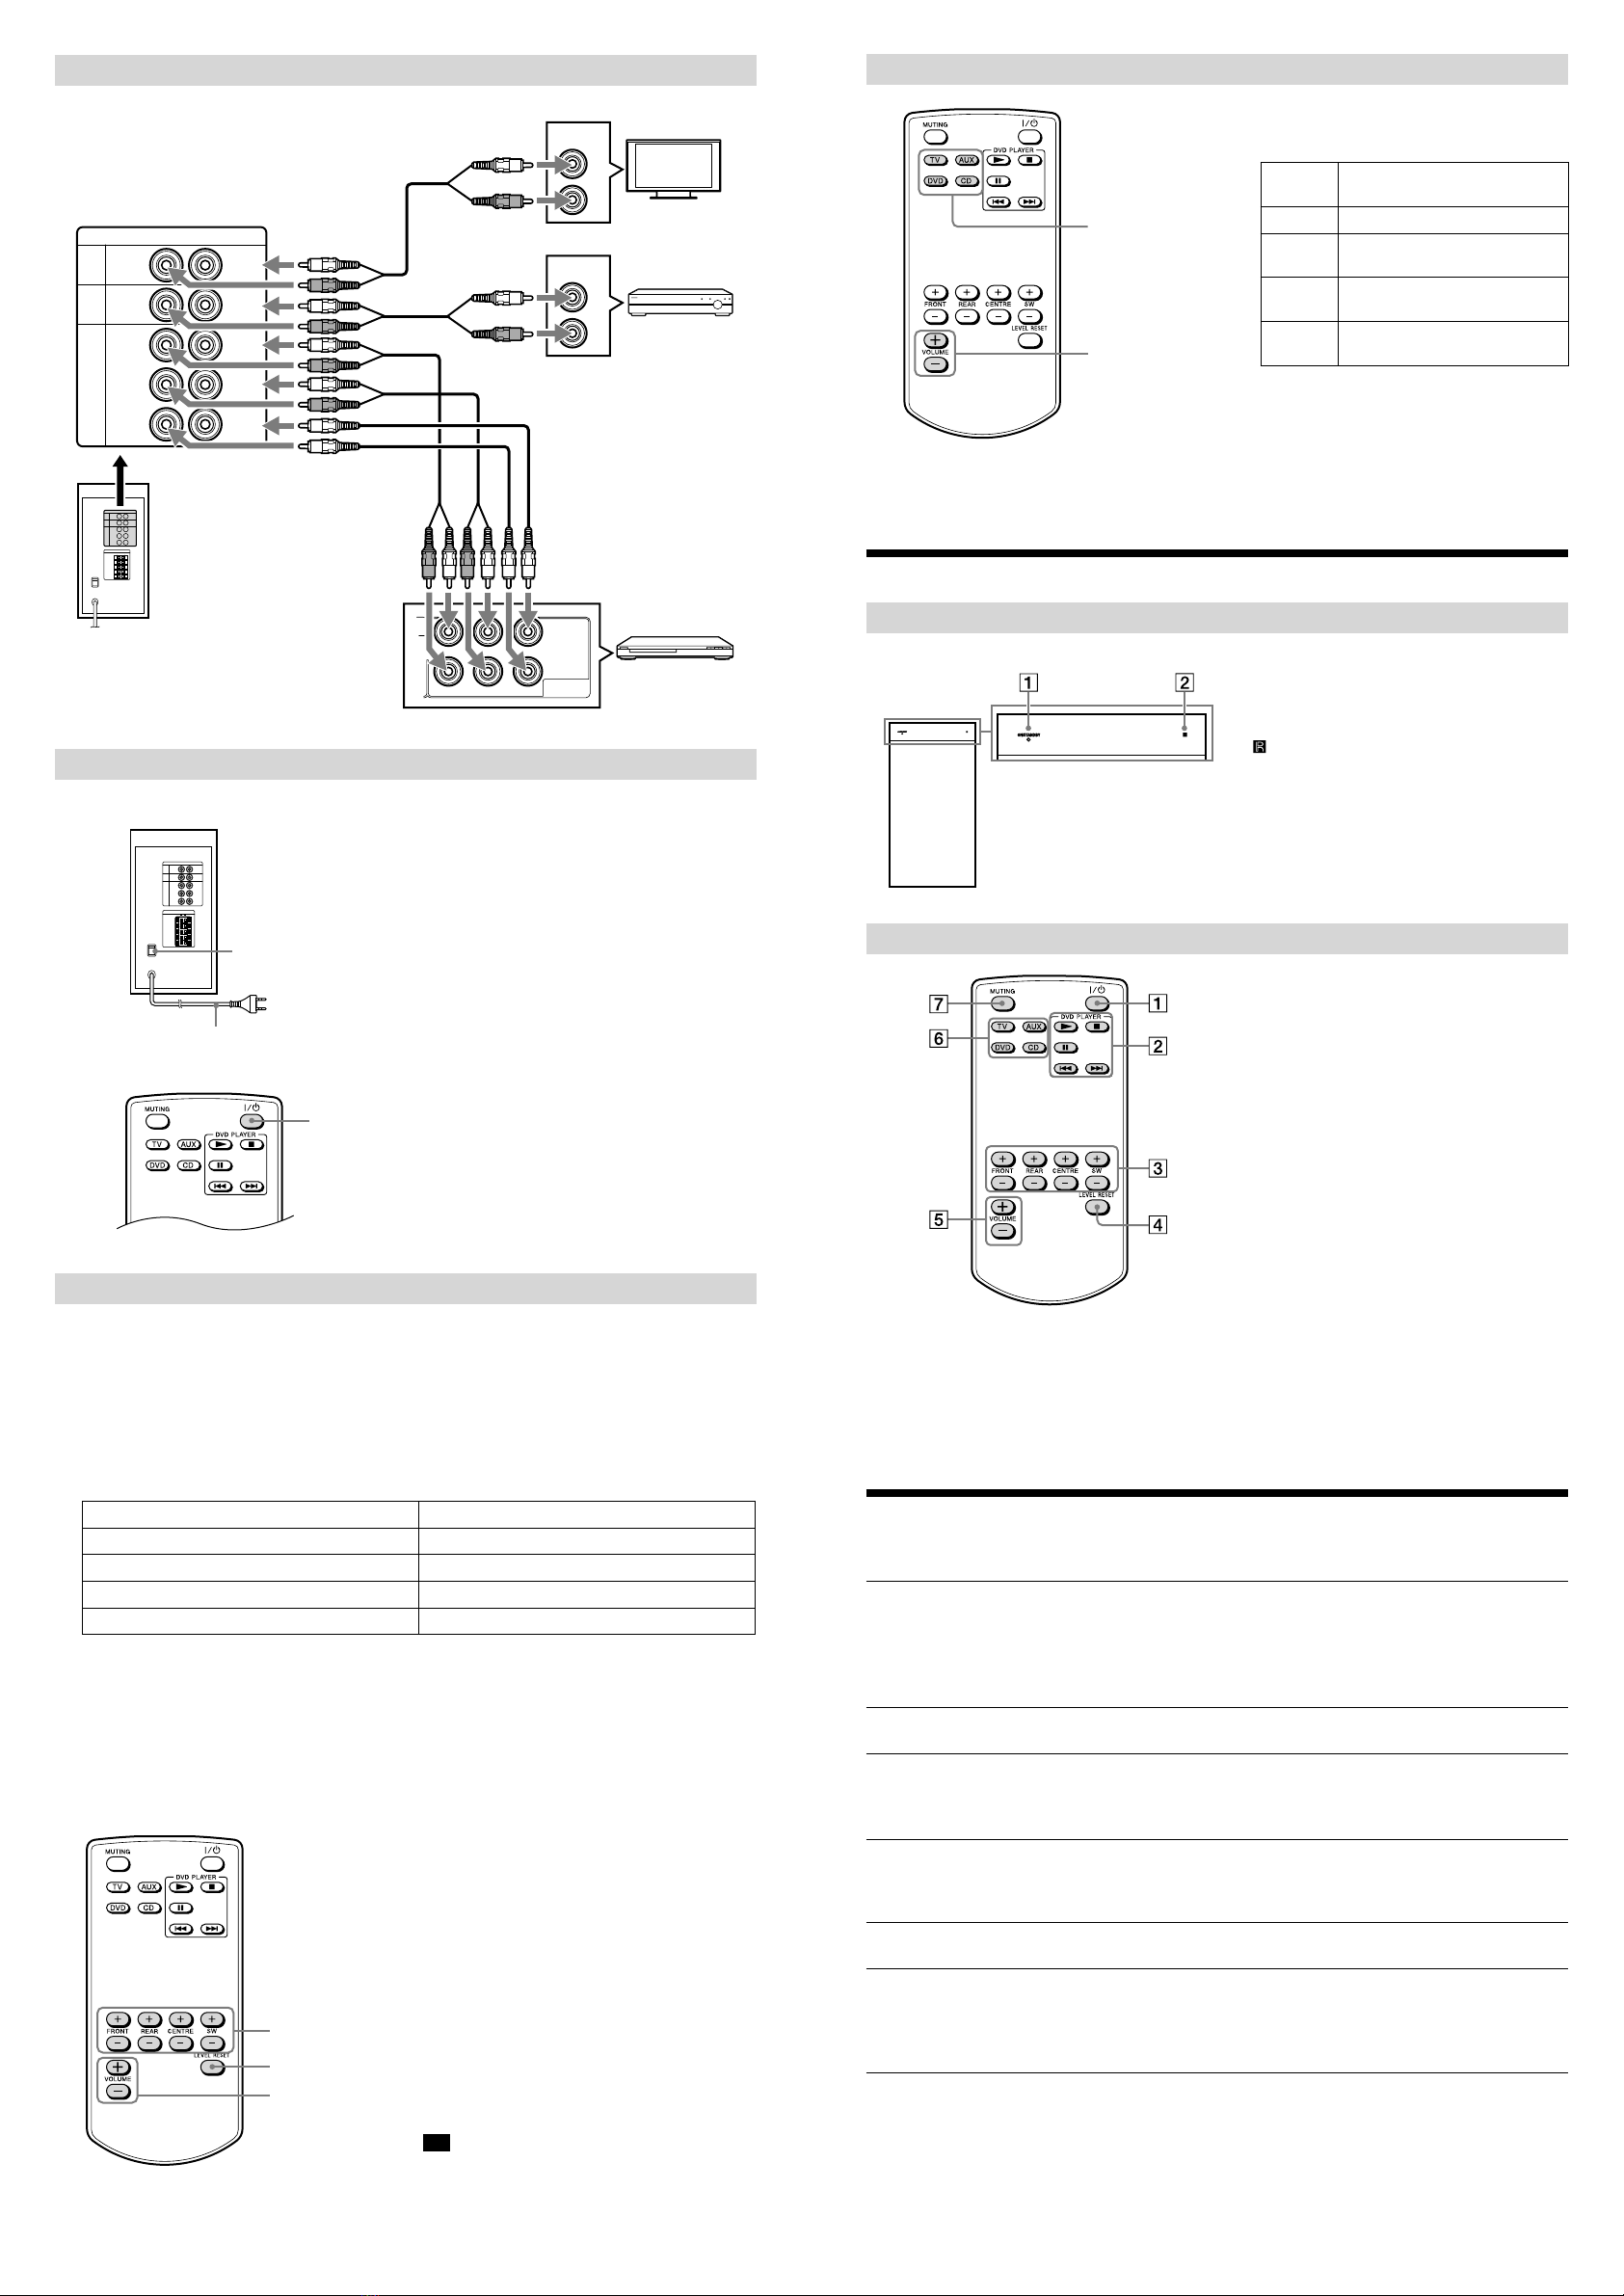
Input
DVD/CD: Pin Jack × 6 (5.1 ch) (FL/
FR for CD in)
TV: Pin Jack × 2 (L/R)
AUX: Pin Jack × 2 (L/R)
Power output
Front/Centre/Rear speakers
2.5 W × 5 ch (4 ohms,
1 kHz, THD 10 %)
Subwoofer 17.5 W (3.5 ohms, 100 Hz,
THD 10 %)
General
Power requirements 230 V AC, 50 Hz
Power consumptions 25 W
Design and specifications are subject to change
without notice.
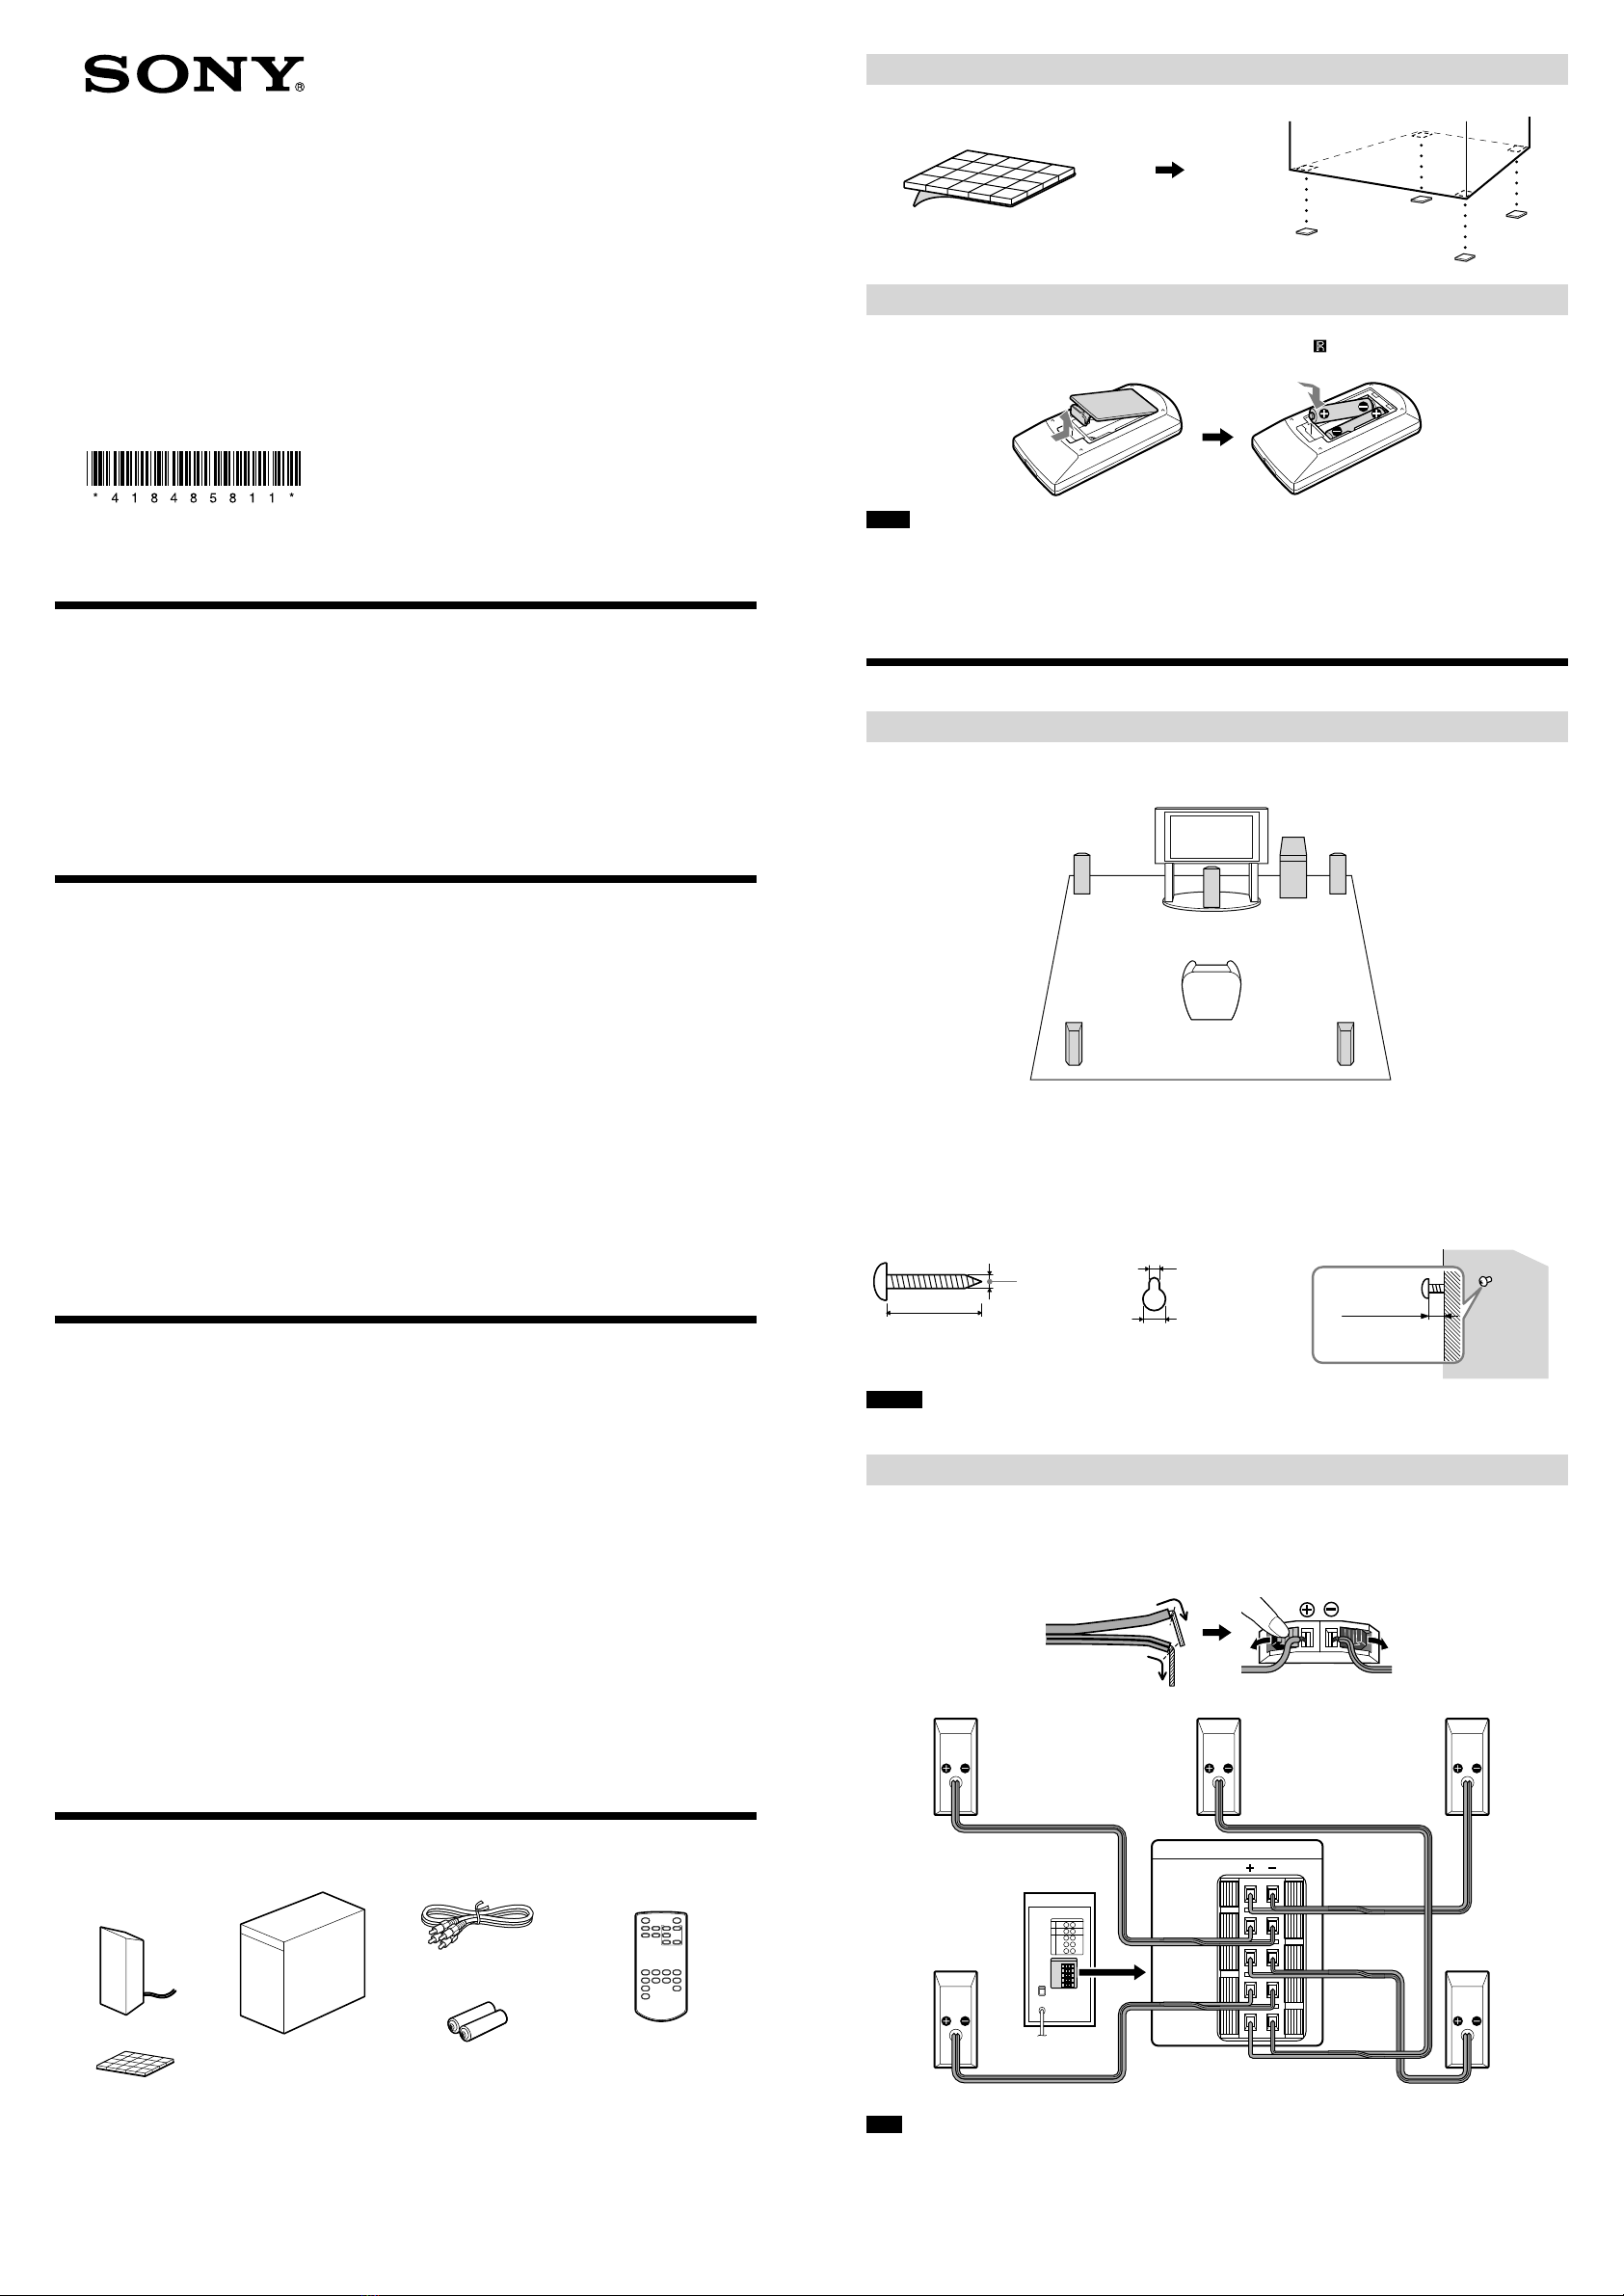
Unpacking
Front speakers (2)
Centre speaker (1)
Rear speakers (2)
Foot pads (1 set)
Subwoofer (1)
Audio cables (3)
R3 (size AAA) batteries
(2)
Remote commander
(remote) (1)
4-184-858-11(3)
Operating Instructions
5.1ch Active Speaker System
SA-ID5000
©2010 Sony Corporation Printed in Malaysia
Attaching the foot pads to the front/centre/rear speakers
Attach the foot pads (supplied) to the bottom of the speakers to stabilize the speakers and prevent it from slipping.
Remove the foot pads from
the protective cover.
Inserting the batteries into the remote
Insert two R3 (size AAA) batteries (supplied) by matching the and ends on the batteries to the marking
inside the compartment. To use the remote, point it at the remote sensor on the subwoofer.
Notes
• Do not leave the remote in an extremely hot or humid place.
• Do not use a new battery with an old one.
• Do not drop any foreign object into the remote casing, particularly when replacing the batteries.
• Do not expose the remote sensor to direct light from the sun or lighting apparatus. Doing so may cause a malfunction.
• If you do not intend to use the remote for an extended period of time, remove the batteries to avoid possible damage from
battery leakage and corrosion.
Set Up
Step 1: Positioning the speakers
For the best possible surround sound, place all speakers at the same distance from the listening position.
The subwoofer can be placed anywhere in the room.
Front
speaker (L)
Front
speaker (R)
Rear
speaker (R)
Rear
speaker (L)
Subwoofer
Centre
speaker
To Install the speakers on a wall
Prepare screws () (not supplied) that are suitable for the hole on the back of each speaker (). Then, fasten the
screws to the wall (). You can hang the speakers on the screws.
30 mm
4 mm
5 mm
10 mm
8 to 10 mm
Caution
• Sony is not responsible for accidents or damage caused by improper installation, insufficient wall strength or improper screw
installation, natural calamity, etc.
Step 2: Connecting the speakers
To connect the speaker cords
Be sure to match the speaker cords to the appropriate terminals on the subwoofer: the speaker cord with the black
line to , and the speaker cord without the black line to . Do not catch the speaker cord insulation (rubber
covering) in the speaker terminals.
Rear of the subwoofer
SPEAKER
FRONT L
FRONT R
REAR L
REAR R
CENTRE
Front
speaker (L)
Front
speaker (R)
Centre
speaker
Rear
speaker (R) Rear
speaker (L)
Subwoofer
Note
• When you connect another component with a volume control, turn down the volume of the other components to a level where
sound is not distorted.
(3)