Sony LBT-XB88KS User manual

©1998 by Sony Corporation
Operating Instructions
3-862-867-11(1)
Compact Hi-Fi
Stereo System
LBT-XB88KS

2
WARNING
To prevent fire or shock hazard, do not
expose the unit to rain or moisture.
To avoid electrical shock, do not open the cabinet.
Refer servicing to qualified personnel only.
Do not install the appliance in a confined space,
such as a bookcase or built-in cabinet.
Laser component in this product is capable of
emitting radiation exceeding the limit for Class 1.
This caution label is located inside the unit.
This appliance is classified as
a CLASS 1 LASER product.
The CLASS 1 LASER
PRODUCT MARKING is
located on the rear exterior.
This stereo system is equipped with the Dolby Pro
Logic Surround system* and the Dolby B-type noise
reduction system.
* Manufactured under license from Dolby
Laboratories Licensing Corporation.
DOLBY, the double-D symbol aand “PRO
LOGIC” are trademarks of Dolby Laboratories
Licensing Corporation.

3
ES
F
P
Table of Contents
Getting Started
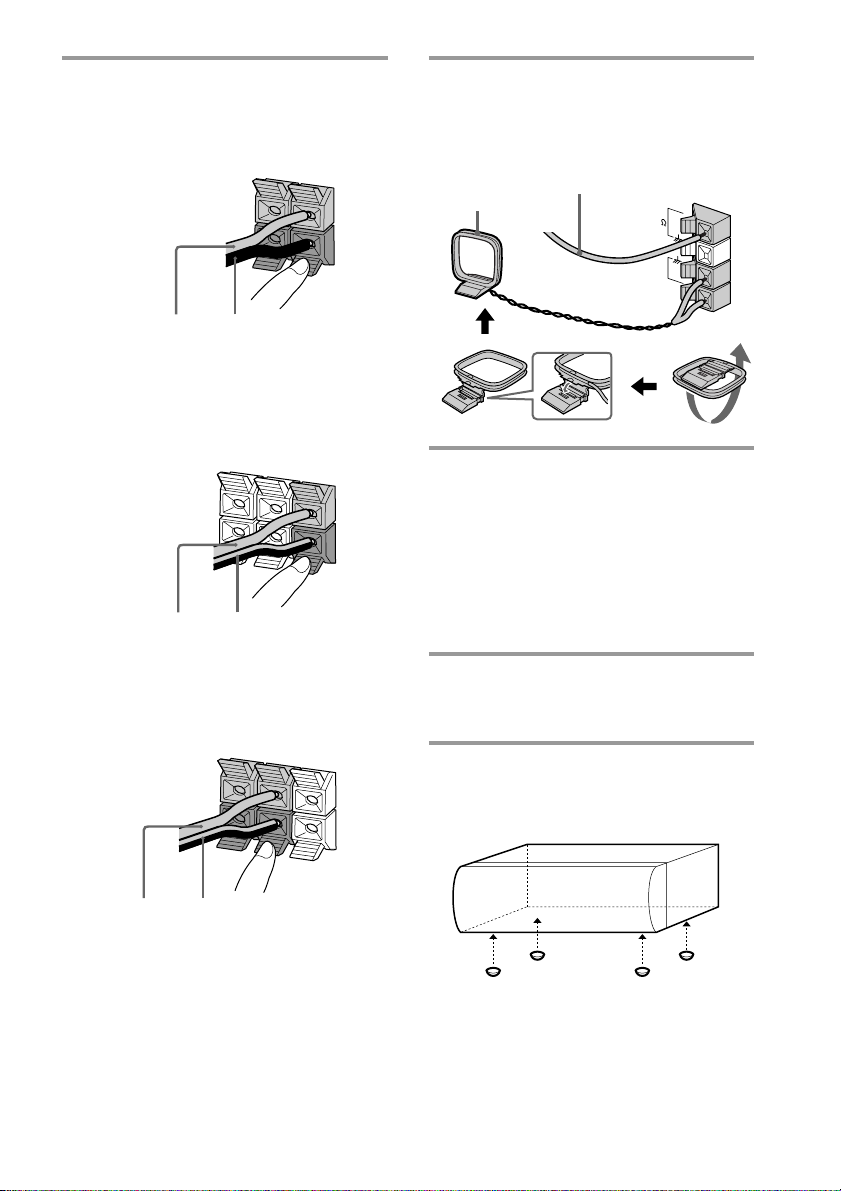
Step 1: Hooking up the system ............ 4
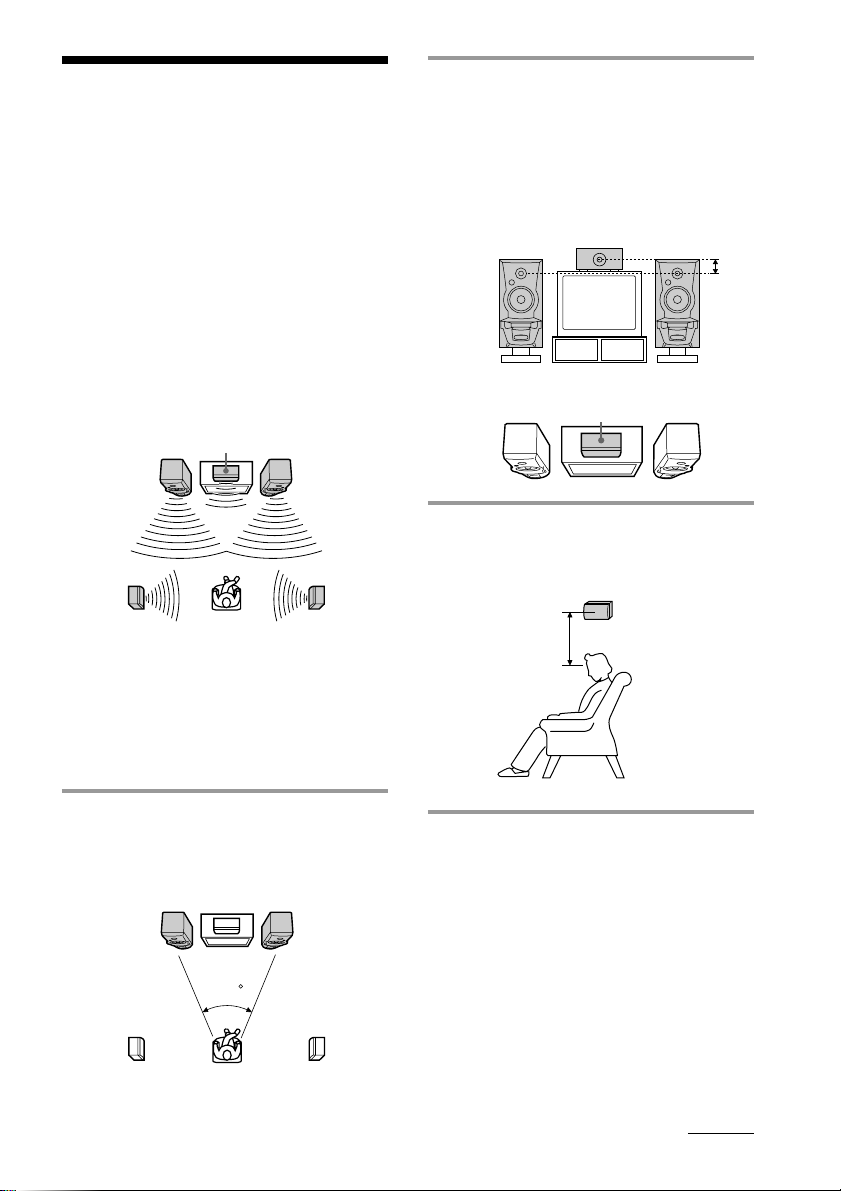
Step 2: Setting up the speakers ............ 7
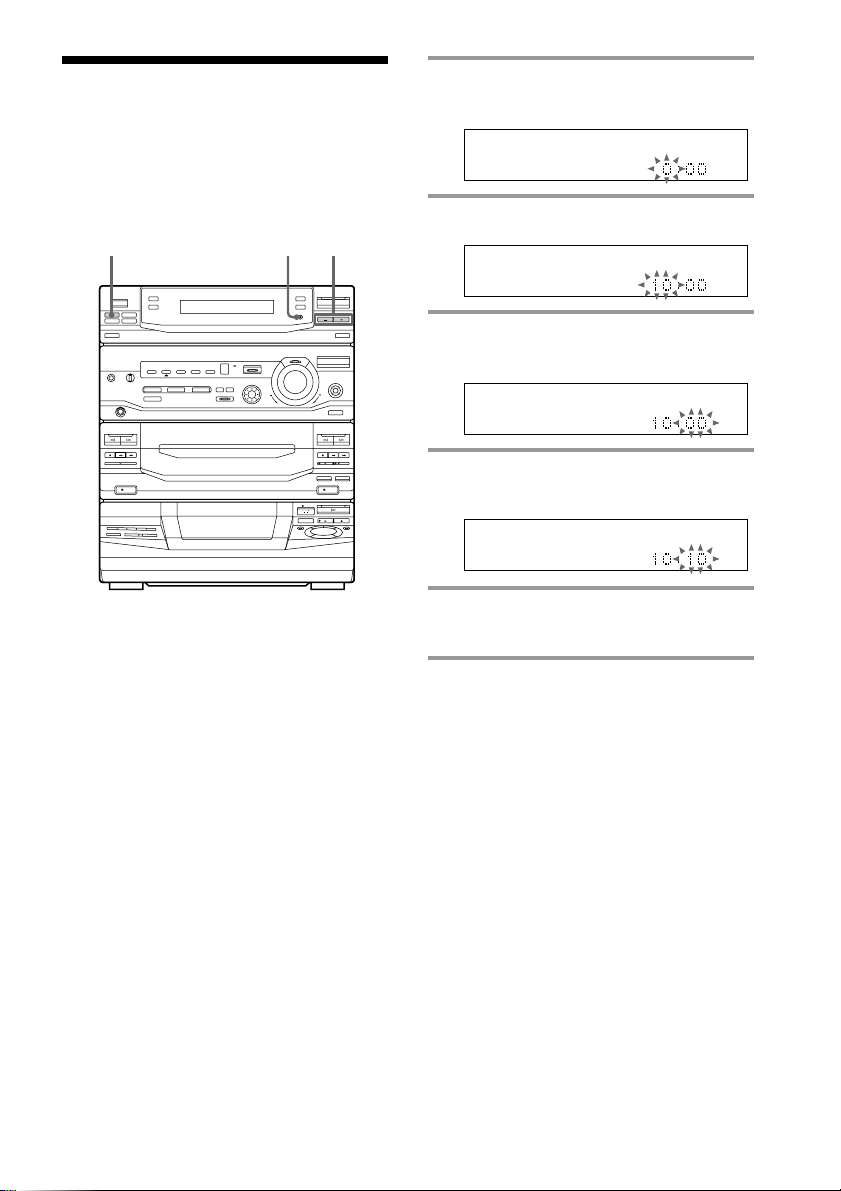
Step 3: Setting the time ......................... 9
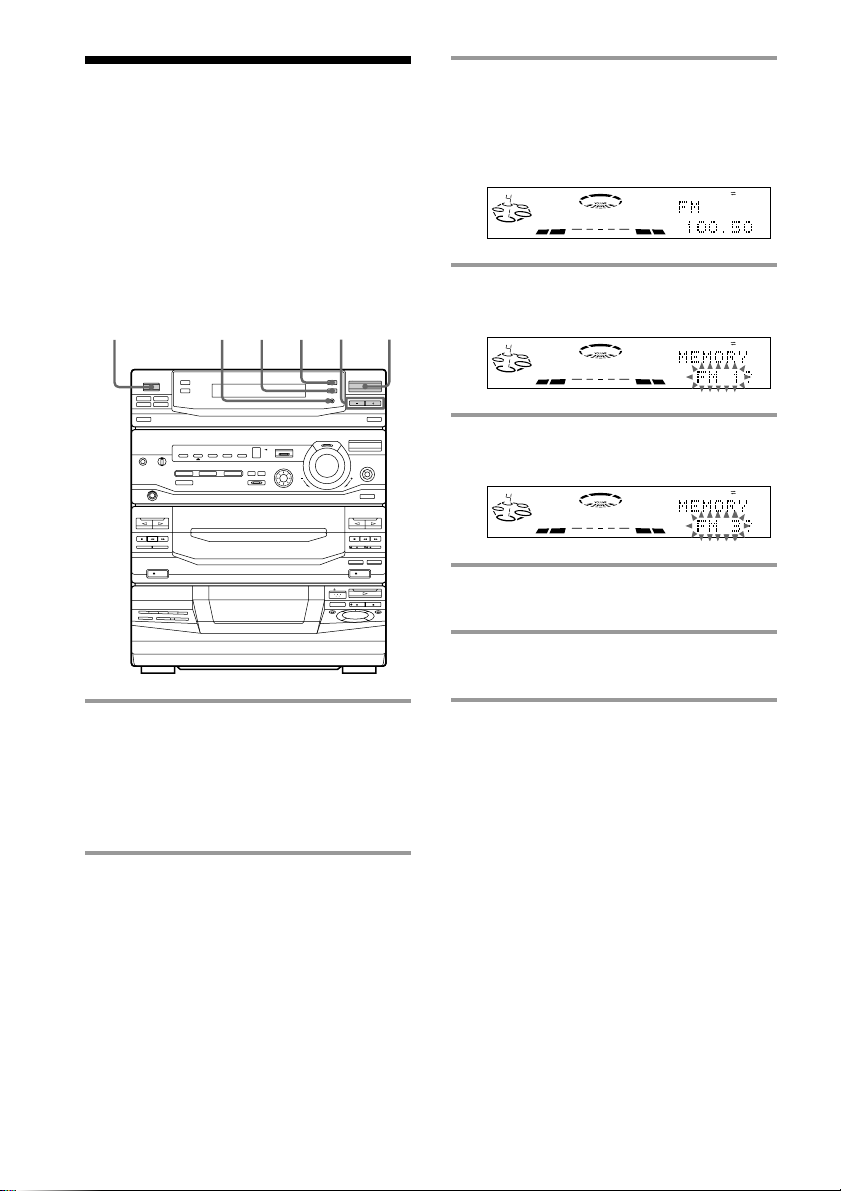
Step 4: Presetting radio stations ........ 10
Connecting optional AV
components .................................... 11
Basic Operations
Playing a CD ......................................... 14
Recording a CD .................................... 15
Listening to the radio ........................... 16
Recording from the radio .................... 18
Playing a tape........................................ 19
Recording from a tape ......................... 21
The CD Player
Using the CD display........................... 22
Playing CD tracks repeatedly ............. 22
Playing CD tracks in random
order ................................................ 23
Programming CD tracks ..................... 24
Playing CDs without interruption ..... 25
The Tape Deck
Recording on a tape manually ........... 26
Recording CDs by specifying the track
order ................................................ 27
DJ Effect
Looping part of a CD ........................... 29
Flashing part of a CD ........................... 29
Waving the equalizer ........................... 30
Sound Adjustment
Adjusting the sound ............................ 31
Selecting the audio emphasis ............. 32
Adjusting the audio emphasis............ 33
Making a personal audio emphasis file ....
35
Enjoying Dolby Pro Logic Surround
sound ............................................... 36
Other Features
Singing along: Karaoke ...................... 37
Falling asleep to music ........................ 39
Waking up to music ............................. 40
Timer-recording radio programs ....... 41
Additional Information
Precautions ............................................ 43
Troubleshooting ................................... 44
Specifications ........................................ 46
Index........................................ Back cover

4
Step 1: Hooking up the system
Getting Started
Follow steps 1through 4to hook up your system using the supplied cords and accessories.
Left front
speaker
Right front
speaker
AM loop antenna
FM antenna
Left rear speaker
Right rear speaker
Center speaker

5
1Connect the speakers.
1 Connecting the front speakers
Connect the speaker cords to FRONT
SPEAKER jacks of the same color.
2 Connecting the center speaker
Connect the speaker cords to the
SURROUND SPEAKER CENTER
jacks.
3 Connecting the rear speakers
Connect the speaker cords to the
SURROUND SPEAKER REAR jacks.
Notes
• Keep the speaker cords away from the antennas to
prevent noise.
• Insert only the stripped portion of the cord.
Inserting the vinyl portion will interfere with the
speaker connection and no sound will come from
the speaker.
2Connect the FM/AM antennas.
Set up the AM loop antenna, then
connect it.
3Connect the power cord to a wall
outlet.
The demonstration appears in the
display.
If the plug on this unit does not fit your
wall outlet, detach the supplied adapter
from the plug (except for North and
South American countries, Europe and
Australia).
4Deactivate the demonstration mode
by pressing DISPLAY/DEMO while
the system is off.
To attach the center speaker feet
Attach the four center speaker feet (supplied)
to the bottom corners of the center speaker.
Gray with black stripe (’)
Gray (‘)
Black (’)Red (‘)
Gray with black stripe (’)
Gray (‘)
+
_
L
R
+
_
L
R
CENTER
REAR
+
_
_
+
_
L
R
CENTER
REAR
+
AM loop antenna
Extend the FM wire
antenna horizontally.
FM75
AM

6
Inserting two size AA (R6)
batteries into the remote
Tips
• With normal use, the batteries should last for
about six months. When the remote no longer
operates the system, replace both batteries with
new ones.
• When you set the time, the demonstration is
deactivated.
To activate the demonstration again, press
DISPLAY/DEMO while the system is off.
Note
If you do not use the remote for a long period of
time, remove the batteries to avoid possible damage
from battery leakage.
When carrying this system
Do the following to protect the CD
mechanism.
1Press FUNCTION repeatedly until “CD”
appears in the display.
2Hold down PLAY MODE and press 1/u
(power) to turn off the system.

7
By connecting the supplied speakers, you can
enjoy Dolby Pro Logic Surround sound.
Dolby Pro Logic Surround is a decoding
system standardized in TV programs and
movies. Dolby Pro Logic Surround improves
the sound image by using four separate
channels. These channels manipulate the
sound to enhance the action as it happens on
the screen.
Since the center speaker cannot produce
enough bass, the bass sound of the center
channel is output from the front speakers.
Positioning the center
and rear speakers
Before you connect them, determine the best
location for your speakers.
1Place the front speakers at an angle
of 45 degrees from your listening
position.
continued
Step 2: Setting up
the speakers
2Place the center speaker so it is
placed at about the same height as
the front speakers (A). Align the
center speaker with the front
speakers or place it a little behind
the front speakers’ position (B).
A
B
3Place the rear speakers facing each
other at about 60 to 90 cm above
your listening position.
Front
speaker (L) Front
speaker (R)
Rear
speaker
(R)
Rear
speaker
(L)
Front
speaker
(L)
Front
speaker
(R)
Rear
speaker
(L)
Rear
speaker
(R)
Center speaker
Center speaker
Rear speaker
60 to 90 cm
Center speaker
45

8
1Press PRO LOGIC (or PRO LOGIC
ON/OFF on the remote).
The indicator on this button lights up.
2Press T. TONE ON/OFF on the
remote.
The test tone is heard from the speakers
in the following order. Adjust the
volume of the test tone.
nFront (left) nCenter
Rear NFront (right) N
3From your listening position, press
CENTER LEVEL +/– and REAR
LEVEL +/– on the remote to adjust
the volume levels.
The volume levels from each speaker
should be the same.
4Press T. TONE ON/OFF when you
are done adjusting.
The test tone is turned off.
Note
The test tone feature works only for Dolby Pro Logic
Surround sound.
Tip
If you turn VOLUME (or press VOLUME +/– on the
remote), all the speaker volumes change.
Step 2: Setting up the speakers
(continued)
Adjusting the speaker
volume
To enjoy Dolby Pro Logic Surround sound,
adjust the volume of each speaker using the
test tone that the system provides.
1
3
2,4
1VOLUME
VOLUME +/–
1/u
(Power)

9
Step 3: Setting the
time
1Press t/CLOCK SET.
The hour indication flashes.
2Press TUNING +/– to set the hour.
3Press ENTER/NEXT.
The minutes indication flashes.
4Press TUNING +/– to set the
minutes.
5Press ENTER/NEXT.
The clock starts.
Tip
If you make a mistake, start over from step 1.
You must set the time before using the timer
functions. The clock is on a 12-hour system.
3,51 2,4

10
Step 4: Presetting
radio stations
You can preset 20 stations for FM and 10
stations for AM.
The bands you can select depend on the kind
of tuner built into your system. Confirm the
bands by pressing TUNER/BAND
repeatedly.
DISCALL
DOLBY NR
OFF
AUTO
TUNED
STEREO
MHz
S
DISCALL
DOLBY NR
OFF
AUTO
TUNED
STEREO
S
DISCALL
DOLBY NR
OFF
AUTO
TUNED
STEREO
S
3Press TUNING +/–.
The frequency indication changes and
scanning stops when the system tunes in
a station. “TUNED” and “STEREO” (for
a stereo program) appear.
4Press TUNER MEMORY.
A preset number flashes in the display.
5Press TUNING +/– to select the
preset number you want.
6Press ENTER/NEXT.
The station is stored.
7Repeat steps 1 through 6 to store
other stations.
3,5 1246
1/u
(Power)
1Press TUNER/BAND repeatedly
until the band you want appears in
the display.
Each time you press this button, the
band changes as follows:
FM ˜AM
2Press TUNING MODE repeatedly
until “AUTO” appears in the
display.

11
To tune in a station with a weak
signal
Press TUNING MODE repeatedly until
“MANUAL” appears in step 2, then press
TUNING +/– to tune in the station.
To change the preset number
Start over from step 1.
To change the AM tuning interval
The AM tuning interval is factory-preset to 9
kHz (10 kHz in some areas). To change the
AM tuning interval to 10 kHz (or 9 kHz),
press TUNER/BAND repeatedly until “AM”
appears first, then turn off the system. While
holding down ENTER/NEXT, turn the
system back on. When you change the
interval, the AM preset stations will be
erased. To reset the interval, repeat the same
procedure.
Note
The preset stations are canceled when you
disconnect the power cord or if a power failure
occurs for half a day.
Connecting
optional AV
components
To the audio output of the TV/VCR
To enhance your system, you can connect
optional components. Refer to the
instructions included with each component
for details.
Connecting a TV/VCR
You can connect a TV and VCR to enjoy
Dolby Pro Logic Surround encoded videos
and TV programs.
Be sure to match the color of the plugs and
the connectors. To listen to the sound from
the connected TV/VCR, press FUNCTION
repeatedly until “VIDEO” appears.
continued

12
Connecting audio
components
Connecting a turntable
Be sure to match the color of the plugs and
the connectors. To listen to the sound from
the connected turntable, press FUNCTION
repeatedly until “PHONO” appears.
Note
Using the turntable at high volume may cause
distortion or howling. This is often caused by the
bass sound from the speakers. The bass sound may
be picked up by the needle of the turntable, and
produce the distortion or howling. To avoid this, do
the following:
1Keep some distance between the speakers and the
turntable.
2Stop using the surround effect.
3Install the speakers or the turntable on a firm and
stable surface.
4Press SUPER WOOFER repeatedly until the
indicator on this button goes off.
To the audio output of the turntable
Connecting optional AV
components (continued)
Connecting an MD deck for digital
recording
You can record a CD to an MD digitally by
connecting your MD deck using an optical
cable.
Connecting an MD deck for analog
recording
Be sure to match the color of the plugs and
the connectors. To listen to the sound of the
connected MD deck, press FUNCTION
repeatedly until “MD” appears.
Note
If you cannot select “MD” by pressing FUNCTION,
press 1/u(power) while pressing FUNCTION
when the power is turned off. “VIDEO” will be
switched to “MD.” To return to “VIDEO,” do the
same procedure.
To the digital input of the MD deck
To the audio outputs
of the MD deck To the audio inputs of
the MD deck

13
Connecting outdoor
antennas
Connect an outdoor antenna to improve the
reception.
FM antenna
Connect an optional FM outdoor antenna.
You can also use the TV antenna instead.
AM antenna
Connect a 6 to 15 meter insulated wire to the
AM antenna terminal. Leave the supplied
AM loop antenna connected.
Important
If you connect an outdoor antenna, connect a
ground wire to the yterminal with the screw
clamp. To prevent a gas explosion, do not
connect the ground wire to a gas pipe.
AM
FM75
Screw clamp
Ground wire (not supplied)
75-ohm coaxial cable
(not supplied)
Insulated wire (not supplied)
Screw clamp
Ground wire (not supplied)
FM75
AM

14
Playing a CD
— Normal Play
Basic Operations
You can play up to five CDs in a row.
1Press 6OPEN and place a CD on
the disc tray.
If the disc is not placed properly it will
not be recognized.
2Press DISC SKIP to place up to four
more CDs on the tray.
The disc tray rotates so you can insert
other CDs.
3Close the front cover.
4Press one of the DIRECT PLAY
buttons.
Playback starts.
If you press ·(or CD ·on the
remote), playback starts from the CD in
the playing position.
ª
ª
6
Pr
0)
6
ª
Pp
ª
ª
p
6
0)p
)
0
With the label
side up.
When you play
a CD single,
place it on the
inner circle of
the tray.
Disc number in the playing position
Track number
Elapsed time
DISCALL
DOLBY NR
OFF
S
1234 pP
)
0
1/ALL DISCS
·VOLUME
Jog dial
AMS =/+
p
0/)
D.SKIP
VOLUME +/–
CD ·
P
1
/
A
L
L
D
I
S
C
S
P
L
A
Y
M
O
D
E
R
E
P
E
R
T
E
D
I
T
A
M
S
1/u
(Power)

15
Basic Operations
To
Stop playback
Pause
Select a track
Find a point in
a track
Select a CD
Play only the
CD you have
selected
Play all CDs
Remove or
change the
CDs
Adjust the
volume
* AMS: Automatic Music Sensor.
Tips
• Pressing ·while the system is off automatically
turns on the system and starts CD playback if
there is a CD on the tray (One Touch Play).
• You can switch from another source to the CD
player and start playing a CD just by pressing ·
or one of the DIRECT PLAY buttons (Automatic
Source Selection).
• If there is no CD in the player, “NO DISC”
appears in the display.
• You can change the CD in the loading position
during playback.
Do this
Press p.
Press P. Press again to resume
playback.
During playback or pause, turn
the jog dial clockwise (to go
forward) or counterclockwise (to
go backward) and release it when
you reach the desired track.
Or press AMS* +(to go
forward) or AMS* =(to go
backward) on the remote.
Press and hold )or 0during
playback, and release at the
desired point.
Press one of the DIRECT PLAY
buttons.
Or press DISC SKIP (or press
D.SKIP on the remote).
Press 1/ALL DISCS repeatedly
until “1 DISC” appears.
Press 1/ALL DISCS repeatedly
until “ALL DISCS” appears.
Press 6OPEN.
Turn VOLUME (or press
VOLUME +/– on the remote).
Recording a CD
— CD Synchro Recording
This function lets you record from a CD to a
tape easily. You can use TYPE I (normal) or
TYPE II (CrO2) tapes. The recording level is
adjusted automatically.
1Press 6EJECT and insert a blank
tape into deck B.
2Press 6OPEN and place a CD.
ª
ª
6
Pr
0)
6
ª
Pp
ª
ª
p
6
0)p
)
0
With the label
side up.
When you play
a CD single,
place it on the
inner circle of
the tray.
With the side you want to
record on facing forward
ª
ª
6
Pr
0)
6
ª
ª
p0)p
12
5
6
7
3
p
DSP
DOLBY NR p
ª
4
continued
1/u
(Power)

16
Listening to the
radio
— Preset Tuning
Before using this function, preset radio
stations in the tuner’s memory (see “Step
4: Presetting radio stations”).
Recording a CD (continued)
123
STEREO/MONO
VOLUME
TUNING +/–
TUNER/BAND
VOLUME +/–
3Close the front cover.
4Press DISC SKIP repeatedly until
the disc number you want to record
appears in the playing position
indicator.
5Press CD SYNC.
Deck B stands by for recording and the
CD player stands by for playback, and
the indicator on the ·button (for the
front side) lights up green.
6Press DIRECTION repeatedly to
select Ato record on one side or
ß(or RELAY) to record on both
sides.
7Press Pon deck B.
Recording starts.
To stop recording
Press pon deck B or on the CD player.
Tips
• If you want to record on the reverse side, press ª
so the indicator on the ªbutton (for the reverse
side) lights up green.
• When you record on both sides, be sure to start
from the front side. If you start from the reverse
side, recording stops at the end of the reverse side.
• When you want to reduce the hiss noise in low-
level high-frequency signals, press DOLBY NR
before step 7 so “DOLBY NR B” appears in the
display.
• To record with the surround effect, press DSP (or
DSP MODE on the remote) so “SUR ”
appears in the display.
The equalizer settings will not be recorded.
Note
You cannot listen to other sources while recording.
1/u
(Power)

17
Basic Operations
n
1Press TUNER/BAND repeatedly
until the band you want appears in
the display.
Each time you press this button, the
band changes as follows:
FM ˜AM
2Press TUNING MODE repeatedly
until “PRESET” appears in the
display.
MANUAL nAUTO nPRESET
3Press TUNING +/– to tune in the
desired preset station.
To Do this
Turn off the radio Press 1/u(power).
Adjust the volume Turn VOLUME (or press
VOLUME +/– on the
remote).
To listen to non-preset radio
stations
Press TUNING MODE repeatedly in step 2
until “MANUAL” appears, then press
TUNING +/– to tune in the desired station.
Tips
• Pressing TUNER/BAND while the system is off
automatically turns on the system and tunes to the
last received station (One Touch Play).
• You can switch from another source to the radio
just by pressing TUNER/BAND (Automatic
Source Selection).
• If an FM program is noisy, press STEREO/
MONO so “MONO” appears in the display. There
will be no stereo effect, but the reception will
improve. Press this button again to restore the
stereo effect.
• To improve broadcast reception, move the
supplied antennas.
Preset number
Frequency
DISCALL
DOLBY NR
OFF
PRESET
TUNED
STEREO
MHz
S

18
Recording from the
radio
1Press TUNER/BAND repeatedly
until the band you want appears in
the display.
2Press TUNING MODE repeatedly
until “PRESET” appears in the
display.
3Press TUNING +/– to tune in a
preset station.
4Press 6EJECT and insert a blank
tape into deck B.
5Press rREC.
Deck B stands by for recording, and the
indicator on the ·button (for the front
side) lights up green.
6Press DIRECTION repeatedly to
select Ato record on one side or
ß(or RELAY) to record on both
sides.
7Press Pon deck B.
Recording starts.
To stop recording
Press pon deck B.
You can record a radio program on a tape by
tuning in a preset station. You can use TYPE I
(normal) or TYPE II (CrO2) tapes. The
recording level is automatically adjusted.
With the side you want to
record on facing forward
ª
ª
6
Pr
0)
6
ª
ª
p0)p
Preset number
Frequency
DISCALL
DOLBY NR
OFF
PRESET
TUNED
STEREO
MHz
S
4576
123
DSP
DOLBY NR pª
1/u
(Power)

19
Basic Operations
Tips
•
If you want to record on the reverse side, press ª
so the indicator on the ªbutton (for the reverse
side) lights up green after pressing rREC in step 5.
• When you record on both sides, be sure to start
from the front side. If you start from the reverse
side, recording stops at the end of the reverse side.
• To record non-preset stations, select “MANUAL”
in step 2, then press TUNING +/– to tune in the
desired station.
• When you want to reduce the hiss noise in low-
level high-frequency signals, press DOLBY NR
before step 7 so “DOLBY NR B” appears in the
display.
• To record with surround effect, press DSP (or DSP
MODE on the remote) so “SUR ” appears
in the display.
The equalizer settings will not be recorded.
• If noise is heard while recording from the radio,
move the appropriate antenna to reduce the noise.
Playing a tape
You can play any type of tape, TYPE I
(normal), TYPE II (CrO2) or TYPE IV (metal).
The deck automatically detects the tape type.
To select either deck A or B, press DECK A
ª· or DECK B ª· on the remote.
continued
112
33
pP
0/
)
p
VOLUME
DOLBY NR
0/
)
p
0/)
P
DECK A ª·
DECK B ª·
VOLUME +/–
1/u
(Power)

20
Tips
• Pressing ·or ªwhile the system is off
automatically turns on the system and starts tape
playback if there is a tape in the deck (One Touch
Play).
• You can switch from another source to the tape
deck just by pressing ·or ª(Automatic Source
Selection).
• When you want to reduce the hiss noise in low-
level high-frequency signals, press DOLBY NR so
“DOLBY NR B” appears in the display.
1Press 6EJECT and insert a
recorded tape in deck A or B.
2Press DIRECTION repeatedly to
select Ato play one side, ß* to
play both sides, or RELAY (Relay
Play)** to play both decks in
succession.
3Press ·.
Press ªto play the reverse side. The
tape starts playing.
* The deck stops automatically after playing
both sides five times.
** Relay Play always plays according to the
following sequence:
Deck A (front side), Deck A (reverse side),
Deck B (front side), Deck B (reverse side).
To Do this
Stop play Press p.
Pause (Deck B only) Press P. Press again to
resume play.
Fast-forward Press )while playing
the front side or 0while
playing the reverse side.
Rewind Press 0while playing
the front side or )while
playing the reverse side.
Remove the cassette Press 6EJECT.
Adjust the volume Turn VOLUME (or press
VOLUME +/– on the
remote).
Playing a tape (continued)
With the side you want
to play facing forward
ª
ª
6
Pr
0)
6
ª
ª
p0)p
Table of contents
Other Sony Stereo System manuals

Sony
Sony MHC-DP1000D User manual

Sony
Sony R-D-S EON MHC-2900 User manual

Sony
Sony LBT-D170 User manual

Sony
Sony FST-SH2000 User manual

Sony
Sony HCD-XGR66 User manual

Sony
Sony CMT-EX5 - Micro Hi Fi Component System User manual

Sony
Sony LBT-G2000 User manual

Sony
Sony MHC-ECL99BT User manual

Sony
Sony MHC-EC619iP User manual

Sony
Sony MHC-V73D Reference guide

Sony
Sony MHC-GT660 User manual

Sony
Sony SRS-X55 User manual

Sony
Sony MHC-EC50 User manual

Sony
Sony ICF-C11IP/BLK User manual

Sony
Sony MHC-V808 User manual

Sony
Sony HCD-RG222 User manual

Sony
Sony HCD-RG221 User manual

Sony
Sony MEX-BT2500 Product guide

Sony
Sony MHC-C70 User manual

Sony
Sony MHC-EC78Pi - Mini Hi-fi Component System User manual