– 9 – – 10 –
SECTION 4
EXPLEDED VIEW
• Items marked “*” are not stocked since they
are seldom required for routine service. Some
delayshouldbeanticipatedwhenorderingthese
items.
• The mechanical parts with no reference num-
ber in the exploded views are not supplied.
NOTE:
• -XX and -X mean standardized parts, so they
may have some difference from the original
one.
• Color Indication of Appearance Parts
Example:
KNOB, BALANCE (WHITE) . . . (RED)
↑↑
Parts Color Cabinet's Color
Ref. No. Part No. Description Remark Ref. No. Part No. Description Remark
SECTION 5
ELECTRICAL PARTS LIST
Ref. No. Part No. Description Remark
NOTE:
• Due to standardization, replacements in the
parts list may be different from the parts speci-
fied in the diagrams or the components used
on the set.
• -XX and -X mean standardized parts, so they
may have some difference from the original
one.
• RESISTORS
All resistors are in ohms.
METAL: Metal-film resistor.
METAL OXIDE: Metal oxide-film resistor.
F: nonflammable
• Items marked “*” are not stocked since they
are seldom required for routine service.
Some delay should be anticipated when order-
ing these items.
• SEMICONDUCTORS
In each case, u: µ, for example:
uA. . : µA. . uPA. . : µPA. .
uPB. . : µPB. . uPC. . : µPC. .
uPD. . : µPD. .
• CAPACITORS
uF: µF
• COILS
Ref. No. Part No. Description Remark
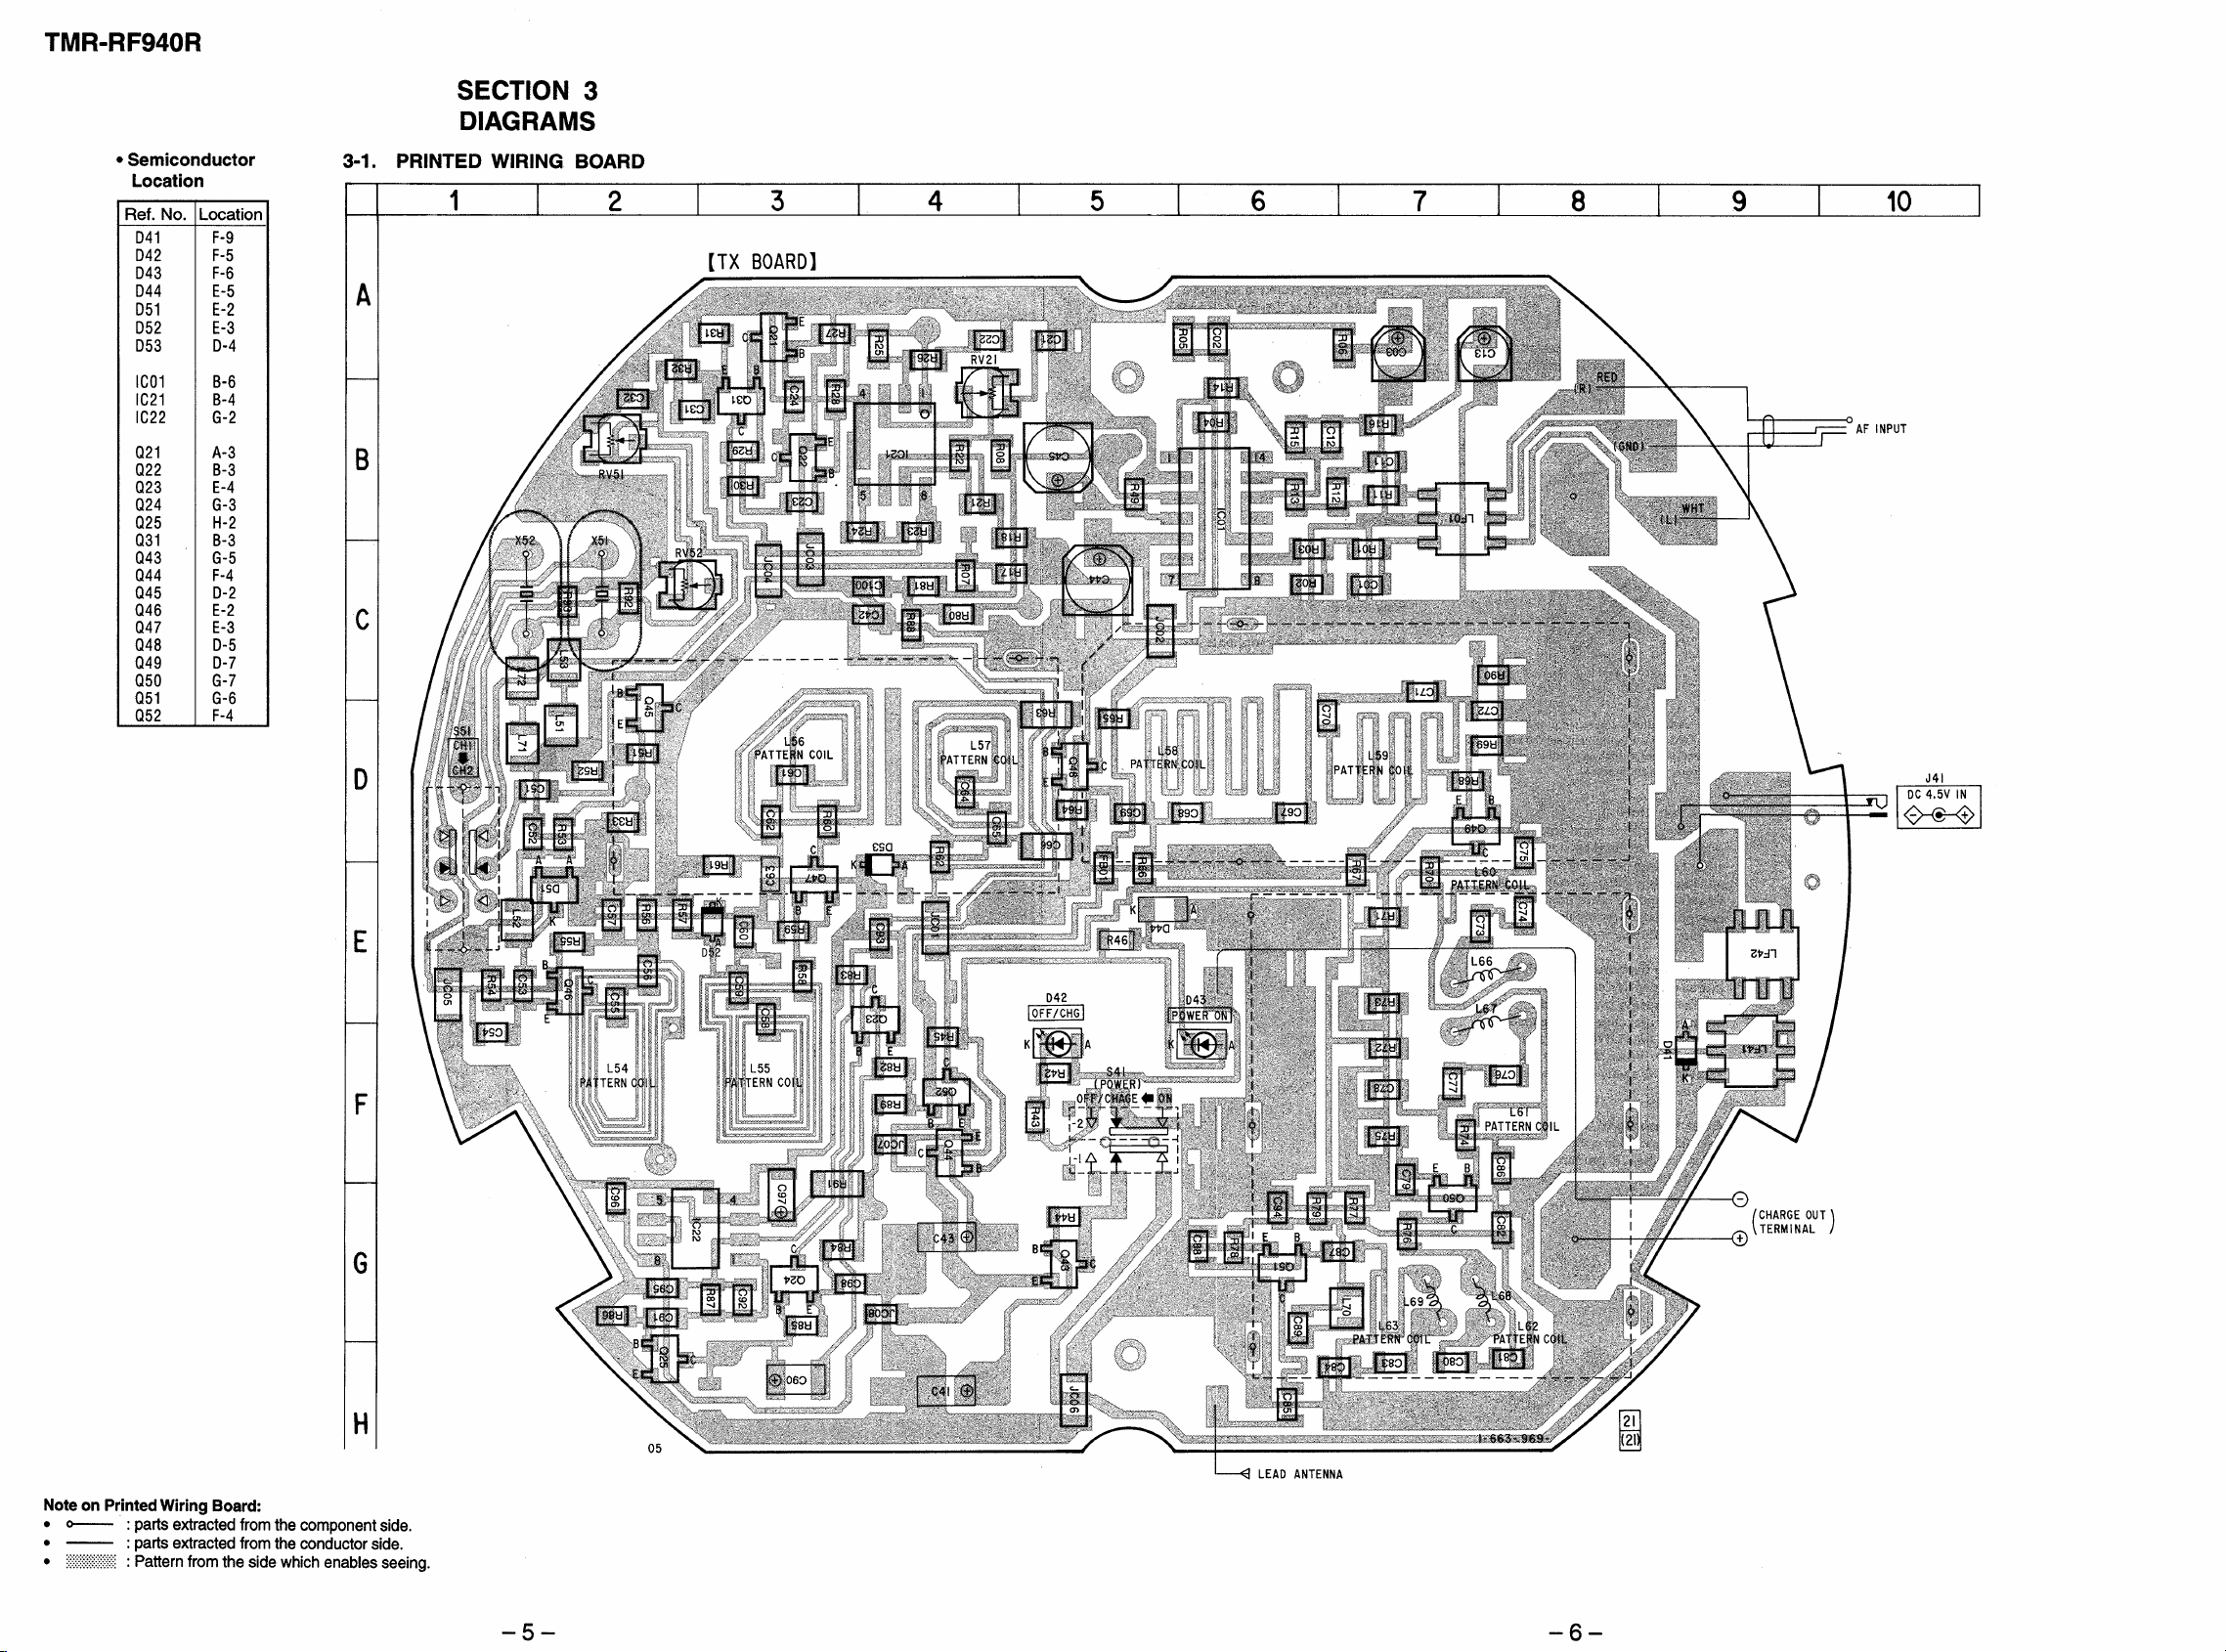
TX
When indicating parts by reference
number, please include the board.
1 3-895-784-01 SPRING
2 4-957-332-01 CABINET (LOWER)
*3 A-4542-442-A TX BOARD, COMPLETE
4 X-4948-054-1 CABINET (UPPER) ASSY
5 1-559-892-11 CORD (WITH PLUG)
6 4-958-633-01 CUSHION (BATTERY CASE LID)
7 4-957-333-01 LID, BATTERY CASE
8 7-685-135-19 SCREW +P 2.6X10 TYPE2 NON-SLIT
9 4-987-337-01 LABEL (CHG), WARNING
10 4-989-335-01 TERMINAL, CHARGE
11 4-986-508-01 COVER (BATTERY CASE)
12 4-989-336-01 TERMINAL (COMMONNESS), CHARGE
13 3-846-312-01 SPACER
14 3-561-902-01 CLOTH, RETAINING, CASSETTE
15 3-880-474-01 CUSHION, 15X5X0.3
4
3
15
14
15
2
18
10
11
12
not supplied
7
9
6
5
13
not supplied
not supplied
*A-4542-442-A TX BOARD, COMPLETE
*******************
< CAPACITOR >
C01 1-163-141-00 CERAMIC CHIP 0.001uF 5% 50V
C02 1-163-037-11 CERAMIC CHIP 0.022uF 10% 25V
C03 1-128-007-11 ELECT CHIP 2.2uF 20% 35V
C11 1-163-141-00 CERAMIC CHIP 0.001uF 5% 50V
C12 1-163-037-11 CERAMIC CHIP 0.022uF 10% 25V
C13 1-128-007-11 ELECT CHIP 2.2uF 20% 35V
C21 1-107-823-11 CERAMIC CHIP 0.47uF 10% 16V
C22 1-164-489-11 CERAMIC CHIP 0.22uF 10% 16V
C23 1-163-131-00 CERAMIC CHIP 390PF 5% 50V
C24 1-163-131-00 CERAMIC CHIP 390PF 5% 50V
C31 1-163-135-00 CERAMIC CHIP 560PF 5% 50V
C32 1-163-141-00 CERAMIC CHIP 0.001uF 5% 50V
C41 1-128-393-11 ELECT CHIP 100uF 20% 10V
C42 1-164-222-11 CERAMIC CHIP 0.22uF 25V
C43 1-126-246-11 ELECT CHIP 220uF 20% 4V
C44 1-126-205-11 ELECT CHIP 47uF 20% 6.3V
C45 1-126-205-11 ELECT CHIP 47uF 20% 6.3V
C51 1-164-489-11 CERAMIC CHIP 0.22uF 10% 16V
C52 1-164-695-11 CERAMIC CHIP 0.0022uF 5% 50V
C53 1-163-141-00 CERAMIC CHIP 0.001uF 5% 50V
C54 1-163-251-11 CERAMIC CHIP 100PF 5% 50V
C55 1-163-116-00 CERAMIC CHIP 91PF 5% 50V
C56 1-163-251-11 CERAMIC CHIP 100PF 5% 50V
C57 1-164-232-11 CERAMIC CHIP 0.01uF 50V
C58 1-163-116-00 CERAMIC CHIP 91PF 5% 50V
C59 1-163-251-11 CERAMIC CHIP 100PF 5% 50V
C60 1-164-232-11 CERAMIC CHIP 0.01uF 50V
C61 1-163-241-11 CERAMIC CHIP 39PF 5% 50V
C62 1-163-243-11 CERAMIC CHIP 47PF 5% 50V
C63 1-164-232-11 CERAMIC CHIP 0.01uF 50V
C64 1-163-112-00 CERAMIC CHIP 62PF 5% 50V
C65 1-163-108-00 CERAMIC CHIP 43PF 5% 50V
C66 1-163-059-91 CERAMIC CHIP 0.01uF 10% 50V
C67 1-163-089-00 CERAMIC CHIP 6PF 50V
C68 1-163-088-00 CERAMIC CHIP 5PF 50V
C69 1-164-232-11 CERAMIC CHIP 0.01uF 50V
C70 1-163-094-00 CERAMIC CHIP 11PF 5% 50V
C71 1-163-096-00 CERAMIC CHIP 13PF 5% 50V
C72 1-164-232-11 CERAMIC CHIP 0.01uF 50V
C73 1-163-092-00 CERAMIC CHIP 9PF 0.25PF 50V
C74 1-163-091-00 CERAMIC CHIP 8PF 50V
C75 1-164-232-11 CERAMIC CHIP 0.01uF 50V
C76 1-163-091-00 CERAMIC CHIP 8PF 50V
C77 1-163-227-11 CERAMIC CHIP 10PF 0.5PF 50V
C78 1-164-232-11 CERAMIC CHIP 0.01uF 50V
C79 1-164-232-11 CERAMIC CHIP 0.01uF 50V
C80 1-163-094-00 CERAMIC CHIP 11PF 5% 50V
C81 1-163-227-11 CERAMIC CHIP 10PF 0.5PF 50V
C82 1-164-232-11 CERAMIC CHIP 0.01uF 50V
C83 1-163-091-00 CERAMIC CHIP 8PF 50V
C84 1-163-090-00 CERAMIC CHIP 7PF 50V
C85 1-163-229-11 CERAMIC CHIP 12PF 5% 50V
C86 1-164-232-11 CERAMIC CHIP 0.01uF 50V
C87 1-163-229-11 CERAMIC CHIP 12PF 5% 50V
C88 1-163-083-00 CERAMIC CHIP 1PF 50V
C89 1-163-087-00 CERAMIC CHIP 4PF 50V
C90 1-104-908-11 TANTALUM CHIP 47uF 20% 4V
C91 1-163-038-91 CERAMIC CHIP 0.1uF 25V
C92 1-163-113-00 CERAMIC CHIP 68PF 5% 50V
C93 1-163-038-91 CERAMIC CHIP 0.1uF 25V
C94 1-164-232-11 CERAMIC CHIP 0.01uF 50V
C95 1-163-037-11 CERAMIC CHIP 0.022uF 10% 25V
C96 1-164-232-11 CERAMIC CHIP 0.01uF 50V
C97 1-135-158-21 TANTALUM CHIP 15uF 20% 4V
C98 1-163-141-00 CERAMIC CHIP 0.001uF 5% 50V
C100 1-107-725-11 CERAMIC CHIP 0.1uF 10% 16V
< DIODE >
D41 8-719-404-49 DIODE MA111
D42 8-719-975-06 LED CL-70G-CD (OFF/CHG)
D43 8-719-018-51 LED CL-170R-CD (POWER ON)
D44 8-719-045-99 DIODE RD2.2M-T1B
D51 8-719-939-02 DIODE SVC203CP
D52 8-719-421-40 DIODE MA77
D53 8-719-421-40 DIODE MA77
< FERRITE BEAD >
FB01 1-500-419-21 INDUCTOR, FERRITE BEAD
< IC >
IC01 8-759-998-71 IC BA3308F
IC21 8-759-701-39 IC NJM3404AM
IC22 8-759-177-69 IC TLV2362ID-ELL2500